RADIKAL TECHNOLOGIES SAC-2K User manual

1
SAC 2K/2.2 Manual for
Logic Audio Platinum

2
SAC-2K/SAC-2.2 in LGC (Logic Control) operating mode

3
System
Dump

4
Copyright2002RadikalTechnologies,Inc.
Thismanualcannotbereproduced,inwholeorin part, without the express writtenpermissionfrom Radikal Technologies,
Inc. All company names and trademarks mentioned in this manual are the property of their respective owners.

5
Attention!!
If a Logic Audio presents you with a dialog box when it recognizes the SAC-2K/2.2, suggesting you
update the firmware, press [Cancel].
Table of Content
InstallationandSetup................................................................................................................................................ 6
Relativecontrol resolution ................................................................................................................. 7
Usemultiplecontrolsper parameter .................................................................................................. 7
Showlong names whileediting:.......................................................................................................... 7
MaximumMIDIbandwith(%). ........................................................................................................... 8
Buttonassignement inLogicControlmode ............................................................................................................. 8
Jog WheelButtons ............................................................................................................................. 8
TransportField.................................................................................................................................... 8
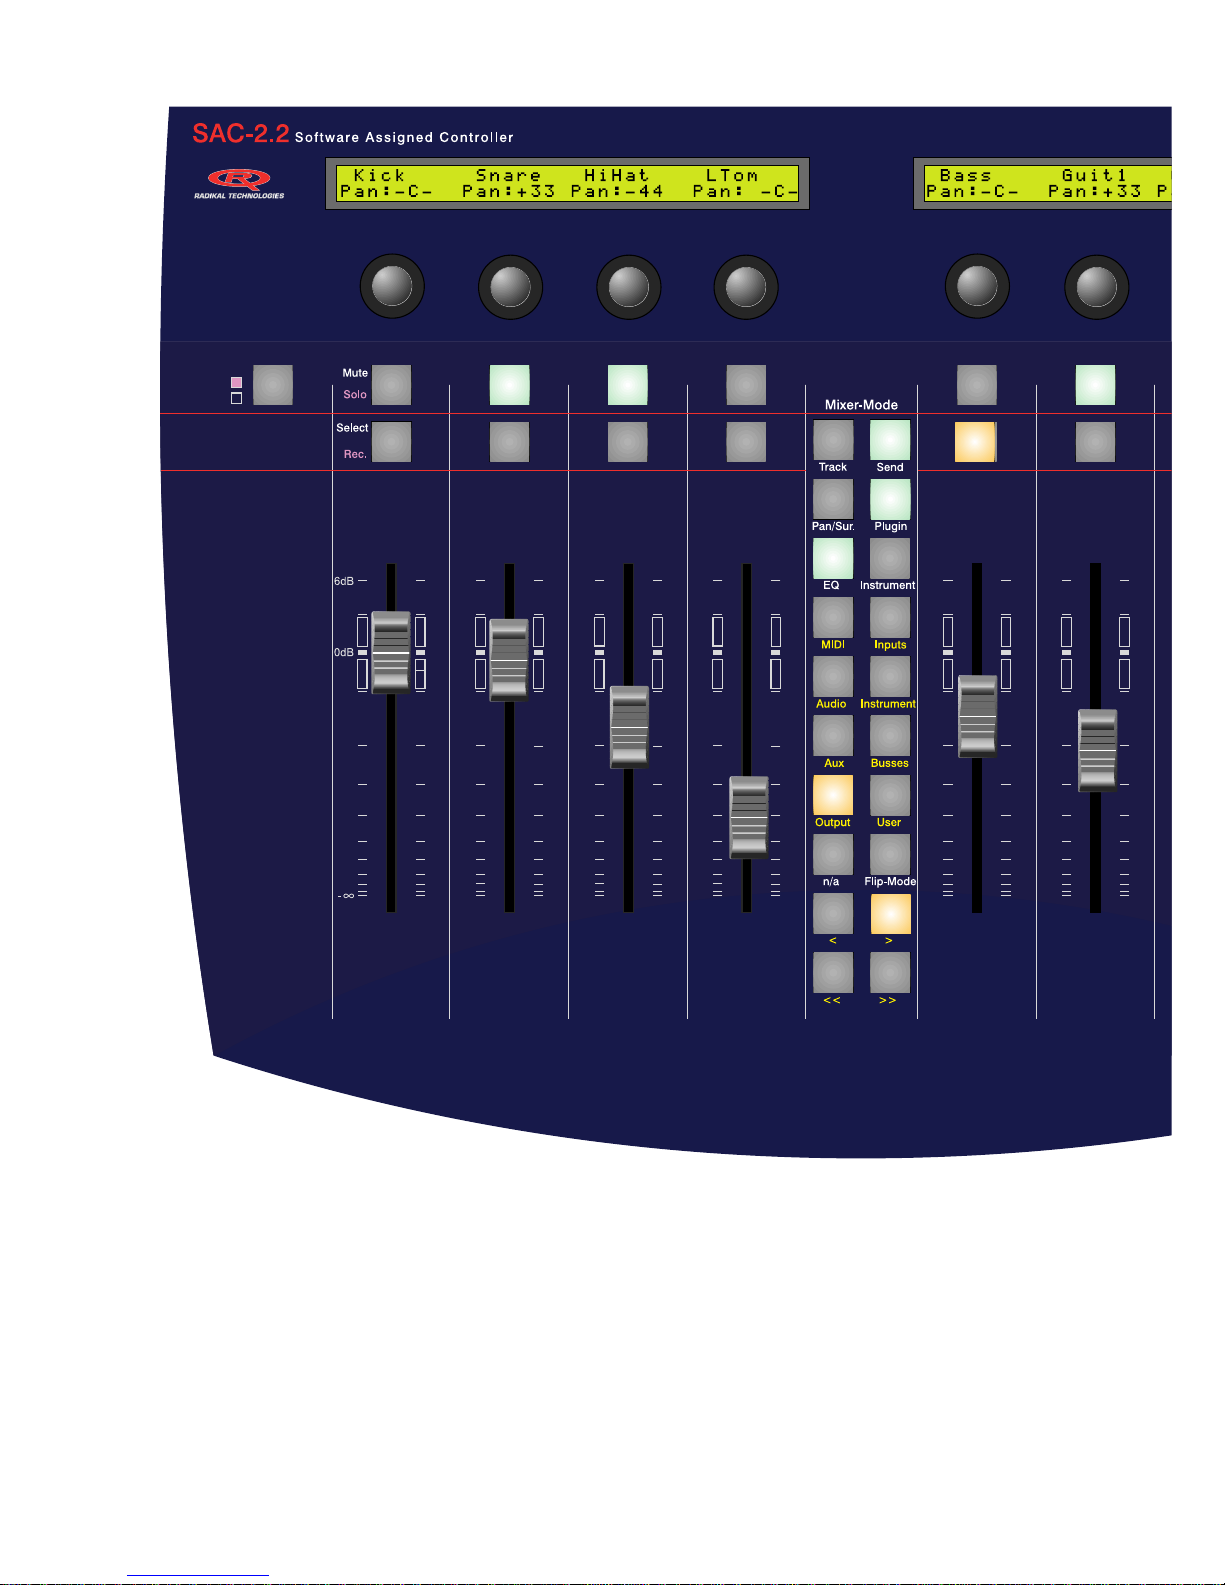
SACMixerModeButtons ................................................................................................................... 9
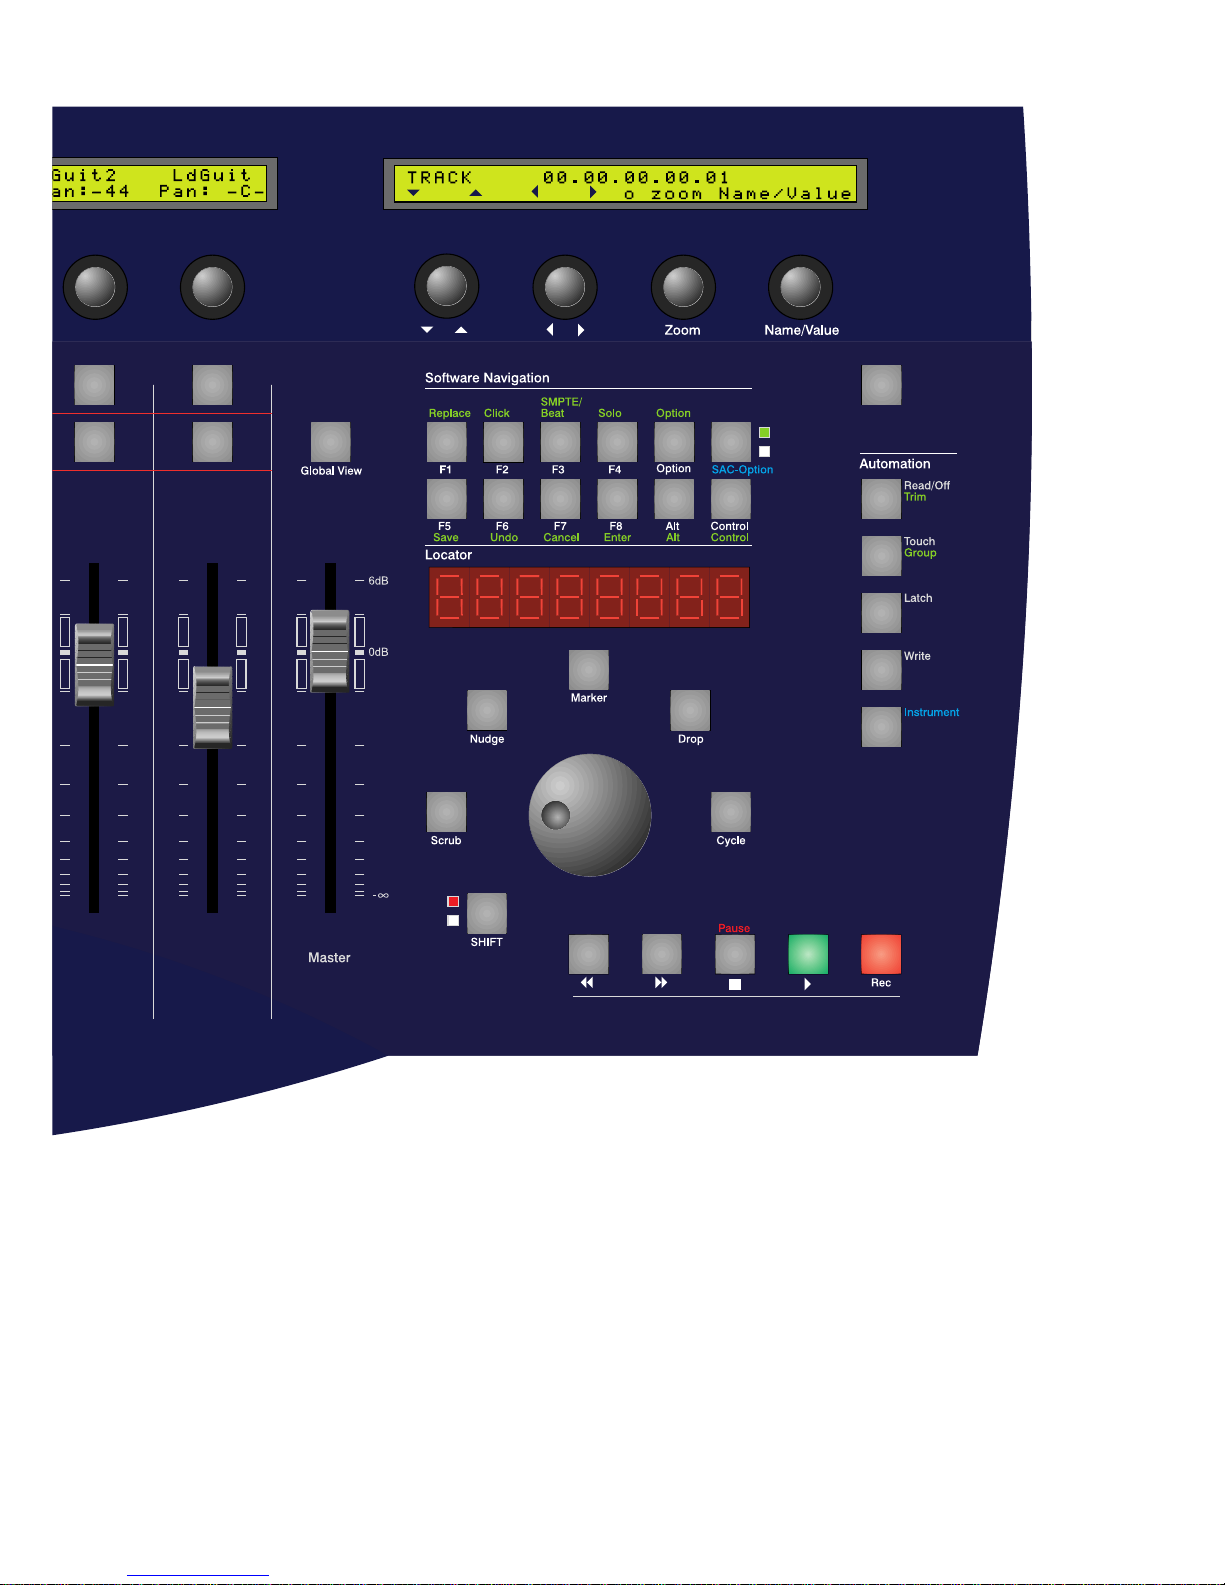
TheSoftwareNavigationButtons ....................................................................................................... 9
The MasterSelect Button .................................................................................................................. 10
TheChannel StripButtons ................................................................................................................ 10
TheMute andSelectButtons ............................................................................................................. 11
TheViewModesof theSAC..................................................................................................................................... 11
Firstcontact –the statusof theSAC afterloading theLogic Audio5.1Autoload Song. ....................................... 11
ViewModes ........................................................................................................................................................ 11
1)TrackView ....................................................................................................................................... 11
2)GlobalView....................................................................................................................................... 11
3)ExtendedTrackView ........................................................................................................................ 11
AssignmentButtons, „ChannelStrip”displayand „Multi Channel“Display ...................................................... 13
1)MultiChanneldisplay ...................................................................................................................... 13
2)ChannelStripdisplay ....................................................................................................................... 14
EncodersandFadersinLGCMode .......................................................................................................................... 14
Callup ofPreset Values...................................................................................................................... 14
EditinginFineMode .......................................................................................................................... 14
CallingupMaximumandMinimumValues ...................................................................................... 14
Fader-FlipMode .................................................................................................................................. 14
MotorfaderOff ................................................................................................................................... 15
OverviewoftheAssignmentbuttons........................................................................................................................ 15
RecordingofTrackAutomation .............................................................................................................................. 16
SoftwareNavigation ................................................................................................................................................. 16
Thefunctionbuttons ................................................................................................................................................ 16
TheCursorandZoomfunctions .............................................................................................................................. 19
TheTrackMixer Elementfunctions ........................................................................................................................ 20
Setting Markers ...................................................................................................................................................... 22
1)ProgrammingMarkers.................................................................................................................... 22
2)Loadingstored MarkerPositions .................................................................................................... 22
3)Erasing a MarkerPosition............................................................................................................... 22
NudgeOperation ...................................................................................................................................................... 22
1)Movingtheobjectbyafixedvalue..................................................................................................... 23
2)DirectMoving ................................................................................................................................... 23
3)MovingtotheSongPosition ............................................................................................................. 23
Drop-InProgramming ............................................................................................................................................. 23
1)Determininga DropIn/Drop OutZone ............................................................................................ 23
2)EditingtheDropZone....................................................................................................................... 23
CycleModeEditing................................................................................................................................................... 23
1)Quickly repositioningthe CycleLocator ........................................................................................ 23
2)CycleEditing .................................................................................................................................... 23
TransportOverview .................................................................................................................................................. 24

6
Installation and Setup
The basic assumption of this manual concerning using the SAC-2K/2.2 in Logic Control mode is that you have already
connected, set up and installed the SAC-2K or SAC 2.2. You can use either the MIDI or the USB connection, the
functionality is the same. Once the SAC is connected to your system, Logic Audio Platinum (version 5.1 or better) will
“recognize” the SAC automatically as a Logic Control and activate the SAC’s LGC operation mode. When you start up
Logic Audio it scans all active MIDI Ports for hardware controllers. This Scan Function sends a brief Sysex message, the
Logic Control responds to if connected. Once the SAC receives this Sysex message, it automatically switches to Logic
Control Mode and waits for your input.
To verify the installataion or to edit the configuration parameters proceed as follows:
Select “Options” > “Control Surfaces” > “Setup…”
This will open up the Logic Control setup window. If you don’t see an icon of the Logic Control in this window, Logic
for some reason has not recognized the SAC. In this case, check your connections between SAC and computer once
more,switchthe LGC mode manually in the system menu of the SAC and restart Logic. By now you should definitely see
the following display in the setup window:

7
Click on the Logic Control icon. On the left side of the setup window you should now see the parameters of the selected
control surface.
In the section “Special Parameters” you should definitely deactivate the option “Touchless movable faders”. Use of this
functionwithequipment with reliable touch sensitivity technology is not advisable, because in this mode fader movement
is also used to recognize activation of the fader. Such “intelligence” cannot distinguish accurately between movement
generated by manual movement of the fader and motor movement. This can result in this function becoming the source
of potential problems during the recording of automation data.
Theotherselectionoptions,whichappearfurtherdownontheparameterlist,arenotrelevantforthegeneralfunctionality
of the SAC and we will skip further detailed explanations at this time. More important are the settings in the dialog box
“Preferrences…” (“Options” > “Control Surfaces” > “Preferrences…”), which we will pay attention to next.
Relativecontrol resolution
Logic’sdefaultvalueforthis parameter is 128. This means that an encoder will have a resolution of 128 steps per rotation,
in order for the complete value range to be covered in a full 360 degree revolution. This isn’t the case with the Logic
Control or with the SAC. Adjust this parameter to a considerably lower value, so you can cover bigger range of values
with one encoder revolution. A lower value means that the intervals between the edited parameter’s value ecome
coarser.However, you can still make fine parameter adjustments, by pressing the [Alt] Button while rotating the encoder.
The encoders of the SAC have 24 values per rotation. You should set this parameter to a value between 24 and 48, to
enable you to cover wide value ranges easily.
Usemultiplecontrolsper parameter
Set this option to a value of 1. Due to the SAC’s layout there is no benefit when this option is activated.
Showlong names whileediting:
Disable both the “Parameter Name” and “Parameter value” options. Because the sizes of the displays differ between the
Logic Control and the SAC, names and values can be displayed incorrectly if elongated information is used. The SAC
can display considerably more characters and its control elements are located further apart. The SAC is programmed to

8
display blank spaces for a correct replication of Track Names between the individual channels. If these options are
checked it is possible that long parameter names can be separated in pieces.
Displayduration(s)
This parameter determines how long the alternate longer version of the parameter name is shown in the display, after
releasing the relevant encoder. If the long paramter names preference is switched off, this parameter has no function.
Allowmultipleinfos
Showinfowhenselectingtracks
Showinfowheneditingvolume
Showvalueunitfor Instrument/Plug-inparameters
Volumeandotherparamters
The above mentioned parameters can be adjusted to your personal preference. Displaying units usually results in the
expense of length of other info, i.e. parameter name or track name
MaximumMIDIbandwith(%).
With this paramter you are able to increase or decrease data throughput. If you notice performance fluctuations during
work with the SAC you can decrease the value. We never encountered such problems with our test systems. Of course
decreasing this parameter also causes a decrease in automation accuracy.With the SAC, this parameter can only change
the data throughput from Logic to the SAC. However, it is also possible to change the datathroughput in the SAC’s
System menu. You will find more details in the SAC 2.2 manual under System menu settings.
Buttonassignement inLogicControlmode
In Logic Control mode, the SAC’s button assignment does not conform with the labeling information printed on the
surface. You will find a graphic of the actual button assignments on pages 2 and 3 of this manual. (you can print the two
pages for referrence)
You can find the button assignment used in the following charts. We are currently producing special templates, which
will allow comfortable working with these button assignments, similar to earlier templates we produced for Digital
Performer and Pro Tools. We will be happy to send you these templates free of charge upon request. For the time being,
you can also write on the backs of the included templates, for temporary ease of operation.
JogWheelButtons
This group of buttons is set up in a circle around the Jog Wheel. In the left column of the charts you can see the original
function inscription of the SAC and in the right column the according function corresponding to Logic Audio.
TransportField
The assignment of the transport buttons is as labeled on the SAC.
Jog-Wheel Tasten
SAC-Taste LC-Funktion
Shift Shift
Scrub Scrub
From Nudge
Store Marker Marker
To Drop
Recall Marker Cycle

9
SACMixerModeButtons
Located Between the two fader groups of the SAC are the Mixer Mode buttons. In the following chart you can see the
LGCassignments.
TheSoftwareNavigationButtons
Just above the Locator Display of the SAC are the Software Navigation buttons. The [Num] key of the SAC is of
particular importance. It is used for toggling the assignments of the remaining SAC Software Navigation buttons. We
will use the name SAC Option for this button in the following chapters. When the [SAC Option] button is pushed it
lights up and the third display momentarily shows the current status of the four functions which are assigned to the
upper first four buttons. You will find the assignments of the Software Navigation buttons in the following two charts.
SAC MixerMode Buttons
Assignment
Track Send
Pan/Surround Plugin
EQ Instrument
Global View
MIDI-Tracks Inputs
Audio-Tracks Instrument
Aux Busses
Output User
Fader n/a Flip-Mode
Track-Group
switches
< >
<< >>
SAC Software Navigation I - SAC Option Button
[NUM] not activated (LED off)
F1 F2 F3 F4 Option SAC-
Option
F5 F6 F7 F8 Alt Control
SAC Software Navigation II - SAC Option Button
[NUM] activated (LED on)
Replace Click SMPTE/-
BEAT SOLO Option SAC-
Option
Save Undo Cancel Enter Alt Control

10
TheMaster Select Button
The [Master Select] button above the master fader has been assigned the [Global view] button function of the Logic
Control.
TheChannel Strip Buttons
The Channel Strip buttons of the SAC are used to activate the various automation modes of Logic Audio. The one
exception is the [Instrument] Channel Strip button. The Instrument button allows you to call up the integrated synth
editors of the SAC, just like in other SAC modes. When in LGC mode, double-click the [Instrument] button to call up the
Instrument editor section.
Master-Select Button
SAC Button LC Mode Function
Master Select Global View Button
SAC Channel StripButtons
original
SAC Button
SAC Button function
im Logic Control
Mode, if the [NUM]
Button is NOT lit.
SAC Button
function im Logic
Control Mode, if
the [NUM] Button
is lit.
EQ's Read/Off Trim
Inserts/Sends Touch Group
Dynamics Latch n/a
MIDI Write n/a
Instrument SAC Instrument
Editor SAC Instrument
Editor

11
TheMute andSelectButtons
The Logic Control has 4 buttons per fader channel. They are assigned the functions Solo, Mute, Select and Record-
Ready. Since the SAC has only two buttons per fader channel, the [Solo/Mute] switch of the SAC is used for the
toggling of two alternate assignments of these buttons.
The View Modes of the SAC
InthefollowingsectionyouwillfindadetaileddescriptionofallfunctionsoftheLogicControlimplementation.Itissafe
toassume that the implementationby Emagic might receive changesor improvements. You will beableto find instructions
and additions in the readme files of future Logic Audio Platinum updates. This manual was written based on the
possibilities of version 5.12 of Logic Audio Platinum.
Firstcontact – the status oftheSACafterloadingthe Logic Audio 5.1 Autoload Song.
You should always turn on the SAC first, then start up Logic Audio, in case you have not stored LGC mode as start-up
mode in your SAC-2.2. If you don’t, you will have to activate the LGC mode manually in the System menu of the SAC,
as Logic only searches for potential control surfaces during the start-up process. If you select the LGC mode in the SAC,
Logic will react to the messages which the SAC sends to Logic in this mode to alert the program of its presence.
After loading the Autoload song, all encoder settings, fader positions and display messages are updated. The Encoders
set the panorama of the selected tracks, the faders control their volumes and the [mute] and [select] buttons are active.
Note
Instructions for storing the startup operation mode can be found in your SAC manual. The Start-up mode can only
be stored with the SAC 2.2 model. Users of the SAC-2K can store their setting via MIDI dump to a computer. See
more about this in the SAC-2.2 Manual.
ViewModes
Track Arrangements in the displays of the SAC can be done in three different display modes:
1) Track View
The arrangement is in accordance with the Arrange window. If more than one track affects the same environment object,
only one channel is set up per object.
2) GlobalView
The arrangement is in accordance with the track Mixer.
3) ExtendedTrackView
The arrangement is in accordance with the Arrange window. Contrary to Track view, all tracks are shown – even if more
The Mute/Solo button toggles between two functions for each of the
channels Mute and Select buttons
SAC Buttons LC Function
Mute/Solo Button not activated, LED off Mute-Buttons Mute
Select-Buttons Select
Mute/Solo Button activated, LED on Mute-Buttons Solo
Select-Buttons Record-Enable

12
than one is assigned to the same environment object. The [Masterselect] button is used for the selection of the various
display modes.
You can select a specific track category in global view directly, by pushing the according category button. The category
button is located on the SAC in the middle section of the Mixer Mode button. When pushing a track category button the
global View Mode is automatically selected. However, you can also use the buttons for quick track navigation in the
track view or extended track view mode. The following chart shows all of the selection possibilities.
Global-View Buttons
Button Modifier
Button Function
Global View
-Toggles between "Track View"and "Global View"
Shift Toggles between "Track View"and "Extended
Track View"
Track-Group Buttons
Button Modifier
Button Function
MIDI -Activates GlobalView and displays MIDI
tracks
Shift Calls up first fader group (1-8).
Inputs -Activates GlobalView and displays Input
tracks
Shift Calls up second fader group (9-16)
Audio Tracks -Activates Global View and displays Audio
tracks
Shift Calls up third fader group (17-24)
Instruments -Activates Global View and displays Instrument
tracks
Shift Calls up forth fader group (25-32)
Aux -Activates Global View and displays Aux tracks
Shift Calls up fifth fader group (33-40)
Busses -Activates Global View and displays Buss
Object tracks
Shift Calls up sixth fader group (41-48).
Outputs -Activates Global View and displays Output
tracks
Shift Calls up seventh fader group (49-56).
User -Keine Funktion!
Shift Calls up eighth fader group (57-64).

13
The lowest four of the Mixer Mode buttons are used for moving the display section of the mixer. Instead of directly
selecting a specific fader group (as just described) you can move the selection of the currently displayed track upwards
or downwards.
InTrackView or extended Track View the SAC always showsthetracks of a specific file. Normally they are locatedinthe
uppermostlevel, the root file. If you have combinedmultipletracks to a file, you have to first jumpintothe lower file level,
to be able to operate the channels within the sub-file. If you wish for a file to be shown in the display, all you have to do
is push the assigned encoder button to reach the lower file level. Thereafter you are able to reach all tracks of the file with
the help of the already introduced selection buttons. When you want to leave the file level, push the [cancel] button.
The [cancel] button is in the Software Navigation area of the SAC with the [SAC=Option] button activated.
Assignment Buttons, „Channel Strip” display and „Multi
Channel“ Display
Of course, setting the panorama of a track is not the only thing you can do with the encoders! You can edit any parameter
of a track. Included are all parameters of integrated software synths and editing functions of Insert Plugins. Even VST
Plugins can be edited using the encoders, as long as they are able to be edited from control surfaces. If the VST Plugins
allow for control generally but can’t send parameter strings to Logic, the displays of the SAC will only show the
according MIDI control numbers. In this case you might want to contact the Plugin Manufacturer. The more people that
express concern about incompatibilities and insufficient implementation, the more the Plugin designers will consider
reworking their products.
Bei der Belegung der Encoder gibt es zwei verschiedene Betriebsarten beziehungsweise Anzeigearten:
1) MultiChanneldisplay
In “Multi Channel” display mode, the selected parameter can be edited on up to eight channels simultaneously. This
modeisin accordance with the functions of a traditional mixer.If youconnectmultipleSACsor expansion units to Logic,
you will be able to edit more than eight channels at once.
To edit a parameter in Mutli Channel Mode, select one of the assignment buttons (the upper 6 buttons of the SAC Mixer
Mode buttons are the equivalent of the assignment buttons). After selection, a parameter is assigned immediately to the
encoders. Using the second encoder in the third display of the SAC you are now able to select another parameter for
editing
Note:
Make sure that the Zoom Function is not active. This function can be turned on and off with the third encoder
button under the third display. When the Zoom function is active, parameter selection is not possible.
The fourth encoder button switches between parameter and value display. This button determines whether you want
to see the parameter values or the parameter names in the lower display row above the encoders. Displaying the
parameter names will make selection of the desired parameters easier.
Bank-Select Buttons
Button Modifier
Button Function
< > -displayed Tracks shift one at a time
Option Jumps to the first or last Track position
<< >> -displayed Tracks shift in groups of 8 at a time
Option Jumps to the first or last Track position

14
Parameters available for selection are shown blinking in the display. The selection won’t take place until you have
pushed the according encoder button.
Parameters which are not available for editing are not displayed in the SAC at all nor offered for selection. For instance,
if you would like to change the position [Pre/Post] of a FX Send, this FX send has to be activated. A FX Send becomes
active once it has been assigned to a Bus. Similarly you won’t be able to select the frequency of an EQ, when there is no
EQ active in the selected slot or none has been selected.
Logic Audio has multiple FX-Sends, Insert Slots and EQs. Using the first encoder under the third display you can select
the FX Send, EQ or Insert Number. You can view the current selection in the third display above the encoder.
There is also another alternate mode of operation for the selection of specific parameters. This one is of particular
interest to experienced Users. Select a non-lit assignment button and keep it depressed, a direct selection choice for the
desired parameter of the according assignment group will be displayed in the first two displays. They jump to the “multi
channel” display of the desired parameters when the assigned encoder button is used.
Now,asyouwork further with the SAC-2.2, youwillundoubtedly encounter the “Channel Strip” displaymodefrequently,
as the assignment buttons always will switch between these two display modes.
2)Channel Stripdisplay
Whenselecting “Channel Strip” display mode, up to eight parameters of a selected channel can be edited simultaneously.
It could be 8 EQ parameters, the parameters to a random plugin or the surround parameters of a track, for instance. You
can reach the Channel Strip display mode by pushing an already selected assignment button a second time. To leave the
channel strip, push the button again.
Additionally, the Channel Strip mode is called up automatically when you select an instrument or FX plugin with the
encoder and confirm the selection by pressing the encoder. The according plugin window will be opened automatically
in Logic Audio. You can change the track to be edited anytime with the [Select] button. If you have the arrange window
set in the foreground (you can open, close and move into the foreground the arrange window by using the button
combination [shift]+[Functionbutton F1], you can comfortably make a quick track selection with the first encoder under
the third display.
If a “Channel Strip” display makes multiple parameter pages available, you can select the pages with the second encoder
under the third display. The upper display row of the Channel Strip display will show you the current page number as
well as the number of available display pages.
To leave the Channel Strip, push the according assignment button a second time. Any Plugin window that may have
been opened by Logic before, will be automatically closed.
EncodersandFadersinLGCMode
CallupofPresetValues
If you wish to reset a parameter quickly to a preset value, press the assigned encoder button. The value will be reset
immediately to the preset value. With parameters which offer only two possible values, the encoder button will toggle
between the two available values.
Editing in Fine Mode
By keeping the [Alt] button pushed during editing, you can make “fine” adjustments to the according parameters.
CallingupMaximumandMinimumValues
Holding the [Option] button pushed while editing a value with the encoder switches back and forth between the
maximumand minimumvalueof the parameter.
Fader-FlipMode
By now you know how you can edit parameters of your choice using the encoders. However it is also possible to change
parameters with the faders of the SAC. For this operation, Logic Audio supports a Fader Flip Mode. By pushing the
[Flip] button, you can adjust the parameters simultaneously with the faders. When selecting the Flip function the faders
are automatically set to the paramter values.

15
By pushing down the [shift] button while pushing the [flip] button, Logic will activate a “Flip-Swap” mode. In this mode
the parameter assigned to the encoder will be assigned to the fader, while the fader parameter can be edited with the
encoder.
MotorfaderOff
If you want quiet during listening, you can turn the movement of the motorfaders off. To do so, use the [Control] button
and the [Flip] button at the same time. Pushing the buttons a second time will active the fader movement again.
Overview of the Assignment buttons
Assignment Buttons
Button Modifier
Button Function
Track - Track Parameterr
Pan/Surround - Pan and Surround Parameters
EQ - EQ Parameter
Send - Send Parameter
Plugin - Plugin Selection or Plugin Editing
Instrument - Instrument Selection or Instrument Editing
Flip
-Toggle between "Flip Off" and "Flip duplicate"
modes
Shift Toggle between "Flip Off" und "Flip swap" modes
Control Toggle between "Flip Off" und "Flip Zero"modes
(Fader motors off)

16
Recording of Track Automation
Of course you can automate all parameters in Logic Audio. To turn on automation you won’t need a mouse! You can
comfortably call up the various automation modes with the channel strip buttons of the SAC.
Caution: Automation data is recorded continuously when the according automation mode is enabled. This is indepen-
dent of whether the Record button in the Transport section is engaged or not. Automation data can be written even
during Playback.
SoftwareNavigation
Thefunctionbuttons
Using the function buttons [F1] to [F7] you can call up the first seven screensets of Logic Audio. Accordingly, you can
adjust these first seven screenset in your songs as well as in the default song to your liking. When holding down the
[shift] button when you press a Function button, you can alternatively open and close individual windows or put them
in the foreground in case they are partially covered by another. A list of the windows that can be controlled with the
function buttons can be found in the following chart, which also lists a few additional shortcuts for other functions,
which can be accessed in combination with the 8 function buttons. These additional functions can also be called up in
connection with the encoder buttons 1-8, by holding down the listed switch button. This way has the advantage that
you can actually see the selection choices in the displays.
Automation Buttons
Button Modifier
Button Function
Read/Off
-Toggles "Read"Automation mode on/off
Option Toggles "Read"Automation mode on/off on all
tracks
Touch
-Switches the Track Automation mode to
"Touch" for the selected Track.
Option Switches the Track Automation mode to
"Touch" for all Tracks.
Latch
-Switches the Track Automation mode to
"Latch" for the selected Track.
Option Switches the Track Automation mode to
"Latch" for all Tracks..
Write
-Switches the Track Automation mode to
"Write" for the selected Track.
Option Switches the Track Automation mode to
"Write" for all Tracks.
Trim (SAC-
Option +
Read/Off) -Function not yet implemented by Logic.
Group (SAC-
Option + Touch) -Function not yet implemented by Logic.

17
Function Buttons 1 - 8
Function Button Modifier
Button Function
F1
-Calls up Screenset 1
Shift Opens/closes the Arrange window.
Track Calls up Volume on multiple tracks
Pan/Surround Calls up Pan/Surround on multiple tracks
EQ Calls up Bypass on multiple tracks
Send Calls up Sends on multiple tracks
Marker Jump to the first Marker position
Nudge Nudge-Value: Tick
F2
-Calls up Screenset 2
Shift Opens/closes the Track Mixer window.
Track Calls up Pan on multiple tracks
Pan/Surround Calls up Pan/Surround Radius on multiple
tracks
EQ Calls up EQ-Type on multiple tracks
Send Calls up Level on multiple tracks
Marker Jump to the second Marker position
Nudge Nudge-Value: Format
F3
-Calls up Screenset 3
Shift Opens/closes the Event List window.
Track Calls up Track mode on multiple tracks
Pan/Surround Calls up Pan/Surround LFE on multiple tracks
EQ Calls up Frequency on multiple tracks
Send Calls up Position on multiple tracks
Marker Jump to the third Marker position
Nudge Nudge-Value: Beat

18
F4
-Calls up Screenset 4
Shift Opens/closes the Note Editor
Track Calls up Input on multiple tracks
Pan/Surround Calls up Pan/Surround Mode on multiple
tracks
EQ Calls up Gain on multiple tracks
Send Calls up Mute on multiple tracks
Marker Jumps to the fourth Marker position
Nudge Nudge-Value: Bar
F5
-Calls up Screenset 5
Shift Opens/closes the Hyper Edit window
Track Calls up Output on multiple tracks
Pan/Surround Switches into Channel Strip display mode
EQ Calls up Q-Factor on multiple tracks
Send Switches into Channel Strip" View
Marker Jumps to the fifth Marker position
Nudge Nudge-Value: Frame
F6
-Opens Screenset 6
Shift Opens/closes the Matrix Editor
Track Calls up Automation on multiple tracks
Pan/Surround Calls up Angle/Diversity on multiple tracks
EQ Calls up Channel Strip on multiple tracks
Send Calls up Channel Strip 2 on multiple tracks
Marker Jumps to the sixth Marker position
Nudge Nudge-Value: 1/2 Frame

19
TheCursorandZoomfunctions
F7
-Calls up Screenset 7
Shift Opens/closes the Transport window
EQ Calls up Frequency/Gain on multiple tracks
Send Calls up Destination/Level on multiple tracks
Marker Jumps to the seventh Marker position
F8
-Enter on the topmost window
Shift Opens/closes the Audio window
Track Calls up Track Setup on multiple tracks
EQ Calls up Frequency/Gain on multiple tracks
Send Calls up Destination/Level on multiple tracks
Marker Jumps to the eighth Marker position
Cursor and Jog-Wheel Functions
The cursor keys of Logic Control are replaced on the SAC-2K and SAC-2.2 by
the first two Encoder under the third display. This way you can quickly dial in
extreme zoom-settings more efficiently than with repeated button presses. The
Zoom enable button is on the push-button of the third Encoder. The display shows
at any time whether the Zoom shot mode is active or not.
Element Modifier
Button Function
Encoder 1 -
Cursor up/down
In the "Channel Strip EQ", "Send" or "Plugin/Instrument-Editor"
mode.
-Calls up the next EQ bands or the next Insert
Slots
Otherwise... (however, always in the Nudge mode)
Encoder steers the verticalcursor keys of the
computers keyboard.
In the "Zoom" Mode:
-Verticle Zoom setting change
Shift Momentarily suspends the Zoom function and
can be used to select tracks

20
The Track Mixer Element functions
Track Mixer Elements are all control elements which are available for each channel individually. The following chart
shows the list of key combinations and shortcuts which are available.
Encoder 2 -
Cursor left/right
In the "Multi Channel" Mode:
-Call of the next or previous parameter for the
current operation
In the "Channel Strip EQ", "Send" or "Plugin/Instrument-Editor"
mode.
-Scrolls the pages of the current editor.
Alt Scrolls the parameters of the current editor.
Otherwise... (however, always in the Nudge mode)
Encoder steers the horizontal cursor keys of
the computers keyboard.
In "Zoom" Mode:
-Horizontal Zoomsetting change
Shift
Counter-clockwise rotation:Sets the individual
zoom shot back on the selected track.
Clockwise rotation: Sets all tracks to the zoom
setting of the selected track.
Encoder 3 -
"Zoom"-Taste
-Toggles between normal behavior of the cursor
Encoder and Zoom Mode.
Shift Toggles between normal behavior of the cursor
Encoder and the simulation of the keyboard
cursor keys.
Scrub - Ein- und Ausschalten der Scrub-Betriebsart.
Jog-Wheel
-Moves the playback wiper.
In the "Scrub" Mode:
- Scrubs audio and MIDI
Other manuals for SAC-2K
1
This manual suits for next models
1
Table of contents
Popular Music Mixer manuals by other brands

Clear One
Clear One CONVERGE SR 1212 datasheet

PULSE+
PULSE+ F-ST Freedom range user manual

IMG STAGE LINE
IMG STAGE LINE MPM-400 instruction manual

IMG STAGE LINE
IMG STAGE LINE ULM-164/SW instruction manual

SignVideo
SignVideo ENG-44 Operator's manual

IMG STAGE LINE
IMG STAGE LINE MMX-24USB instruction manual