RC Mowers TK-52XP User manual

An EmbankScape Product
Models TK-52XP, TK-60XP
Rev. A 09/18
Printed in USA

TABLE OF CONTENTS
TABLE OF CONTENTS............................................2
WELCOME ...............................................................1
Product Registration .....................................................1
Manuals ........................................................................1
Disclaimer .....................................................................1
SAFETY....................................................................2
Practices and Laws ........................................................2
Emission Control System ..............................................2
Required Operator
Training...........................................2
Safety Alert Symbol.......................................................2
Signal Words .................................................................2
Safety Decals................................................................3
Safety Rules..................................................................6
ASSEMBLY ............................................................10
CONTROLS AND FEATURES...............................11
Ignition Key .................................................................12
Throttle Control Lever .................................................12
Emergency Stop Switch..............................................12
Fuel Valve ...................................................................12
Oil Pressure Warning Light .........................................12
Malfunction Indicator light ...........................................13
Deck Lift Handle..........................................................13
Height-of-Cut Adustment
System ...............................13
Transport Lock ............................................................13
Transaxle Bypass Valves............................................13
Anti-Scalp Wheels.......................................................13
Transport Lock Release Lever ....................................13
Hour/Maintenance Meter ............................................13
Parking Brake Lever ...................................................13
Safety Interlock System...............................................13
BEFORE OPERATION...........................................13
Set Cutting Height.......................................................14
Open Fuel Valve .........................................................14
OPERATION...........................................................14
Emergency Stopping...................................................14
Start the Engine ..........................................................14
Operate Unit................................................................14
Stop the Engine...........................................................15
Move Unit Manually .....................................................15
Transport Unit..............................................................15
Release Transport Lock ..............................................15
MOWING INSTRUCTIONS ....................................15
Mowing Techniques .................................................... 16
Approaching Transitions: ............................................ 16
Application of Techniques........................................... 16
MAINTENANCE......................................................17
Service Position .......................................................... 17
Hour / Maintenance Meter ........................................... 17
Maintenance Schedule ................................................ 18
Service Parts............................................................... 18
Check Hydraulic System ............................................. 19
Track Tension ............................................................. 20
Check Mower Blades.................................................. 20
Sharpen Blades .......................................................... 20
Check Parking Brake .................................................. 21
Check Battery ............................................................. 22
Charge Battery ............................................................ 22
Check Fasteners ......................................................... 22
Lubricate Unit .............................................................. 22
Check Carbon Canister
Filters .................................... 23
SERVICE AND ADJUSTMENTS...........................23
Electrical Service......................................................... 23
Adjust Transaxles ....................................................... 23
Adjust Parking Brake Interlock .................................... 24
Adjust Parking Brake ................................................... 25
Replace Mower Belts................................................... 25
Replace Transaxle Drive
Belt ..................................... 27
Adjust Anti-Scalp Wheels ............................................ 29
Remove / Install Mower Deck ..................................... 29
Level and Pitch Mower
Deck ...................................... 30
Adjust Clutch............................................................... 31
TROUBLESHOOTING............................................33
STORAGE ..............................................................34
Short-Term Storage..................................................... 34
Long-Term Storage ..................................................... 34
Start-of-Season Preparation ....................................... 34
ACCESSORIES ......................................................34
SPECIFICATIONS ..................................................35
LIMITED WARRANTY ............................................36
Exclusions and Limitations .......................................... 37
Disclaimer ................................................................... 38
Disclaimer of Further Warranty.................................... 38

WELCOME
Congratulations on your purchase and welcome to RC Mowers. Our unique machines separate themselves from
the competition, as you now have done. We stand proud on both the durability of our machines and our superior
customer service.
Have Questions or Need Assistance?
Website: rcmowersus.com Phone: 888-700-4044
PRODUCT REGISTRATION
The product comes to you pre-registered. Record your model and serial numbers for your records.
Figure 1
Record model number here.
Record serial number here
MANUALS
Before operating or servicing the unit, carefully and
completely read the manuals provided with the unit.
They contain safety instructions and important
information about unit controls.
The engine on this unit is covered by a separate
manual. Refer to the engine manual for engine
service recommendations. Contact the engine
manufacturer for a replacement manual if necessary.
You should review important information in this
manual upon delivery of the unit. It is your
responsibility to read and understand all
safety precautions and instructions in the manual. If
you do not understand or have difficulty following the
instructions, contact RC Mowers.
DISCLAIMER
RC Mowers reserves the right to discontinue, make
changes to, and add improvements upon its
products
at any time without public notice or obligation. The
descriptions and specifications contained in this
manual were in effect at printing. Equipment
described in this manual
may be optional. Some
illustrations may not be applicable to your unit.
Serial Number
Model Number
1

SAFETY
Read these safety rules and follow them closely.
Failure to follow these rules could lead to loss of
control of unit, severe personal injury or death to you
or bystanders, or result in damage to property or the
machine.
PRACTICES AND LAWS
Practice usual and customary safe working
precautions. Learn applicable rules and laws
in your
area. Always follow the practices set forth in this
manual.
EMISSION CONTROL SYSTEM
This equipment and/or its engine may include
exhaust and evaporative emissions control
system
components required to meet U.S. Environmental
Protection Agency (EPA) and/or California Air
Resources Board (CARB) regulations. Tampering
with emission controls and components by
unauthorized personnel may result in severe fines or
penalties. Emission controls and components can
only be adjusted by RC Mowers or an authorized
engine manufacturer's service center. Contact
RC Mowers concerning emission controls and
component questions.
REQUIRED OPERATOR
TRAINING
Read and understand the Operator's
Manual and decals on the unit. This
information is for your safety and the
proper use of your equipment.
Failure to follow these
instructions and warnings may
cause death or serious injury. If you have purchased
this product from an RC Mowers dealer, the dealer
can provide you with training.
Familiarize yourself and any other operators with all
controls and the safe use of the features of this unit.
If you loan, rent or sell this product to others, provide
them with all manuals.
If you have any questions, please contact us at
888-700-4044 or online at rcmowersus.com. Do not
use this equipment if, after reading the Operator's
Manual and the on-board decals, you have
any
questions about the safe use of this
product.
WARNING: Avoid Injury
This cutting machine is capable of
amputating body parts
and throwing
objects. Failure to observe the safety
instructions in the manual and on decals
could result in serious injury or death.
ALWAYS disengage blades, stop unit
and engine, remove key, set parking
brake, and allow moving parts to stop
before leaving operator’s position
SAFETY ALERT SYMBOL
This is the safety alert symbol. It
means:
•
ATTENTION!
•
YOUR SAFETY IS
INVOLVED!
When you see this symbol:
•
BECOME ALERT!
•
OBEY THE MESSAGE!
SIGNAL WORDS
The safety alert symbol above and signal
words
below are used on decals and in this
manual. Read
and understand all safety
messages.
1. Danger
DANGER: Indicates an
IMMINENTLY
HAZARDOUS
SITUATION If not
avoided,
WILL RESULT in death or
serious injury.
2. Warning
WARNING: Indicates a
POTENTIALLY
HAZARDOUS
SITUATION If not
avoided,
COULD RESULT in death or
serious injury.
3. Caution
CAUTION: Indicates a
POTENTIALLY
HAZARDOUS SITUATION If not
avoided, MAY
RESULT in minor or
moderate injury. It may also be used to
alert
against unsafe practices.
2

4. Notice
NOTICE: Indicates information or procedures
that
are considered important but not hazard
related. If
not avoided property damage could
result.
5. Important
IMPORTANT: Indicates general reference
information worthy of special attention
SAFETY DECALS
The safety decals on your machine are visual
reminders of the important safety information in this
manual. All messages on your unit
must be fully
understood and carefully followed. Safety decals on
the machine are
explained below.
ALWAYS replace missing or damaged safety
decals.
Replacement decal part numbers are
found in the
parts manual for your machine
and may be ordered
from RC Mowers. (See Figure 2 for safety decal
locations.)
Figure 2
(Under hood
above
hydro fans)
3

Safety Decal Descriptions
1. DANGER
Danger
Read Operator’s Manual
1.1 Amputation Hazard
To avoid amputation hazard, DO
NOT put hands near rotating
blades.
To avoid amputation hazard,
DO
NOT put hands near moving
belts.
Keep hands away from all
rotating or moving parts.
Keep all guards and shields
in
place.
1.2 Discharge Hazard
NEVER direct discharge toward
people, pets or
property. Thrown
objects can cause injury or
damage.
Keep children and others
away
from unit while unit is
in
operation.
DO NOT operate mower
unless
all guards are in operating
position or bagger is attached.
1.3 Tipping Hazard
DO NOT operate on slopes over
50°.
1.4 Service Hazard
Before servicing unit, do the
following:
Read Operator’s Manual
before
servicing or making adjustments
to unit.
Set parking brake.
Remove key and disconnect
spark plug before servicing
or
making adjustments to unit.
4

1.5 Bystander Hazard
DO NOT operate the unit in
the
presence of bystanders.
DO NOT carry passengers.
DO NOT ride on machine for
any reason.
1.6 Loss of Traction Hazard
If loss of traction is experienced
do the
following:
Press Emergency Stop.
Look before backing. Proceed off
slope slowly.
DO NOT try to turn or speed up.
2. DANGER!
Discharge Hazard – NEVER
direct discharge toward
people,
pets or property.
Thrown objects can cause
injury
or damage.
Amputation Hazard –
NEVER
stick hands or feet
under deck or
shielded
areas.
Stop engine, remove key, and
read manual before servicing or
making
adjustments to unit.
Keep children and others
away
from unit while unit is
in
operation.
Keep hands and away from
all
rotating or moving parts.
DO NOT step or stand in
this
area.
3. DANGER!
Discharge Hazard – NEVER
operate unit without discharge
chute in operating position.
Thrown objects can cause injury
or damage.
DO NOT operate mower unless
all guards are in operating
position or bagger is attached.
4. HOT SURFACES!
DO NOT touch parts which are
hot from operation. ALWAYS
allow parts to cool.
5

5. ROTATING PARTS!
AVOID INJURY. Stay clear of
rotating parts.
6. DANGER!
Keep hands and feet away from
all rotating or moving parts.
7. WARNING!
Overfilling may cause
severe
damage to
evaporative system.
NEVER fill fuel tank when
engine
is running, hot, or unit is indoors.
Replace fuel cap securely
and
clean up spilled fuel.
No smoking.
Fill fuel tank to bottom of filler
neck – MAXIMUM.
SAFETY RULES
The following safety instructions are based on the
B71.1 specification of the American National
Standards Institute and ISO 5395 in effect at the
time of production.
Training
Read, understand, and follow all instructions on the
machine and in the manual(s) before starting.
Be sure the area is clear of bystanders and
pets
before operating. Stop machine if
anyone enters the
area.
Improper use of power equipment can cause serious
permanent injury or death to the operator or a
bystander.
Understand:
•
How to operate all controls.
•
The functions of all controls.
•
How to STOP in an emergency.
•
Braking and steering characteristics.
•
Turning radius and clearances.
If the operator or the mechanic cannot read
the
manual, it is the owner’s responsibility to explain it to
them.
ALWAYS train any inexperienced operators and
require them to read and understand all manuals and
decals.
Only allow responsible adults, who are
familiar with
the instructions, to operate this machine.
Only the operator can prevent and is
responsible for
accidents or injuries
occurring to themselves, other
people or property.
Operator Age
DO NOT allow children under the age of 18
to
operate any outdoor power equipment.
Local regulations may restrict the age of the
operator.
Data indicates operators age 60 years and
above
are involved in a large percentage of
mower-related
injuries.
These operators should evaluate their ability
to
operate the mower safely enough to
protect
themselves and others from serious
injury.
Children
Tragic accidents can occur if the operator is
not alert
to the presence of children.
Children are often attracted to the machine
and the
mowing activity. NEVER assume that children will
remain where you last saw them.
Be alert and turn machine off if a child enters the
area.
Before and while backing, look behind and down for
small children.
NEVER allow children to climb on the mower, even
with the blade(s) shut off. They may fall off and be
seriously injured or interfere with safe machine
operation. Children who have been allowed to ride
on it in the past may suddenly appear in the mowing
area for another ride and be run over or backed over
by the machine.
NEVER allow children to operate the machine.
Use extreme care when approaching blind corners,
shrubs, trees or other objects that may block your
view of a child.
6

Keep children out of the mowing area and in the
watchful care of a responsible adult
other than the
operator.
Personal Protection
DO NOT wear loose clothing or jewelry and
tie back
hair that may get caught in rotating parts.
Wear adequate outer garments.
NEVER wear open sandals or canvas shoes during
operation. Wear adequate safety gear, protective
gloves and footwear.
Wear proper footwear to improve footing on slippery
surfaces.
ALWAYS wear eye protection when operating
machine.
Before Operating
Keep all nuts and bolts tight to be sure the equipment
is in safe working condition.
Maintain the machine to be in compliance with the
maintenance schedule.
Clean grass and debris from unit, especially from
around muffler and engine, to help
prevent fires.
Check parking brake operation frequently. Adjust and
service as required.
Inspect unit before each use for missing or
damaged
decals and shields, correctly operating safety
interlock system, and deterioration of grass
catchers. Replace or repair as needed.
Ensure Safety Interlock System is functioning
properly. DO NOT operate unit if safety interlock is
damaged or disabled.
Start and operate unit only when standing at a safe
distance. Steering control joystick must be in neutral
and PTO disengaged when starting engine.
NEVER interfere with the intended function of a
safety device or reduce the protection provided by a
safety device. Check their proper operation
regularly.
Keep machine free of grass, leaves or other debris
build-up. Clean up oil or fuel spillage
and remove
any fuel-soaked debris.
Operation
Be sure the area is clear of bystanders
before
operating. Stop machine if anyone
enters the area.
NEVER operate machine in a closed or poorly-
ventilated area.
ALWAYS maintain unit in safe operating condition.
Damaged or worn out muffler can cause fire or
explosion.
This product is equipped with an internal combustion
type engine. DO NOT use unit on or near any
unimproved, forest-covered or brush-covered land
unless exhaust system is equipped with a spark
arrester meeting applicable local, state or federal
laws. A spark arrester, if it is used, must be
maintained in effective working order by operator.
DO NOT operate machine while feeling tired, ill or
under the influence of alcohol or other drugs.
DO NOT put hands or feet near rotating parts or
under the machine. Keep clear of the discharge
opening at all times.
DO NOT touch parts which are hot. Allow parts to
cool.
DO NOT operate machine without the entire grass
catcher, discharge guard or other safety devices in
place and working.
ALWAYS keep hands and feet away from all pinch
points.
Avoid slippery surfaces. ALWAYS be sure of your
footing.
NEVER carry passengers or ride on machine for any
reason.
NEVER direct discharged material toward anyone.
Avoid discharging material against a wall or
obstruction. Material may ricochet back toward the
operator. Stop the blade(s) when crossing gravel
surfaces.
NEVER engage PTO when attachment, including
mower blades, is not in use. ALWAYS turn off power
to attachment when
not in active use such as
traveling or
crossing driveways.
ALWAYS disengage PTO, stop unit and engine and
allow moving parts to stop before
approaching
machine.
NEVER engage PTO while raising the attachment,
including mower blades, or when attachment is in
the raised position.
Keep safety devices or guards in place and
functioning properly. NEVER modify or remove
safety devices.
Stop engine before removing grass catcher or
unclogging chute.
Slow down before turning.
If you strike a foreign object, stop and inspect the
machine. Repair, if necessary, before restarting.
NEVER leave a running machine unattended.
ALWAYS turn off blade(s), stop engine, remove key,
and set parking brake when leaving stopped
machine unattended.
Disengage blade(s) when not mowing. Shut off
engine and wait for all parts to come to a complete
stop before cleaning the machine, removing the
grass catcher, or unclogging the discharge guard.
Know the weight of loads. Limit loads to
those you
can safely control and the unit can safely handle.
7

When starting, stopping, or adjusting throttle stand
to the side of the unit outside of the track assembly.
DO NOT put hands, feet, or loose material on track
assembly when unit is running.
THROWN HAZARD WARNING! When mowing do
not stand in front of the cutting deck at any time. Do
not point the front of mower at the operator or any
other person while the cutting blades are moving. All
persons must remain 200 feet from the open front
deck of the mower while blades are turning.
When mowing, the operator and all other persons
should remain at least 30 feet to the side of the
mower, or 100 feet from the back of the mower, or
200 feet from the front of the mower.
DO NOT stand on machine or tracks while the
engine is running
DO NOT stand in front or behind the machine or
tracks while the engine is running.
DO NOT drive machine through more than
8 inches of water
DO NOT allow cutting blades to contact standing
water. DO NOT mow in areas where there could be
more than 2 inches of standing water.
DO NOT adjust deck height while PTO is engaged.
Operating Conditions
Lightning can cause severe injury or death. If
lightning is seen or thunder is heard in the area, DO
NOT operate the machine, seek shelter.
ALWAYS check overhead and side clearances
carefully before operation.
Watch for traffic when operating near or crossing
roadways.
Clear the area of objects such as rocks, wire, toys,
etc., which could be thrown by the blades.
Check for weak spots on docks, ramps or floors.
Avoid uneven work areas and rough terrain. Stay
alert for hidden hazards or traffic.
Use care when approaching blind corners, shrubs,
trees or other objects that may obscure vision.
Dust, smoke, fog, etc. can reduce vision and cause
an accident.
Operate machine only in daylight or good
artificial
light.
Slope Operation
Slopes are a major factor related to loss of
control
and tip-over accidents, which can
result in severe
injury or death. Operation on
all slopes requires extra
caution. If you
cannot drive on the slope with
adequate traction, or if you feel
uneasy on it,
DO NOT mow it.
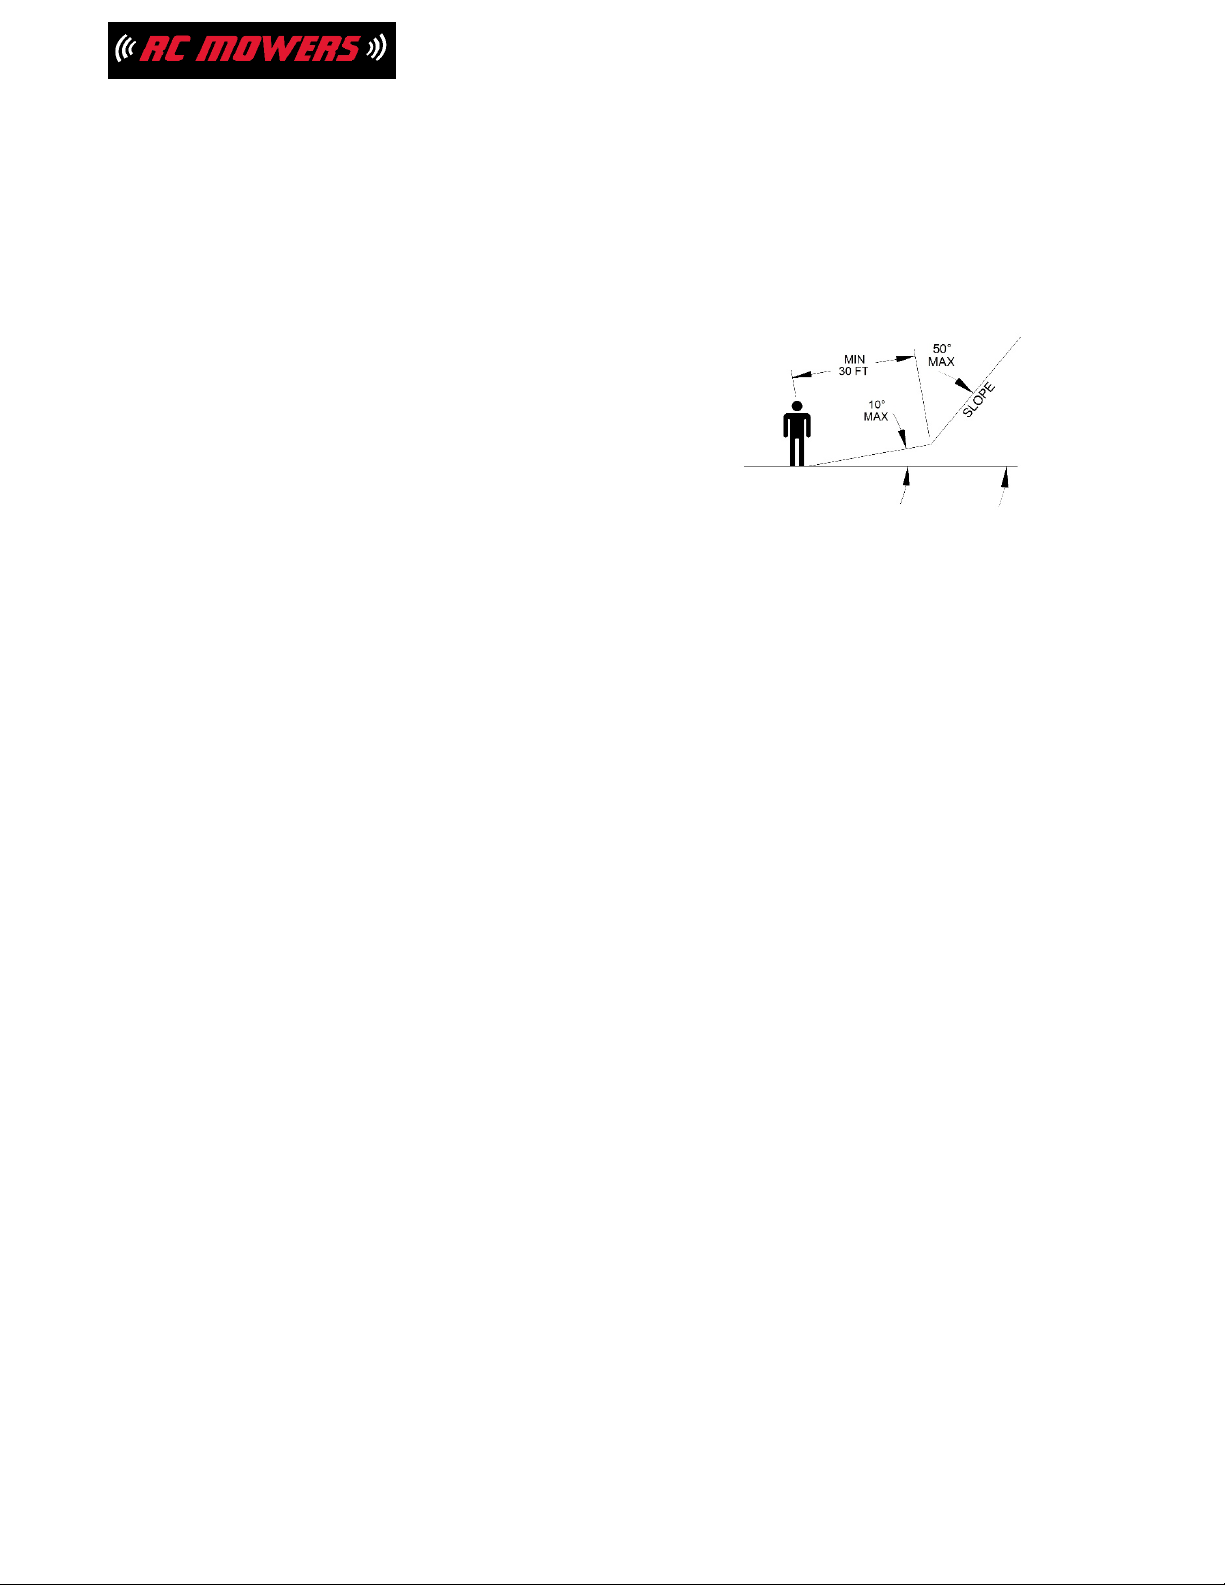
DO NOT operate on slopes of more than
50°.
When mowing a slope, the best position is at the top
of the slope, looking down at the mower. Certain
situations may require the operator to be at the
bottom of the slope. When in this position, all
persons must be at least 30 feet to the side of the
mower at all times. If the mower must cross the path
of any person downhill from the machine, those
persons should be on level ground, at least 30 feet
back from where the hill transitions above 10°.
The operator and any observers MUST NOT stand
directly below the mower in case the mower were to
slide or roll over. While a rollover is rare, it is
possible in certain conditions. The machine is very
heavy and if it were to roll over a person, it would
likely result in severe injury or death.
If operating from the side or bottom of a slope, the
operator must be aware of what is at the top of the
slope and beyond. There may be steep drop-offs,
bystanders, or other hazardous terrain. The operator
must be able to control the area that is not within
direct sightlines, so that people are not able to
approach the machine without the operator knowing.
Watch for holes, ruts, bumps, rocks, or other
hidden
objects. Uneven terrain could
overturn the machine.
Tall grass can hide
obstacles.
DO NOT mow on moist or wet grass. Tracks
may
lose traction causing a loss of control.
Use extra care while operating machine with
grass
catchers or other attachments; they can affect the
stability of the machine. DO NOT use these
attachments on steep slopes.
Keep all movements on the slope slow and
gradual.
DO NOT make sudden changes in speed or
direction, which could cause the
machine to roll over.
Avoid starting, stopping, or turning on a
slope. If the
tracks lose traction, disengage
the blade(s) and
proceed slowly straight
down the slope.
Operation on slopes may lead to loss of
steering
control. When operating on slopes
be prepared to
react to an emergency situation.
DO NOT park on slopes unless necessary. When
parking on slope ALWAYS chock or
block wheels.
ALWAYS set parking brake.
Choose a low ground speed to better maintain
traction.
DO NOT bypass transmission or allow
transmission
to free-wheel when on a slope.
8

Fuel
To avoid personal injury or property damage, use
extreme care in handling gasoline. Gasoline is
extremely flammable and the vapors are explosive.
Ethanol blends must not exceed E10. Higher
ethanol content may cause your machine to run
hotter and damage your engine.
Replace fuel cap securely and clean up spilled fuel
before starting engine.
Extinguish all cigarettes, cigars, pipes and other
sources of ignition.
Use only an approved gasoline container.
NEVER store the machine or fuel container where
there is an open flame, spark or pilot light such as
on a water or space heater or other appliances.
NEVER fill containers inside a vehicle or on a truck
or trailer bed with a plastic liner.
ALWAYS place containers on the ground away from
your vehicle before filling.
NEVER fuel the machine indoors.
NEVER remove gas cap or add fuel with the engine
running. Allow engine to cool before fueling.
Fuel is highly flammable and its vapors are
explosive. Handle with care. Use only an approved
gasoline container with an appropriately-sized
dispensing spout.
NO smoking, NO sparks, NO flames.
Remove gas-powered equipment from the trailer
and refuel it on the ground. If this is not possible,
then refuel such equipment with a portable
container, rather than from a gasoline dispenser
nozzle.
Keep the nozzle in contact with the rim of the fuel
tank or container opening at all times until the
fueling is complete. DO NOT use a nozzle lock-open
device.
NEVER overfill fuel tank. Replace gas cap and
tighten securely.
If fuel is spilled on clothing, change clothing
immediately.
Towing/Transporting
Follow the manufacturer’s recommendations
for
weight limits for towed equipment and
towing on
slopes.
NEVER allow children or others in or on towed
equipment.
Only load or unload machine utilizing the proper
weight approved ramps and/or trailer equipment.
Do not transport machine without at least two (2) tie
downs rated for at least 3000 pounds each.
Tow only with a machine that has a hitch designed
for towing. DO NOT attach towed equipment except
at the hitch point.
On slopes, the weight of the towed equipment may
cause loss of traction and loss of control.
Travel slowly and allow extra distance to stop.
Accessories
Use only recommended attachments that are
appropriate to your machine and can be used safely
in your application.
Follow the manufacturer’s recommendation
for
wheel weights or counterweights.
Check grass catcher components and the
discharge guard frequently and replace with the
manufacturer’s recommended parts, when
necessary.
Batteries
Do not jump start mower. Transmitter electronics
may be destroyed.
Avoid electric shock. Objects contacting
both battery
terminals at the same time may
result in injury and
unit damage. DO NOT
reverse battery connections.
Reverse connections may result in sparks which can
cause serious injury. ALWAYS connect positive (+)
lead of charger to positive (+) terminal, and negative
(-) lead to negative (-) terminal.
ALWAYS disconnect negative (-) cable FIRST and
positive (+) cable SECOND. ALWAYS connect
positive (+) cable FIRST, and negative (-) cable
SECOND.
Explosive gases from battery can cause death or
serious injury. Poisonous battery fluid contains
sulfuric acid and its contact with skin, eyes or
clothing can cause severe chemical burns.
No flames, No sparks, No smoking near battery.
ALWAYS wear safety glasses and protective gear
near battery. Use insulated tools.
ALWAYS keep batteries out of reach of children.
Battery posts, terminals and related accessories
contain lead and lead compounds, chemicals known
to the state of California to cause cancer and
reproductive harm. Wash hands after handling.
Rollover Protection System (ROPS)
Frequently inspect ROPS for damage or loose
hardware.
Use extreme care when working close to fences,
ditches, or on hills.
Check overhead clearance carefully before guiding
machine under any objects.
9

Service
The use of non-genuine replacement parts
or
accessories could adversely affect
machine operation
and safety.
Do not change engine governor setting or
overspeed the engine.
Maintain or replace safety and instruction labels as
necessary.
Keep unit free of debris. Clean up oil or fuel spills.
ALWAYS block tracks and know all jack stands are
strong and secure and will hold weight of unit during
maintenance.
Release any pneumatic or hydraulic pressure from
components slowly.
NEVER attempt to make any adjustments to unit
while engine is running (except where specifically
recommended). Stop engine, remove key and spark
plug wire and wait for all moving parts to stop before
servicing or cleaning.
Lower cutting deck unless a positive mechanical
lock is used.
Allow engine to cool before servicing.
Moving parts can cut or amputate fingers or a hand.
On multiblade mowers, rotation of one blade will
cause all blades to rotate.
NEVER weld or straighten mower blades.
NEVER make adjustments or repairs with the
engine running.
Do not perform any work on the machine unless the
key is removed and the remote is turned off.
Do not perform work on the machine before tracks
are blocked from rolling and emergency brake is
applied (if unit is so equipped).
Do not change blades on the machine until tracks
are blocked, key is out, and controller is off.
Mower blades are sharp. Wrap the blade or wear
gloves, and use extra caution when servicing them.
ALWAYS keep body and hands away from pin holes
or nozzles which eject hydraulic fluid under
pressure.
Foreign fluid, such as hydraulic fluid, injected into
body can result in gangrene. Such fluid must be
surgically removed within a few hours by a doctor
familiar with this form of injury.
Transporting Unit
Use extra care when loading or unloading
the
machine into a trailer or truck.
Secure unit chassis to transport vehicle. NEVER
secure from rods or linkages that could be
damaged.
DO NOT transport machine while engine is running.
ALWAYS turn off power to attachment.
Always shut off fuel when transporting unit.
Storage
NEVER store unit with fuel in fuel tank inside
a
building where any ignition sources are
present.
Keep machine free of grass, leaves or other debris
build-up. Clean up oil or fuel spillage
and remove
any fuel-soaked debris. Allow
machine to cool before
storing.
For extended storage, close fuel shut off valve and
clean unit thoroughly. See engine
manual for proper
storage.
ASSEMBLY
WARNING: Avoid Injury
Read and understand the
Safety
section before
proceeding.
1. Remove wrap and packaging materials from
unit.
2. Remove unit from shipping container. See
Move Unit Manually on page 15.
3. Remove hardware from negative (-) battery
cable, but DO NOT discard.
4. Secure negative (-) battery cable to negative
(-) battery terminal with hardware removed
in Step 3.
5. Check track tension. See Track Tension on
page 21 and Specifications on page 35.
6. Make sure deck is level. See Level and
Pitch Mower Deck on page 30.
7. Ensure all hardware is tight.
10

CONTROLS AND FEATURES
WARNING: Avoid Injury
Read and understand the
Safety
section before
proceeding.
Figure 3 displays the controls and features locations.
Figure 3 (key on next page)
1
2
3
5
4
6
7
7
8
8
20
15
14
13
9
9
10
11
12
16
17
18
19
22
23
24
25
21
11

1. Ignition Key
2. Throttle Control Lever
3. Emergency Stop
4. Hour Meter
5. Oil Pressure Warning Light
6. Malfunction Indicator Light
7. Fuel Tank and Cap (2)
8. Fuel Gauge (2)
9. Hydraulic Oil Expansion Tank (2)
10. Oil Fill/Dipstick
11. Oil Drain (not visible)
12. Engine Oil Filter (not visible)
13. Air Filter
14. Deck Lift Handle
15. Height-of-Cut Adjustment System
16. Transport Lock Release Lever
17. Fuel Tank Selection On/Off Valve
18. Hood Latch
19. Battery
20. Parking Brake (if equipped)
21. Rollover Protection Structure (ROPS)
22. Transaxle Bypass Valve (2) (under fans)
23. Anti-Scalp Wheel (2)
24. Tool-less Belt Cover (2)
25. Fuse Box
IGNITION KEY
See Figure 4.
Controls power to the engine. The key cannot
be
removed when in the On position.
Figure 4
THROTTLE CONTROL LEVER
See Figure 5.
Controls engine speed.
Figure 5
EMERGENCY STOP SWITCH
See Figure 6.
Controls power to the mower. The engine will not
start with the Emergency Stop switch in the down
position.
Figure 6
FUEL VALVE
See Figure 7.
Controls fuel flow to the engine. Directs fuel from left
or right fuel tank or stops all fuel flow.
Figure 7
OIL PRESSURE WARNING LIGHT
See Figure 8.
Illuminates when oil pressure is low. Stop engine
immediately and refer to engine manual.
12

Figure 8
MALFUNCTION INDICATOR LIGHT
Illuminates when an engine-related problem occurs.
Stop engine immediately and refer to engine
manual.
DECK LIFT HANDLE.
Raises mower deck to change height of cut setting.
HEIGHT-OF-CUT ADUSTMENT
SYSTEM
Sets the height of cut.
TRANSPORT LOCK
Locks mower deck in the highest position for
transporting or moving unit from one work area to
another. See Transport Unit on page 15.
TRANSAXLE BYPASS VALVES
Engage and disengage transaxles so unit can be
moved with the engine off.
ANTI-SCALP WHEELS
Help prevent the deck from contacting the ground
and scalping the lawn when mowing over high spots.
TRANSPORT LOCK RELEASE LEVER
See Figure 9.
Releases deck from transport lock position.
Figure 9
HOUR/MAINTENANCE METER
Measures and displays engine runtime. Some
models also display service alerts and
recommended service intervals.
PARKING BRAKE LEVER
See Figure 10.
Engages the parking brake. The mower will not drive
with brake engaged (on).
Figure 10
SAFETY INTERLOCK SYSTEM
Monitors the interaction of various unit
features for
operator safety.
BEFORE OPERATION
WARNING: Avoid Injury
Read and understand the
Safety
section before
proceeding.
1. Know how to stop in an emergency. See
Emergency Stopping on page 14.
2. Check fuel level and add fuel if needed.
IMPORTANT: Use fresh unleaded fuel with an
octane rating of at least 87. DO NOT use E85
blended fuels: the engine is not E20/E30/E85
compatible. The maximum recommended
ethanol content is 10%. RC Mowers recom-
mends using a quality fuel stabilizer in all fuel.
See Short-Term Storage on page 34.
3. Check engine oil level and add oil if needed.
Refer to engine manual.
4. Check hydraulic oil level. See Check
Hydraulic System on page 19.
5. Check condition of air cleaner. Refer to
engine manual.
6. Check function of all controls
13

SET CUTTING HEIGHT
See Figure 11.
1. Pull mower lift handle forward until transport
lock engages.
2. Insert adjustment pin through desired setting
in height-of-cut adjustment system.
3. Move mower lift handle slightly forward,
release transport lock and slowly release
mower lift handle until it contacts adjustment
pin and stops.
Figure 11
OPEN FUEL VALVE
See Figure 12.
•
Turn fuel valve toward the left or right fuel
tank to use fuel from that tank.
•
Move valve to the off position when storing
or transporting unit.
Figure 12
OPERATION
WARNING: Avoid Injury
Read and understand the
Safety
section before
proceeding.
IMPORTANT: All references to left, right, front, or
rear are given from the perspective of operator
standing behind the machine, facing the direction of
forward travel.
EMERGENCY STOPPING
WARNING: Avoid Injury
Operating on slopes may lead to loss of
steering control. Be prepared to react.
1. Push Emergency Stop
2. Engage parking brake
3. Set PTO switch to Off position
4. Turn key to Off position and remove from
ignition.
START THE ENGINE
1. Engage parking brake.
2. Turn fuel valve to appropriate tank.
3. Ensure PTO switch is off.
4. Move throttle to 3/4 fast position.
5. Place key in ignition and turn to on position.
6. Secure remote from carrying case and turn
remote on.
7. Remote signal indicator will illuminate to
confirm connection with machine and strobe
light on machine will turn on (if so
equipped).
8. Step away from machine a safe distance.
9. Press Start button on remote control.
OPERATE UNIT
1. Start the engine. See Start the Engine on
page 14.
2. Release parking brake.
WARNING: Avoid Injury
Move the steering joystick slowly and
keep the throttle at slow speed until you
learn how to operate the unit.
3. Move throttle to the full fast position.
4. Press “Enable” button.
5. Use joystick to position mower.
6. Engage PTO to begin mowing.
IMPORTANT: Never engage the PTO if the
mower is plugged with grass or debris. This
may
cause damage to the electric clutch.
14

IMPORTANT: Aggressive turning can scuff or
damage lawns. Always keep both tracks
rotating
when making sharp turns. DO NOT
make turns with
inside tracks completely
stopped. For minimum
turning radius, slowly
reverse inside track while
moving outside
track slowly forward.
For Best Mowing Results
•
Cut grass when it is dry.
•
Keep mower blades sharp.
•
Keep mower deck properly leveled.
•
Adjust anti-scalp wheels to prevent
scalping.
•
Do not set height of cut too low. For very
tall
grass, mow twice.
•
Do not travel too fast.
•
Mow with engine at full throttle.
•
Change cutting pattern with each mowing.
•
Do not allow grass or debris to collect
inside
mower deck. Clean after each use.
STOP THE ENGINE
WARNING: Avoid Injury
Wait for all moving parts to stop before
leaving operator’s position.
1. Ensure PTO is disengaged.
2. Turn off remote control (thereby sending a
signal to machine to turn off).
3. Approach the throttle control side of the unit
and turn throttle to low.
4. Turn key to off position and remove.
5. If preparing for transport, turn fuel valve off.
6. Place key and remote in secured carrying
case.
MOVE UNIT MANUALLY
See Figure 13.
Bypass the transaxles to move the unit with
the
engine off.
1. Place unit in service position. See Service
Position on page 17.
2. Turn both transaxle bypass valves 1/4 turn
clockwise to the bypass position.
3. Release parking brake and push unit to
desired location.
4. Engage parking brake.
5. Turn both transaxle bypass valves 1/4 turn
counterclockwise to operating
position.
6. Return hood to operating position.
Figure 13
TRANSPORT UNIT
1. Pull deck lift handle completely forward to
engage transport lock.
2. Move unit to transport vehicle.
3. Stop engine, engage parking brake,
remove
key from ignition and turn fuel
valve to off
position.
4. Secure mower frame to transport vehicle.
NOTICE: NEVER secure unit to vehicle from
rods or linkages that could be damaged.
RELEASE TRANSPORT LOCK
1. Pull deck lift handle forward and lift
transport
lock release lever.
2. Slowly return mower lift handle to resting
position.
MOWING INSTRUCTIONS
WARNING:
When mowing, the best position is at
the top of the slope looking downward
at the machine.
Certain situations may require the oper-
ator to be at the bottom of the slope.
If it is necessary for the operator to be at the bottom
of the slope, the operator and any observers must
never be directly downslope from the mower in case
the mower were to slide or roll over.
When mowing from below, all persons must be at
least 30' to the side of the mower at all times. If the
15

mower must cross the path of any person that is
downhill from the machine, those persons must be
on level ground, 30' back from where the slope
transitions above 10 degrees. (See Figure 14.)
Figure 14
While a rollover is rare, it is possible in certain
conditions. The machine is very heavy and if it were
to roll over a person, it will likely result in severe
injury or death.
If operating from the bottom of a slope, the operator
must know what is at the top of that slope and
beyond. There may be bystanders, steep drop-offs,
or other hazardous terrain.
The operator must have control of the area that is
not within direct sight so that onlookers are not able
to approach the machine without the operator
knowing.
MOWING TECHNIQUES
There are three basic techniques to mowing
embankments: 45° diagonal, horizontal, and vertical.
Diagonal
Running the mower on a diagonal 45° angle from
the slope is normally the best way to mow most
embankments.
This will allow you to easily turn the mower around at
the top and bottom, ensuring the cutting direction is
always at the front of the mower.
This also minimizes the possibility of erosion or track
marks. Mowing in this manner allows you to keep
moving from left to right on the slope to maintain a
safe operating distance from your machine.
Horizontal
Choose an area to mow that is about 100' long
from left to right.
Stand in a safe location above the mower and at
approximately half way from left to right of the
selected area.
Mow horizontally from side to side. Rotate the
mower at the end of your selected area (or before
you lose good visual line-of-sight from the mower)
then mow back toward the other end of the area.
Once the area is completely mowed, repeat this
process on the next section of the embankment.
Vertical
Mowing vertically (straight up and down the slope)
may work for certain situations. This is accomplished
by driving the machine up and down the slope,
turning it around when you reach the top or the
bottom.
When mowing in this manner you may continue to
move with the machine to your left or right and mow
up and down.
Ensure that you know what is at the top of the slope
and control who or what is beyond the sightline over
the hill.
The vertical mowing technique is not advised above
a 35° slope angle as this may cause the tracks to dig
into the terrain, lose grip, or even spin out (different
soil types and vegetation conditions affect traction).
APPROACHING TRANSITIONS:
When transitioning sharply from a steep slope to a
flat area at the bottom of the embankment (or into a
valley or ditch), do so at a diagonal 45° angle or less
to prevent the front or back of the machine from
digging into the terrain.
When transitioning over the crest of a hill (or when
exiting a ditch or valley onto a flat area), do so at a
vertical approach only.
The tracks are wide and the ground clearance over
the mowing deck is small, allowing hill crests and
other convex ground features to contact the mowing
deck if crossing these transitions at a diagonal or
horizontal approach (i.e., high centering).
When first mowing these areas, it may be helpful to
turn off the PTO switch to prevent scalping of the hill
until the operator understands the best approach to
prevent ground contact with the mowing deck.
APPLICATION OF TECHNIQUES
Soil/Sod types can affect mowing performance.
•
Loose soil/light sod – mow diagonal only.
•
Loose soil/heavy sod – mow diagonal or
horizontal.
•
Stable soil/light sod – mow diagonal or
horizontal.
•
Stable soil/heavy sod – mow diagonal,
horizontal, or vertical.
16

MAINTENANCE
WARNING: Avoid Injury
Read and understand the
Safety
section before
proceeding.
Proper maintenance can prolong the life of
unit. The
Maintenance Schedule on page 18 shows the
recommended service schedule.
Your RC Mowers dealer can provide service and
adjustments to keep your unit operating at
peak
efficiency. Contact an authorized engine
manufacturer’s service center for engine service.
More frequent service may be required due to
working conditions (heavy loads, high ambient
temperatures, dusty conditions, or airborne debris).
See the maintenance instructions in the
Engine
Manual for additional information.
SERVICE POSITION
1. Park unit on a flat, level surface.
2. Stop engine, remove key and wait for
moving parts to stop and for hot parts to
cool.
3. Engage parking brake.
4. Pull hood latch and rotate hood forward.
5. Chock tracks. Strap and clamp unit onto
lift,
if used.
WARNING: Avoid Injury
Hood assembly is heavy. Secure your
footing to accommodate weight shift
when rotating hood forward.
HOUR / MAINTENANCE METER
Timer-only Models
Timer measures engine runtime and cannot
be reset.
Maintenance Models
See Figure 15.
When the key is in the on position, the Timer mode
displays. Press the Mode button to toggle between
different modes.
Timer: Measures engine runtime until reset. To reset
the timer, press the Mode button to select TMR1
mode and then hold Mode button for 3 seconds.
IMPORTANT: Turn ignition key to the off
position
when unit is not in use. Some meters
may count
hours when the key is in the on
position, even if the
engine is off. This results
in inaccurate maintenance
intervals.
Figure 15
Service Alerts: Counts down hours until
service is
needed and displays
“Now” when
service is due.
Service time is measured for:
•
Engine oil and filter changes (CHG OIL)
•
Hydraulic oil and filter changes (CHG H
OIL)
•
Air filter service (SVC AIRFILTER)
The service intervals preset into the hour
meter are:
•
Hydraulic oil and filter: First 75 hours and
every 400 hours thereafter
•
Engine oil and filter: First 25 hours and
every
100 hours thereafter
•
Air filter: Every 100 hours
NOTICE: The preset engine oil services
intervals are
normal recommended intervals.
Specific engine
manufacturer’s
recommendations may vary.
To clear a service message, press the Mode button
to select Service Alert mode and then hold the Mode
button for 3 seconds.
17

Service Performed
Each Use
Every 25 hrs
Every 50 hrs
Every 100 hrs
Every 400 hrs
Every 500 hrs
Check Hydraulic
System •
Check Engine Oil *
•
Change Engine Oil *
Check Tire Pressure
•
Check Mower
Blades
•
Check Air Filter *
•
Check Carbon
Canister Filter
•
Lubricate Unit
•
Check Parking
Brake
•
Clean Battery
•
Clean Engine
Cooling System *
•
Check Fasteners
•
Check Belts
•
Change Hydraulic
Oil and Filter **
•
Lubricate Caster
Fork Bearings
•
Lubricate Caster
Wheel Bearings
•
Adjust Clutch‡
•
* Refer to engine manual for instructions.
** Change after first 75 hours of operation.
‡ Adjust clutch every 500 hours or once per
season if used
less than 500 hours.
MAINTENANCE SCHEDULE
SERVICE PARTS
Contact RC Mowers to purchase service
parts for
your unit.
Common Service Parts
Description
Qty.
Part No.
PTO Belt (Engine to Deck) – 52
1
850100
Mower Drive Belt – 52
1
850110
Mower Blade – 52
3
850120
Mulching Blade – 52
3
850130
PTO Belt (Engine to Deck) – 60
1
850140
Mower Drive Belt – 60
1
850150
Mower Blade – 60
3
850160
Mulching Blade – 60
3
850170
Transaxle Drive Belt
1
850180
Fuel Stabilizer – 118 ml (4 oz)
A/R
>Except Canada
850190
>Canada Only
850200
Hydraulic Oil Filter
2
850210
Hydraulic Oil and Filter Kit
1
850220
Relay
A/R
850230
Model TK-52XP
Description
Qty.
Part No.
Air Filter
1
850290
Engine Oil Filter
1
850300
Fuel Filter
1
850310
Muffler Gasket
1
850320
Track
1
850330
Model TK-60XP
Description
Qty.
Part No.
Air Filter (Outer)
1
850240
Air Filter (Inner)
1
850250
Engine Oil Filter
1
850260
Fuel Filter
1
850270
Track
1
850280
18
This manual suits for next models
2
Table of contents
Other RC Mowers Lawn Mower manuals