Redsun PW3-1/2G Service manual

OPERATING INSTRUCTIONS
AND PARTS MANUAL
Please read and save these instructions.
Read through this owner’s manual carefully before using product. Protect yourself and others by
observing all safety information, warnings, and cautions. Failure to comply with instructions could
result in personal injury and/or damage to product or property. Please retain instructions for future
reference.
MODEL: PW3-1/2G
V1701
3-1/2 GALLON PARTS WASHER

TABLE OF CONTENTS
SAFETY PRECAUTIONS
TABLE OF CONTENTS
PRODUCT SPECIFICATION
SAFETY INFORMATION
INSTALLATION STEPS
OPERATION
MAINTENANCE
TROUBLESHOOTING FOR VACUUM STYLE
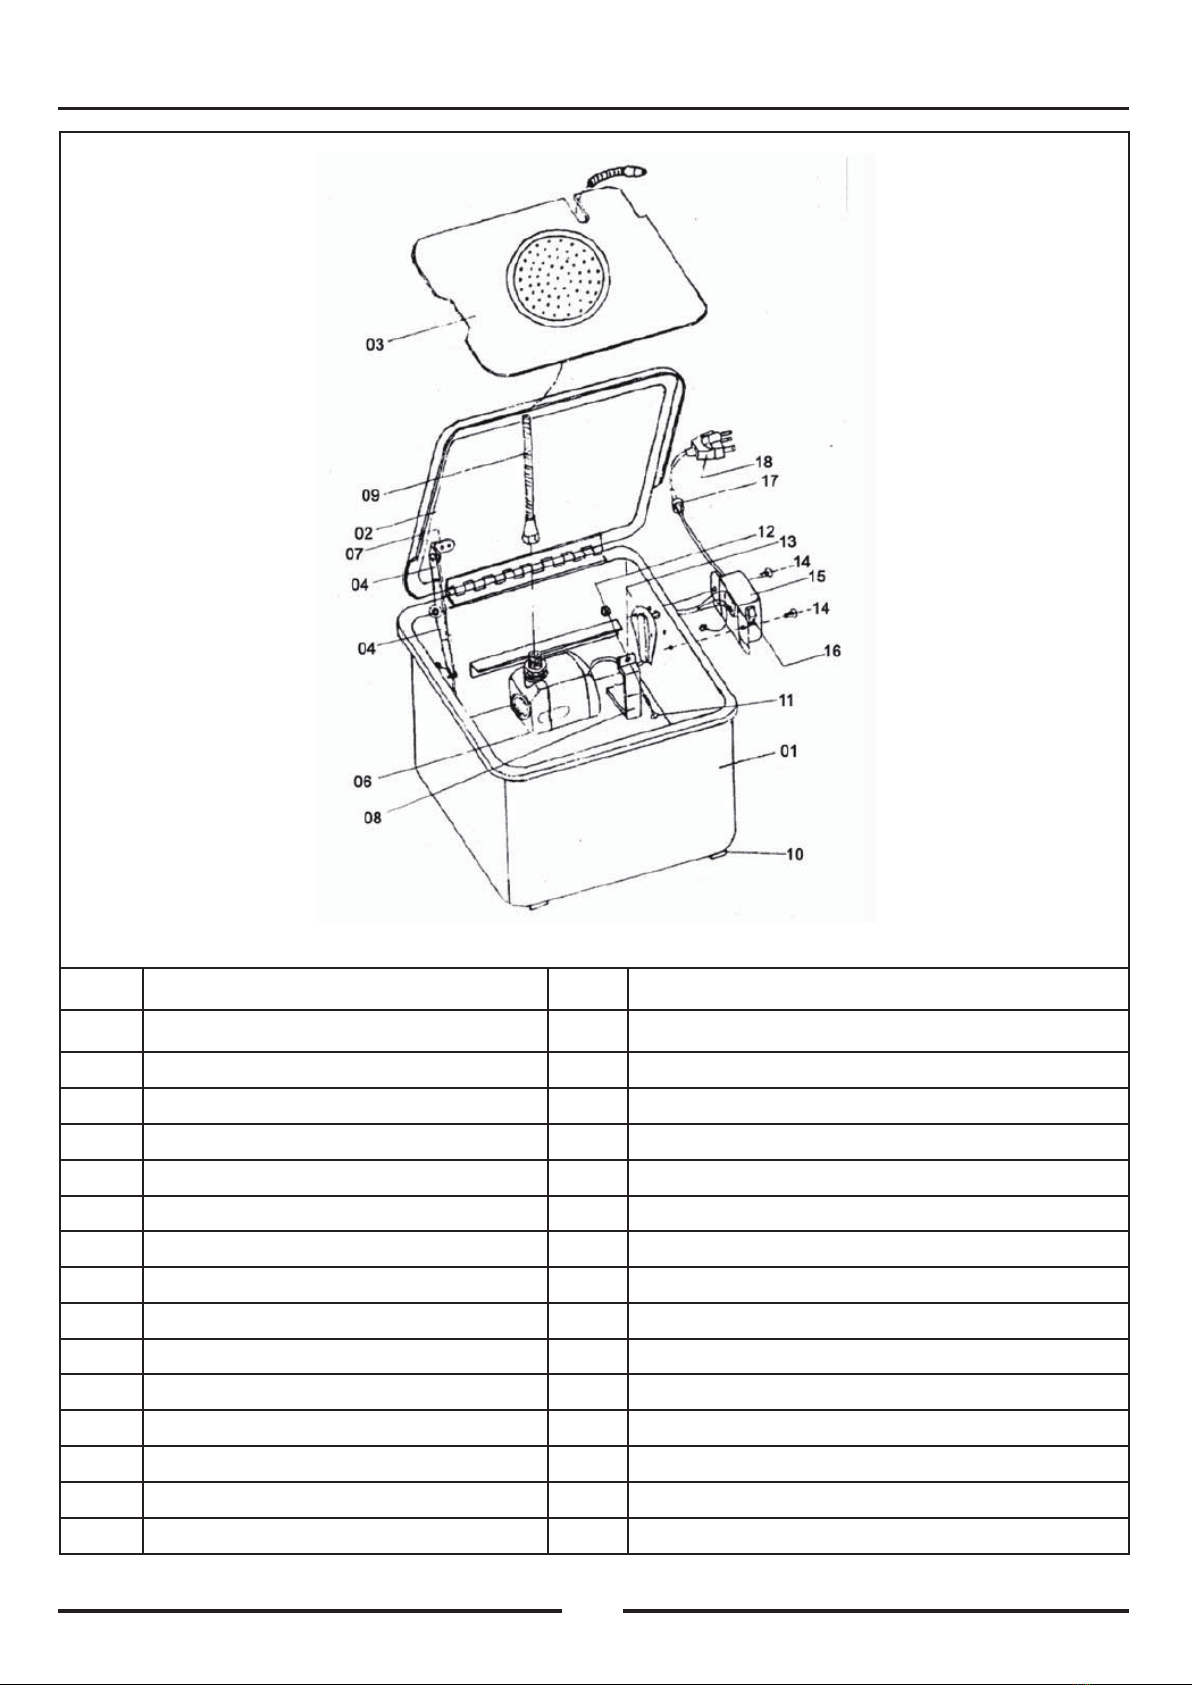
PARTS DIAGRAM
2
3
2
4
4
5
5
6
............................................................................................................................
.................................................................................
...............................................................................................................................
....................................................................................................................................
....................................................................................................................
..................................................................................................................
............................................................................................................
...................................................................................................................
GUARANTEE
This product is guaranteed against faulty manufacture for a period of 12 months from the date of
purchase. Please keep your receipt as proof of purchase. This guarantee is invalid if the product is
found to have been abused or tampered with in any way, or not used for its intended purpose.
Faulty goods should be returned to their place of purchase, no product can be returned to us without
prior permission.
This guarantee does not effect your statutory rights.
ALWAYS Learn the machine’s applications, limitations, and the specific potential hazards
peculiar to it. Read and become familiar with the entire operating manual.
ALWAYS wear suitable protective clothing, gloves and goggles, manufactured to the latest
European Safety Standards. Everyday eye glasses are not safety glasses.
ALWAYS clean off any accidental splashes of degreaser on the skin, seek medical attention
immediately if necessary.
ALWAYS follow degreaser manufacturer’s instructions carefully.
ALWAYS check for damage. Before using the washer, any damaged part, should be checked to
ensure that it will operate properly, and perform its intended function. Any damage should be
properly repaired or the part replaced. If in doubt, DO NOT use the machine. Consult your local
dealer.
ALWAYS disconnect the washer from the power supply before carrying out any maintenance or
cleaning of the parts washer.
ALWAYS keep work area clean. Cluttered areas and benches invite accidents, mop up
accidental spillages of degreaser immediately.
WARNING
2
AS WITH ALL MACHINERY, THERE ARE CERTAIN HAZARDS INVOLVED WITH THEIR OPERATION
AND USE. EXERCISING RESPECT AND CAUTION WILL CONSIDERABLY LESSEN THE RISK OF
PERSONAL INJURY.
HOWEVER, IF NORMAL SAFETY PRECAUTIONS ARE OVERLOOKED OR IGNORED, PERSONAL
INJURY TO THE OPERATOR OR DAMAGE TO PROPERTY, MAY RESULT.
1.
2.
3.
4.
5.
6.
7.
ALWAYS ensure that adequate lighting is available. A minimum intensity of 300 lux should be
provided. Ensure that lighting is placed so that you will not be working in your own shadow.
ALWAYS keep children away. All visitors should be kept a safe distance from the work area,
especially whilst operating the machine.
ALWAYS maintain machine in top condition. Keep washer clean for the best and safest
performance. Follow maintenance instructions.
ALWAYS ensure the switch is off before plugging in to mains. Avoid accidental starting.
ALWAYS concentrate on the job in hand, no matter how trivial it may seem. Be aware that
accidents are caused by carelessness due to familiarity.
ALWAYS keep your proper footing and balance at all times don’t over reach. For best footing,
wear rubber soled footwear. keep floor clear.

SAFETY PRECAUTIONS
INCLUDES
SPECIFICATIONS
ALWAYS Learn the machine’s applications, limitations, and the specific potential hazards
peculiar to it. Read and become familiar with the entire operating manual.
ALWAYS wear suitable protective clothing, gloves and goggles, manufactured to the latest
European Safety Standards. Everyday eye glasses are not safety glasses.
ALWAYS clean off any accidental splashes of degreaser on the skin, seek medical attention
immediately if necessary.
ALWAYS follow degreaser manufacturer’s instructions carefully.
ALWAYS check for damage. Before using the washer, any damaged part, should be checked to
ensure that it will operate properly, and perform its intended function. Any damage should be
properly repaired or the part replaced. If in doubt, DO NOT use the machine. Consult your local
dealer.
ALWAYS disconnect the washer from the power supply before carrying out any maintenance or
cleaning of the parts washer.
ALWAYS keep work area clean. Cluttered areas and benches invite accidents, mop up
accidental spillages of degreaser immediately.
(1) 3.5 Gallon capacity tub (1.5 gallon actual operating capacity)
(1) Parts tray
(1) Flexible, positionable metal “Gooseneck” fluid outlet tube with nozzle
(1) flow-thru parts brush with tube
3
Item Name PW3-1/2G
ALWAYS ensure that adequate lighting is available. A minimum intensity of 300 lux should be
provided. Ensure that lighting is placed so that you will not be working in your own shadow.
ALWAYS keep children away. All visitors should be kept a safe distance from the work area,
especially whilst operating the machine.
ALWAYS maintain machine in top condition. Keep washer clean for the best and safest
performance. Follow maintenance instructions.
ALWAYS ensure the switch is off before plugging in to mains. Avoid accidental starting.
ALWAYS concentrate on the job in hand, no matter how trivial it may seem. Be aware that
accidents are caused by carelessness due to familiarity.
ALWAYS keep your proper footing and balance at all times don’t over reach. For best footing,
wear rubber soled footwear. keep floor clear.
8.
9.
10.
11.
12.
13.
• 120 Volt AC, 60hz current requirement
• Maximum pump capacity @ outlet: 1 gallon per minute
• 3.5 gallon tub capacity, 1.5 gallon operating capacity

ASSEMBLY
OPERATION
4
• Thread the Flexible Metal “Gooseneck” Fluid Outlet
Tube onto the Pump Outlet Fitting (Fig A).
• Place the Parts Cleaning Tray over the ledges on the
walls of the tub. Make sure the Nozzle of the Flexible
Metal “Gooseneck” Fluid Outlet Tube is shaped to be
facing in and downward toward the center of the Tub
(Fig B).
• Fill unit with suitable, water-based degreasing
solution suffi ciently to cover the entire Pump (approx.
1.5 gallons) (Fig C).
Important Notes:
- Follow degreasing solution mixing, usage and safety
label instructions carefully before using.
- Be sure the cleaning solution level fully covers the
Pump or it will not function properly.
• Plug power cord into an approved, grounded and GFI
equipped 120 Volt AC, 60hz. outlet.
• Turn Power Switch to the “On” position. The Parts
Washer is now ready for use.
• Place parts to be cleaned on the Parts Tray.
• Allow cleaning solution to fl ow completely over the
part surface, wetting it completely. Allow time for
solution to soften any grease and debris then use a
suitable parts cleaning brush to remove stubborn
deposits.
• Let excess solution drain from parts then remove
from washer and rinse in warm water.
• When done, turn pump to the off position, close lid
and unplug unit.

MAINTENANCE
TROUBLESHOOTING
5
• Unplug unit and inspect the pump intake grill after
every hour of cleaning (Fig D). Clean more often if
removing excessively heavy deposits of grease and
grit. Important Note:
Failure to clean pump intake will result in diminished fl
uid fl ow, cleaning effectiveness and eventual pump
motor failure.
• If it becomes apparent that the pump intake grill
requires cleaning more often, it is likely that the
cleaning solution needs to be replaced and an
accumulation of sediment from the Tub bottom needs
to be removed.
- Drain and pour drain cleaning solution into suitable
containers and dispose of properly.
• If Fluid stops fl owing or fl ows sporadically, the Pump may not be fully submersed. The Pump
must be fully under the fl uid surface level to work properly (Fig C).
• If pump intake cleaning does not restore pump performance, an accumulation of dirt and grit
may be present in the Flexible Metal “Gooseneck” Fluid Outlet Tube.
- Unplug unit and remove Flexible Metal “Gooseneck” Fluid Outlet Tube and check for
obstructions lodged in tube and remove.

N.O. DESCRIPTION
PARTS DIAGRAM
6
PARTS LIST
Tank
Lid
Heavy-Duty Removable
Work Shelf
Fusible Linked Lid Arm
Pump
Rivet
Pump Holder
Flexible Metal Spigot
1
2
3
4
5
6
7
8
9
N.O. DESCRIPTION
Plastic Foot
M5x30 Screw
M5 Nut
Cover
M4x12 Screw
Switch Box
Switch
Strain Relief
Power cord
10
11
12
13
14
15
16
17
18
Table of contents