Rehan LOOKY 5 User manual

5
User Manual

5The Looky 5 logo is a trademark of
Rehan Electronics Ltd.
User manual V1.5

EnglishNederlandsDeutschFrançaisItalianoEspañol
English ...................................... 4
Nederlands................................ 21
Deutsch.................................... 38
Français ................................... 55
Itialiano.................................... 72
Español .................................... 89

4 Looky 5
EnglishEnglish
Table of contents
1. Introduction ......................................................... 5
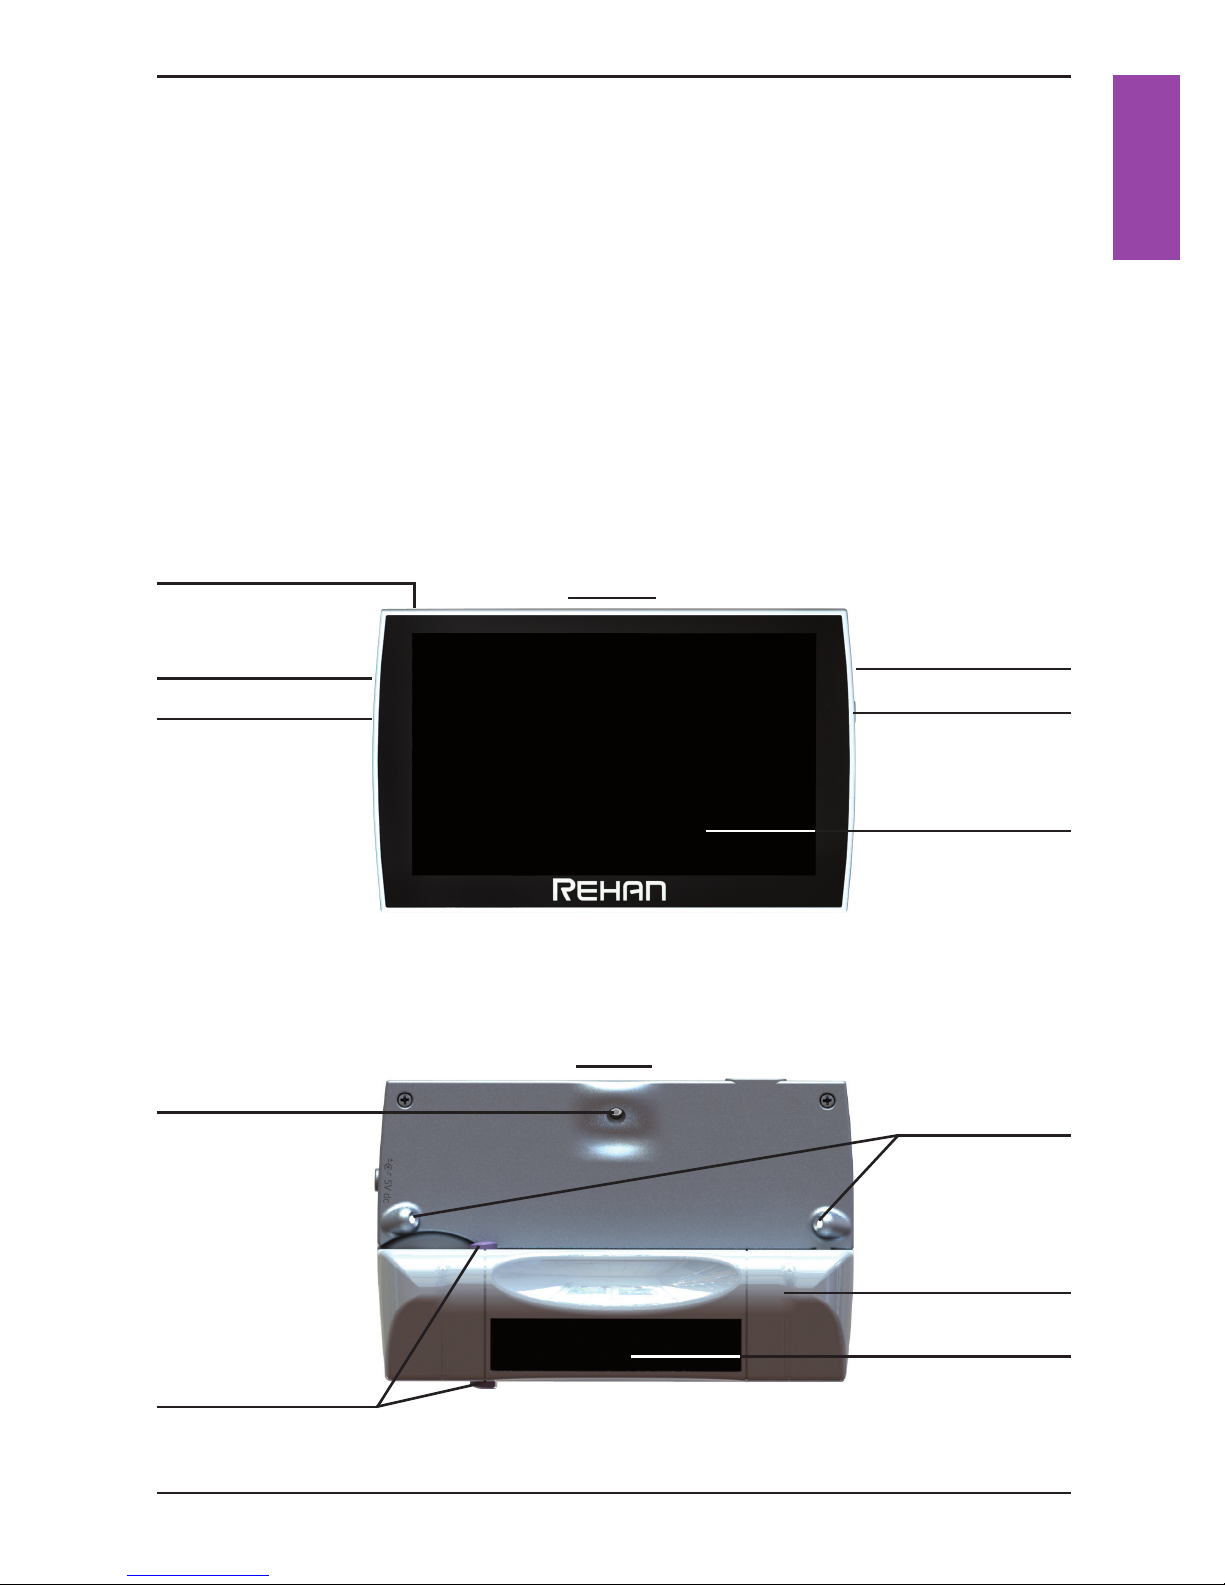
2. General description Looky 5 ..................................... 5
3. Intended use......................................................... 6
4. Safety and Maintenance ........................................... 6
5. Installing the Looky 5 .............................................. 7
6. Instructions for charging........................................... 7
7. Battery handle maintenance...................................... 8
8. Folding handle ...................................................... 8
9. Switching the Looky 5 on or off .................................. 9
10. Focusing the Looky 5 ............................................. 9
11. Far View function ................................................. 9
12. Switching off the LED............................................. 9
13. Display modes.....................................................10
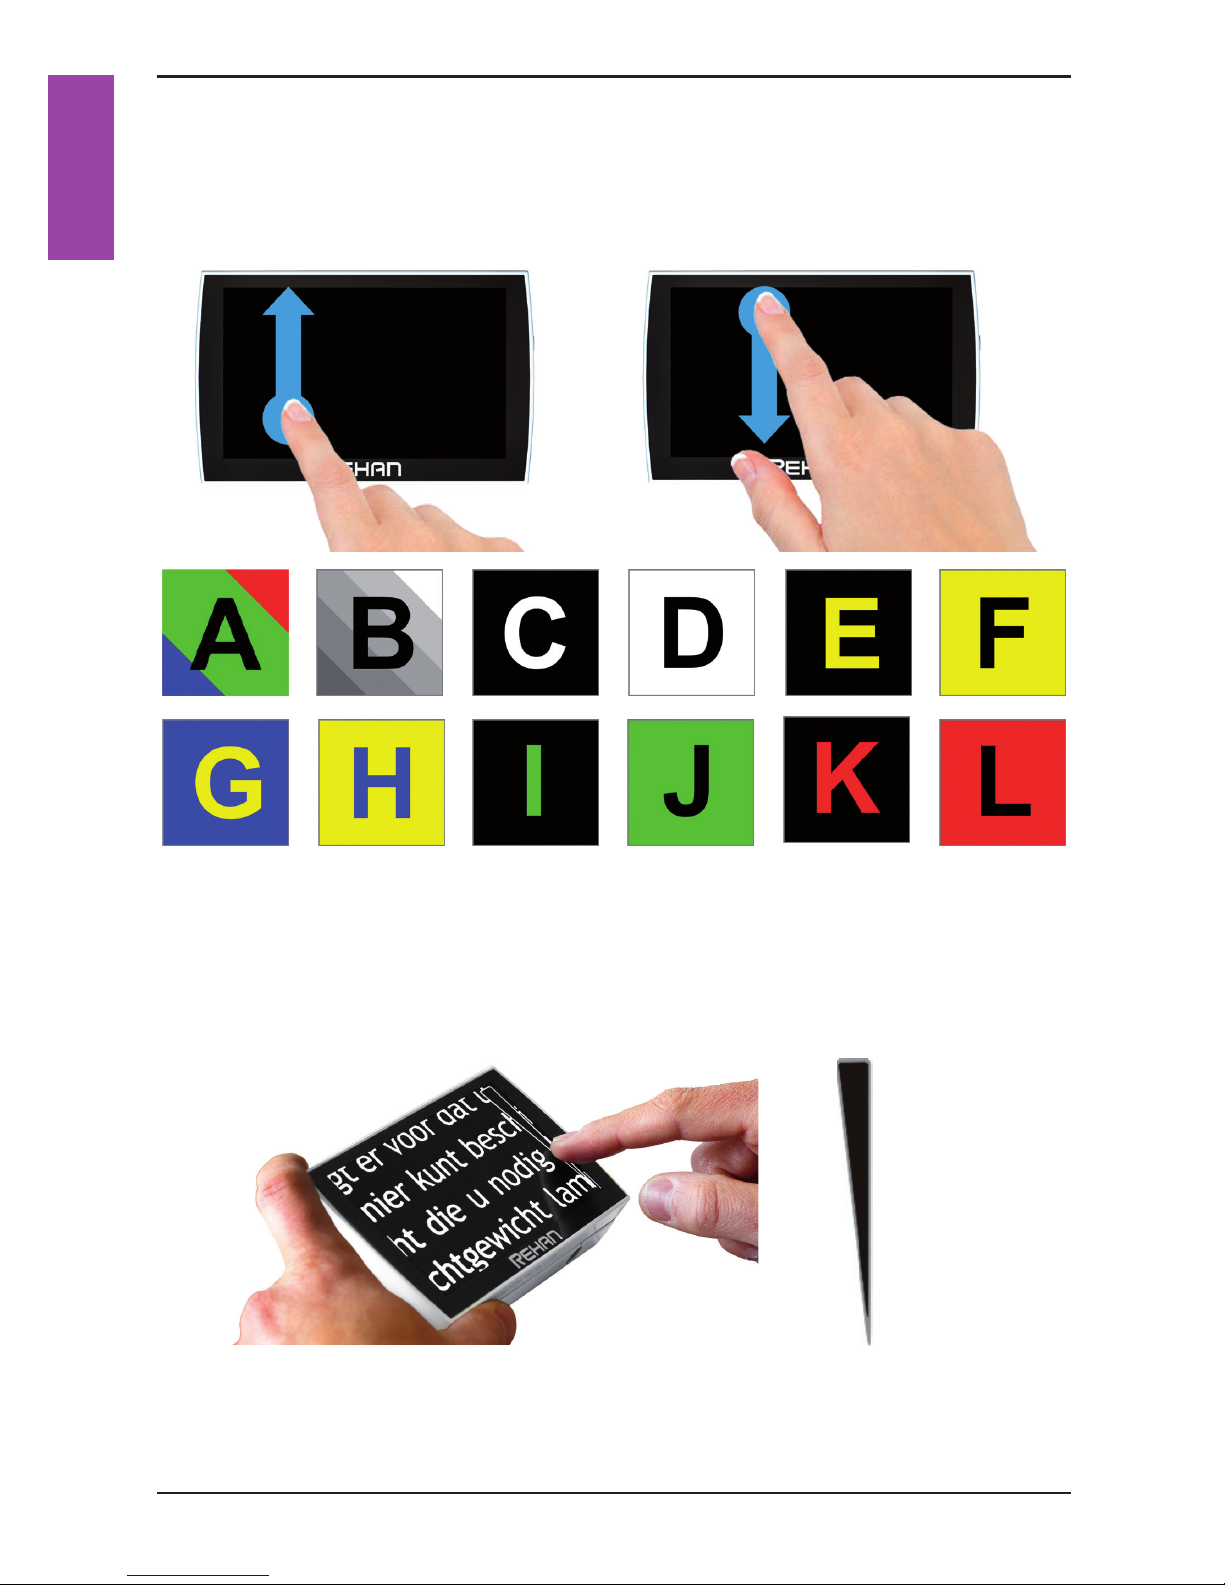
14. Zooming............................................................10
15. Freeze function...................................................11
16. Magnetic lines ....................................................11
17. Looky 5 menu .....................................................12
17.1 Sound, brightness and reading lines.......................12
17.1.1 Sound icon ................................................12
17.1.2 Brightness icon...........................................12
17.1.3 Reading lines .............................................13
17.2 Display modes and battery..................................13
17.2.1 Battery icon ..............................................13
17.2.2 Display mode icon .......................................14
18. Picture output ....................................................14
19. Writing with the Looky 5 .......................................14
20. Hidden menu access .............................................15
21. Troubleshooting...................................................18
22. Specications .....................................................19
23. Warnings ...........................................................20
24. Discarding the Looky 5 or battery .............................20
25. Warranty regulations ............................................20
26. Regulations........................................................20

5
English
1. Introduction
Congratulations with the purchase of your Looky5! In this manual
you will nd a detailed description of all the functions of the
Looky5. Read this manual carefully before you start using the
Looky5. If you still have any questions after reading this manual,
please contact your supplier.
2. General description Looky 5
On/Off button
Indicator LED
LED lighting
HD camera
Handle
Magnetic lines
Charging port
Handle release
HDTV port
Composite Video
5” HD screen
Front
Back

6 Looky 5
EnglishEnglish
3. Intended use
This device is solely used for displaying enlarged representations
of text, photographic material and objects. When the Looky
5 is used for any purpose other than the intended use, the CE
regulation will not apply.
Caution: do not, under any circumstances, perform main-
tenance or repairs on the device; always ask a manufacturer
approved technician to do this. Warranty will be voided if
the Looky 5 is attempted to be repaired by anyone other
than a technician approved by the manufacturer.
4. Safety and Maintenance
Before use, be sure to comply to with the following safety and
maintenance instructions:
• Protect the device and its batteries from moisture, rain, sand
or extreme temperatures like radiators or direct sunlight.
• Do not use cleaning products that contain alcohol, methylated
spirits, ammonia or abrasives. These can damage the device
or its touch screen.
• Onlyuseaccessoriesthatthemanufacturersuppliesyouwith,or
approves of.
• Never throw batteries into a re. Batteries and chargers that
are defect are considered chemical waste. They therefore need
to be disposed of at a refuse/recycling centre of your choice.
• Note that the use of a screen protector might inuence the
functioning of the touch screen.

7
English
5. Installing the Looky 5
Connect the battery handle of the Looky 5 by sliding it onto the
connector until you hear it clicking into place. This battery handle
also functions as the Looky5’s handle.
To replace the battery handle push the 2 purple battery release
buttons on the side of the battery handle, and slide on the
replacement battery handle.
Charge the battery handle completely before using the Looky5.
Please read the charging instructions carefully.
6. Instructions for charging
Put the adaptor in the wall socket and connect its plug to the
charging adaptor port of the Looky5.
LED burning constantly batteries are being charged
LED off batteries are fully charged
LED blinking error / batteries are defect
Charge the batteries in a well ventilated environment. Remove
the Looky 5 from its carrying case when charging. Don’t place it
in direct sunlight or near a radiator whilst charging.
When the battery is empty, the Looky 5 will switch itself off. You
will hear a high pitched tone that fades away.

8 Looky 5
EnglishEnglish
7. Battery handle maintenance
• Remove the battery handle from the Looky 5 if you do not intend
to use it for an extended period of time. This will
improve the longevity of the battery handle.
• Batteries are sensitive to overcharging. It is
recommended to only charge the battery handle when it is
completely drained.
• Chargeable Lithium-Ion batteries have an auto discharge that
strongly depends on the temperature of the
environment (e.g. never leave the battery handle in a car that
is parked in direct sunlight).
• New Lithium-Ion batteries must be charged several times
before reaching their nominal capacity.
• Charge Lithium-Ion batteries at least once every 6 months.
• The average lifespan of the battery handle is usually 300
charging cycles, but this depends on the use. Total capacity will
slowly decrease after multiple charging cycles.
8. Folding handle
The Looky 5 comes with a replaceable foldable handle with a
built-in battery. This handle can be used in several positions.
When the handle is extended, you can use the Looky
5 as a magnier. The closer you get to the object, the
bigger the magnication will be. You can also hold the Looky 5
up to see distant objects as the Looky 5 can focus from 5cm to
innity.
It is also possible to use the Looky 5 with the handle folded in. You
can easily set the device on the table and it will automatically
stand at an angle. The magnication will then be about 8x. This is
easier when you want some stability during the reading of texts.

9
English
9. Switching the Looky 5 on or off
To switch the Looky 5 on, press the ON/OFF button once. You will
hear a scaled sound increasing in pitch.
To switch the Looky 5 off, press the ON/OFF button for 3 seconds.
You will hear a scaled sound decreasing in pitch.
When the Looky 5 is switched on, and it doesn’t detect
any movement on the screen, it will switch itself off after
3 minutes. A two-pitched signal will be heard.
10. Focusing the Looky 5
The Looky 5 uses a push-to-focus method to focus the image on
the screen. Simply touch the screen on the section where you
want the Looky 5 to focus; the camera will focus on that area.
11. Far View function
The camera of the Looky 5 can focus on objects from 5 cm.
distance to innity. Just hold the device up to view the object.
Remember to touch the screen in order to focus the camera on
the object you are viewing.
12. Switching off the LED
By touching the centre of the screen for 1 second you can switch
off the LED at the back of the Looky5. You will hear a beeping
sound indicating that the LED is switched off.
Touch the centre of the screen again for 1 second to turn the LED
back on. Another beeping sound will be heard.

10 Looky 5
EnglishEnglish
13. Display modes
By swiping from the top to the bottom of the screen, or vice versa
you can cycle through multiple colour modes.
14. Zooming
To alter the magnication you slide your nger up/down on the
left or right hand side of the touch screen.
To zoom in slide your nger upwards on the zooming icon, to
zoom out, slide downwards on the zooming icon. The magnica-
tion range of the Looky 5 ranges from 2x to a 20x magnication.
or
Zooming
icon

11
English
15. Freeze function
By shortly pressing the ON/OFF button you can freeze the image
on the Looky5’s display. Press the button again to revert to the
regular viewing mode.
When the image is frozen, the lighting will be dimmed to save
battery capacity.
When the image is frozen, you can use 1 nger to pan through the
frozen image.
All functions of the Looky 5 can still be used while the image is
frozen.
16. Magnetic lines
On the bottom side of the handle, there is a magnetic area that
can be used with the magnetic sheet.
Slide the sheet underneath the text you want to read. Now place
the Looky 5 on the text and slide it across the magnetic sheet.
The ridges in the magnetic sheet will guide the Looky 5 along the
lines; making it easier to keep the Looky 5 straight while reading.

12 Looky 5
EnglishEnglish
17. Looky 5 menu
17.1 Sound, brightness and reading lines
Use 1 nger to touch the bottom section of the screen for 2
seconds to generate the sound menu, brightness menu and the
reading line option in the bottom half of the screen. These settings
will be saved when the Looky 5 is switched off.
17.1.1 Sound icon
With this icon you can switch the sound on or off.
17.1.2 Brightness icon
With this icon you can set the brightness of the screen. There are
5 different intensity settings.
sound on sound off
least brightness most brightness

13
English
17.1.3 Reading lines
By tapping this icon you can generate a horizontal or
vertical reading line on the screen.
17.2 Display modes and battery
Use 1 nger to touch the top section of the screen for 2 seconds
to generate the battery and display mode menu in the top half
of the screen.
17.2.1 Battery icon
This icon indicates the remaining battery life. There are 5
different icons to indicate this.
When the battery is charging, the menu will display
the charging icon.
When the adaptor is connected, but the battery is
not connected, this icon will appear.
battery empty battery full

14 Looky 5
EnglishEnglish
17.2.2 Display mode icon
By touching the display mode icon, an overview of all available
display modes will appear. You can easily select which display
mode you want to use.
18. Picture output
19. Writing with the Looky 5
Fold the handle inwards and
place it on the paper you want
to sign.
Composite video
HDTV
The Looky 5 can output the picture
to an external display. Do this
simply by connecting the appro-
priate cable to the HDTV port or
the Composite Video port.
Be sure to connect the Looky 5 to
an earthed TV for the best results.

15
English
20. Hidden menu access
The Looky 5 has a hidden menu consisting out of 6 sections where
you can customize certain aspects of the Looky 5 software to
your liking.
To enter the hidden menu keep the On/Off button pressed for at
least 4 seconds.
You can scroll through each section by swiping from top to bottom.
Swipe from right to left to select other options.
To exit the hidden menu, press the On/Off button once.
20.1 Enabling/Disabling colour modes
By enabling or disabling colour modes in this section of the hidden
menu you can determine which colour modes are available during
basic use of the Looky 5.
Please note that, regardless of which colour modes have been
disabled, all colour modes can still be accessed via the Looky 5
menu (see chapter 17.2.2 for more information).
Note: the full colour mode cannot be disabled.
Tap the tick box to disable the
selected colour mode.
Tap the cross box to re-enable
the selected colour mode.

16 Looky 5
EnglishEnglish
20.2 Refresh Rate
In this section you can change the refresh rate of the TFT.
20.3 User interface option
The Looky 5 has 3 user interface options that the user can choose
from: standard, basic or basic continuous. The standard user
interface is explained in chapter 15.
The basic user interface only contains the zoom, display mode
and freeze image functions.
The Basic Continuous user interface is the same as the basic
user interface with the exception that it doesn’t disappear auto-
matically when the screen hasn’t been operated in 2 seconds.
Combined with the included masking sticker this can create an
easier to use interface.
Applying the masking sticker
Take the supplied masking sticker
from the backing sheet and place
it with the rounded side to the
right on the right side of the
screen so that it exactly surrounds
the buttons of the basic conti-
nuous-user interface.
50 Hz 60 Hz
Standard Basic
2sec
Basic continuous

17
English
20.4 Enable/Disable 3 minute auto shutdown
When the Looky 5 does not detect movement for 3 minutes, it
automatically shuts itself down to preserve battery capacity. This
feature can be switched off in the hidden menu.
20.5 Enable/Disable reading lines
In this section you can choose whether to enable/disable the
horizontal or vertical reading lines. Swipe from right to left to
switch between the horizontal and vertical reading lines.
20.6 Software information
This section shows the software
version of the Looky 5.
Tap the tick box to disable the
horizontal reading line.
Tap the cross box to re-enable
the horizontal reading line.
Rehan Electronics
Looky HD Touch
Version X.X

18 Looky 5
EnglishEnglish
21. Troubleshooting
If the following table does not offer a solution to your problem,
please contact your distributor.
Problem Solution
1 No picture, dark
or blurry image.
• Switch the Looky 5 on.
• Image is frozen, shortly press the
ON/OFFbutton once.
• Switch the viewing mode to colour.
2 Looky 5 cannot be
switched on. • Press the ON/OFF button to switch
the Looky 5 on.
• Charge the battery handle.
• Reinsert or replace the battery
handle.
3 Looky 5 switches
itself off within
minutes, sounding
a dual-pitched
tone.
• The Looky 5 switches itself off if it
does not detect movement on the
screen for 3 minutes.
4 Looky 5 switches
itself off within
minutes with
a single high
pitched tone that
fades away.
• Charge the battery handle.
• Replace the battery handle with a
new battery handle.

19
English
22. Specications
Main specication
Measurements 131 × 75 × 32 mm (l × w × h)
Weight 300 grams (including battery)
Dislay
TFT diameter 5.0”
Other specications High Brightness
Touch technology
Camera
Minimum magnication 2×
Maximum magnitation 20×
Focus 5cm - infinity
Power supply
Battery system Interchangable (inside battery handle)
Lithium-Ion 4000mAh
Adaptor 5VDC/1.8A
Conditions of use
Temperature +5°C till +35°C / 50°F till 95°F
Air humidity <70% (no condensation)
Time of use and charging time
Time of use Up to 3 hours
Charging time approx. 5 hours
Package contents
Looky5
Battery handle (4000mAh)
Charging adapter
Travel pouch
Magnetic sheet
User manual
HDTV cable
SDTV cable
Cleaning cloth

20 Looky 5
EnglishEnglish
23. Warnings
24. Discarding the Looky 5 or battery
This symbol of the crossed out wheelie bin indicates
that the product must not be disposed of with your
other household waste. Check local regulations for
proper disposal of electronic products.
25. Warranty regulations
This device is subject to the warranty regulations of your supplier.
For futher information regarding these regulations, please contact
your supplier.
26. Regulations
Products with CE marking comply with EMC Directive (2004/108/
EC), and the Low Voltage Directive (2006/95/EC) issued by the
Commission of the European Community.
Compliance with these directives implies conformity to the
following standards:
EMC: EN 55022; EN 55024
FCC: part 15 Class B
Safety: EN 60950
Warning This icon indicates that users with pacemakers
should take care with the magnetic area of the
handle on the Looky 5 as this might, depending on
your pacemaker, interfere with the pacemaker.
Please contact your surgeon to inform yourself
on the effects of magnets with your pacemaker.
Table of contents
Languages: