Rekam DVC-540 User manual

DIGITAL CAMCORDER
DVC-540
USER MANUAL

CONTENTS
1. PREPARING FOR USING .................................................................3
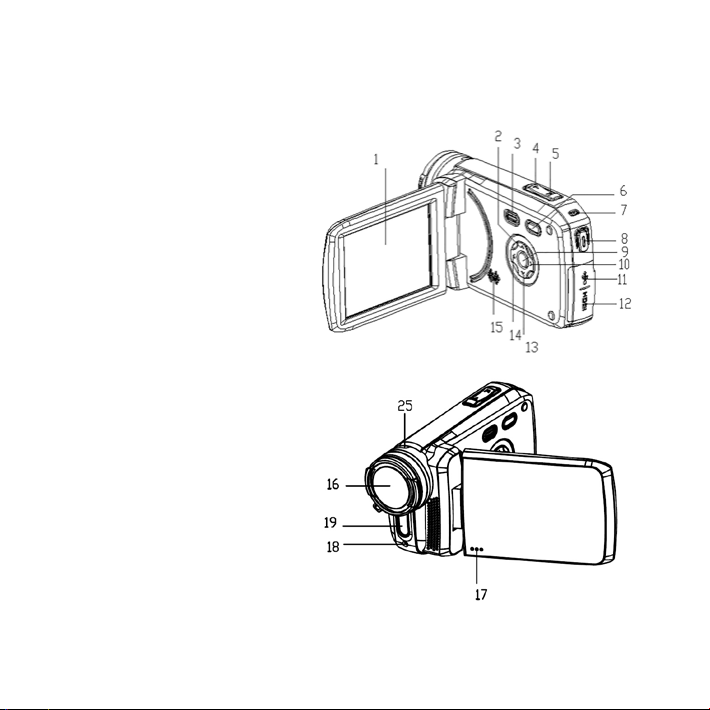
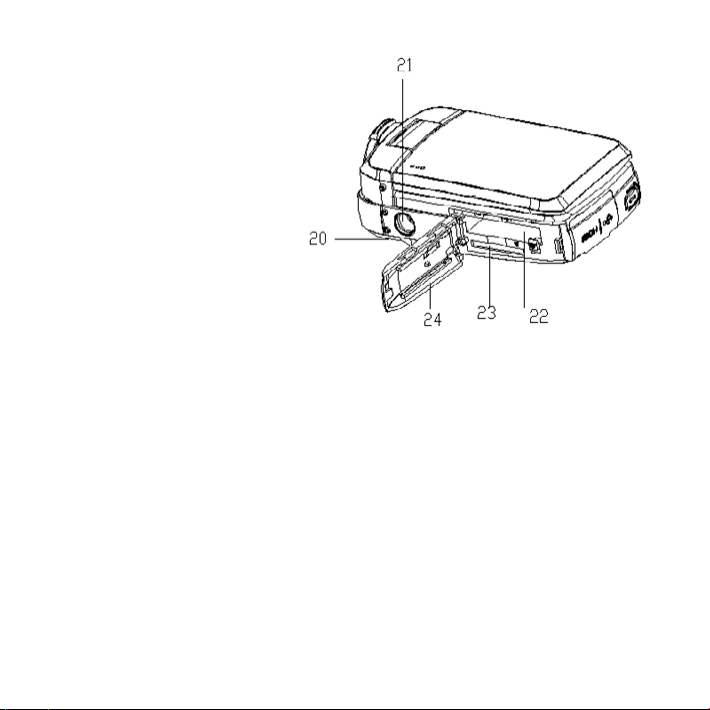
1.1 PARTS OF THE CAMERA ............................................................3
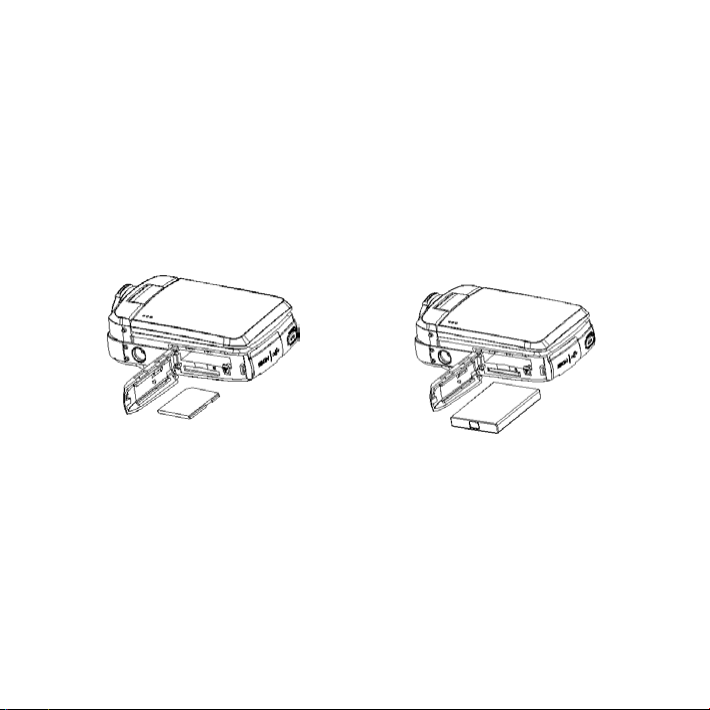
1.2 INSERTING THE BATTERY AND MEMORY CARD .....................................4
2. BASIC OPERATION ......................................................................6
2.1 TURN ON AND OFF ................................................................6
2.2 SETTING THE DATE AND TIME .....................................................6
2.3 FORMATTING THE MEMORY CARD .................................................7
2.4 CHANGING THE MODE .............................................................8
2.5 DISPLAY ON THE LCD SCREEN .....................................................8
2.6 SETTING THE CAMERA ............................................................10
3. RECORDING VIDEO ....................................................................11
3.1 VIDEO MODE MENU...............................................................12
4. TAKING STILL IMAGES .................................................................13
4.1 CAPTURE MODE MENU............................................................14
5. PLAYBACK.............................................................................16
5.1 PLAYBACK MODE MENU...........................................................17
6. MAKE CONNECTIONS ..................................................................17
6.1 CONNECTING THE CAMERA TO A HDTV ............................................17
6.2 CONNECTING THE CAMERA TO A COMPUTER . . . . . . . . . . . . . . . . . . . . . . . . . . . . . . . . . . . . . . 18
6.3 WI-FI CONNECTING ...............................................................19
6.4 HOW TO USE THE PC CAMERA FUNCTION..........................................20
7. SPECIFICATION ........................................................................21

3
1. PREPARING FOR USING
1.1 Parts of the camera
1. LCD screen
2. Up/Playback
button
3. Power button
4. T/Zoom in button
5. W/Zoom out
button
6. Mode button
7. Charging indicator
light
8. Shutter button
9. OK/MENU button
10. Right/LED lamp
button
11. USB jack
12. HDMI jack
13. Down / Wi-Fi
button

4
14. Left button
15. Speaker
16. Lens
17. Microphone
18. Self timer
indicator light
19. LED lamp
20. Wrist strap
21. Tripod slot
22. Battery slot
23. SD card slot
24. Plastic cover
25. Long shots /
Microspur
1.2 Inserting the battery and memory card
1. Slide and open the bottom plastic cover as per the
direction showing on the cover.
2. Find the battery slot and SD card slot.

5
3. Insert the lithium battery into the bigger slot as shown in
the following gure(a). Please make sure the +/- symbols
on the battery are matching the +/- symbols on the camera.
4. Insert the SD card (upto 32GB) into another slot as shown
in following gure(b).Please pay attention to the direction,
do not try to insert the card forcibly.
(a) (b)
Note: Please connect the camera to a computer via the USB
cable to charge the battery for the rst time using. Once the
battery is fully charged, the busy indicator light will turn off.
And the camera body may be warm after extended use.

6
2. BASIC OPERATION
The camera has a 3” HD resistance touch screen.You can oper-
ate it by tapping the screen or pressing the button.
2.1 Turn on and off
Turn on: Press the Power button or turn over the LCD screen to
turn on the camera.
Turn off: Press the Power button or close the LCD screen to
turn the power off.
2.2 Setting the date and time
1. Turn on the camera.
2. Press the Menu button(ortouch the “MENU” icon on the
screen) to enter menu interface. Then press the Right
button to enter the setup menu.
3. Press Up and Down button(or touch the “Date&Time”
on the screen) to select the date option. Then press OK
button(ortouch the “OK” icon on the screen) to enter the
setting interface.
4. Press the Up/Down/Right/Left button(or touch the ”Up/
Down/Right” icon on the screen) to select the option that

7
you want to modify. And press OK button to conrm and
exit.
5. Press the Left button to turn back.Press the Mode
button(ortouch the ”Back” icon on the screen)to exit the
setup menu.
2.3 Formatting the memory card
It is important to formatting the memory card for the rst time
using. All the data including protected les will be deleted,
please ensure that you copy the important les to your com-
puter before formatting.
1. Turn on the camera.
2. Press the Menu button to enter the menu interface, then
press the Right button to enter the setup menu.
3. Select the Format option by pressing Up/Down button.
Then press OK button to enter the sub menu.
4. Press the Up/Down to select YES, and then press the OK
button to start formatting the memory card.
5. Press Left button can exit the setup menu.

8
2.4 Changing the mode
The camera has 3 different modes: capture mode, video mode
and playback mode.Press the Mode button(ortouch the ”MODE“
icon on the bottom right of screen) can change to different mode.
Icon Title Description
Capture mode For taking still photos.
Video mode For recording movie clips.
Playback mode For playing recorded les.
2.5 Display on the LCD screen
Video Mode
1. Video mode
2. Resolution
3. Loop recording
4. Voice recording
5. Stabilizer
6. Memory card capacity
7. Battery level

9
Capture Mode
1. Capture mode
2. Resolution
3. Exposure
4. Stabilizer
5. Memory card capacity
6. Battery level
Playback Mode
1. Playback mode
2. The sequence of current le/
the total number of recorded
les
3. File type:video/photos

10
2.6 Setting the camera
Before taking photographs or recording videos, turn on the
camera to set the camera rstly. Press Menu button to enter
the mode menu.Then press the Right button to bring up the
setup menu as below, press the Right/Left/Up/Down/OK but-
ton to set the option and exit.
Menu Function
Sounds
Set the sounds and volume of shutter, start-up and beep.
Shutter: [on]/ [off]
Start-up: [none]/ [1]/ [2]/ [3]
Beep: [on]/ [off]
Volume: [0]/ [1]/ [2]/ [3]
Back Light Set the duration of back light.Options: [1min]/ [3min]/ [5min]/
[on].
LED Set the LED state.Options: [on]/ [off].
Power Save
For saving power, the camera will turn off automatically after
a period of time if you did not operate it.Options: [1min]/
[3min]/ [5min]/ [off].
Date&Time Set the date and time of the camera.Press Up/Down/Left/Right
button to set correct time.
Language Set the on-screen language: [English]/ [German]/ [Italian]/
[Spanish]/ [Portuguese]/ [Dutch]/ [French]/ [Russian]
Power
Frequency
Light Frequency should be set depending on your region:
[50HZ]/ [60HZ].

11
Menu Function
USB Set the default mode when connect the camera to a computer
by USB cable: [MSDC]/ [UVC].
Format
Format your SD card will delete all les including the protected
les.Please copy important les before format.
Options: [Yes]/ [No].
Reset All Restores the camera to default settings:
Options: [Yes]/ [No].
3. RECORDING VIDEO
1. Turn on the camera, press the Mode button to set the
camera to video mode. An icon will show on the top
left corner of the screen.
2. View the target subject on LCD screen, and press the W/T
button to zoom in/zoom out the image.
3. Press the Shutter button to start recording.The recording
duration will shown on the top right cover of the screen.
4. Press the Up button to pause recording.Press the Shutter
button again to stop recording.The camera will stop
recording automatically when the memory capacity is full.

12
• The LCD screen can rotate 270°.
• During recording, press Left button, the screen will turn
black(for saving power)while the camera is still working.
Press Left button again to light up the screen.
• The camera has the function of manual focusing.
Rotating the lens can alternate long shots[ ] and macro
photography[ ]. Rotate the lens to the left, the camera is
switched to long shots state. Rotate the lens to the right,
the camera is switched to macro shooting state. In macro
photography mode, you can record video that will show
small objects clearly.
3.1 Video Mode Menu
Menu Function
Movie Size
Set the video resolution. Select small movie size can record
longer time.
Options: [1920×1080(30fps)]/ [1280×720(60fps)]/
[1280×720(30fps)].
White Balance Set the white balance to adapt different light sources.Options:
[Auto]/ [Daylight]/ [Cloudy]/ [Fluorescent]/ [Tungsten].
Video Quality Set the video quality.Options: [Super Fine]/ [Fine]/ [Normal].
Stabilizer Use the function to avoid our hands shaking when taking
pictures. [On]/ [Off].
Voice Rec Record the voice when recording video.[On]/ [Off].

13
Menu Function
Loop
Recording
Set the time of loop recording.Options: [Off]/ [1min]/ [3min]/
[5min].
Motion Detect
The camera will detect the motion state automatically after
open this function.If it detect a period time of stationary, the
camera will stop recording.If detect motion again, it will restart
to recording. [On]/ [Off].
Slow Motion [On]/ [Off]
Time-lapse Set the time-lapse recording.
Options: [Off]/ [3sec]/ [5sec]/ [10sec]/ [30sec]/ [1min]/ [3min].
Time-lapse
Duration
Set the duration of time-lapse recording.Options: [Unlimited]/
[3min]/ [5min]/ [10min]/ [15min]/ [20min]/ [30min]/ [60min].
Date Stamp Stamp the date and time on the recorded video les.Options:
[Off]/ [Date]/ [Date&Time].
4. TAKING STILL IMAGES
1. Turn on the camera, and press the Mode button to set the
camera to capture mode. An icon will show on the top
left corner of the screen.
2. View the target subject on LCD screen, and press the W/T
button to zoom in/zoom out the image.
3. Press the Shutter button to take a picture.After the image
has been taken, the LCD will display the image for a brief
seconds.

14
• The memory capacity in the top right of screen will
decrease one as each image is taken.
• The LCD screen can rotate 270°.
• During taking pictures, press Left button, the screen will
turn black(for saving power)while the camera is still
working.Press Left button again to light up the screen.
• The camera has the function of manual focusing.
Rotating the lens can alternate long shots[ ] and macro
photography[ ]. Rotate the lens to the left, the camera is
switched to long shots state. Rotate the lens to the right,
the camera is switched to macro shooting state. In macro
photography mode, you can take pictures that will show
small objects clearly.
4.1 Capture Mode Menu
Menu Function
Resolution Set the resolution of pictures.
Options: [20M]/ [16M]/ [12M]/ [8M]
White Balance Set the white balance to adapt different light sources.Options:
[Auto]/ [Daylight]/ [Cloudy]/[Fluorescent]/ [Tungsten].
Video Quality Set the image quality.
Options: [Super Fine]/ [Fine]/ [Normal].

15
Menu Function
Metering [Center]/ [Multi]/ [Spot]
Sharpness [Hard]/ [Normal]/ [Soft]
ISO
Set the level of light sensitivity to adapt the surrounding
environment.Options: [Auto]/ [50]/ [100]/ [200]/ [400]/ [800]/
[1600].
Exposure
Set the exposure value manually to compensate light in
unusual condition.
Options: [–2.0]/ [–1.7]/ [–1.3]/ [–1.0]/ [–0.7]/ [–0.3]/ [0.0]/
[+0.3]/ [+0.7]/ [+1.0]/ [+1.3]/ [+1.7]/ [+2.0].
Stabilizer Use the function to avoid our hands shaking when taking
pictures. [On]/ [Off].
Auto Review Keep the photo displaying on the screen for seconds after press
the Shutter button.Options: [Off]/ [1sec]/ [3sec]/ [5sec].
Self-Timer Set the time of taking pictures automatically.
Options: [Off]/ [2sec]/ [10sec].
Photo Burst
Once press the Shutter button, the camera will take several
photos continuously.
Options: [Off]/ [3]/ [5]/ [10].
Time-lapse Set the time-lapse taking pictures.
Options: [Off]/ [3sec]/ [5sec]/ [10sec]/ [30sec]/ [1min]/ [3min].
Time-lapse
Duration
Set the duration of time-lapse.Options: [Unlimited]/ [3min]/
[5min]/ [10min]/ [15min]/ [20min]/ [30min]/ [60min].
Date Stamp Stamp the date and time on the photo les.Options: [Off]/
[Date]/ [Date&Time].

16
5. PLAYBACK
1. Entering playback mode
Turn on the camera and press the Mode button to set the cam-
era to playback mode.The screen will show two options ”Vid-
eo File” and “JPG File”.Chose the option you want to playback,
press OK button to enter the playback interface. An icon
will appear on the top left cover of the screen.
Press the UP button to enter the playback mode quickly when
the camera is in video or capture mode and press it again to
go back to the primary mode.
2. View all the les
Press the Down button(orthe W/T button) to view the images
and video les one by one.Press the OK button to chose le
and enter the playback mode menu interface.
3. Playback video les
Press the Shutter button to play the video, press the Up but-
ton to pause playing. Press the Shutter button or Mode button
again to stop playing.

17
5.1 Playback Mode Menu
Menu Function
Lock Use this function to protect the les from being deleted by
accident: [Single]/ [Lock All]/ [Unlock All].
Delete Use this function to delete single le or all les: [Single]/ [All].
6. MAKE CONNECTIONS
6.1 Connecting the camera to a HDTV
Connect the HDTV to the camera, the screen of camera will
turn off.At this time, the function of HDTV screen is same as
the camera screen.
1. Connect the camera to HDTV by attached HDMI-cable.
2. Turn on the camera and HDTV and switch the TV to “HDMI”
mode.
3. When the camera is in capture and video mode, you can
view the target subject on TV.
4. When the camera is in playback mode, you can review the
recorded video and photo les on TV.

18
6.2 Connecting the camera to a computer
Download the les on the computer
There are two ways to download les from the camera’s inter-
nal memory or memory card to a computer:
• By inserting the memory card into a card reader
• By connecting the camera to a computer by the supplied
USB cable.
Using a Card Reader
1. Eject the memory card from the camera and insert it into
a card reader that is connected to a computer.
2. Open [My Computer] or [Windows Explorer] and double-
click the removable disk icon that represents the memory
card.
3. Copy images from the card into a directory of your choice
on the computer’s hard disk.
Connecting the camera to a PC by the USB Cable
1. Connect the camera to the computer by the USB cable
and turn on the camera.The LCD screen will show “MSDC”.
2. Open [My Computer] or [Windows Explorer]. A”Removable
Disk” appears in the drive list. Double-click the “Removable

19
Disk” icon to view its contents. Files stored on the camera
are located in the folder named “DCIM”.
3. Copy the photos or video les to your computer.
6.3 Wi-Fi connecting
Step 1: Download APP “Ishare Cam”.
Search and download APP “Ishare Cam” from “Apple App Store“
or “Google Play“. Then install it on your Pad or smartphone.
Step 2: Open camera’s Wi-Fi.
Turn on the camera, press Down / Wi-Fi button in capture
mode or video mode. The screen will show ”Waiting for WiFi
Connection…”.
Step 3: Connect smartphone to camera’s Wi-Fi

20
Open Wi-Fi search on smartphone or Pad. Search camera’s
Wi-Fi account ”DVC-540-XXXXXX”. Input the initial password
“12345678“. Then click to link.
Step 4: If connection successful, the screen will show “WiFi
Connection Ready!” Then you can open APP “Ishare Cam” to
operate the camera on smartphone or Pad.
Step 5: Press Wi-Fi button again will exit Wi-Fi mode.
6.4 How to use the PC camera function
1. Turn off the camera. Connect the camera to the computer
by the USB cable.
2. Long press the Power button or turn over the LCD screen
to turn on the camera. If the screen shows “MSDC”, please
press Mode button to switch to PC camera mode and the
screen will show “PCCAM”.
3. In Windows XP system, open [My Computer] and double
click “USB video tool”. The camcorder will works as PC
Camera function; In Window s Vista, 7 and 8 system, the
PC Camera function can only be used in communication
software, such as QQ and Skype.
4. Press the Power button can exit the PCCAM mode.
Table of contents
Languages:
Other Rekam Camcorder manuals