Repotec CyberBank G User manual

C
Cy
yb
be
er
rB
Ba
an
nk
kG
G
3
3.
.5
5”
”S
SA
AT
TA
AG
Gi
ig
ga
aL
LA
AN
ND
Di
is
sk
kE
En
nc
cl
lo
os
su
ur
re
e
U
Us
se
er
rM
Ma
an
nu
ua
al
l3
3.
.2
20
0S
So
of
ft
tw
wa
ar
re
e
For Windows 2000/XP/Vista
Version: 1.0

INDEX
Trademarks...................................................................................................................1
Introductions.................................................................................................................1
System requirements ...................................................................................................2
Package contents.........................................................................................................2
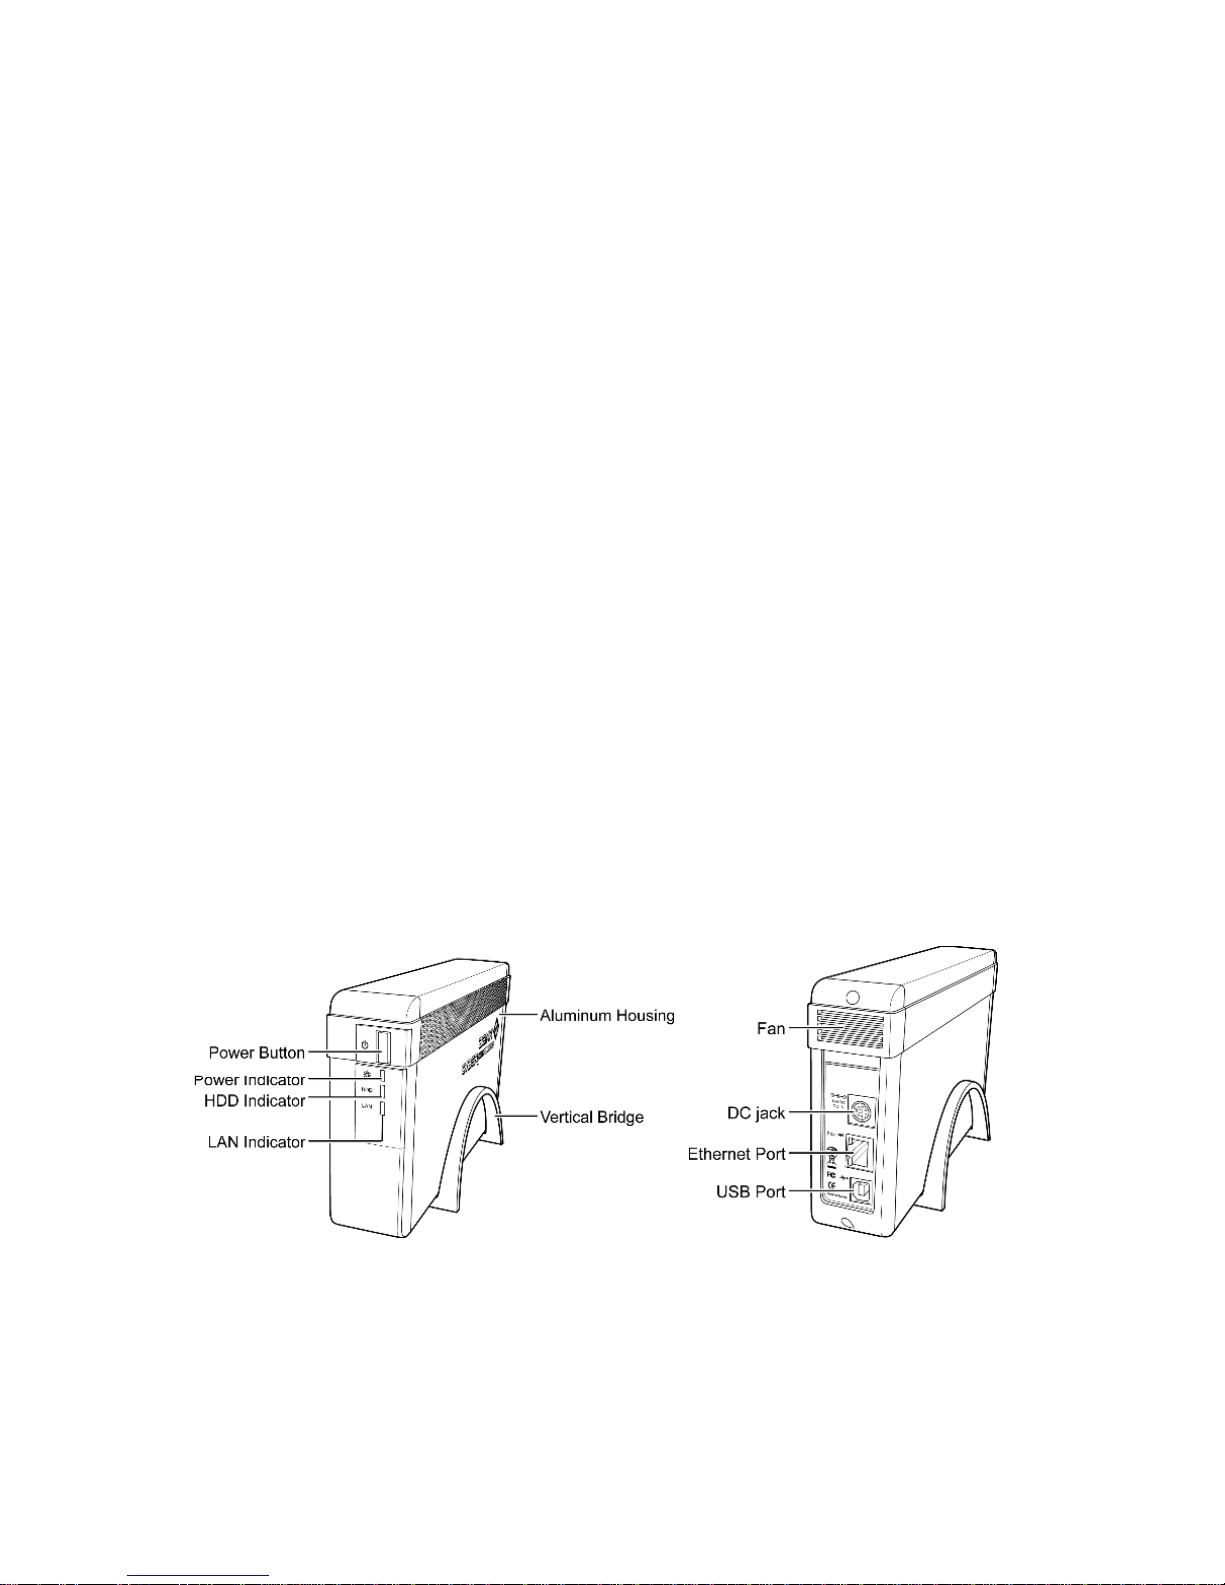
Your LAN Disk at a glance ...........................................................................................2
LAN Disk Application Mode Overview.........................................................................3
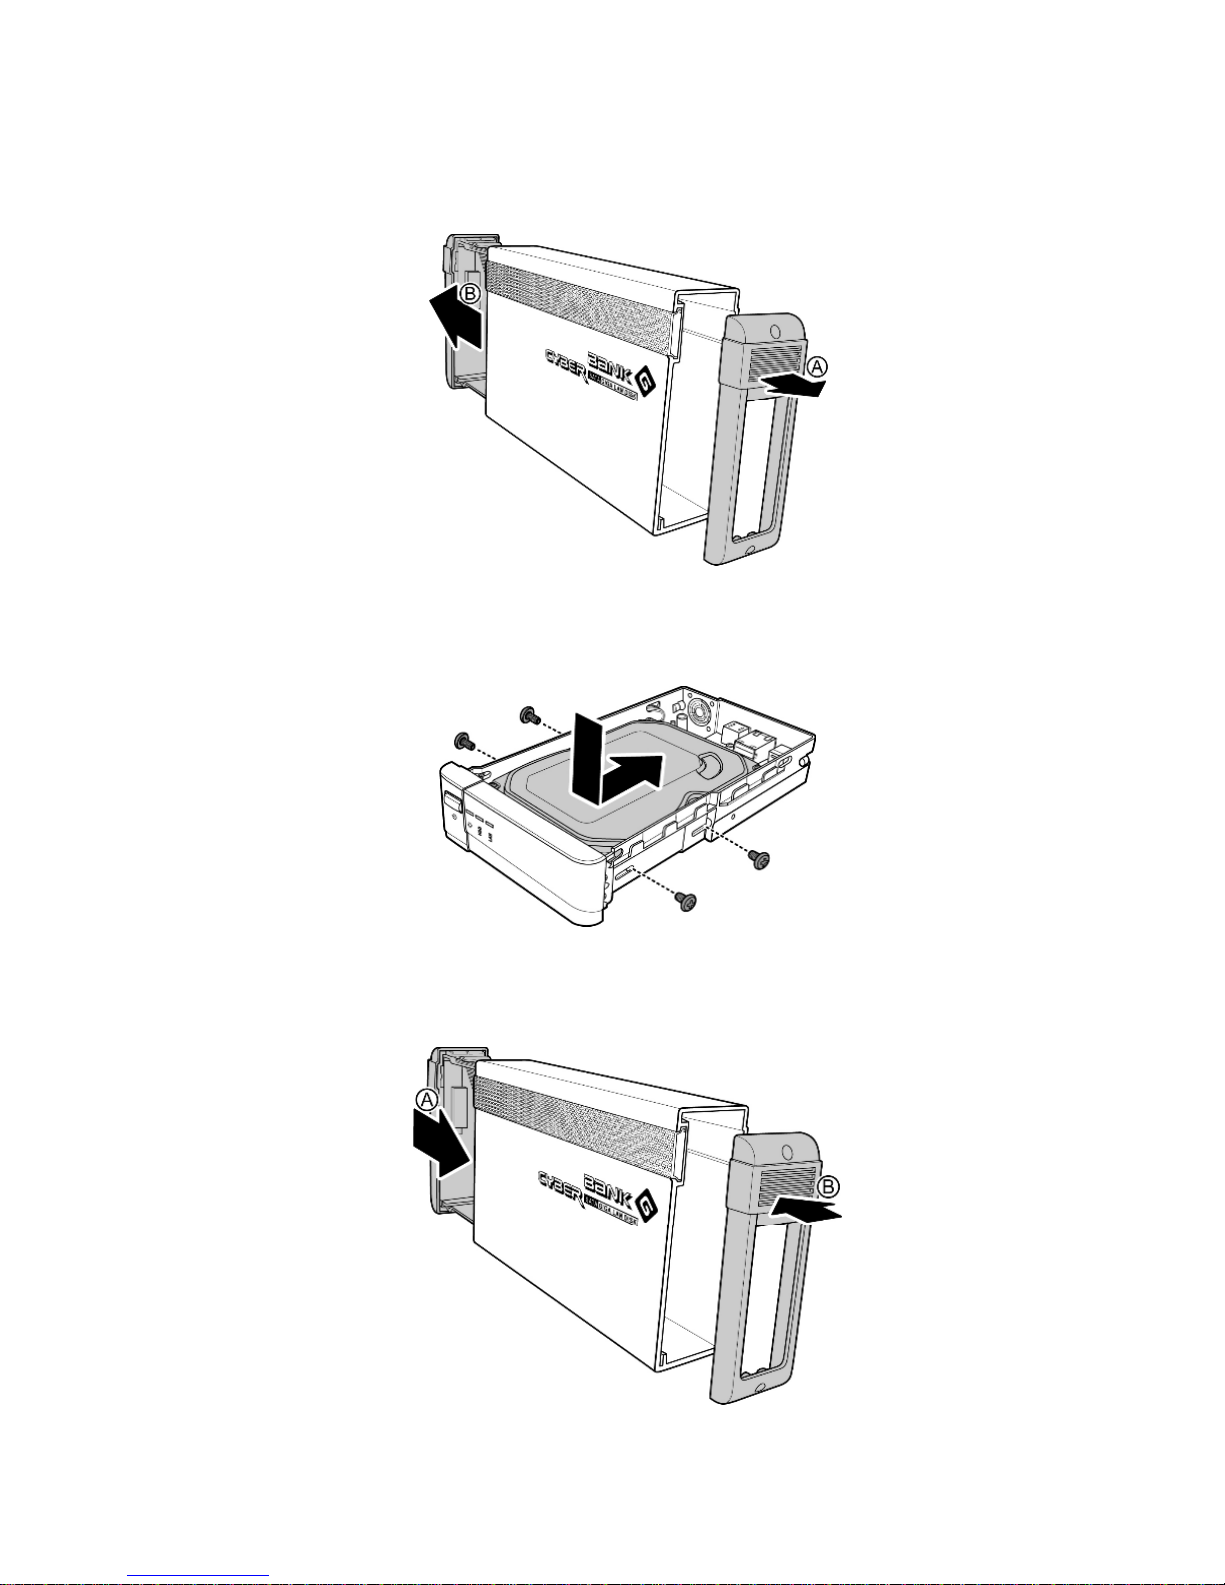
Setting up your LAN Disk.............................................................................................5
NDAS software installation.......................................................................................8
NDAS Device Registration................................................................................... 13
Introduce the NDAS Device Management .............................................................. 21
The NDAS Device Management.......................................................................... 21
Switching the Mount (Read/Write) Mode to the Mount (Read-only) Mode......... 25
Changing from Read-Only Mode to Read/Write Mode ....................................... 26
The NDAS Device Status Modes......................................................................... 27
NDAS Bind Management......................................................................................... 28
Bind....................................................................................................................... 29
Unbind................................................................................................................... 34
Refresh.................................................................................................................. 35
Other NDAS Bind Management Functions.......................................................... 36
Formatting the NDAS Device................................................................................... 40
Initialize the NDAS Device................................................................................... 40
Partition NDAS Device ......................................................................................... 42
Format the NDAS Device through My Computer................................................ 46
Uninstall.................................................................................................................... 48
Indicator Descriptions............................................................................................... 49
Product Specifications:............................................................................................. 50
FAQ........................................................................................................................... 51

CyberBank G 3.5” SATA Giga LAN Disk Enclosure
1
Trademarks
All names and products mentioned below are registered trademarks of their respective
companies.
Introductions
Thank you for purchasing our CyberBank G 3.5” SATA Giga LAN Disk Enclosure, this
guide contains information of product features, 3.5” hard drive installation procedure and
detail functions. Please read this guide thoroughly before start using and retain it for future
reference.
The CyberBank G LAN Disk is an external network hard drive enclosure, also name as
NDAS (Network Direct Attached Storage) Device or NetDisk. It performs like as mini file
server that can share and store files or data from multiple computers by a network
1000Base-TX Ethernet port without needing any particular computer. The LAN Disk storage
works as a local drive on each PC with a bundle software driver. It is a very convenience for
your home or small office users.
For a single user, you also can directly attach the CyberBank G LAN Disk via an USB port
for personal data backup.
Product features:
Single 3.5" SATA hard drive up to 1TB.
Provides both USB 2.0 High Speed and Giga LAN Connection for HDD Access.
Shared network storage for your home or office.
Sleek, portable and optimized heat sink design.
Driver based management interface, easy configuration,setting and management.
Supports of multi-languages, access management and optional applications.
Optional bind management for Aggregation, DAID0 or RAID1 (PC only).
Key Code security protection.
USB 2.0 port for PC connection.

CyberBank G 3.5” SATA Giga LAN Disk Enclosure
2
System requirements
IBMPC or Macintoshcomputer with one free USB2.0 port.
1000 Base-TX Auto MDI/ MDI-X Ethernet switch for network connection.
Requires 3.5” hard drive installation before use.
Operation System supporting:
oWindows2000/ WindowsXP/ WindowsVista
oMAC OS 10.3.X or later version (USB connection only)
Package contents
Please check the following items are included in the package. If any of items are missing or
damaged, please return to your local dealer.
CyberBank G LAN Disk (without hard drive)
USB cable
Ethernet cable
Software and manual disc
Power adapter
Screws pack
Vertical stand
Your LAN Disk at a glance

CyberBank G 3.5” SATA Giga LAN Disk Enclosure
3
LAN Disk Application Mode Overview
Network Data sharing connection:
1. Connects the supplied Ethernet cable from the Ethernet port on the LAN Disk to the
1000Base-TX Fast Ethernet switch hub.
2. Each computer must install the software driver in first time; then the LAN Disk works as a
local drive on each PC.
3. No PC server required.
Wireless User connection:
Wireless users can connect the LAN Disk to your wireless access point or router by Ethernet
cable.

CyberBank G 3.5” SATA Giga LAN Disk Enclosure
4
USB Direct Connection:
You can directly attach the LAN Disk to a PC’s USB2.0 host port by an USB cable.
No software driver required in Windows 2000/ XP/ Vista and Mac OS.
Warning: Do not use the USB and LAN
connection at the same time.

CyberBank G 3.5” SATA Giga LAN Disk Enclosure
5
Setting up your LAN Disk
Notice:
Electrostatic discharge may damage the electronic components of the LAN Disk. Be
sure your LAN Disk is properly grounded before you set up the LAN Disk. You may
touch the metal part of computer’s chassis or power supply unit to discharge any static
electricity that may have built up inside your body.
Handle a plastic bracket and do not touch any electronic components on the circuit
board.
To avoid damaging to your hard drive, please handle with care. Do not shake or drop
your hard drive in progress.
All electronic components have lifetime cycle, it may damage by a component
degeneration, electrostatic shock accident or personal carelessness. For the reason,
we strong recommend you that always backup your important file for one or more
copy to a CD-R, DVD-R or other storage media for prevent your precious data missing.
Installing a 3.5” hard drive to your LAN Disk
Follow the below steps to install a 3.5” hard drive to your LAN Disk.
1. Remove the two screws on the rear cover of the LAN Disk with a philips screwdriver and
remove the rear cover.

CyberBank G 3.5” SATA Giga LAN Disk Enclosure
6
2. Pull out the rear cover (A) and front cover (B) as shown.
3. Place the hard drive and fasten the hard drive to the hard disk with four screws as shown.
4. Replace the front cover with hard drive (A) and then rear cover (B) to the Hard Disk.

CyberBank G 3.5” SATA Giga LAN Disk Enclosure
7
5. Fasten the rear cover with two screws as shown.

CyberBank G 3.5” SATA Giga LAN Disk Enclosure
8
NDAS software installation
Before using the LAN Disk, you must install the supplied NDAS software to your PC. Please
follow the below steps to start the installation progress.
Notice for Mac user:
The hard drive in the LAN Disk should be formatted as FAT 32/ NTFS before using the
LAN Disk.
Notice for all user:
Make sure to plug the power cable on the wall outlet.
Make sure to connect the LAN Disk to the PC by the USB cable or Ethernet cable.
Make sure to close all the executing files on your task bar.

CyberBank G 3.5” SATA Giga LAN Disk Enclosure
9
Start to install the NDAS software.
1. Put the NDAS software disk into your CD-ROM drive and select your CD-ROM drive.
2. Double click the Windows Driver folder.
3. Double click the setup.exe file.
4. The Setup Wizard window appears and click the Next button
5. Select the I accept the terms in the license agreement option and click the Next button.

CyberBank G 3.5” SATA Giga LAN Disk Enclosure
10
6. Click the Install button.
7. Wait for a while till the installation is finished.
Note:
During the installation, you may press the Cancel button to end the installation.

CyberBank G 3.5” SATA Giga LAN Disk Enclosure
11
8. Click the Continue Anyway button if the following window pops up.
9. Click the Finish button to complete the installation.

CyberBank G 3.5” SATA Giga LAN Disk Enclosure
12
10. A message window appears. Click the Yes button to restart your computer or click the No
button to restart the computer later.

CyberBank G 3.5” SATA Giga LAN Disk Enclosure
13
NDAS Device Registration
Each PC must register a set of NDAS device ID number and Write key to configure the
authority of data access before you use the NDAS Disk. You can find an ID number and write
key code on the aluminum housing of your LAN Disk. Then Use the NDAS Device
Registration Wizard (see Registering by the NDAS Device Registration Wizard on page 13)
to start registering.
Registering by the NDAS Device Registration Wizard
1. Click the NDAS Device Management located on the system tray and select the
Register a New Device.
2. The NDAS Device Registration Wizard window appears. Enter the name of the NDAS
device and click the Next button.

CyberBank G 3.5” SATA Giga LAN Disk Enclosure
14
3. Enter the NDAS device ID and Write Key (You can find your ID and Write key number
label on the Aluminum housing of your LAN Disk), click the Next button.
Note:
You must enter the NDAS device ID, or you cannot progress the next step.
The Write Key is optional. If you enter the Write Key, you can read and write
the data from the NDAS Disk to your computer, whereas you can only read
the data from the LAN Disk.
The NDAS device ID and Write Key do not allow to enter the letter “O”.
Please replace the letter “O” as the number “0”.
The NDAS device ID number in the above graphic is an installation sample.
You should get your own ID labeled on the aluminum housing of your LAN
Disk of inside PC board.

CyberBank G 3.5” SATA Giga LAN Disk Enclosure
15
4. Wait for checking the NDAS device status.
5. Select an option to mount the NDAS device to your system.

CyberBank G 3.5” SATA Giga LAN Disk Enclosure
16
Note:
Read/Write mMode: Mounts the NDAS device as Read/Write mode. The
“Yes, I want to mount this NDAS device as Read/Write Mode” option is
disabled if a user do not enter the Write Key (see NDAS software installation
on page 8)
Read-Only Mode: Mounts the NDAS device as Read-Only mode.
Don’t Mount: The NDAS device is not mounted as Read/Only or Read/
Write mode now.
6. Click the Finish button to complete the progress.

CyberBank G 3.5” SATA Giga LAN Disk Enclosure
17
Found new hardware wizard
The Found New Hardware Wizard may appear after you have registered a new NDAS
device.
1. When the Found New Hardware Wizard appears, click the Next button.
2. The following window appears. Click the Next button.

CyberBank G 3.5” SATA Giga LAN Disk Enclosure
18
3. If the following window appears. Click the Continue Anyway or Yes button.
4. After finishing the procedure, the following window appears. Click the Finish button to
complete the process.
Table of contents
Other Repotec Enclosure manuals
Popular Enclosure manuals by other brands

IC
IC IB-RD2253-C31 manual

Extron electronics
Extron electronics Cable Cubby F55 Edge installation guide

Rockford Fosgate
Rockford Fosgate RFX3-FWED Installation & operation

Onnto
Onnto 2.5" SATA HDD Enclosure user manual

Leviton
Leviton Opt-X 5WMED-04C Instructions for use

Aero
Aero Mirage-G-BK-v1 quick start guide