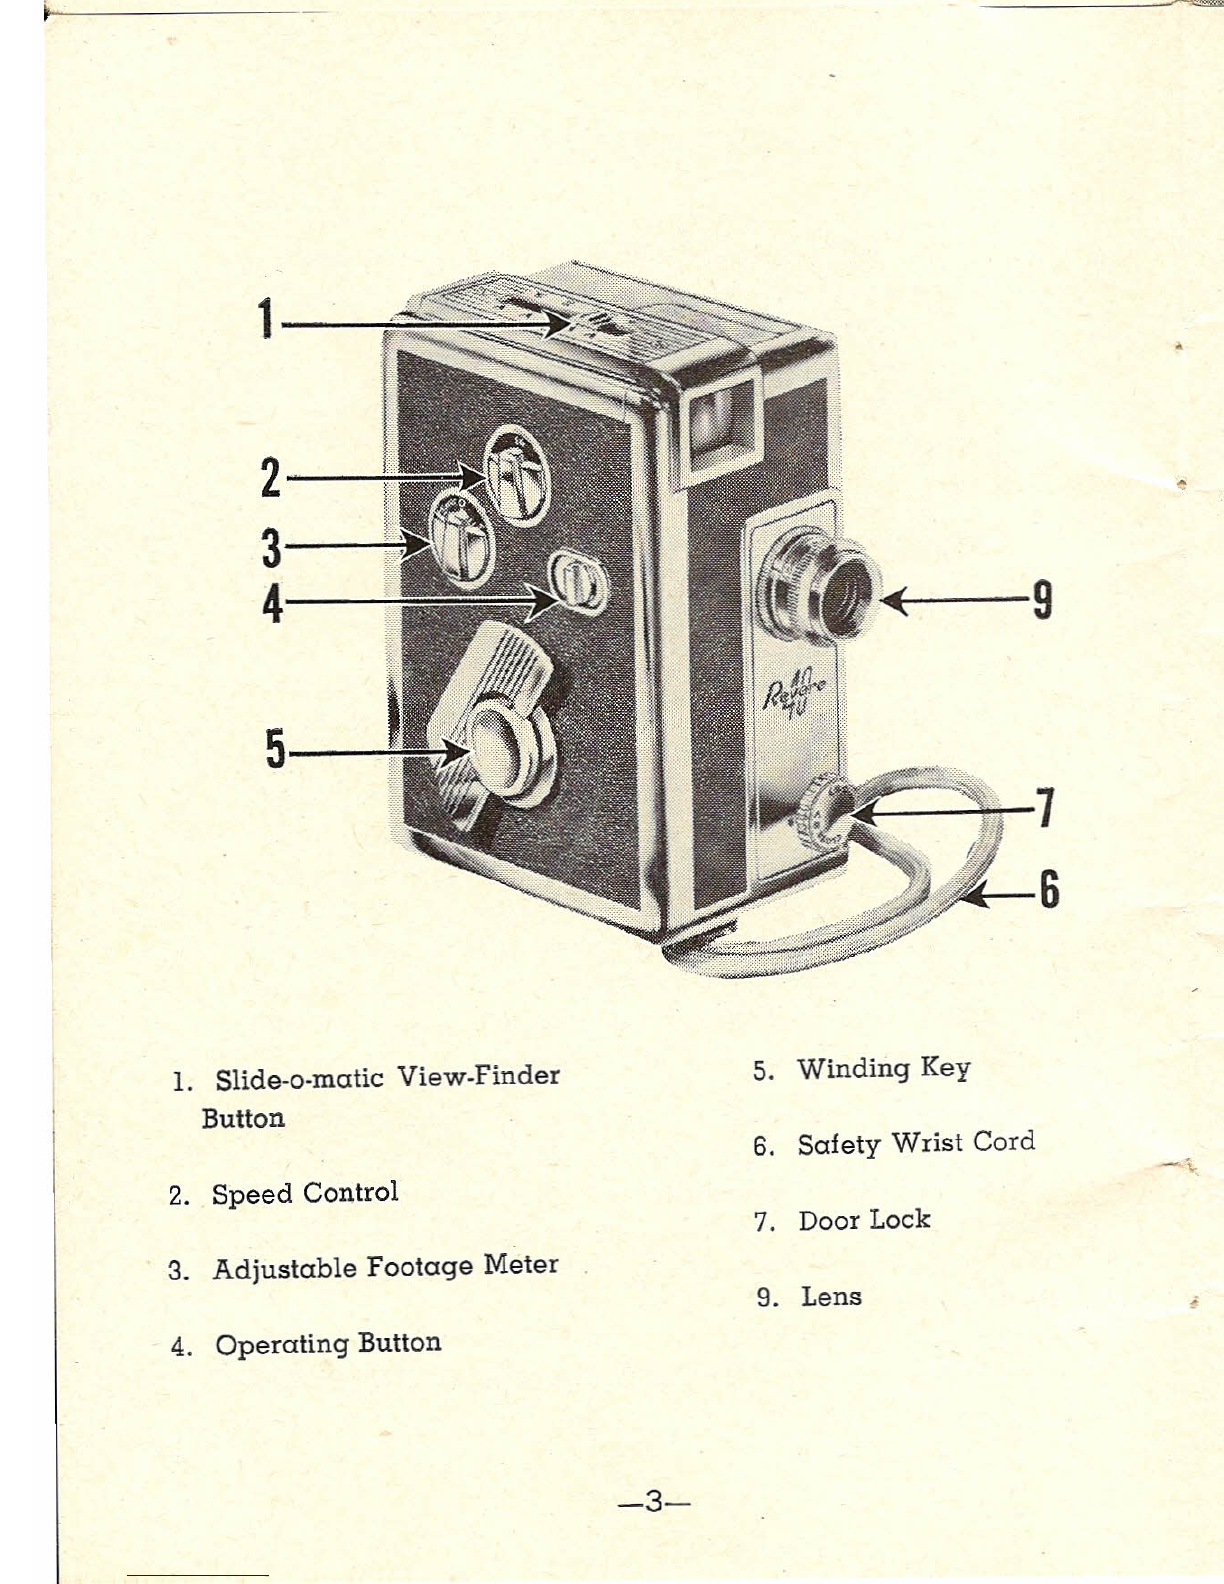
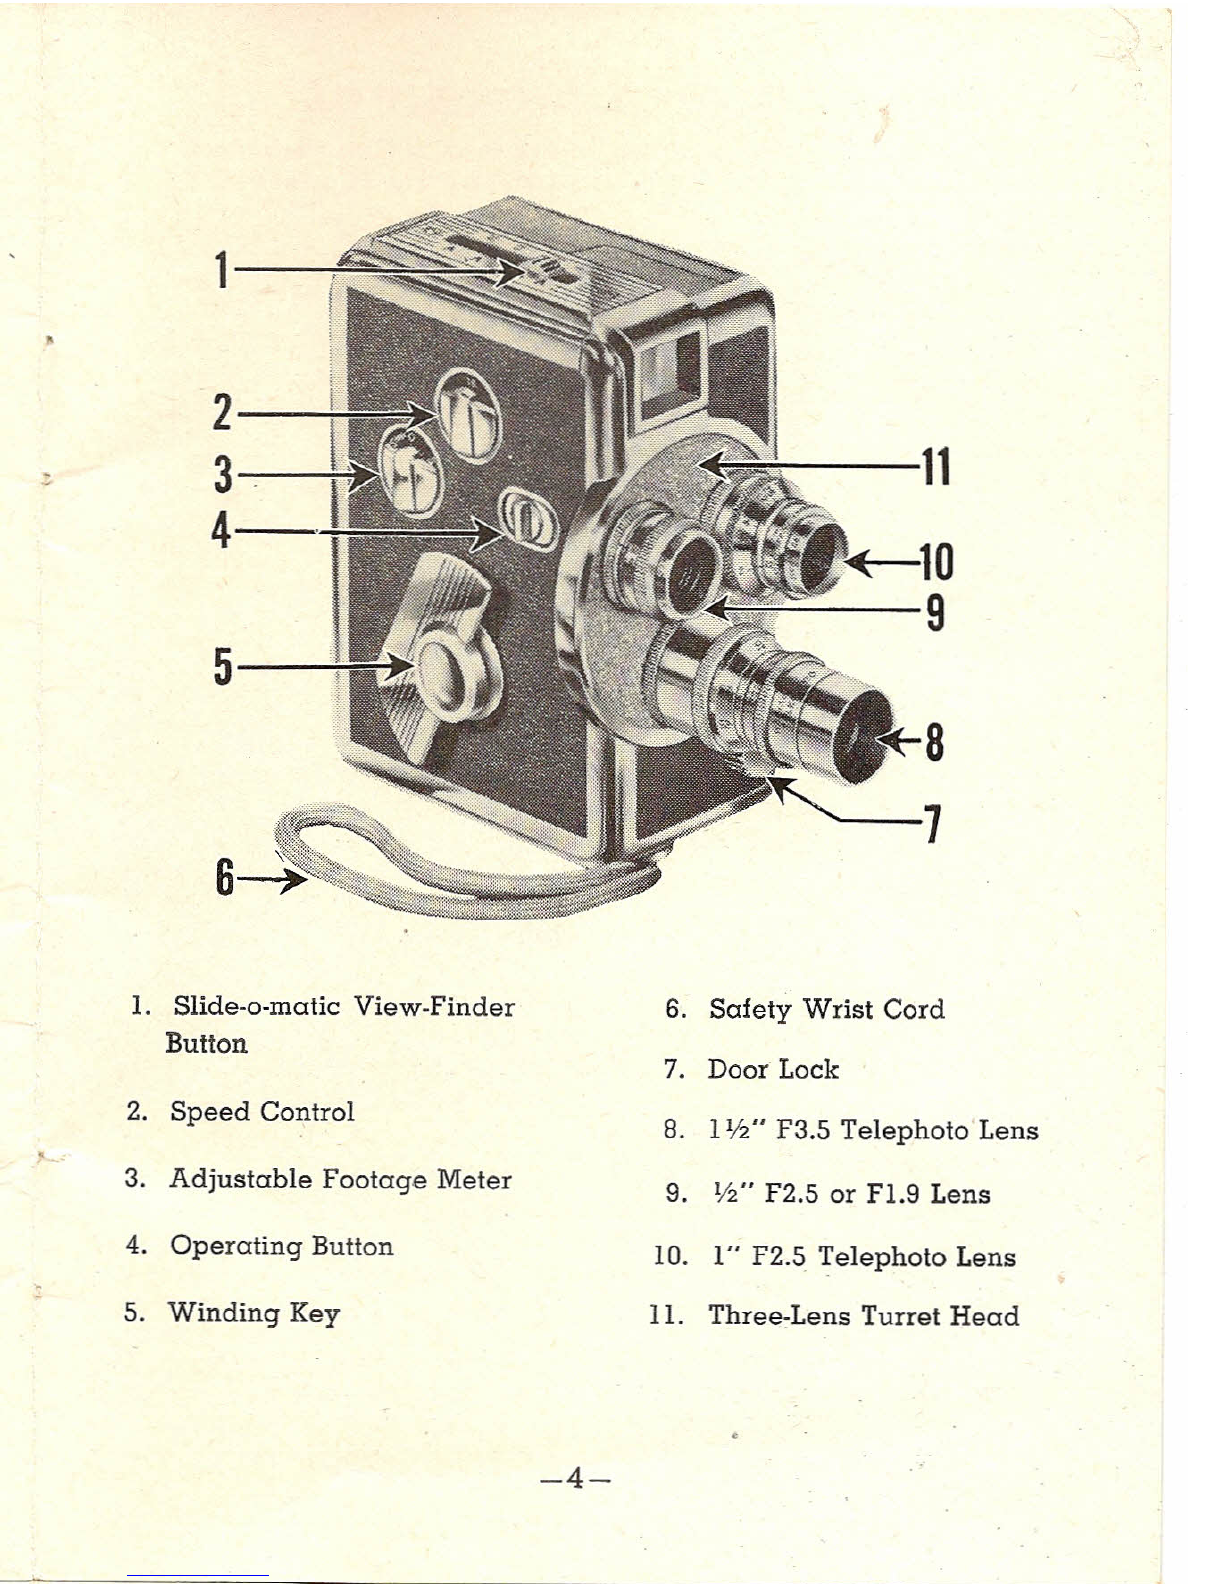
manuals.online logo
Brands
  1. Home
  2. •
  3. Brands
  4. •
  5. Revere
  6. •
  7. Camcorder
  8. •
  9. Revere 40 Setup guide

Revere 40 Setup guide

ACCESSORIES
EXTRA LENSES- The following Bmm
lenses are available at your dealer's.
With these interchangeable lenses. you
are equipped for every movie making
situation.
F 1.9 - Focusing Mount 13mm Coated
Lens
F 2.5 - Focusing Mount 25mm (1"
Telephoto) Coated Lens
F 3.5 - Focusing Mount 37.5 (l
V2"
Telephoto) Coated Lens
CARRYING CASE FOR "44" - Top-qrcdn
cowhide. richly lined, dustproof and
durable. Protective partitions for camera.
film, lenses and filters. Has lock and
key.
CARRYING CASE FOR "40" -
Sturdy
binocular type. Custom-built of selected
top-qrcdn
tan cowhide. Attractively
lined. Extra adjustable shoulder strap
included.
300·FOOT METAL CONTAINERS -
Ideal
protection for your precious film in
stor-
ing or transporting.
300·FOOT REELS-
Reinforced for
oddi-
tional sturdiness. yet lightweight.
REVERE CAMERA COMPANY
320 E. 21st St., Chicago 16, III., U. S. A.
INDEX
Page
Accessories Back Cover
Camera, General Instructions " 7, 17
Camera, Parts 3, 4
Cleaning Camera 24
Depth of Focus with Focusing Mount Lens :9, 21, 22
Depth of Focus with Universal Focus Lens 10
Exposing the Film.............................................................. 11
Exposure Guides, DaylighL......... 18
Exposure Guides, Photoflood................... . 20
Exposures with Floodlights 19
Film, Exposing the................................... 11
Filters for Black and White Film................. 15
Filters for Color Film 13
Footage Meter 9
Hold the Camera, How to...... 17, 24
Lens and Its Use 10
Lighting the SubjecL..... 12
Load the Camera, How to........................ 5
Photoflood Exposure Guides....... 20
Picture Defects 23
Planning and Taking Pictures 16
Projector, Revere "85" .Inside Back Cover
Registration Card 1
Revere Factory Address... 1
Speeds, The Camera......... 7
Splicing 17
Things to Hemember.. 24
Titles and Splicing 17
Unload the Camera, How to.......................................... 6
Viewfinder, The 8
-25-
Model"44"
~
-
,
-,
OWN
E R'S INS T RUe
T'I 0 N MAN U A L
- - - ~- - - ~ -- - , + -
FOREWORD
R
EVERE "40" and "44" 8mm cameras represent the
proud result of years of engineering to achieve the
finest in magazine cameras. Handsomely designed, ultra
compact. and expertly built in true Revere tradition, they
offer the
very
newest and simplest in movie camera
opere-
tion.
Loading Revere "40" or "44" with film magazines is
so easy a child can do it. No threading-you change quickly
from Color to
Bleck-end-White
at any time without spoiling
the film.
Numerous other outstanding features include: continuous
run ... single frame exposure for titles and trick shots ...
built-in
micromatic
view-finder ...
footage meter . . . ex·
posure chart ... five speeds including slow motion. Coated
lenses available are 13mm F2.5 (Universal Focus) or 13mm
F1.9 (Focusing Mount) for model "40" ... and 13mm F2.B
or 13mm F1.9 (Focusing Mount) or 13mm
n.9
(Universal
Focus) for model "44." Interchangeable lens mounts also
permit use of
wide-
angle and telephoto lenses. Accessory
lenses available for both cameras include a 25mm (1") F2.5
telephoto, and 38mm (1
V2')
F3.5 telephoto.
It's
easy
to take good movies with the Revere "40" and
"44," starting with your first magazine of film. If you
follow the simple instructions, you soon will master your
camera. Give it the proper attention
by
referring to these
instructions occasionally. It will help
you
produce the finest
movies easily.
REVERE CAMERA COMPANY
-2-
•
A Revere Registration card is included with your
camera.
Please print the serial number which you will find
inside your camera on the etched name plate.
Please give complete information requested on the
card, and to insure accuracy please PRINT.
Send card within ten days after making purchase
to the Revere Camera Company, 320-336 East
Twenty-first Street, Chicago, Illinois. This is im-
portant. The guarantee does not go into effect until
you mail the registration card.
REVERE CAMERA COMPANY
General Offices and Factory
320·336 East Twenty-First Street •Chicago 16, Illinois
Copyright 1951, Revere Camera Company Pri nted in
U.S
.A.
10M 3·52
-1-
2
3-......l.;
4--
'+---9
5
7
6
1.
Slide·o.malic Viaw-Finder 5. Winding Key
Button
6.
Safety Wrist Cord
2.
Speed Control
7.
Door Lock
3.
Adjustable Footage Meter
9.
Lens
4. Operating Button
-3-
ULTIMATE IN
Bmm
PROJECTION
'~euepe
-£
I G +l T
~~65"
PROJECTOR
Designed to finest professional stand-
ards, this all-new deluxe projector
makes a thrifty mate to the "4 0" or
" 4 4" eight! Handsome plastic carry-
ing case is included in the modest
price! Precision-built to run as per-
fectly as a fine watch, the "85" gives
amazing "theatre quality"
perform-
ance. Striking in appearance,
with
smart russet brown finish
enhanced
by bright chrome plated fittings, it
embodies many important innova-
tions that
ale
exclusively Revere.
Among these are: finest and most
precise
film
track ever designed for
safe
film transport . . . professional
type, sturdy, stainless steel film re-
tainers and guides that defy compari-
son for film preservation ... built-in.
selt-contcined
film compartment. In
every respect, it is a projector you
will be proud to own!
Complete with
carrying case, SOO-wall
lamp,
300-ft. reel,
and
fast I-inch Fl B
coated
lens.
Instant Tilt Control-
Easy action tilt knob
quickly centers image
on screen. Pilot light
and "still" picture
projection are other
important features.
Sltp-o'ver
Case - Fits
snugly over projector,
lifts off instantly to
simplify and speed
setting up. Stream-
lined, easy to carry.
Flexible handle.
Reel Compartment -
Convenient Storage
space in projector
base holds two 300-
foot reels securely,
keeps them immedi-
ately available.
THINGS TO REMEMBER
1. Always remove rubber lens cap before taking pic-
tures.
2. Clean camera lens at regular intervals with dry
lintless cloth or tissue.
3. Wind camera after each exposure.
4. Plan pictures before operating camera. Make sure
everything is in readiness.
5. Follow exposure instructions when setting lens
stops. Shutter speed 1130 second at 16 frames.
6. Check lens before each scene to see that it has not
been accidentally moved from proper setting.
7. Hold camera steady. Brace it against your face,
forehead or stationary objects. Use Safety Cord.
8. Panoraming (swinging camera as you shoot) should
be avoided. When necessary it must be done very
slowly and steadily. Otherwise, pictures will annoy
the audience when projected.
9. When taking "slow motion" scenes caution sub-
jects to move naturally.
10. Don't attempt to take pictures in poor light.
11. Hold camera vertically - never tilted sideways.
12. Don't oil camera - send to factory.
-24-
PICTURES
UNSTEADY:
PICTURES
NOT SHARP:
PICTURES
TOO DARK:
PICTURES
TOO LIGHT:
EDGES OF
PICTURE
BLACK:
. EDGES OF
PICTURE
LIGHT OR
CLEAR:
PICTURE DEFECTS
Caused by shaking of camera when
taking scenes. Practice more, or if un-
able to hold steady - use a tripod.
Usually caused by dirty lens, or lens
not resting against seat.
--11
Under exposed film. Due to improper
lens stop used, or if taken inside - in-
sufficient artificial light was used.
5
Over exposed film. Due to improper
lens stop used, or if taken inside - too
much artificial light was used.
7
Finger or object obstructed lens barrel
when picture was taken.
1. Slide-o-mcrtic View-Ffnder 6. Safety Wrist Cord
Button
7.
Door Lock
2. Speed Control 8.
1 \O!"
F3.5 Telephoto Lens
3. Adjustable Footage Meter 9.
V2'
F2.5 or F1.9 Lens
4. Operating Button 10. I" F2.5 Telephoto Lens
5. Winding Key 11. Three-Lens Turret Head
Camera loaded in too brilliant light. To
avoid edqe-foq, film magazine should
be kept in carton and handled in sub-
dued light.
The above defects are based upon reversible film that
has been developed and processed-meaning negative
picture reversed into a positive picture.
-23-
-4-
HOW TO UNLOAD THE CAMERA
0]
-;j
~
1
~
:5 :9
-;j
~
<Xi '"""I '"""I
to
~
0
~
8
M
u)
so
N
~~ ~
NNNN N
'"
'"
;:;
:5
"
-;j
"
:s
~
Turn door lock completely
~
,,;
~
:::: '"""I
~
::::
r-
in
"
open" direction. Be
~
'"
~~
":
r-
.•.
"'
M
~~
'"
N
'"
MM M
•
sure that the "open" dot on
door knob
lines
up with the
00
0
~
~
-;j
:s
-;j -;j
dot on camera. Open door
..,
'"
~~
;:;
0
f!!
M
~
'"""I '"""I ;::: '"""I
'"
Z
~~
'"
,..:.
'"
r-
u;
wide.
..:
~~
M
N
M M
,,; ,,; ,,;
...
N
00
Q
'"
'"
~
"'
to
1
~
"
-;j
]
..:
to
N
~
<Xi <Xi '"""I
-e
000
!!i
,..:.
'i
,..:.
~
::::
8
.•.
~
0'"
'"
..
~
to
,.""
•••00
NN
MM
,,;
u; u;
cD
I
f!iaJ
p,'"
><..,
so
'"
<D
'"
<D
:s ...
-;j -;j
:t2:
~
,,;
1
..
~
N
,,;
cD
'"
~
'"""I
g
~o
~
M
mm
<1> <1>
<D
0000
~
NN
M
,,;
"'
<0
~
<Xi
~8
~o
~
8
'"
-;j
~
-;j
~
Simply lift out magazine.
•
...
",
"'
0
~
M
ro
<'!
,,;
0
~~~
!!l~
~
'"""I
8
~
ci
~
u)
'" '"
0
N
M
,,; ,,;
u;
cD
<Xi en
0
•..
•..
t-<
..,.
ex)
<D
"l
-;j
:E
-;j
0
'"
~
..
-e
c-
N
M
0
~
io
'"""I '"""I
~
:t !;j
o:i
u)
'"
M
,..:.
<D
u)
~
...
N
M
,,;
u;
<0
~
en
~
p,
~
..,
0
'"
8
"'
~
0
-;j
:3
to
'"
~
~
<'!
M
ai
to
u;
'"""I
'"
'!'
~
'!'
8
<1>
~
~
8
o:i
"'
'"
'"
~
'"
...;
N
M
,,;
~
<Xi en
:::
Close door tight and turn
u;
door lock completely in
<ii
"close
"
direction. Be
.",
c e
•
sure
Qj Qj Qj Qj Qj Qj Qj
0"
o •
't:~
"
door
2~5
•""• •
"
•
~~
that "close dot on
•.. •.. •.. •.. •.. •.. •..
i:S~~
N
'"
"
to
ex)
~ ~
",
..
knob lines up with dot on
:to
camera.
-21-
-6-
HOW TO LOAD THE CAMERA
The film magazine should never be exposed to direct sunlight.
When handling it outdoors, remove from carton only in subdued
light.
Turn door lock completely
in "open" direction. Be sure
• that the '.'open" dot on door
knob
lines
up with the dot
on camera. Door will spring
open.
Door opens wide to permit
easy, smooth insertion of
film magazine. Be sure that •
"open" dot on door lock
lines up with dot on camera
while inserting magazine.
Insert magazine under door
catch, slide forward and press
down. Side marked, "This Side
Up For First Exposure" should
be face up for first 25 feet, then
•
reversed to complete 50-foot roll.
Close door tight and turn lock
completely in "close" direction.
Be sure that "close" dot on door
knob
lines
up with the dot on
camera.
-5-
II I
I
I I
I
II I III I
~
'"
..,.
s
-;j -;j
I
CD
M
~
I
'"
«i
q
-
~
'"
0
.•.
:b
~
!;j
<D
~
'l'
"'
M
.;,
-e
~ ~
M
'"
M
to
«i ..;
cO
'"
M
-'"
CD
"
~
]
rzl
-
'"
~~
'"
roO ..,.
0
CD
~
<9
q
~
..,. en
M
z
M
N
..: ...
'"
to
-
~ ~
'"
f-<
..•
«i ..; ..;
en
S
~
0-10
eo
M
"'
'"
CD
]
co
~
...
<f-<
-
<1
..;
:
~ ~
«i
'" ..,.
00
N
~~
N
M
O~
M
<D
en
"'
ci
...""
'"
to to
«i ..;
«i
~~
'"
g:j~
""rzl
><"
~
co eo
'"
~
~rzl
"'
'"
q
~ ~
roO
'"
eo
~ES
!ll
<1
~
<9
~~
"I
«i
",0
eo
M
~
'"
'"
..,.
..•
to
«i
cO
en
-
~
rzl'"
CD
-'"
0-1::J
i!10
;:52
..,.
"
~
e-
..,.
~
cc
-
~~~
<to
to
«i
<7
q
-
'"
"'.
!ii
<D <D
N
M
«i
::J~
M
'"
riJ
ci
CD
0_
'"
to
«i ..;
cO
~ ~ ~
0
'"
...
•..
-
"
co
]
0
M
..,.
"'
N
~~
..•
to
~
..;
cO
-
"!
"
-
<D
M
~~~
.;,
'"
0
<D
N
f-<
to
«i ..;
~~~
roO
'"
"" ... en
M
rzl
0
..,.
":
U) U)
N
eo
'"
..,.
'"
-
~~
roO
M
'"
to
«i
<7 <9
~~
'"
N
!:l
~
<D
U)
M
en
~
..•
to
«i ..;
~ ~
ci
..•
cO
'"
M
••
"."
a; a; a; a; a; a; a;
Gi
a;
u"
c "
~g
B
g
§
e
"
e
""""""
•.. •.. •.. •.. •.. •.. •.. •.. •..
"
.
0.-:;;
a~~
to
CD
r-
eo
s
~ ~
"'
0
•....
'"
to
~o
-22-
GENERAL CAMERA INSTRUCTIONS
To make good movies with your Revere "40" or "44" Magazine
Eight Camera, it is necessary to familiarize yourself with its construc-
tion and operation.
First, examine the outside of your camera. It is advisable to
memorize the names of the controls and parts referred to in this
book. See pages 3 and 4. Learn to: sight through the view-finder
and slide Slide-o-matic view-finder button (1) to desired click stop
indicated for various focal lengths: set speed control (2); adjust foot-
age meter (3); slide operating button (4); wind spring motor (5);
fasten safety wrist cord (6); open and close camera door (7); set lens
(10) for correct exposure as indicated by exposure guide on door of
camera; rotate turret head (11).
WINDING SPRING MOTOR-Before winding spring motor, be sure
operating button is in neutral position. Powerful motor runs 10 feet
of film per winding.
OPERATINGBUTTON-For normal shooting, slide button back about
half-wcry.
For continuous run, slide button all the way back. This gives you a
chance to leave camera unattended while you get into your own
movies.
For single frame exposures, push button forward. One frame at a
time is exposed, permitting you to take as many as 4000 pictures with
a single magazine of film! Single frame exposures are ideal for titling
and trick animation of inanimate objects.
FIVE SPEEDS-Revere "40" and "44" Magazine Cameras are pro-
vided with five speeds: 12, 16, 24, 32, and 48 frames per second.
Set at 12 for fast motion (e.g. crowded street corner traffic can be
speeded up to hectic pace for an amusing sequence). Use 12 also
when lighting conditions are poor.
Set at 16 for all normal shooting.
Set at 24 when shooting from moving vehicles to offset speed of
motion.
Set at 32 for semi-slow motion shots.
Set at 48 for slow motion. Subjects will apear to move on screen
at one-third speed. This speed offers a host of possibilities for comical
and trick shots. (Also ideal for disclosing the rhythm and form of a
high dive or golf swing, etc.)
(Note: Different speeds require corresponding changes in lens open-
ing. For example, scenes shot at 48 frames per second require three
times the exposure for scenes shot at 16 frames.)
-7-
PHOTOFLOOD
EXPOSURE GUIDES
FOR INDOOR COLOR FILMS AND OTHER FILMS
TUNGSTEN RATING A.SA 16 OR WESTON 12
Camera Set
at
No. of
Distance from Lamps to Subjecl
16 Frames per Second
L'mps
F1.9 F2.5 F3.5 F4 F5.6
1
6'12
ft. 4'/2 ft.
3'12
ft. 3 ft.
No. 1 Pholoflood
-- ---
29 fl.
6'12
ft. 5 fl.
4'12
ft. 3fl.
Lamps in
---
311 ft.
7'12
ft. 6 ft.
5'12
ft. 3% ft.
Bright Reflectors
--
9 ft. 7 ft.
6'12
ft. 4Y2ft.
413 ft.
1 8 ft. 5'/2 ft.
4'12
ft. 4 ft.
2'12
ft.
No. 2 Photoflood 212 ft. 8 ft.
6'12
ft.
5'12
ft. 4 ft.
Lamps in 314 ft. 10 ft. 8 ft. 7 ft. 5 ft.
Bright Reflectors 4 16 ft. 12 ft. 9ft. 8 ft.
5'12
ft.
FOR ALL FILMS WITH
TUNGSTEN RATING A.S.A. 32 OR WESTON 24
Camera Set
at
No. of
Distance from Lamps to Subject
16 Frames per Second
L'mps
F2.5 F3.5 F4 FS.6 Fa
No. 1 Pholoflood 2
7'12
ft. 6ft. SY2it. 3
3
4
it. 2Y2it_
--
Lamps in 39 ft. 7'/2 it.
6'12
it. 41/2it. 31/2ft.
Bright Refleclors 411 it. 81/2ft. 7'/2 ft.
5'12
it. 3% ft.
2 10 ft. 7'/2 ft. 7 ft. 4%ft. 31/4ft.
No.2 Photoflood
--
91/2ft. 8 Y2it. 6it. 4 it.
Lamps in 312 it.
Bright Reflectors 414 ft. 11 ft. 10 ft. 7it. 4% It.
The above tables a:i:ebased on exposures of average
or medium colored subjects. For dark colored subjects,
use next half stop larger; for light colored subjects,
use next half stop smaller.
CAUTION: Do not use more than six number
1
photoflood lamps or three number 2 lamps on a single
fused circuit.
-20-
PICTURES
UNSTEADY:
PICTURES
NOT SHARP:
PICTURES
TOO DARK:
PICTURES
TOO LIGHT:
EDGES OF
PICTURE
BLACK:
. EDGES OF
PICTURE
LIGHT OR
CLEAR:
PICTURE DEFECTS
Caused by shaking of camera when
taking scenes. Practice more, or if un-
able to hold steady - use a tripod.
Usually caused by dirty lens, or lens
not resting against seat.
--11
Under exposed film. Due to improper
lens stop used, or if taken inside - in-
sufficient artificial light was used.
5
Over exposed film. Due to improper
lens stop used, or if taken inside - too
much artificial light was used.
7
Finger or object obstructed lens barrel
when picture was taken.
1. Slide-o-mcrtic View-Ffnder 6. Safety Wrist Cord
Button
7.
Door Lock
2. Speed Control 8.
1 \O!"
F3.5 Telephoto Lens
3. Adjustable Footage Meter 9.
V2'
F2.5 or F1.9 Lens
4. Operating Button 10. I" F2.5 Telephoto Lens
5. Winding Key 11. Three-Lens Turret Head
Camera loaded in too brilliant light. To
avoid edqe-foq, film magazine should
be kept in carton and handled in sub-
dued light.
The above defects are based upon reversible film that
has been developed and processed-meaning negative
picture reversed into a positive picture.
-23-
-4-
HOW TO UNLOAD THE CAMERA
0]
-;j
~
1
~
:5 :9
-;j
~
<Xi '"""I '"""I
to
~
0
~
8
M
u)
so
N
~~ ~
NNNN N
'"
'"
;:;
:5
"
-;j
"
:s
~
Turn door lock completely
~
,,;
~
:::: '"""I
~
::::
r-
in
"
open" direction. Be
~
'"
~~
":
r-
.•.
"'
M
~~
'"
N
'"
MM M
•
sure that the "open" dot on
door knob
lines
up with the
00
0
~
~
-;j
:s
-;j -;j
dot on camera. Open door
..,
'"
~~
;:;
0
f!!
M
~
'"""I '"""I ;::: '"""I
'"
Z
~~
'"
,..:.
'"
r-
u;
wide.
..:
~~
M
N
M M
,,; ,,; ,,;
...
N
00
Q
'"
'"
~
"'
to
1
~
"
-;j
]
..:
to
N
~
<Xi <Xi '"""I
-e
000
!!i
,..:.
'i
,..:.
~
::::
8
.•.
~
0'"
'"
..
~
to
,.""
•••00
NN
MM
,,;
u; u;
cD
I
f!iaJ
p,'"
><..,
so
'"
<D
'"
<D
:s ...
-;j -;j
:t2:
~
,,;
1
..
~
N
,,;
cD
'"
~
'"""I
g
~o
~
M
mm
<1> <1>
<D
0000
~
NN
M
,,;
"'
<0
~
<Xi
~8
~o
~
8
'"
-;j
~
-;j
~
Simply lift out magazine.
•
...
",
"'
0
~
M
ro
<'!
,,;
0
~~~
!!l~
~
'"""I
8
~
ci
~
u)
'" '"
0
N
M
,,; ,,;
u;
cD
<Xi en
0
•..
•..
t-<
..,.
ex)
<D
"l
-;j
:E
-;j
0
'"
~
..
-e
c-
N
M
0
~
io
'"""I '"""I
~
:t !;j
o:i
u)
'"
M
,..:.
<D
u)
~
...
N
M
,,;
u;
<0
~
en
~
p,
~
..,
0
'"
8
"'
~
0
-;j
:3
to
'"
~
~
<'!
M
ai
to
u;
'"""I
'"
'!'
~
'!'
8
<1>
~
~
8
o:i
"'
'"
'"
~
'"
...;
N
M
,,;
~
<Xi en
:::
Close door tight and turn
u;
door lock completely in
<ii
"close
"
direction. Be
.",
c e
•
sure
Qj Qj Qj Qj Qj Qj Qj
0"
o •
't:~
"
door
2~5
•""• •
"
•
~~
that "close dot on
•.. •.. •.. •.. •.. •.. •..
i:S~~
N
'"
"
to
ex)
~ ~
",
..
knob lines up with dot on
:to
camera.
-21-
-6-
HOW TO LOAD THE CAMERA
The film magazine should never be exposed to direct sunlight.
When handling it outdoors, remove from carton only in subdued
light.
Turn door lock completely
in "open" direction. Be sure
• that the '.'open" dot on door
knob
lines
up with the dot
on camera. Door will spring
open.
Door opens wide to permit
easy, smooth insertion of
film magazine. Be sure that •
"open" dot on door lock
lines up with dot on camera
while inserting magazine.
Insert magazine under door
catch, slide forward and press
down. Side marked, "This Side
Up For First Exposure" should
be face up for first 25 feet, then
•
reversed to complete 50-foot roll.
Close door tight and turn lock
completely in "close" direction.
Be sure that "close" dot on door
knob
lines
up with the dot on
camera.
-5-
II I
I
I I
I
II I III I
~
'"
..,.
s
-;j -;j
I
CD
M
~
I
'"
«i
q
-
~
'"
0
.•.
:b
~
!;j
<D
~
'l'
"'
M
.;,
-e
~ ~
M
'"
M
to
«i ..;
cO
'"
M
-'"
CD
"
~
]
rzl
-
'"
~~
'"
roO ..,.
0
CD
~
<9
q
~
..,. en
M
z
M
N
..: ...
'"
to
-
~ ~
'"
f-<
..•
«i ..; ..;
en
S
~
0-10
eo
M
"'
'"
CD
]
co
~
...
<f-<
-
<1
..;
:
~ ~
«i
'" ..,.
00
N
~~
N
M
O~
M
<D
en
"'
ci
...""
'"
to to
«i ..;
«i
~~
'"
g:j~
""rzl
><"
~
co eo
'"
~
~rzl
"'
'"
q
~ ~
roO
'"
eo
~ES
!ll
<1
~
<9
~~
"I
«i
",0
eo
M
~
'"
'"
..,.
..•
to
«i
cO
en
-
~
rzl'"
CD
-'"
0-1::J
i!10
;:52
..,.
"
~
e-
..,.
~
cc
-
~~~
<to
to
«i
<7
q
-
'"
"'.
!ii
<D <D
N
M
«i
::J~
M
'"
riJ
ci
CD
0_
'"
to
«i ..;
cO
~ ~ ~
0
'"
...
•..
-
"
co
]
0
M
..,.
"'
N
~~
..•
to
~
..;
cO
-
"!
"
-
<D
M
~~~
.;,
'"
0
<D
N
f-<
to
«i ..;
~~~
roO
'"
"" ... en
M
rzl
0
..,.
":
U) U)
N
eo
'"
..,.
'"
-
~~
roO
M
'"
to
«i
<7 <9
~~
'"
N
!:l
~
<D
U)
M
en
~
..•
to
«i ..;
~ ~
ci
..•
cO
'"
M
••
"."
a; a; a; a; a; a; a;
Gi
a;
u"
c "
~g
B
g
§
e
"
e
""""""
•.. •.. •.. •.. •.. •.. •.. •.. •..
"
.
0.-:;;
a~~
to
CD
r-
eo
s
~ ~
"'
0
•....
'"
to
~o
-22-
GENERAL CAMERA INSTRUCTIONS
To make good movies with your Revere "40" or "44" Magazine
Eight Camera, it is necessary to familiarize yourself with its construc-
tion and operation.
First, examine the outside of your camera. It is advisable to
memorize the names of the controls and parts referred to in this
book. See pages 3 and 4. Learn to: sight through the view-finder
and slide Slide-o-matic view-finder button (1) to desired click stop
indicated for various focal lengths: set speed control (2); adjust foot-
age meter (3); slide operating button (4); wind spring motor (5);
fasten safety wrist cord (6); open and close camera door (7); set lens
(10) for correct exposure as indicated by exposure guide on door of
camera; rotate turret head (11).
WINDING SPRING MOTOR-Before winding spring motor, be sure
operating button is in neutral position. Powerful motor runs 10 feet
of film per winding.
OPERATINGBUTTON-For normal shooting, slide button back about
half-wcry.
For continuous run, slide button all the way back. This gives you a
chance to leave camera unattended while you get into your own
movies.
For single frame exposures, push button forward. One frame at a
time is exposed, permitting you to take as many as 4000 pictures with
a single magazine of film! Single frame exposures are ideal for titling
and trick animation of inanimate objects.
FIVE SPEEDS-Revere "40" and "44" Magazine Cameras are pro-
vided with five speeds: 12, 16, 24, 32, and 48 frames per second.
Set at 12 for fast motion (e.g. crowded street corner traffic can be
speeded up to hectic pace for an amusing sequence). Use 12 also
when lighting conditions are poor.
Set at 16 for all normal shooting.
Set at 24 when shooting from moving vehicles to offset speed of
motion.
Set at 32 for semi-slow motion shots.
Set at 48 for slow motion. Subjects will apear to move on screen
at one-third speed. This speed offers a host of possibilities for comical
and trick shots. (Also ideal for disclosing the rhythm and form of a
high dive or golf swing, etc.)
(Note: Different speeds require corresponding changes in lens open-
ing. For example, scenes shot at 48 frames per second require three
times the exposure for scenes shot at 16 frames.)
-7-
PHOTOFLOOD
EXPOSURE GUIDES
FOR INDOOR COLOR FILMS AND OTHER FILMS
TUNGSTEN RATING A.SA 16 OR WESTON 12
Camera Set
at
No. of
Distance from Lamps to Subjecl
16 Frames per Second
L'mps
F1.9 F2.5 F3.5 F4 F5.6
1
6'12
ft. 4'/2 ft.
3'12
ft. 3 ft.
No. 1 Pholoflood
-- ---
29 fl.
6'12
ft. 5 fl.
4'12
ft. 3fl.
Lamps in
---
311 ft.
7'12
ft. 6 ft.
5'12
ft. 3% ft.
Bright Reflectors
--
9 ft. 7 ft.
6'12
ft. 4Y2ft.
413 ft.
1 8 ft. 5'/2 ft.
4'12
ft. 4 ft.
2'12
ft.
No. 2 Photoflood 212 ft. 8 ft.
6'12
ft.
5'12
ft. 4 ft.
Lamps in 314 ft. 10 ft. 8 ft. 7 ft. 5 ft.
Bright Reflectors 4 16 ft. 12 ft. 9ft. 8 ft.
5'12
ft.
FOR ALL FILMS WITH
TUNGSTEN RATING A.S.A. 32 OR WESTON 24
Camera Set
at
No. of
Distance from Lamps to Subject
16 Frames per Second
L'mps
F2.5 F3.5 F4 FS.6 Fa
No. 1 Pholoflood 2
7'12
ft. 6ft. SY2it. 3
3
4
it. 2Y2it_
--
Lamps in 39 ft. 7'/2 it.
6'12
it. 41/2it. 31/2ft.
Bright Refleclors 411 it. 81/2ft. 7'/2 ft.
5'12
it. 3% ft.
2 10 ft. 7'/2 ft. 7 ft. 4%ft. 31/4ft.
No.2 Photoflood
--
91/2ft. 8 Y2it. 6it. 4 it.
Lamps in 312 it.
Bright Reflectors 414 ft. 11 ft. 10 ft. 7it. 4% It.
The above tables a:i:ebased on exposures of average
or medium colored subjects. For dark colored subjects,
use next half stop larger; for light colored subjects,
use next half stop smaller.
CAUTION: Do not use more than six number
1
photoflood lamps or three number 2 lamps on a single
fused circuit.
-20-
EXPOSURES WITH FLOODLIGHTS
Motion pictures of fine quality may be made indoors
at night with Color or Black-and-White Film. There are
only a few details to consider for making satisfac~ory
indoor pictures. Follow the Photoflood Exposure Guide.
Be sure of proper light distribution and use pr.oper
exposure stop on lens. Also follow these suggestlons:
1st. Arrange lights so they come from different directions-
this breaks up strong shadows and gives finer detail to the
pictures. If you are using two Mazda lamps - place one on
each side of camera, this will give an even distribution of
light on subject.
2nd. Use white photofloods with bright reflectors. Number I
photoflood bulbs have a rated life of two hours. Number 2
photoflood bulbs have a rated life of six hours and will give
slightly more than twice the illumination of the number
I
bulbs.
To conserve lamp life, turn them out when scene is complete.
3rd. Direct some light behind the subject to lighten the
beck-
ground.
4th.
Eliminate bright reflections glaring
into the
camera
lens-
reflections will fog pictures.
5th. Locate lamps higher than subject. The lights should flood
the subject. Take care that lamps do not show in picture. De-
termine this by looking through view finder.
6th. When possible use a tripod for indoor pictures, or rest
camera on table or stand - to keep camera steady.
7th. Remember the distance between the camera and subject
does not affect the exposure. It is the distance from light to
subject that is important. Do not crowd your subjects. Stand
well back with camera to include as much of the subject as
desired, but of course the reflectors must not show in finder.
8th. Follow the PHOTOFLOOD EXPOSURE GUIDE. Take ample
time and excellent results will follow.
-19-
BRIEF COURSE IN MOVIE-MAKING
1. Load camera per instructions.
2. Set footage meter to ZERO.
3. Check Speed Control Dial (should remain at 16
frames for normal movies).
4. Now wind Camera.
5. Set Lens Diaphragm to proper position.
6. Hold Camera steady.
This is important.
For extreme
accuracy, a tripod may.be used. However, as most
Movie Cameras are held by hand, the REVERE "40"
and "44" Magazine Cameras are so designed that a
firm, steady grip is easily obtained. Safety wrist
cord should be securely around the left wrist. This
assists you in obtaining steadiness and prevents
dropping camera.
7. Sight through the Viewfinder. Slide operating but-
ton and you're making movies. It's as simple as that.
TITLES AND SPLICING
Titles help you tell your story and make your pic-
tures more interesting. Titles may be spliced into the
film at any desired place. You can make your own
titles or purchase them from your photographic dealer.
When you have taken several reels of pictures, you
will want to splice them together and place them all
on one or more Revere 300 foot reels. Splicing your
films with a Revere Curvamatic Splicer is easy. Ask
your dealer.
-17-
THE VIEW-FINDER
'-
The Slide-o-matic view-finder on your Revere Model
"40" or "44" Magazine Eight Camera is parallax cor-
rected and glare-free. One of its outstanding features
is the click stop optical adjustment, which eliminates
masks and gives you a full view of the field for the
lens being used. Simply slide button to the proper
click stop calibration. (Click stops are marked at 9mm
for wide-angle lens, l3mm for standard
V2"
lens, 2Smm
for 1" telephoto lens, and 38mm for 1
V:z"
telephoto lens.)
When taking extreme close-ups, remember that sub-
jects closer than four feet from the camera cannot be
centered accurately through the view-finder. Either
center subject by measuring to the center of the lens,
or by making visual allowances (i.e., sighting "high"
through the view-finder so that top of subject appears
in lower half only).
-8-
HOW TO SET THE LENS DIAPHRAGM
The lenses used on Revere cameras are appro xi-
ately 13 mm or "half-inch" lenses. Standard F 2.5
and F 2.8 lenses are Universal or fixed focus type, which
means focusing for distance is not necessary, except as
described below. If camera is equipped with F 1.9
focusing mount lens, footage must be adjusted to your
needs. These lenses have diaphragm openings or stops
calibrated on the rotating lens barrel. The purpose of
these openings is to control the amount of exposure
light to the film. As the
size
of the opening or stops
is increased, the
amount
of exposure light is increased.
The drawing below shows the relative opening of the
diaphragm stops.
@@(!)888
F2.5 4 5.6 8 11 16
RELATIVE OPENING OF DIAPHRAGM STOPS
When Universal Focus lens Pictures will be in sharp focus
stops, listed below, are used: from distances, listed below, to
infinity.
F 2.5 or F 2.8 8.35 feet
F 3.5 5.95
"
F 4 5.2
"
F 5.6 3.7
"
F 8 2.6
"
Fll 1.85
"
F 16 1.3
"
Auxiliary portrait lenses may be used when subjects
are nearer the camera than the above distances.
Important: Viewfinder cannot be used with accuracy
when working at shorter distances than 4 feet from
subject to camera; subjects must then be centered with
center of lens by measurement. .
-10-
THE FOOTAGE METER
The Footage Meter automatically registers the num-
ber of feet of exposed film in the magazine. Place this
dial at "0" after loading camera, and again to "0"
when magazine is turned over and camera is reloaded.
When Meter registers 25 feet, the end of the film
has been reached. The magazine should then be
turned over for second run, after which magazine
should be removed for processing.
If the magazine is changed before being completed,
mark the scale on the magazine to agree with the
reading on Footage Meter. When magazine is again
in place, Footage Meter should be set at the footage
indicated on the magazine scale.
If a magazine should be replaced with another after
only one side has been entirely exposed, indicate
plainly on the dial" on the side of the magazine marked
"This Side Up." This will prevent double exposure,
I'
DEPTH OF FOCUS
FOR FOCUSING MOUNT LENSES
On pages 21 and 22 are Depth of Focus Tables to be
consulted when using Revere Focusing Mount lenses,
such as the
Y2
inch F 1.9, the one inch F 2.5 telephoto,
and the 1
Y2
inch F 3.5 telephoto. The Depth of Focus
tables give you the distance in front of and behind the
point of focus within which all subjects will be in sharp
focus. Hyperfocal distance is the nearest distance in
sharp focus when the lens is focused at infinity. If the
lens is focused on the hyperfocal distance, the depth
of sharp focus will then extend from a point one-half
the hyperfocus to infinity.
-9-
..
EXPOSURE GUIDES
FOR DAYLIGHT USE WITH KODACHROME
OR ANY FILM RATED WESTON 8
Camera Set at Bright Over-
16 Frames Bright Hazy Open cast Deep
Per Second Sun Sun Shade Cloudy Shade
------
---- ----
----
---- ----
Basic Between Between Between Between Between
Exposure F8&F11 F5.6&F8 F3.5&5.6 3.5 &5.6 2.5 & 3.5
----
Light Sub. F11 F8 F5.6 F5.6 F3.5
------ ---- ---- ---- ---- ---
Dark Sub. F8 F5.6 F3.5 F3.5 F2.5
------- ---- --- ---- --- ----
Side Light F5.6to 8
---- ---
Back Light F3.5to5.61
FOR DAYLIGHT USE WITH
FILM RATED WESTON 32
Camera Speed Bright Over-
16 Frames Bright Hazy Open cast Deep
Per Second Sun Sun Shade Cloudy Shade
------
---- ---- ---- ---- ----
Basic Between Between Between Between Between
Exposure 11 & 16 8 & 11 5.6&8 5.6&8 4&5.6
---- --- ---- ----
Light Sub. Fl6 F11 F8 F8 F5.6
Dark Sub. F11
I
F8 F5.6 F5.6 F4
----
Side Light 8 to 11
Back Light 5.6 to 8
-18-
EXPOSING THE FILM
It is vitally important that the correct lens aperture
opening be used in order that the film may be prop-
erly exposed. The setting of the lens aperture opening
is determined by two factors: first, the emulsion speed
of the film which is being used in the camera, and
secondly, the amount of light on the subject.
The emulsion speed rating on each film is merely a
comparative number or factor set up by the exposure
meter manufacturers to denote differences between
film emulsions and the rapidity with which each film
accepts the light to which it is exposed. Before you
can make a properly exposed picture you must know
the proper rating of that film. If you do not use an
exposure meter, you must use an exposure guide for
that particular film rating. Since color films and the
more popular black and white panchromatic films are
-11-
PLANNING AND TAKING PICTURES
Always plan interesting pictures that tell a story.
Your first movies will likely be of the children, the
family and your close friends. Always avoid any
attempt to make the subjects act, or pose in front of the
ccmerc. Have them relax and act natural. Never take
pictures directly into the rays of the sun. Before high
noon or early afternoon is the ideal time to take
movies. Don't make the mistake of "clipping" scenes
too short; keep the camera operating long enough on
each scene. When a short scene is projected upon
the screen it flashes on and off so quickly it is difficult
for the eyes to grasp the meaning of the image. You
should never run less than 1
Y2
to 2 feet of film on
each scene. At times you will use a longer period,
depending on the importance of the subject. You can-
not conveniently take pictures and watch the footage
meter at the same time; however you can easily mem-
orize operating time - IT TAKES ABOUT 5 SECONDS
TO RUN 1 FOOT OF FILM. TIME EACH SHORT
SCENE FOR AT LEAST EIGHT SECONDS.
Close-up scenes and portraits are interesting and
add to the variety and interest of your reels. CAU-
TION - Be sure the entire subject or face you wish to
take is seen in the center of the finder. Only what is
seen in the view finder will be recorded on the film.
The only exception to that statement is when you are
taking extreme closeups of less than 4 feet, then it will
be necessary to center subject with center of lens by
measurement. (See page 10 for closeup focusinq limite-
tions while using universal focus lens.)
-16-
FILTERS FOR BLACK AND WHITE FILM
YELLOW FILTERS
The filters for black and white film are made in
varying degrees of yellow. red. green and blue. The
most popular filter. as well as the most useful, is the
yellow filter. There are many shades or intensities of
yellow filters. but the most widely used is the "medium
yellow" filter. The yellow filter helps the lens to pene-
trate mist, fog and haze. It helps to sharpen up your
pictures by giving better detail especially in shaded
areas. It reduces the glare from sun. water or sand.
It also tends to darken the blue of the sky sufficiently
to allow the white clouds to stand out more naturally.
rated by A.S.A. 10 or Weston 8. we have prepared on
page 18. an exposure guide for this speed film. On
the same page.
you
will find an exposure guide for
film having an A.S.A. 40 or Weston 32 rating. You
should study both of these exposure guides. and test
yourself by studying the light conditions on several
~iifferent subjects. Then figure out which in your opin-
ion would be the proper exposure for each subject.
LIGHTING THE SUBJECT
RED FILTER
Another popular filter is the "red" filter. This filter
is also available in a variety of intensities of the color.
The red filter is used for more dramatic effects. It
darkens the blue sky more than the yellow filter. It
will help bring out more detail in subject matter in
the darker co.lors such as purple. dark red. and deep
shadows. It IS also helpful when taking pictures in
bright sun light and on snow and water.
When
you
purchase a filter it is important that
you
obtain information as to the "filter factor". When using
a filter.
it
is necessary to increase the exposure. The
filter factor. which should be supplied by the manu-
~acturer of the filter. will tell
you
how much more light
IS necessary when using that particular filter.
_Remember. a filter will make objects of its own
color photograph as white. and objects of the opposite
color will photograph as dark gray or black.
-15-
Light is as important in photography as gasoline is
t~ an automobile. Always remember. to make good
~lct,:res.
you
n:ust properly expose the film. The rapid
nse m. populanty of color film makes it imperative that
~ou gIve careful thought and study to lighting condi-
tions and the exposure of your film.
. Lighting is of vital importance regardless of which
film
you
use. When working with black and white film
the form and shape of your subjects are made more
interesting by shadows. The exact reversal of this is
true when
you
are working with color film. When
working with color film the colors of your subjects
provide the contrast, and produce the shape and
form of the subject. Shadows. especially heavy black
shadows, should be avoided.
For best results with color film. the source of light
should be almost directly behind the camera. A flat,
front ligh.ting. on your subject i~ the best. Side lighting
or bac~ liqhtinq should be cvoided when working with
~olor films, unless
you
use a reflector to throw light up
into .the darkened areas of the subject. Also avoid
makmg outdoor exposures of people with a bright sun
-12-
directly overhead. The sun, in this position, makes
deep shadows around the eyes and the neck. These
deep shadows can only be removed through the use
of a reflector. You will find that some of your best
results with colored pictures will be obtained when
the sky is lightly overcast or when your subject is
in open shade, receiving light from the sky but not
directly in the sun.
A great deal more care must be exercised in deter-
mining the proper exposure for color film than is re-
quired with black and white film. This is because
color film has considerably less latitude for exposure
error. Incorrectly exposed pictures will be slightly off
color and they will lack clarity and sharpness. The
exposure guide for colored film on page 20 should be
studied with extreme care. The basic exposures given
in the table are based on the use of front lighting as
described above. When it is absolutely necessary to
use side lighting on the subject be sure to use at least
one diaphragm opening larger than for front lighting.
FILTERS FOR COLOR FILM
HAZE FILTER
When working with regular color film outdoors, no
filter is necessary for close ups and medium close up
"shots." When taking distant shots of landscapes or
over water it is advisable to use a haze filter. Atmos-
pheric haze or ultra-violet light has a tendency to
photograph as violet. This haze tends to make your
pictures fuzzy or indistinct, because the ultra-violet
light is more prevalent in extremely distant scenes,
snow scenes, water scenes and those taken at high
-13-
11
altitudes. When taking such scenes the haze filter will
improve the color rendition.
Also, on a gray day and in the shade, the light is
colder in tone. Taking color pictures under such light-
ing conditions is usually not advisable; however, a
haze filter used under these conditions will help to
bring about a warmer tone to the colors.
- r
I
;1-,
TYPE A FILTER FOR COLOR FILM
Indoor color film is different from regular daylight
color film. It is especially prepared for: use with white
photoflood lights. This film cannot be used in sunlight
or daylight unless a Type A filter is used on the lens.
This special filter is required to change the quality of
daylight to that of regular photoflood illumination;
therefore the color of the filter is reddish yellow. It is
not necessary to use the haze filter when using the
Type A filter. When using the Type A filter with in-
door color film outdoors, the speed rating of the film
is then the same as that given the regular outdoor
color film. When using the indoor color film with
photofloods, it is not necessary to use any filter.
Regular color film, prepared especially for use in
daylight, can be used with regular white photoflood
lights, if the proper blue filter is used in front of the
lens. The use of the blue filter is not practical because
of the effect of the filter on the speed of the film. The
speed of the film is cut down to less than half when
the blue filter is used. Reasonably good results can
be obtained with day light color film by using blue
photoflood lights. With these blue lights no filter is
required. Blue photoflood lights are especially useful
when there is a combination of daylight and artificial
light.
-14-
FILTERS FOR BLACK AND WHITE FILM
YELLOW FILTERS
The filters for black and white film are made in
varying degrees of yellow, red, green and blue. The
most popular filter, as well as the most useful, is the
yellow filter. There are many shades or intensities of
yellow filters, but the most widely used is the "medium
yellow" filter. The yellow filter helps the lens to pene-
trate mist, fog and haze. It helps to sharpen up your
pictures by giving better detail especially in shaded
areas. It reduces the glare from sun, water or sand.
It also tends to darken the blue of the sky sufficiently
to allow the white clouds to stand out more naturally.
RED FILTER
Another popular filter is the "red" filter. This filter
is also available in a variety of intensities of the color.
The red filter is used for more dramatic effects. It
darkens the blue sky more than the yellow filter. It
will help bring out more detail in subject matter in
the darker colors such as purple, dark red, and deep
shadows. It is also helpful when taking pictures in
bright sun light and on snow and water.
When
you
purchase a filter it is important that
you
obtain information as to the "filter factor". When using
a filter, it is necessary to increase the exposure. The
filter factor, which should be supplied by the manu-
facturer of the filter, will tell
you
how much more light
is necessary when using that particular filter.
Remember, a filter will make objects of its own
color photograph as white, and objects of the opposite
color will photograph as dark gray or black.
-15-
THE FOOTAGE METER
The Footage Meter automatically registers the num-
ber of feet of exposed film in the magazine. Place this
dial at "0" after loading camera, and again to "0"
when magazine is turned over and camera is reloaded.
When Meter registers 25 feet, the end of the film
has been reached. The magazine should then be
turned over for second run, after which magazine
should be removed for processing.
If the magazine is changed before being completed,
mark the scale on the magazine to agree with the
reading on Footage Meter. When magazine is again
in place, Footage Meter should be set at the footage
indicated on the magazine scale.
If a magazine should be replaced with another after
only one side has been entirely exposed, indicate
plainly on the dial" on the side of the magazine marked
"This Side Up." This will prevent double exposure,
I'
DEPTH OF FOCUS
FOR FOCUSING MOUNT LENSES
On pages 21 and 22 are Depth of Focus Tables to be
consulted when using Revere Focusing Mount lenses,
such as the
Y2
inch F 1.9, the one inch F 2.5 telephoto,
and the 1
Y2
inch F 3.5 telephoto. The Depth of Focus
tables give you the distance in front of and behind the
point of focus within which all subjects will be in sharp
focus. Hyperfocal distance is the nearest distance in
sharp focus when the lens is focused at infinity. If the
lens is focused on the hyperfocal distance, the depth
of sharp focus will then extend from a point one-half
the hyperfocus to infinity.
-9-
..
EXPOSURE GUIDES
FOR DAYLIGHT USE WITH KODACHROME
OR ANY FILM RATED WESTON 8
Camera Set at Bright Over-
16 Frames Bright Hazy Open cast Deep
Per Second Sun Sun Shade Cloudy Shade
------
---- ----
----
---- ----
Basic Between Between Between Between Between
Exposure F8&F11 F5.6&F8 F3.5&5.6 3.5 &5.6 2.5 & 3.5
----
Light Sub. F11 F8 F5.6 F5.6 F3.5
------ ---- ---- ---- ---- ---
Dark Sub. F8 F5.6 F3.5 F3.5 F2.5
------- ---- --- ---- --- ----
Side Light F5.6to 8
---- ---
Back Light F3.5to5.61
FOR DAYLIGHT USE WITH
FILM RATED WESTON 32
Camera Speed Bright Over-
16 Frames Bright Hazy Open cast Deep
Per Second Sun Sun Shade Cloudy Shade
------
---- ---- ---- ---- ----
Basic Between Between Between Between Between
Exposure 11 & 16 8 & 11 5.6&8 5.6&8 4&5.6
---- --- ---- ----
Light Sub. Fl6 F11 F8 F8 F5.6
Dark Sub. F11
I
F8 F5.6 F5.6 F4
----
Side Light 8 to 11
Back Light 5.6 to 8
-18-
EXPOSING THE FILM
It is vitally important that the correct lens aperture
opening be used in order that the film may be prop-
erly exposed. The setting of the lens aperture opening
is determined by two factors: first, the emulsion speed
of the film which is being used in the camera, and
secondly, the amount of light on the subject.
The emulsion speed rating on each film is merely a
comparative number or factor set up by the exposure
meter manufacturers to denote differences between
film emulsions and the rapidity with which each film
accepts the light to which it is exposed. Before you
can make a properly exposed picture you must know
the proper rating of that film. If you do not use an
exposure meter, you must use an exposure guide for
that particular film rating. Since color films and the
more popular black and white panchromatic films are
-11-
PLANNING AND TAKING PICTURES
Always plan interesting pictures that tell a story.
Your first movies will likely be of the children, the
family and your close friends. Always avoid any
attempt to make the subjects act, or pose in front of the
ccmerc. Have them relax and act natural. Never take
pictures directly into the rays of the sun. Before high
noon or early afternoon is the ideal time to take
movies. Don't make the mistake of "clipping" scenes
too short; keep the camera operating long enough on
each scene. When a short scene is projected upon
the screen it flashes on and off so quickly it is difficult
for the eyes to grasp the meaning of the image. You
should never run less than 1
Y2
to 2 feet of film on
each scene. At times you will use a longer period,
depending on the importance of the subject. You can-
not conveniently take pictures and watch the footage
meter at the same time; however you can easily mem-
orize operating time - IT TAKES ABOUT 5 SECONDS
TO RUN 1 FOOT OF FILM. TIME EACH SHORT
SCENE FOR AT LEAST EIGHT SECONDS.
Close-up scenes and portraits are interesting and
add to the variety and interest of your reels. CAU-
TION - Be sure the entire subject or face you wish to
take is seen in the center of the finder. Only what is
seen in the view finder will be recorded on the film.
The only exception to that statement is when you are
taking extreme closeups of less than 4 feet, then it will
be necessary to center subject with center of lens by
measurement. (See page 10 for closeup focusinq limite-
tions while using universal focus lens.)
-16-
EXPOSURES WITH FLOODLIGHTS
Motion pictures of fine quality may be made indoors
at night with Color or Black-and-White Film. There are
only a few details to consider for making satisfac~ory
indoor pictures. Follow the Photoflood Exposure Guide.
Be sure of proper light distribution and use pr.oper
exposure stop on lens. Also follow these suggestlons:
1st. Arrange lights so they come from different directions-
this breaks up strong shadows and gives finer detail to the
pictures. If you are using two Mazda lamps - place one on
each side of camera, this will give an even distribution of
light on subject.
2nd. Use white photofloods with bright reflectors. Number I
photoflood bulbs have a rated life of two hours. Number 2
photoflood bulbs have a rated life of six hours and will give
slightly more than twice the illumination of the number
I
bulbs.
To conserve lamp life, turn them out when scene is complete.
3rd. Direct some light behind the subject to lighten the
beck-
ground.
4th.
Eliminate bright reflections glaring
into the
camera
lens-
reflections will fog pictures.
5th. Locate lamps higher than subject. The lights should flood
the subject. Take care that lamps do not show in picture. De-
termine this by looking through view finder.
6th. When possible use a tripod for indoor pictures, or rest
camera on table or stand - to keep camera steady.
7th. Remember the distance between the camera and subject
does not affect the exposure. It is the distance from light to
subject that is important. Do not crowd your subjects. Stand
well back with camera to include as much of the subject as
desired, but of course the reflectors must not show in finder.
8th. Follow the PHOTOFLOOD EXPOSURE GUIDE. Take ample
time and excellent results will follow.
-19-
BRIEF COURSE IN MOVIE-MAKING
1. Load camera per instructions.
2. Set footage meter to ZERO.
3. Check Speed Control Dial (should remain at 16
frames for normal movies).
4. Now wind Camera.
5. Set Lens Diaphragm to proper position.
6. Hold Camera steady.
This is important.
For extreme
accuracy, a tripod may.be used. However, as most
Movie Cameras are held by hand, the REVERE "40"
and "44" Magazine Cameras are so designed that a
firm, steady grip is easily obtained. Safety wrist
cord should be securely around the left wrist. This
assists you in obtaining steadiness and prevents
dropping camera.
7. Sight through the Viewfinder. Slide operating but-
ton and you're making movies. It's as simple as that.
TITLES AND SPLICING
Titles help you tell your story and make your pic-
tures more interesting. Titles may be spliced into the
film at any desired place. You can make your own
titles or purchase them from your photographic dealer.
When you have taken several reels of pictures, you
will want to splice them together and place them all
on one or more Revere 300 foot reels. Splicing your
films with a Revere Curvamatic Splicer is easy. Ask
your dealer.
-17-
THE VIEW-FINDER
'-
The Slide-o-matic view-finder on your Revere Model
"40" or "44" Magazine Eight Camera is parallax cor-
rected and glare-free. One of its outstanding features
is the click stop optical adjustment, which eliminates
masks and gives you a full view of the field for the
lens being used. Simply slide button to the proper
click stop calibration. (Click stops are marked at 9mm
for wide-angle lens, l3mm for standard
V2"
lens, 2Smm
for 1" telephoto lens, and 38mm for 1
V:z"
telephoto lens.)
When taking extreme close-ups, remember that sub-
jects closer than four feet from the camera cannot be
centered accurately through the view-finder. Either
center subject by measuring to the center of the lens,
or by making visual allowances (i.e., sighting "high"
through the view-finder so that top of subject appears
in lower half only).
-8-
HOW TO SET THE LENS DIAPHRAGM
The lenses used on Revere cameras are appro xi-
ately 13 mm or "half-inch" lenses. Standard F 2.5
and F 2.8 lenses are Universal or fixed focus type, which
means focusing for distance is not necessary, except as
described below. If camera is equipped with F 1.9
focusing mount lens, footage must be adjusted to your
needs. These lenses have diaphragm openings or stops
calibrated on the rotating lens barrel. The purpose of
these openings is to control the amount of exposure
light to the film. As the
size
of the opening or stops
is increased, the
amount
of exposure light is increased.
The drawing below shows the relative opening of the
diaphragm stops.
@@(!)888
F2.5 4 5.6 8 11 16
RELATIVE OPENING OF DIAPHRAGM STOPS
When Universal Focus lens Pictures will be in sharp focus
stops, listed below, are used: from distances, listed below, to
infinity.
F 2.5 or F 2.8 8.35 feet
F 3.5 5.95
"
F 4 5.2
"
F 5.6 3.7
"
F 8 2.6
"
Fll 1.85
"
F 16 1.3
"
Auxiliary portrait lenses may be used when subjects
are nearer the camera than the above distances.
Important: Viewfinder cannot be used with accuracy
when working at shorter distances than 4 feet from
subject to camera; subjects must then be centered with
center of lens by measurement. .
-10-
THE FOOTAGE METER
The Footage Meter automatically registers the num-
ber of feet of exposed film in the magazine. Place this
dial at "0" after loading camera, and again to "0"
when magazine is turned over and camera is reloaded.
When Meter registers 25 feet, the end of the film
has been reached. The magazine should then be
turned over for second run, after which magazine
should be removed for processing.
If the magazine is changed before being completed,
mark the scale on the magazine to agree with the
reading on Footage Meter. When magazine is again
in place, Footage Meter should be set at the footage
indicated on the magazine scale.
If a magazine should be replaced with another after
only one side has been entirely exposed, indicate
plainly on the dial" on the side of the magazine marked
"This Side Up." This will prevent double exposure,
I'
DEPTH OF FOCUS
FOR FOCUSING MOUNT LENSES
On pages 21 and 22 are Depth of Focus Tables to be
consulted when using Revere Focusing Mount lenses,
such as the
Y2
inch F 1.9, the one inch F 2.5 telephoto,
and the 1
Y2
inch F 3.5 telephoto. The Depth of Focus
tables give you the distance in front of and behind the
point of focus within which all subjects will be in sharp
focus. Hyperfocal distance is the nearest distance in
sharp focus when the lens is focused at infinity. If the
lens is focused on the hyperfocal distance, the depth
of sharp focus will then extend from a point one-half
the hyperfocus to infinity.
-9-
..
EXPOSURE GUIDES
FOR DAYLIGHT USE WITH KODACHROME
OR ANY FILM RATED WESTON 8
Camera Set at Bright Over-
16 Frames Bright Hazy Open cast Deep
Per Second Sun Sun Shade Cloudy Shade
------
---- ----
----
---- ----
Basic Between Between Between Between Between
Exposure F8&F11 F5.6&F8 F3.5&5.6 3.5 &5.6 2.5 & 3.5
----
Light Sub. F11 F8 F5.6 F5.6 F3.5
------ ---- ---- ---- ---- ---
Dark Sub. F8 F5.6 F3.5 F3.5 F2.5
------- ---- --- ---- --- ----
Side Light F5.6to 8
---- ---
Back Light F3.5to5.61
FOR DAYLIGHT USE WITH
FILM RATED WESTON 32
Camera Speed Bright Over-
16 Frames Bright Hazy Open cast Deep
Per Second Sun Sun Shade Cloudy Shade
------
---- ---- ---- ---- ----
Basic Between Between Between Between Between
Exposure 11 & 16 8 & 11 5.6&8 5.6&8 4&5.6
---- --- ---- ----
Light Sub. Fl6 F11 F8 F8 F5.6
Dark Sub. F11
I
F8 F5.6 F5.6 F4
----
Side Light 8 to 11
Back Light 5.6 to 8
-18-
EXPOSING THE FILM
It is vitally important that the correct lens aperture
opening be used in order that the film may be prop-
erly exposed. The setting of the lens aperture opening
is determined by two factors: first, the emulsion speed
of the film which is being used in the camera, and
secondly, the amount of light on the subject.
The emulsion speed rating on each film is merely a
comparative number or factor set up by the exposure
meter manufacturers to denote differences between
film emulsions and the rapidity with which each film
accepts the light to which it is exposed. Before you
can make a properly exposed picture you must know
the proper rating of that film. If you do not use an
exposure meter, you must use an exposure guide for
that particular film rating. Since color films and the
more popular black and white panchromatic films are
-11-
PLANNING AND TAKING PICTURES
Always plan interesting pictures that tell a story.
Your first movies will likely be of the children, the
family and your close friends. Always avoid any
attempt to make the subjects act, or pose in front of the
ccmerc. Have them relax and act natural. Never take
pictures directly into the rays of the sun. Before high
noon or early afternoon is the ideal time to take
movies. Don't make the mistake of "clipping" scenes
too short; keep the camera operating long enough on
each scene. When a short scene is projected upon
the screen it flashes on and off so quickly it is difficult
for the eyes to grasp the meaning of the image. You
should never run less than 1
Y2
to 2 feet of film on
each scene. At times you will use a longer period,
depending on the importance of the subject. You can-
not conveniently take pictures and watch the footage
meter at the same time; however you can easily mem-
orize operating time - IT TAKES ABOUT 5 SECONDS
TO RUN 1 FOOT OF FILM. TIME EACH SHORT
SCENE FOR AT LEAST EIGHT SECONDS.
Close-up scenes and portraits are interesting and
add to the variety and interest of your reels. CAU-
TION - Be sure the entire subject or face you wish to
take is seen in the center of the finder. Only what is
seen in the view finder will be recorded on the film.
The only exception to that statement is when you are
taking extreme closeups of less than 4 feet, then it will
be necessary to center subject with center of lens by
measurement. (See page 10 for closeup focusinq limite-
tions while using universal focus lens.)
-16-
EXPOSURES WITH FLOODLIGHTS
Motion pictures of fine quality may be made indoors
at night with Color or Black-and-White Film. There are
only a few details to consider for making satisfac~ory
indoor pictures. Follow the Photoflood Exposure Guide.
Be sure of proper light distribution and use pr.oper
exposure stop on lens. Also follow these suggestlons:
1st. Arrange lights so they come from different directions-
this breaks up strong shadows and gives finer detail to the
pictures. If you are using two Mazda lamps - place one on
each side of camera, this will give an even distribution of
light on subject.
2nd. Use white photofloods with bright reflectors. Number I
photoflood bulbs have a rated life of two hours. Number 2
photoflood bulbs have a rated life of six hours and will give
slightly more than twice the illumination of the number
I
bulbs.
To conserve lamp life, turn them out when scene is complete.
3rd. Direct some light behind the subject to lighten the
beck-
ground.
4th.
Eliminate bright reflections glaring
into the
camera
lens-
reflections will fog pictures.
5th. Locate lamps higher than subject. The lights should flood
the subject. Take care that lamps do not show in picture. De-
termine this by looking through view finder.
6th. When possible use a tripod for indoor pictures, or rest
camera on table or stand - to keep camera steady.
7th. Remember the distance between the camera and subject
does not affect the exposure. It is the distance from light to
subject that is important. Do not crowd your subjects. Stand
well back with camera to include as much of the subject as
desired, but of course the reflectors must not show in finder.
8th. Follow the PHOTOFLOOD EXPOSURE GUIDE. Take ample
time and excellent results will follow.
-19-
BRIEF COURSE IN MOVIE-MAKING
1. Load camera per instructions.
2. Set footage meter to ZERO.
3. Check Speed Control Dial (should remain at 16
frames for normal movies).
4. Now wind Camera.
5. Set Lens Diaphragm to proper position.
6. Hold Camera steady.
This is important.
For extreme
accuracy, a tripod may.be used. However, as most
Movie Cameras are held by hand, the REVERE "40"
and "44" Magazine Cameras are so designed that a
firm, steady grip is easily obtained. Safety wrist
cord should be securely around the left wrist. This
assists you in obtaining steadiness and prevents
dropping camera.
7. Sight through the Viewfinder. Slide operating but-
ton and you're making movies. It's as simple as that.
TITLES AND SPLICING
Titles help you tell your story and make your pic-
tures more interesting. Titles may be spliced into the
film at any desired place. You can make your own
titles or purchase them from your photographic dealer.
When you have taken several reels of pictures, you
will want to splice them together and place them all
on one or more Revere 300 foot reels. Splicing your
films with a Revere Curvamatic Splicer is easy. Ask
your dealer.
-17-
THE VIEW-FINDER
'-
The Slide-o-matic view-finder on your Revere Model
"40" or "44" Magazine Eight Camera is parallax cor-
rected and glare-free. One of its outstanding features
is the click stop optical adjustment, which eliminates
masks and gives you a full view of the field for the
lens being used. Simply slide button to the proper
click stop calibration. (Click stops are marked at 9mm
for wide-angle lens, l3mm for standard
V2"
lens, 2Smm
for 1" telephoto lens, and 38mm for 1
V:z"
telephoto lens.)
When taking extreme close-ups, remember that sub-
jects closer than four feet from the camera cannot be
centered accurately through the view-finder. Either
center subject by measuring to the center of the lens,
or by making visual allowances (i.e., sighting "high"
through the view-finder so that top of subject appears
in lower half only).
-8-
HOW TO SET THE LENS DIAPHRAGM
The lenses used on Revere cameras are appro xi-
ately 13 mm or "half-inch" lenses. Standard F 2.5
and F 2.8 lenses are Universal or fixed focus type, which
means focusing for distance is not necessary, except as
described below. If camera is equipped with F 1.9
focusing mount lens, footage must be adjusted to your
needs. These lenses have diaphragm openings or stops
calibrated on the rotating lens barrel. The purpose of
these openings is to control the amount of exposure
light to the film. As the
size
of the opening or stops
is increased, the
amount
of exposure light is increased.
The drawing below shows the relative opening of the
diaphragm stops.
@@(!)888
F2.5 4 5.6 8 11 16
RELATIVE OPENING OF DIAPHRAGM STOPS
When Universal Focus lens Pictures will be in sharp focus
stops, listed below, are used: from distances, listed below, to
infinity.
F 2.5 or F 2.8 8.35 feet
F 3.5 5.95
"
F 4 5.2
"
F 5.6 3.7
"
F 8 2.6
"
Fll 1.85
"
F 16 1.3
"
Auxiliary portrait lenses may be used when subjects
are nearer the camera than the above distances.
Important: Viewfinder cannot be used with accuracy
when working at shorter distances than 4 feet from
subject to camera; subjects must then be centered with
center of lens by measurement. .
-10-

This manual suits for next models

1

Other Revere Camcorder manuals

Revere EYE-Matic CA-2 User manual

Revere

Revere EYE-Matic CA-2 User manual

Revere EYE - MATIC CA-1 User manual

Revere

Revere EYE - MATIC CA-1 User manual

Popular Camcorder manuals by other brands

JVC EVERIO R GZ-R440 user guide

JVC

JVC EVERIO R GZ-R440 user guide

JVC GR-AXM66EG instruction manual

JVC

JVC GR-AXM66EG instruction manual

Panasonic WV-F565 user guide

Panasonic

Panasonic WV-F565 user guide

Hitachi DZ-MV230A - Camcorder Service manual

Hitachi

Hitachi DZ-MV230A - Camcorder Service manual

Sony SSC-DC14 user manual

Sony

Sony SSC-DC14 user manual

Rear view safety RVS-77535 instruction manual

Rear view safety

Rear view safety RVS-77535 instruction manual

Toshiba CAMILEO AIR10 user manual

Toshiba

Toshiba CAMILEO AIR10 user manual

Panasonic AJSDC915 - DVC PRO CAMCORDER Brochure & specs

Panasonic

Panasonic AJSDC915 - DVC PRO CAMCORDER Brochure & specs

Sony DCR SR100 - Handycam Camcorder - 3.3 MP brochure

Sony

Sony DCR SR100 - Handycam Camcorder - 3.3 MP brochure

Apexto DV008 user manual

Apexto

Apexto DV008 user manual

Crays SDV-1A instruction manual

Crays

Crays SDV-1A instruction manual

Sanyo VM-D6P instruction manual

Sanyo

Sanyo VM-D6P instruction manual

JVC Everio GZ-MS110U user guide

JVC

JVC Everio GZ-MS110U user guide

Sony Handycam HDR-TD20VE operating guide

Sony

Sony Handycam HDR-TD20VE operating guide

Panasonic AJ-SPD850E operating instructions

Panasonic

Panasonic AJ-SPD850E operating instructions

Panasonic BB-HNP15 operating instructions

Panasonic

Panasonic BB-HNP15 operating instructions

Samsung VP-D451 Owner's instruction book

Samsung

Samsung VP-D451 Owner's instruction book

Panasonic Palmcorder IQ PV-L606 user guide

Panasonic

Panasonic Palmcorder IQ PV-L606 user guide

manuals.online logo
manuals.online logoBrands
  • About & Mission
  • Contact us
  • Privacy Policy
  • Terms and Conditions

Copyright 2025 Manuals.Online. All Rights Reserved.