Revere EYE - MATIC CA-1 User manual

OPERATING
INSTRUCTIONS

KNOW
YOUR
CAMERA
WELCOME
TO
THE
REVERE
FAMILY
Congratulations.
You
are
now
the
proud
owner
of
the
world's
first
completely
new
fully
automatic
8mm
camera
with
versatile
“SPECIAL
EFFECTS"
features.
We
know
you
will
find
pleasure
in
using
the
Revere
Electric
Eye-Matic
camera
and
will
marvel
at
the
ease
with
which
you
can
produce
truly
beautiful
movies
with
completely
automatic
exposure
settings.
As
with
all
other
Revere
products,
this
camera
has
been
rigidly
inspected
and
film
tested.
To
insure
complete
familiarity
with
its
operation,
we
recommend
that
you
shoot
one
roll
of
film
at
your
earliest
convenience.
FILM
1
TRIPOD
SOCKET
2
CARRYING
STRAP
3
WINDING
KEY
4
OPERATING
BUTTON
5
FOOTAGE
DIAL
6
EXPOSURE
CONTROL
DIAL
7
VIEWFINDER
EYEPIECE
8
PICTURE
WINDOW
FINDER
9
FILM
SETTING
10
EXPOSURE
COMPUTER
LENS
11
DOOR
LOCK
(not
visible)
12
NORMAL
LENS
(13mm)
f/1.8
Accepts
Size
4.5
filter
13
WIDE
ANGLE
(9mm)
Accepts
Size
4.5
filter
14
TELEPHOTO
(32.5mm)
Accepts
Size
5
filter
See
page
2
for
filter
sizes
used
in
accessory
adapters
for
Model
CA-1.

MODEL
CA-2
THREE
LENS
TURRET
Turret
disc
rotates
to
positive
click
stops.
For
correct
shooting
position,
DOT
above
lens
must
line
up
with
DOT
on
camera
front.
LENS
BARRELS
ARE
FACTORY
MATCHED
AND
NON-DETACHABLE.
WIDE
ANGLE
AND
TELEPHOTO
ADAPTERS
FOR
MODEL
CA-1
REVERE
EYE-
MATIC
CAMERA
•
No.
808
9mm
four
ele¬
ment
Wollensak
Cine
Raptar
WIDE
ANGLE
ADAPTER.
Accepts
Size
5.5
filter.
•
No.
809
32.5mm
preci¬
sion
five
el
e-
ment
Wollensak
Cine
Raptar
TEL¬
EPHOTO
ADAP¬
TER.
Accepts
Size
5.5
filter.
•
WOLLENSAK
WIDE
ANGLE
AND
TELEPHOTO
ADAPTERS
are
available
at
your
Revere
dealer.
To
install
simply
re¬
move
the
filter
ring,
from
the
normal
lens
and
screw
the
adapter
into
the
lens
hood.
^.oad,
rfittt
and
S&o&t
“Pvt^ect
IRe&dte
For
full
AUTOMATIC
operation
keep
the
SEMI-AUTO
dial
in
the
DETENT
position.
RED
DOT
on
dial
must
line
up
with
ARROW
on
camera.
No
special
knowledge
of
photography
is
re¬
quired
to
make
perfectly
exposed
movies
with
your
Revere
Eye-Matic
8mm
camera.
To
operate
simply
LOAD,
AIM
and
SHOOT.
Without
any
delay,
the
lens
aperture
automatically
sets
itself
even
before
your
finger
touches
the
OPERATING
BUTTON.
Detailed
explanations
of
light
conditions
and
lens
settings
are
no
longer
necessary.
To
operate
your
camera
successfully
simply
review
the
easy
loading
instructions
and
you
are
ready.
Results
of
your
very
first
roll
of
movies
will
reveal
what
a
truly
amazing
camera
the
Revere
Electric
Eye-Matic
really
is.
The
Revere
Electric
EXPOSURE
COMPUTER
LENS
is
composed
of
many
ultra-sensitive
rectangular
cells
and
measures
the
rectangular
area
as
seen
by
the
camera.
Extraneous
light
outside
the
actual
picture
taking
area
cannot
influence
the
meter
reading.
Ordinary
exposure
meters
pick
up
excess
light
sur¬
rounding
the
picture
area.
The
Ex¬
posure
Computer
Lens
is
self-ener¬
gized
and
there
are
no
batter¬
ies
to
replace
in
order
to
maintain
the
peak
effi¬
ciency
of
your
camera.

Color
film
is
the
popular
choice
of
all
amateur
movie
makers.
The
Revere
Electric
Eye-Matic
cameras
are
de¬
signed
for
use
with
Daylight
color
film
as
well
as
the
Indoor
type
color
film,
usually
referred
to
as
Type
A.
DAYLIGHT
COLOR
FILM,
rated
ASA
10,
is
balanced
for
use
in
sunlight.
Under
normal
conditions,
no
special
filters
are
required.
Very
distant
land¬
scapes
or
scenes
exposed
in
the
shade,
on
a
sunny
day,
will
tend
to
be
slightly
bluish
in
color.
If
this
is
objectionable,
bluishness
may
be
minimized
with
a
HAZE
filter.
ADJUST
THE
“FILM
SETTING”
TO
THE
ASA
10
IN¬
DICATION
WHEN
USING
DAYLIGHT
COLOR
FILM,
WITH
OR
WITHOUT
HAZE
FILTER.
INDOOR
“TYPE
A"
COLOR
FILM,
rated
ASA
16,
is
balanced
for
use
with
artificial
light
supplied
by
photoflood
lamps.
These
are
generally
used
on
a
camera
light
bar.
No
special
filter
is
required
for
indoor
use.
ADJUST
THE
“FILM
SETTING"
TO
THE
ASA
16
IN¬
DICATION
WHEN
USING
TYPE
A
COLOR
FILM.
When
necessary,
INDOOR
TYPE
A
COLOR
FILM
may
be
ex¬
posed
in
daylight
with
a
No.
85
CONVERSION
FILTER
behind
the
lens
hood.
With
filter
in
place,
film
speed
is
reduced
from
ASA
16
to
ASA
10.
ADJUST
THE
“FILM
SETTING”
TO
THE
ASA
10
IN¬
DICATION
WHEN
USING
TYPE
A
FILM
WITH
A
No.
85
CONVERSION
FILTER.
FILM
AND
FILTERS
3
LOADING
Spool
type
8mm
film
is
double
width
and
exposed
one-half
width
at
a
time.
In
order
to
expose
the
film
completely,
it
is
necessary
to
run
the
film
through
the
camera
twice.
When
double
width
film
is
processed,
it
is
slit
down
the
center
and
the
two
halves
spliced
together
in
one
continuous
length.
The
film
is
returned
by
the
processing
station,
on
a
fifty
foot
reel,
ready
for
screening.
Set
the
DOT
of
the
FOOTAGE
ME¬
TER
on
the
GOLD
ARROW
before
loading
camera.
Never
handle
unprocessed
light
sensitive
film
in
direct
sunlight.
Se¬
lect
a
shaded
area
to
thread
the
camera.
Extra
footage
is
provided
on
both
ends
of
the
reel
to
pre¬
vent
fogging
of
usable
film.
Fully
wind
spring
by
turning
the
WINDING
KEY
in
the
clockwise
direction.

Turn
camera
on
the
other
side
and
open
door
by
turning
the
DOOR
LOCK
counter
clockwise
(direction
of
arrow),
until
the
BLACK
DOT
lines
up
with
the
UPPER
MARKER
on
the
camera.
Remove
film
from
its
container
and
remove
the
pro¬
tective
paper
band.
Place
the
unexposed
roll
of
film
on
the
top
spindle
so
that
film
un¬
winds
from
bottom
of
reel.
Hole
in
spool
is
notched
so
that
reverse
loading
is
impossible.
Swing
GATE
(A)
open.
Pull
out
a
few
inches
of
film
and
follow
line
with
arrow
around
the
UPPER
GUIDE
POST
(B)
and
through
the
APERTURE
TRACK
(C).
Continue
to
pull
film
through
by
following
the
guide
line
around
and
in
front
of
the
LOWER
GUIDE
POST
(D).
Make
certain
film
is
be¬
tween
the
side
bars
and
flush
against
the
aperture
plate.
Close
GATE
against
the
film.
Note:
GATE
is
automatically
held
in
proper
tension
when
camera
door
is
closed.
Hold
empty
take-up
spool
with
side
marked
“FILM
WHEN
ON
THIS
SPOOL
IS
ONLY
HALF
EXPOSED*
1
facing
up.
Insert
end
of
film
deep
into
slot
of
take-up
spool
and
turn
several
times
(in
clockwise
direc¬
tion)
until
securely
engaged.
Slip
spool
over
lower
take-up
spindle.
Spool
will
not
fit
if
inverted.
With
camera
door
still
open,
slide
the
OPERATING
BUTTON
back
and
run
a
few
inches
of
film
to
see
that
if
is
advancing
smoothly.
Close
camera
door
and
turn
the
DOOR
LOCK
until
the
BLACK
DOT
lines
up
with
the
lower
marker
on
the
camera,
(direction
of
arrow).
Pull
back
OPERATING
BUTTON
and
run
camera
until
FOOTAGE
METER
reads
“0“
feet.
Failure
to
run
off
leader
will
result
in
fogging
of
the
opening
scenes.
Wind
spring
to
full
tension
and
proceed
to
expose
the
first
half.
See
page
5
for
procedure
of
exposing
the
second
half.

OPERATION
OPERATING—Hold
the
camera
firmly
against
the
cheek,
bracing
the
elbows
against
the
body.
For
best
results
hold
the
camera
very
still
and
let
your
subjects
provide
the
action.
Panning,
moving
camera
from
left
to
right,
should
be
done
very
slowly
only
when
absolutely
necessary.
Faster
panning
is
permissible
when
following
a
subject
in
motion
providing
action
is
kept
well
centered
at
all
times.
Expose
each
scene
at
least
five
seconds.
OPERATING
BUTTON—For
normal
use,
slide
the
OPERATING
BUTTON
back
lightly
to
start
camera.
Release
finger
to
stop
camera
operation.
CONTINUOUS
RUN—To
lock
button
in
place,
allowing
you
to
step
into
your
own
movies,
slide
the
OPERATING
BUTTON
back
and
apply
slight
pressure.
Reverse
procedure
to
stop
camera.
SINGLE
FRAME—To
make
single
frame
exposures,
slide
the
OPERATING
BUTTON
forward
and
release
finger.
This
action
exposes
only
one
frame
at
a
time
and
is
a
feature
the
advanced
movie
maker
can
apply
when
producing
time
lapse
effects.
SECOND
HALF
5
When
the
FOOTAGE
METER
indicates
"
2
5
"
feet,
the
film
is
only
half-
exposed.
Stop
taking
pictures,
but
continue
running
camera
until
balance
of
film
runs
out.
FOOTAGE
METER
will
indicate
"0"
when
all
the
film
is
on
the
take-up
spool.
To
expose
the
second
half,
apply
the
following
instructions:
Open
door
and
proceed
to
unload
camera
in
a
shaded
area,
NEVER
IN
DIRECT
SUNLIGHT.
Film
on
take-up
spool
will
be
tightly
coiled
except
for
a
short
strip
around
the
LOWER
GUIDE
POST
which
prevents
unnec¬
essary
spill.
Remove
both
spools,
turn
them
over
and
reverse
their
positions
so
that
the
full
spool
is
now
on
the
top
spindle.
Then
follow
instructions
as
given
on
pages
3
and
4
for
loading.
When
the
second
half
has
been
exposed,
remove
the
full
take-up
spool
and
place
it
in
the
metal
container
supplied
with
film.
Submit
to
the
nearest
laboratory
for
processing.
DO
NOT
MAIL
EXPOSED
FILM
TO
REVERE
FOR
PROCESSING.
The
PICTURE
WINDOW
FINDER
of
the
Electric
Eye-Matic
camera
is
de¬
signed
to
provide
a
large
easy
to
sight
and
easy
to
compose
image.
To
insure
well
centered
subjects,
at
all
distances,
the
VIEWFINDER
EYE¬
PIECE
has
a
special
parallax
adjustment
for
near
and
distant
subjects.
FOR
CLOSEUPS
USE
THE
3-12
FOOT
SETTING.
FOR
AVERAGE
MOVIE
MAKING
USE
THE
8-INF.
SETTING.
When
sighting
through
the
VIEWFINDER
EYEPIECE
you
will
see
field
out¬
lines
for
the
following
lenses:
WIDE
ANGLE
Full
area.
NORMAL
Area
bordered
by
a
gray
transparent
field.
TELEPHOTO
Small
center
field.
For
your
convenience,
the
correct
f/stop
setting
is
always
clearly
visible
in
the
special
f/STOP
SCALE
directly
above
the
lens
fields.
A
RED
WARNING
SIGNAL,
immediately
following
the
f/1.8
indication,
will
appear
when
the
light
is
insufficient
for
movie
making.

The
Revere
Electric
Eye-Matic
camera
is
equipped
with
a
Wollen-
sak
fixed
focus
f/1.8
lens
system
which
eliminates
need
for
focus¬
ing.
This
feature
applies
to
the
three
lens
turret
Model
CA-2
as
well
as
the
single
lens
Model
CA-1
accepting
the
accessory
No.
808
WIDE
ANGLE
and
No.
809
TELEPHOTO
ADAPTERS.
The
13mm
NORMAL
lens
is
the
type
most
frequently
used
for
general
movie
making.
The
9mm
WIDE
ANGLE
covers
twice
the
area
of
a
normal
lens
and
is
employed
mainly
where
conditions
make
it
impossible
to
move
bock
sufficiently
to
include
everything
in
one
scene.
The
32.5mm
TELEPHOTO
is
most
useful
for
distant
scenes
.
.
.
where
the
subject
is
too
far
away
and
you
can’t
move
up
closer.
Since
the
TELEPHOTO
magnifies
the
image
2
V
2
times,
o
tripod
is
recommended
for
the
steadiest
results.
Study
the
depth
of
field
scale
and
make
certain
that
subjects
do
not
appear
closer
than
the
recommended
minimum
distances
for
the
lens
and
aperture
chosen
for
exposure.
For
example:
When
using
Ihe
NORMAL
13mm
lens
at
f/8,
all
objects
from
3
y
/i
feet
to
INFINITY
will
be
in
focus.
However,
when
the
TELEPHOTO
is
used
at
the
same
f/8
aperture,
the
near
subject
should
not
be
closer
than
14
feet.
SHARPEST
MOVIES
WILL
BE
OBTAINED
BY
OBSERVING
THE
FOL¬
LOWING
MINIMUM
SUBJECT
TO
CAMERA
DISTANCES
FOR
EACH
LENS
AND
APERTURE
USED.
LENS
f/STOP
LENS
OPENING
9mm
f/1.8
f/
2.8
f/4
f/5.6
f/8
f/11
f/16
WIDE
ANGLE
5'
4'
3'
2V
2
'
2'
iy
2
'
r
1
3mm
NORMAL
10'
8'
6'
41
/
2
'
31
/
2
'
2V
2
'
2'
3
2.5mm
TELEPHOTO
25'
22'
20'
17'
14'
1
r
7'
Sharp
focus
extends
from
the
minimum
distances
indicated
to
IN¬
FINITY
in
all
instances.
f/STOP
SCALE
visible
in
the
viewfinder
will
be
helpful
when
referring
back
to
the
above
depth
of
field
chart,
particularly
when
using
TELEPHOTO.
HAVE
FUN
WITH
YOUR
CAMERA
In
addition
to
complete
automatic
operation,
exclu¬
sive
SEMI-AUTO
DIAL
control
makes
precise
expo¬
sure
control
possible
as
you
shoot.
Special
effects
such
as
complete
fades,
deliberate
under
and
over¬
exposure
and
balanced
tone
control
of
sub-normal
scenes
are
now
at
your
finger
tips.
To
obtain
these
SPECIAL
EFFECTS,
place
your
finger
on
the
SEMI-AUTO
DIAL
and
then
sight
through
the
viewfinder
eyepiece.
Observe
the
f/STOP
SCALE
directly
above
the
lens
fields
and
practice
operation
by
slowly
rotating
the
SEMI-AUTO
DIAL
up
and
down.
Notice
the
f/stop
lens
settings
change
as
soon
as
the
SEMI-AUTO
DIAL
is
moved
out
of
the
COMPLETE
AUTOMATIC
"DErENT”
POSITION.
Rotate
the
SEMI-AUTO
DIAL
“UP”
to
decrease
the
lens
aperture.
The
larger
numbers
indicate
smaller
lens
openings.
When
an
average
or
light
colored
subject
is
situated
against
a
dominantly
dark
background,
the
exposure
can
be
balanced
by
reducing
the
lens
aperture
by
one-half
to
one
full
f/stops.
Unusual
effects,
such
as
a
brilliant
sunset,
can
be
excitingly
dramatized
by
various
degrees
of
deliberate
underexposure.
If
a
complete
fade
is
desired,
continue
to
ro¬
tate
the
SEMI-AUTO
DIAL
“UP”
until
it
comes
to
a
stop.
Note
that
a
BLACK
BAND
now
ap¬
pears
in
the
f/STOP
SCALE
indicating
com¬
plete
exposure
blackout.
To
fade
back
into
normal
exposure,
slowly
rotate
the
SEMI-AUTO
DIAL
“DOWN*
until
it
rolls
into
the
COMPLETE
AUTOMATIC
“DETENT”
POSITION.
When
a
dark
or
average
subject
is
situated
against
a
dominantly
light
background
an
exposure
increase
of
one-half
to
one
full
f/stop
is
recom¬
mended
for
correct
exposure
balance.
Rotate
the
SEMI-AUTO
DIAL
down¬
ward
to
increase
exposure
over
normal.
Smaller
f/numbers
indicate
larger
lens
openings.
Deliberate
exposure
increase
over
normal
is
also
desired,
occasionally,
when
lightening
dark
colors
or
when
greater
shadow
detail
is
desired
in
back
lighted
subjects.
IMPORTANT:
ALWAYS
REMEMBER
TO
RETURN
THE
SEMI-AUTO
DIAL
BACK
TO
THE
CENTRAL
DETENT
POSITION
WHEN
OPER¬
ATING
CAMERA
AUTOMATICALLY.
RED
DOT
on
the
SEMI-AUTO
DIAL
must
line
up
with
the
ARROW
ON
THE
CAMERA.
(0
"0
m
o
>
r
m
i\
m
o
H
(0
6

No.
513
CASE
FOR
MODEL
CA-1
Complete
your
camera
outfit
with
a
smart
custom
designed
Revere
carrying
case.
Hand
crafted
workmanship
.
.
.
bass
wood
veneer
covered
in
hand
boarded
analine
dyed
full
grain
genuine
cowhide
leather.
Elegant
“Ranch
Tone"
color
is
most
eye
appealing.
Compact
yei
large
enough
to
include
extra
packages
of
film
and
small
ac¬
cessories.
Choice
of
two
models
for
either
single
lens
or
turret
camera".
Shoulder
strap
included.
No.
524
CASE
FOR
MODEL
CA-2
7
REVERE
•777"
8mm
PROJECTOR
Here
in
the
modem
manner
is
Revere's
newest
contribution
to
8mm
movie
projection.
The
777
is
the
last
word
in
modern
styling
and
precision
engineering.
Optional
choice
of
Z
U"
or
l”
f/l.6
coated
projection
lens,
one
simple
FORWARD-REVERSE
control;
high
speed
rewind;
ultra
modern
stainless
steel
film
retainers
and
swing
open
gate
for
easy
threading;
rheostat
speed
control;
750
watt
illumination;
ultra-bright
still
picture;
instant
tilt
control;
retractable
handle;
automatic
room-lamp
accommodation;
built-in
film
and
cord
compartments;
115
volt
AC-DC
operation;
no
lubrication
required
for
life.
Complete
with
stream-lined
carrying
case
and
two
400
foot
reels.
Printed
in
U.S.A.
FORM
No.
B-508-2
REVERE
CAMERA
COMPANY
to
iM
CHICAGO
16,
ILLINOIS

HELPFUL
HINTS
for
making
better
movies
under
all
light
conditions

Set
camera
at
AUTOMATIC
where
subject
is
six
feet
or
less
from
background.
Best
results
will
be
obtained
if
camera
and
lights
are
six
feet
or
more
from
subject.
Exposure
adjusts
automatically.
Indoor
movies
in
large
room,
ballroom,
etc.
where
background
is
more
than
6
feet
away
from
subject.
Use
SEMI-AUTO
according
to
Guide
at
right.
Taking
indoor
movies
automatically
The
use
of
a
light
bar
is
the
most
popular
method
of
taking
indoor
movies.
Here
the
camera
is
mounted
between
the
lamps.
The
light
follows
the
subject
in
whatever
direction
the
camera
is
aimed.
If
subject
is
6
feet
or
less
from
background
(usually
in
average
size
rooms
of
most
homes)
and
camera
and
lights
are
six
feet
or
more
from
subject,
set
camera
on
AUTOMATIC.
It
adjusts
itself
automatically
to
amount
of
light.
In
extra
large
living
room,
ballroom
or
public
hall
the
subject
may
be
more
than
6
feet
away
from
background.
The
illumination
naturally
drops
off
behind
the
subject.
Your
Revere
Electric
Eye-Matic
has
a
provision
for
this
sub-normal
light
condition.
Use
SEMI-AUTO
DIAL
and
simply
set
exposure
manually
according
to
Guide
printed
below.
Exposure
shows
on
"Optic-Scale"
as
you
view
scene
through
viewfinder.
Exposure
Guide
when
using
SEMI-AUTO
for
occasional
subnormal
lighting.
IAMPS
TO
SUBJECT
3
feet
4
feet
6
feet
9
feet
13
feet
MANUAL
SETTING
This
table
based
on
light
bar
with
4
medium
beam
375
watt
reflector
floods
With
2
reflector
bulbs
increase
aperture
one
f/stop
B508-30
PRINTED
IN
U.3.A.

always
remember:
Load
and
unload
camera
in
shaded
area.
Wind
motor
fully
before
each
scene.
Remove
lens
caps.
Keep
lenses
spotlessly
clean.
Hold
camera
very
steady.
Pan
when
following
action
—
and
very
slowly
if
subjects
are
posed.
Keep
the
sun
behind
you
when
you
shoot
Sunshine
is
fine
for
outdoor
movies
and
sunburn.
When
the
sun
is
high
in
the
sky
and
behind
you,
affording
FULL
FRONT
ILLUMINATION
(as
shown
below),
it
doesn't
matter
if
the
day
is
Bright,
Hazy
or
Cloudy.
Your
Revere
Electric
Eye-Matic
camera
takes
perfectly
exposed,
brilliant
movies
automatically.
Truest
colors
are
captured
if
movies
are
made
two
hours
after
sunrise
and
two
hours
before
sunset.
Avoid
situations
where
subjects
are
partly
in
shade
and
partly
in
the
sun.
Set
camera
at
AUTOMATIC,
just
aim
and
shoot!
FULL
FRONT
ILLUMINATION

For
“difficult”
light
conditions
the
“OPTIC-SCALE”
comes
in
handy
Occasionally
you
want
to
take
movies
when
the
sun
is
not
behind
you.
Strong,
glaring
sidelight
or
shooting
directly
into
the
sun
are
difficult
shots
for
any
camera
and
should
be
avoided.
To
cope
with
these
situations,
your
„
e
'
e
Electnc
Eye-Mafic
is
equipped
with
an
ingenious
OPTIC-SCALE".
It
permits
you
to
manually
and
visually
make
simple
adjustments
for
these
"difficult"
shots
to
assure
perfectly
exposed
movies.
By
dialing
the
SEMI-AUTO
knob
you
can
easily
make
compensations
for
sub-normal
lighting,
an
advantage
not
available
with
cameras
lacking
this
manual
optional
control.
The
"OPTIC-SCAIE"
indicates
exposure
through
the
viewfinder
os
you
shoot.
Without
taking
your
eye
owoy
from
camera
you
can
make
adjustments
for
sub-normal
lighting
by
dialing
the
SEMI-AUTO
knob
conveniently
adjacent
to
the
operating
button.
SIDELIGHT
ILLUMINATION
Sun
shines
only
on
one
side
of
subject.
If
dramatic,
contrasty
effects
are
de-
sired
continue
to
operate
on
AUTOMATIC.
To
get
more
details
in
shadow
portions
operate
camera
on
SEMI-AUTO.
First
note
exposure
on
"Optic-Scale"
when
,n
AUTOMATIC
position.
Then
rotate
SEMI-AUTO
DIAL
down
one
full
stop,
(example
f/8
to
f/5.6)
back
light
illumin
AT
I
O
N
fn
Un
AUTnM^r
y
c
behind
°
r
overhead
-
For
d
"
""°*'‘
silhouette
effects
operate
in
AUTOMATIC.
For
precise
details:
When
it
is
possible
to
approach
subject,
ake
Optic-Scale"
reading
at
very
close
range,
6
to
8
inches
away
from
subiec,
with
camera
in
AUTOMATIC.
Then
step
back
to
shooting
position
and
match
close-up
reading
by
rotating
SEMI-AUTO
DIAL
down.
When
not
pos-
s.bie
to
approach
subject,
note
exposure
on
"Optic-Scale"
in
AUTOMATIC.
Then
rotate
SEMI-AUTO
DIAL
down
two
stops
(example
f/8
to
f/4).
DOWN
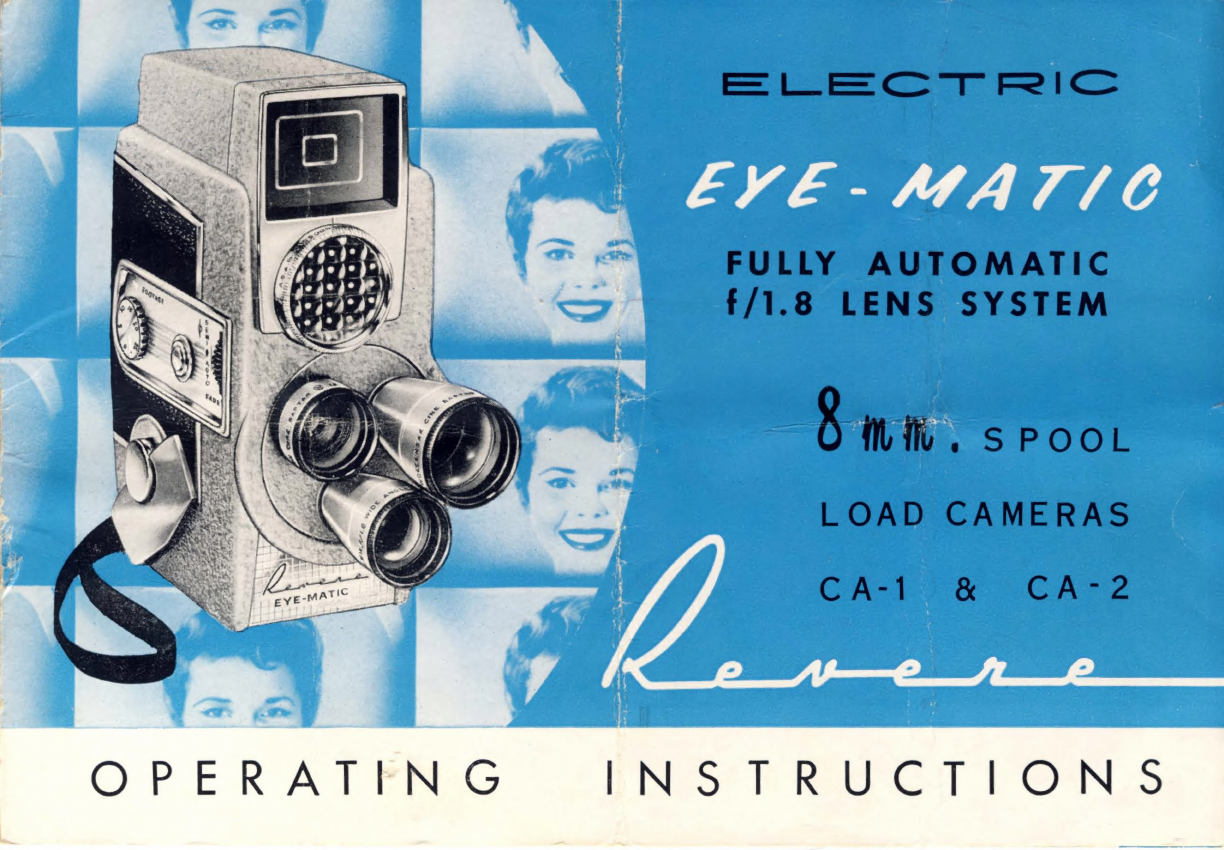
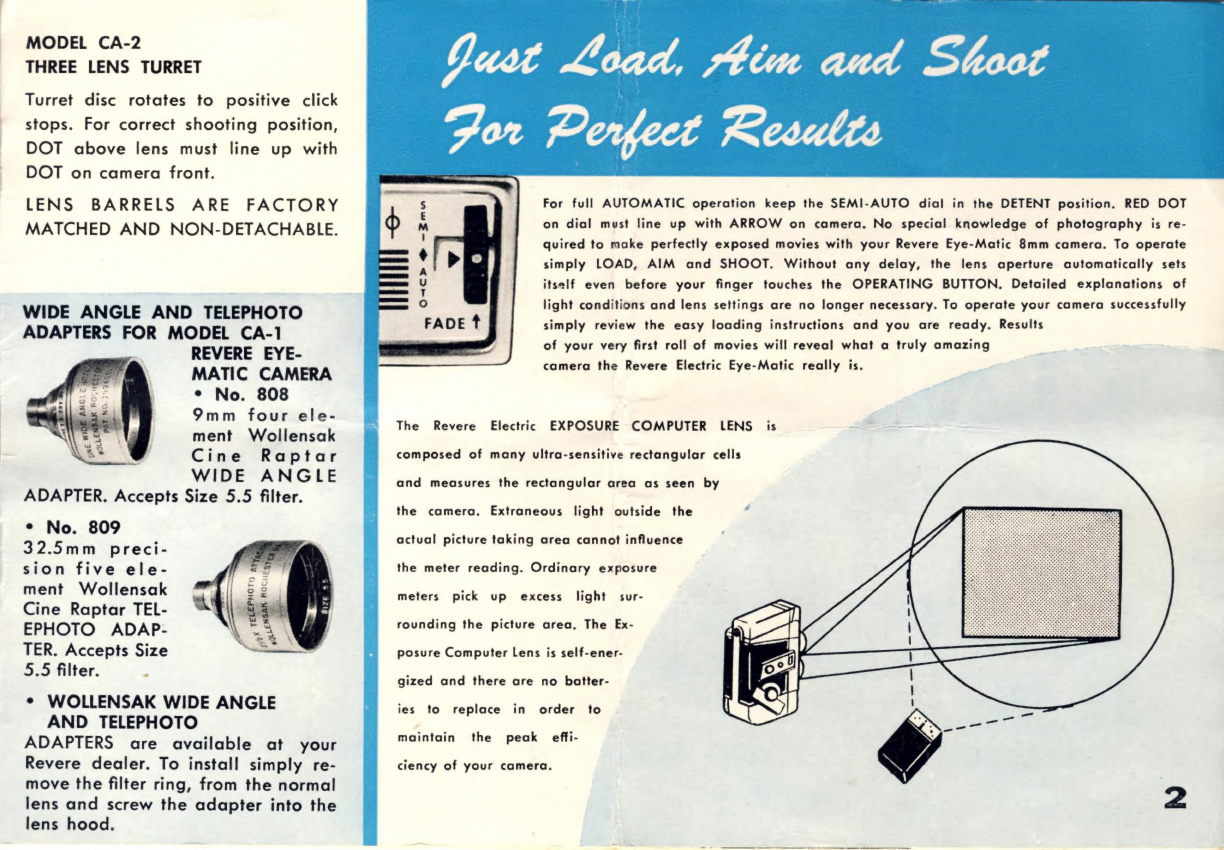
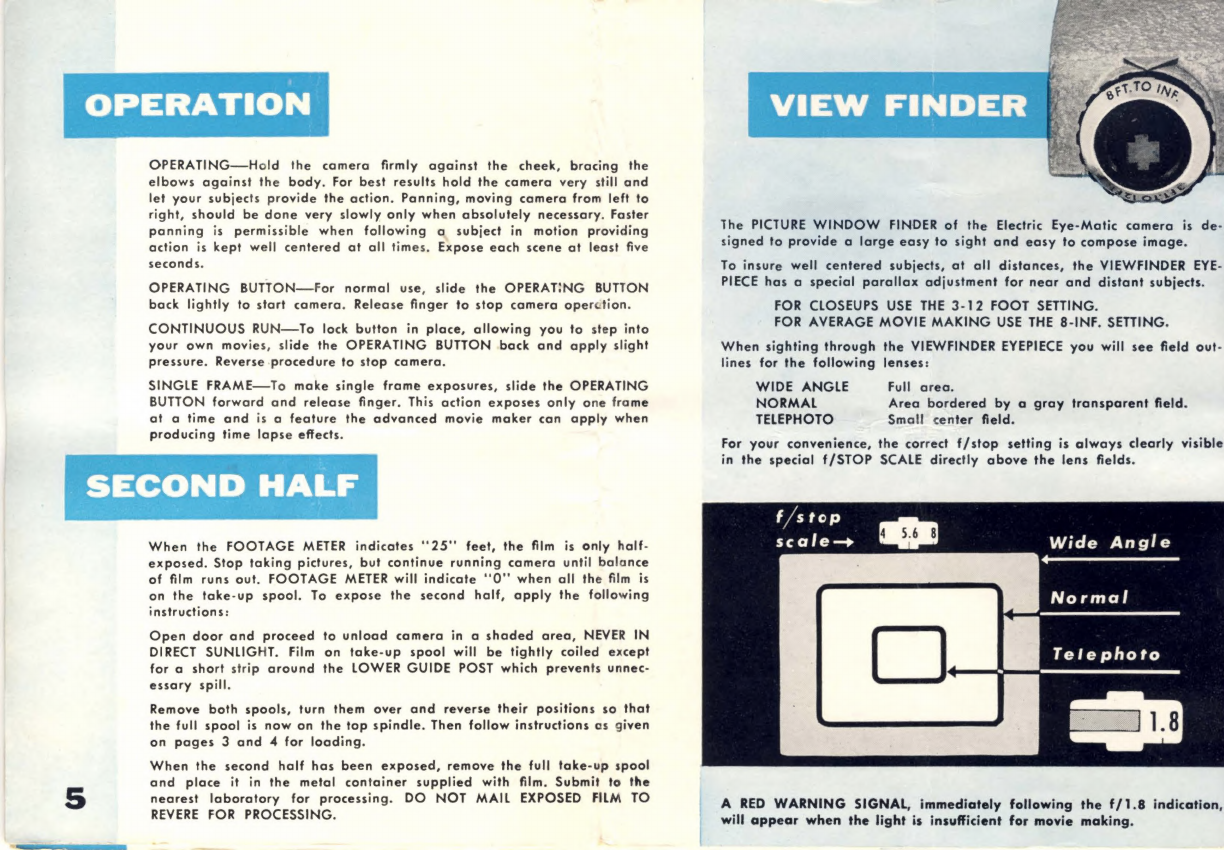
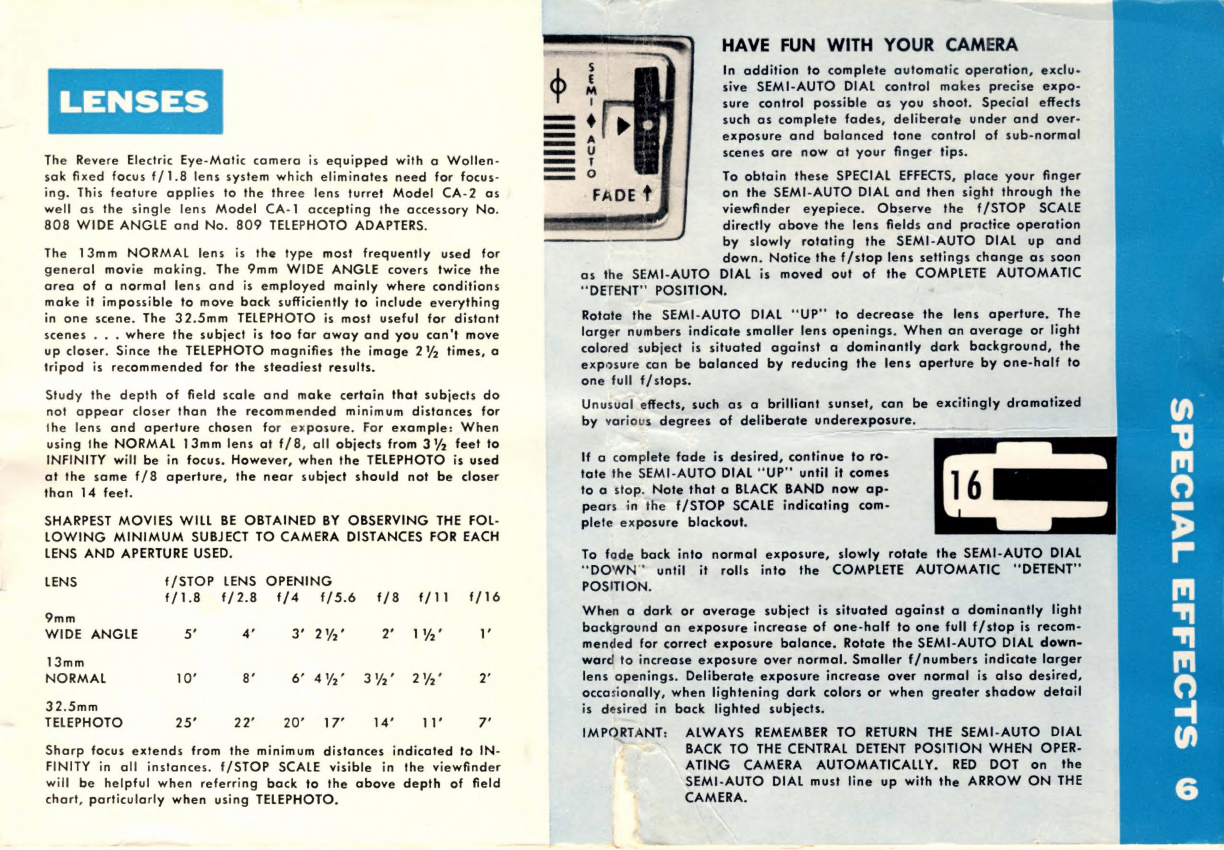
This manual suits for next models
1
Table of contents
Other Revere Camcorder manuals