RIP TUNES RCS-220S User manual

USER’S GUIDE
GUÍA DE USUARIO
GUIDE DE L’UTILISATEUR
MODEL RCS-220S
Cassette Player / Recorder with
USB playback and recording
Reproductor de Casetes con Reproducción y Grabación USB
Lecteur de cassette avec lecture et enregistrement USB

–2–
ENGLISH ESPAÑOL FRANÇAIS
TABLE OF CONTENTS
Safety Precautions ............................................................ 3
Introduction...................................................................... 4
Whats in the Box................................................................ 4
Product Diagram ............................................................... 5
Getting Started.................................................................. 6
Playback Modes and Functions.......................................... 6
Care and Maintenance....................................................... 8
Troubleshooting................................................................ 9
Technical Support ........................................................... 10
Limited Warranty ............................................................ 11
Español ........................................................................... 12
Français........................................................................... 22

–3–
ENGLISHESPAÑOLFRANÇAIS
SAFETY PRECAUTIONS
READ THIS MANUAL CAREFULLY BEFORE OPERATING AND RESERVE IT FOR FUTURE
REFERENCE. REFER TO IT WHEN ENCOUNTERING ANY OPERATING PROBLEM.
1. WARNING: To reduce the risk of electric shock or damage to the player’s
speakers, do not disassemble the player. There are no user-serviceable parts
inside. Contact technical support for assistance.
2. WARNING: To prevent fire or electric shock hazard, do not expose the player
to rain or moisture (including drips or splashes). Objects filled with liquids,
such as vases and water bottles, should not be placed on or near the player.
Do not touch the unit with wet hands.
3. WARNING: Do not expose the cassette player or batteries to excessive heat,
such as direct sunlight, fire, or other heat sources.
4. WARNING: Use only the attachments/accessories provided by the manufac-
turer, except for tape cleaners, headphones, or a 2.5mm microphone.
5. Do not place objects on top of the player.
6. Do not place the player on an unstable table, stand, tripod, bracket, or cart.
The player may fall, resulting in possible damage or injury.
7. Unplug the power from the outlet during lightning storms or when the player
is not in use.
8. Pay attention to the safety purpose of the polarized plug. A polarized plug has
two blades. One blade is wider than the other. If the provided plug does not
fit into your outlet, consult an electrician to replace the obsolete outlet.
9. Protect the power cord from being walked on or pinched. No stress should be
placed on the cord at either end.
10. Dispose of this player properly, respecting your local laws for electronics and
battery disposal.
WARNING: THE POWER CORD ON THIS PRODUCT CONTAINS LEAD, A CHEM-
ICAL KNOWN TO THE STATE OF CALIFORNIA TO CAUSE CANCER AND BIRTH
DEFECTS OR OTHER REPRODUCTIVE HARM. WASH HANDS AFTER HANDLING.

–4–
ENGLISH ESPAÑOL FRANÇAIS
INTRODUCTION
Congratulations on your purchase of this Cassette Player/Recorder with
USB recording and playback! For your safety, and to get the most
enjoyment from your player, please read all of these instructions.
FEATURES
• Cassette player and recorder
• USB slot for MP3/WMA playback and recording from tape or microphone
• Microphone input
• Headphone jack
• Runs on AC Power or 4 C-cell batteries
WHATS IN THE BOX
Your Cassette
Recorder
This User Manual
AC Power Adapter
Warranty Tech Support
Card

–5–
ENGLISHESPAÑOLFRANÇAIS
1
3
5
4
6
9
8
7
11
10
2
1. Speaker
2. USB Play/Record Controls
3. USB Port
4. Built-in Microphone
5. Cassette Tape Door
6. Tape Transport
7. Power Input
8. Headphone Output
9. USB/Tape Switch
10. Microphone Input
11. Volume Control
MIC
PRODUCT DIAGRAM

–6–
ENGLISH ESPAÑOL FRANÇAIS
GETTING STARTED
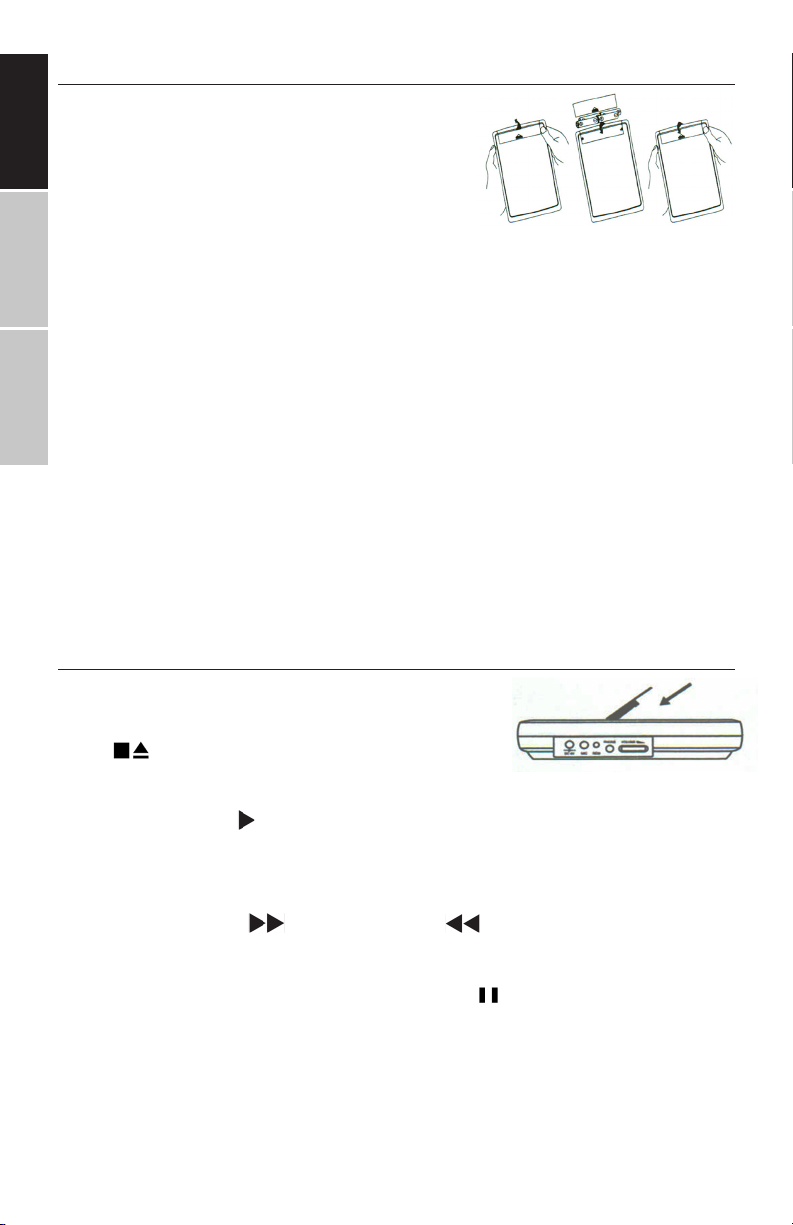
BATTERY INSTALLATION
This player takes 4 C-cell batteries (not in-
cluded). It also plugs into the wall with the AC
adapter provided. To install the 4 C batteries,
open the battery cover on the back of the play-
er. Insert the batteries, matching the +and –
with the markings on the unit. Replace the battery cover. If the player is not
used for an extended period of time, remove the batteries before storing it.
PLUGGING INTO AC POWER
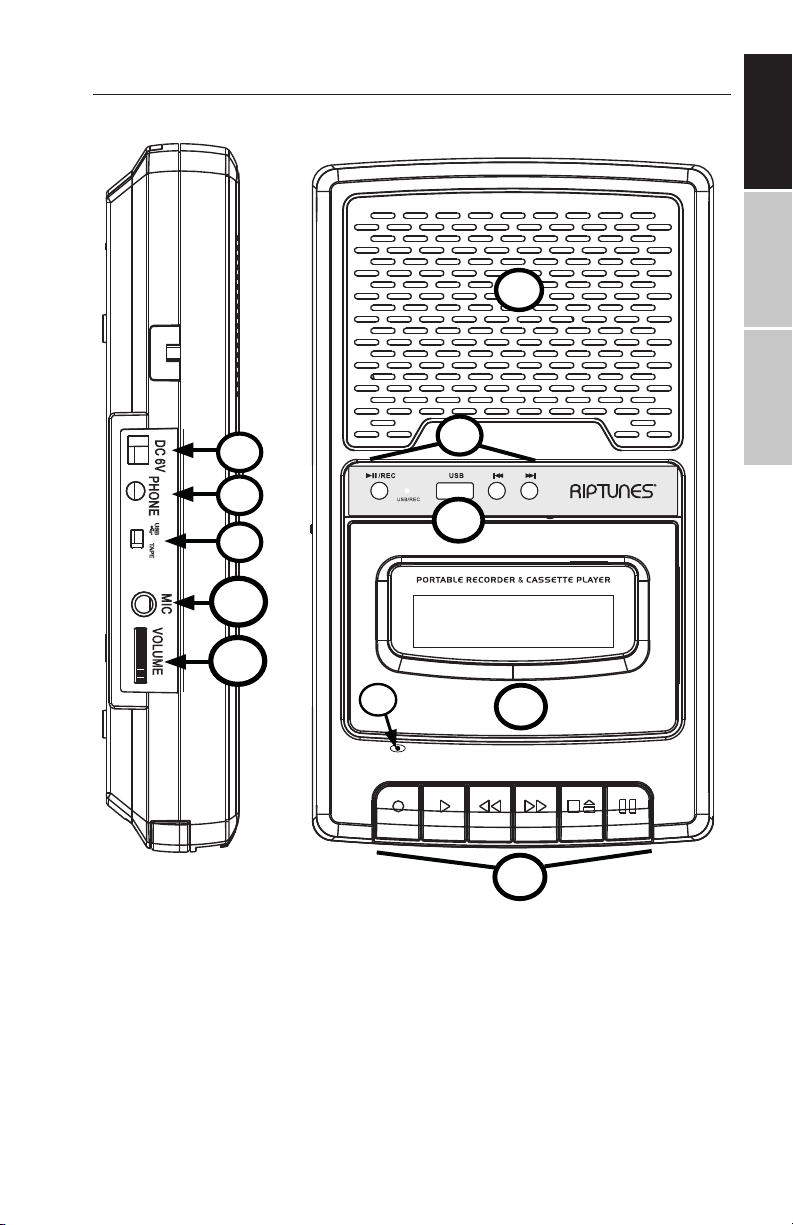
Plug the provided AC adapter into the DC 6v power jack on the side of the
player. Plug the other end into a standard 110/120 volt AC outlet. When
plugged in, the batteries are automatically disconnected to save battery
life.
The AC/DC Power adapter is intended to be orientated in either a vertical or
floor mount position.
USING HEADPHONES (NOT INCLUDED)
You can plug a set of headphones into the PHONE jack on the side of the
player. With headphones plugged in, the speaker is automatically si-
lenced for private listening.
PLAYBACK MODES AND FUNCTIONS
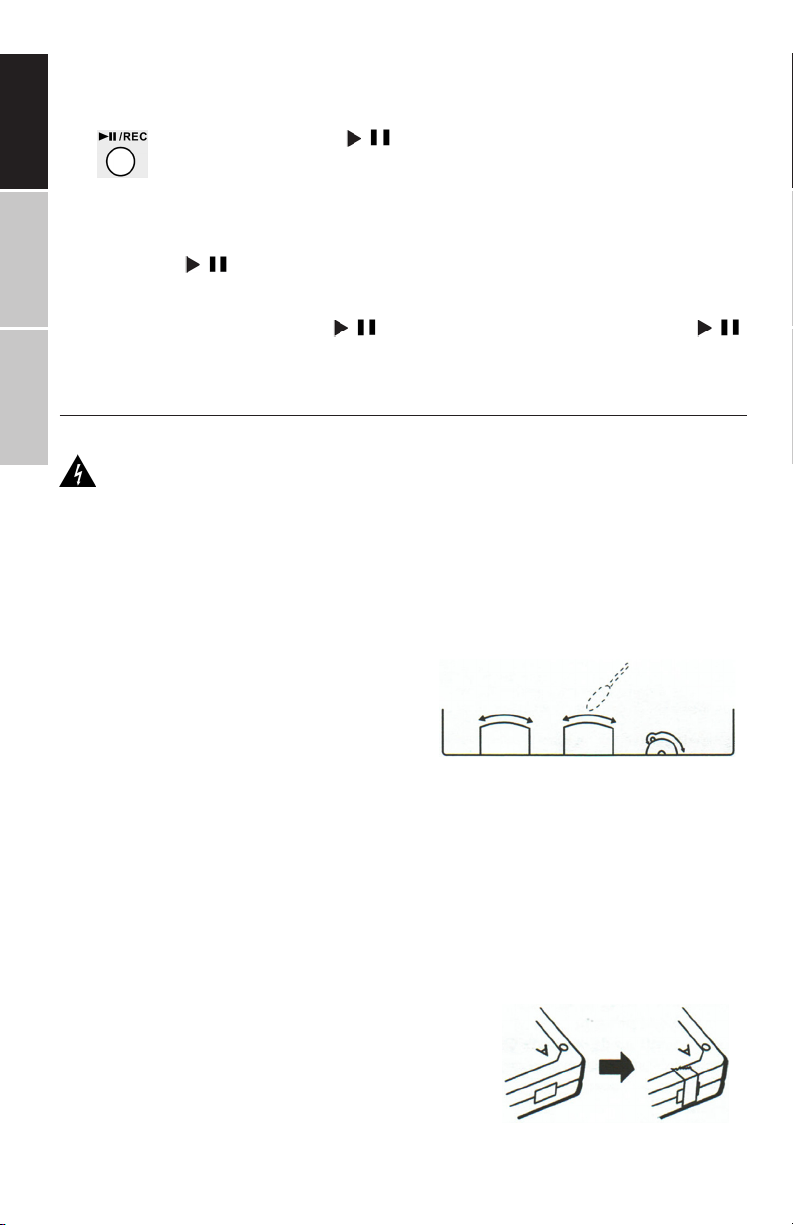
CASSETTE TAPE PLAYBACK
Set the USB/TAPE switch to the TAPE position.
Press (Stop/Eject) to open the tape door
and place a tape in the cassette compartment.
The side you wish to play/record on should be facing upward. Close the
door and press the (PLAY) button. Adjust the Volume (on the side of
the player) as needed. You may wish to rewind the tape first to the be-
ginning before playing.
If you need to fast-forward or rewind, press STOP first if the tape is play-
ing. Then, press the (fast-forward) or (rewind) button. To stop
fast-forwarding or rewinding, press STOP. Then, you can press PLAY
again. Don’t press PLAY while fast-forwarding or rewinding!
If you need to pause while playing, press the (PAUSE) button. Press
PAUSE again to resume playback.
Automatic Stop: When your recorder is operating in PLAY or RECORD
mode and the end of the tape is reached, it will automatically shut itself
off and return all buttons to the OFF position. The same should happen
if the end of a tape is reached when rewinding or fast-forwarding.

–7–
ENGLISHESPAÑOLFRANÇAIS
NOTE: This player is designed to record on TYPE I (iron oxide) cassette
tapes, which are the most common tapes. Some special formula tapes
(chromium dioxide and metal particle tapes) cannot be properly recorded
on with this product. Those tapes can, however, be used for playback.
RECORDING FROM THE MICROPHONE TO TAPE
Recording from the built-in microphone
1. Set the USB/TAPE switch to the TAPE position and insert a cassette.
2. Press RECORD (the PLAY button is depressed with it). You are now
recording. If the RECORD button does not depress, see “Cassette Re-
cording Tabs” on the next page. Talk normally into the built in micro-
phone. To obtain optimum recording quality, place the recorder near
the sound source.
NOTE: The automatic level control (ALC) will set the record level for
optimum recording, regardless of the volume setting.
Using an external microphone (not included)
This recorder can also use an external microphone with a 2.5mm con-
nector. To record with an external microphone, plug the microphone
into the MIC jack on the side of the player. When an external micro-
phone is used, the built-in microphone is automatically disconnected.
USB PLAYBACK
1. Insert the USB drive/device into the USB port on the top of unit.
The recorder accepts USB drives of up to 32GB capacity.
2. Set the USB/TAPE switch to USB.
3. Press the //REC button on the top of the player to play-
back music from USB. Press //REC again to stop play-
back.
4. Jump to the previous and next tracks on the USB device
by using these buttons on the top of the player.
RECORDING FROM THE MICROPHONE TO USB
1. Set the USB/TAPE switch to USB.
2. Press and hold the //REC button to record from the built-in or
external mic. The red USB/REC indicator will blink rapidly. Press
//REC again to stop recording.
3. Press and hold the //REC button once again to play the sound
recording from USB.

–8–
ENGLISH ESPAÑOL FRANÇAIS
RECORDING FROM TAPE TO USB
1. Set USB/TAPE switch to TAPE and insert a USB drive in the USB port.
2. Press and hold the //REC button (on the USB controls) to
start recording from the tape, the red USB/REC indicator will
keep blinking rapidly.
3. Play the tape by pressing PLAY on the tape player.
4. Press the //REC button again to stop Recording.
5. To hear the recording you just made from USB, set the USB/TAPE
switch to USB. Press the //REC button to play it back. Press //
REC button again to stop playing.
CARE AND MAINTENANCE
CLEANING YOUR CASSETTE PLAYER/RECORDER
CAUTION: Unplug the unit before cleaning!
CLEANING THE OUTSIDE OF THE PLAYER
Use a so, damp cloth to clean the outside. Do not wipe any internal parts
or get them wet. Soapy water should be suicient. Do not use any abrasive
cleaning agents.
CLEANING THE HEADS
Iron oxide particles from magnetic tapes
can build up on parts that come in contact
with the tape, especially the tape heads.
This can cause muled recording or play-
back, and might prevent automatic stopping. To clean the tape mechanism,
open the tape door and push the PLAY button. Then, gently clean the heads,
capstan, and pinch wheel with a head cleaner or head cleaning cassette. Al-
ways unplug the power cord before cleaning.
Allow 30 minutes’ drying time when using a liquid cleaner. Clean heads aer
every 25 hours of use. Do not allow any cleaning material to fall inside the tape
assembly.
CASSETTE RECORDING TABS
Cassette tapes have recording tabs on the top. If
the tab is broken and there is a gap here, the tape
cannot be recorded on. The record button will
not press down. If you have a cassette that you

–9–
ENGLISHESPAÑOLFRANÇAIS
wish to record over and there is a gap present, tape a piece of cellophane
tape over the gaps. The record button will now press down as expected.
Similarly, if you have a recording you want to keep permanently and there
is a tab already present, you can break o the tabs to prevent the tape from
being recorded over.
OTHER BEST PRACTICES
• Never use any metal objects on or near the tape heads.
• Don’t expose tapes to sunlight or store them in hot places. High tempera-
tures may warp the shell or damage the tape.
• Keep cassettes in their jackets when not in use.
• Cassette tapes can be erased by magnetic fields produced by magnets,
electric motors, electrical transformers, and other devices. Keep tapes
away from magnets and magnetic fields
• Be sure to remove the batteries when storing the player for more than
a few weeks at a time. Leaking batteries can badly damage the record-
er. When discarding batteries, be sure to dispose of them in the proper
manner, according to provincial and local regulations.
• Always push STOP before storing the player. This will relieve pressure on
certain parts in the recorder that might deform aer long periods of time.
• Alittle bit of slack in your tapes can cause scratches on the
tape, or worse yet, the tape could break. If you notice some
slack in the tape, use a pencil to tighten it up.
• Demagnetize the head occasionally with a head demagnetizing
cassette (available from audio equipment retailers).
TROUBLESHOOTING
PROBLEM SOLUTION
No power to unit • Connect the power cord or install batteries.
No sound from the
speakers
• Make sure volume is up, and the unit has
power.
• Make sure headphones are not connected.
The record button will
not press down.
• The cassette needs to be record-enabled
with cellophane tape. See “Cassette Re-
cording tabs” in the previous section.

–10–
ENGLISH ESPAÑOL FRANÇAIS
The recorder begins
to sound distorted.
The tape reels turn
very slowly or not at
all.
• If using btteries, try gin with AC power
or other btteries
• Try dierent cssette
Tapes sound muffled • Try dierent cssette
• Clen or demgnetize the tpe mechnism
TECHNICAL SUPPORT
For questions not answered in this manual, or for warranty service,
please contact Riptunes Technical Support:
By phone: 1-888-217-7688 (9:00 AM to 6:00 PM ET)
By e-mail: service@rip-tunes.com
Online: www.rip-tunes.com
© 2020 Riptunes by Impecca, a division of LT Inc., Wilkes Barre, PA.
Bluetooth is a registered trademark of Bluetooth SIG, Inc.

–11–
ENGLISHESPAÑOLFRANÇAIS
Riptunes™ warrants this product against defects in
material and workmanship to the original purchaser as
specified below provided product is registered online
within fourteen (14) days of purchase.
PARTS – if the product is determined to
have a manufacturing defect, within a
period of one (1) year from the date of the
original purchase, Riptunes™ will repair or
replace the product parts at no charge (for
parts) to you in the U.S.A. and Canada.
LABOR – if the product is determined to
have a manufacturing defect, within a
period of ninety (90) Days from the date of
the original purchase, Riptunes™ will repair
or replace the product at no charge to you
in the U.S.A. and Canada, After ninety (90)
days it will be the responsibility of the
consumer.
Shipping costs to and from our warranty service center
is the sole responsibility of the consumer.
To obtain warranty service by an authorized Riptunes™
service center, please email us at: support@rip-
tunes.com to obtain a Repair and Maintenance
Authorization (RMA) number and to locate the service
center nearest you. Once authorized, you must mail
the product, to the authorized Riptunes™ service
center in its original product packaging materials or
equivalent, to prevent damage while in transit.
Further, should Riptunes™ determine that the product
is outside of the Warranty term, Riptunes™ will return
the product to sender at sender’s expense without
being repaired or replaced, unless authorized by the
consumer to service the out of warranty product at
consumer’s expense. All handling or restocking charges
for returns and/or replacements shall be non-
refundable.
Riptunes™ specifically excludes from this warranty any
non-electric/mechanical attachments, accessories and
disposable parts including but not limited to outside
case, connecting cables, batteries and AC adaptors.
Riptunes™ reserves the right to repair or replace
defective products with the same, equivalent or newer
models.
We reserve the right to either repair or replace
product at our discretion. Replacement may be either
new or refurbished and while every endeavor will be
made to ensure it is the same model, if same model is
not available it will replaced with a model of equal or
higher specification.
Normal “Wear and Tear” is not covered by this
warranty. Further, Riptunes™ hereby reserves the right
to determine “Wear and Tear” on any and all products.
Tampering or opening the product casting or shell, will
void this warranty in its entirety.
ONE YEAR LIMITED WARRANTY / 90 Days
Important: Be Sure to Register Your Product at WWW.RIP-TUNES.COM within 14 Days
Riptunes™ USA
|
PA 18711
|
www.rip-
tunes.com
|
support@rip-tunes.com
*Do not send any returns to this address, as it might get lost and this will delay your repair and service process.
Also this warranty does not apply if the product has
been damaged by accident, abuse, misuse, or
misapplication; has been altered or modified without
the written permission of Riptunes™; has been
serviced by a non-authorized repair center of
Riptunes™; has not been properly maintained or
operated according to the operation manual; has
been used for commercial, non-household purposes;
cosmetically damaged; was not imported by
Riptunes™; was not manufactured according to
specification of the United States market; improper
installation or neglect; damaged due to improper
packaging in shipment; damaged due to natural
disasters; if the serial number for the product has
been removed or defaced; or for cosmetic damages.
ALL IMPLIED WARRANTIES, INCLUDING IMPLIED
WARRANTIES OF MERCHANTABILITY AND FITNESS FOR
A PARTICULAR PURPOSE ARE LIMITED IN DURATION
TO ONE (1) YEAR PARTS AND NINETY (90) DAYS
LABOR FROM THE DATE OF THE ORIGINAL RETAIL
PURCHASE OF THIS PRODUCT.
THESE WARRANTIES AND REMEDIES ARE THE SOLE
AND EXCLUSIVE WARRANTIES AND REMEDIES IN
CONNECTION WITH THE SALE AND USE OF THE
PRODUCT. NO OTHER WARRANTIES, ORAL OR
WRITTEN, EXPRESSED OR IMPLIED, ARE GIVEN.
RIPTUNES™ IS NOT RESPONSIBLE OR LIABLE FOR ANY
DAMAGE, WHETHER SPECIAL, INCIDENTAL,
CONSEQUENTIAL, DIRECT OR OTHERWISE, OR
WHETHER KNOWN OR SHOULD HAVE BEEN KNOWN TO
RIPTUNES™, INCLUDING LOST PROFITS, GOODWILL,
AND PROPERTY AND PERSONAL INJURY RESULTING
FROM ANY BREACH OF WARRANTY, THE INABILITY TO
USE THE PRODUCT OR UNDER ANY LEGAL THEORY IN
CONTRACT OR TORT. RIPTUNES LIABILITY IS LIMITED
TO THE ACTUAL PURCHASE PRICE PAID TO THE
RETAIL SELLER OF THE DEFECTIVE PRODUCT.
No Riptunes™ dealer, agent or employee is
authorized to make any modification, extension,
change or amendment to this warranty without the
written consent and authorization from Riptunes™.
Some states do not allow the exclusion or limitation
of implied warranties or liability for incidental or
consequential damages, or do not allow a limitation
on how long an implied warranty lasts, so the above
limitations or exclusions may not apply to you. This
warranty gives you specific legal rights, and you
have other rights, which vary from state to state.
Note: Our Warranty center ships only within Continental
U.S., excluding Alaska and Hawaii.
LIMITED WARRANTY

–12–
ENGLISH ESPAÑOL FRANÇAIS
ESPAÑOL
TABLA DE CONTENIDO
Precauciones de Seguridad ............................................. 13
Introducción.................................................................... 14
Qué Hay en la Caja........................................................... 14
Diagrama del Producto.................................................... 15
Comenzando................................................................... 16
Modos de Reproducción y Volumen ................................. 16
Cuidado y Mantenimiento ............................................... 18
Solución de Problemas.................................................... 20
Soporte Técnico .............................................................. 20
Garantia .......................................................................... 21
Español ........................................................................... 22

–13–
ENGLISHESPAÑOLFRANÇAIS
PRECAUCIONES DE SEGURIDAD
LEA ESTE MANUAL CUIDADOSAMENTE ANTES DE OPERAR SU UNIDAD
Y GUÁRDELO PARA REFERENCIA A FUTURO. REFIÉRASE A ÉL CUANDO
ENCUENTRE CUALQUIER PROBLEMA DE OPERACIÓN.
1. ADVERTENCIA: Para reducir el riesgo de descarga eléctrica o daños a los
altavoces del reproductor, no lo desarme. No hay partes internas a las que
el usuario pueda darles servicio. Entre en contacto con soporte técnico para
mayor asistencia.
2. ADVERTENCIA: Para evitar el riesgo de incendio o descarga eléctrica, no
exponga el reproductor a la lluvia o humedad (incluyendo gotas o salpicadu-
ras). Los objetos llenos de líquidos, como los floreros o botellas de agua, no
deben colocarse cerca o sobre la unidad. No toque la unidad con las manos
mojadas.
3. ADVERTENCIA: No exponga el reproductor de casetes o las baterías al calor
excesivo, como la luz directa del sol o fuego.
4. ADVERTENCIA: Solo utilice accesorios proporcionados por el fabricante, a
excepción de los limpiadores de cinta, auriculares o un micrófono de 2.5 mm.
5. No coloque objetos encima del reproductor.
6. No coloque el reproductor en una mesa o soporte inestable. El reproductor
puede caer, lo que puede provocar posibles daños o lesiones.
7. Desconecte el reproductor del tomacorrientes durante las tormentas eléctri-
cas o cuando no esté en uso.
8. Preste atención al propósito de seguridad del enchufe polarizado. Un enchufe
polarizado tiene dos patas. Una de las patas es más ancha que la otra. Si el
enchufe no puede conectarse en el tomacorriente, consulte a un electricista
para reemplazar el tomacorriente obsoleto.
9. Proteja el cable de alimentación para que no sea pisado o pellizcado.
10. Deseche este reproductor de forma adecuada, respetando las leyes locales de
eliminación de aparatos electrónicos y baterías.
ADVERTENCIA: EL CABLE DE ALIMENTACIÓN DE ESTE PRODUCTO CONTIENE
PLOMO, UNA SUSTANCIA QUÍMICA QUE EL ESTADO DE CALIFORNIA SABE QUE
CAUSA CÁNCER Y DEFECTOS DE NACIMIENTO U OTROS DAÑOS REPRODUCTI-
VOS. LÁVESE LAS MANOS DESPUÉS DE MANIPULARLO.

–14–
ENGLISH ESPAÑOL FRANÇAIS
INTRODUCCIÓN
¡Felicidades por la compra de este Reproductor/Grabadora de Casetes
con Reproducción y Grabación USB de Riptunes! Por su seguridad y
para obtener el mayor disfrute de su reproductor, por favor, lea todas
las instrucciones.
CARACTERÍSTICAS
• Reproductor y grabadora de casetes
• Entrada USB para reproducción y grabación MP3/WMA desde las cintas
o el micrófono
• Entrada para micrófono
• Entrada de auriculares
• Funciona con corriente AC o cuatro baterías tipo “C”
QUÉ HAY EN LA CAJA
Su grabadora
de casetes
Este manual de usuario
Adaptador de corri-
ente AC
Garantía Tarjeta de Soporte
Técnico

–15–
ENGLISHESPAÑOLFRANÇAIS
DIAGRAMA DEL PRODUCTO
1
3
5
4
6
9
8
7
11
10
2
1. Altavoz
2. Controles de grabación y
reproducción USB
3. Puerto USB
4. Micrófono integrado
5. Puerta de la cinta de casete
6. Controles de la grabadora
7. Interruptor de encendido
8. Salida de Auriculares
9. Interruptor USB/Cinta
10. Entrada de Micrófono
11. Control de volumen
MIC

–16–
ENGLISH ESPAÑOL FRANÇAIS
COMENZANDO
INSTALACIÓN DE LAS BATERÍAS
Este reproductor utiliza 4 baterías tipo C (no
incluidas). También se enchufa en la pared
con el adaptador AC que se incluye. Para
instalar las 4 baterías C, abra la tapa del com-
partimento de las baterías en la parte posteri-
or del reproductor. Inserte las baterías, haciendo coincidir los símbolos + y
- con las marcas de la unidad. Vuelva a colocar la tapa del compartimento
de las baterías. Si el reproductor no se utiliza durante un período de tiem-
po prolongado, retire las baterías antes de guardarlo.
CONECTANDO A LA CORRIENTE AC
Conecte el adaptador de AC suministrado en la entrada de ali-
mentación de 6v DC en la parte lateral del reproductor. Conecte el otro
extremo a un tomacorriente estándar de 110/120 volts AC. Al conectar-
lo, las baterías se desconectan automáticamente para ahorrar energía.
El adaptador de corriente AC/DC está pensado para ser orientado en una
posición vertical o de montaje en el suelo.
USANDO LOS AURICULARES (NO INCLUIDOS)
Puede conectar un juego de auriculares en la entrada PHONE a un lado
del reproductor. Con los auriculares enchufados, el altavoz se silencia
automáticamente para la escucha en privado.
MODOS DE REPRODUCCIÓN Y VOLUMEN
REPRODUCCIÓN DE CINTAS DE CASETE
Coloque el interruptor USB/TAPE en la
posición TAPE. Presione (Stop/Eject) para
abrir la puerta de las cintas y colocar una en el
compartimento para casetes. El lado que de-
see reproducir o grabar debe estar mirando
hacia arriba. Cierre la puerta y presione el botón (PLAY). Ajuste el
volumen (a un lado del reproductor) conforme lo requiera. Quizá qui-
era rebobinar la cinta antes de comenzar la reproducción.
Si necesita adelantar o rebobinar la cinta, primero presione STOP si la
cinta se está reproduciendo. Después, presione el botón (adelan-
tar) o (rebobinar). Para detener el rebobinado o adelantar la cinta,
presione STOP. Después, puede presionar nuevamente PLAY. ¡No presi-
one PLAY mientras la cinta se está adelantando o rebobinando! Si
necesita hacer una pausa mientras se está reproduciendo, presione el
botón (PAUSE). Presione nuevamente PAUSE para continuar con la
reproducción.

–17–
ENGLISHESPAÑOLFRANÇAIS
Paro automático: Cuando su reproductor esté funcionando en modo
PLAY o RECORD y se llegue al final de la cinta, este se apagará au-
tomáticamente y volverá todos los botones a la posición OFF. Lo mismo
debería ocurrir si se alcanza el final de una cinta al rebobinar o avanzar
rápidamente.
Nota: Este reproductor/grabadora está diseñada para grabar en cintas
de casete TIPO I (óxido de hierro), que son las cintas de casete más co-
munes. Algunas cintas de fórmulas especiales (cintas de dióxido de cromo
y de partículas metálicas) no se pueden grabar correctamente con este
producto. Sin embargo, esas cintas pueden ser utilizadas para la repro-
ducción.
GRABANDO DESDE EL MICRÓFONO A LA CINTA
Grabación del micrófono incorporado
1. Ponga el interruptor USB/TAPE en la posición TAPE e inserte un ca-
sete.
2. Pulse RECORD (el botón PLAY se presiona con él). Ahora está graban-
do. Si el botón RECORD no se presiona, consulte la sección “Pestañas
de grabación de casetes” en la página siguiente. Hable normalmente en
el micrófono integrado. Para obtener una calidad de grabación óptima,
coloque la grabadora cerca de la fuente de sonido.
NOTA: El control automático de nivel (ALC) fijará el nivel de grabación
para obtener una grabación óptima, independientemente del ajuste de
volumen.
Usando un micrófono externo (no incluido)
Esta grabadora también puede usar un micrófono externo con un
conector de 2.5 mm. Para grabar con un micrófono externo, conecte
el micrófono en el conector MIC a un lado del reproductor. Cuando se
utiliza un micrófono externo, el micrófono incorporado se desconecta
automáticamente.
REPRODUCCIÓN USB
1. Inserte el dispositivo o unidad USB en el puerto USB de la parte
superior de la unidad. Este reproductor acepta unidades USB de
hasta 32 GB de capacidad.
2. Coloque el interruptor USB/TAPE en USB..
3. Presione el botón //REC en la parte superior del repro-
ductor para reproducir música desde una USB. Presione
nuevamente el botón //REC para detener la reproduc-
ción.
4. Salte a la pista siguiente o anterior en el dispositivo USB
usando estos botones en la parte superior del reproduc-
tor.

–18–
ENGLISH ESPAÑOL FRANÇAIS
GRABANDO DESDE EL MICRÓFONO A USB
1. Coloque el interruptor USB/TAPE en USB.
2. Presione y sostenga el botón //REC para grabar desde el micró-
fono integrado o micrófono externo. El indicador USB/REC comen-
zará a parpadear rápidamente. Presione el botón //REC para
detener la grabación.
3. Presione y sostenga el botón //REC nuevamente una vez para
reproducir la grabación de la USB.
GRABANDO DESDE LA CINTA DE CASETE A USB
1. Coloque el interruptor USB/TAPE en TAPE e inserte una USB en el
puerto.
2. Presione y sostenga el botón //REC (en los controles de la
USB) para comenzar a grabar desde la cinta. El indicador rojo
USB/REC comenzará a parpadear rápidamente.
3. Reproduzca la cinta presionando PLAY en el reproductor.
4. Presione el botón //REC para detener la grabación.
5. Para escuchar desde la USB la grabación que acaba de hacer, Colo-
que el interruptor USB/TAPE en USB. Presione el botón //REC
para reproducir. Presione el botón //REC nuevamente para de-
tener la reproducción.
CUIDADO Y MANTENIMIENTO
LIMPIANDO SU REPRODUCTOR/GRABADORA DE CASETES
PRECAUCIÓN: ¡DESCONECTE AL UNIDAD ANTES DE LIMPIARLA!
LIMPIANDO LA PARTE EXTERNA DEL REPRODUCTOR
Utilice un paño suave y húmedo para limpiar el exterior. No limpie ninguna
parte interna ni la moje. El agua jabonosa debería ser suficiente. No utilice
ningún agente de limpieza abrasivo.
LIMPIANDO LAS CABEZAS
Las partículas de óxido de hierro de las
cintas magnéticas pueden acumularse
en las partes que entran en contacto con
la cinta, especialmente las cabezas de la
cinta.

–19–
ENGLISHESPAÑOLFRANÇAIS
Esto puede causar una grabación o reproducción amortiguada, y podría
impedir el paro automático. Para limpiar el mecanismo de la cinta, abra la
tapa de la cinta y pulse el botón PLAY. A continuación, limpie suavemente
los cabezales, el cabrestante y la rueda de tracción con un limpiador de
cabezales o un casete limpiador de cabezales. Antes de limpiar, desconecte
el cable de alimentación.
Deje que se seque durante 30 minutos cuando use un limpiador líquido.
Limpie las cabezas después de cada 25 horas de uso. No permita que caiga
ningún material de limpieza dentro del conjunto de la cinta.
PESTAÑAS DE GRABACIÓN DEL CASETE
Las cintas de casete tienen pestañas de grabación en la parte superior. Si la
lengüeta se rompe, se forma una muesca y la cinta no podrá ser grabada. El
botón de grabación no se dejará presionar. Si tiene un casete al que desea
grabarle encima y tiene esta muesca, pegue un trozo de cinta de celofán
sobre las muescas. El botón de grabación se podrá
presionar como se esperaba. Del mismo modo,
si tiene una grabación que desea conservar per-
manentemente y hay pestañas presentes, puede
romper las pestañas para evitar que la cinta se
grabe encima.
OTRAS BUENAS PRÁCTICAS
• Nunca utilice ningún objeto metálico en o cerca de las cabezas de la
cinta.
• No exponga las cintas a la luz del sol ni las guarde en lugares calientes.
Las temperaturas altas pueden deformar la cubierta o dañar la cinta.
• Guarde los casetes en su caja cuando no los utilice.
• Las cintas de casete pueden ser borradas por campos magnéticos pro-
ducidos por imanes, motores eléctricos, transformadores eléctricos y
otros dispositivos. Mantenga las cintas alejadas de los imanes y los cam-
pos magnéticos
• Asegúrese de quitar las pilas cuando guarde el reproductor por más
de unas cuantas semanas. Las baterías que se chorrean pueden dañar
gravemente al reproductor. Al desechar las baterías, asegúrese de de-
shacerse de ellas de la manera adecuada, de acuerdo con las regula-
ciones provinciales y locales.
• Siempre presione STOP antes de guardar el reproductor. Esto aliviará
la presión sobre ciertas partes de la grabadora que podrían deformarse
después de largos períodos de tiempo.
• Un poco de holgura en las cintas puede causar arañazos en la
cinta, o peor aún, la cinta podría romperse. Si nota alguna hol-
gura en la cinta, use un lápiz para apretarla.
• Desmagnetice la cabeza ocasionalmente con un casete desmagnetiza-
dor de cabezas (disponible en las tiendas de equipos de audio).

–20–
ENGLISH ESPAÑOL FRANÇAIS
SOLUCIÓN DE PROBLEMAS
PROBLEMA SOLUCIÓN
La unidad no se enci-
ende
• Conecte el cable de suministro de energía o
instale baterías
No sale sonido de los
altavoces
• Asegúrese de que ha subido el volumen y la
unidad esta encendida.
• Asegúrese de que los auriculares no estén
conectados.
El botón para grabar no
se puede presionar
• Se necesita tapar las muescas del ca-
sete con cinta de celofán para permitir la
grabación. Ver “Pestañas de Grabación del
casete” en la sección anterior.
El reproductor emite un
sonido distorsionado.
Las ruedas de la cinta
corren muy despacio o
no se mueven.
• Si utiliz bterís, intente de nuevo con
corriente AC u otro juego de bterís.
• Pruebe con un csete diferente.
Las cintas suenan aten-
uadas
• Pruebe con un csete diferente.
• Limpie o desmgnetice el mecnismo de
ls cints.
SOPORTE TÉCNICO
Para preguntas no respondidas en este manual o para solicitar servicio de
garantía, entre en contacto con el Soporte Técnico de Riptunes:
Por teléfono: 1-888-216-7688 (9:00 AM a 6:00 PM ET)
Por e-mail: service@rip-tunes.com
En línea: www.rip-tunes.com
© 2020 Riptunes de Impecca, una división de LT Inc., Wilkes Barre, PA.
Bluetooth es una marca registrada de Bluetooth SIG, Inc.
Table of contents
Languages: