RNIB Duo-Comm 2 User manual

1
Duo-Comm 2 splitter box audio mixer (HT299)
Thank you for purchasing from RNIB. In the unlikely event the item is
unsuitable, please contact us within 14 days of receipt to obtain your returns
number. To ensure your return goes smoothly, the item and all components
must be in as new condition and packed in its original, undamaged
packaging. For further details and guidance on returning faulty items,
please see the Terms and conditions of sale and How to contact RNIB
sections of this instruction manual.
Please retain these instructions for future reference. These instructions are
also available in other formats.
Contents
General description....................................................................................1
Items supplied with the Duo-Comm 2:.......................................................2
Orientation .................................................................................................2
Controls and functions...............................................................................2
Front facia panel.....................................................................................2
Rear facia panel......................................................................................4
Getting started ...........................................................................................5
Product features.........................................................................................7
Technical specification...............................................................................7
Terms and Conditions of sale....................................................................8
How to contact RNIB..................................................................................8
Product Regulations...................................................................................8
Why recycle?..........................................................................................9
What is WEEE?......................................................................................9
How are we helping?..............................................................................9
General description
The Duo-Comm 2 lets you receive and make calls over a standard BT line
while listening to voice assisted software like JAWS, SuperNova and other
similar products. This is accomplished using a mode button on the front of

2
the Duo-Comm 2 and the supplied microphone-headset. The Duo-Comm 2
includes an auxillary input which allows connection to an external device
such as an MP3 player.
Items supplied with the Duo-Comm 2:
•1 X Phone line cable (coiled RJ10 3 metres)
•2 X Stereo extension cables (2 metres)
•1 X Stereo extension cable (1 metre)
•1 X 6 volt regulated power supply
•1 X A set of headphones with a microphone (Headset includes a volume
control)
•Instructions.
Orientation
The Duo-Comm 2 is a box measuring 105mm X 33mm X 127mm. It is
made of aluminium with two black, plastic facia panels at each end.
The controls for the Duo-Comm 2 are situated on both facia panels. The
front panel has three knobs on it and two buttons. Hold the Duo-Comm 2 so
that the knobs are facing towards you and the three knobs are on the left of
the panel. The Duo-Comm 2 is now correctly orientated.
Controls and functions
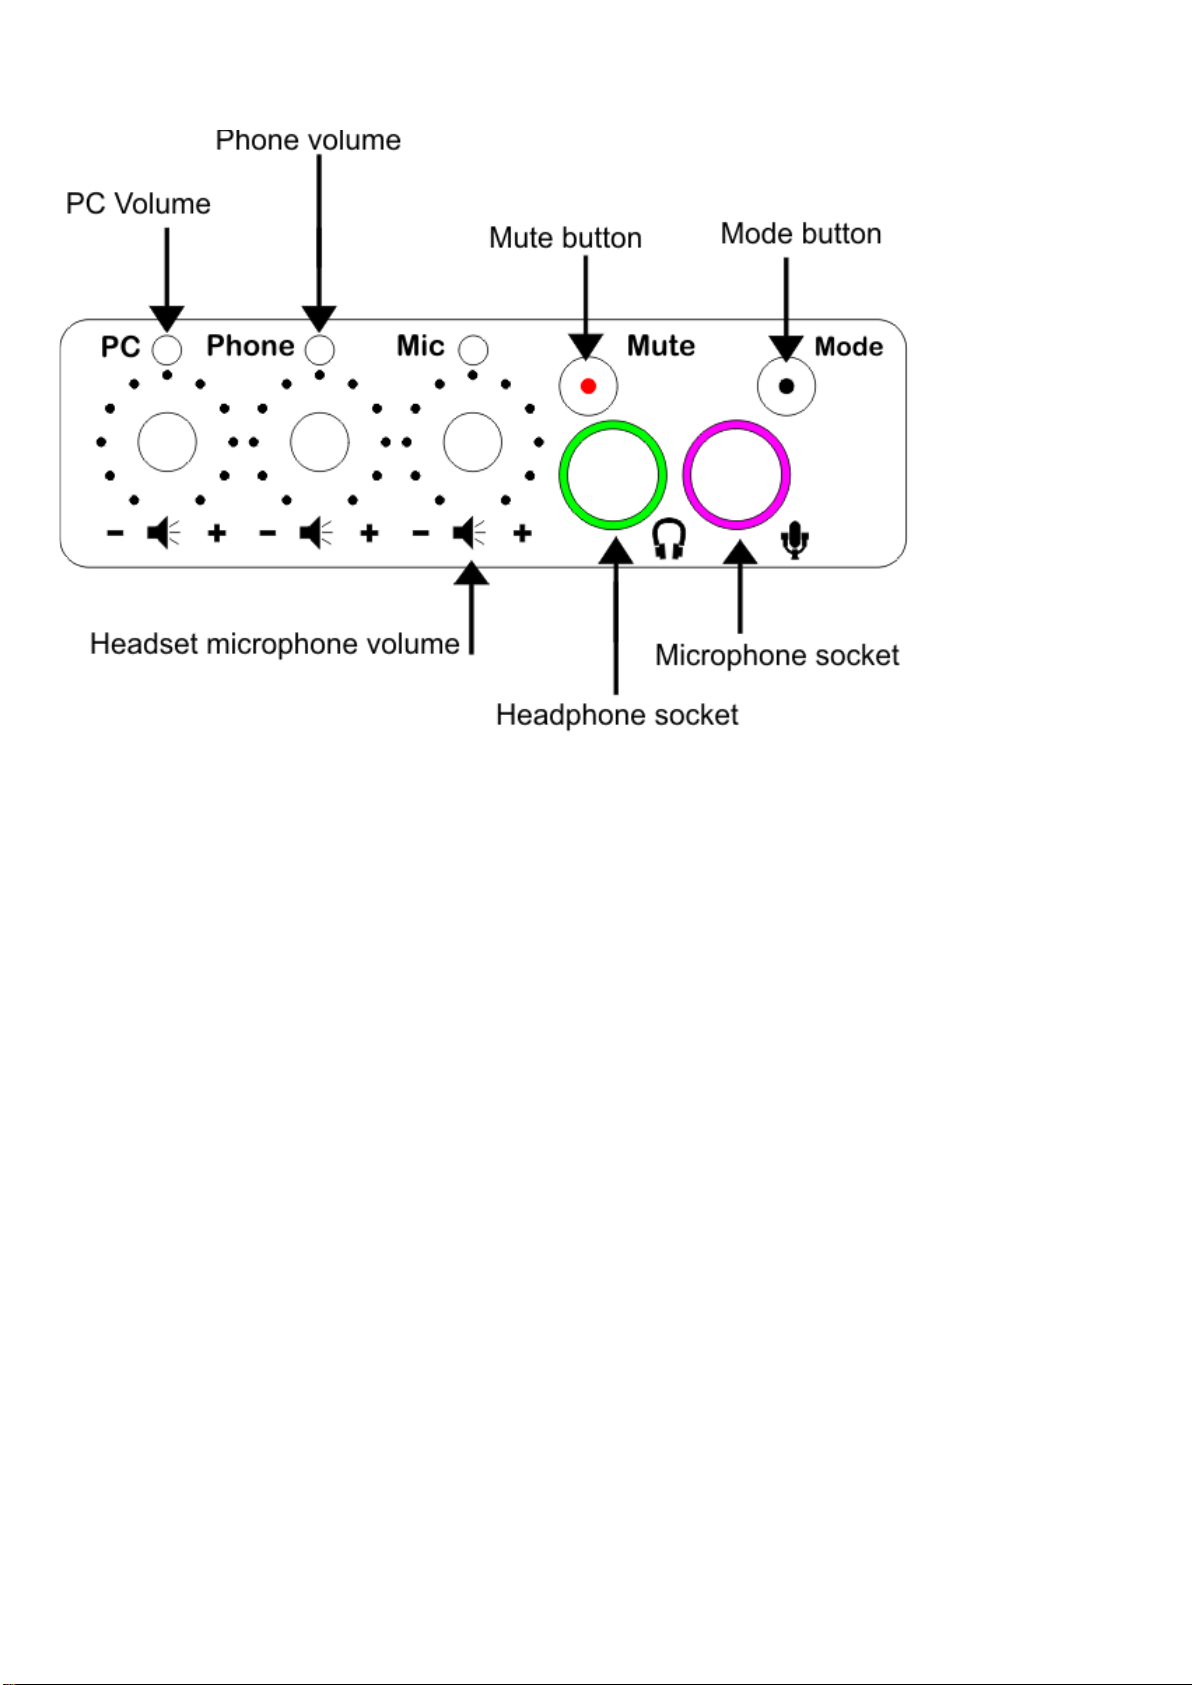
Front facia panel
There are three knobs and two buttons on the front of the product. From left
to right they are:
•volume control for the computer (PC)
•volume control for the phone
•volume control for the headset microphone
•mute select button
•mode select button.
There are two sockets on the front of the product. These are located
underneath the mute and mode buttons. From left to right they are:
•headset Socket (green)
•microphone socket (pink).
3
The PC volume knob, phone volume knob and headset microphone knob
are turned clockwise to increase the volume and anticlockwise to decrease
the volume. Each has a printed “–“(minus) sign and a “+” (plus) sign
marking the quietest and loudest points.
The PC volume knob, phone volume knob and headset microphone knob
turn freely from left to right.
The mode select button has four mode settings.
•Mode 1 –enables you to listen to the computer in both earpieces
•Mode 2 –enables you to listen to the phone line in one earpiece and the
computer in the other
•Mode 3 –enables you to listen to the phone line in both earpieces.
•Mode 4 - enables you to listen to an auxiliary device in both earpieces
The mute select button has an on/off function. The mute select button will
mute all inputs including the microphone. The mute select button is simply
pushed and a single beep will be heard when the mute is active. The mute
select LED will flash continually until the mute select button is pressed

4
again. All LED’s will be extinguished apart from the mute LED. To turn the
mute off press the mute select button, holding this button until two beeps
are heard. Release the mute select button as soon as the beeps are heard.
Once two beeps are heard the Duo-Comm 2 will resume normal operating
in the mode previously selected. Please note that while the Duo-Comm 2 is
in mute mode no other modes can be accessed. Only turning the mute
mode off will enable the Duo-Comm 2 to function normally.
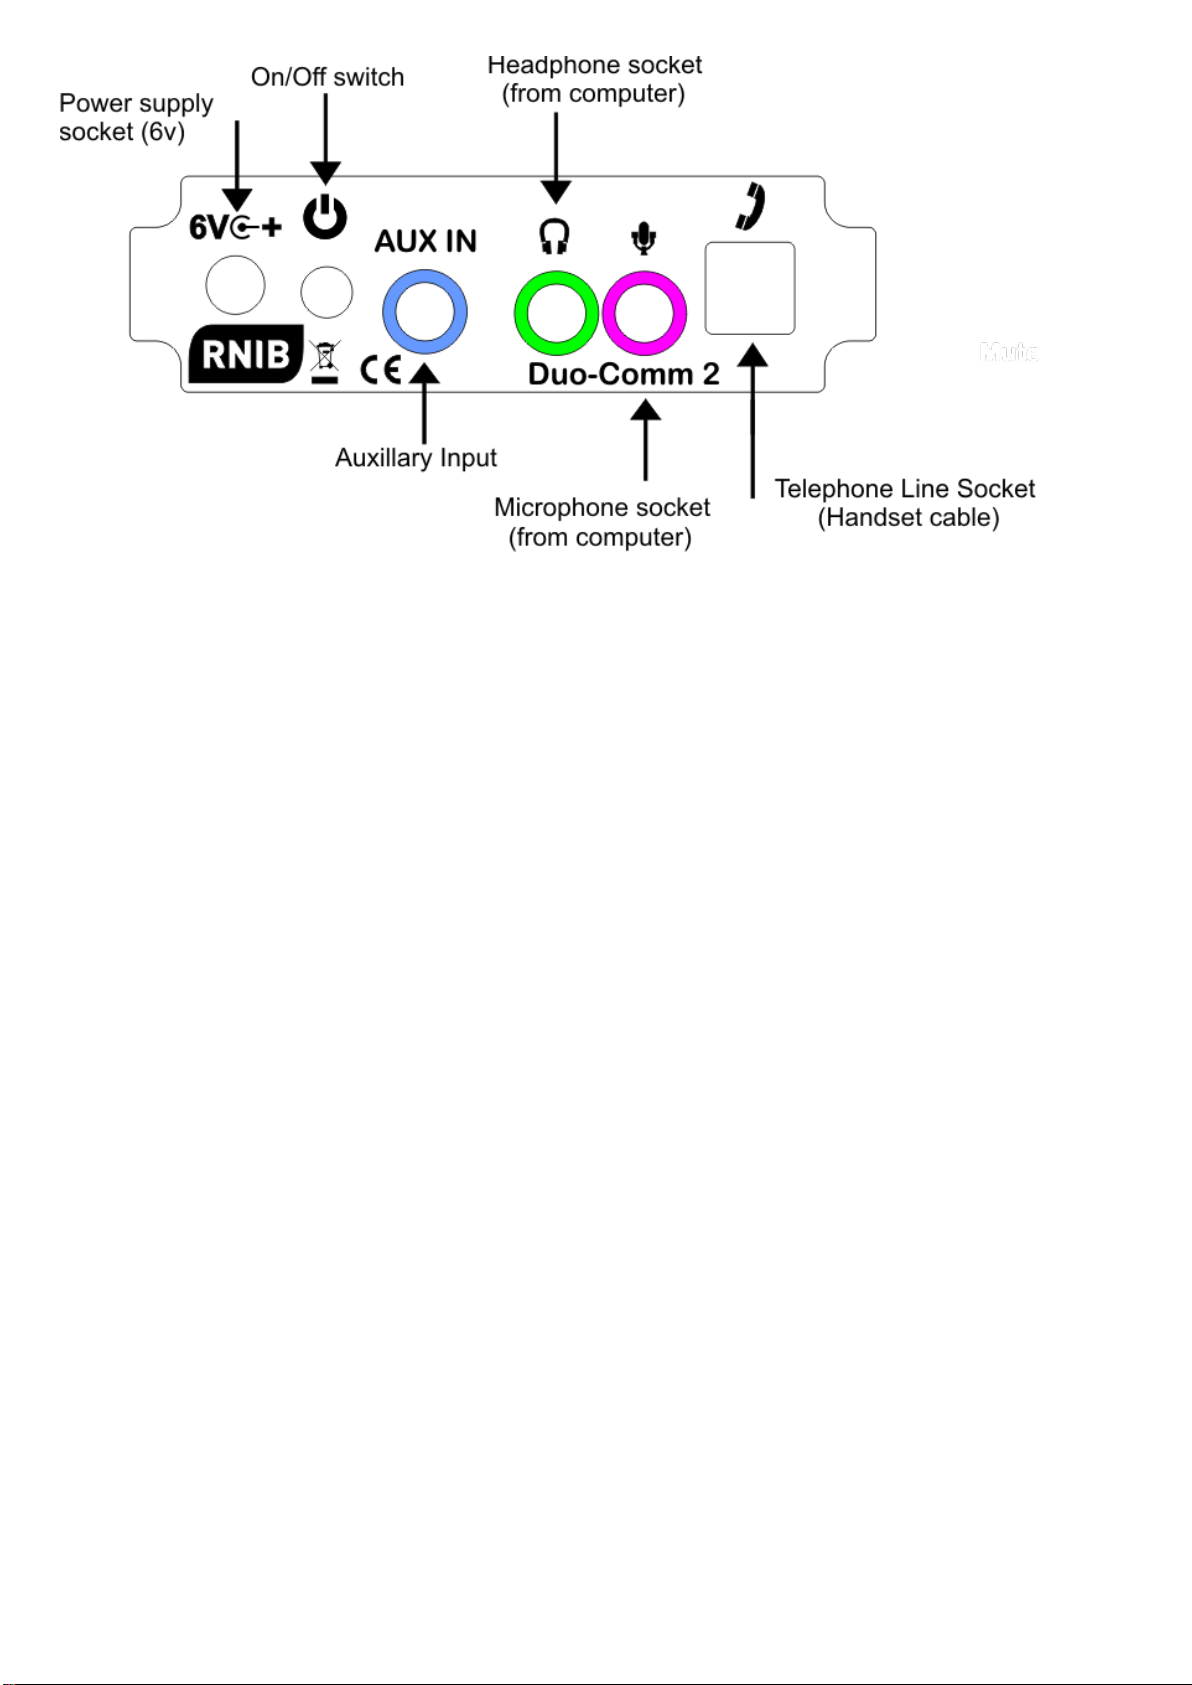
Rear facia panel
Turn the Duo-Comm around in your hand through 180 degrees. You are
now looking at the rear panel.
From left to right, the rear panel has the following connections.
•Power supply socket (circular and recessed with a centre pin). This
accepts the plug from the power supply
•Power on/off push-switch (Circular and protruding)
•Auxiliary input socket (a small, 3.5 mm jack socket marked with the
words “Aux In” and highlighted by a blue outline.
There is a space of 15mm before reaching the next connector.
•Computer headphone socket (a small, 3.5 mm jack socket marked with a
green outline around the socket)
•Computer microphone socket (small, 3.5 mm jack socket marked with a
pink outline around the socket)
•Telephone line connector socket (square-shaped).
5
Getting started
Plug the cables supplied plus the cables from your telephone into the
sockets on the Duo-Comm 2 rear facia panel in the following order.
Plug the Power adaptor cable into the Duo-Comm 2 power socket (marked
with "6v" and centre positive icon). This is the first socket on the left hand
side of the rear facia panel.
Plug the headphone cable into the Duo-Comm 2 headphone socket
(marked with a headphone icon and outlined in green). Connect the other
end of this cable to your computers headphone socket, which is usually a
green coded socket.
Plug the microphone connector (Pink) into the Duo-Comm 2 Microphone
socket (marked with a microphone icon and outlined in pink). Connect the
other end of this cable to your computers microphone socket, which is
usually a pink coded socket.
Plug the phone line cable (coiled) into the Duo-Comm 2 telephone line
connector socket and connect the other end to your phone's original
handset socket. This is the square, protruding socket at the far right of the
rear facia panel.
If required plug the auxiliary cable (shortest cable) into the Duo-Comm 2
auxiliary input socket (outlined in blue). This is marked with the words “Aux
In”. Connect the other end of the cable to your external devices headphone

6
socket. Please use the volume control on the external device to control the
volume.
Please check that all volumes are low before switching the Duo-Comm
2 on for the first time.
After connecting all cables to the correct sockets:
•check that all volume controls are set to a low position
•press the Power On/off (6v) push switch at the rear of the Duo-Comm 2
•the Duo-Comm 2 will run a simple audio and LED test pattern when it is
switched on. This test pattern consists of three beeps and each LED will
be lit for a brief time in sequence. Once the test pattern is complete the
Duo-Comm 2 will be ready for use
•on the front of the Duo-Comm 2 the power on LED will illuminate through
the Mode select button.
Select the mode you require by pressing the Mode select button. By default
the Duo-Comm 2 starts with Mode 1 - computer mode. Pressing the Mode
select button increments to the next mode with each press, as per the
following sequence.
Mode 1 –Computer Mode (Default) - enables you to listen to the computer
in both earpieces and allows access to the computers microphone inputs.
An LED will illuminate above the PC volume knob. The microphone volume
LED will also be illuminated.
Mode 2 –Dual Mode - enables you to listen to the phone line in the left
earpiece and the computer in the right earpiece. When the Duo-Comm 2 is
in Dual Mode you can talk through the microphone to communicate with the
caller using the phone line. An LED will illuminate above the PC volume
knob and Phone volume knob. The microphone volume LED will also be
illuminated.
Mode 3 –Phone Mode enables you to listen to the phone line in both
earpieces and allows the use of the microphone on the phone to be used.
When the Duo-Comm 2 is in Phone Mode you can talk through the
microphone to communicate with the caller via the phone line. An LED will
illuminate above the Phone volume knob. The microphone volume LED will
also be illuminated.

7
Mode 4 –Aux Mode- enables an external device such as an MP3 player or
mobile phones (as a playback device) to be connected to the Duo-Comm 2.
The headset microphone will be disabled in this mode. Please note that the
volume setting of the external device is used when in Aux Mode so please
ensure the volume levels are low on the device before connecting to the
Duo-Comm 2.
Adjust each volume control to suit your needs. The supplied headset
features an in-line volume control located around 350mm (14 inches) from
the headset. This in-line volume control varies the volume level from the
Duo-Comm 2. Please ensure that the rotary dial on the in-line volume
control is set roughly to a middle position before testing the volume level
using the volume control on the Duo-Comm 2. If you cannot hear any audio
from the headset it is likely that this rotary dial requires further adjustment.
To increase the volume, the rotary dial must be rotated clockwise. To
decrease the volume the rotary dial must be rotated anti-clockwise.
Please test the headset microphone volume by ringing a friend or colleague
so that they can tell you if the microphone volume needs adjusting. Try to
avoid high levels of volume on the microphone, as this may be
uncomfortable for the person listening to you.
Product features
The Duo-Comm 2 enables you to listen to music, audio described books or
audio from movies via the computer. The Duo-Comm 2 can also access
communication software such as SKYPE when in Computer Mode.
Most commercially available headphone/microphone headsets featuring 3.5
mm stereo sockets are compatible with the Duo-Comm 2.
Technical specification
•6 volt (centre positive) - 1300ma Regulated supply.
•Amplifier output 150 mW
•Energy consumption (not yet confirmed)
It is recommended that the Duo-Comm 2 power supply is connected directly
into a mains socket. Using an extension lead to power the Duo-Comm 2
can degrade sound quality during use. Please note that placing mobile
phones or similar devices close to the Duo-Comm 2 can also affect sound
quality.

8
Terms and Conditions of sale
If you have not purchased the Duo-Comm splitter box audio mixer directly
from RNIB, please contact your retailer in the first instance.
This product is guaranteed from manufacturing faults for 12 months from
the date of purchase.
How to contact RNIB
Phone: 0303 123 9999
Address: RNIB, Midgate House, Midgate, Peterborough PE1 1TN
Online Shop: shop.rnib.org.uk
Product Regulations
Declaration of Conformity
The Duo-Comm (HT299) fully complies with the directives listed below of
UK and European legislation on electronic products entering the UK and
European markets.
This product is CE marked and fully complies with all applicable EU
legislation.
WEEE 2002/96/EC (Waste Electrical and Equipment)
RoHS 2002/95/EC (Restriction of Hazardous Substances)
EMC 2004/108/EC (Electromagnetic)
LVD 2006/95/EC (Low Voltage)

9
Please do not throw items marked with this symbol in your bin. Recycle
your electricals and electronic devices free at your local recycling centre.
Search for your nearest recycling centre by visiting www.recyclenow.com.
Why recycle?
Unwanted electrical equipment is the UK’s fastest growing type of waste.
Many electrical items can be repaired or recycled, saving natural resources
and the environment. If you do not recycle, electrical equipment will end up
in landfill where hazardous substances will leak out and cause soil and
water contamination –harming wildlife and human health.
RNIB are proud to support your local authority in providing local recycling
facilities for electrical equipment.
To remind you that old electrical equipment can be recycled, it is now
marked with the crossed-out wheeled bin symbol. Please do not throw any
electrical equipment (including those marked with this symbol) in your bin.
What is WEEE?
The Waste Electrical or Electronic Equipment (WEEE) Directive requires
countries to maximise separate collection and environmentally friendly
processing of these items.
How are we helping?
In the UK, distributors including retailers must provide a system which
allows all customers buying new electrical equipment the opportunity to
recycle their old items free of charge. As a responsible retailer, we have met
the requirements placed on us by financially supporting the national network
of WEEE recycling centres established by local authorities. This is achieved
through membership of the national Distributor Take-back scheme (DTS).
Revised: December 2018.
This manual suits for next models
1
Table of contents


