Role Audio loudspeakers User manual

CARE
Your loudspeakers have a fine finish and should be treated like fine furniture. They will
require only occasional cleaning. For wood finishes, use a slightly damp cloth to wipe the
loudspeakers clean. Using any other cleaning method will most likely result in damage to
the finish. Lint and dust may be removed from the grills by removing the grills from the
loudspeakers and lightly vacuuming them with a vacuum tip that is clean and has soft
bristles. lternatively, a clothes lint remover of the masking tape variety may be used to
remove lint and dust.
To clean the grills you must remove them to avoid damage to the tweeters and woofers. To
remove the grills, grasp the cabinet firmly with one hand. Use the other to grasp the top of
the grill, then the bottom. The loudspeakers can be used without the grills but you should
ensure that the drivers will not be damaged.
If bare wire or spade terminal connections are used to connect the loudspeakers to the
amplifier, the terminals should be firmly hand tightened and checked periodically to
ensure tightness.
WARRANTY
ll Role udio loudspeaker systems are intended for use in the reproduction of music
and are warranted against defects in materials or workmanship that occur in normal use
for ten (10) years from the date of original purchase. Role udio will repair, replace or
adjust defective parts for the original owner without charge for parts or labor, provided
the loudspeaker is returned at the owner’s cost to the dealer from which the loudspeaker
was purchased or to Role udio. Please call us prior to any return shipments.
This warranty does not apply to damage that results from abuse or misuse, accidents
including those that occur during shipping, and any damage that results from repair or
modification by anyone not specifically authorized to make repairs by Role udio. In
order to claim coverage under this warranty, you must provide proof of purchase in the
form of a sales slip or proof of product registration with Role udio. This warranty gives
you specific legal rights, and you may have other rights which vary from state to state.
OWNER'S MANUAL
TWO CHANNEL STEREO
Basic two-channel stereo loudspeaker placement.....................................page 2
mplifier requirements and power response.............................................page 7
lternative stereo placement.....................................................................page 8
HOME THEATER AND SURROUND SOUND
Surround placement...............................................................................page 11
Center channel placement.....................................................................page 14
lternative surround placement...............................................................page 15
CARE......................................................................................................page 16
WARRANTY...........................................................................................page 16
UNPACKING
Fold the flaps along the sides of the carton and gently invert the carton on
protective material on the floor. Lift off the carton to reveal its contents. We suggest
you retain all packaging materials. Carefully review all accompanying literature
before proceeding.
Role udio
th e bes t smal l loud spea k e rs
Role Audio
P.O. Box 13396, Research Triangle Park
North Carolina, US 27709-3396
Phone: 919-2 -8777 Fax: 206-339-903
www.roleaudio.com

BASIC TWO-CHANNEL STEREO LOUDSPEAKER PLACEMENT
Placement is a very important determinant of loudspeaker performance. No matter how well
designed your loudspeakers are, if they are not properly placed in the listening area you will
not realize their performance capabilities. Since variations in speaker placement can
produce dramatic difference in the way music sounds, it is worthwhile to spend some time
experimenting with which placements work best in your listening room. Optimal stereophonic
placement is treated in considerable detail in the section on lternative Stereo Placement.
For those of you who have a dedicated listening room or if you want to experiment please
refer to that section.
Basic Placement
Most people however do not have the luxury of a room that they can dedicate strictly to
listening to music. They cannot rearrange the room around the music system. Listening to
music must coexist with the other pursuits that occur in the living room among the furniture
and other fixtures. For these situations the best compromise is a basic setup where the
loudspeakers are placed fairly close to one wall and a couch or chair that is opposite to them
is the listening position.
ALTERNATIVE 5.1 SURROUND LOUDSPEAKER PLACEMENT
You can mount the surround loudspeakers
on the back wall above the listeners and
aim them forward.
You can mount the surround loudspeakers
on the back wall above the listeners and aim
them away from each other.
You can mount the surround loudspeakers
on the back wall above the listeners and
aim the loudspeakers at each other.
You can place the surround loudspeakers
behind the listeners and aim them upwards
towards the ceiling.
You can mount the surround loudspeakers
on the back wall above the listeners and aim
them to the side walls to reflect the sound
forward.
Remember, if you cannot mount the
loudspeakers on the back wall, you can
mount them on loudspeaker stands.
215

CENTER CHANNEL PLACEMENT
High quality accurate loudspeakers such as our Discovery, Kayak or Skiff that radiate sound
evenly will let you hear voices clearly and centered in your home theater system. The center
loudspeaker has to be accurate because it is reproducing all the information produced by the
other front loudspeakers in addition to dialogue. Without the center channel speaker only the
person in the "sweet spot" will hear dialogue that is centered. For other listeners the dialogue
will drift towards the speaker they are sitting closest to. Your center channel loudspeaker
should be "timbre-matched," with the left and right front speakers.
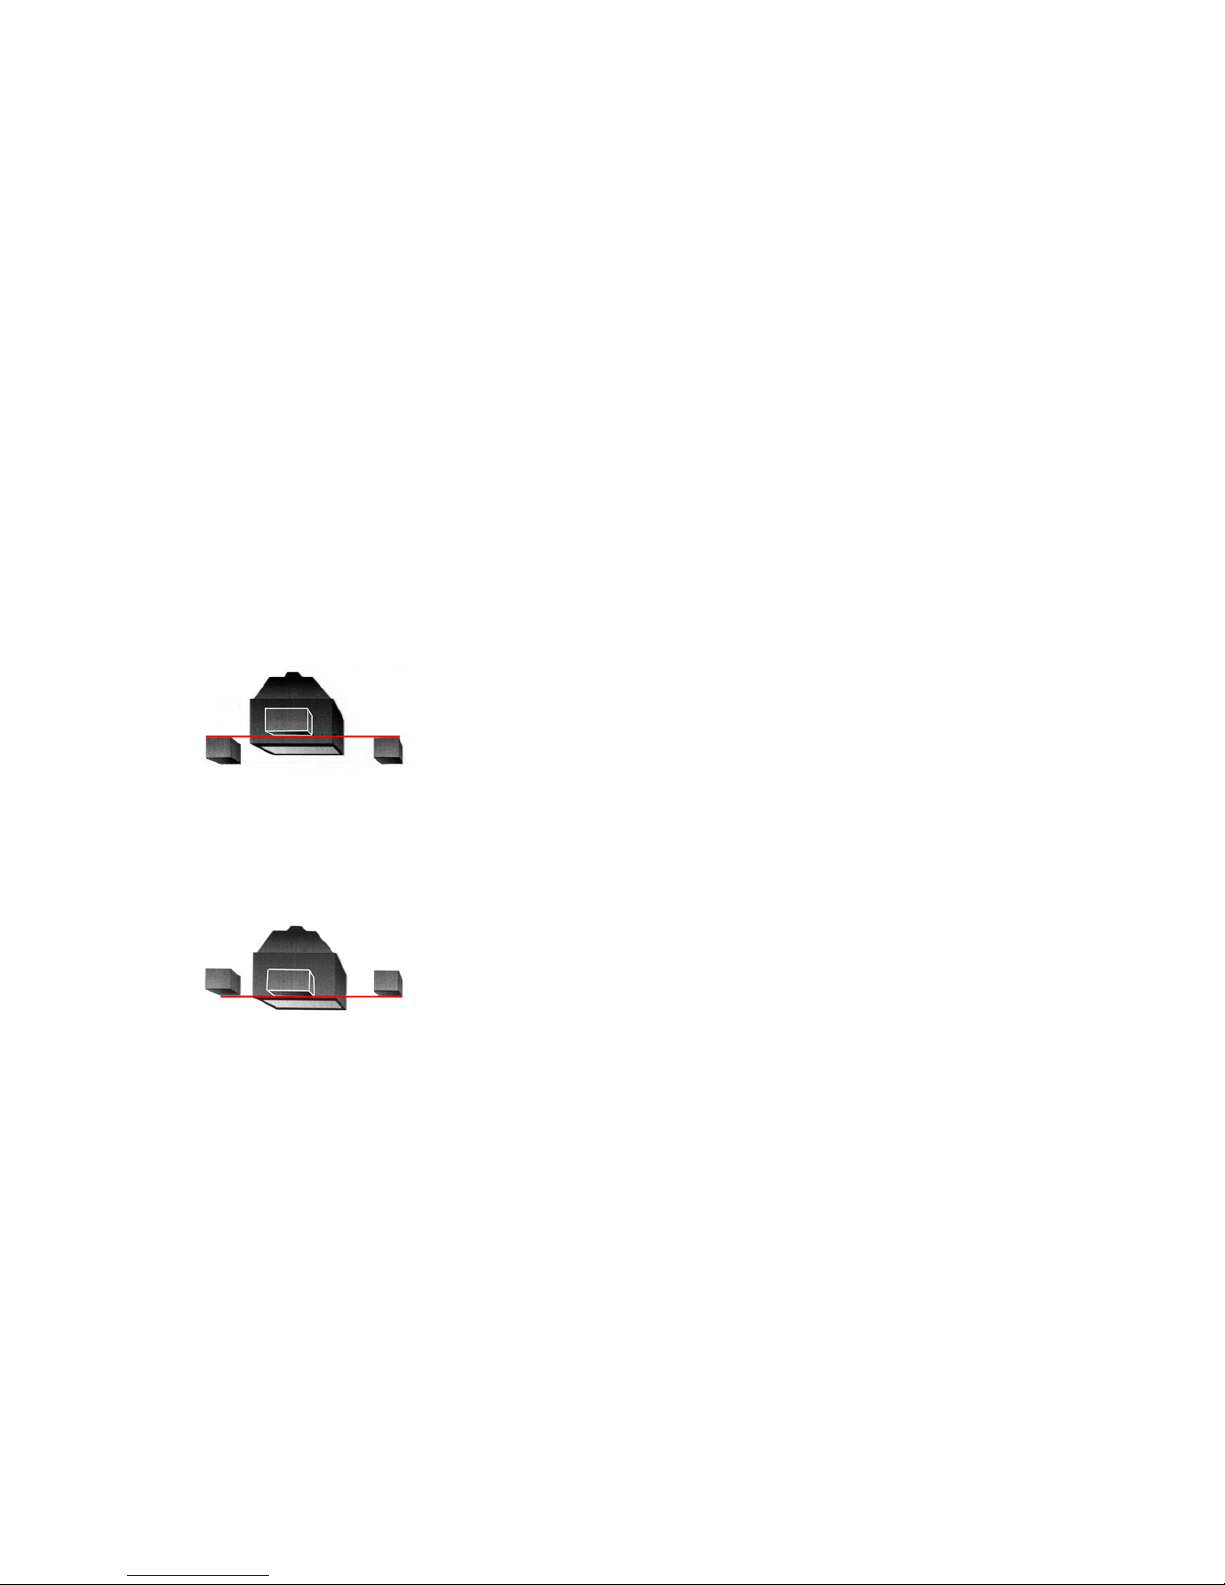
The best placement for the center channel is directly on top, or directly below the TV,
recessed enough to make the center channel and the front loudspeakers equidistant from
someone sitting directly in front of the TV. The center channel loudspeaker should be tilted, if
necessary, so that its top and bottom edges are the same distance from the listener.
Preferred Center Channel Placement
common alternative placement is to align the front of the loudspeaker with the TV. While
this placement is not optimal, it is visually more harmonious with the TV.
Alternative Center Channel Placement
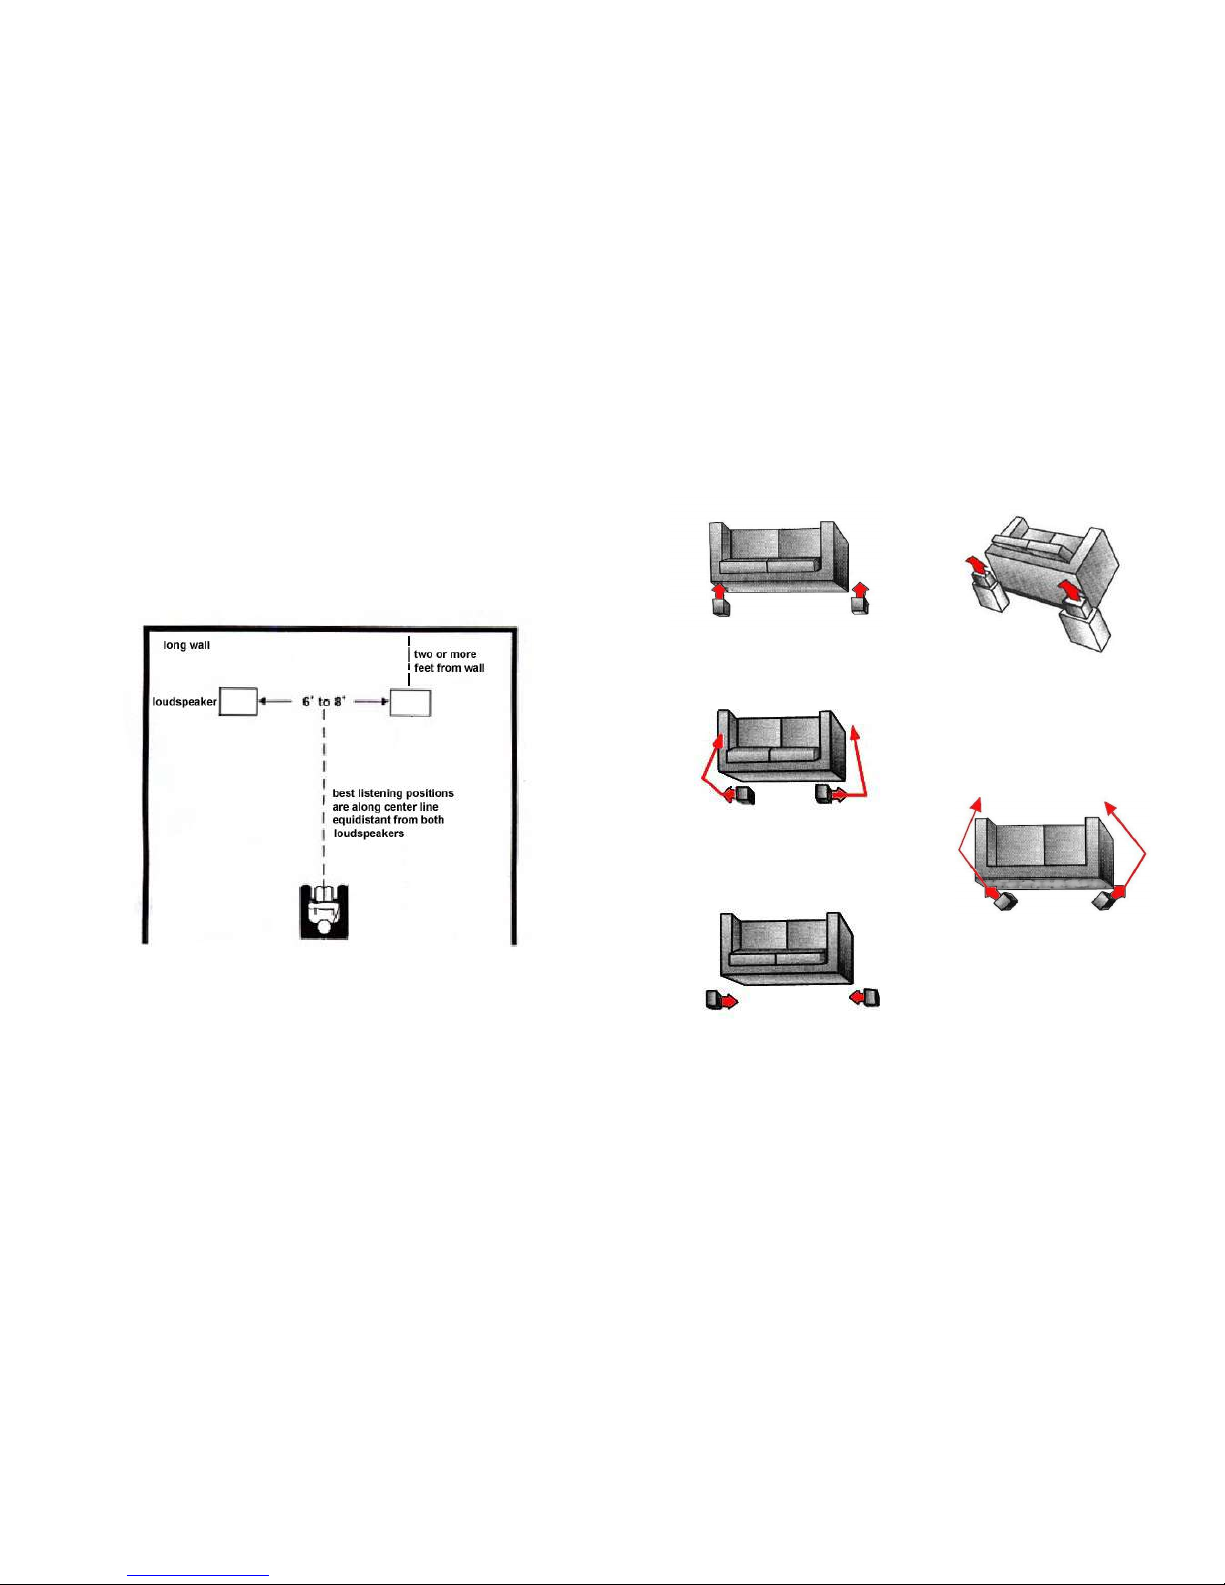
For flattest frequency response, position the loudspeakers to ensure the tweeters are
close to the height of the ears of the seated listener as possible (if necessary use
loudspeaker stands to achieve the desired height). height of roughly 35 inches from
the floor to the tweeter will generally match the height of the ear of a person of average
height who is seated on a couch. Place the loudspeakers six to eight feet apart and
eighteen inches or more from the rear wall. For greater bass response place the
loudspeakers closer to the rear wall. If you cannot realize this basic placement, moving
the loudspeakers even six to twelve inches from the rear wall will significantly improve
the depth of the stereophonic soundstage. Consult the section on " lternative Stereo
Placement" for techniques to improve on this basic placement.
No two listening rooms are the same. Therefore you are encouraged to spend some
time experimenting with which placements work best in your listening room. Trust your
ears and be willing to experiment freely. Start with our basic recommendations.
What About Placement on Bookshelves and in Wall Cabinets?
Placement on bookshelves and in wall cabinets will generally reduce the soundstaging
and imaging performance of loudspeakers, while it can often provide a richer, more full-
bodied sound. Because our minimonitors and bookshelf loudspeakers are acoustic
suspension designs they are the most well suited loudspeakers for placement on
bookshelves and in wall cabinets. Because of their acoustic suspension design, our
small loudspeakers are widely used in custom installations, where the loudspeakers
are often fitted into custom wall units, with excellent results.
Remember, for any placement, try to maximize the performance of the loudspeakers.
Moving them just a few inches and changing the angle of the loudspeaker can provide
noticeable improvements in performance.
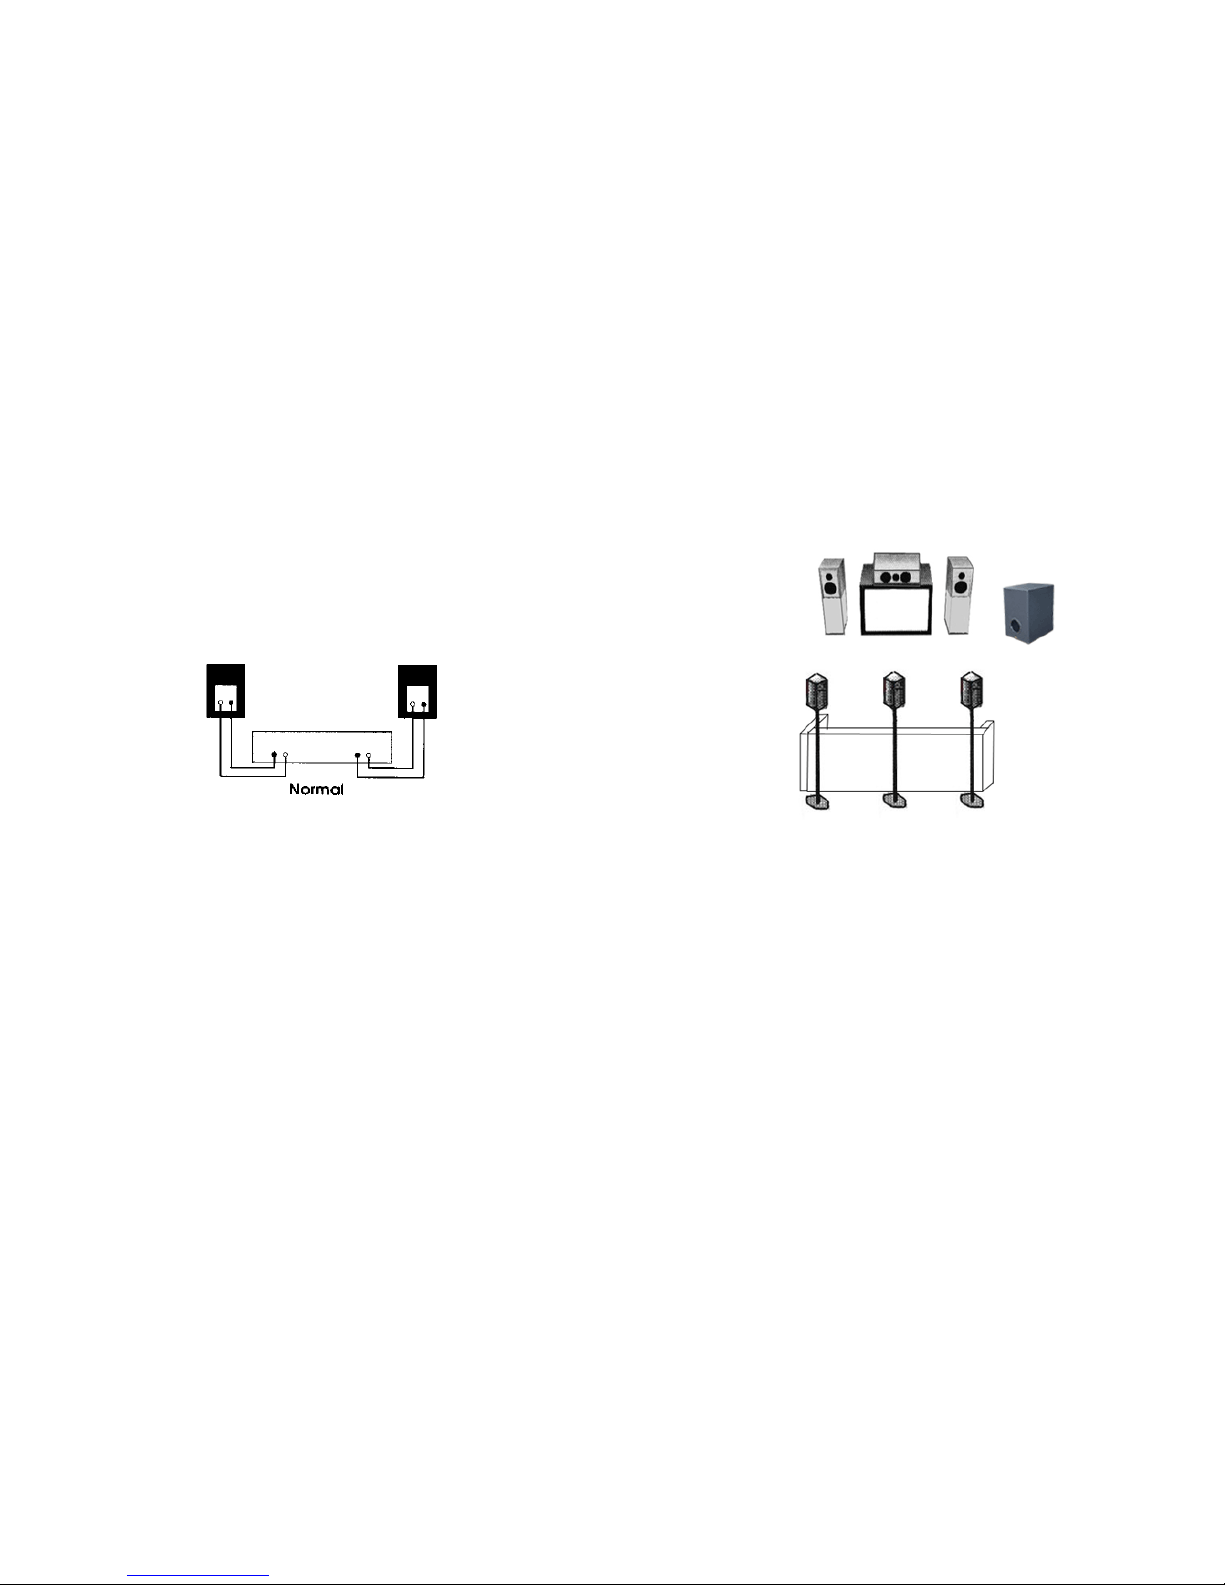
SUBWOOFER PLACEMENT
Placing a subwoofer near to walls or in corners will generally reinforce bass response.
lthough, in some cases the resulting bass response can be unpleasant. For the most
audiophile response, locate the subwoofer on the same plane between, and slightly
ahead of, the front satellite or main speakers. For convenience, the subwoofer may be
located away from the main or satellite speakers. For greatest bass reinforcement,
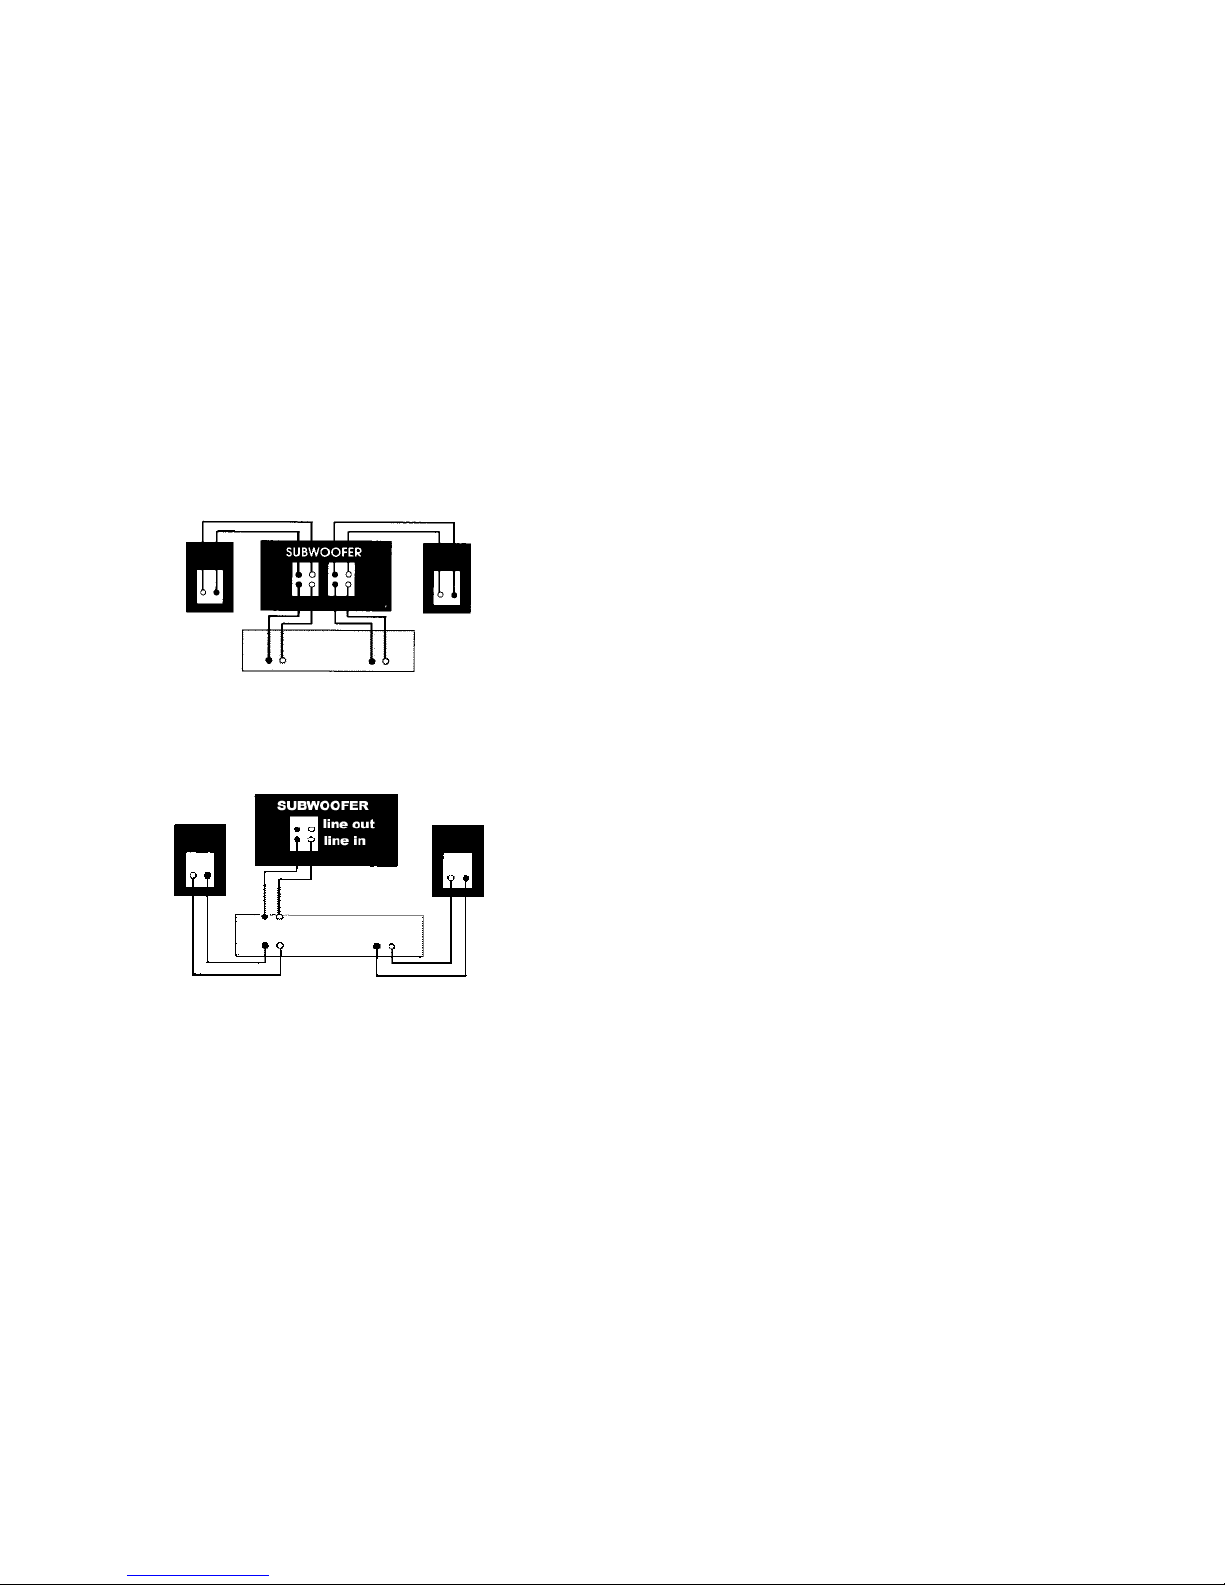
locate the subwoofer near to a wall or corner. Once placement is determined, if the
subwoofer has a phase switch, engage the phase switch to find the setting that
provides the loudest output and coherence with the satellites. In the correct setting the
speaker system will sound louder and produce more bass. djust the crossover switch
to get the best acoustical match with the satellite speakers. For more extensive
information on setting up subwoofers, refer to the users manual that is shipped with
your subwoofer.
3
14

CONNECTING THE LOUDSPEAKERS TO THE AMPLIFIER
Place the loudspeakers in the anticipated position. If you are using speaker stands,
place the stands in the appropriate position and place the loudspeakers on top of
them. Be sure the amplifier is switched off before connecting the loudspeakers to
the amplifier. Observe polarity on the amplifier or receiver and the loudspeaker by
identifying the positive and ground binding posts or connectors. On the
loudspeakers, the positive connectors are coded red, the grounds are coded black.
Our loudspeakers use SuperiorTM five-way gold-plated binding posts that are suited
for just about any connection. They accept heavy gauge bare wire, banana plugs,
spade lugs, or pin terminators. Use equal lengths of hookup wire to connect the
loudspeakers to the amplifier. We recommend low gauge oxygen free copper wire or
other high quality speaker cables. For loudspeakers located up to 25 feet from the
amplifier or receiver we recommend equal lengths of 16 gauge oxygen free cooper
wire or other high quality loudspeaker wire. For loudspeaker located more than 25
feet away from the amplifier or receiver we recommend 14 gauge wire.
Connect the left channel wires from the amplifier or receiver to the speaker that is to
the left of the listening position. Connect the right channel wires to the speaker that
is to the right of the listening position. Be sure the loudspeaker binding posts are
securely hand-tightened if you are using bare wire connections. lso ensure there
are no loose strands of wire that can short circuit the binding posts (touch the other
binding post). You should now turn on your system and do a listening test to ensure
the system is hooked-up and functioning correctly. Use your amplifier balance
control to ensure the loudspeakers are connected in the proper left-right orientation.
Make sure the system is connected in proper phase. If the system is connected out
of phase the volume and bass response will be diminished. To check for correct
polarity, place the loudspeakers facing each other a few inches apart. Switch your
amplifier to mono. Play a recording that has deep bass then switch around the
connections on one loudspeaker. Correct polarity will result in stronger bass
response.
SURROUND LOUDSPEAKERS
First, let's clear up a misperception, that only specially designed loudspeakers, such as THX
certified loudspeakers, can work well in surround or home theater systems. Nothing could
6.1 Surround Placement
be farther from the truth. nd the various arguments for such loudspeakers are mostly
marketing ploys. For certain, if you intend to use a loudspeaker near (generally, less than a
foot and a half) from a CRT screen such as a TV, you should use a shielded loudspeaker to
prevent magnetic interference from the magnet that is on the transducers (drivers) in the
loudspeaker from reaching the CRT. ll our loudspeakers are magnetically shielded.
Magnetic interference will cause color distortion and can permanently damage CRTs. Some
small loudspeakers can be used less than a foot from a CRT and not produce any magnetic
interference, because of the small magnets they use. If you don't intend to place the
loudspeakers very close to the CRT, they do not have to be magnetically shielded.
Buy the highest quality loudspeakers you can afford. Remember loudspeakers are the most
critical pieces of equipment in the chain of the equipment that forms your home theater
system. By highest quality we mean well designed and well constructed, not pricey. high
quality loudspeaker should produce neutral coverage of the frequency spectrum. It should
radiate sound fairly evenly in all directions. nd it should reproduce a stereophonic image
and soundstage accurately.
Amplifier
or Receiver
413
Amplifier
or Receiver

listening area. Our Skiff loudspeakers are are ideal for this purpose because they are
outfitted with a receptacle for “no-fuss” attachment to OmnimountTM 10.0 series brackets.
However, you can use any of our small loudspeakers for this purpose.
5.1 Surround Placement
6.1 SURROUND PLACEMENT AND SURROUND LOUDSPEAKERS
6.1 surround speaker system adds a center channel loudspeaker in the rear for a more
revealing sound. ny of our small loudspeakers may be used as a rear center channel
loudspeaker.
CONNECTIONS FOR BI-WIRING AND BIAMPING
If your loudspeaker is equipped with bi-wire terminals, bi-wiring can result in improved
performance, including less distortion, especially in small loudspeakers. Bi-wiring requires
the use of four equal lengths of loudspeaker hook-up wire, two per channel, to connect the
amplifier to the loudspeakers. First remove all the bridging brackets from between the
loudspeaker binding posts. For the left channel speaker, connect one set of positive and
ground wires to the bottom row of binding posts. Connect the other set to the top row of
binding posts. Make the respective connections to the right channel loudspeaker.
Bi-amping can further enhance the performance of the system. To bi-amp, remove all the
bridging brackets from between the loudspeaker binding posts. Use one amplifier or receiver
to power the tweeters and the other to power the woofers. For the left channel speaker,
connect one set of positive and ground wires between the tweeter binding posts and the left
channel speaker output terminals on the amplifier used to power the tweeters. Connect the
other set between the woofer terminals and the left channel loudspeaker output terminals of
the amplifier used to power the woofers. Make the respective connections to the right
channel loudspeaker.
Amplifier
or Receiver
Two
Amplifiers
or
Receivers
5
12

CONNECTIONS-FOR SYSTEMS WITH AN ACTIVE SUBWOOFER THAT USE THE
SUBWOOFER'S HIGH PASS FILTER, OR CONNECTIONS FOR SYSTEMS WITH A
PASSIVE SUBWOOFER
Connect two equal-length sets of loudspeaker wire, one per channel, between the amplifier
and the input row of binding posts on the subwoofer. Observe polarity. Connect another two
equal-length sets of wire, one per channel, between the output row of binding posts on the
subwoofer and the terminals of the respective loudspeakers used as satellites.
CONNECTIONS-FOR SYSTEMS WITH AN ACTIVE SUBWOOFER USING LINE LEVEL
CONNECTIONS
Connect two equal-length sets of line level interconnects, one per channel, between the
amplifier or receiver's RC preamplifier outputs and the appropriate RC inputs connectors
on the subwoofer. Some receivers have a single line level output for active subwoofers.
Connect this single output to the right (red) input on the subwoofer or refer to the owners
manual for the subwoofer. If preamplifier outputs are not available on the amplifier or
receiver, use high-level or loudspeaker connections between the amplifier or receiver
STEP #3 ESTABLISH SOUNDSTAGE FOCUS
To get the performers to come into focus (as with a camera) requires two people. The other
person should rotate the loudspeakers, one at a time, in a rapid fashion on the axis indicated
by the arrows in figure B, while the listener checks for greater or lesser focus of the
stereophonic image. fter a small amount of practice the listener will get a sense of the right
position. Do the other loudspeaker and trust your judgment. You will hear the difference.
STEP # ESTABLISH SOUNDSTAGE BALANCE
In cases where the stereophonic image is more dominant on one side of the room, the other
person in figure B should move the loudspeaker on the weaker side of the soundstage
forward along the axis shown in figure C, Move the loudspeakers in increments of 1/16" to
1/8" until the best soundstage balance is achieved.
The four corners of the room between the walls and the ceiling, often cause defocusing of
the soundstage. Therefore, the four corners are a good pace to start treating the room with
absorbent materials if you still experience lack of soundstage focus or if you want the best
soundstage focus.
SURROUND PLACEMENT
5.1 AND 6.1 SURROUND PLACEMENT AND SURROUND LOUDSPEAKERS
When putting together a Dolby digital 5.1 home theater system, you should ensure that the
five main loudspeakers-left, center, right, and two surrounds can reproduce the same sound.
Loudspeakers that have perfectly matched timbre (generally those using the same or similar
tweeters and woofers and crossover design) will give the best results. However, the main
loudspeakers do not have to reproduce low bass. With a good subwoofer dedicated to
reproducing low bass and adjusted for the best integration with the main loudspeakers, it can
be virtually impossible for you to determine which of the loudspeakers is reproducing low
bass. You could use large floor standing loudspeakers that are capable of reproducing low
bass, but that is not necessary, because you can achieve excellent results with five small
satellite loudspeakers and a dedicated subwoofer. Most surround receivers have a switch to
match the output of the receiver to small or large loudspeakers. In general this switch should
be set to “small” if you are using a subwoofer.
You will hear different opinions about where to place your rear surround loudspeakers. The
ideal placement is on adjacent walls above the listening area as shown in the following
graphic. The surround loudspeakers may be wall-mounted. Where wall mounting is
undesirable, you can place the loudspeakers on loudspeaker stands or use small floor
standing towers. nother alternative is to use pivoting adjustable brackets (such as
OmnimountTM) to mount the loudspeaker on the ceiling and angle them downward over the
Amplifier
or Receiver
Amplifier
or Receiver
Amplifier or
Receiver
611

surprising how many people have never been exposed to the effect this placement
generates. The middle position has the second deepest soundstage, and is often acceptable.
Rear quarter placement is the most acceptable compromise when décor issues limit
placement choices. Having determined the best position that suits your life style and proper
bass response, let's go to step two.
FIGURE C
STEP #2 ESTABLISH SOUNDTAGE WIDTH
Take the loudspeakers along the axis you have chosen in Step l and have someone
move them toward the side walls, one at a time, while you are listening. You will
notice that the soundstage gets wider. t a certain point you will experience the
center of the soundstage falling out, then you know that have gone too far. Move
one or both of the loudspeakers toward the center a little at a time to re-achieve the
best balance.
and the subwoofer. Then connect two equal-length sets of loudspeaker wire, one
per channel, between the amplifier or receiver loudspeaker output terminals and the
terminals of the respective loudspeakers used as satellites.
CONNECTIONS FOR SYSTEMS WITH TWO SUBWOOFERS
Ideally, the two subwoofers should be place between the loudspeakers. However,
they may be placed anywhere in the room for convenience. Use two equal-length
sets of RC terminated interconnects, one per channel, to connect the amplifier or
receiver preamplifier outputs to the subwoofers. Use two equal-length sets of
loudspeaker wire, one per channel, to connect the left and right channel
loudspeaker output terminals on the amplifier or receiver to the left and right
loudspeakers used as satellites.
AMPLIFIER REQUIREMENTS AND POWER RESPONSE
mplifier power requirements depend on a combination of room size, desired
listening level and interaction between the amplifier or receiver and the
loudspeakers. This makes it impossible to make hard and fast amplifier or receiver
power requirement recommendations. The recommended power requirements that
we make reflect what should be needed under average listening conditions. In
general, low powered amplifiers pose more risks of damage to loudspeakers than
high powered ones. s a general rule a more powerful amplifier is preferable to one
with less power. However, with high powered amplifiers you can damage
loudspeakers by driving them beyond their capacity.
How loud you can play loudspeakers is determined mainly by the loudspeaker’s size
and the response accuracy you desire. Please note that in order to provide the
purest signal path to the loudspeakers, no protection circuitry is included in our
loudspeakers. We use extremely high quality parts in all of our loudspeakers.
Nonetheless, at the first sign of audible distortion, reduce the volume of your
amplifier or receiver. Loudspeakers can be damaged by unusually high volume bass
passages when the loudspeakers are being played at extremely loud levels.
ll loudspeakers have a finite mechanical limit. Driving loudspeakers beyond their
limit can cause serious damage. Distortion is evidence that either the loudspeaker
or the amplifier is reaching its limits. Distortion produced by an amplifier is often
heard as harmonics that are not part of the music. clicking noise from the
loudspeaker is an indication that the loudspeaker has reached the mechanical limits
of its travel and the volume must be reduced immediately.
7
10

ALTERNATIVE STEREO PLACEMENT
This section is based on Guidelines for Setting Up Speakers by the late Leo Massi, formerly
of Sound II, North Dartmouth, Massachusetts (used with permission)
FIGURE A
STEP #l ESTABLISH PROPER BASS RESPONSE
It is not always true that one gets the best bass near the wall. For example, corner
positioning may substantially enhance bass response below 40 to 50 Hz, yet may drastically
reduce mid-bass output at the listening position. If positioning causes standing waves or
"suck-outs" the tonality of the presentation will be off. Therefore, getting the best bass
response is the first step to obtaining the best performance from your loudspeakers. If you
position loudspeakers along the wider wall you will get a wider soundstage. If you place
them along the shorter wall, it is unlikely you get as wide a soundtage, yet, if you can place
them closer to you, the listener, you will experience a very deep soundstage. In any case, the
width of the soundstage should go well beyond the two speakers.
There are three positions suggested in Figure : good, better and best. While a lot will
depend on your room, you should try to experiment with these rules. The listener should be
within three feet from the rear wall to minimize de-focusing reflections from the rear wall. It
also helps to have some sort of sound dissipating material on the wall directly behind the
listener's head.
Somewhere within a foot to an inch of the exact middle of the room will give you the best
overall bass response.
FIGURE B
Front or rear quarter positions will be close seconds. These distances should be measured
with a tape and, while slight deviations should not significantly affect the sound, being a foot
or more off will most likely affect bass response and overall tonality will be off.
The front quarter position takes most of the back of the room out of play and gives the most
holographic sense of depth. This is referred to as "nearfield listening", and it is always
89
Table of contents