Sakar 32490 User manual

32490/32492 Digital Video Camera
Owner’s Manual
© 2007 Sakar International, Inc. All rights reserved.
Windows and the Windows logo are registered trade arks of Microsoft Corporation.
All other trade arks are the property of their respective co panies.

Table of Contents
Introduction.........................................................................................................3
Key Features .....................................................................................................3
What your digital video ca era includes: .........................................................4
Co puter Syste Require ents ......................................................................4
A Quick Look at your Digital Video Ca era ......................................................5
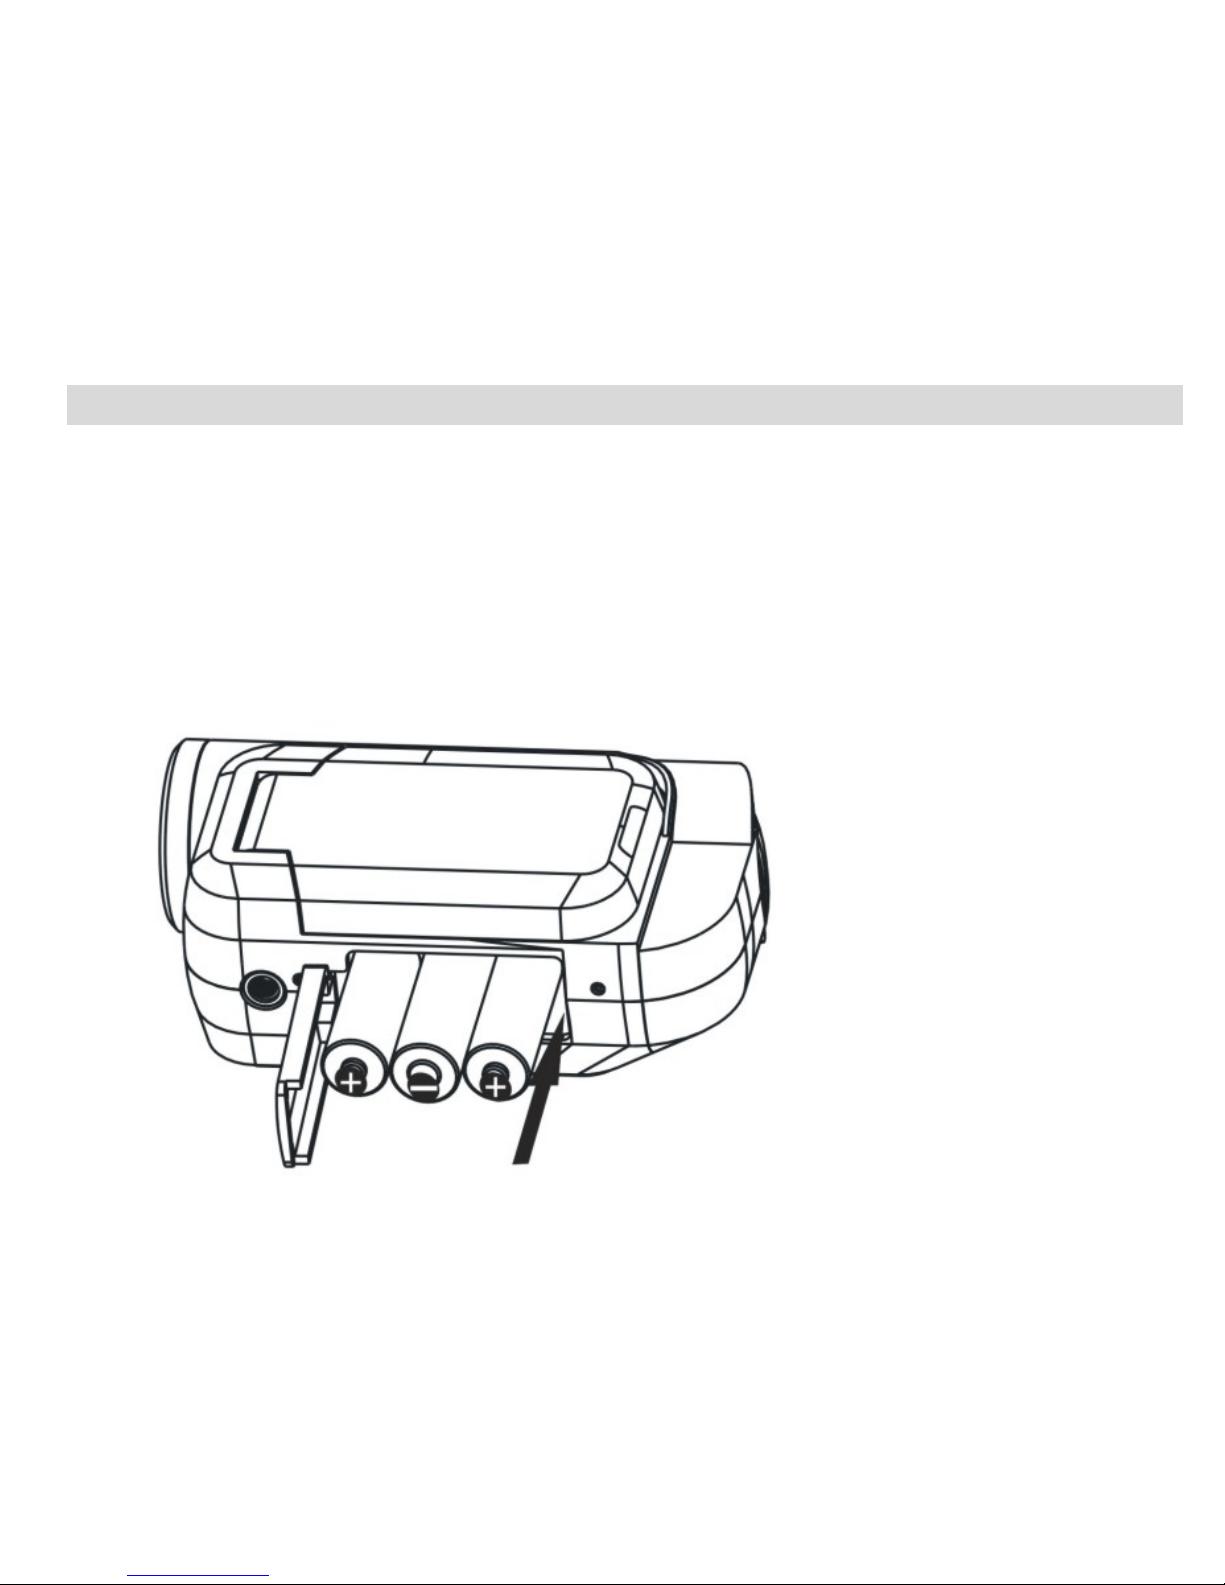
Preparing Your Ca era for Use.........................................................................6
Inserting a Me ory Card....................................................................................7
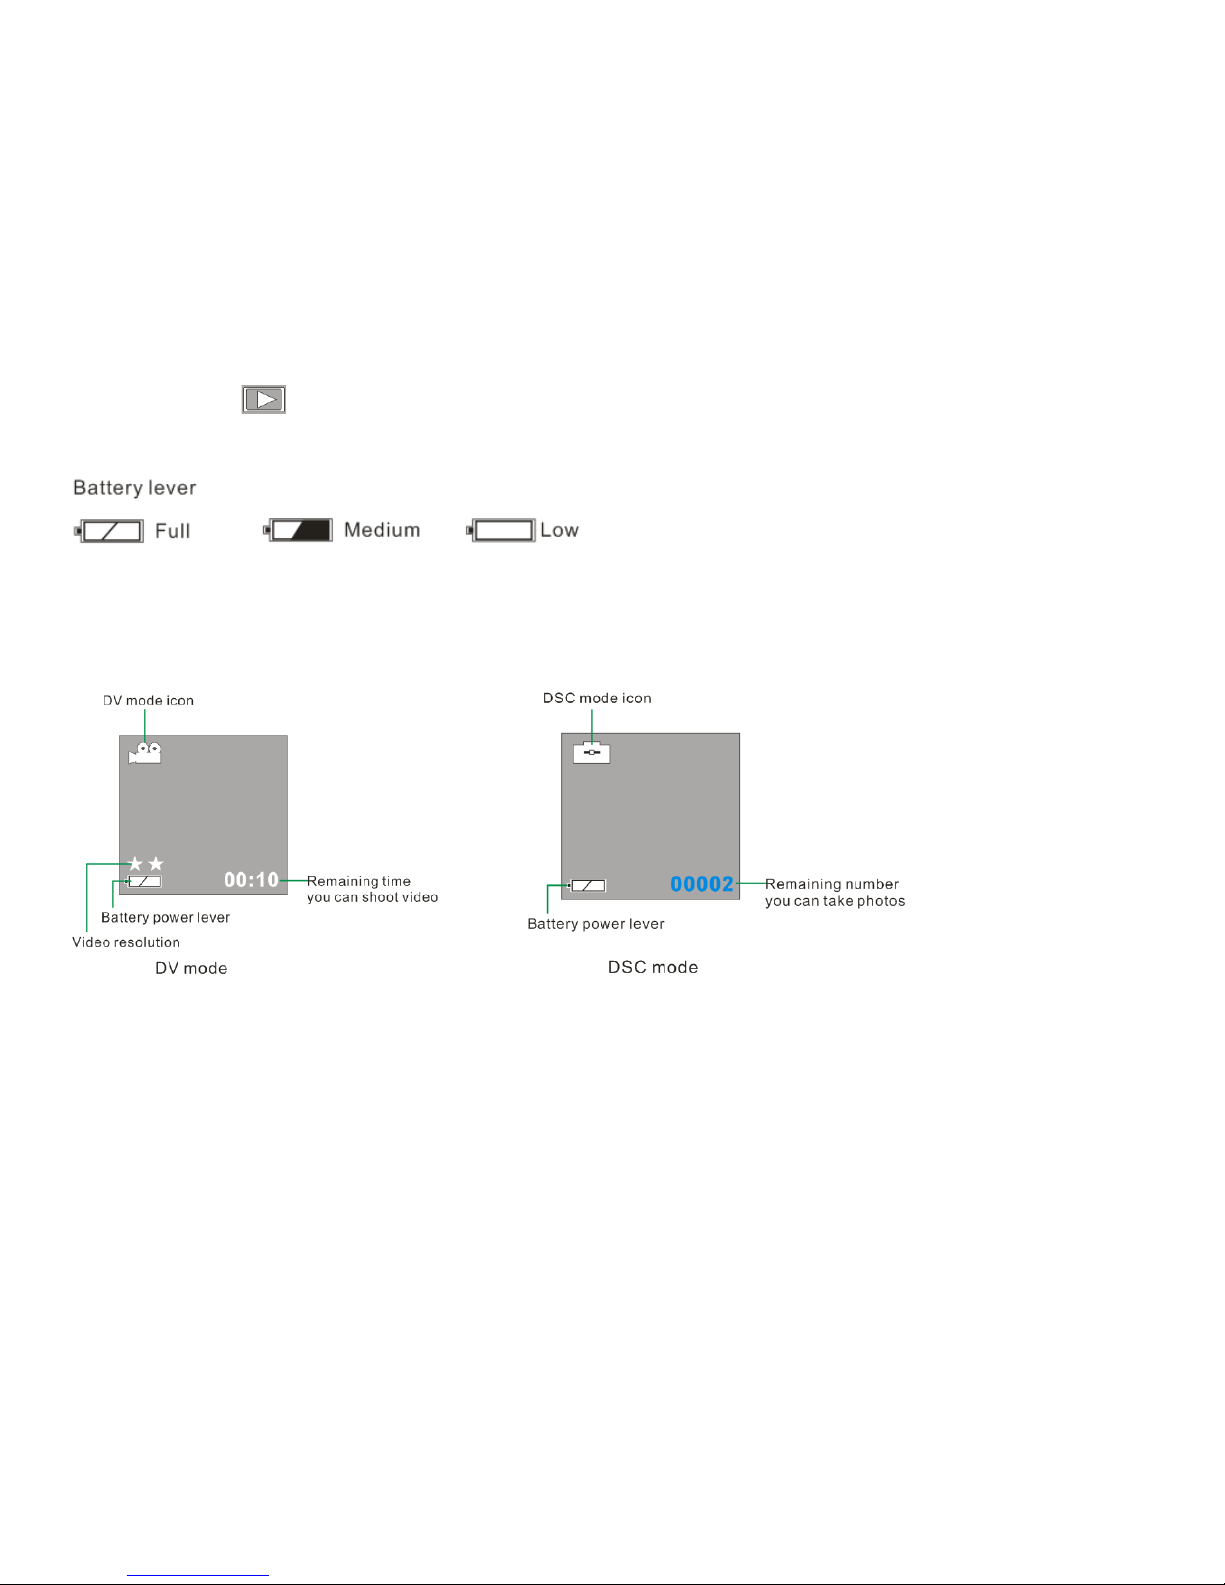
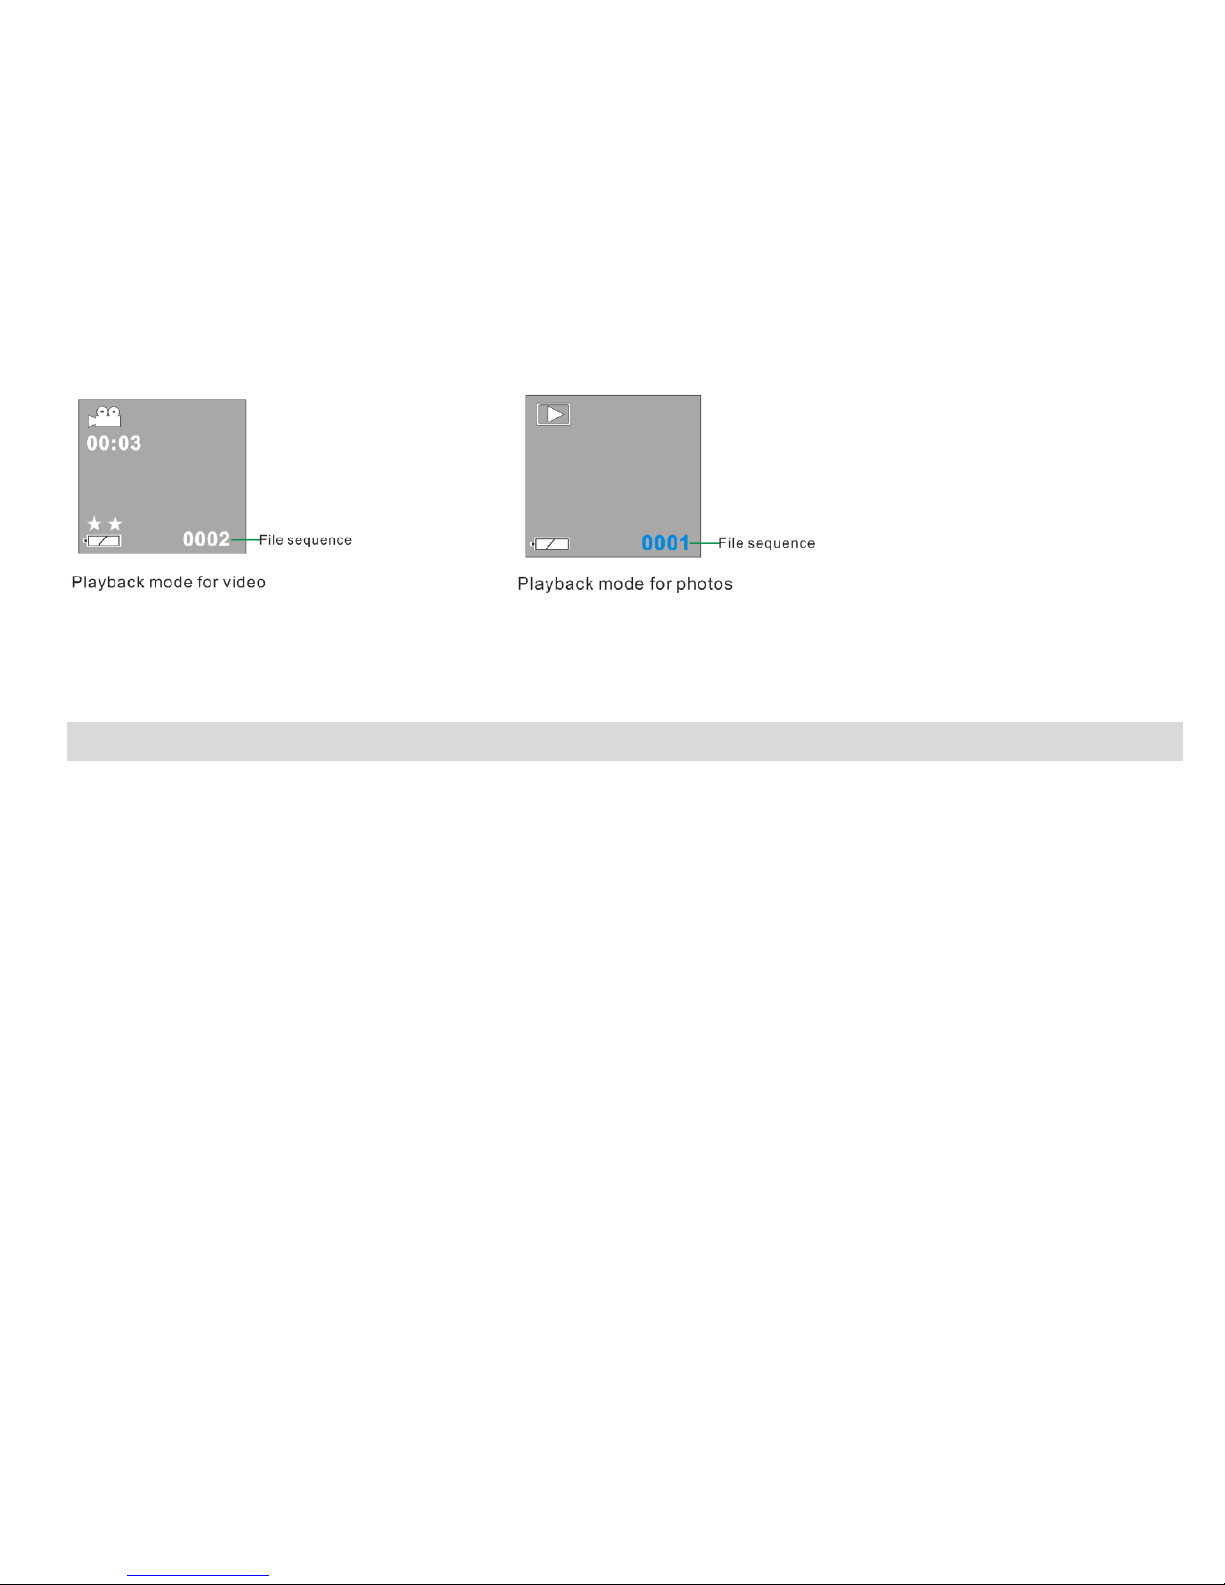
DV Function Control.........................................................................................10
Installing Kids I aging Studio Software...........................................................17
Transferring I ages to your PC using Media Auto Detect ..............................23
Transferring i ages to your PC using Kids I aging Studio.............................26
Everything You Need To Get the Most of Your Photos and MORE.................33
Maintenance of Your Digital Ca era ............................................................35
Technical Support............................................................................................35
Sakar Warranty Card........................................................................................35
Technical Specifications...................................................................................37
Troubleshooting................................................................................................38
Special Note: For best video output connect to TV instead of your PC...........39
2

Introduction
Thank you for purchasing our Digital Video ca era. Now you can shoot video clips and take individual
photos. In addition, any SD co patible e ory card up to 1GB can be inserted to expand the e ory
of your DV ca era.
Your ca era includes the patented Kids I aging Studio technology, the ost powerful way to share
your photos that enable you to:
•Create fun, personalized videos
•Co bine selected usic with sound track
•Personalize with titles and credits
•Annotate your Jpeg photos with sound, text and ore
•Generally produce videos created with auto atic editing and synchronized transitions and effects.
In short, everything you need to get the ost out of your photos.
Key Features
•Effective resolution: 300k pixels.
•1.5" CSTN LCD
•Support SD card
•Create your own ovies
•Add special effects with Kids I aging Studio
3

•Record 80 inutes of video with 1GB SD Card (not included)
•Takes digital photos
hat your digital video camera includes:
•Digital Video Ca era
•USB cable.
•TV cable
•Kids I aging Studio Software
•User Manual
•1 year warranty
Computer System Requirements
•MAC Co patible
•Windows 2000 ,XP or Vista (32-Bit Edition)
•Pentiu II 300 or higher
•128MB RAM
•250MB free hard drive space
•CD-ROM drive
•Available USB port
4

A Quick Look at your Digital Video Camera
5

Preparing Your Camera for Use
Battery Installation
Your DV ca era requires three “AA” batteries (not included). It is reco ended that alkaline batteries be
used.
1. Open the battery co part ent.
2. Insert the batteries in accordance with the polarity indicated on the back of the battery cover
3. Close the battery cover.
6

Note:
•Do not open the battery cover indiscri inately as photos and video clips in e ory will be lost.
•Re ove batteries fro the DV ca era when not in use for an extended period.
Inserting a Memory Card
A SD co patible e ory card (not included) can be inserted into your DV ca era, which will allow an
increase in the nu ber of ovies, or photos that can be taken before the need arises to transfer the to a
co puter.
7

Note:
•This product supports SD e ory cards with capacities between 128MB to 1GB.
•For atting will delete all data on the SD Me ory Card including protected data.
•Do not re ove the SD e ory Card during for atting as this ay da age the card and render it
unusable.
•Be sure to for at the card with the ca era.
•SD e ory cards for atted on a PC or device other than the DV ca era should not be used.
•All the data in the built-in e ory will be lost if no SD Me ory Card has been inserted in the DV when
you change your batteries.
•IMPORTANT NOTE: If you do not have an SD memory card inserted in your camera while
recording video, no sound will be recorded. The internal memory of the camera records test
video only and does not record audio. To record with sound you must have an SD memory card
inserted in your camera while recording video.
Main icons on the LCD
DV mode (for shooting video)
DSC mode (for taking photos)
8

Playback mode
9

DV Function Control
Power on
Press the Power Button and hold for about 3 seconds. The LCD onitor will light up and the DV is ready for
using.
Power off
Press the Power Button and hold for about 3 seconds. The DV ca era will switch off.
If the DV ca era is not operated for 60 seconds it will switch off auto atically.
Shooting videos
In DV ode: There are two video resolutions for you to shooting video files. Press UP or Down button to
10

change between the .
: 640x480 pixels (VGA), ★★
: 320x240 pixels (QVGA).★
1. Switch on the DV ca era. The default ode is DV (video) and the DV icon will appear on the
LCD. Alternatively, press the Mode button repeatedly until the DV icon appears on the LCD.
2. Hold the DV ca era steadily and use the LCD to focus on the subject.
3. Press the Shutter button to co ence shooting. The red spot won’t be flashing on the LCD until
you press the Shutter button again to stop shooting or the e ory is full.
4. Press the Shutter button again to stop shooting. Alternatively it will stop when the e ory is full.
Note:
11

•Before shooting, you ay use a SD card to expand your e ory capacity.
•IMPORTANT NOTE: If you do not have an SD memory card inserted in your camera while
recording video, no sound will be recorded. The internal memory of the camera records test
video only and does not record audio. To record with sound you must have an SD memory
card inserted in your camera while recording video.
•When the e ory is full, the LCD will appear “ MEMORY FULL! TRANSFER TEST IMAGES TO PC
AND INSERT A SD MEMORY CARD TO TAKE MORE IMAGES!”. Download photos and video files
to your PC as often as possible.
•If the lighting is inadequate, the shooting ay fail.
Taking photos
The i age resolution (640x480 pixels) is defaulted by your DV which can not change.
1. Switch on the DV ca era.
2. Press the Mode button to select DSC ode, i.e. until the DSC icon appears on the LCD.
12

3. Hold the DV ca era steadily and use the LCD to focus on the subject.
4. Press the Shutter button to take a photo. (There will be a short delay while the ca era saves the
photo to e ory.)
Note:
•You cannot take photos whilst the ca era is connected to a co puter.
•Download photos and video clips to your PC regularly.
•When the e ory is full, the LCD will appear “ MEMORY FULL! TRANSFER TEST IMAGES
TO PC AND INSERT A SD MEMORY CARD TO TAKE MORE IMAGES!”. Download photos
and video files to your PC as often as possible.
Playback mode
1. Switch on the DV ca era.
2. Press the Mode button repeatedly until you select playback ode i.e. so that the nu ber of
video clips or photos taken and their sequence appear in the botto right hand corner of the
LCD, press the shutter button to confir this ode.
13

3. To view photos, press the UP or DOWN button.
4. To play back video clips:
Press UP or DOWN button to select an AVI file. The nu ber of video clips or photos taken and their
sequence appear in the botto right hand corner of the LCD.
5. Press the Shutter button to play back the video clips in your DV ca era.
6. Press the Shutter button to stop playing.
14

Note: Video clips are saved in AVI for at.
Deleting current Photo or Video file:
1. Whilst in Playback ode, select a photo you want to delete.
2. Press the Delete button once. The LCD will be shown: .
3. Press UP or DOWN button to select “Yes”.
4. Press Shutter button to confir the deletion.
Deleting all photos and video files:
1. Press Mode button until you select Playback ode.
2. Press Delete button twice. A appear on the LCD screen.
3. Press UP or DOWN button to select “Yes”.
4. Press Shutter button to confir the deletion.
15

Format
1. Press Mode button until you select Playback ode.
2. Press Delete button three ti es. A shown on the LCD screen.
3. Press UP or DOWN button to select “Yes”.
4. Press Shutter button to confir .
Note:
•For at will delete all datu in your DV, please ake sure before you execute the function.
•All delete operations ust be done in Playback ode.
•In Playback ode, you can exit by pressing Delete button repeatedly without any deletion and
for atting.
Mass Storage
1. Connect your DV ca era to your co puter using the USB cable.
2. “MSDC” will appear on the LCD, indicating that your DV ca era is in Mass Storage Mode.
3. Double click My Co puter/Re ovable Disk/DCIM/).
4. You can download photos or use it as U-Disk
Note: After you connected your DV to PC, your DV will be auto atically turned on, and it won’t be switched off
16

when you pull out the USB cable.
TV out function
Your Digital Video has the function that allows the photos and video clips can be played on TV.
1. Connect DV to TV with TV cable correctly.
2. Power on your DV and TV (AV ode).
3. You can use TV LCD instead of your DV LCD.
Installing Kids Imaging Studio Software
Before you install the “Kids Imaging Studio” application please ensure that the Camera is NOT
connected to the computer.
Insert the Software CD that ca e with your ca era into the CD-ROM drive.
17
TV ou t jack
in side !
Connect to TV!

Make sure that your ca era is NOT connected to the co puter.
The Kids I aging Studio installation screen will appear.
Both Kids I aging Studio and the uvee AutoProducer will be installed.
At the co pletion of the installation you will be required to restart your co puter in order to co plete the
software installation.
1. Select your ca era odel fro the list and click the “Install” button to install Kids I aging Studio.
18

2. On the “Kids I aging Studio" screen, click the “Next” button.
3. Please review the license ter s and click the “Agree” button to continue.
19

4. Let the “Kids I aging Studio” installer create the folder where the progra will be installed,
and then click “Install”.
5. Click “Finish” to let the “Kids I aging Studio” installer finish the installation progra . After this, the
installation process will auto atically install the uvee AutoProducer.
20
This manual suits for next models
1
Table of contents
Other Sakar Camcorder manuals