manuals.online logo
Brands
  1. Home
  2. •
  3. Brands
  4. •
  5. Sanyo
  6. •
  7. CRT TV
  8. •
  9. Sanyo AVM-27D11 User manual

Sanyo AVM-27D11 User manual

1
Introduction 2
Safety Instructions 3
Locations of Controls 4
Use of Remote Control 5
Antenna Connections 6
Cable TV Connections
Video/Audio Connections 8
Basic Operation 10
Basic Menu Operation 11
Set-Up 13
Antenna Selection
Auto Channel Programming
Manual Memory (Add/Delete)
Fine Tuning
Channel Guide
Picture Adjustment 21
Sound Adjustment 24
Clock/Timer 28
Functions 32
Picture-in-Picture (AVM-2 D11 only) 34
Other Useful Functions 38
Reception Disturbance 39
Care and Maintenance 39
Troubleshooting Guide 40
Warranty 41
TABLE OF CONTENTS
P.STD Button
Manual Adjustment
S.STD Button
Sound Menu
MTS
Channel Guard
32
Caution
To prevent electric shock do not use this (polarized) plug with an extension cord, receptacle or
other outlet unless the blades can be inserted fully to prevent blade exposure
GRAPHICAL SYMBOLS EXPLANATION
CAUTION
RISK OF ELECTRIC SHOCK
DO NOT OPEN
CAUTION : TO REDUCE THE RISK OF
ELECTRIC SHOCK, DO NOT
REMOVE COVER (OR BACK)
NO PARTS INSIDE
REFER SERVICING TO
QUALIFIED SERVICE PERSONNEL
This lightning flash with arrowhead symbol, within an
equilateral triangle is intended to alert the user to the
presence of uninsulated "dangerous voltage" within
the product's enclosure that may be of sufficient
magnitude to constitute a risk of electric shock to
persons
The exclamation point within an equilateral triangle is
intended to alert the user to the presence of important
operating and maintenance (Servicing) instructions in
the literature accompanying the appliance
Caution
Any changes or modifications in construction of this device which are not expressly approved
by the party responsible for compliance could void the user’s authority to operate the
equipment
ANTENNA
Unless your TV is connected to a Cable TV system or to a centralized antenna system, a good
outdoor color TV antenna is recommended for the best performance However, if you are
located in a strong signal area that is free from interference and ghost conditions (multipath),
an indoor antenna may be sufficient
LOCATION
Select an area where sunlight or bright indoor illumination will not fall directly on the picture
screen
Also, be sure that the location selected allows a free flow of air to and from the perforated back
cover of the set
NOTES
Never remove the back cover of the set This can expose you to very high voltage and other
hazards
If the set does not operate properly, unplug it and call your dealer or service shop
VIEWING
This color TV may be viewed from any desired distance Most viewers prefer a distance of
three to six feet or more depending on screen size for maximum eye comfort
SAFETY INSTRUCTIONS
HOW TO GET THE MOST ENJOYMENT FROM YOUR NEW COLOR TV SET
Your new Color TV incorporates a host of features designed to give you excellent performance
In addition, this model utilizes a highly sophisticated Control Microprocessor that can give you
unprecedented convenience and control in the areas of Picture Adjustment, Channel Tuning,
On-Screen Information
We therefore strongly urge that you read all of these instructions before using your TV for the first time
Congratulations on your purchase of this Sanyo MTS stereo television
The stereo speakers are front-mounted at the left and right sides of the TV screen for better
stereo effect, delivering a high audio output of 24 watts (total) With over 500 lines of horizontal
resolution via the built-in S-video jack, pictures from DVD will be reproduced in amazing detail
INTRODUCTION
Oth r F atur s
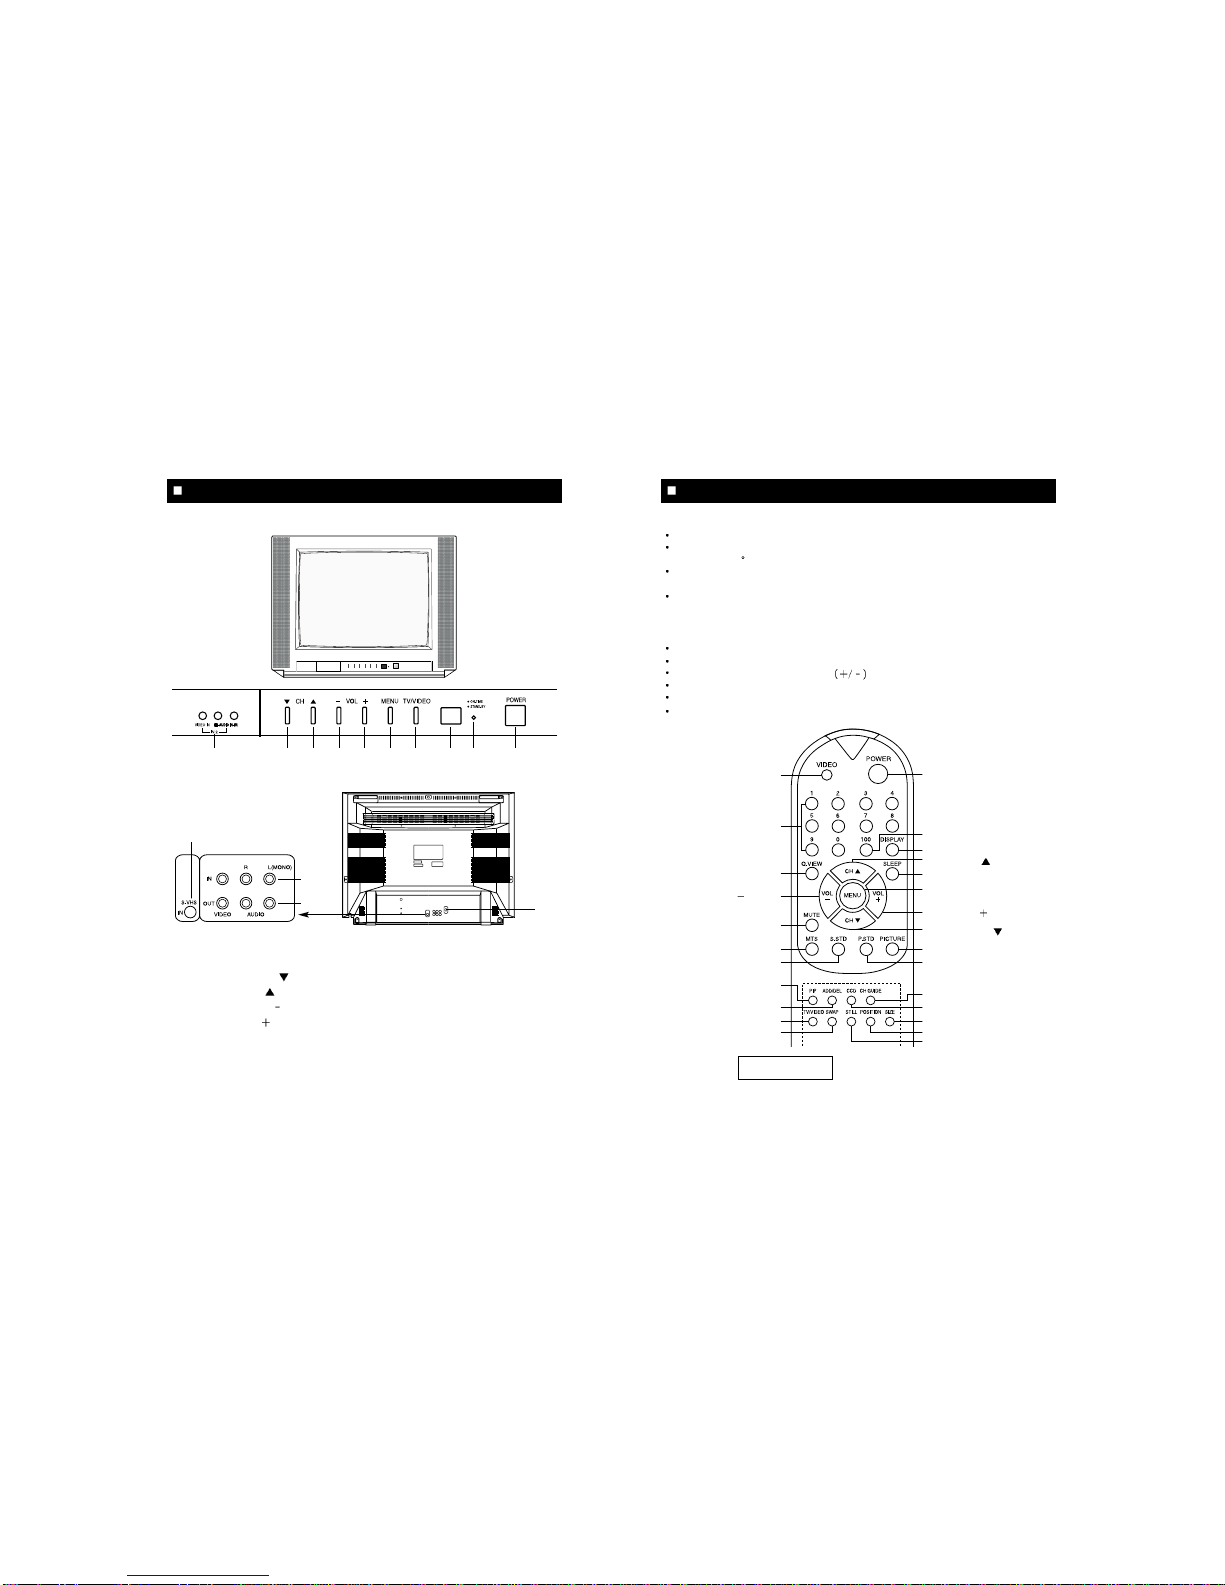
181-channel cable-compatible frequency synthesizer tuner with built-in MTS decoder
2 sets of A/V inputs (1 set each on front and rear panels)
Picture-in-Picture (1-tuner) (AVM-27D11 only)
Clock and Sleep/On-Off timer
Multi-color on-screen menu/display in English, French or Spanish
High-contrast dark picture tube
Closed-captioning decoder
Audio out jacks
Parental channel control (Channel Guard)
Auto channel programming
Automatic power shut-off in the absence of a signal
Remote control with MoonGlow
TM
keys for easy operation in a darkroom (uses 2 x AAA
batteries, not incl )
S-VHS Input
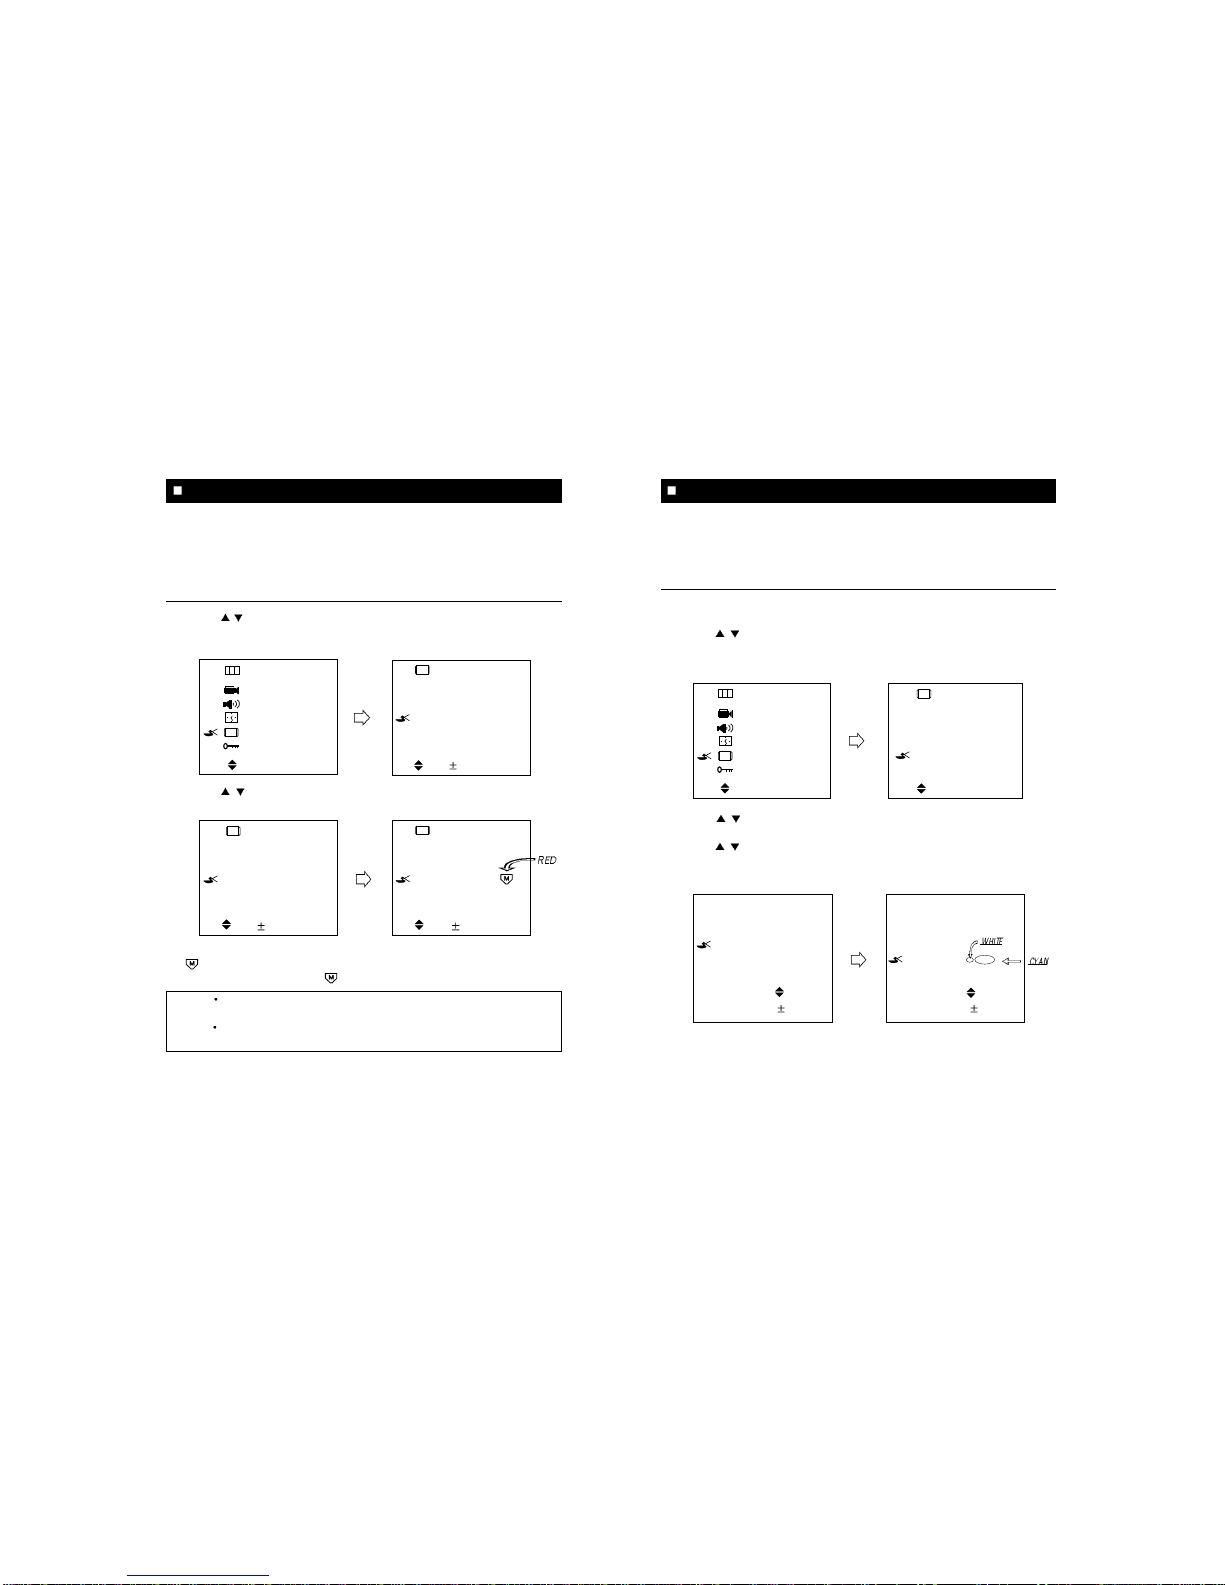
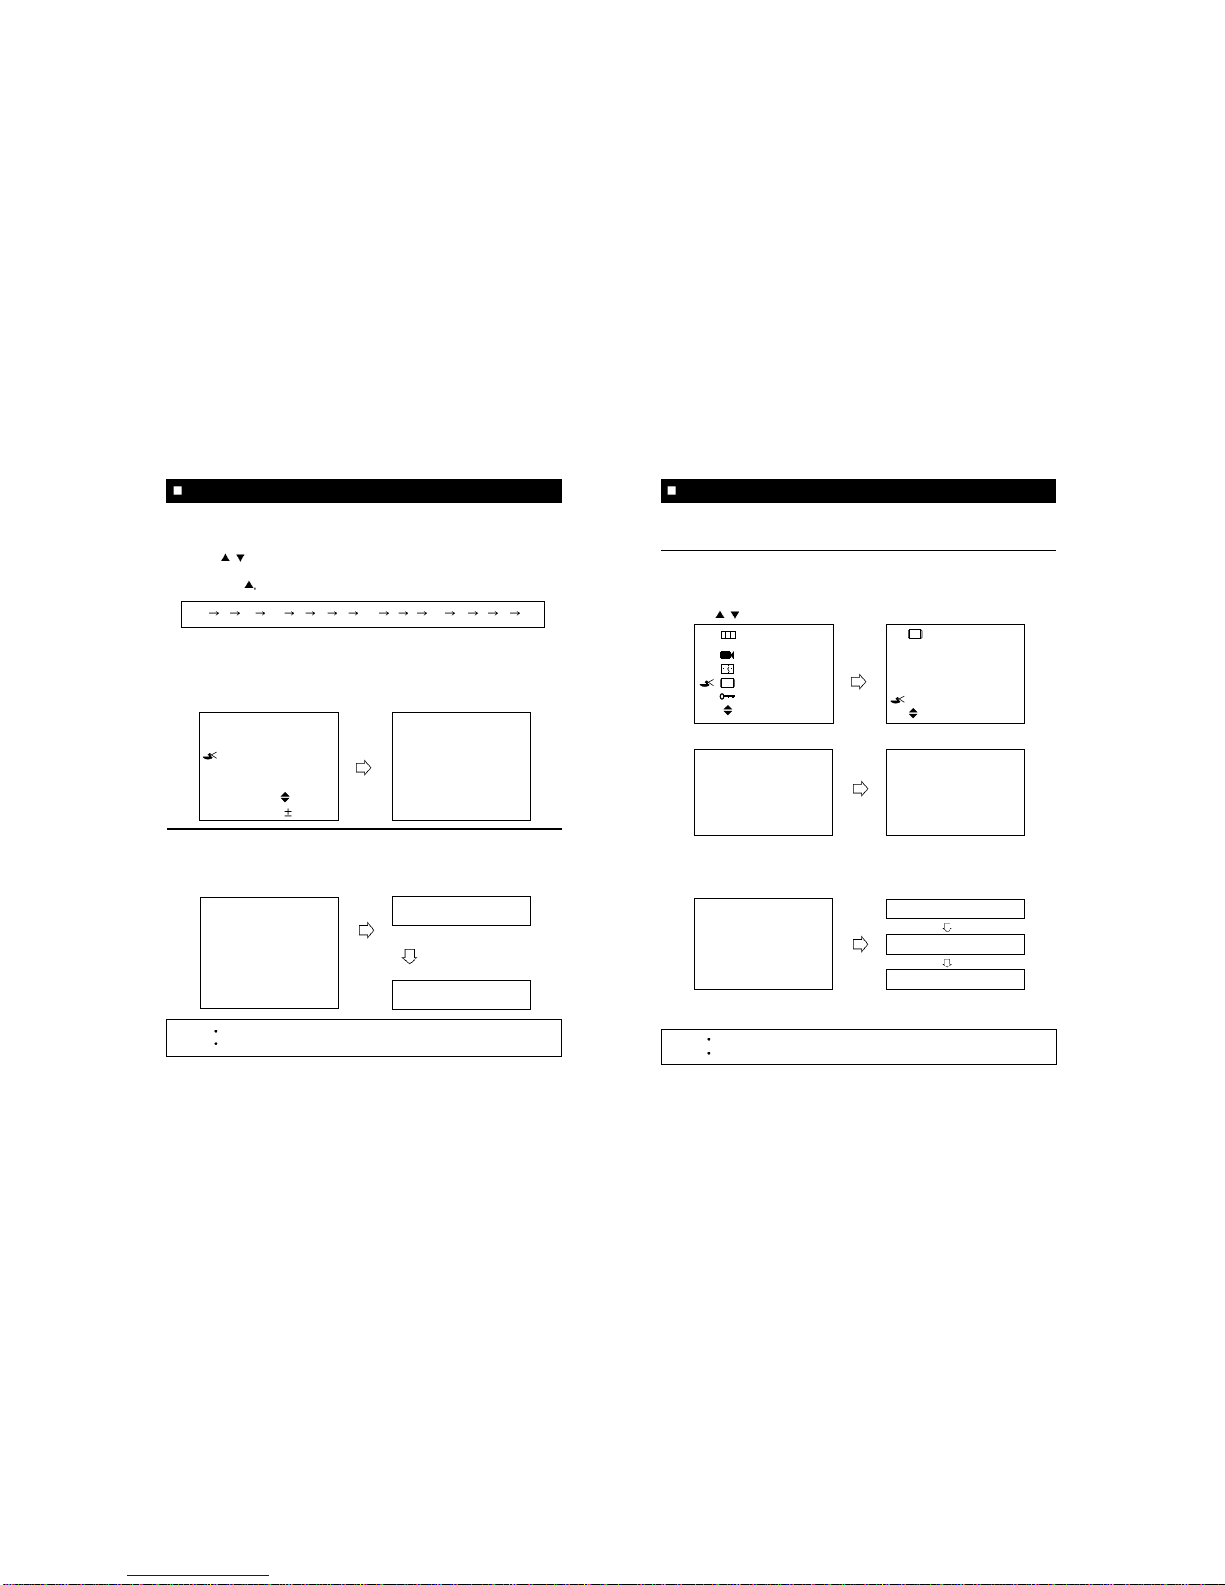
Not : Some illustrations in this manual may differ from the actual unit for explanation purposes
It is especially important that you read and follow the instructions under the heading :
"SET-UP" on page 13
5
TV/VIDEO Button Power Button
100 Button
Display Button
Channel Up ( ) Button
Sleep Button
Menu Button
Volume Up ( ) Button
Channel Down ( ) Button
Picture Button
Picture Standard Button
Ch Guide Button
CCD Button
PIP Size Button *
PIP Position Button *
PIP Still Button *
Number Buttons
Quick View Button
Volume Down ( ) Button
Mute Button
Mts Button
Sound Standard Button
* PIP On/Off Button
Add/Del Button
* PIP TV/VIDEO Button
* Swap Button
Point to remote control sensor of the TV set
The maximum operable distance is approximately 20 feet from the remote control sensor, and
not more than 30 to either side of center
The operation of the remote control is most effective when there is nothing between it and the
remote control sensor
The duration of the batteries is approximately 6 months to 1 year
Replace the batteries when the remote operation becomes unstable
BATTERY INSTALLATION
Slide down the cover
Press the indentation and lift up the cover
Correctly install the batteries, observing polarities as shown in the compartment
Do not use a combination of old and new batteries or different type of batteries
If batteries become exhausted, remove and replace them soon
When battery leakage occurs, clean the battery compartment with a soft cloth and replace the
batteries
USE OF THE REMOTE CONTROL
* AVM-27D11(only)
4
11
LOCATION OF CONTROLS
FRONT
1 Video/Audio 2 In Jacks
2 Channel Down ( ) Button
3 Channel Up ( ) Button
4 Volume Down ( ) Button
5 Volume Up ( ) Button
6 Menu Button
7 TV/Video Button
8 Remote Control Sensor
9 Stand-By Indicator
10 Power Button
11 Coaxial Cable Connector (75ohm)
12 Video / Audio 1 Input Jacks
13 Video / Audio Output Jacks
14
S-VHS Input Jack
REAR
12
13
14
1 2 3 4 5 678 9 10
76
CABLE TV (CATV) CONNECTION
A 75-ohm coaxial cable connector is built into the set for easy hookup
When connecting the 75 ohm coaxial cable to the set, screw the 75-ohm cable to the
COAXIAL CABLE CONNECTOR
Some cable TV companies offer "premium pay channels" Since the signals of these premium
pay channels are scrambled, a cable TV converter/descrambler is generally provided to the
subscriber by the cable TV company This converter/descrambler is necessary for normal
viewing of the scrambled channels (Set your TV to channel 3 or 4, as typically one of these
channels is used If this is unknown, consult your cable TV company One possible method of
utilizing the converter/descrambler provided by your cable TV company is explained below )
"A" position on the RF switch (not supplied)
You can view all unscrambled channels using the TV's channel keys
"B" position on the RF switch (not supplied)
You can view the scrambled channels via the converter/descrambler using the converter's
channel keys
NOTE : An RF switch equipped with position A/B (not provided) is required
Cable TV line
ANT/
Cable
Rear of TV
OUT IN
Cable TV converter/
descrambler
Two-set
signal
splitter
(not supplied)
RF switch (not supplied)
A
OUT IN
B
ANTENNA CONNECTION
ANTENNA
The antenna requirements for good color television reception are more important than those
for black & white television reception For this reason, a good quality outdoor antenna is
strongly recommended
The following is a brief explanation of the type of connections that are provided with the various
antenna systems:
OUTDOOR ANTENNA CONNECTION
Use one of the following two diagrams if you connect an outdoor antenna
A : Using a VHF/UHF combination outdoor antenna
B : Using separate VHF and/or UHF outdoor antenna
Connect an outdoor antenna cable lead-in to the COAXIAL CABLE CONNECTOR on the rear
of the TV set
1 A 75-ohm system is generally a round cable
with F-type connector that can easily be
attached to a terminal without tools
2 A 300-ohm system is a flat "twin-lead" cable
that can be attached to a 75 ohm terminal
through a 300-75 ohm ADAPTOR
300-ohm twin-lead cable (flat)
VHF/UHF ANTENNA
A. Combination VHF/UHF Ant nnas
B. S parat VHF/UHF Ant nnas
VHF ANTENNA UHF ANTENNA
300/75-ohm
ADAPTOR
(Not supplied) 300-ohm
twin-lead
300-ohm
twin-lead
300-ohm
twin-lead
75-ohm
coaxial cable
75-ohm coaxial cable
ANT/
CABLE
75Ω
ANT/
CABLE
75Ω
or
IN OUT
VHF/UHF ANTENNA
COMBINER
(not supplied)
REAR OF TV
REAR OF TV
75-ohm coaxial cable (round)
F-type connector
or
Prior to making any connections to your TV set, be sure to turn the POWER off
For a more detailed understanding of each connection, it is recommended that you read the
instruction manual for each connected component
If you use video or audio equipment placed near the TV, picture and/or sound may become
distorted due to interference between these components
In such a case, separate each piece of equipment at a sufficient distance
The following shows examples for connecting external equipment
Do not connect another audio source to the same speaker to which the TV set is connected;
otherwise it may damage the amplifier of the TV set or that of the other audio source
(1) R ar Input Jacks
Use these input jacks to connect your VCR or DVD player for viewing
1 A/V 1 IN jacks
2 S-VHS jack
To view a connected video source, press VIDEO button on the front panel or remote control
98
(2) Front Input Jacks
Please use the front jacks (VIDEO 2) for a GAME-PLAYER or CAMCORDER
To view a connected video source, press VIDEO button to set the TV to the VIDEO 2 mode
(3) Audio Syst m Conn ctors
The audio signal available at these jacks is the same as the audio source of the program being
monitored on this TV screen
1 Adjust the volume of the TV to minimum
2 Connect the AUDIO OUT jacks on the rear of the set with the AUDIO LINE IN jacks of your
audio system through an optional AUDIO/VIDEO cable
3 Set the INPUT SELECTION switch on the AMPLIFIER/AUDIO SYSTEM into the AUX
position and adjust the volume
NOTES You can hear the sound of TV in more vivid stereo through audio system
If you have no "AUX IN" jack on your audio system, connect to CD or Video jacks
L (MONO) R
VIDEO AUDIO TO VIDEO OUT
TO AUDIO OUTS
Video game,
Camcorder or VCR
SPEAKERS
AMPLIFIER/AUDIO SYSTEM
AUDIO LINE INs
VIDEO/AUDIO CONNECTIONS
NOTES In the case that sound output of your VCR is MONO, connect it to "AUDIO IN L
(MONO)" Jack of your TV Then the sound can be heard from both R and L
speakers
VHF/UHF
OUTPUT
TO VIDEO OUT
VCR or DVD
TO AUDIO OUT
TO VIDEO IN
TO AUDIO IN
S-VHS OUT
TO AUDIO OUT
TO AUDIO IN
DVD
8
from CATV
or antenna
This connection is optional
1110
1 Press POWER button to turn the TV on
2 Press MENU button and move the cursor to "SET UP" option and press VOL + button
The "SET UP" menu is displayed
3 Press VOL
+
button to select ANTENNA option (TV or CATV)
4 Press CH /buttons to place cursor on the "AUTO PROGRAM " option and press VOL
+
button
5 When you have finished "AUTO PROGRAMMING", press MENU button repeatedly until the
menu disappears
6 Press CH /buttons to select the channel you want
7 Press VOL
+
or VOL
-
buttons to adjust volume to your desired listening level
BASIC MENU OPERATION
SET UP
*ANTENNA : TV 2
*AUTOPROGRAM
*FINE TUNE : 00
*CH GUIDE
*CH GUARD
SEL + ENTER
AUTOPROGRAMMING
TV 2
+STOP
Th icon is us d as a cursor.
MENU
PICTURE
SOUND
TIME
SET UP
FUNCTION
SEL + ENTER
SET UP
*ANTENNA : TV 2
*AUTOPROGRAM
*FINE TUNE : 00
*CH GUIDE
*CH GUARD
SEL + SET
FIRST PREPARATIONS
Connect either Antenna or Cable TV according to "ANTENNA CONNECTION"
instructions on page 6
Insert batteries into the remote control unit according to "REMOTE CONTROL USE"
instructions on page 5
Insert the AC Cord Plug into a standard 120V, 60Hz polarized AC outlet
TURN ON/OFF THE TV
1 Press the "POWER" button on the front panel
or on the remote control
2 Press the same button again to turn the
television off
CHANNEL SELECTION
Use CHANNEL ( ) buttons on the remote control (or on the front panel)
Press the button to advance for the higher channels, and the button to go down for
the lower channels
Channels can be selected directly by using the number buttons on the remote control
For example, to select channel 5, press "0" first, then press "5"
For channel 120, press the 100 button first, then press "2", then "0"
VOLUME CONTROL
Pr ss VOLUME
+
/
-
buttons on either the
remote control or front panel to adjust volume to your
desired listening level
Pressing the
+
button will increase sound volume, and the
-
button will decrease sound volume
The volume level is displayed on the screen;
reference number (0-100) and bar scale as shown
NOTE : Certain channels have been preset at the factory It may be necessary to add or
erase some channels in your areas See "AUTO PROGRAMMING" on page 14 for
presetting channels
BASIC OPERATION
or
(Front panel)
POWER
POWER
(Remote control)
NOTE : The volume level can be muted instantly by pressing MUTE button on the remote
control See "MUTE Button" on page 38
VOLUME 25
1312
ANTENNA SELECTION
In this mode, you can change the broadcast mode between "TV" (for regular VHF/UHF
channels) and " CATV " (for cable channels)
1 Press MENU button, move the cursor to "SET UP" option and press VOL + button The "SET
UP" menu is displayed
2 Press CH /buttons to place the cursor on the "ANTENNA" option and press VOL +
button
You can select "TV" (on-air) or "CATV" (cable TV) broadcast mode
3 When you have finished "ANTENNA" mode selecting, press MENU button repeatedly until the
menus disappear
SET-UP
SET UP
*ANTENNA : TV 2
*AUTOPROGRAM
*FINE TUNE : 00
*CH GUIDE
*CH GUARD
SEL + SET
SET UP
*ANTENNA : CATV 2
*AUTOPROGRAM
*FINE TUNE : 00
*CH GUIDE
*CH GUARD
SEL + SET
SET UP
*ANTENNA : TV 2
*AUTOPROGRAM
*FINE TUNE : 00
*CH GUIDE
*CH GUARD
SEL + SET
MENU
PICTURE
SOUND
TIME
SET UP
FUNCTION
SEL + ENTER
You can execute every operation by pressing CH /buttons and VOL
+
/
-
buttons
alternately
If you learn one menu, you can easily operate other functions by viewing pictures
1 Pressing these buttons alternately makes
every operation easy
2 MOVE Press CH /buttons to move
cursor
3 SELECTION Press VOL
+
/
-
buttons to
change your selection
BASIC MENU OPERATION
MENU
PICTURE
SOUND
TIME
SET UP
FUNCTION
SEL + ENTER
FUNCTION
*CCD : OFF
*BLUE BACK : OFF
*LANGUAGE : ENGLISH
*
DEMONSTRATION
SEL + SET
TIME
*CLOCK : AM - - : - -
*SLEEP : OFF
*TIMER : OFF
*ON TIME : AM - - : - -
*
OFF TIME : AM
- - : - -
SEL + ENTER
SET UP
*ANTENNA : TV 2
*AUTOPROGRAM
*FINE TUNE : 00
*CH GUIDE
*CH GUARD
SEL + SET
PICTURE
75 CONTRAST
50 BRIGHTNESS
50 SHARPNESS
50 COLOR
00 TINT
SEL ADJ
SOUND
*50 BASS
*50 TREBLE
*50 BALANCE
*MTS : STEREO
ON AIR STEREO
SEL ADJ
1514
MANUAL MEMORY (chann l add/d l t )
1. TO ADD A CHANNEL
If you want to add to the memory a channel the TV does not store during AUTO PROGRAM,
follow these steps
Select a channel you want to view by using the number buttons on the remote control
Press "ADD/DEL" button on the remote control
The channel is added to memory and the color of the channel number changes from
magenta to green
2. TO DELETE CHANNEL
You can exclude the channels of your choice from the memorized channels
Follow these steps to delete the channel in the TV's memory
Press CH /buttons or use the number buttons to select a channel you want to delete
Press "ADD / DEL" button on the remote control
The channel is removed from the memory, and the color of the channel number changes
from green to magenta
SET-UP
CATV 12
CH DELETED
CATV 12
CH ADDED
CHANNEL ADDING CHANNEL DELETING
COLOR
: GREEN
COLOR
: MAGENTA
AUTO CHANNEL PROGRAMMING
This function allows the channels to be memorized automatically to match the TV broadcasts
and cable channels in your area
1 Press MENU button, move the cursor to "SET UP" option and press VOL + button The "SET
UP" menu is displayed
2 Press CH /buttons to place the cursor on the "AUTO PROGRAM" option and press
VOL + button
When tuned to an active channel in which TV program is broadcasted, this channel is
memorized and the color of the channel number changes from magenta to green
After all active channels were memorized, "SET UP" menu is displayed
3 When you have finished "AUTO PROGRAMMING", press MENU button repeatedly until the
menu disappears
SET-UP
NOTES If the broadcast signal is weak, the channel will not be memorized
If you wish to stop this procedure during the operation, press VOL + button
AUTOPROGRAMMING
TV 2
+STOP
SET UP
*ANTENNA : TV 2
*AUTOPROGRAM
*FINE TUNE : 00
*CH GUIDE
*CH GUARD
SEL + ENTER
MENU
PICTURE
SOUND
TIME
SET UP
FUNCTION
SEL + ENTER
SET UP
*ANTENNA : TV 2
*AUTOPROGRAM
*FINE TUNE : 00
*CH GUIDE
*CH GUARD
SEL + ENTER
1716
CHANNEL GUIDE
You can choose up to 5 channels and assign them to the Channel Guide (CH GUIDE)
This function allows you to select your favorite channels easily
CH GUIDE PRESETTING
1 Press CH /buttons or use the number buttons to select a channel you want
2 Press MENU button, move the cursor to "SET UP" option and press VOL
+
button The "SET
UP" menu is displayed
3 Press CH /buttons to place cursor on the "CH GUIDE" option and press VOL
+
button
The "CH GUIDE" menu is displayed
4 Press CH /buttons to select your favorite channel and press a number button (1 to 5) on
the remote control
Then the cursor will be at the "LETTERS" option
The color of the first selected character (
-
) will change from cyan into white
SET-UP
CH GUIDE
CATV 23
* GUIDE NO : 1
*LETTERS : ----
A/D : MEMO SEL
MENU : EXIT MOVE
CH GUIDE
CATV 23
*GUIDE NO : -
*LETTERS : ----
PRESS 1-5 NOW
A/D : MEMO SEL
MENU : EXIT MOVE
SET UP
*ANTENNA : TV 2
*AUTOPROGRAM
*FINE TUNE : 00
*CH GUIDE
*CH GUARD
SEL + ENTER
MENU
PICTURE
SOUND
TIME
SET UP
FUNCTION
SEL + ENTER
FINE TUNING
If the reception is clear, you do not have to fine-tune the channel, as this is done automatically
during auto program and manual memory
If, however, the signal is weak or distorted, you may have to fine-tune the channel manually
1 Press CH /buttons or use the number buttons to select a channel you want to adjust
2 Press MENU button, move the cursor to "SET UP" option and press VOL
+
button The "SET
UP" menu is displayed
3 Press CH /buttons to place the cursor on the "FINE TUNE" option
4 Use VOL
+
/
-
buttons until you obtain a sharp and clear picture and good sound quality
5 If you wish to memorize the fine-tuned frequency for the channel, press ADD/DEL button The
[ ] symbol (red color) appears to the right of the channel number To delete the memory,
press the same button again The [ ] symbol disappears
SET-UP
MENU
PICTURE
SOUND
TIME
SET UP
FUNCTION
SEL + ENTER
NOTES The AFT (Automatic Frequency Tuning) mode does not operate on the channels
that are fine-tuned
After the Auto Channel Programming has been performed, memorized channels
are automatically tuned to their optimum frequencies
SET UP
*ANTENNA : TV 2
*AUTOPROGRAM
*FINE TUNE : 00
*CH GUIDE
*CH GUARD
SEL ADJ A/D: MEMO
SET UP
*ANTENNA : TV 2
*AUTOPROGRAM
*FINE TUNE : 00
*CH GUIDE
*CH GUARD
SEL ADJ A/D: MEMO
SET UP
*ANTENNA : TV 2
*AUTOPROGRAM
*FINE TUNE : 12
*CH GUIDE
*CH GUARD
SEL ADJ A/D: MEMO
1918
CHANNEL GUARD
With this feature, you can protect your children from viewing violent or other inappropriate TV programs
I.D. NUMBER PRESETTING
1 Press MENU button and move the cursor to "SET UP" option; press VOL + button then the
"SET UP" menu is displayed
Press CH /buttons to move cursor to the "CH GUARD" option and press VOL + button
2 Press "0" twice then "CH GUARD" menu is displayed
3 Press "3" to enter a 3-digit I D NUMBER of your choice, then "SET ID NO _ _ _" is
displayed The selected characters will change from cyan to magenta color
After you finished entering your I D NUMBER, "SET ID NO XXX ENTERED" is displayed
4 When you have finished
"
ID NO SETTING
"
, press MENU button repeatedly until the menus
disappear
SET-UP
CH GUARD
SET ID NO _ _ _
e g ) If ID No is "1 2 3"
NOTES Memorize the I D NUMBER as you need it to select guarded channels
If you wish to change the I D NUMBER, repeat the procedure
SET UP
*ANTENNA : TV 2
*AUTOPROGRAM
*FINE TUNE : 00
*CH GUIDE
*CH GUARD
SEL +ENTER
MENU
PICTURE
TIME
SET UP
FUNCTION
SEL +ENTER
CHANNEL GUARD
1 SET 2 CANCEL
3 SET ID NO
1 2
3 4
CHANNEL GUARD
1 SET 2 CANCEL
3 SET ID NO
1 2
3 4
SET ID NO 1 2 3
SET ID NO 1 2 3 ENTERED
CH GUIDE PRESETTING
5 Press CH /buttons to select characters for station name (if desired) and press VOL
+
/
-
buttons The color of the next character changes into white
If you press CH the characters appear sequentially as follows :
6 Press "ADD / DEL" button on the remote control, then this channel is memorized in the "CH
GUIDE LIST"
7 Repeat the process from steps 4 to 6 until you complete "CH GUIDE"
8 After you have finished "CH GUIDE", press MENU button "CH GUIDE LIST" will be
displayed for a few seconds
SELECTING A CHANNEL BY CH GUIDE LIST
1 Press CH GUIDE button, then CH GUIDE LIST will be displayed
2 Press a number button (1-5), then selected channel will appear
SET-UP
NOTES The selected channel is changed directly regardless of ANTENNA mode
At the video mode, CH GUIDE button does not operate
A B C X Y Z
-
0 18 9 A B
CH GUIDE LIST
1 CATV 112 ABC1
2 CATV 49 KBS
3 CATV 11 BBC
4 CATV 12 CNN
5 CATV 2 ABC5
PRESS 1-5 NOW
CH GUIDE
CATV 2
*GUIDE NO : 5
*LETTERS : A B C 5
A/D : MEMO SEL
MENU : EXIT MOVE
CH GUIDE LIST
1 CATV 112 ABC1
2 CATV 49 KBS
3 CATV 11 BBC
4 CATV 12 CNN
5 CATV 2 ABC5
PRESS 1-5 NOW
TV 2
e g
if you press "1",
TV 2 channel changes
to CATV 112
112
CATV
P.STD (Pictur Standard) BUTTON
By pressing the P STD button on the remote control, you can sequentially select any one of the
four possible picture standard presets
(1) CUSTOM mode
(2) STANDARD mode
(3) DYNAMIC mode
(4) MILD mode
2120
PICTURE ADJUSTMENT
MODE PICTURE
CUSTOM Select this mode to use your customized picture setting
See next page
Select this mode to use the
factory-presetting standard picture setting
Select this mode
-To emphasize more contrast
-To watch in the brighter (daylight) environments
Select this mode
- For soft contrast
- When the room is dark
- To lessen eye fatigue
STANDARD
DYNAMIC
MILD
CH GUARD SETTING/CANCELLING
1
Press CH /buttons or number buttons to select the channel you wish to guard or cancel the guard
2 Press MENU button and move the cursor to "SET UP" option; press VOL + button then the
"SET UP" menu is displayed
3 Press "0" twice then "CH GUARD" menu is displayed
4 Press 1 or 2 to set or cancel a channel SET/CANCEL menu is displayed
5 Press a number (1 to 4) to select or cancel the current channel you are viewing
SELECT THE GUARDED CHANNEL
1
Press number buttons to select a guarded channel
2 Enter I D NUMBER then
"
_
"
will change to
"
?
"
If the I D NUMBER is right, the desired channel
will be received
If I D NUMBER is wrong, “INVALID ID NUMBER” will display and the desired channel cannot be selected
SET-UP
CH GUARD
NOTES If you wish to set/cancel another channel, repeat procedure
Auto channel programming does not select guarded channels
SET UP
*ANTENNA : TV 2
*AUTOPROGRAM
*FINE TUNE : 00
*CH GUIDE
*CH GUARD
SEL +ENTER
MENU
PICTURE
TIME
SET UP
FUNCTION
SEL +ENTER
CHANNEL GUARD
1 SET 2 CANCEL
3 SET ID NO
1 CATV 13 2 CATV 2
3 CATV 24 4 CATV 36
SELECT NO
1 CATV 13 2
3 4
SELECT NO
1 2
3 4
e g ) CATV 13 cancelled
(The selected channel will change
from cyan to magenta color)
ENTER ID NO _ _ _ ENTER ID NO ? ? ?
SET
MODE CANCEL
MODE
2322
PICTURE ADJUSTMENT
If you select this mode, you can directly adjust "BRIGHTNESS" without "MENU" option
e.g. : Bright. A justment by "PICTURE" button.
Press the "PICTURE" button on the
Remote Control
"PICTURE" menu is displayed
Move the Cursor to
BRIGHTNESS
by
pressing the CH /buttons and press
the VOL +/- buttons
Adjust "BRIGHTNESS" by VOL +/-
buttons
When you have finished
BRIGHTNESS
adjustment, press "PICTURE"
repeatedly until the menus disappear
11
11
22
22
33
33
BRIGHTNESS 50
44
44
PICTURE
PICTURE
PICTURE
75 CONTRAST
50 BRIGHTNESS
50 SHARPNESS
50 COLOR
00 TINT
SEL ADJ
PICTURE
75 CONTRAST
50 BRIGHTNESS
50 SHARPNESS
50 COLOR
00 TINT
SEL ADJ
CUSTOM (MANUAL) ADJUSTMENT
You can sequentially select and adjust one of five picture properties
Contrast, Brightness, Color, Sharpness or Tint
Press the MENU button Move the
cursor to PICTURE by pressing the CH
/buttons and press the VOL
+
button
Move the cursor to CONTRAST by
pressing the CH /buttons and
press the VOL
+
/
-
buttons
Adjust "CONTRAST" with VOL
+
/
-
buttons
When you have finished contrast
adjustment, press MENU repeatedly until
the menus disappear
PICTURE ADJUSTMENT
11
11
MENU
PICTURE
SOUND
TIME
SET UP
FUNCTION
SEL + ENTER
22
22
33
33
44
44
PICTURE
75 CONTRAST
50 BRIGHTNESS
50 SHARPNESS
50 COLOR
00 TINT
SEL ADJ
CONTRAST 75
2524
SOUND MENU
You can sequentially select and adjust one of four sound properties (BASS, TREBLE,
BALANCE and MTS)
Press the MENU button Move the
cursor to SOUND by pressing the CH /
buttons and press the VOL +
button
Move the cursor to TREBLE by pressing
the CH /buttons
Press the VOL
+
/
-
buttons
The sound level is adjusted
SOUND ADJUSTMENT
11
11
22
22
33
33
MENU
PICTURE
SOUND
TIME
SET UP
FUNCTION
SEL + ENTER
TREBLE 50
SOUND
*50 BASS
*50 TREBLE
*00 BALANCE
*MTS : STEREO
ON AIR
SEL ADJ
S.STD (Sound Standard) BUTTON
There is a choice of five audio settings By pressing the S STD button, the five settings can be
viewed in the sequence illustrated
1 Press S STD button
Whenever this button is pressed, the mode will be changed as follows
SOUND ADJUSTMENT
Select this mode to hear the adjusted sound you want See
next page
CUSTOM
Select this mode to use the factory presetting
STANDARD
Select this mode when listening to music
MUSIC
Select this mode when viewing a movie
MOVIE
Select this mode to hear voices clearly
SPEECH
CUSTOM STANDARD MUSIC MOVIE SPEECH
2726
MTS
2) USING SOUND MENU : METHOD 2
Press the MENU button Move the
cursor to SOUND by pressing the CH
/buttons and press the VOL
+
button
Move the cursor to MTS by pressing the
CH /buttons
Press the VOL
+
/
-
buttons
Whenever this button is pressed, the mode will be changed as follows
SOUND ADJUSTMENT
11
11
22
22
33
33
STEREO SAP MONO
MENU
PICTURE
SOUND
TIME
SET UP
FUNCTION
SEL + ENTER
SOUND
*50 BASS
*50 TREBLE
*00 BALANCE
*MTS : STEREO
ON AIR
SEL
+
SET
SOUND
*50 BASS
*50 TREBLE
*00 BALANCE
*MTS : STEREO
ON AIR
SEL
+
SET
SOUND
*50 BASS
*50 TREBLE
*00 BALANCE
*MTS : SAP
ON AIR
SEL
+
SET
MTS
1) USING MTS BUTTON : METHOD 1
Your TV set incorporates an MTS (Multichannel Television Sound) decoder to receive stereo
broadcasts and any accompanying SAP (Second Audio Program), such as a bilingual
broadcast
1 Press the MTS button
Whenever this button is pressed, the reception mode will be changed as follows
The " ", " " symbols indicate that MTS mode is being broadcasted
STEREO symbol (RED color)
SAP symbol (RED color)
When the power is switched on or channel is changed, the " ", " " symbols are
automatically displayed, depending on the current broadcast
SOUND ADJUSTMENT
NOTES
If the received signal is weak, noise may be heard
In such a case, press MTS button to set to the MONO mode for better sound reception
If the received SAP signal is weak, the SAP will not be heard
Even if both STEREO and SAP broadcasts are received, both broadcasts cannot be
heard at the same time
Transmission of CABLE TV signals may differ from off-air TV broadcasts
TV 2
STEREO SAP MONO
2928
SLEEP TIMER : METHOD 1
You can select a sleep time period from 15 through 90 minutes The television automatically
shuts off after the sleep time period
Whenever the SLEEP button on the remote control is pressed, the time is changed :
SLEEP TIMER : METHOD 2
Press MENU button, move the cursor to
"TIME" option and press VOL + The
"TIME" menu is displayed
Press CH /buttons to place cursor
on the "SLEEP" option
Press VOL + button and press CH /
buttons to set between 15 to 90 minutes
Press the "MENU" button to return to
the main menu
CLOCK/TIMER
NOTE :
To cancel the sleep timer function, press SLEEP button repeatedly until the word
" OFF " is displayed
11
11
22
22
33
33
44
44
OFF 15 30 45 60 90
MENU
PICTURE
SOUND
TIME
SET UP
FUNCTION
SEL + ENTER
TIME
*CLOCK : AM 11 : 30
*SLEEP : OFF
*TIMER : OFF
*ON TIME : AM - - : - -
*OFF TIME : AM - - : - -
SEL + ENTER
TIME
*CLOCK : AM 11 : 30
*SLEEP : 15
*TIMER : OFF
*ON TIME : AM - - : - -
*OFF TIME : AM - - : - -
ADJ + SET
CLOCK
You can set the television’s clock so that the current time will be displayed when you press the
MENU button on the remote control
You must set the current time before you can set the automatic On/Off timer
Press MENU button and move to
"TIME"option by using CH /
buttons
Press VOL
+
button and press it again
Adjust "HOUR" with CH /buttons
Whenever these buttons are pressed,
the hour indication increases or
decreases by 1
Press VOL + button and adjust
"MINUTE" by using CH /buttons
Whenever these buttons are pressed,
the minute indication increases or
decreases by 1
Press the "MENU"button to return to the
main menu
CLOCK/TIMER
11
11
22
22
33
33
44
44
MENU
PICTURE
SOUND
TIME
SET UP
FUNCTION
SEL + ENTER
TIME
*CLOCK : AM - - : - -
*SLEEP : OFF
*TIMER : OFF
*ON TIME : AM - - : - -
*OFF TIME : AM - - : - -
MOVE ADJ
TIME
*CLOCK : AM 12 : 00
*SLEEP : OFF
*TIMER : OFF
*ON TIME : AM - - : - -
*OFF TIME : AM - - : - -
MOVE ADJ
3130
CLOCK/TIMER
Move the cursor to "ON TIME" by using
CH /buttons and press the VOL
+
/
-
buttons to set the time (Refer to
page 28)
"ON " appears to show that the "ON TIME"
has started and STAND BY indicator
changes to green
W
hen the power is OFF after TIMER is
set, the STAND BY indicator changes to
orange
Move the cursor to "OFF TIME" by using
CH /buttons and press the VOL
+
/
-
buttons to set the time (refer to
page 28)
Press "MENU" to return to the main
menu
AUTOMATIC POWER-OFF MODE
If the set is not switched off when the TV station stops broadcasting, it will automatically go to
power-off mode after 15 minutes
44
44
55
55
66
66
NOTES If you set "ON TIME" and "OFF TIME" with the same time, "NOT AVAILABLE "
message will be displayed
If the power is disconnected (in case of a power failure) and reapplied later, the
clock operation will stop
TIME
*CLOCK : AM 11 : 30
*SLEEP : OFF
*TIMER : ON
*ON TIME : AM 07 : 30
*OFF TIME : AM - - : - -
MOVE ADJ
TIME
*CLOCK : AM 11 : 30
*SLEEP : OFF
*TIMER : ON
*ON TIME : AM 07 : 30
*OFF TIME : AM 10 : 15
MOVE ADJ
CLOCK/TIMER
ON/OFF TIMER
The ON/OFF timer lets you use alarm and automatic off functions
Press MENU button
The "MENU" is displayed on the
screen
Move the cursor to TIME by pressing the
CH /buttons and press the VOL +
button
"TIME" menu is displayed on the
screen
Move the cursor to TIMER by using CH
/buttons and press VOL + button
to set TIMER ON
NOTES If you have not yet set the television’s clock, the message "CLOCK STOPPED"
is displayed
If this happens, refer to "CLOCK" on page 28
11
11
22
22
33
33
MENU
PICTURE
SOUND
TIME
SET UP
FUNCTION
SEL + ENTER
MENU
PICTURE
SOUND
TIME
SET UP
FUNCTION
SEL + ENTER
TIME
*CLOCK : AM 11 : 30
*SLEEP : OFF
*TIMER : ON
*ON TIME : AM - - : - -
*OFF TIME : AM - - : - -
SEL + SET
3332
FUNCTIONS
LANGUAGE
You can select language among ENGLISH, SPANISH, PORTUGUESE and FRENCH by
pressing VOL
+
button
FUNCTION
*CCD : OFF
*BLUE BACK : OFF
*LANGUAGE : ENGLISH
*DEMONSTRATION
SEL + SET
FUNCTION
*CCD : NO
*PANTALLA AZUL : NO
*IDIOMA : ESPAÑOL
*DEMONSTRATION
ELI + FIJAR
DEMONSTRATION
All the MENU pages appear repeatedly in sequence
To stop Demonstration, press any button
DEMONSTRATION SEQUENCE
DEMONSTRATION MENU PICTURE P STD SOUND S STD TIME
DISPLAY FUNCTION SET UP SLEEP
DEMONSTRATION
FUNCTION
*CCD : OFF
*BLUE BACK : OFF
*LANGUAGE : ENGLISH
*DEMONSTRATION
SEL + ENTER
32
FUNCTIONS
1 Press the MENU button Move the cursor to FUNCTION by pressing the CH /buttons
Make a selection by pressing the VOL + button
CCD (Clos d Caption D cod r)
You can select closed caption mode
Press CCD button on the remote control to change selections as follows :
BLUE BACKGROUND
When there is no picture signal or the signal is weak, the screen reverts to a solid blue
color
Disable this feature to watch very weak signals
MENU
PICTURE
SOUND
TIME
SET UP
FUNCTION
SEL + ENTER
MENU
PICTURE
SOUND
TIME
SET UP
FUNCTION
SEL + ENTER
* Refer to page 38(CCD)
FUNCTION
*CCD : OFF
*BLUE BACK : OFF
*LANGUAGE : ENGLISH
*DEMONSTRATION
SEL + SET
FUNCTION
*CCD : OFF
*BLUE BACK : OFF
*LANGUAGE : ENGLISH
*DEMONSTRATION
SEL + SET
FUNCTION
*CCD : CAP1
*BLUE BACK : OFF
*LANGUAGE : ENGLISH
*DEMONSTRATION
SEL + SET
OFF CAP1 CAP2 TEXT1 TEXT2
FUNCTION
*CCD : OFF
*BLUE BACK : OFF
*LANGUAGE : ENGLISH
*DEMONSTRATION
SEL + SET
FUNCTION
*CCD : OFF
*BLUE BACK : ON
*LANGUAGE : ENGLISH
*DEMONSTRATION
SEL + SET
3534
1. PIP ON/OFF
Press PIP ON/OFF button on the remote control and then the PIP window will be
displayed as shown below
2. PIP POSITION
Press POSITION button and then the position of PIP window will be moved as shown below
CATV13 CATV13
VIDEO
1/16
Main screen picture (GREEN)
PIP window picture (YELLOW)
PICTURE-IN-PICTURE (PIP)
AVM-27D11 only
PICTURE-IN-PICTURE (PIP)
PIP OPERATION :
In this mode, you can enjoy viewing two programs at the same time
The "PIP" function enables you to enjoy the present broadcast program while viewing a
video source (Eg video tape, CD, DVD)
Also, It enables you to view two TV channels at the same time, using a VCR with a built-in
tuner
(1) ANTENNA AND VIDEO/AUDIO CONNECTION
Please connect your TV set with a VCR, using VIDEO/AUDIO cables and the coaxial
cable
(2) How to vi w two chann ls at th sam tim
Press the PIP ON/OFF button on the remote control
(Eg You are watching CATV 13 Channel)
Turn on the VCR and press the channel up/down button on your VCR to select another
channel
(If you press the "PLAY" button on your VCR, the video tape playback will be seen
CATV13 CATV13
VIDEO1
AVM-27D11 only
VHF/UHF
OUTPUT
TO VIDEO OUT
VCR
TO AUDIO OUT
TO VIDEO IN
TO AUDIO IN
from CATV
or antenna
3736
Also, you can use the TV/VIDEO button in the VIDEO mode
6. PIP SWAP
Press SWAP button to swap pictures between the main screen and the PIP window
CATV13
VIDEO1
MAIN
VIDEO1
CATV13
PIP MAIN
PIP
PICTURE-IN-PICTURE (PIP)
VIDEO1
CATV13 VIDEO1
VIDEO1
A/VTV
VIDEO1
VIDEO2
A/V
AVM-27D11 only
3. PIP SIZE
Press SIZE button and then the size of the PIP window will be toggled as shown below
4. PIP STILL
Press STILL button and then the PIP picture will freeze frame
5. PIP TV/VIDEO
Press TV/VIDEO button on the remote control and then the PIP picture mode will be toggled
as shown below
The Component Video Input cannot be toggled
1/36
1/16 1/9
(picture is active) (picture freezes)
PICTURE-IN-PICTURE (PIP)
CATV 13
CATV 13 CATV 13
VIDEO 1
A/VTV
CATV 13
VIDEO 2
A/V
TV VIDEO1 VIDEO2
AVM-27D11 only
3938
The most common types of television interference are as follows:
IGNITION :
Black spots or horizontal lines may appear; picture may flutter or
drift Usually caused by interference from automobile ignition
systems, neon lamps, electric drills and other electric appliances
GHOSTS:
Ghosts are caused by the television signal following two paths One
is the direct path and the other is reflected from tall buildings, hills
or other objects Changing the direction or position of the antenna
may improve the reception
SNOW:
If you are located on the fringes of a television reception area, the
signal will be weak, and your picture may contain many small dots
When the signal is extremely weak, it may be necessary to install
an external antenna to improve the picture
RADIO FREQUENCY INTERFERENCE:
This interference produces moving ripples or diagonal streaks, and
in some cases causes loss of contrast in the picture
PICTURE SIZE VARIATION:
A slight variation in picture size is normal when you adjust the
CONTRAST or BRIGHTNESS controls
To prevent fire of shock hazard, disconnect your unit from the AC power source when cleaning
The finish on the receiver may be cleaned with a dust cloth and cared for as other furniture
Use caution when cleaning and wiping the plastic parts Mild soap and a soft, damp cloth may be
used
NOTE: If you subscribe to a cable service and any these symptoms appear, the problem may
be caused by the cable company
RECEPTION DISTURBANCE
CARE AND MAINTENANCE
OTHER USEFUL FUNCTIONS
CCD :
This TV set incorporates a CCD (Closed Caption Decoder) to enable viewing closed captions
and TEXT broadcasts
Closed caption and TEXT each has 2 channels (CH1 & CH2)
Closed caption and TEXT information can only be viewed if they are being broadcast by a
television station, or contained in a videotape or videodisc
Press the CCD button to select CCD mode
CAPTION OPERATION AND CHARACTERISTICS :
After the set is turned on, caption signals will be displayed on screen (if broadcasted) in about
10 seconds Once activated, the television will always remain in caption mode unless
deactivated by the CCD button
Captions appear on screen in various positions where they will least interfere with the picture
Generally captions will be displayed at the top or bottom of the screen
It is common to see unusual characters or misspelled words appearing in the caption This is
especially true during a live broadcast as captions are created while the program is in
progress
QUICK VIEW Button : Press Q VIEW button on the remote control The previously viewed
channel will appear on the screen Press Q VIEW again to switch back to the original channel
Repeatedly pressing Q VIEW switches between these two channels
DISPLAY BUTTON : Press DISPLAY button on the remote control The channel number of
the program you are viewing, the TIMER settings and the current time are displayed in
sequence
The current time remains displayed on the screen, until DISPLAY button is pressed again
MUTE BUTTON : Press MUTE button on the remote control The sound of the TV program
being viewed will be reduced to zero and "MUTE" will appear on the screen
To restore normal sound, press MUTE again
NOTES
When any function is displayed on screen, captions cannot be seen Captions will reappear
after display disappears
Errors will occur in captioning if the signal is weak or the videotape/videodisc is poorly recorded
A videotape that has been recorded over numerous times can also cause caption malfunction
NOTE : Changing the audio volume also restores the sound
OFF CAP1 CAP2 TEXT1 TEXT2

This manual suits for next models

1

Other Sanyo CRT TV manuals

Sanyo DS27425 User manual

Sanyo

Sanyo DS27425 User manual

Sanyo HT28745 User manual

Sanyo

Sanyo HT28745 User manual

Sanyo DS24425 User manual

Sanyo

Sanyo DS24425 User manual

Sanyo CE28WN3-B User manual

Sanyo

Sanyo CE28WN3-B User manual

Sanyo DS13390, DS19390, DS25390 User manual

Sanyo

Sanyo DS13390, DS19390, DS25390 User manual

Sanyo DS2722 DS27225 User manual

Sanyo

Sanyo DS2722 DS27225 User manual

Sanyo AVM-1341S User manual

Sanyo

Sanyo AVM-1341S User manual

Sanyo DS31810 User manual

Sanyo

Sanyo DS31810 User manual

Sanyo AVM-2760S User manual

Sanyo

Sanyo AVM-2760S User manual

Sanyo DP19648 - 19" LCD TV User manual

Sanyo

Sanyo DP19648 - 19" LCD TV User manual

Sanyo DS27910 User manual

Sanyo

Sanyo DS27910 User manual

Sanyo DS13204 User manual

Sanyo

Sanyo DS13204 User manual

Sanyo Vizzon HT27546 User manual

Sanyo

Sanyo Vizzon HT27546 User manual

Sanyo HT30746 User manual

Sanyo

Sanyo HT30746 User manual

Sanyo AVM-2550S, AVM-2759S User manual

Sanyo

Sanyo AVM-2550S, AVM-2759S User manual

Sanyo DS25320 User manual

Sanyo

Sanyo DS25320 User manual

Sanyo Vizzon HT32546 User manual

Sanyo

Sanyo Vizzon HT32546 User manual

Sanyo DS32920 User manual

Sanyo

Sanyo DS32920 User manual

Sanyo DS35520 User manual

Sanyo

Sanyo DS35520 User manual

Popular CRT TV manuals by other brands

Philips 21PT5457 Product information

Philips

Philips 21PT5457 Product information

Panasonic CT-27G23 operating manual

Panasonic

Panasonic CT-27G23 operating manual

Philips 29PT4643 Specifications

Philips

Philips 29PT4643 Specifications

Toshiba 13A26C owner's manual

Toshiba

Toshiba 13A26C owner's manual

Telefunken TRU-FLAT TTV-29TM Insrtructions for use and care

Telefunken

Telefunken TRU-FLAT TTV-29TM Insrtructions for use and care

Philips 21PT1546 Specifications

Philips

Philips 21PT1546 Specifications

JVC AV 27150 user guide

JVC

JVC AV 27150 user guide

Toshiba 27AF41 owner's manual

Toshiba

Toshiba 27AF41 owner's manual

Sylvania SRT2027 owner's manual

Sylvania

Sylvania SRT2027 owner's manual

Hitachi 32FX41B, 32UX51B, 36FX42B, 36UX52B, 36CX35B operating guide

Hitachi

Hitachi 32FX41B, 32UX51B, 36FX42B, 36UX52B, 36CX35B operating guide

Zenith Z19A02 operating guide

Zenith

Zenith Z19A02 operating guide

Magnavox 23MT2336/17 user guide

Magnavox

Magnavox 23MT2336/17 user guide

Magnavox MT2501C Directions for use

Magnavox

Magnavox MT2501C Directions for use

Philips Matchline 36PW9308 Technical specifications

Philips

Philips Matchline 36PW9308 Technical specifications

JVC AV-21V311, AV-21V511, AV-21V53 instructions

JVC

JVC AV-21V311, AV-21V511, AV-21V53 instructions

JVC I'Art AV-27MF36 user guide

JVC

JVC I'Art AV-27MF36 user guide

Sharp 56FW-53H Operation manual

Sharp

Sharp 56FW-53H Operation manual

Philips COLOR TV 27 INCH TABLE TS2754C brochure

Philips

Philips COLOR TV 27 INCH TABLE TS2754C brochure

manuals.online logo
manuals.online logoBrands
  • About & Mission
  • Contact us
  • Privacy Policy
  • Terms and Conditions

Copyright 2025 Manuals.Online. All Rights Reserved.