SCANDINOVA FF 6-6853 User manual

Please read these Operating Instructions carefully before
switching on your Fridge Freezer for the first time. They are
brief and contain only information which will help you to
obtain the best results from your appliance. Take care of
this booklet and all accessories supplied with this unit.
Operating
Instructions
for the
FF 6-6853
FridgeFreezer
95.63.576.02

2
CONTENTS
Introduction and
Technical Data
Introduction .....................................3
Technical Data .................................3
Safety Instructions
Electrical Requirements.................4
Installing your Fridge
Freezer
Installation ...................................5-6
Beforeuse ...................................... 5
Getting to know the Controls
Getting to know the Controls .......... 7
How to use your Fridge
Freezer
Operating the Fridge Freezer ........8
Fridge Section (Auto Defrost) ........ 8
Cabinet facilities.............................9
Freezer Section ............................11
Freezing Fresh Foods ..................11
Thawing Frozen Foods ................ 11
Maintenance and Cleaning..........13
Defrosting the Freezer ................. 12
Maintenance and Cleaning..........13
PowerFailure ............................... 13
If the Appliance Fails to Operate .13
Operating Characteristics ............13
Door Reversal
Door Reversal ..............................14
Do’s and Don’ts
Do’s and Don’ts............................ 16
Home Freezing
Brief Guide to Home Freezing 17-19
WARNING!
Since this appliance
contains a flammable
gas (Isobutane
R600a) as a
refrigerant, special care should be
taken with transport, placing and
installation.
Do not use mechanical tools or
other artificial ways of speeding up
defrosting than those recommended
by the manufacturer.
The unit must only be serviced by a
qualified service centre.
19
HOME FREEZING
NOTES

3
TECHNICAL DATA
Thank you for purchasing a model from the Scandinova range which has
been designed using the very latest advances in refrigeration technology to
promote energy efficiency and protect the environment. There are therefore no
harmful CFCs in the refrigerant or insulation.
Before operating this appliance, please read the following instructions care-
fully, as they cover the basic information for safety of installation, operation
and maintenance.
Technical Data FF 6-6853
Gross Capacity:
Fridge (cu ft)...................................................................................... 6.8
Freezer (cu ft)..................................................................................... 5.3
Height (mm) ........................................................................................... 1860
Width (mm) ............................................................................................ 600
Depth (mm)............................................................................................ 595
Fuse ....................................................................................................... 13 Amp
Energy consumption: kWh/24hrs .......................................................... 1,29
Freezing Capacity: (kg/24hrs) ............................................................... 15
This appliance meets the provisions of the following directives: 89/336/EEC
(electromagnetic compatibility), 73/23/EEC (electrical equipment designed for
use within certain voltage limits) as amended.
Household appliances sold in the EU also meet 96/57/EEC (energy efficiency
requirements) as amended.
Our policy is one of continuous development and for this reason we reserve the
right to change specifications without prior notice.
DISPOSAL OF THE APPLIANCE
This appliance contains materials which are recyclable. When disposing of the
appliance you can contact your local authority technical department, which will
inform you of how collection and recycling of the appliances takes place in the
local authority area.
18
Vegetables Storage time Blanching time
Asparagus Up to 6 months Use fresh, firm,white,non-expanded
heads,straight,unstringystalks.
Pareandcut.2-4minutesaccording
tosize.
Beans Green Up to 6 months Selecttenderpods.Snipendsandcut
into 1“ lengths or slice lengthways.
3minutes
Broad Up to 6 months Shellpodsandblanchbeans
for2minutes
Broccoli Up to 6 months Selectcompact heads. Wash
thoroughly. Soak for 30 minutes in salt
waterbeforeblanching.Separate
headsinto1"pieces.3minutes.
Brussel sprouts Up to 6 months Wash and trim offouter leaves. Soak
3minutesinsaltwaterbefore
blanching.5minutes
Carrots Up to 6 months Washwell and scrape. Cut into slices
ordice. Ifsmall,carrotsmaybeleftwhole.
3minutes
Cauliflower Up to 6 months Cut into serving pieces. Soak in salt
waterfor30minutes.Rinsewell.
4minutes
Peas Up to 6 months Washpodswellbeforeremoving
peas.Processasquicklyaspossible.
2minutes
Parsnips Up to 6 months Washwell and peel. Dice into 1/2"
cubesorsplitlengthways.Remove
core.Cubes2minutes,slices
3minutes
Sweetcorn Up to 6 months Strip off leaves.Small cobs 4 minutes,
medium6minutes
BLANCHING: This process is simply the placing of a small quantity of fruit or vegetables in
alarge quantity of hot water.
Proceed as follows: Bring to the boil about a gallon of water for each 450-500 g (1-1 1/2 Ibs)
of produce. Place produce in a square of muslin, a wire basket or a colander and lower them
intotheboilingwater.Agitatetoensureevenheat.Whenwaterreturnstotheboil, start
countingtheblanchingtime.
Whenfreezingliquids or produce packed in a liquid, remember toleave“head”spacefor
expansionwhichtakes place during freezing.
Brief guide to Home Freezing

4
Safety information
Thisinformationisprovidedin the interest of
yoursafety. Please read the following
carefullybeforecarryingouttheinstallation
oruseoftheappliance.
• If you are discarding an old freezer with a
lock or catch fitted to the lid/door, ensure
that the appliance is left in a safe
conditiontopreventtheentrapmentof
youngchildren.
• This appliance must only be used for its
intendedpurposei.e.thestoringof
domesticediblefoodstuffs.
Electrical requirements
Checkthatthevoltagestampedonthe
ratingplateofyourmachinecorresponds
withyourhouse electricity supply.
Your machine is already fitted with a plug
incorporating a 13 amp fuse. If it does not fit
your socket the plug should be cut off from
themainsleadandanappropriateplug
fitted.Carefullydisposeofthecut off plug
after removing the fuse; do not insert it in a
13 amp socket elsewhere in the house as
this could cause the hazard of electric
shocks.
Withalternativeplugsnotincorporatinga
fuse the circuit must be protected with a 15
ampfuse.
The mains lead may only be replaced by a
mainsleadsuppliedbythesupplier.
WARNING - THISAPPLIANCE MUST BE
EARTHED.
Important
Shouldanalternativeplugneedtobefitted,
the wires in this mains lead are coloured in
accordancewiththefollowingcode:
Green & Yellow – Earth
Blue – Neutral
Brown – Live
As the colours of the wires in the mains lead
ofthisappliancemaynotcorrespond with
thecolouredmarkingsidentifyingthe
terminalsinyourplug,proceedasfollows:
Figure 1
• The wire which is coloured green and
yellowmustbeconnectedtotheterminal
in the plug which is marked with the letter
»E« or by the earth symbol or
colouredgreenorgreenandyellow.
• The wire which is coloured blue must be
connected to the terminal which is
markedwiththeletter »N« or coloured
black.
• The wire which is coloured brown must be
connected to the terminal which is
markedwiththeletter»L« or coloured
red.
If a moulded plug is present, the fuse cover
mustberefittedwhenchangingthefuse
using a 13 ampASTAapproved fuse to BS
1362.Intheeventoflosingthefusecover,
the plug must NOT be used until a replace-
mentfusecoverhasbeenobtainedand
fitted.A new fuse cover can be obtained
fromyournearestelectricaldealer.The
colourof the correct replacement fuse cover
is that of the coloured marks on the base of
theplug.
ENSURE THAT YOUR MACHINE IS
CONNECTED CORRECTLY.
Socketoutletsarenotpermittedinbath-
rooms,neithershouldanyprovisionbe
madeforconnectingmovableelectrical
appliances.Nostationaryapplianceistobe
installedwithin reach of a person using the
bath or shower.
IMPORTANT!
In case of damage to the power cord it
must be replaced by a power cord of
corresponding type, available from the
manufacturer or his service
representative.
SAFETY INSTRUCTIONS
Earth
Green
&Yellow
Fuse
13 amp
Live
Brown
Neutral
Blue
17
Brief guide to Home Freezing
Fresh meat Storage time Defrosting time
Beef Joints Up to 12 months Approx 2 hours per
13mm/1/2"depth
Steak Up to 6 months Approx 2-4 hours
Mince Up to 6 months Approx 1-2 hours
Pork Joints Up to 6 months Approx 1 1/4 hours per
13mm/1/2" depth
Cutlets Up to 6 months Approx 2-4 hours
Lamb Joints Up to 12 months Approx 2-4 hoursper
13mm/1/2"depth
Cutlets Up to 6 months Approx 2-4 hours
Veal Joints Up to 9 months Approx 1 1/4 hours per
13mm/1/2"depth
Poultry
Chickens Whole Up to 6 months Approx 24 hours in a fridge
Portions Up to 6 months Approx 4-6 hours in a fridge
Turkey Whole Up to 6 months Approx 2-3 days in a fridge
Portions Up to 6 months Approx 4-6 hours in a fridge
Duck Up to 6 months Approx 24 hours in a fridge
Goose Up to 3-4 months Approx 24-36 hours in afridge
Pheasant Up to 6 months Approx10-12hoursinafridge
Fish
Trout Up to 3 months Approx 5 hours in a fridge
or 1 1/2 hours in kitchen
Salmon Up to 3 months Approx 24 hours for whole
fish in a fridge
White fish Up to 3 months May be cookedfrozen
Oily fish Up to 2 months May be cooked frozen
Prawns / Shrimps Up to 1 month Approx 1-2 hours in a fridge
Fruit
Apples Up to 12 months Approx 4 hours at
roomtemperature
Blackberries/ Raspberries Up to 12 months Approx3-4hoursat
roomtemperature
orovernightinfridge
Black / Red currants Up to 12 months Approx 3-4 hours at
roomtemperature
orovernightinfridge
Strawberries Up to 12 months Approx 3-4 hours at
roomtemperature
orovernightinfridge
DO'S AND DON'TS

5
Installation
Positiontheapplianceandallowtostandfor
10 to 12 hours before it is turned on for the
first time to allow the system to settle.
Install the cabinet in a dry place and so that
itisnotexposed to directsunlightoranyother
source of heat, e.g. cooker, boiler etc..
Anyunevennessofthefloorshouldbe
correctedpriortoinstallation,slight
unevennesscanbeovercomebyadjusting
the two feet fitted to the front edge of the
cabinetbasepanel.
To adjust the feet, first remove the kick
panel using a coin (figure 2) and adjust the
feetas required using the larger,4 mm
Allenkeyprovided.(figure3c).
NOTE: Iftheapplianceispositionedona
carpet, soft floor covering or a wooden floor,
youshouldre-adjustthefeetoncethe
appliancehashadtimetosettle.
INSTALLING YOUR FRIDGE FREEZER
Before use
Removeallpackingmaterialsandwashthe
interioroftheapplianceusinglukewarm
watercontainingalittlebicarbonateofsoda
in the proportion of 1 teaspoon to 1.2 litres
(2 pints) of water. Do not use detergents or
soap as they may taint the food.After
cleaning,dryallpartsthoroughly.
Figure 3
Figure 2
C
16
HOME FREEZING
Do's and Don'ts
DO unplugtheappliancefromthemains
supplybeforecarryingoutcleaning.
DO takecarewhenmoving the appliance
as it is heavy. There are roller wheels at the
rear.
DO allow the appliance to stand for ten to
twelwe hours before it is turned on for the
first time to allow the system to settle.
DO followthefoodmanufacturersstorage
recommendationsindicatedonthepackag-
ing.
DO allowadequateairventilationtothe
appliance as failure to do so could result in
reducedperformanceorpremature
componentfailure(seeinstallation,page4).
DO NOT positionnextto a heat source, e.g.
cooker,boileretc.
DO NOT alter or modify the design
specificationsoftheapplianceinanyway.
DO NOT allow young children to tamper or
playwiththecontrolsoftheappliance.
DO NOT attempttorepairtheappliance
yourself,anyservicingormaintenancemust
onlybeundertakenbysuitablyqualified
personnel.
DO NOT place carbonated or fizzy drink in
thefreezerasthecontainermayexplode
whenfrozen.
DO NOT store explosive substances in the
appliancee.g.gaslightercanisters.
DO NOT re-freeze frozen food once it has
beenthawedout,unlessithasbeen cooked
first.
DO NOT freezeliquids in a narrow-necked
container(e.g.abottle).
DOOR REVERSAL

6
INSTALLING YOUR FRIDGE FREEZER
Your fridge freezer can be positioned
betweenkitchencabinets(seefig.4a)or
placed side by side with a matching
Scandinovalarderfridge,freezerorfridge
freezer(seefig.4b).
Pleasenotethatdecorpanelscannot be
fittedtoyourScandinovaappliance.
WhenpositioningyourScandinova
appliances side by side, a distance of 5 cm
(2inches)isrequiredbetweenthe appli-
ancestoallow sufficientairflow.Forthis
reason it is also necessary to allow 10-15
cm(4-6inches)space above the appliance
(see figs. 4a and 4b) or ensure that an air
duct will allow warm air to escape around
cupboardsabove(seefig.4c).
Whenpositioningthecabinetnexttoan
adjacentwallensurethatthere is sufficient
space for the door(s) to open in order to pull
any baskets out of the unit (see fig. 4d).
NOTE:Caremustbetakenwhenopening
the door(s) against a wall so as not to
damagethedoor(s)orhandle(s).
Fig 4b.
600
100
50
600
100
Fig 4c.
100
10
Fig 4d.
Fig 4a.
min. 635 15
➇
➈
➄
➈
➀
➁
➂
➃
➅
➆
DOOR REVERSAL

7
!
I
S
S0
..-10.....-20.....-30..
7
6
5
6
01
43
2
1
0
7
4
53
2
Getting to know the Controls
The control panel (figure 5) is located on the
frontoftheappliance,beingvisibleonlywith
the fridge door open. As a safety feature
therefore,thecontrolscanonlybeadjusted
whilst the door is open. The controls are as
follows:
1.Lampfortherefrigeratorsection.
2.Thermostatknob for the refrigerator
section.
3.Thermostat knob for the freezer section.
4.Mainsindicatorlight(green).
5.Fastfreezeindicatorlight(yellow).
6.Fastfreezeswitch.
7.Fridgethermometer.
8.Freezertemperaturewarninglight(red).
Mains Indicator Light (green)
Thelightremainsilluminatedaslongas the
applianceisconnectedto the electricity
supply, and switched on.
Thermostats
Thefridgeandfreezerthermostatscontrol
thetemperaturewithinthewithinthe
respectivesectionsandcanbeadjusted
from setting 0 (STOP) to 7 (COLDEST).
Fridge Thermometer
Thethermometerindicatestheinternal
temperaturewithinthefridge. Anormal
fridgetemperatureshouldbebetween+2°C
and + 5°C, but may rise or fall due to the
factorslistedundertheheading»Fridge
Section«.
Fridge Internal Light
Thelightwillswitchon/offautomatically
wheneverthefridgedoorisopened/closed.
Freezer Temperature
Warning Indicator Light (red)
Thislightwillilluminatewheneverthereisa
risein temperature in the freezer compart-
mentabovethesafestoragecondition.
It is quite normal for the light to flash
temporarilyif:
aLargequantitiesoffoodareintroduced
intothecabinet.
bThefreezer door is left open for
excessiveperiods.
cPeriodicallyduringtheautomaticdefrost
cycle the red light may flash for short
periods.
Thelight will go out when the internal
temperaturehasreturnedtosafestorage
condition.
NOTE:
When the freezer is switched on for the first
time,orisswitched on after being unused
for a period of time, the red light may start to
flashafterapproximately40minutes.The
lightwillremainflashinguntiltheinternal
temperaturereachessafestoragecondi-
tions.
Fast Freeze Switch
This switch puts the freezer into the FAST
freezemode.Inthisconditionthefreezer
willquicklyfreezefresh produce ensuring
that it will be kept in the best condition.
Fast Freeze Indicator Light
(yellow)
ThislightwillilluminatewhenevertheFAST
freeze switch is switched to the ON position.
Figure 5
4
8716
5
32
GETTING TO KNOW THE CONTROLS
14
DOOR REVERSAL
3) Remove the middle
hinge. Lift off the
bottom door. Replace
the hinge screws.
1) Remove the upper
hinge. This will later be
used as the upper
hinge on the opposite
side. Lift off the upper
door.
7) The kick plate panel
is mounted and the
hole plugs are
mounted on the
opposite side.
5) Remove the screws in
the middle of the new
hinge side. Mount the
bottom door and
screw on the middle
hinge. Mount the
upper door and
screw on the upper
hinge.
Changing the hinge side
The doors can be changed from right-hinged to left-hinged or vice versa in the following way:
2) On appliances with a
door closer on the
upper door, this door
closer should be
removed and
remounted on the
opposite side.
6) Adjusting the bottom
door: Loosen the 3
screws in the
bottom hinge and
push the bottom
hinge to the
required side.
Tighten the screws
and mount the kick
plate panel.
8)Adjusting the upper door:
Loosen the screws in the
hinge above the door and
turn the hinge to the
required side. Tighten the
screws.
9) Move the handle. The
covering plugs for the
handle holes are
mounted.
4) Remove the kick plate
panel
a) Only for appliances with
a door closer on the
bottom door. The door
closer is moved to the
second hole..
b) The bottom hinge is
dismounted at the 3
screws. The hinge is
turned 900and mounted
on the opposite side of
the cabinet.

8
HOW TO USE YOUR FRIDGE FREEZER
Operating the Fridge Freezer
Plugtheapplianceintoasuitable13amp
socket, do not use adaptors or a socket that
isusedforotherappliances.
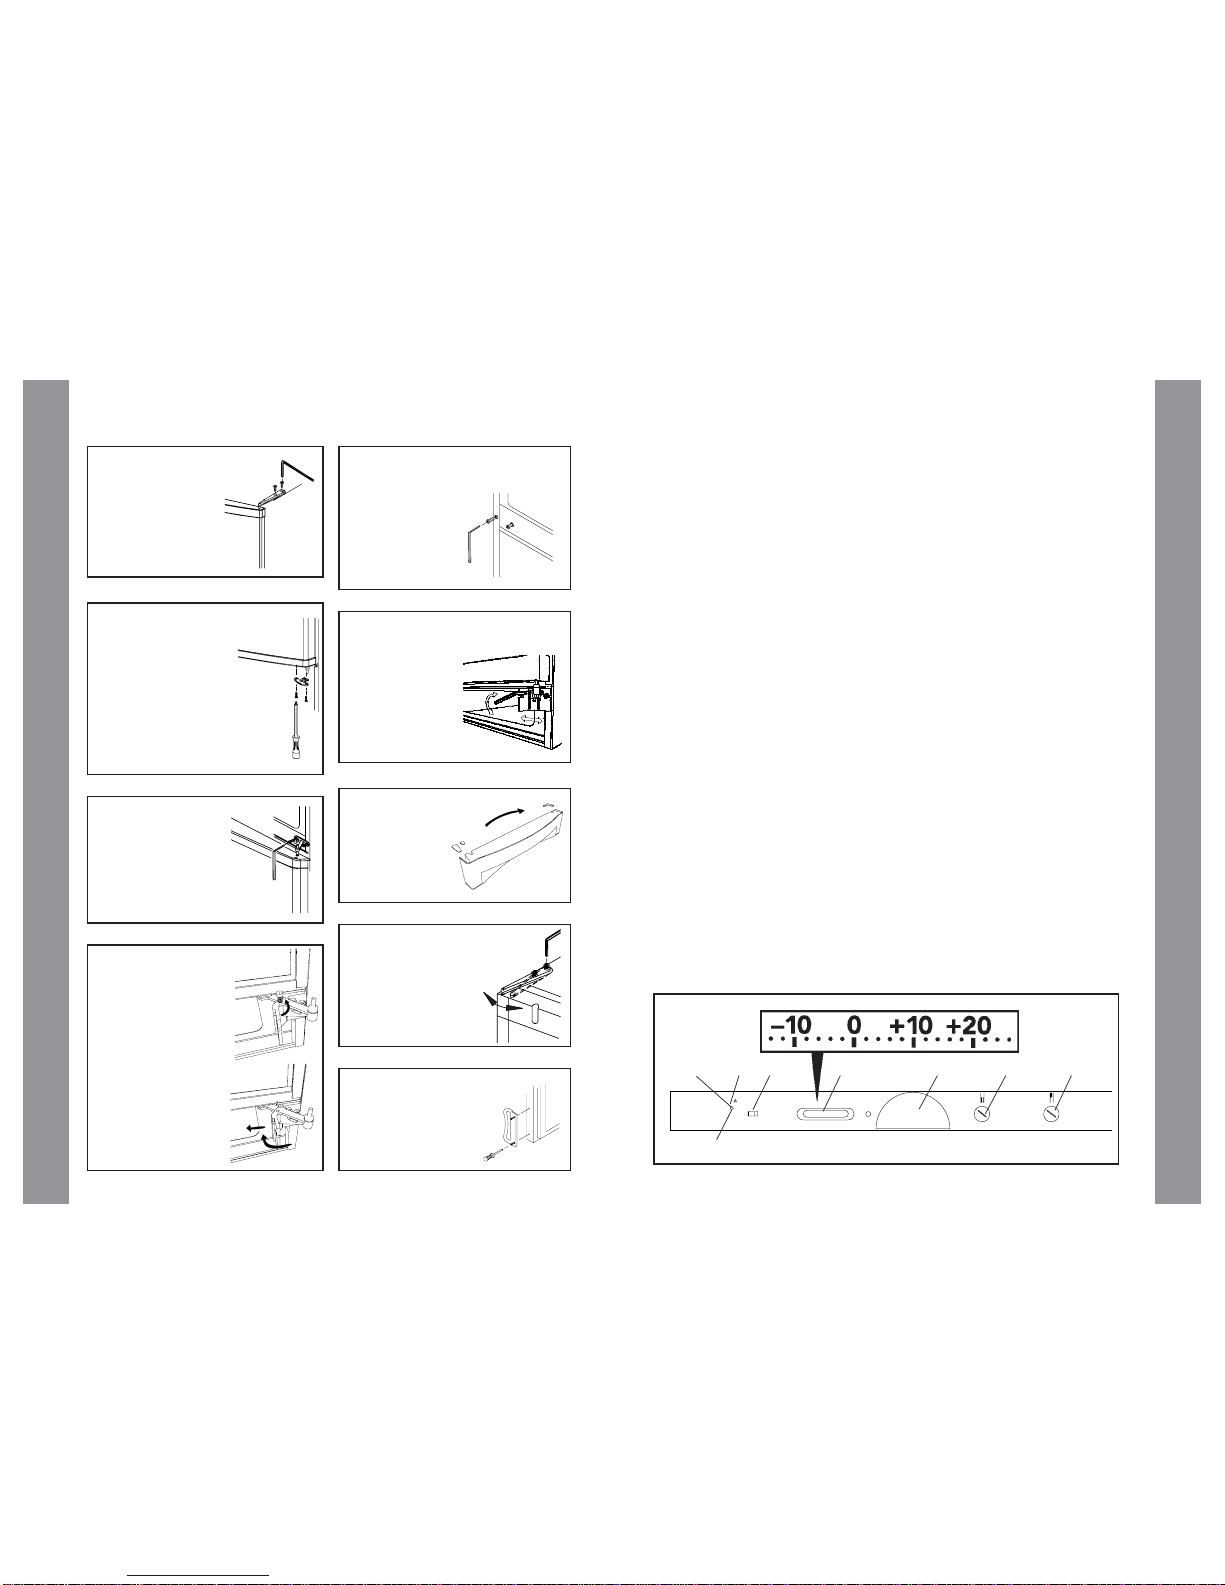
Turnboththefridgeandfreezer thermostat
knobstoposition5.
Anormal freezer storage temperature of
–18°Cisrecommendedformostfoods.
Anormal fridge storage temperature is
between+2°Cand+5°C.Thebuilt-in
thermometerwillassistyoutomaintain the
correcttemperature.
Theinternaltemperatureofbothfridgeand
freezersectionsismaintainedautomatically
bythe thermostats and in most conditions,
with the thermostat knobs set to position 5,
thesectionswillapproximatelymaintain
thesetemperatures.
IF, HOWEVER, THEAPPLIANCE IS
OPERATINGWHERETHE CONDITIONS
ARE SUCH THAT THEAPPLIANCE HAS
TO WORK HARDER, E.G. HIGH ROOM
TEMPERATURE,POORVENTILATION
OR THE DOOR BEING FREQUENTLY
OPENED, IT MAY BE NECESSARYTO
ADJUSTTHE THERMOSTATTOA
HIGHERSETTING.
To obtain a lower internal temperature,turn
the control knobs clockwise to a higher
number.Toincreasethe temperature turn
thecontrolanti-clockwisetoalowernumber.
Fridge Section (Auto Defrost)
The fridge is designed for the short term
storageoffreshfoodanddrinks.
To ensure that the correct internal cabinet
temperatureismaintained,itisrecom-
mendedthatthethermometerischecked
regularlyandthethermostatadjustedifthe
temperatureisoutsidetherecommended
temperaturerange.
However,theinternaltemperatureand
thermostatsettingisdependentona
numberoffactors:
1Varyingroom temperatures.
2The number of times the fridge door is
openedandthelengthoftimethedoor
isleftopen.
3Theamountandtemperatureoffresh
foodanddrinkintroducedintothefridge.
4Theweatherconditionsandthetimeof
yeare.g.summer/winter.
Never place hot or warm foods in the
cabinetorleavethedooropenforlonger
than necessary, as this will raise the
temperatureandcauseexcessiveamounts
ofmoisturethusincreasingtheamount of
defrostwater.
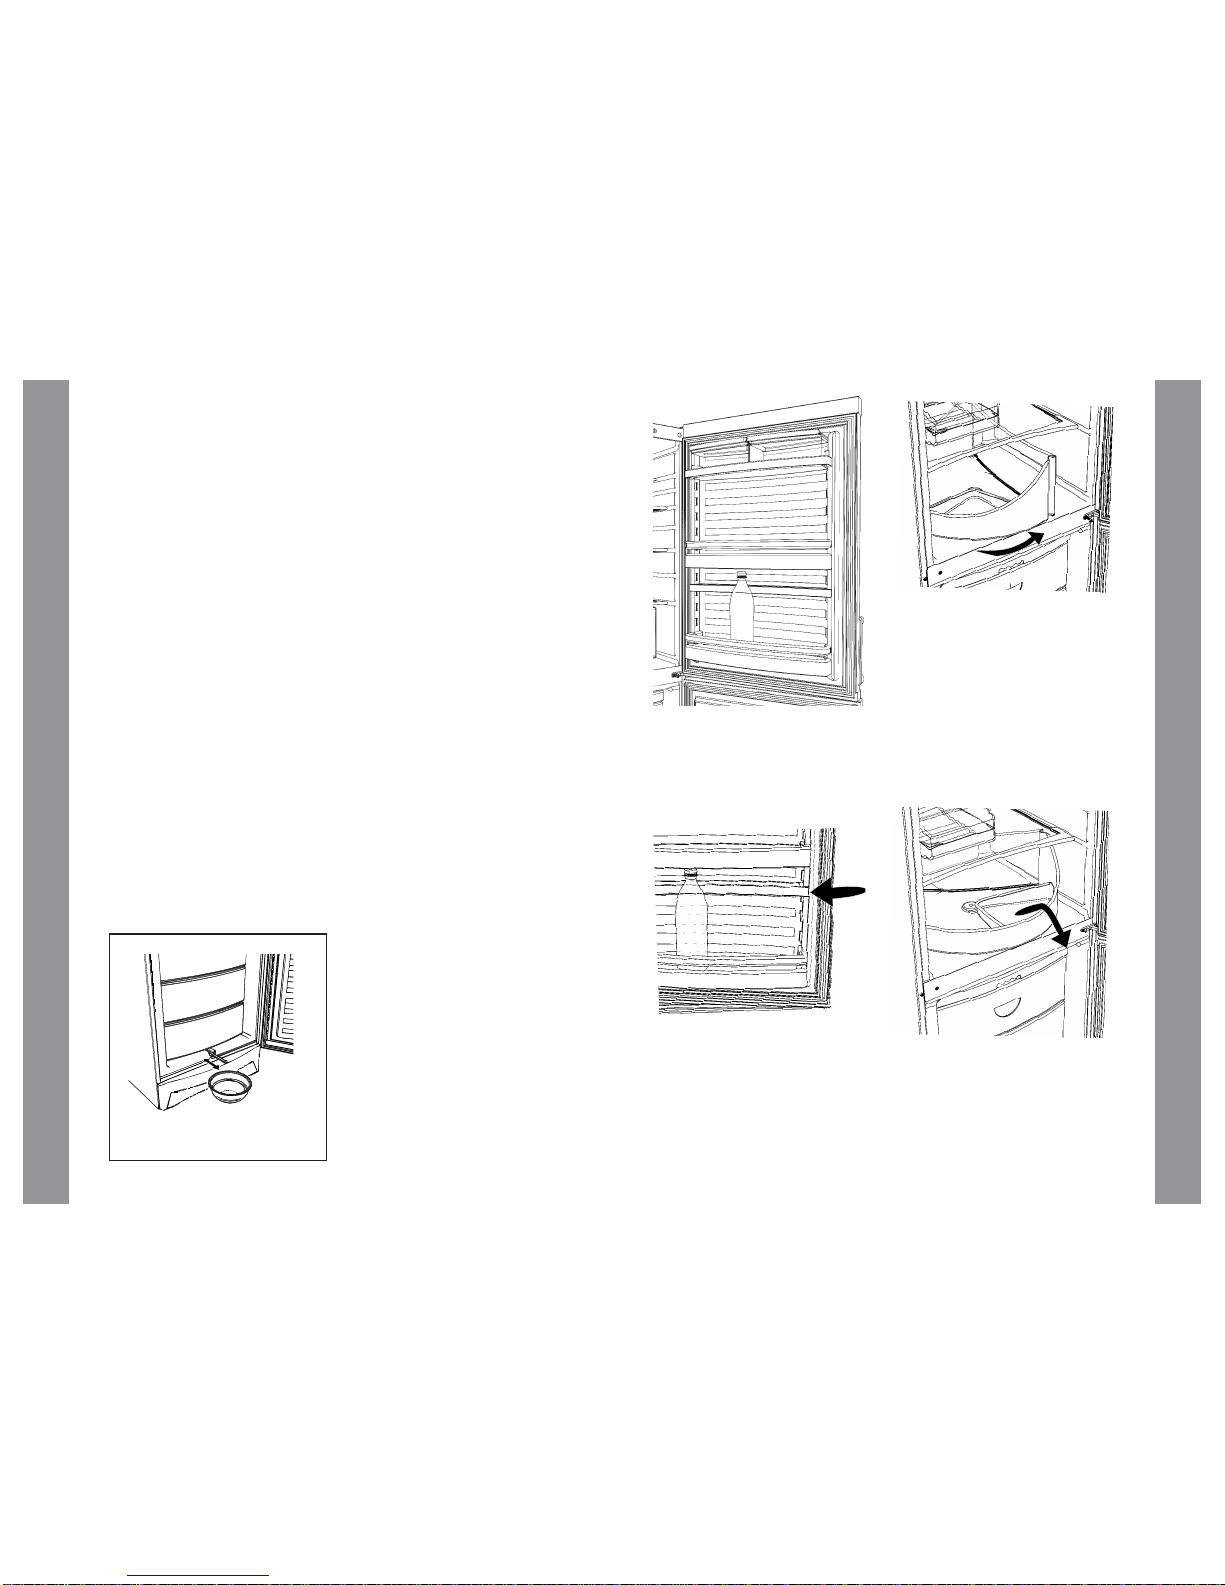
Defrostingiscarriedoutautomaticallyevery
timethecompressorstops.Thedefrost
waterdrainsfromthe cabinet onto a tray
placed on the top of the compressor where
itevaporates.
Foodshouldbetightlywrappedwithfoilor
plastic film or bags or stored in bags or
airtightcontainers.Thiswillpreventfood
fromdehydrating,andpreventthestrong
smellofsomefoodstransferringtomilder
ones.
Do not cover the shelves with any protec-
tivematerial such as aluminium foil as this
mayobstructtheaircirculationthrough the
cabinet.
13
Power Failure (freezer)
In the event of a power failure, providing
that the door is kept closed, the food will
keep frozen at a safe temperature for up to
12 hours. Extra protection can be given by
coveringthefreezerwiththickblankets.
Where the power failure is in excess of 12
hoursthefoodshouldbecheckedbefore
the mains supply is re-connected to ensure
thatit has not defrosted. DO NOTre-freeze
defrostedfood.
Operating Characteristics
When the appliance is in operation, the
outsideofthecabinet will become warm
andmayevenfeelhottothetouch.Thisis
quitenormalandindicatesthattheappli-
anceisoperatingcorrectly.
HOW TO USE YOUR FRIDGE FREEZER
Maintenance and Cleaning
The interior of the fridge should be cleaned
periodically.Turnoffatthethermostatand
wipe with a clean cloth using a solution of
warmwatercontaining1teaspoonof
bicarbonate of soda to 1.2 litres (2 pints) of
water. All surfaces should be dried
thoroughlyusingacleandrycloth.Turnthe
thermostatbackon.
NEVER usedetergents,soaporabrasive
powdersastheymaydamagetheinterior
liningorleaveanodourwhichmay
contaminatethefood.
Theexteriorshouldbe wiped with a damp
cloth,containingasmallamountof
detergent,butavoidcontactwiththedoor
gaskets.A small amount of wax car polish
orsiliconepolishcanbeapplied to maintain
theexteriorfinishofthecabinet.
If the fridge section is to be left out of use for
any length of time, it should be switched off
(turn thermostat to zero) and the interior
andaccessoriesthoroughlycleanedandthe
doorsleftopentoallowaircirculation.
The front kick panel can be removed to
enablecleaningundertheappliance.
The freezer compartment is designed with
a totally frost-free system and therefore
does not need to be defrosted. Defrosting
is completely automatic and the freezer
will switch itself on and off as required.
However,itmaybenecessaryperiodically
to clean the inside of the freezer. This is
best undertaken when the freezer is nearly
empty. Remove the food packages and wrap
inthickblanketsornewspaperto keep them
cold.Storeinboxesandifavailableplace
frozen freezer packs in the box with the
food,andkeepin a cool place.
Clean the freezer section in the same way
as the fridge and ensure the surfaces are
driedproperly.Turnthe thermostat back on
andreplacethefoodoncethetemperature
in the freezer is sufficiently reduced.
If the Appliance should fail
to Operate
To avoid needless service calls, before
callingforassistance please check the
followingpoints:
Is the plug correctly in the socket
and the socket switched on? Check
the supply by plugging in another
appliance!
Has the fuse blown in the plug? Try
changing the fuse!
Is there a power failure? Switch on
the house lights!
Are the wires in the mains plug
correctly connected?
Is the thermostat turned to the
correct setting?
Stop the compressor by turning the
thermostattozero or unplug the
appliance.Leavetheappliancefor1
hourandturnthecompressoronagain.
By doing this all the electronic com-
pressorprotectionsarereset.
Havingcheckedallthesepointsand the
appliancestilldoes not work properly
contact your nearest Comet Service Centre
or Store. DO NOT attempt to repair the
appliance yourself, as to do so could be
hazardous to you or others.
NOTE: If there is a short power failure or
the unit is switched off momentarily, it is
common for the compressor to be
unable to start for up to 1 hour after the
power failure due to the compressor
protector.
l
l
l
l
l

9
CABINET FACILITIES
The door strap is intended to
support bottles, cartons, and other
things that are placed in the door
shelf, and it can be moved up or
down as required.
The swing-out vegetable drawer has
a temperature which is a little higher
than in the rest of the cabinet, and it
is ideal forstoring fruit and
vegetables. It is opened by pulling
the vertical side handles. If it is to be
taken out of the cabinet you have to
pull at the top of both sides at the
same time.
The egg tray can be placed behind
high bottles. If the inserts are used it
can be used for little things. The insert for the swing-out drawer is
intended for small loose vegetables.
The insert can be taken out and used
as washing strainer.
12
HOW TO USE YOUR FRIDGE FREEZER
Defrosting the Freezer
With use, the freezer shelves will
progressively become covered with
frost, the amount of frost accumulation
will be dependent upon the frequency
of the door being opened, the length of
time that the door is left open and the
amount of moisture introduced with the
produce stored.
Large amounts of frost act as an
insulator and prevent the very low
temperature within the freezer from
reaching the food, it can also cause the
freezer to operate for longer cycles,
thereby using more energy.
It is important that no frost is allowed to
build up around the door where it may
affect the sealing of the door gasket.
Small amounts of soft frost can be
removed by using a plastic scraper. On
no account use any metal object or
tools as you could permanently damage
the interior of the freezer.
When the thickness of the frost exceeds
5 mm (1/4 inch) the freezer should be
completely defrosted as follows:
Remove the food packages and wrap in
thick blankets or newspaper to keep
them cold. Store in boxes and if
available place frozen freezer packs in
the box with the food, and keep in a
cool place.
NOTE: Defrosting is best undertaken
when the freezer is nearly empty and
should be carried out as quickly as
possible to prevent an undue rise in the
temperature of the food which may
shorten its storage life.
Switch off the freezer at the thermostat.
Open the door, pull out the draining
spout, and place a bowl under the
spout to collect the defrost water. (See
figure 8). Be sure the appliance is level
(see installation, page 5) otherwise
defrost water will not drain towards the
spout.
To speed up defrosting you can place a
bowl of hot water in the freezer and
replace when cool. When all the frost
has been removed, the interior of the
freezer should be thoroughly cleaned
and wiped dry.
Turn on the thermostat and switch the
freezer onto the FAST Freeze mode.
Replace the food and switch off the
FAST Freeze mode after 12 hours or
when the temperature warning indicator
light goes out.
It is recommended to defrost and
thoroughly clean the freezer at least
THREE times a year in order to
maintain the internal hygiene and
efficient operation of the product.
Figure 8
For defrosting pull out the drain
water extension over a bowl.

10
CABINET FACILITIES
The thawing box if for the thawing of
meat and other frozen food. The
meat juice or the like is collected in
the grooves. The box can also be
used for the storage of cold cuts or
strongly smelling food.
The bottle shelf is for large bottles. Be sure that these bottles have tight-fitting
caps..
If you want whole icicles - and not
just ice cubes - the ice tray is placed
in a little warm water, after which the
icicle is taken out carefully.
11
Freezer Section
The freezer section of your fridgefreezer
has a four star rating which means that
you can safely freeze fresh food. It will also
store commercially frozen food with the
three star symbol for up to three months
unless otherwise stated on the packaging.
Attention
• Do not put carbonated liquids (fizzy
drinks) in the freezer as they can explode
whenfrozen.
• Ifwatericesareconsumedimmediately
afterremovalfromthefreezer, freezer-
burncouldresultdue to the low tempera-
ture. Alwaysallowtowarm slightly before
consumption.
Freezing Fresh Foods
To keep food at its best it should be frozen
downto-180C in the shortest time possible.
To achieve quick freezing turn the FAST
Freezeswitch to the ON position (the FAST
Freezelightwillilluminate)24hoursbefore
introducingtheproduce.(Thelowerthe
temperaturethequickerthefoodwillfreeze).
PlacetheproduceintheFastFreeze
compartments at these are the coldest
area.The freezing process will take up to 24
hoursdependingontheamountoffood
introduced. Afterapprox 24 hours or when
thetemperatureindicatorwarninglightgoes
out, switch the freezer back to the normal
operatingmodebyswitchingtheFAST
FreezeswitchtotheOFFposition.Toget
the best results when freezing fresh
produceweadviseyou to follow these
instructions:
Onlyfreezegoodqualityproduce,freezing
preservesthequalitybutcannotimproveit.
Cleanandprepareallfoodandwrapin
freezerbags,foilorwaxedcontainersetc.
Keep the size of the packages small and
rememberthatsquarepacks will utilise the
spaceinthefreezermoreeffectively.
Place each package in as much contact
with the shelves of the freezer as possible
andavoidplacingunfrozenfoodincontact
withfoodthatisalreadyfrozen.
HOW TO USE YOUR FRIDGE FREEZER
DO NOT freeze more food than is
recommended in any 24 hour period (see
page 3).
The food should be used in rotation so mark
eachpack with the contents and date.
When sealing bags expel as much air as
possibleandensurethatthewrappingis
wellsealed. Avoidingcontactwiththeair
willhelpretainthecolour,flavourand
nutritionalvalueofthefood.Rememberthat
leanmeatskeepbetterandlongerthanfatty
meatsandsaltreducesstoragetime.
Thawing Frozen Food
Whenthawingfoodthat wasfrozenwhen
fresh, the food will retain its quality better if
thawedslowly. Slow thawing allows the food
tore-absorballtheflavourandnutritional
valuewhichmaybelostwithfastthawing.
By far the best method to thaw fresh food is
to allow the temperature to rise slowly by
placingthefood on a plate in the fridge
sectionoratroomtemperatureuntil
completelythawed.
Commerciallyfrozenpre-packedfood
shouldbethawedinaccordancewiththe
manufacturersinstructions.Somesmall
itemsoffoodmaybe cooked from frozen,
butwillrequirealongercookingtime.For
thawingfoodinamicrowaveoven,referto
themanufacturersinstructions.
Foodwhichhasbeenthawedmust NOTbe
re-frozenunlesscookedthoroughly.
Defrostedcookedfoodmustneverbere-
frozen,butshouldeitherbeeatenstraight
awayordisposed.
Table of contents
Other SCANDINOVA Refrigerator manuals