Schachner Elektrofahrzeuge MM13 User manual


1
Stand April 2013

Preface
Dear client!
We want to congratulate on your acquisition of a Schachner
central motor – electric kit. We are glad to inform you about
operation, maintenance and care of our e-kits on the following
pages.
You bought a product from Austria which have been technically
improved during more than 22 years and is approved in Europe
for 10.000 times.
The electric kit has been developed for people who like to be in
motion but feel that riding a bike up a hill or with headwind is
too hard for them. It is particularly strong, robust and totally
maintenance free - for people who attach importance to quality,
health, security, reliability and long life.
The Schachner e-kit has been developed in Austria especially for
mountain cyclists and it proved very well.
We hope you enjoy using your new e-kit and wish you always a
good, secure and accident- free ride!
best regards
Schachner GmbH, Gewerbepark Pölla 6, A-3353 Seitenstetten,
Tel. +43 (0) 7477/42973, Fax DW 13, UID Nr.: ATU52754700
2

1Inhaltsverzeichnis
1 Inhaltsverzeichnis ...........................................................3
2 Gewährleistung.........Fehler! Textmarke nicht definiert.
3 Lieferumfang ............Fehler! Textmarke nicht definiert.
4 Fahrbetrieb...............Fehler! Textmarke nicht definiert.
5 Funktionsbeschreibung: Trittfrequenzsensor....................11
6 Funktionsbeschreibung: Motor .......................................11
7 Funktionsbeschreibung: Gepäckträger ............................12
8 Funktionsbeschreibung: Ladegerät .................................12
9 Funktionsbeschreibung: Akku.........................................13
10 Bedienung und Funktion des LCD-Displays..............Fehler!
Textmarke nicht definiert.
11 Der Fahrradbetrieb....Fehler! Textmarke nicht definiert.
12 Entsorgung...............Fehler! Textmarke nicht definiert.
13 Sicherheitshinweise...Fehler! Textmarke nicht definiert.
14 Fehlersuche..............Fehler! Textmarke nicht definiert.
15 CE Konformitätserklärung ..........Fehler! Textmarke nicht
definiert.
16 Technische Daten......Fehler! Textmarke nicht definiert.
3

To avoid faults please read the operating instructions
very carefully before putting the e-kit into operation.
This kit offers numerous functions which can only be used
optimally by using the kit in the right way. This is also important
to reach optimal life cycle and distance.
When a malfunction occurs, please take the operating
instructions, check the cable connections and try to patch the
fault.
In case a malfunction can not be repaired from your side, please
contact your specialized dealer. Reparations should always be
done from a qualified, specialized dealer!
4

2Warranty
According to the European warranty- law from 01. January
2002, we grant a legally warranty of 2 years. The warranty
period begins from handing over of the kit. Please keep the
invoice for time of warranty to proof the purchase, respectively
the hand over date. When spare parts are mounted in the time
of warranty, the warranty time will not be prolonged.
The warranty for the battery is half a year, because
it is a consumable article. We offer you a half year
more for our high-quality batteries.
We can only guarantee handling by warranty if you
submit the battery including invoice. For batteries
which can not be sold for longer time you have to
secure regular charging. If not, the warranty time
will not be prolonged.
The warranty does not refer to:
-damages occurred by improper use and irresistible force,
-all parts of a bicycle, which are subject to a wear and tear
conditional on the function, as far as there are no
production or material faults,
-damages, occurred by improper or defectively care and
reparations, modifications or exchanges which have not
been done professionally,
-belated added parts which do not belong to the scope of
supply at time of hand over or damages that occur of not-
professional assembly of those added parts
-damages occurred by oxidation, corrosion and
environmental impacts.
5

Entitled warranty demands are present, if:
-a production- or material fault exists,
-the complained damage or fault already existed at the time
of hand over to the customer
-the damage or the fault causally occurred because of an
intended deallocation from Schachner GmbH
The warranty includes all necessary spare parts.
Further demands are excepted.
6

3Scope of supply
When you acquire an e-kit from Schachner GmbH, it consists of
the following parts:
LCD-Display with button-device
Throttle grip with connection cable
Controller
Motor with connection cable
Carrier
Charger
Cadence sensor cable including bracket and magnetic disc
Speed sensor with magnet
User manual
Battery: 9Ah Battery / 11Ah Battery
If you have acquired the e-kit completely assembled you only
receive a charger and this operating instruction added to the
bike.
All other parts are already assembled.
7

Assembling schedule
Throttle grip
with cable
Display with
Control unit
Battery
Carrier
Controller
Cadence sensor
Central motor
8

4Driving operation
A bicycle, with Schachner e-kit is according to the European
draft standard prEN 15197 an “EPAC” (Electically Power Assisted
Cycle) also called “pedelec” (pedal electric cycle).
The Schachner Pedelec is a bicycle including drive support. It is
equipped with an electromotive auxiliary drive with a maximum
continuous rating of 250 Watt. The driving speed with motor
power is limited to 25 km/h and the maximum power output is
bounded to 400 Watt.
The motor performance can not only be regulated with the
throttle grip, it is dependent on the footwork of the cyclist.
Because of that, pedelecs are rid of approval-, insurance-, and
driving licence-obligations and are not subject of age restriction.
For handicapped people and vehicles which are not
specify for road traffic it is allowed to drive up to a
speed of 25 km/h only with throttle grip (without
pedalling). If you want to drive only with motor power
up to a speed of 25 km/h and do not want to pedal
(where the road traffic regulations are valid) you need
to register your bicycle.
Additionally we offer a starting help which brings you in motion
safely. You can and should move your bike with your own power
from time to time.
When you pedal stronger at the start, in the case of headwind
and when driving up a hill, the distance you can reach with a
charged battery can be increased a lot.
With the help of the shifting system you can regulate the
pedaling speed in relation to the driving speed. You need least
of power when you pedal 40 to 60 times a minute. (Athletes
pedal around 100 times a minute.) When you drive up a hill and
the driving speed gets lower, you can switch to another gear to
keep the regular pedaling frequency.
9

You can regulate the assistance of the e-kit also
without throttle grip but with pedalling frequency. To
do this, please pull out the connector of the throttle
grip from the controller and switch on the controller
again.
The complete power unit is very light and when the motor is
turned off, it is totally separated from the bike. Also without
switching on the e-kit you have a very manageable and
smoothly running bike.
First of all, please ride the bike without help of the
motor to familiarize with ride comfort, function of
shifting system and brakes.
10

5Function description: Cadence sensor
The cadence sensor with the magnetic disc is responsibel for the
detection of the cadence.
It is plugged in, on the backside of the controller and it is
responsible for the limitation of speed according to the European
norm project prEN 15194.
For handicapped people and vehicles which are not
specify for road traffic it is allowed to disconnect
respectively not mount the sensor. As soon as sensor
is disconnected you need to switch on the controller
new because the terminal assignment checking
happens.
6Function description: Motor
You have acquired a totally maintenance- free
high performance central motor.
The nominal speed is 90 revolutions per
minute, the nominal performance is 250 Watt
and the maximal performance is 400 Watt.
The motor is mounted in the bottom bracket instead of the
bottom bracket.
To avoid damages it is recommendable to let reparations be
done by professional workshops which also check and secure
the correct function of the brakes.
11

7Function description: Carrier
The battery is located in the carrier or directly fixed in the frame
(depending on the model) and it has a cable which leads to the
controller. The lock protects the battery from dropping out of
the carrier and from thefts.
8Function description: charger
For charging you can take out the
battery or charge it directly on the bike.
The temperature of the battery should
not drop below 5°C or exceed 35°C
while charging, otherwise the battery
can not be charged.
As soon as the battery is out of the recommended
temperature, the red lamp of the charger shines. Out
of this reason, please let the battery cool down after
driving and charge it only cooled down.
To charge the battery, please act as follows:
Put the charger and the battery on a non- flammable base for
duration of charging.
First connect the charger with the battery, and after that,
please connect the charger with a 230 voltage receptacle.
The charging procedure begins promptly. – The red lamp is
shining.
The charging procedure takes about 5 hours for an empty
battery (depending on the capacity).
12

The charging rate amounts approximately 2 Ampere and the
charging voltage 36 V.
As soon as the battery is completely loaded the charging will be
stopped automatically. – The green lamp on the charger is light.
The best time for recharging the battery is at night. So
the battery will be fully loaded next morning.
Overloading is impossible!
If you are using a new battery (or again after longer storage)
the distance you can reach with one full load will increase during
the first charging processes.
In the winter we recommend to store the full charged battery in
a dry area. As the battery discharges also when it is not in use,
you should load for some hours every 6 weeks, so that the
battery will not be damaged because of over-discharging. Before
setting out the first run please load up the battery again.
9Function description: Battery
9 Ah / 11 Ah NCM Battery
- battery integrated in the luggage carrier
- riding distances: 9Ah: 50-70km 11Ah: 60-80km
- weight: 9Ah: 2,6kg 11Ah: 3,0kg
- very favorable power-weight-ratio
- strong power – high reach
13
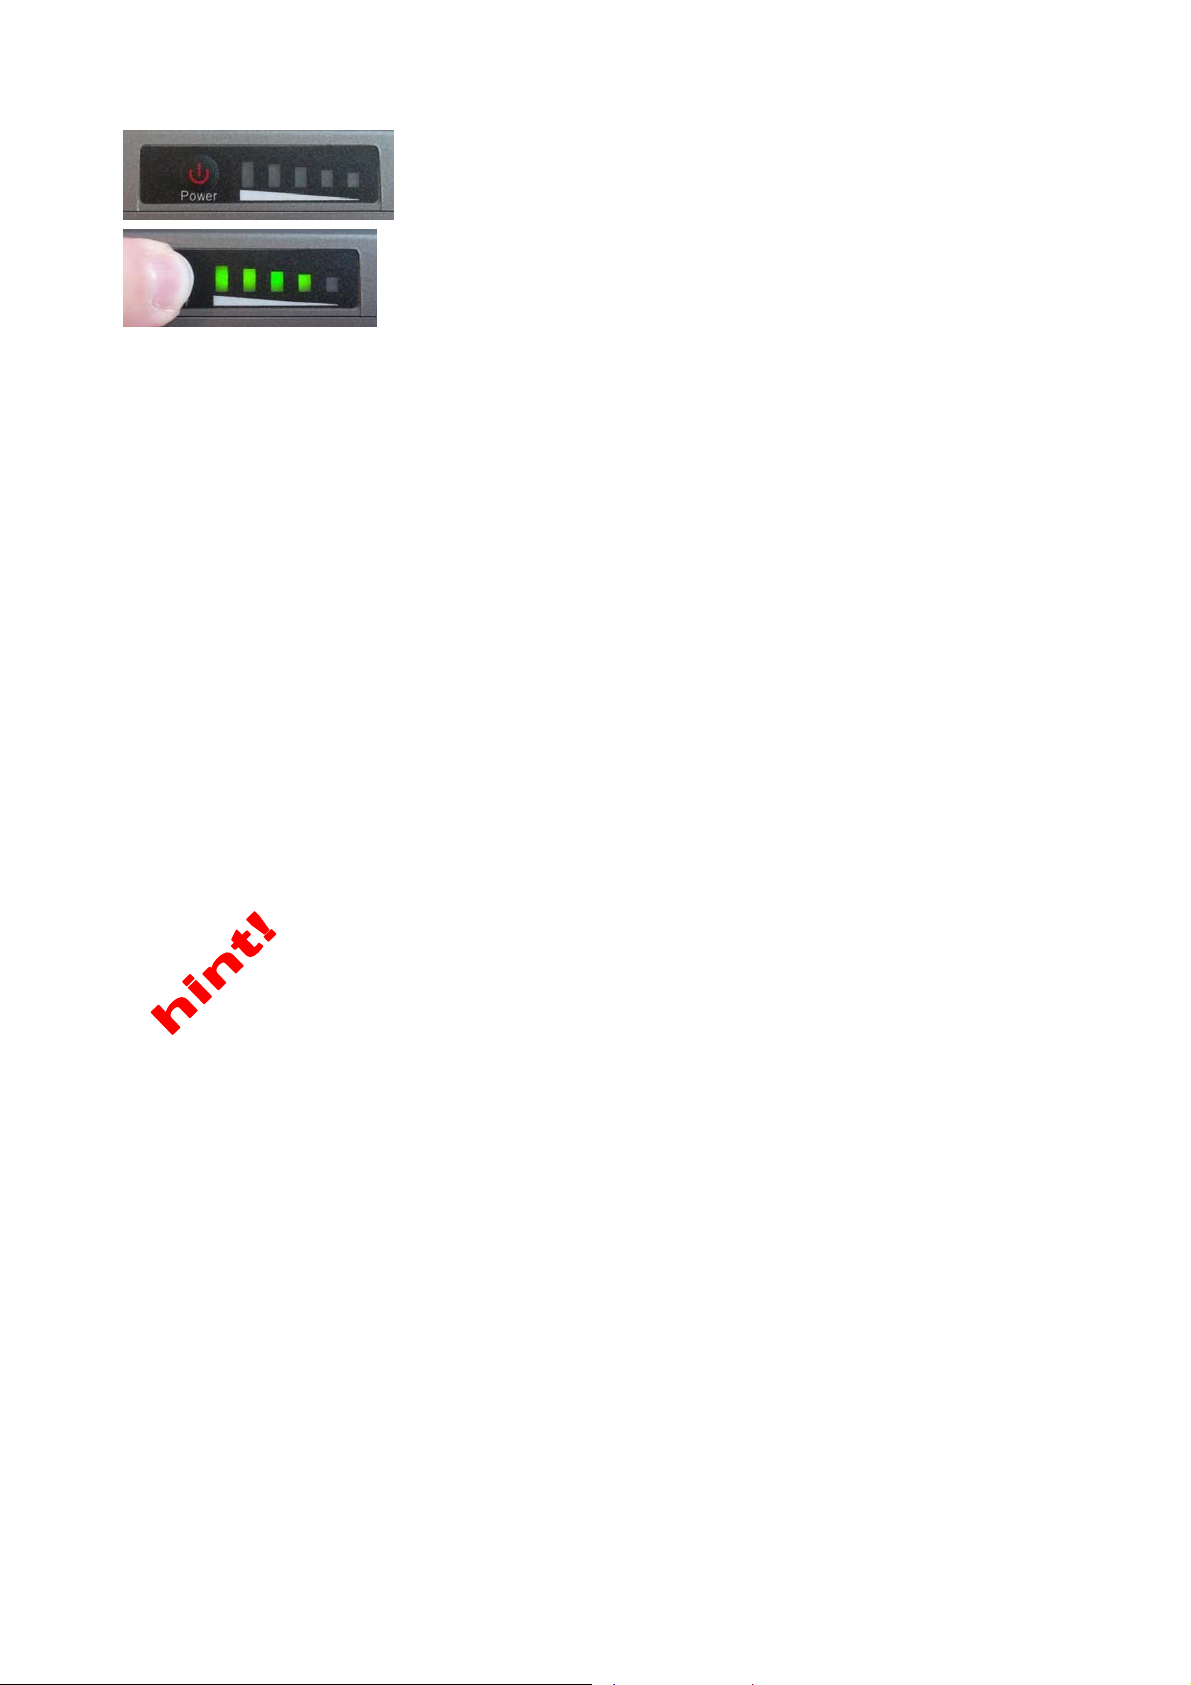
The state of charge of the battery you can
control on the integrated display on the
battery, when you push the red button. The
battery is empty if only the red lamp is light.
The length of the way you can drive with a full battery charge
depends decisive on structure of the way, ambient temperature,
head wind, tyre pressure, weight of the driver, age of the
battery as well as how often you use the motor and how strong
you pedal.
So you can reach a high range:
recharge the battery fully after every run.
drive mainly with a low supporting step.
avoid to use the electronic drive all the time.
Check tyre pressure every month (3.5 to 4 bar).
Oil the chain every 200 to 300 km.
For long driving distances you can take the charger
in a bag with you. Eventually stop-offs increase the
range of the battery notable. The battery can, for
example when you make a tour for several days, be
fully recharged during the night.
The connector on the battery is for connecting the charger. It
should always be closed with the cover (only open to charge) to
protect the contacts from dirt and moisture.
14
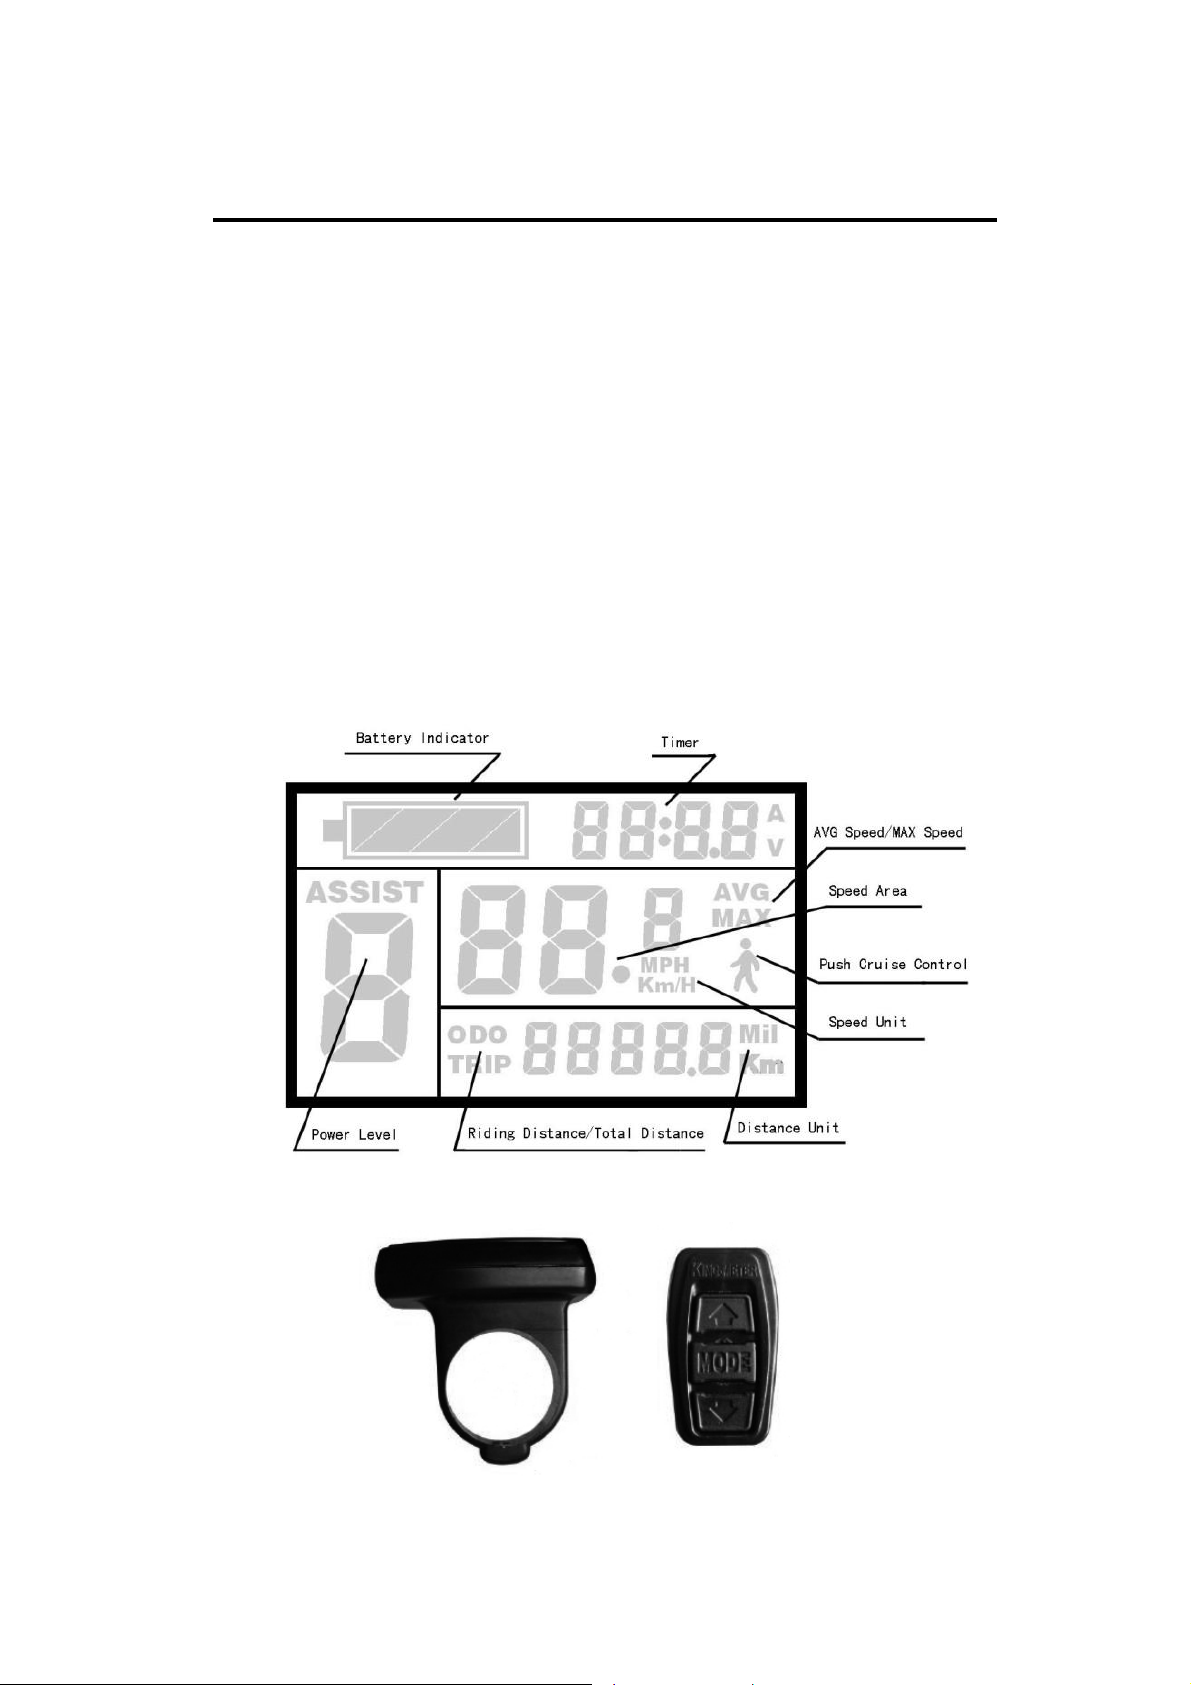
10 Handling and function of the LCD-display
Outlook and function
LCD display settings include local time setting, top riding speed
setting, metric system / english system setting (MPH and Km/H,
Mile and Km), wheel size setting (18—28inch), LCD backlight
brightness setting.
LCD-display displays battery capacity, time, motor power ratio,
riding speed, riding distance, 6Km/h power assist walk, and
malfunction code of the electronic control system.
15

The LCD-display is equipped with a seperate control unit which
is connected to the display with a cable. In this way the control
unit could be mounted either on the left or right side of the
handle bar.
In this description the –button is named as „Mode“,
is „UP“ and is „DOWN“.
Settings
Press the MODE button and start the display. After start-up,
please hold both UP and DOWN at the same time, for 3 seconds,
LCD will enter into the setting state.
Time Setting
After entering into the setting state, first set the HOUR by using
UP and DOWN. Press MODE for confirmation and then set the
MINUTE by using UP and DOWN. Press MODE for confirmation
and then set the top riding speed.
Setting hour Setting minutes
Top-speed setting
The default figure of the top riding speed is 25 km/h. Please do
not change this point, it is programmed by your dealer!
Top-speed setting
16
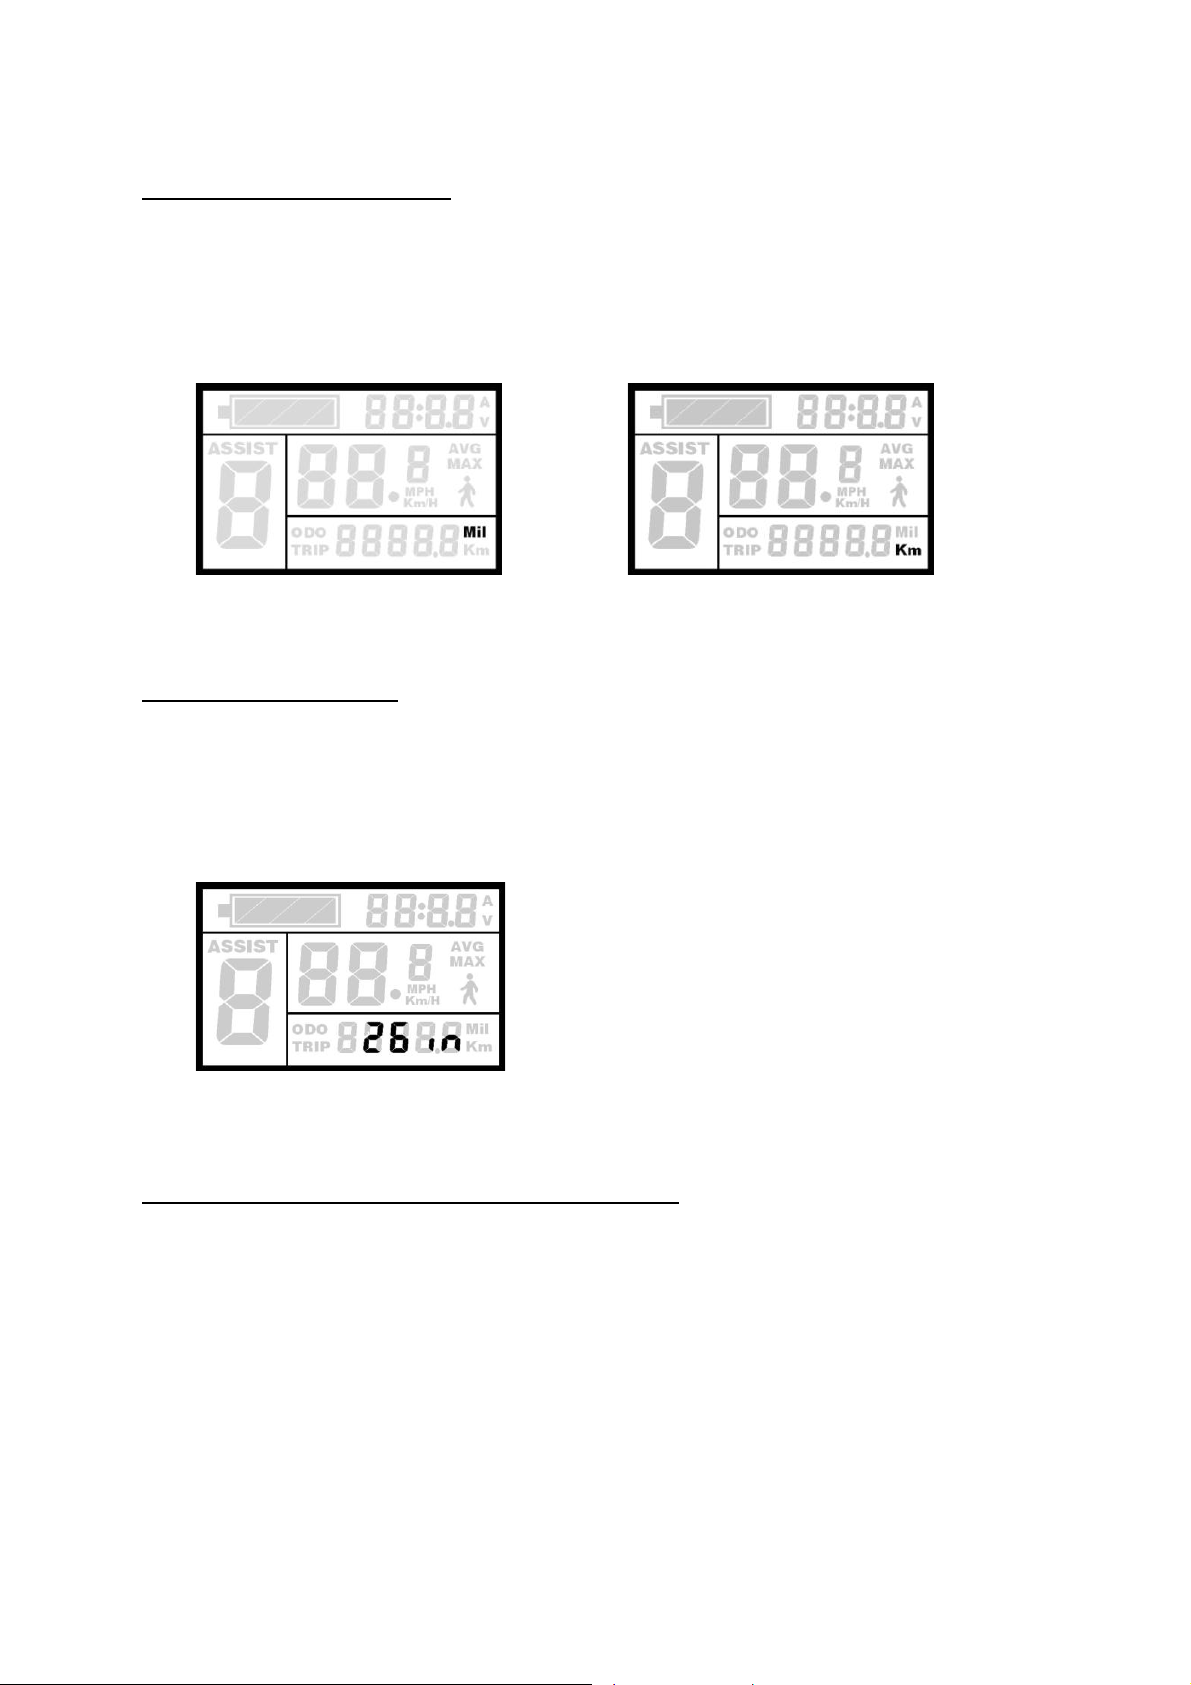
Choice of Display Unit
Press UP or DOWN to choose a display unit (metric / english
system). The unit could be MPH and Km/h. The range unit is
changing accordingly with the speed unit. Press MODE to save.
English system Metric system
Wheel size setting
Press UP or DOWN to choose a corresponding wheel diameter to
ensure the accurate display of speed and distance. Press MODE
to save.
wheel
size
Helligkeit der Hintergrundbeleuchtung
Press UP or DOWN to modify the backlight brightness. You can
choose from level 1 to level 3. Level 1 is the minimum
brightness. Level 3 is the maximum brightness. The default
value is level 1.
17

Exit setting
In the state of parameter setting, short press MODE to make
confirmation. Hold MODE (more than 2 seconds) , save the
current setting and exit the setting interface.
Normal Operation
On / Off
Press MODE and the display start to work for the controller
power supply. In the Power On State, hold MODE or lay aside
(the sate is no speed and no setting) for five minutes, to cut off
the e-bike power supply. In the Power Off state, the display and
the controller don’t use the battery power supply.
Speed display
When the e-bike starts, the display will automatically show the
current speed.
Hold UP and the display will show the MAX speed during this
ride. Hold UP again and the display will show the AVG speed
during this ride. Hold UP again and the display will turn to the
current speed display.
Power levels
Press UP or DOWN to change motor output power of the motor.
The power ranges from level 1 to level 5. Level 1 is the
minimum power. Level 5 is the maximum power. The default va-
lue is level 1.
18

The support levels
Starting aid
To use starting aid, hold button and turn the throttle grip.
The more you turn the throttle grip, the faster the bike will run.
The starting aid will support you for 10 seconds, then the motor
support is stopped.
starting
aid
19
Table of contents
Popular Engine manuals by other brands


Sumec
Sumec SV200 Operator's manual

Generac Power Systems
Generac Power Systems GN190H Service and repair manual

WEG
WEG M line Series Installation, operation and maintenance manual

MTU
MTU 6R 1600 G10F operating instructions

O.S. engine
O.S. engine 49-PI II instruction manual

Ingersoll-Rand
Ingersoll-Rand IR Series Workshop manual