Schaub Lorenz DVDP7-1615 User manual

PORTABLE DVD
USER'S MANUAL
DVDP7-1615
Please read and keep these instructions For instruction manual in another language, check online at
http://manuel-utilisateur.logisav.fr

1
Important Safety Instructions
Important safety instructions – please read carefully
and keep for future reference
To reduce the risk of fire or electric shock, do not
expose this product to water, rain or moisture. To
prevent the risk of electric shock, do not remove the
cover or back of this product. In case of product
failure, only qualified personnel can repair. There are
no user-serviceable parts inside.
Use of controls, adjustments, or performance of
procedures other than those specified herein may
result in dangerous radiation exposure. This product
is rated as LASER CLASS 1 PRODUCT.
CAUTION: Laser radiation when open - never stare
into the laser beam.
Proper ventilation
Place the product in a sufficiently–aerated place to avoid
overheating. Allow at least 10cm spacing at the back and top of the
product, and 5cm spacing on both sides to prevent overheating.
Do not place items such as newspapers, tablecloth, curtains, in
front of the ventilating openings.
Do not expose the product to high temperatures, moisture,
water and dust.
No object filled with liquids, such as vases, shall be placed on the
apparatus.
Do not place other items close to this product that may damage
it (for example, objects containing water or lightened candles).
No naked flame sources, such as lighted candles, should be
placed on the apparatus.
The apparatus shall not be exposed to dripping or splashing.
Electric supply
Please unplug the product in case of prolonged non-use.
If the supply cable is damaged, it must be replaced by the
manufacturer or qualified after-sales personnel to avoid any danger.
This product must be connected to an electrical supply 230V ~
50Hz.
The plug must be accessible after installation.
Only use this product with the AC adaptor provided.
CAUTION !
Dangerous tension inside the product ! Do not open. Risk of
electric shock ! No parts can be repaired by the end-user. Only
qualified personnel can repair and maintain this product.
If the electric cord is damaged, it must be replaced by the
manufacturer or qualified after-sales personnel in order to avoid
any danger.
The product must be installed in accordance with local laws.
Damaged batteries must be properly disposed. In order to protect
the environment, please dispose the batteries properly, in
accordance with local laws (information is available at your
reseller).
Where to install the product
- Place the product on a straight, rigid and stable place. Do not
place the product on a carpet.
- Do not place the product on top of another that may cause
overheating (for example, a receiver or amplifier).
- Do not place anything underneath the product (for example, CDs
or magazines).

2
When using earphones, reduce the volume to
protect your ears.
DVD Compatibility
This product can only play ZONE 2 DVD.
This product is compliant with directives
2006/95/CE (abrogating the directive 73/23/CEE
modified by the directive 93/68/CEE) and
2004/108/CE (abrogating the directive 89/336CEE).
This logo set on the product means that the
recycling of this apparatus comes within the
framework of the directive 2002/96/EC of
January 27, 2003 concerning the waste on
electrical and electronic equipment (WEEE).
The presence of dangerous substances in the electrical and
electronic equipments can have potential consequences on the
environment and human health in the cycle of reprocessing this
product.
Therefore, at the end of its lifetime, this product shall not be
disposed with other non-recycled waste.
As the end user, your role is of prime importance in the cycles
of re-using, recycling, and other forms of valorization of this
electrical and electronic equipment. Local authorities and
resellers have set special procedures for the purpose of
collecting and recycling this product.
You have the obligation to use the selective waste collection
systems put in place by your local authorities.
Thank you for having purchased this Schaublorenz product. With this
portable DVD, you will be able to enjoy full multimedia capabilities at
home, or inside your car. Here are the main benefits:
Full multimedia compatibility with DVD movies and also CD discs,
CD-RW, DVD-R(W), DVD+R(W) and VCD discs.
USB and SD card reader on side panel to play MP3 music, view
JPEG photos, or to play MPEG-2 and MPEG-4 SD (AVI) videos.
Car cord with headrest fixing set for car-use,
Note:
Indicates special notes and operating features.
Tip:
Indicates tips and hints for making the task easier.A section whose title
has one of the following symbols is applicable only to the disc
represented by the symbol.
Video CDs
Audio CDs
Mp3 Discs
JPEG Discs
DVD
VCD
CD
Mp3
JPEG
DVD and finalized DVD+R/RW
Introduction

3
About the Symbol Display
“ ”may appear during operation and indicates that the function
explained in this owner's manual is not available on that specific
DVD video disc.
Storing Discs
After playing,store the disc in its case.Do not expose the disc to
direct sunlight or source of heat and never leave it in a parked car
exposed to direct sunlight.
Cleaning Discs
Fingerprints and dust on the disc can cause poor picture quality
and sound distortion. Before playing,clean the disc with a clean
cloth. Wipe the disc from the center out.
Notes on Discs
Handling Discs
Do not touch the playback side of the disc. Hold the disc by the
edges so that fingerprints do not get on the surface. Never stick
paper or tape on the disc.
Do not use strong solvents such as alcohol,benzine,thinner,
commercially available cleaners, or anti-static spray intended for
older vinyl records.
Notes:
This indicates a product feature that is
capable of playing DVD-RW discs
recorded with Video Recording format.
1.Depending on the conditions of the recording equipment or the
CD-R/RW (or DVD -R, DVD +R,DVD -RW, DVD +RW) disc itself,
someCD-R/RW (or DVD -R, DVD +R, DVD -RW, DVD +RW) discs
cannot be played on the unit.
2.Do not attach any seal or label to either side (the labeled side or
the recorded side) of a disc.
3.Do not use irregularly shaped CDs (e.g., Heartshaped or
octagonal)since they may result in malfunctions.
4.Some playback operations of DVDs and Video CDs may be
intentionally programmed by software manufacturers. This unit
plays DVDs and Video CDs according to disc content designed
by the software manufacturer, therefore some playback features
may not be available or other functions may be added.
_________________________________________
_________________________________________
_________________________________________
_________________________________________
_________________________________________
Video CD (VCD)
(8 cm / 12 cm disc)
DVD
(8 cm / 12 cm disc)
Audio CD
(8 cm / 12 cm disc)
In addition, this unit plays , DVD -R, DVD +R,DVD -RW,DVD +RW,
Kodak Picture CDs, SVCD, and CD-R / CD-RW that contains audio
titles,MP3, JPEG and MPEG4 files.
RW
C0MPATIBLE
Before Use
Types of Playable Discs

4
1.Remote Control(Battery)
3.Car Plug
Accessories Provided
2).Insert battery.
NNOTES:
for a long time.
1).Open the battery door.
Battery
Hole
Remote Control
4.Fixing Set
5.AC Adaptor
Before Use (Continued)
How To Switch From DVD to USB and Card Reader Modes
Insert a USB device or a memory card.
Wait for a few seconds for the device to be recognized,
Press the SOURCE key of the remote control to switch from one
mode to another.
2. 2 sets of earphones
Remove battery when you are not using the DVD player
7. Carry bag
6.Connection Cable between 2 units

Before Use (Continued)
5
How To Install The Unit Inside A Car
Step 1: Put the portable DVD into the fixing set
Step 2: Connect the fixing set to the passenger seat
Step 3: Connect the car cord
How To Use the Unit at Home
Ensure all the cables are disconnected from the main unit before
connecting to AC power source by AC power adaptor.
Read through the instructions before connecting other equipment.
Main Unit Slave Unit
AC Adaptor
First connect the 2 units with the connection cable provided. The
main unit is the unit with the DVD player. Connect the main unit’s
DC OUT and AV OUT jacks with the slave unit’s DC IN and AV IN.
Then connect the main unit’s DC IN 9-12V jack with the A/C adapter
or the car cord provided.

Identification of Controls
Main Unit
6
1
2
3
4
5
6
7
8
9
10
19
20
21
22
23
1.CARD SLOT(SD/SDHC/MMC/MS)
2. POWER ON/OFF
3. HEADPHONE OUT JACK
4. VIDEO/AUDIO OUT
5. DIGITAL AUDIO OUT (COAXIAL)
6.USB
7. DC OUT
8. DC IN 9-12V
9. (PLAY/PAUSE)
10. UP/PREVIOUS
11. DOWN/NEXT
12. STOP
13. SOURCE
14. MODE
15. UP
16. DOWN
17. LEFT
18.RIGHT
19. POWER ON/OFF
20. HEADPHONE OUT JACK
21. AV IN
22. DC IN
23. Volume Rotary
MASTER TFT SCREEN
SLAVER TFT SCREEN
14
15
11
12
13
16
17
18

7
Remote control unit
Identification of Controls
1. SOURCE
DVD/CARD/USB.
3.0-9 NUMBER BUTTON
Selects numbered items in a menu.
4.DISPLAY
To display the playtime and status information.
2. MUTE
Disable Audio output.
5.10+ BUTTON
In order to select a track 10 or greater, first press 10+, For example;
select track 12, first press 10+, when the 10 displayed on screen,
then press number 2 button.
6. MENU/PBC
Return to DVD root menu(DVD).
PBC on/off switch (VCD) .
7.AUDIO
DVD:Press AUDIO repeatedly during playback to hear a different
audio language or audio track, if available
.
MP3/CD/VCD:Press AUDIO repeatedly during playback to
hear a different audio channel ( Left,Right,Mix,Stereo).
10.MODE
Set LCD parameter(adjust bightness, contrast,and saturation).
14. BUTTON
Press BUTTON allow skipping ahead at 5-level speed(X2->X4->
X8->X16->X32->PLAY), press PLAY button return to normal playback.
8.PLAY/PAUSE
Press PLAY/PAUSE once to pause playback, pressing PLAY/
PAUSE second time will resume the playback.
13.Reverse Skip
Go to previous chapter/ track to the beginning.
12.Forward Skip
Go to next chapter/ track.
9.STOP
When this button is pressed once, the unit records the stopped
point,from where playback will resume if PLAY( )is pressed after
wards. But if STOP button is pressed again instead of PLAY( )
button, there will be no resume function.
11.VOL+
1 2 34
5678
9 0 10+
REPEAT
TITLE
ENTER
MODE
SUBTITL E
AUDIO
MUTE
SOURCE
STEP
DISPLAY
MENU
/PBC
VOL+VOL-
SLOW
ZOOM
16
17 2
1
3
4
5
67
89
10
11
12 13
14
15
27
26
25 24 23
22
21
20
18
19
To switch between DVD,USB, and card reader mode.

Identification of Controls
8
Remote control unit
17.SEARCH
Goto time point , title or chapter you want in DVD Mode.
15. BUTTON
Press BUTTON allow skipping back at 5-level speed(X2->X4->
X8->X16->X32 PLAY), press PLAY button return to normal playback.->
16.STEP
Step the motion in DVD mode.
22.SETUP
Accesses or removes setup menu.
18.SUBTITLE
Press SUBTITLE repeatedly during playback to hear a different
subtitle languages.
20.TITLE
Return to DVD title menu
21.ENTER
Confirms menu selection..
24.REPEAT
Press REPEAT during playback to select a desired repeat mode.
DVD: you can play select repeat chapter/title/all/off.
VCD: you can select repeat single/all/off.
CD/MP3: you can select repeat single/folder/off.
19.ANGLE
DVD:Press ANGLE will change the view angle, on DVDs that
support this feature.
25.SLOW
Press Slow button repeatedly to enter slow playback, and cycle
between different speeds. The speeds are 1/2,1/4,1/8,1/16,and
normal.
26.PROGRAM
DVD/VCD:The program function enables you to store your
favourite tracks from the disc. Press PROGRAM button ,then
PROGRAM MENU will appear on screen, now you can use the
number key to direct input the titles,chapters or tracks number and
select PLAY option. and”PROGRAM”will display on the screen.
TO resume normal playback, press PROGRAM
and select clear program option on the program menu,press
PROGRAM again to exit program menu.
Adjust volume
23.VOL-
DVD/VCD: Use ZOOM to enlarge or shrink the video image.
1.Press ZOOM during playback or still playback to activate the
Zoom function. The square frame appears briefly in the right botton
of the picture.
2. Each pressed of the ZOOM button changes the TV screen in the
following sequence:
JPEG: Use ZOOM to enlarge or shrink the picture.
1.Press 'ZOOM' .
2,Used " " to enlarge,or " " to shorten the picture.
Use the button to move through the zoomed picture.
27.ZOOM

9
Connecting a USB device
1.Power-on the unit.
3.Insert a USB key inside the connector.
4.Press the SOURCE key from the remote control to start.
Remark: Depending on the capacity of the device, the reading can
take more than 1 minute before launching the video.
2.Make sure no disc has been inserted inside the tray
The unit cannot read my USB device
Remark: Depending on the capacity of the device, the reading can
take more than 1 minute before launching the video.
Connecting a memory card
The unit cannot read my memory card
Check firstly that your memory card is compatible with the
memory cards are SD, SDHC, MS, MMC formats. We have tested this
unit with most of the market's memory cards; we cannot however
guarantee a full compatibility with all the cards in the market because of
the multiple technology standards in use. Should you have a compatibility
problem: please use a memory card with a lower capacity (4GB or lower)
or else connect the unit through a USB device.
unit.Supported
1.Power-on the unit.
2.Make sure no disc has been inserted inside the tray.
3.Insert a compatible memory card inside the connector.
4.Press the SOURCE key from the remote control to start.
This unit does not support a direct USB connection with a computer,
nor a connection with a USB-external hard disk. You need to use
either a USB device or a MP3 player.
Once you have plugged your device to the unit, you may need to
switch on the USB device before it can operate.
Check that the files system of your USB device is formatted into the
FAT or FAT 32 format. USB device formatted into NTFS are not
compatible with this unit. Caution: if you attempt to modify your file
system, formatting your device will erase all data. Please refer to
your USB device's instruction manual first.
Warning: Connect your USB device directly to the USB port of the
device. Using an extension cable is not recommended and may
cause interference and failure of data transfer.

SETUP Menu Setting
General Setup Page
10
OSD Language
You can select your own preferred language setings.
Wide Squeeze:
Set screen mode to 4:3.
Angle Mark
Displays current angle setting information on the right hand corner
of the TFT screen if available on the disc.
Closed Captions
Closed captions are data that are hidden in the video signal of some
discs.Before you select this function,please ensure that the disc
contains closed captions information and your TV set also has this
function.
Screen Saver
This function is used to turn the screen saver On or Off.
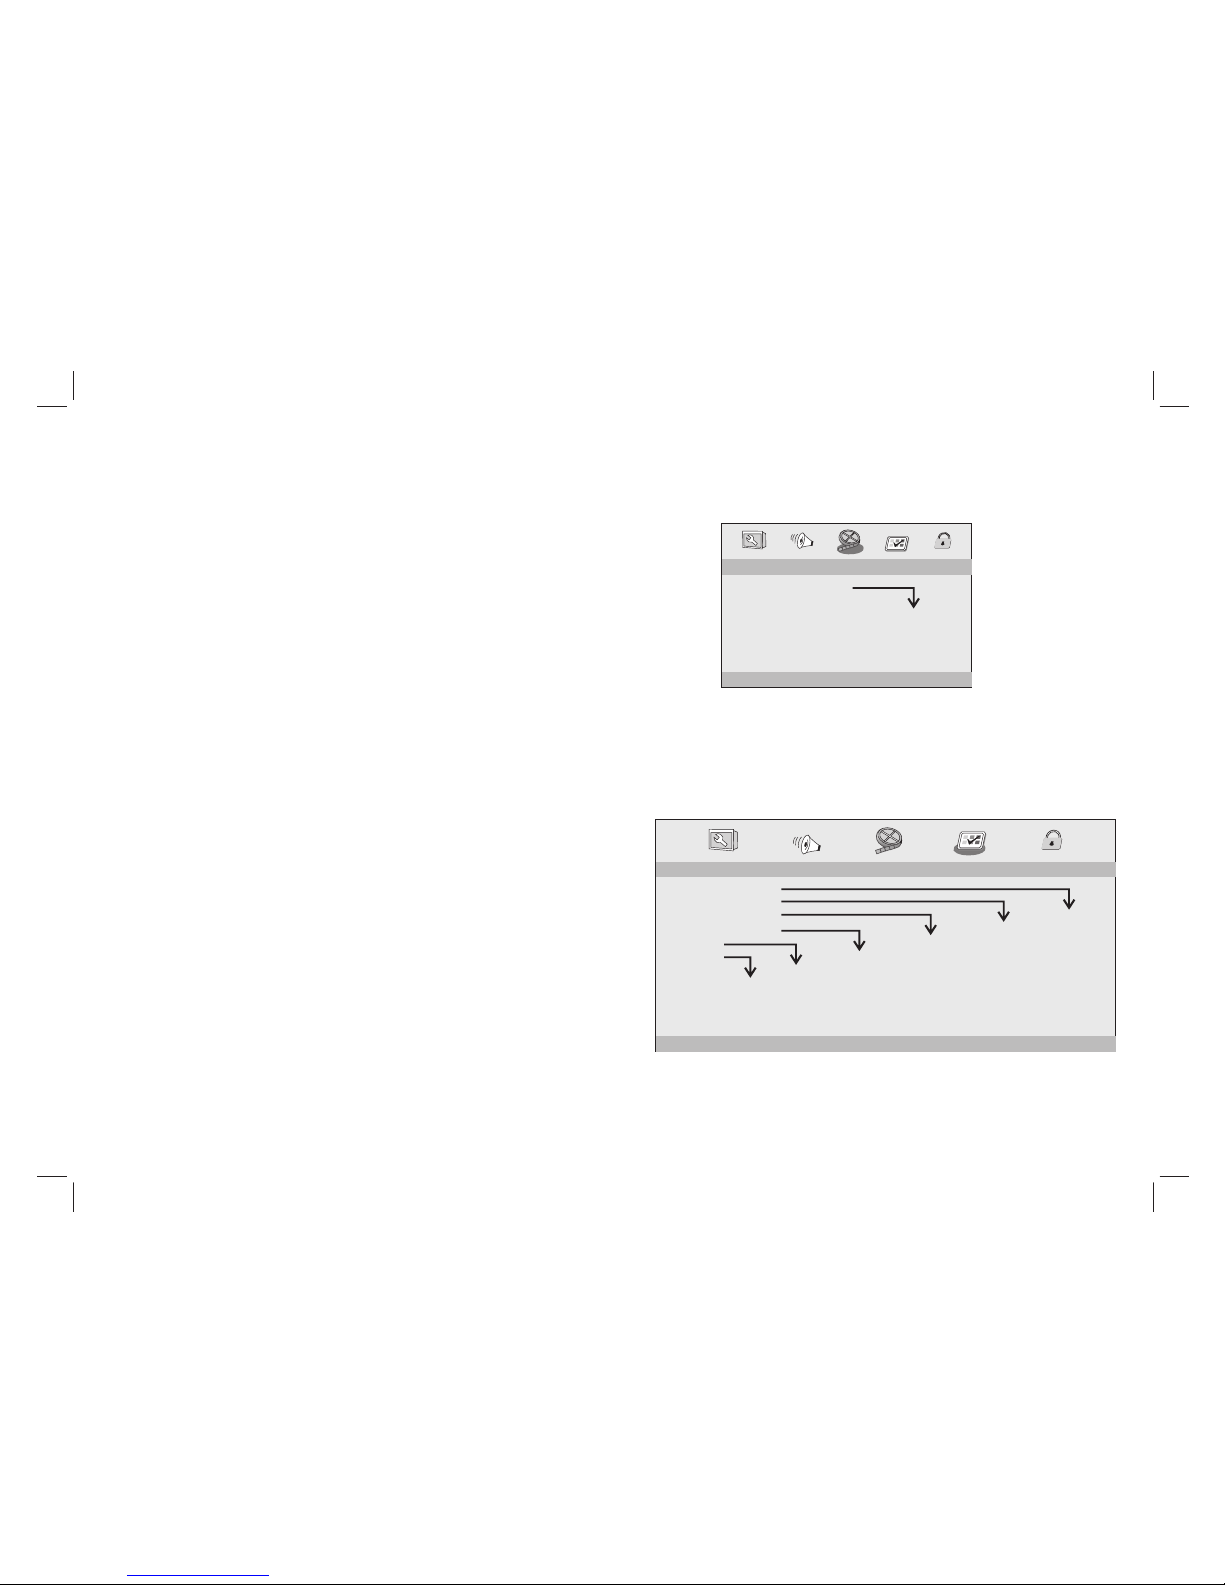
Audio Setup Page
Audio Setup Page
-- --
DOWNMINX STR
DOLBY DIGITAL
LT/RT
SPDIF/OFF
SPDIF/RAW
SPDIF/PCM
DUAL MONO
DYNAMIC
STR STR
L-MONO
R-MONO
MIX-MONO
-
-
-
-
-
-
-
-
-
-
-
-
-
-
-
-
-
-
FULL
OFF
-
Press SETUP button to get the setup menu. Use direction buttons
to select the preferred item. After finishing settings, press
SETUP again to normal display.
The following menu items can be changed:
GENERAL: selects the GENERAL PAGE menu.
AUDIO: selects the AUDIO PAGE menu.
VIDEO: selects the VIDEO PAGE menu.
PREFERENCE : selects the PREFERENCE PAGE menu.
PASSWORD: selects the PASSWORD PAGE menu.
General Setup Page
- - GENERALSETUP PAGE - -
GOTO GENERAL SETUP PAGE
TV DISPLAY WIDE
ANGLE MARK ON
OSD LANGUAGE ENG
CLOSED CAPTIONS ON
SCREEN SAVER ON
4:3 PANSCAN
4:3 LETTERBOX
16:9
WIDE SQUEEZE
ON
OFF
ENGLISH
FRENCH
GERMAN
ITALIAN
SPANISH
PORTUGUESE
ON
OFF
ON
OFF
TV DISPLAY: selects the aspect ratio of the playback picture.
4:3 PANSCAN: if you have a normal TV and want both sides of the
picture to be trimmed or formatted to fit your TV screen.
4:3 LETTERBOX: if you have a normal TV. In this case, a wide picture
with black bands on the upper and lower portions of the TV screen will
be displayed.
16:9:wide screen display.
- - - -AUDIO SETUP PAGE
GO TO AUDIO SETUP PAGE
DIGITAL OUTPUT RAW STEREO
SETUP Menu Setting
11
Video Setup Page
Video Setup Page
- - VIDEO SETUP PAGE - -
GOTO VIDEO SETUP PAGE
BRIGHTNESS 00
CONTRAST 00
HUE 00
SATURATION 00
Preference Page
Preference Page
- - PREFERENCE SETUP PAGE - -
GOTO PREFERENCE PAGE
TV TYPE PAL
AUDIO ENG
SUBTITLE ENG
DISC MENU ENG
PARENTAL
DEFAULT
PAL
AUTO
NTSC
ENGLISH
FRENCH
GERMAN
ITALIAN
SPANISH
PORTUGUESE
OTHERS
1 KID SAF
2 G
3 PG
4 PG13
5 PGR
6 R
7 NC17
8 ADULT
RESET
TV Type
Selecting the colour system that corresponds to your TV when AV
outputs.This DVD Player is compatible with both NTSC and PAL.
Downmix
This options allows you to set the stereo analog output of your
DVD Player.
Audio Setup Page
LT/RT :Select this option if your DVD Player is connected to a
Dolby Pro Logic decoder.
Stereo :Select this option when output delivers sound from only
the two front speakers.
Dolby digital
The options included in Dolby Digital Setup are: and
'Dynamic '.
'Dual Mono '
Dual Mono
Stereo:Left mono sound will send output signals to Left speaker
and Right mono sound will send output signals to Right speaker.
L-Mono:Left mono sound will send output signals to Left speaker
and Right speaker.
R-Mono:Right mono sound will send output signals to Left speaker
and Right speaker.
Mix-Mono:Left and Right mixed mono sound will send output
signals to Left and Right speakers.
Dynamic
Dynamic range compression.
ENGLISH
FRENCH
GERMAN
ITALIAN
SPANISH
PORTUGUESE
OTHERS
ENGLISH
FRENCH
GERMAN
ITALIAN
SPANISH
PORTUGUESE
OFF
OTHERS
Digital Output
The function is used to select the SPDIF Output:SPDIF Off,SPDIF
/RAW,SPDIF/PCM.
SPDIF Off: Turns off the SPDIF output.
SPDIF/RAW: If you have connected your DIGITAL AUDIO OUT
to a multi-channel decoder/receiver.
SPDIF/PCM: Only if your receiver is not capable of decoding
multi-channel audio.
- - VIDEO SETUP PAGE - -
GOTO VIDEO SETUP PAGE
SHARPNESS MID
BRIGHTNESS 00
CONTRAST 00
HUE 00
SATURATION 00
HIGH
MEDIUM
LOW
Sharpness,Brightness,Contrast,Hue,Saturation:setting the video
quality.

SETUP Menu Setting
Password: select the menu password change page.
Password Setup Page
OLD PASSWORD
NEW PASSWORD
CONFIRM PWD
OK
OLD PASSWORD: Enter the OLD password, (Factory setting is
1369), and the cursor will jump automatically to
NEW PASSWORD
.
NEW PASSWORD: Enter the NEW password. Enter 4 digits from
the remote control unit numeric buttons, and the
cursor will automatically jump to CONFIRM PASSWORD.
CONFIRM PASSWORD: Confirm the NEW password by entering
it again. If the confirmation is incorrect, the cursor
will stay in this column. After entering, the correct new password
again, the cursor will jump automatically to OK.
OK: When cursor is on this button, press ENTER key to confirm
setting.
PAL - Select this if the connected TV is PAL system.It will change the
video signal of a NTSC disc and output in PAL format.
NTSC-Select this if the connected TV is NTSC system.It will change
the video signal of a PAL disc and output in NTSC format.
Auto:Chang the video signal output automatic according to the
playing disk format.
Audio:Selects a language for audio (if available).
Subtitle:Selects a language for subtitle (if available).
Disc Menu:Selects a language for disc menu (if available).
Parental
Some DVDs may have a parental level assigned to the complete
disc or to certain scenes on the disc.This feature lets you set a
playback limitation level.The rating levels are from 1 to 8 and are
country dependent. You can prohibit the playing of certain discs
that are not suitable for your children or have certain discs played
with alternative scenes.
Default:Back to the factory setting.
Note: The Preferences Setup menu is only available at disk tray
opening, no disc or full stop mode.
Preference Page
Password Setup Page
Password Setup Page
- - PASSWORD SETUP PAGE - -
GOTO PASSWORD SETUP PAGE
PASSWORD MODE ON
PASSWORD
ON
OFF
Password mode: Set password mode on/off. If set to off, change
parental level will not check password.
Note: If the password has been changed, the parental and disc
lock code will also be changed.
The default password(1369)is always active even the password
has been changed.
12
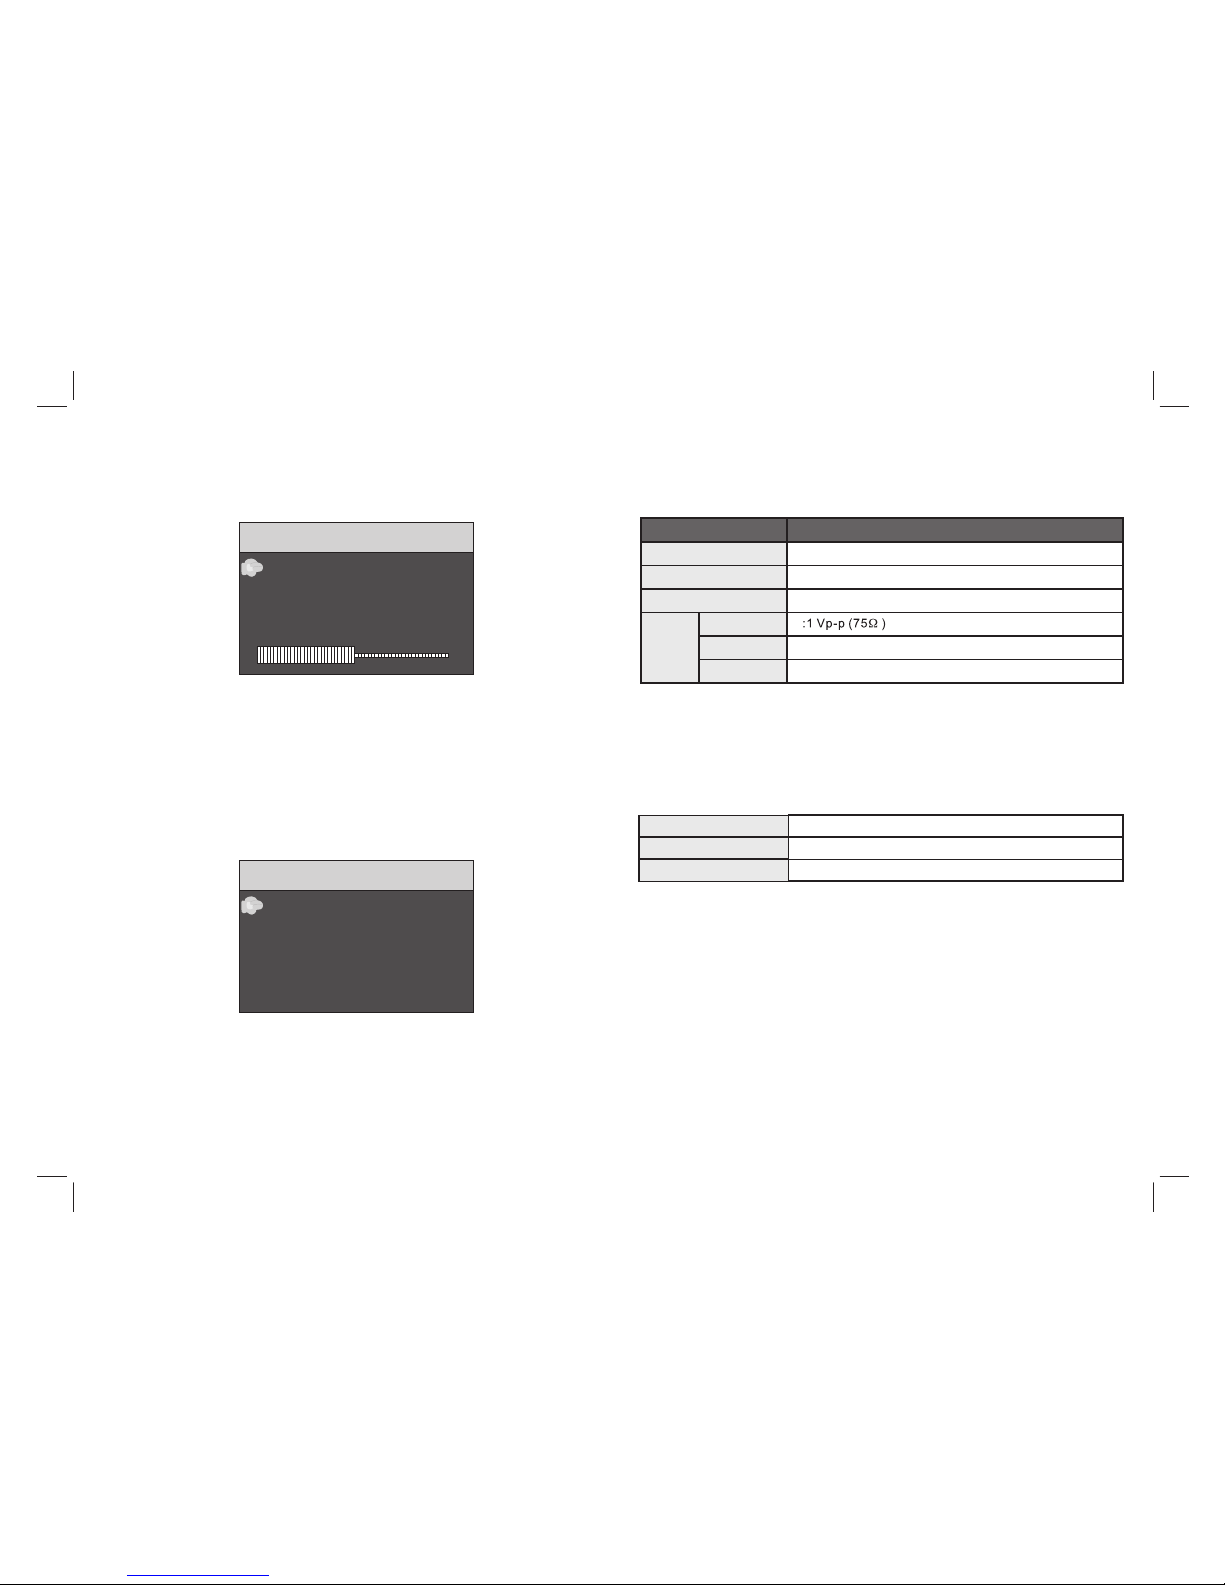
Picture Page
50
50
50
16.9
PICTURE
PICTURE
BRIGHT
CONTRAST
COLOR
ENGLISH
RESET
SCREEN
Brightness
Adjust screen Bright Setting.
Contrast
Adjust screen Contrast Setting.
Color
Adjust screen Color Setting.
ENGLISH
Adjust Menu OSD Language
SCREEN
Adjust screen SCREEN 16:9 or 4:3
Slaver TFT Menu Setting
Item Standard requirement
Audio :Speaker:1WX2, output, Coaxial outputHeadphones
Electronical parameters
VIDEO OUT
AUDIO OUT :1.0 Vrms (1 KHz, 0 dB)
Power requirements
Power consumption
Operating humidity
: AC 100-240 V , 50/60 Hz
: <15W
: 5 % to 90 %
System
Laser :Semiconductor laser, wavelength 650 nm
Signal system : NTSC / PAL
Frequency response
Note: Design and specifications are subject to change prior notice.
: 20Hz to 20 kHz(1dB)
Output
13

Troubleshooting
14
If your DVD player does not seem to be functioning properly, check the
items below before you contact an authorized service center.
Remote
won't work
control
No picture
Make sure the adapter is securely plugged in.
No sound Check the volume setting. If set to zero, turn up
level.
Check that the headphones are plugged into the PHONES
socket.
volume
Symptom Check
Check that the battery is inserted in
"-" direction properly.
The battery may be flat. Replace it with a new one.
Check that the signal transmission is directed at
the remote control sensor on the DVD player.
Remove the obstacle between the remote
controller and remote control sensor.
the "+" and
Check that the A/V cables are securely
Check that the disc is a DVD, DVD-RW or AUDIO CD.
Do not use a disc that has scratches or dirt.
Check that the label-side of the disc is facing up.
The pick-up lens of the DVD player may be dirty.
Contact the service
connected.
center for lens cleaning.
Check that the adapter is properly connected.
Power does
not turn on or
suddenly
turns off.
or sound
Distorted Use a disc without scratches or dents.
video or sound

15
Important remarks about reading MPEG-4 videos on this unit
If you encounter any problems when playing MPEG4 videos, please
check the below points:
1.There is a wide variety of codecs and compression methods
in use. It is possible that some videos, including those downloaded
from unofficial websites, are not fully compatible with this unit.
2.This player does not support MPEG4 videos recorded using a
High Definition format. The MPEG-4 HD and H.264 formats are
different from the standard-resolution one. For the time being,
videos encoded in High Definition are only readable on computers.
3.Maximum resolutions supported by MPEG-4 codecs and this
unit are: 720x480@30fps / 720x576@25fps
4.Videos must be encoded with a soundtrack in MP3 format,
since other formats, such as AC3, are not supported. If there is no
sound, it means that the audio codec is not compatible.
5.If your MPEG-4 video file does not appear on the unit's
screen, check that the file name ends with the extension “.AVI”. If
this is not the case, you can rename the file on your personal
computer.
ADMEA / LOGISAV
ZI du clos des charmes
26 rue du clos des charmes
77090 COLLEGIEN - France
The region number for this DVD player is
Rovi Product Notice:
This product incorporates copyright protection technology that is
protected by U.S. patents and other intellectual property rights.
Use of this copyright protection technology must be authorized by
Rovi Corporation, and is intended for home and other limited viewing
uses only unless otherwise authorized by Rovi Corporation.
Reverse engineering and disassembly are prohibited.
For instruction manual in another language, check online at
http://manuel-utilisateur.logisav.fr
Table of contents
Other Schaub Lorenz Portable DVD Player manuals


