Scotts of Stow 1938656 User manual

1ScottsLtd.CotswoldHouse,1CromptonRoad,Groundwell,Wiltshire.SN255AW
Enquiries:03444829700
ProductCode:1938656
CompactMusicCentre
INSTRUCTIONMANUAL
Pleaseretainforreference

2ScottsLtd.CotswoldHouse,1CromptonRoad,Groundwell,Wiltshire.SN255AW
Enquiries:03444829700
TableofContents
TableofContents....................................................................................2
SafetyInformation..................................................................................3
Unpacking/ConnectingtheCompactMusicCentre.................................4
BatteryInstallation.................................................................................4
RemoteControlFunctions.......................................................................5
LocationofControls................................................................................6
SettingtheClock....................................................................................7
Howtouse–Radio................................................................................7‐8
Howtouse‐Turntable...........................................................................8
Howtouse‐CD......................................................................................8‐9
Howtouse‐Cassette.............................................................................9‐10
MoreFeatures......................................................................................10‐11
Specification.........................................................................................12
3ScottsLtd.CotswoldHouse,1CromptonRoad,Groundwell,Wiltshire.SN255AW
Enquiries:03444829700
IMPORTANT SAFETY INSTRUCTIONS:
1. Read the instructions. All user guidelines must be read before start device.
2. Keep the instructions for future use.
3. Attention, use and security guidelines must be respected.
4. The device must not be used near water or be put in contact with moisture.
5. Make sure no liquid is spilled on the device or device openings.
6. Move device carefully, avoid shocks.
7. Do not block the breakdown of the device outputs.
8. Do not place the device near a heat source (e.g. radiator), or place in direct sunlight.
9. Plug the device as indicated within this instruction manual.
10. The power cable should be unplugged when the unit is not in use.
11. The unit contains no user serviceable parts. All repairs should be carried out by a qualified
engineer. Improper repairs may place the user at risk of harm, and will invalidate any guarantee.
12. The unit shall not be exposed to dripping or splashing and no objects filled with liquids (e.g. vases)
shall be placed on the unit.
13. No naked flame sources, such as lighted candles should be placed on or near to the unit.
14. This unit is not intended for use by persons (including children) with physical, sensory or mental
capabilities or lack of experiences or knowledge. They should be given supervision and instruction in
the use of the appliance by a person responsible for their safety.
15. Do not use the unit for any purpose other than that for which it has been designed.
16. This unit is designed for domestic use only. It should not be used for commercial purposes.
Caution:
Usage of controls or adjustments or performance of procedures other than those specified herein may
result in hazardous radiation exposure.
This unit should not be adjusted or repaired by anyone except qualified service personnel.
Important:
Since movement of the CD mechanism and the sensitive circuitry may cause interference to the radio
tuner nearby, switch this unit off while operating other radio devices.
4ScottsLtd.CotswoldHouse,1CromptonRoad,Groundwell,Wiltshire.SN255AW
Enquiries:03444829700
Unpacking Connecting the Compact Music Centre
Unpack all parts and remove protective material.
Do not connect the unit to the mains before checking the mains voltage and before all other
connections have been made.
Do not cover any vents and make sure that there is a space of several centimeters around the unit for
ventilation.
Connection
Connect the speaker wire from included speaker box to the speaker terminal of the main unit.
Connect the power cable to the AC outlet, the unit will go into standby mode and standby LED will
light up.
Turn on the unit by pressing the on/standby button. If the LCD display lights up it means the unit is
ready to use.
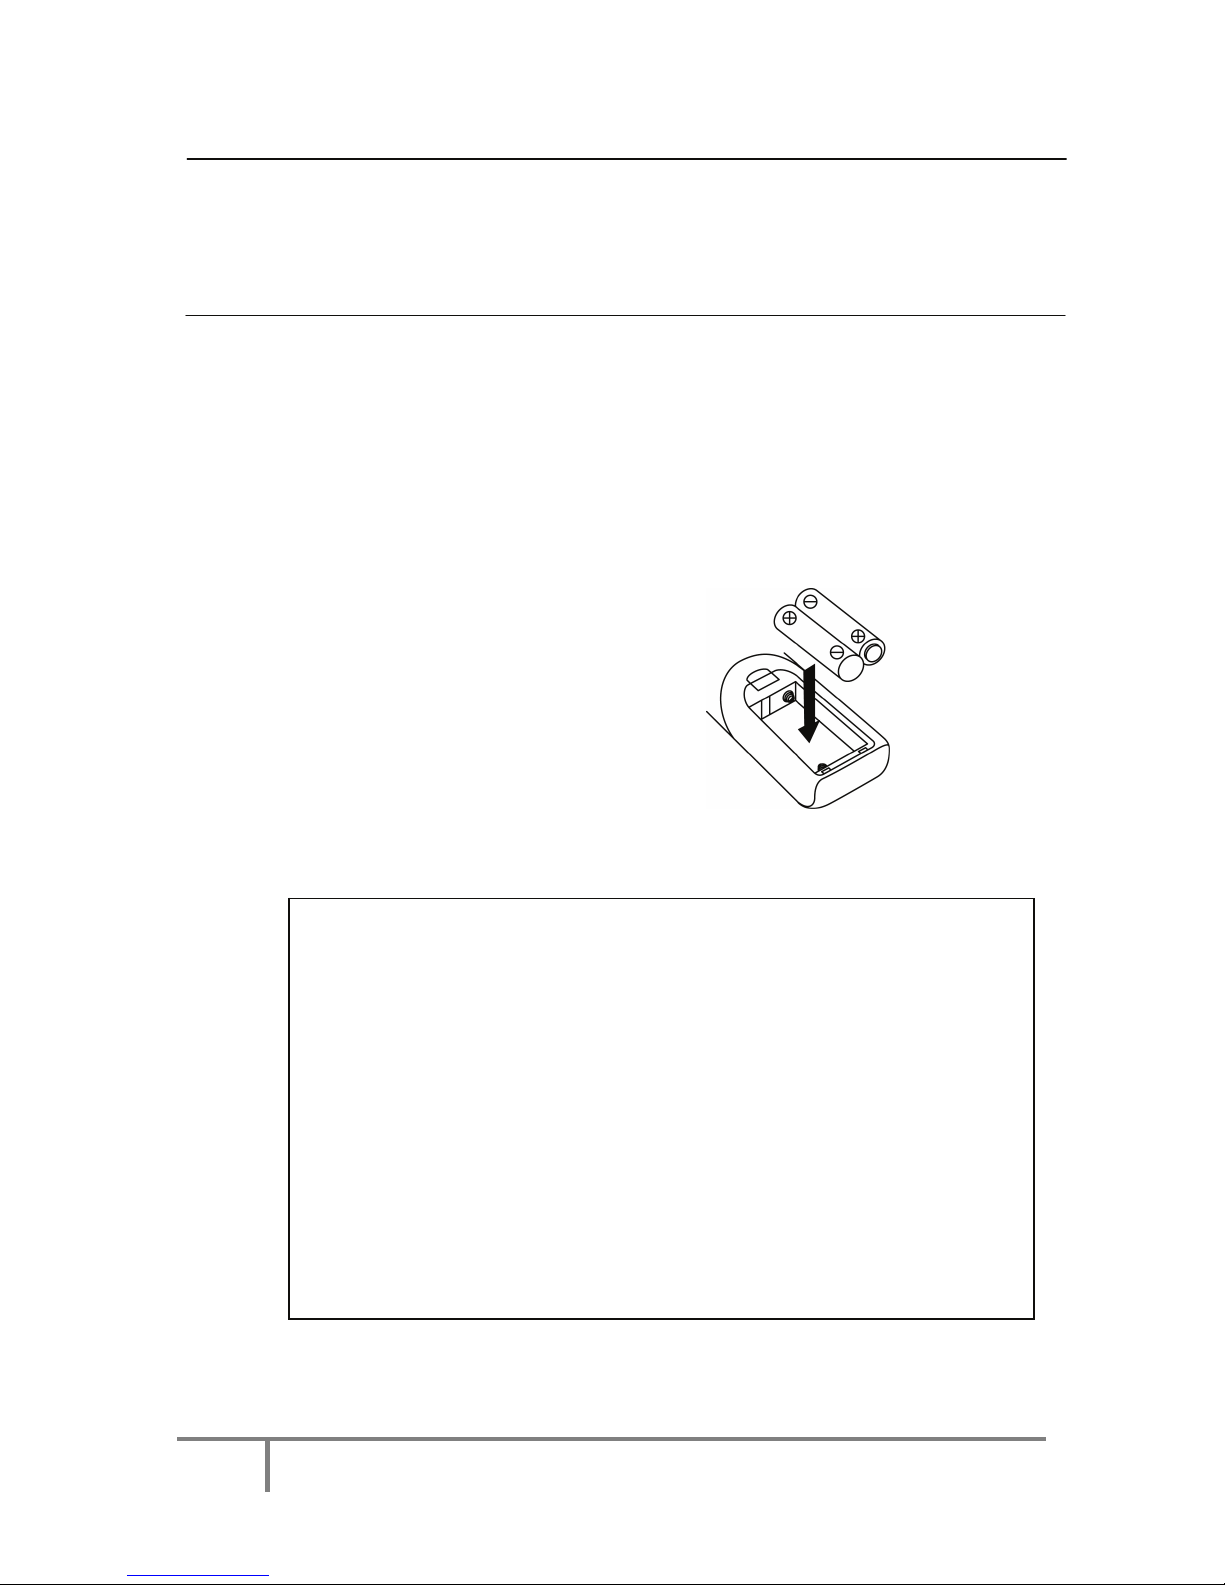
BATTERY INSTALLATION
The battery compartment is located on the back of the remote control.
Remove the battery compartment door by pressing in on the tab and lifting it off.
Insert two (2) AAA size batteries (not included) into the battery compartment following the polarity
markings inside the battery compartment.
Replace the battery compartment door.
Battery Precautions
zReplacement of batteries must be done by an adult.
zDo not mix old and new batteries.
zDo not mix alkaline, standard (carbon-zinc) or rechargeable (nickel-
cadmium) batteries.
zThe supply terminals are not to be short-circuited.
zNon-rechargeable batteries are not to be recharged.
zExhausted batteries are to be removed.
zOnly batteries of the equivalent type are to be used.
zBatteries are to be inserted with the correct polarity.
zDispose of batteries properly. Do not dispose of batteries in fire. The
batteries may explode or leak.
5ScottsLtd.CotswoldHouse,1CromptonRoad,Groundwell,Wiltshire.SN255AW
Enquiries:03444829700
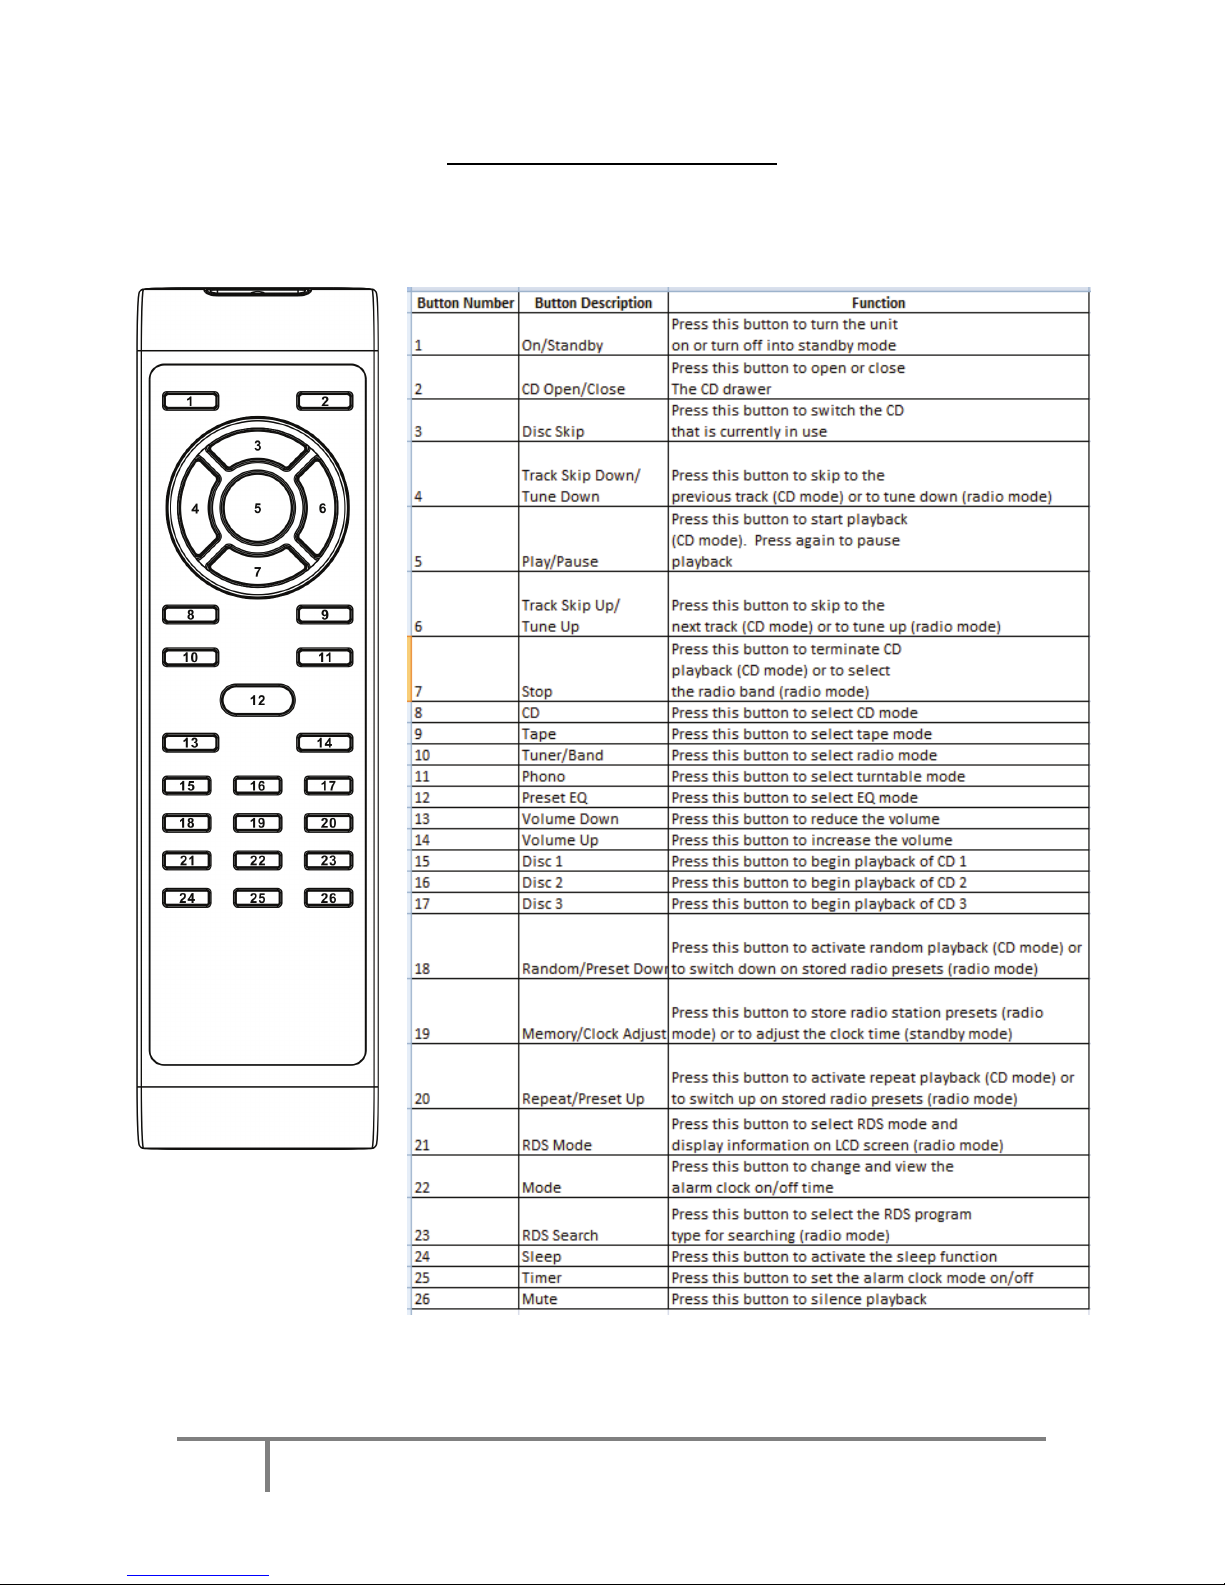
Remote Control Functions

6ScottsLtd.CotswoldHouse,1CromptonRoad,Groundwell,Wiltshire.SN255AW
Enquiries:03444829700
LOCATIONOFCONTROLS
1) Dust cover 18) Headphone jack
2) LCD display 19) Remote sensor
3) Volume up-down button 20) Pre-set EQ button
4) Extra bass control button 21) CD play / pause button
5) Standby LED indicator 22) Disc skip button
6) FM mode / Dubbing speed selector 23) Phono/Tuner/Tape button
7) On/Standby button 24) CD tray open/close button
8) CD stop button 25) Skip / Search / Tuning up button
9) Mute button 26) Repeat / M-up button
10) CD button 27) Deck 2 compartment
11) Sleep / Timer button 28) Deck 2 control keys
12) Skip / Search / Tuning down button 29) Spindle adaptor
13) Random / M-dn button 30) Turntable speed selector
14) Memory / Clock adjust button 31) Auto stop switch
15) Deck 1 compartment 32) Pick-up holder
16) Deck 1 control key 33) Speaker wire terminal
17) CD tray 34) FM wire antenna
35) AC power cord

7ScottsLtd.CotswoldHouse,1CromptonRoad,Groundwell,Wiltshire.SN255AW
Enquiries:03444829700
Setting the clock
Set unit into standby mode by pressing the On/Standby button (7)
Press the Mem/Clk-Adj button (14). The first and second digits will begin to flash “00”. Press the
button (12/25) to set the correct hour. Press the Mem/Clk-Adj button (14) to store.
The third and fourth digits will begin to flash “00”. Press the button (12/25) to set the correct
minutes. Press the Mem/Clk-Adj button (14) to store.
To display the time in 12 or 24 hour format, hold the CD stop button (8) to change between the two
display modes.
Please note that the set time will be automatically reset to “00:00” format if you unplug the device or
turn the mains supply to the unit off. To prevent this leave the unit in standby mode
How to Use-radio
Manual tuning
Set unit into on mode by pressing the On/Standby button (7)..
Press the tuner button (23) to select radio mode.
Tune to the required radio station by pressing the Tuning up/down button (12/25).
Adjust volume controls to the desired volume level.
Auto tuning
Press the tuner button (23) to select radio mode.
Press and hold the Tuning up/down button (12/25) for 1-2 seconds and then release
The unit will start searching automatically and will stop searching once a radio station has been found.
Repeat steps 2 & 3 until the desired radio station has been found.
Adjust volume controls to the desired volume level.
Preset stations
You can store up to a total of 20 radio stations in the memory.
Select radio mode by pressing the tuner button (23).
Turn to the desired radio station by “ Manual” or “Auto” tuning method.
Press the Mem/Clk-Adj button (14) to enable radio station preset storing.
Press the Repeat/M-up button (26) to select the desired preset.
Press the Mem/Clk-Adj button (14) to save the preset.
Repeat steps 2-5 to store other radio station presets.
Press the M-up or M-down button (26/13) to select the required preset to listen to.
Please note- That the preset radio stations will be cleared from the memory if you unplug the device
or turn the mains supply to the unit off. To prevent this leave the unit in standby mode.
If there is a period of 10 seconds of no activity after starting the preset storage process, the tuner will
return to normal play mode.
You can overwrite a stored preset radio station by storing another station in its place.
Radio Data System (RDS) (On remote control)
This feature allows you to display the information released from the radio station broadcast.
RDS Mode- Press this button on the remote control to activate the RDS function and the program
service station name (PS) is being displayed.
RDS Search- Press this button on the remote control to select the program type you want to listen to,
then press the tuning up/down on the unit (12/25) button to start RDS searching and the unit will
automatically detect a suitable station, which is currently broadcasting with Program Type
Identification (PTY) signal.
Please note- No PS or No PTY appears if no signal is sent by the radio station.
Notes for RDS
Program Service Station Name (PS)
This is a name consisting of less than 8 letters and/or numbers, which is displayed in order to inform
listeners about the program service being broadcast by the radio station (e.g. BBC 1)
Program Type Identification (PTY)
PTY allows selection by one of 15 program types rather than by station name.
8ScottsLtd.CotswoldHouse,1CromptonRoad,Groundwell,Wiltshire.SN255AW
Enquiries:03444829700
NEWS, AFFAIRS (current affairs), INFO (information), SPORT, EDUCATE (education), DRAMA,
CULTURE, SCIENCE,
VARIED, POP M (pop music), ROCK M (rock music), MOR M (middle of the road music), LIGHT M (light
classical),
CLASSICS (serious classical), OTHER M (other music).
Radio Text (Text)
Information such as the cast list of a play or the title of a song is shown on the display.
Clock-Timer (CT)
CT function provides an accurate clock signal.
If the clock is not adjusted after plugging in the unit, when an RDS clock signal is received the system
will automatically update the clock to the received RDS clock signal.
FM & FM-stereo reception
zSet the FM mode selector at “MONO” position. Programs are received in mono mode. In
particular when stereo signals are weak. It is preferable to receive the program in mono.
zSet the FM mode selector at “ST” position for receiving stereo programs. The “ST” indicator will
appear on LCD to show FM stereo program is receiving.
- FM : The receiver has a build-in FM wire antenna hanging at the rear cabinet. This wire should be
totally unraveled and extended for best reception.
Please note- The unit has a built in FM wire aerial hanging at the rear. This aerial should be totally
unravelled and extended for best radio reception.
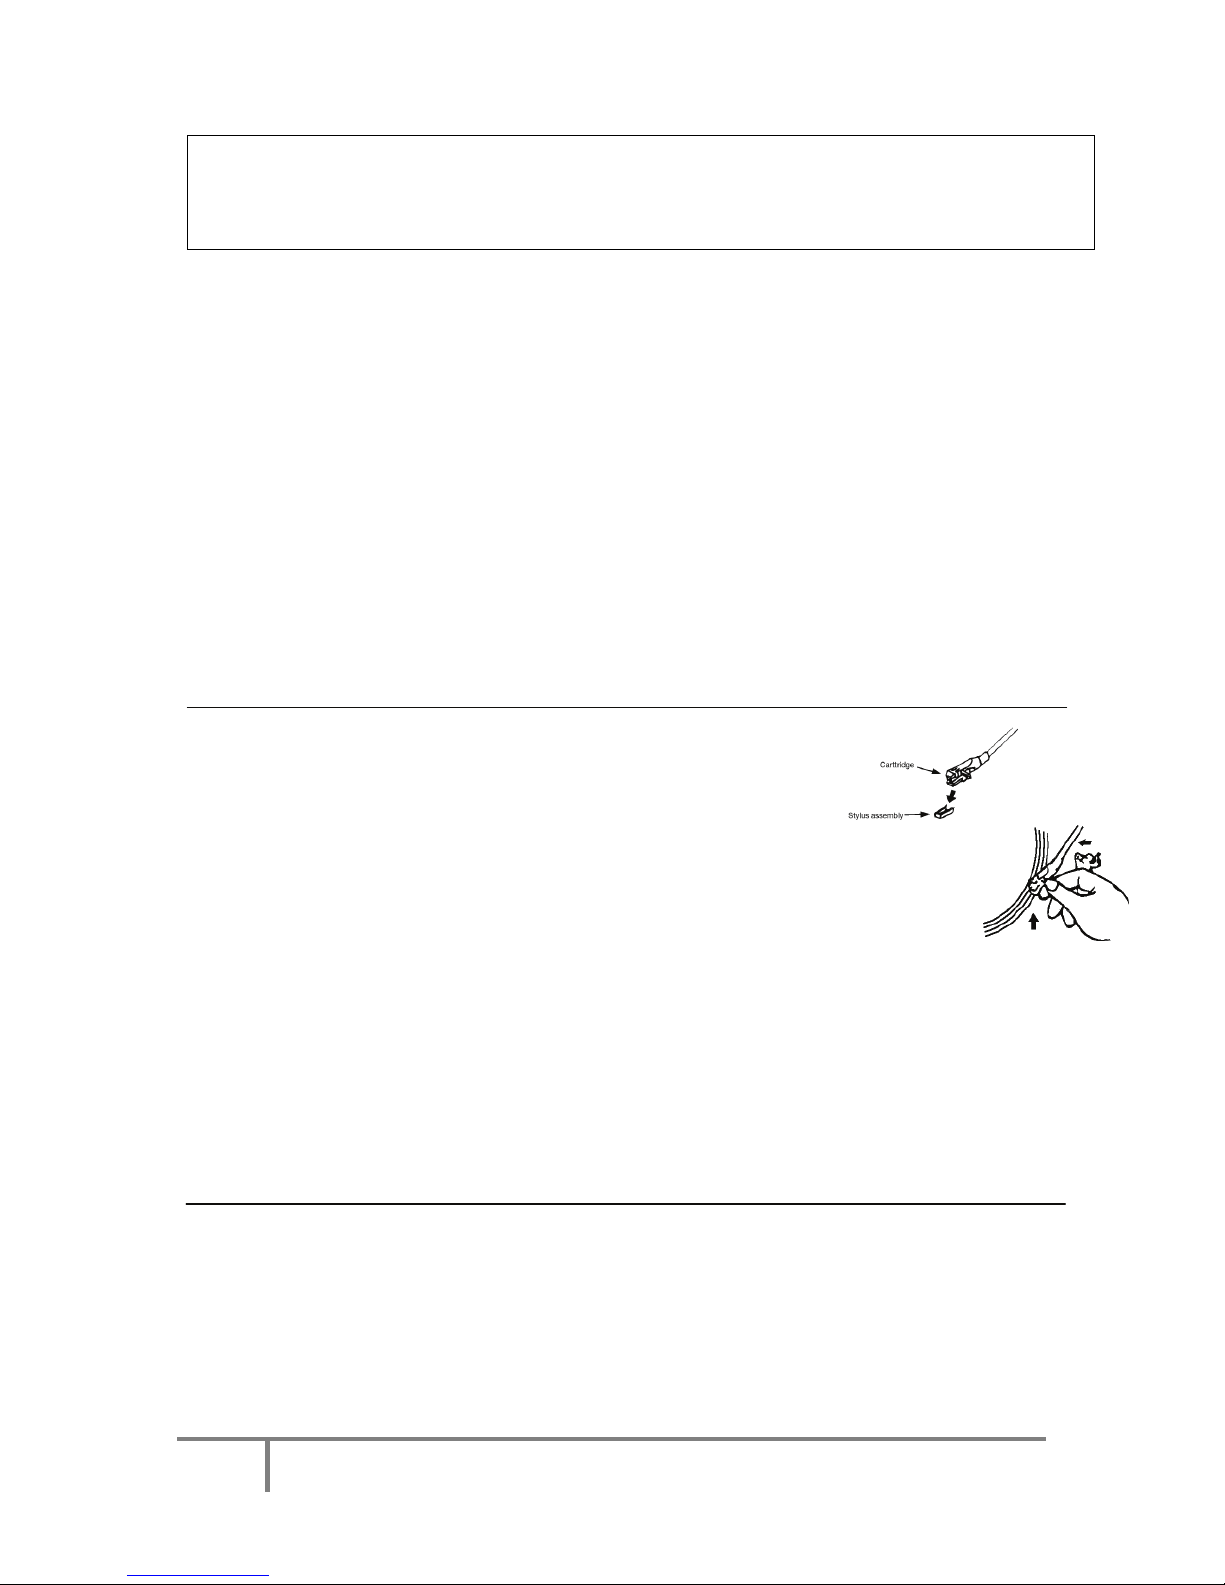
How To Use Turntable
Please Note:
-Remove the stylus protector.
-Be sure that the tone arm is being detached from the tone arm rest
before operating, and re-secured again afterwards.
1. Remove the stylus protector.
2. Press the phono button (23).
3. Set the speed selector (30) to the required position depending on the record to be played.
4. Place the record onto the turntable(use the spindle adapter (29) if required).
5. Lift the tone arm from the rest and slowly move it to the record side. The turntable and the
record will begin to rotate.
6. Place the tone arm to the required position on the record.
7. Adjust the volume to the desired level.
8. When the record has reached the end, the record will automatically stop rotating. Lift the tone arm
from the record and return it to the rest.
9. To stop the record manually, lift the arm from the record and return it to the rest.
Remark: On certain record types the auto-stop area can be out of the unit settings, so it will stop
before the last track finishes. In this case, slide the auto-stop switch (31) to the “off” position, then it
will run to the end of the record, but will not stop automatically. Turn off the power by pressing the
power button (7) or sliding the auto stop switch (31) to the “on” position to stop the turntable from
rotating. Then put the tone arm back to the rest position.
How to use- CD
1. Press CD button (10).
2. Press CD tray open/close button (24) to open the CD tray.
3. Place a CD with the printed side facing up inside the tray.
4. Press the Disc Skip button (22) to turn the CD tray and load a CD into the 2nd compartment.
Press the Disc Skip button (22) and load a CD into the 3rd CD compartment.
5. Press the CD tray open/close button (24) to close the CD door.
6. CD search is now performing. The display will read show the total number of discs, number of
tracks and the playing time of each disc.
9ScottsLtd.CotswoldHouse,1CromptonRoad,Groundwell,Wiltshire.SN255AW
Enquiries:03444829700
Please note- CD search will be performed every time when switching to CD mode or when closing
the CD door. All CD functions will be available only after the CD search function is completed (around
5 seconds).
zPlay / Pause Mode and Stop Mode
1. Press the play/pause button (21) to begin playback. The first track of the first disc will be played
and the play indicator will appear on the LCD display (2).
Alternatively press the Disc skip button (22) to select the desired CD in the disc tray.
2. To pause CD playback, press the play/pause button (21) during playback and the CD will pause.
The display will start flashing. Press the play/pause button (21) to resume playback.
3. To stop playback,press the stop button(8). This can be done during play or pause mode.
zSkip mode (skip up /skip down )
1. During playback, if the track skip up button (25) is pressed it will skip to the next track and begin
playing. During playback, if the track skip down button (12) is pressed it will skip to the beginning
of the track being played. If the track skip button (12) is pressed again it will skip to the previous
track and begin playing.
2. In pause mode, if the track skip down button (12) is pressed it will skip to the beginning of the
track being played and remain paused. If the track skip button (12) is pressed again it will skip to
the previous track and remain paused.
3. After step 2, press skip down button (12) again,and it will go to the previous track and remain in
the play or pause mode.
zSearch mode (search up /search down )
1. During playback, if the search up button (25) is pressed and held for a few seconds, it will begin
searching forward.
2. During playback, if the search down button (12) is pressed and held for a few seconds, it will
begin searching backwards.
zRepeat play
This function allows a single track, 1 single disc or all 3 discs to be played repeatedly.
Press the repeat button (26) repeatedly as below to select the required repeat mode.
REPEAT All DISC REPEAT 1 DISC REPEAT ONE
Please note- Single track repeat function is possible during normal or programmed playback. Repeat
1 single disc or all 3 discs is only available in normal playback.
zRandom play
You can listen to all of the tracks on all available discs in a random order with this function.
1. Press the random button (13) once and the unit will play all tracks on all discs in a random order.
Press again and the unit will play all tracks on the selected disc in a random order.
2. Press the play/pause button (21) to begin random playback.
3. Press random button (13) again to cancel random playback.
CD programming
Up to 60 tracks can be programmed to be played in any required order from one CD or all CDs in the
CD drawer.
1. Press the CD button (10) to set in CD mode.
2. Press the Mem/Clk-Adj button (14).
3. Press the disc skip button (22) to select the desired disc.
4. Press the track skip up or track skip down button (12/25) to select the desired track.
5. Press the Mem/Clk-Adj button (14) again to store the selected track into the memory.
6. Repeat steps 3-5 to enter additional tracks into the memory.
7. Press the play/pause button (21) to begin playback.
8. Press the stop button (8) to stop playback and press stop button (8) again to clear all programmed
tracks.
How to use- Cassette
General operation
Stop/eject key- Press to stop all deck operations. Press again to open the cassette door.
Fast forward key and fast rewind key- Press to start rapid tape winding in either forwards or reverse
direction. Press the stop/eject key when the spools stop turning.
Play key- Press to begin playback.
Pause key- Press to stop playback temporarily. Press again to resume playback.
Record key (deck 1 only)- Press this button together with play key to begin cassette recording.

10ScottsLtd.CotswoldHouse,1CromptonRoad,Groundwell,Wiltshire.SN255AW
Enquiries:03444829700
Playback
1. Press tape button (23) to select cassette function.
2. Insert a cassette into the tape deck.
3. Press play key to begin playback.
4. Adjust volume to the desired level.
5. Press the pause key to temporarily stop playback, press again to continue playback.
6. Press stop/eject key when finished.
Recording
Recording from cassette (deck 2 to deck 1)
The unit enables you to copy a cassette to a blank cassette. It is only possible to record from deck 2
(playback) to deck 1 (recording).
Recording at normal speed
1. Press the tape function button (23).
2. Insert a cassette to be copied into deck 2 and a blank cassette into deck 1.
3. Press the pause key and then press the record and play keys on deck 1.
4. Press the play key to begin playback of cassette in deck 2, and then press the pause key on deck 1
to begin recording.
5. Press the pause key on deck 1 and the stop key on deck 2 when finished.
Recording at high speed
This unit is equipped with a high speed recording system, which can save the time for recording by ⅔
when compared to recording at normal speed.
1. Press the dubbing speed button (6) to “HI” position, and then repeat the same procedures as
stipulated in the recording at normal speed section above.
Please note- If when recording a pre-recorded cassette tape at high speed, a chattering sound is
heard, reduce the volume control.
During recording do not press the HI-NOR button (6), as this will vary the recording speed and may
damage the cassette tape.
Recording from radio
1. Press the Tuner button (23) to select radio mode.
2. Tune to the desired station and insert a blank cassette tape in deck 1.
3. Press the record and play buttons on the cassette deck to start recording.
4. Press the pause key and then the stop/eject key on the cassette deck once finished.
Recording from CD
1. Press the CD button (10).
2. Insert a blank cassette into deck 1.
3. Press the pause key on the cassette deck first, then press the record and play keys on the cassette
deck. The recording function is now on standby.
4. Press the CD play key (21) and then press the pause key on the cassette deck to start recording.
5. To stop recording, press the CD stop button (8), and then press the pause key on the cassette
deck and then the stop/eject buttons on the cassette deck.
Recording from turntable
1. Press the phono button (23) to select turntable mode.
2. Insert a blank cassette into deck 1.
3. Place a record onto the turntable.
4. Press the record and play keys on the cassette deck to start recording.
5. Select the desired track on the record by positioning the needle to the required position.
6. Press the pause key on the cassette deck and then the stop/eject key once finished.
11ScottsLtd.CotswoldHouse,1CromptonRoad,Groundwell,Wiltshire.SN255AW
Enquiries:03444829700
Additional features
Sleep setting
1. Press and hold the sleep/timer button (11) to activate sleep mode. Keep the button held until the
required sleep setting is reached in the following order 90 > 80 > 70> 10 minutes.
2. The SLEEP indicator will be displayed on the LCD screen (2).
3. System will go into standby automatically once the selected time setting has expired.
4. To cancel sleep mode, press and hold the sleep/timer button (11) until the SLEEP indicator
disappears from the LCD screen (2).
Timer setting (on remote only)
This function allows the system to turn on automatically and wake you up by playing music from CD,
turntable, cassette or radio.
1. Set the unit into standby mode. The current time will be displayed on the LCD screen (2).
2. Press the mode button (22) to display the time that the unit will switch on. Press the memory/clock
adjust button (19), the hour digits will begin to flash on the LCD screen (2). Press the track skip up or
down button (6/4) to select the required hour. Press the memory/clock adjust button (19) to confirm
the hour, and the minute digits will begin to flash on the LCD screen (2). Press the track skip up or
down button (6/4) to select the required minutes. Press the memory/clock adjust button (19) to
confirm the minutes.
3. Press the mode button (22) to display the time that the unit will switch off. Press the memory/clock
adjust button (19), the hour digits will begin to flash on the LCD screen (2). Press the track skip up or
down button (6/4) to select the required hour. Press the memory/clock adjust button (19) to confirm
the hour, and the minute digits will begin to flash on the LCD screen (2). Press the track skip up or
down button (6/4) to select the required minutes. Press the memory/clock adjust button (19) to
confirm the minutes.
4. Press the mode button (22) to display the playback mode for the alarm. Press the memory/clock
adjust button (19), the playback mode will begin to flash. Press the track skip up or down button to
select the required playback mode. Press the memory/clock adjust button (19) to confirm the
playback mode.
Please note- To review the alarm press the mode button (22) repeatedly to view each setting.
The alarm programming will automatically cancel if no button is pressed in a period of approximately
10 seconds.
To activate the timer/alarm press the sleep/timer button once on the unit (11). The timer indicator is
displayed on the LCD screen (2).
To de-activate the timer/alarm press the sleep/timer button on the unit (11) until the timer indicator
disappears from the LCD screen (2).
Presets EQ function
The unit has 5 different sound mode presets to enhance your listening experience. You can select
the desired effect by pressing the EQ button (16) until the required effect is reached. The effects are
displayed in the sequence below:
FLAT JAZZ ROCK CLASSIC POP
POP CLASSIC ROCK JAZZ FLAT
Mute function
Press the mute button on the unit (9) to terminate the sound output from the speakers temporarily.
Press the mute button (9) again to cancel mute mode.
AM 540-1600 KHz
FM 88-108 MHz
AC 230V ~ 50Hz
32W
33/45/78 RPM
2” 4” 4Ohm 8W x 2
Table of contents


