Sears proformance 564.97500351 SERIES User manual

......... I I II
OWNERS
MANUAL
MODEL NO.
564.97500351
SERIES
INDEX page
For safe and efficient
operation ............... 1
Technical specifications ..... 3
Features ................. 4
Before use or
transportation ........... 4
Controls and their functions.. 5
Connections .............. 7
Compact disc ............. 8
Operation ................ 9
Troubleshooting guide ..... 13
I II II
proformance
COMPACT DISC PLAYER
INSTALLATION
OPERATION
Record in space provided below the Model
No. and Serial No. of this compact disc
player.
The Model No. is located on the rear. The
Serial No. is located on the rear.
Model No.
Serial No.__
Retain these numbers for future reference,
I III IIII I I I II : I I II
Sears, Roebuck and Co., Chicago, IL 60684 U.S.A.

FOR SAFE AND EFFICIENT OPERATION
WARNING: TO PREVENT FIRE OR SHOCK HAZARD, DO NOT EXPOSE THIS APPLIANCE TO
RAIN OR MOISTURE.
RISK OF ELECTRIC SHOCK
DO NOT OPEN
CAUTION: TO REDUCE THE RISK OF ELECTRIC SHOCK. DO NOT REMOVE COVER (OR BACK). NO USER-
SERVICEABLE PARTS INSIDE. REFER SERVICING TO QUALIFIED SERVICE PERSONNEL.
Alerts you for uninsulated "danger-
ous voltage" inside the unit. Alerts you for important operating
and maintenence (servicing) instruc-
tion in the instruction manual.
NOTE
This unit may cause interference to radio and television reception if you do not operate it in strict
accordance with our OWNERS MANUAL,
This unit complies with Class B computing device rules in accordance with the specifications in Sub-
)art J of Part 15 of FCC Rules, which are designed to provide reasonable protection against such inter-
ference in a residential installation.
If the unit does cause interference to any radio or television reception, try to reduce it by one or more
of the followings means:
a) rotate other unit to improve reception
b) relocate this unit
c) move this unit away from others
d) plug this unit individually into a different AC outlet
* This is a note in pursuant to Section 15.838 of the FCC Rules.
* Be careful that the power cord does not become damaged.
* When not in use, disconnect the power cord from the outlet. Grasp the plug when disconnecting the
cord,
* If water should enter the unit, electrical shock or malfunction may result.
* Do not disassemble or alter this unit in any way.
* Do not use where there are extremes in temperature (below 40 °F or exceeding 95 ° F) or where direct
sunlight may strike it.
* Do not use in places that are damp or dusty.
* Place the player in astable location and in ahorizontal position.
-1-

SAFETY CERTIFICATION
The Compact Disc Player is made and tested to meet exacting safety standards. It meets UL and FCC I
rHuqUmi_em;:_.Sc;n.dcomplies with safety performance standards of the U.S. Department of Health and/
DANGER - Invisible laser radiation when open
and interlock failed or defeated, r
/
AVOID DIRECT EXPOSURE TO BEAM.
DANGER -- Invisible laser radiation when open
and interlock failed or defeated.
AVOID DIRECT EXPOSURE TO BEAM,
MANUFACTURED: DECEMBER
MANUFACTURER: SRS
1983
CAUTION - USE OF CONTROLS OR ADJUSTMENTS OR PERFORMANCE OF PROCEDURES
OTHER THAN THOSE SPECIFIED HEREIN MAY RESULT IN HAZARDOUS RADIATION EX-
POSU RE.
THE COMPACT DISC PLAYER SHOULD NOT BE ADJUSTED OR REPAIRED BY ANYONE
EXCEPT PROPERLY QUALIFIED SERVICE PERSONNEL.
* Because of the player's extremely low noise and wide dynamic range, there might be atendency to
turn the volume on the amplifier unnecessarily high. Doing so may produce an excessively large output
from the amplifier which could damage your speakers.
* Do not obstruct the air hores or place the player on an amplifier or anything that may give off heat.
* Sudden changes in the surrounding temperature can cause dew to form on the optical lens inside. In
this condition the laser cannot pick up the signal and the unit will not operate properly. If this should
happen, do not use the player until it has adjusted to the surrounding temperature.
* Do not use volatile chemicals on this unit (insecticides, etc.). Clean by lightly wiping with asoft cloth.
*If trouble occurs ............
To avoid electric shock hazard or any accidents to yourself or the unit, have the unit bench tested by a
qualified, trained person.
Do not remove the unit from its cabinet to attempt a repair yourself.
-2-

TECHNICAL SPECIFICATIONS
Audio
Channels ................................. 2 channels
Frequency response ........................ 5 - 20,000 Hz
Dynamic range ............................ greater than 90 dB
Channel separation ......................... 90 dB (1 kHz)
Distortion ................................ 0.003% (1 kHz)
Wow and flutter ........................... Undetectable
Outputs ................................. Output: 2V/470 ohms
Phones: 7.8 mW (at 8 ohms)
(impedance range: 8 ohms -10 kohms)
Signal format
Sampling frequency ........................ 44.1 kHz
Quantization ............................. 16 bits linear/channel
Transmission rate .......................... 4.3218 Mbit/sec,
Pickup
System .................................. Objective drive system light pickup
Objective drive system ...................... 2-dimensional parallel drive
Light source .............................. Semiconductor laser
Wave length .............................. 790 nm
General
Power supply ............................. AC 120 V, 60 Hz
Power consumption ........................ 35 W
Dimensions (approx.) ....................... 13-3/16" (W) x 3-1/2" (H) x 10-5/8" (D)
(335 x 88 x 270 ram) (not including power transformer)
Weight (approx.) .......................... 13 Ibs. 3 ozs. (6 kg)
*Specifications and design subject to change without notice.
-3-

FEATURES
This pre_rmance Compact Disc Player reproduces adigital audio signal from a 4-3/4" (12-cm) disc by
means of a semiconductor laser pickup. This system can reproduce sound without noise or crosstalk and
with the same full dynamic range and feel of a live performance. Unlike conventional analog systems, this
digital system uses a pickup that scans the disc surface without coming into contact with it, thus giving
you unsurpassed operability that lets you listen to those selections that you want to hear quickly and
easily.
*Discs last almost forever thanks to the laser beam that picks up the signal so that nothing comes into
contact with the disc surface.
*Outstanding playback characteristics
Afrequency response of 5 - 20,000 Hz
Adynamic range of 90 dB or better
0.003% distortion
Wow and flutter that isvirtually undetectable
90 dB channel separation
This system surpassesall performance limits of conventional analog-system discs and players.
* Quick and easy selection search and programming thanks to the microcomputer.
* A variety of functions
Fast automatic selection search
Up to 16-selection program play (memory) - Listen to your favorite selections in any order.
Repeat function
Pause
BEFORE USE OR TRANSPORTATION
BEFORE USE
1. Fully loosen the disc tray fixing screw located
on the bottom of the unit with a screwdriver.
2. Remove the pickup fixing screw.
(For retaining the screw in case any subsequent
transport of the unit is required, tighten the
screw temporarily on the screw hole "A",)
3. Set the PICK-UP FIXING SWITCH located on
the back of the unit to the OFF position
(Fig. 1).
Pickupfixing switch
BEFORE TRANSPORTATION TO AVOID
DAMAGE TO THE LASER ASSEMBLY
1. Release the POWER button to off.
2. Set the PICK-UP FIXING SWITCH to the ON
position.
3. Press the POWER button to on and wait for
about 10 seconds.
4. Release the POWER button to off.
5. Secure the pickup fixing screw.
6. Secure the disc tray fixing screw,
[ Pickup fixing screw
IDisc tray fixing screwJ
[Screwdriver
Fig. 1
-4-

CONTROLS AND THEIR FUNCTIONS
17 16 15 14
I
phil5
_utormar_e _'_ _v I
PROGRAM k_W,_qy CLEAR
--__ ,--1r"-r,__._ _
f_
34 5 6 7 8 9
18 19 20
1
Fig, 2
1. Power button and indicator (POWER)
2. Headphones jack (PHONES)
Connects to stereo headphones (not included) with a 1/4" (6-mm) plug.
3. Disc tray
4. Open and close button for the disc tray (OPEN/CLOSE)
5. Repeat button (REPEAT)
Repeats play when pressed.
6. Play button (PLAY)
Play begins when pressed.
7. Pause button (PAUSE)
Temporarily stops play when pressed. Pressthe PLAY button to resume play.
8. Stop button (STOP)
Cancels play and stops rotation of the disc when pressed.
-5-

9. Search button (SEARCH) (normal play) or (program play with repeat on)
FWD Quickly advances to the beginning of the next selection skipping the same number of
selections as the number of times the button ispressed.
REV Quickly reverses to the beginning of the previous selection skipping the same number of
selections as the number of times the button is pressed.
10. Program button (PROGRAM)
Used to designate the selection number when programming.
11. Memory button (MEMORY)
Activates memory for storage of the selection number designated by the PROGRAM button.
12. Memory clear button (CLEAR)
Clears one selection of a program at a time.
13. Track number indicators (TRACK NO.)
Indicate the number of the selection being played and indicate, during programming, the number of
the selection to be programmed and the numbers of programmed selections.
These indicators will indicate the number of programs available on the disc. If more than 16 selec-
tions are available on the disc, the last indicator (16) will stay on.
14. Disc inside indicator (DISC IN)
15. Repeat indicator (REPEAT)
16. Play indicator (PLAY)
17. Pause indicator (PAUSE)
18. Output jacks (OUTPUT)
Connects to the input jacks (AUX, TAPE, CD) of an amplifier.
19. Pickup fixing switch (PICK-UP FIXING SWITCH)
20. Power cord
Connects to either a 120 V AC outlet on the amplifier or a 120 V AC, 60 Hz wall outlet.
-6-

CONNECTIONS
CAUTION:
* When making connections or disconnections, be sure to turn off the power to each component.
* Connect one end of the patch cords (supplied) to the OUTPUT jacks of the unit and the other end to
jacks designated by AUX, TAPE, CD, T.V., TUNER, etc., of the amplifier. Do not connect to PHONO
jacks.
Do not confuse the right (R) and left (L) cords when making connections. The white plug is for the
left channel and the red plug is for the right channel.
* After all connections are completed, connect the power cord of the main unit to either a 120 V
wall outlet or a 120 V AC outlet on the amplifier.
* If this unit should interfere with the tuner, turn off the unit during tuner operation.
SPEAKER SYSTEMS
AMPLIFIER
,Plug into a 120 Vwall outlet
AUX, TAPE, CD, etc
COMPACT DISC PLAYER Patch cords
Connect to either a 120 V
wall outlet or a 120 V AC
outlet on the amplifier
:)UTPUT Fig. 3
-7-

COMPACT DISC
OPENING AND CLOSING THE DISC TRAY
1. Pressthe POWE R button. (The disc tray cannot be opened or closed when the power isoff.)
2. Pressthe OPEN/CLOSE button.
*When the OPEN/CLOSE button is pressed even during play, play will stop and the disc tray will come
out.
*When closing the disc tray, be sure to use the OPEN/CLOSE button. Do not close the disc tray by
hand.
CAUTION:
*Do not use force to open or close the disc tray.
*Do not place foreign objects in the opening for the disc. It may result in a malfunction.
*If your finger or any object should get caught in the disc tray, simply press the OPEN/CLOSE button.
INSERTING THE DISC (Fig. 4)
1. Without touching the disc surface, place the disc
with the label facing upward.
2. Press the OPEN/CLOSE button to close the disc
tray.
*When inserted upside down and pressing the
PLAY, SEARCH or PAUSE button, the disc
tray will come out automatically after a few
second. When a scratched disc or dirty disc (with
dust, fingerprints, etc.,) is inserted, the disc tray
may come out. Fig. 4
Note:
Only discs with the symbol shown at the right can be played on this player.
WHEN HANDLING COMPACT DISCS
In order to enjoy your music under the best conditions, always keep your discs clean and note the
following.
*Do not touch the playing surface (shiny, rainbow-colored surface).
*Do not leave the discs in places with high temperatures or high humidity where they may become
warped.
*When you will not be playing a disc for long periods, remove it from the player and return it to its
case.
*Do not put tape, etc., on the label surface.
*Before playing a disc, wipe any dust or fingerprints from the playing surface with the soft cloth
(supplied).
*Do not use cleaners or antistatic sprays used on conventional analog phonograph records.
-8-

OPERATION
FOR NORMAL PLAY
1. Switch on the power to the amplifier and select the input source on the amplifier to which this unit is
connected.
2. Pressthe POWER button. The power indicator will illuminate.
3. Pressthe OPEN/CLOSE button and place a disc on the disc tray.
4. Pressthe OPEN/CLOSE button once again.
The disc tray will close and the DISC IN indicator will illuminate.
5. Pressthe PLAY button. The PLAY and TRACK NO. 1indicators will illuminate. The disc will begin
to rotate, the table of contents will be read out (requires about 10 sec.). The first selection (TRACK
NO. 1) will begin playing.
When the last selection has played, the player will go to pause. The PLAY indicator will go out and the
PAUSE and TRACK NO. 1indicators will illuminate. (After 10 minutes in pause, the unit will go to
stop. The PAUSE and TRACK NO. 1 indicators will go out.)
6. When play is finished and the unit is not going to be used again right away, open the disc tray, remove
the disc, close the disc tray, and press the POWER button once again to turn off the power.
WHEN STOPPING PLAY PART WAY THROUGH
Press the STOP button. The disc will stop rotating and play will stop. The PLAY and track number indi-
cators will go out.
WHEN REMOVING THE DISC
Pressthe OPEN/CLOSE button. The disc will stop rotating and the disc tray will come out.
WHEN PAUSING
When the PAUSE button is pressed, the player will go to pause. (The disc will continue to rotate. About
10 minutes later, the unit will go to stop.) To cancel pause, press the PLAY button, and play will begin
from where it was stopped.
SELECTION SEARCH
By using the FWD and REV side of SEARCH button, the beginning of desired selections can easily be
found. The number of the selections is indicated on the track number indicators. While searching the
selection, the track number indicator is flashing at high speed. When the selection isfound, the indicator
illuminates continuously in normal play - in program play, the indicator will flash slowly.
WHEN GOING TO THE NEXT SELECTION DURING PLAY
Press the FWD side of SEARCH button once.
WHEN GOING TO THE BEGINNING OF THE SELECTION BEING PLAYED
Press the REV side of SEARCH button once. IExample: Beginningof 6th selectionfrom that beingplayed]
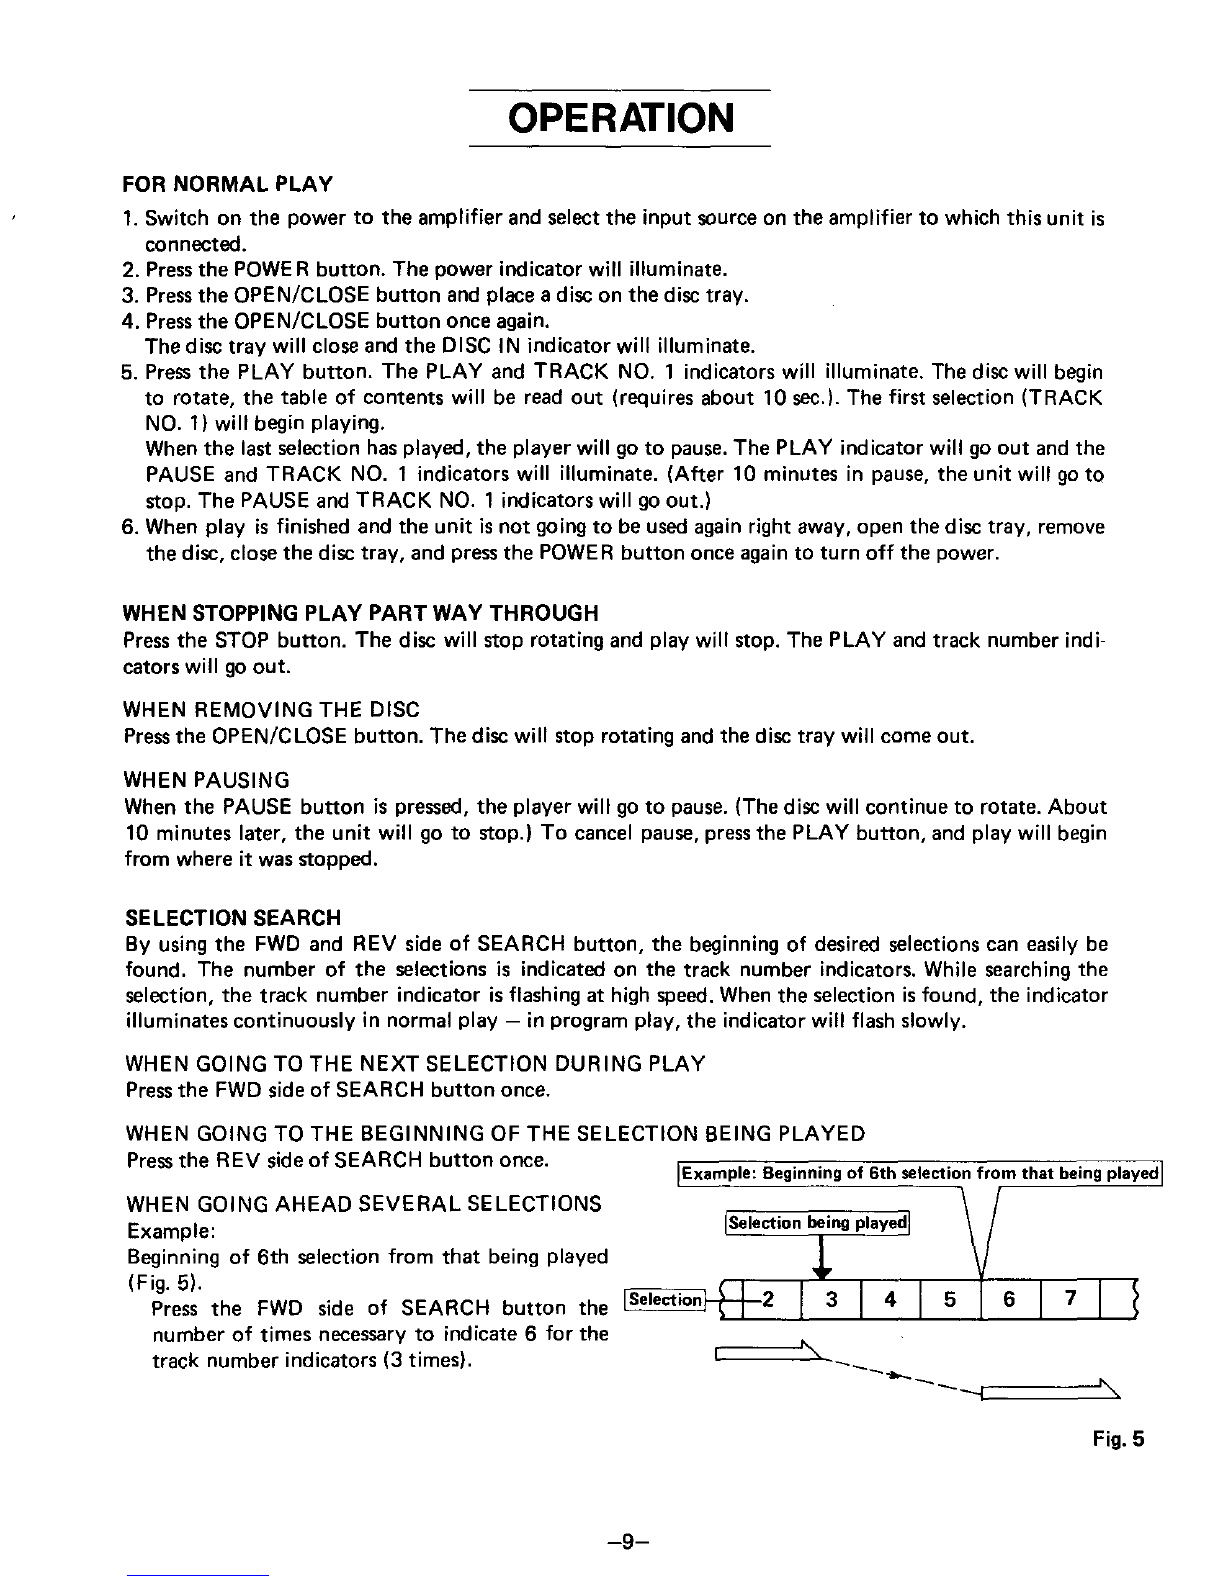
WHEN GOING AHEAD SEVERAL SELECTIONS \ /
Example: ISelecti°nb_lingplayedl V
Beginning of 6th selection from that being played $
,Fig I I/I I/Press the FWD side of SEARCH button the 2 3 4 5 6 7
number of times necessary to indicate 6 for the
track number indicators (3 times). I" _. -_*"_-"_ \
Fig. 5
-9-

WHEN GOING BACK SEVERAL SELECTIONS
Example:
Beginning of 5th selection before that being played
(Fig. 6).
Press the REV side of SEARCH button the
number of times necessary to indicate 5 for the
track number indicators (4 times).
IExample:Beginningof 5th selectionbeforethat being played]
V 'Selecti°n _eringplayed'
'/'[BI'IBIBI I
Fig. 6
If not in pause before pressing either side of button, play will begin as soon as the beginning of the
selection is found.
If in pause before pressing either side of button, the player will go to pause (standby) after beginning
of the selection is found.
If the PLAY button is pressed during searching, play will begin as soon as the beginning of the selec-
tion is found.
If the PAUSE button is pressed during searching, the player will go to pause after beginning of the
selection is found.
REPEATED PLAY
WHEN REPEATING ALL SELECTIONS ON A DISC (NORMAL PLAY)
1. Press the REPEAT button. The REPEAT indicator will illuminate.
* The REPEAT button also functions when pressed during play.
2. Press the PLAY button.
3. To cancel repeated play, press the REPEAT button once again. The REPEAT indicator will go out.
REPEATED PLAY OF PROGRAMMED SELECTIONS
When the desired selections have been preprogrammed (refer to PROGRAM PLAY section), the pro-
grammed selections will be repeated when the REPEAT button is pressed.
During repeated play, the disc is in an endless condition, so the SEARCH button isoperational for any I
selection being played. ]
-10-

PROGRAM PLAY
WHAT IS PROGRAM PLAY?
Suppose you have a disc with 10 selections on it. Programmed play allows you to arrange any of the
selections you want to listen to in the order you want to listen to them.
Example (Fig. 7):
In this example of programmed play, seven of the ten selections are included, and selection 1(TRACK
NO. 1) is in three positions to show you that any selection can be put in a program a number of times,
There are 16 positions available for programming, so programmed play with selections in 16 positions
is possible. Will not program more than 16 positions.
Before programmed play can begin, it is necessary to program the order of the selections in the player's
microcomputer.
seT"ACK"Oeo,o°.um ., --t--'[2 31,10[0 ,I B010I
l . nni°gP,OO,AM.n,o,,
1Orderof play] I 2 3 4 567 8 9
T_ACK.O_--1--3 I , I 6 I1011 I 5 I 7 I e I 1 I
Selectlon numoer I I, I I I I l i I I I
A
7Beginning of programmedplayI lEnd of programmedplay1
Fig. 7
PROGRAMMING
1. Set the unit to the stop mode (or immediately after the disc is inserted). Preparation for programming
(program input mode) iscomplete.
2. First, decide the type of programmed play you want. The procedure for the programmed play shown
in the example (Fig. 7) above is asfollows.
3. To put TRACK NO. 3 in the first order of play, press the PROGRAM button 3 times. The TRACK
NO. 3 indicator isflashing.
4. To store this information, press the MEMORY button. The TRACK NO. 3 indicator illuminates
continuously and programming will move to the second order.
5. Insert TRACK NO. 1in the second order by pressing the PROGRAM button until the TRACK NO. 1
indicator is flashing. (Indication of the indicators moves only upward.)
6. Store this information by pressing the MEMORY button. The TRACK NO. 1indicator illuminates
continuously and programming will move to the third order.
7. Program the remaining selections available on the disc in the same way. When programming is com-
pleted, the unit will be in a wait condition. Press PLAY button.
(This completes programming.)
If the disc has more than 16 selections, it can be programmed but program indicators will stop at 16
tracks. The track number indicators will not move, even when the PROGRAM button is pressed.
Do not program a selection that is not included in the actual disc.
-11-

HOW TO CORRECT AN INCORRECT PROGRAM
Press the CLEAR button. The CLEAR button is effective only when immediately after the MEMORY
button is pressed.
Example:
In case that TRACK NO. 2 is programmed instead of TRACK NO. 3 with the player in the condition
described in items 3 and 4 of PROGRAMMING section above, the procedure for correction is as follows.
1. Press the CLEAR button immediately after the MEMORY button is pressed (item 4). This clears
TRACK NO. 2 which was stored and the TRACK NO. 2 indicator will be changed from illuminating
to flashing.
2. To store TRACK NO. 3, press the PROGRAM button once. The TRACK NO. 2 indicator goes out
and the TRACK NO. 3 is flashing.
3. Pressthe MEMORY button.
When an incorrect program is found after programming has been completed, correction of program is
impossible by the CLEAR button. In this case you must program the selections again.
IN ORDER TO CANCEL (CLEAR) AN ENTIRE PROGRAM
Pressthe STOP or OPEN/CLOSE button.
BEGINNING PROGRAM PLAY
After programming has been completed (The programmed track number indicators are illuminated.),
press the PLAY button. Play will begin from the TRACK NO. 3 selection of the first order of play as
previously programmed.
The track number indicator is flashing at high speed during searching the selection and the indicator is
flashing at low speed during program playing. (Whenever the programmed selection has played, the track
number indicator will go out unless the repeat function has been selected.)
When the last programmed selection has played, the player will go to stop unless the repeat function has
been selected.
After programming has been completed, do not press the PAUSE, SEARCH, STOP or OPEN/CLOSE
buttons before the PLAY has been selected or the entire program will be cancelled.
OPERATION DURING PROGRAMMED PLAY
* The FWD side of SEARCH button advances the player to the beginning of the next selection accord-
ing to the programmed order and then to the end of the program.
During repeated play of the program, the FWD button will advance to the next selection and then to
the end of the program, continueing to press the FWD button will advance to the start of the program.
*The REV side of SEARCH button reverses the player only to the beginning of the selection being
played. But, during repeated play of programmed selections, the button reverses the player to the
beginning of the previous selection according to the programmed order.
*The REPEAT button repeats programmed play in programmed order.
*The PAUSE button operates as in normal play.
Note:
When the unit is turned off, the entire program iscancelled.
-12-

TROUBLESHOOTING GUIDE
Carefully re-read the instructions to be sure the compact disc player is being operated properly. Check
the following before you arrange for service.
SYMPTOMS CAUSE
No sound AC power cord is disconnected from AC
outlet.
Patch cords are disconnected from OUTPUT
jacks of the player or input jacks (AUX,
TAPE, CD, etc.) of amplifier.
Amplifier isnot being operated properly.
"Hum" noise Other electrical equipment is too near to the
player.
Disc tray will not open or close Power is off. (POWER button in released
position.)
Disc tray will come out Disc is placed upside down.
Disc is scratched, warped or dirty.
Inferior or distorted sound Patch cords are misconnected to amplifier.
Output volume of amplifier is too high.
Disc is scratched, warped or dirty.
The player accidentally functions incor- Turn the player off once. After a few second,
rectly, even if you press the appropriate turn the player on then restart to operate.
button(s)
Note:
The player functions incorrectly, even if you press the appropriate button(s), contact your nearest
Sears store or Catalog Sales Office. Complete service isavailable.
-13-

MEMO
-14-

[Sears]
OWNERS
MANUAL
MODEL NO.
564.97500351
SERIES
WE SERVICE WHAT WE SELL --
"We Service What We Sell". .... is our assurance to you
that our customers can depend on Sears for service
nationwide. Your Sears Stereo System has added value
when you consider that we have Service Units Nationwide,
staffed by professional technicians who are specifically
trained on Sears Home Entertainment Products. Sears has
the parts, tools and equipment to ensure that we can
meet our pledge to you.
FULL ONE YEAR WARRANTY
ON p_._g_r/'na, nL-iE,COMPACT
DISC PLAYER
For one year from the date of purchase, Sears will repair
this p_sDm'orrr_nL-eCompact Disc Player, free of charge, if
defective in material or workmanship.
WARRANTY SERVICE IS AVAILABLE BY CON-
TACTING THE NEAREST SEARS SERVICE CENTER
OR SEARS SERVICE DEPARTMENT IN THE UNITED
STATES.
THIS WARRANTY APPLIES ONLY WHILE THIS
PRODUCT IS IN USE IN THE UNITED STATES.
This warranty gives you specific legal rights, and you may
also have other rights which vary from state to state.
SEARS, ROEBUCK AND CO., Department 698-731A,
Sears Tower, Chicago, IL 60684
L46-38833-3 Printed in Japan
Table of contents
Other Sears CD Player manuals