Sedna SE-RM-19-RAID-1U-323-U User manual

SE-RM-19-RAID-1U-323-U Rev. 1 200201033000 P. 1
SE-RM-19-RAID-1U-323-U
1U Rack Mount USB 3.1 Gen II 2 Bay RAID Hard Disk Enclosure
User Manual

SE-RM-19-RAID-1U-323-U Rev. 1 200201033000 P. 2
This manual will introduce the SE-RM-19-RAID-1U-323-U 1U Rack Mount RAID Enclosure.
Although all informa�on contained in this user manual has been carefully verified before publishing,
however, the actual product specifica�on will be based on the �me of delivery from SEDNA.
Any updates to the product specifica�ons may be found on www.sednacomputer.com.
Products are subject to change without prior no�fica�ons.
Introduc�on
1. Package Content
1 x 1U RAID Enclosure
1 x USB 3.1 Cable
1 x 12V 3A AC/DC Power Supply
1 x User Manual
2 x Sever Cabinet Moun�ng Bracket and Screws set
Safety Warning
Read the opera�ng instruc�ons carefully and especially observe the safety informa�on.
If you do not follow the safety instruc�ons and informa�on on proper handling in this
manual, we assume no liability for any resul�ng personal injury or damage to property.
Such cases will invalidate the warranty/guarantee.
• Do not leave packaging material lying around carelessly. These may become dangerous playing
material for children.
• The device is designed for indoor use only. Protect the product from extreme temperatures, direct
sunlight, strong jolts, high humidity, moisture, flammable gases, vapours and solvents.
• Do not place the product under any mechanical stress.
• Always unplug the power cord before installing the unit

SE-RM-19-RAID-1U-323-U Rev. 1 200201033000 P. 3
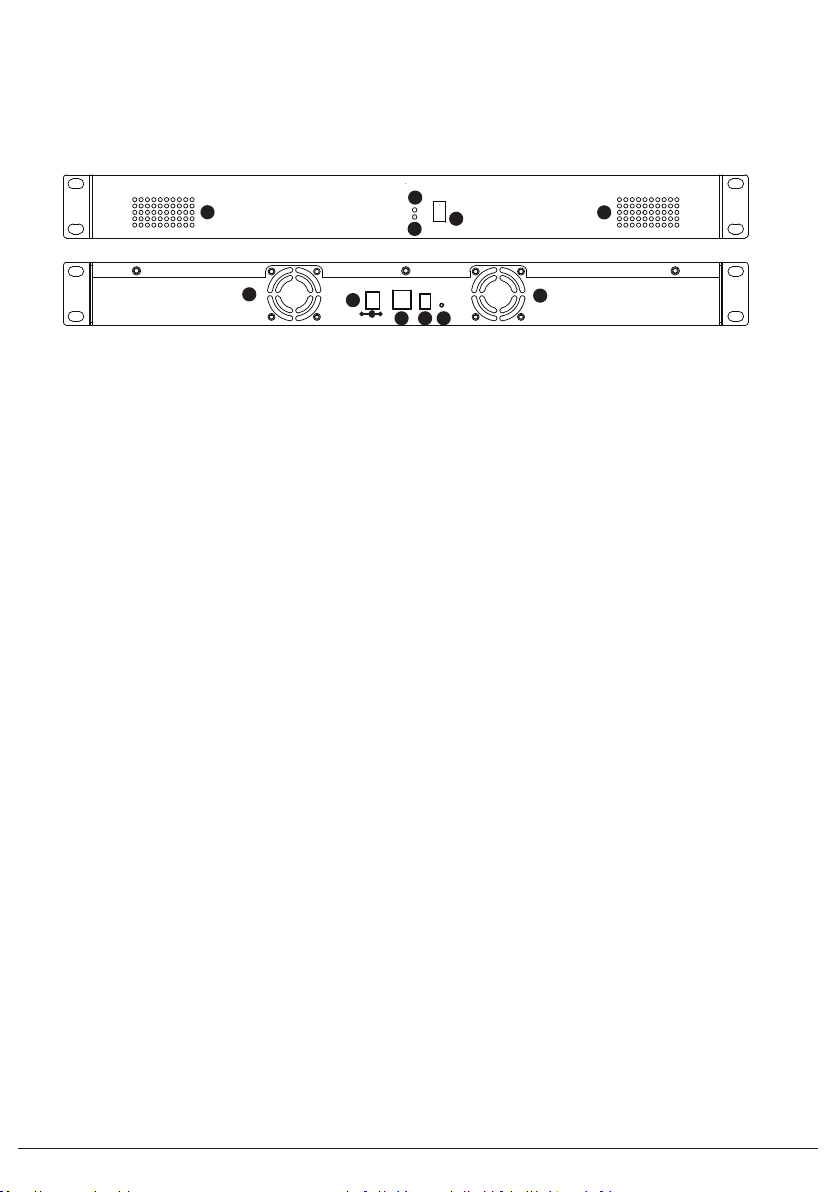
Front and Rear View
2 Specifica�ons and Features
Reset
DC 12V
AA
BB
C
D
E
F
G H I
A. Vent B. Cooling Fan C. Power Switch
D. Power Indicator E. Hard Disk Activities Indicator F. DC Power Supply Input
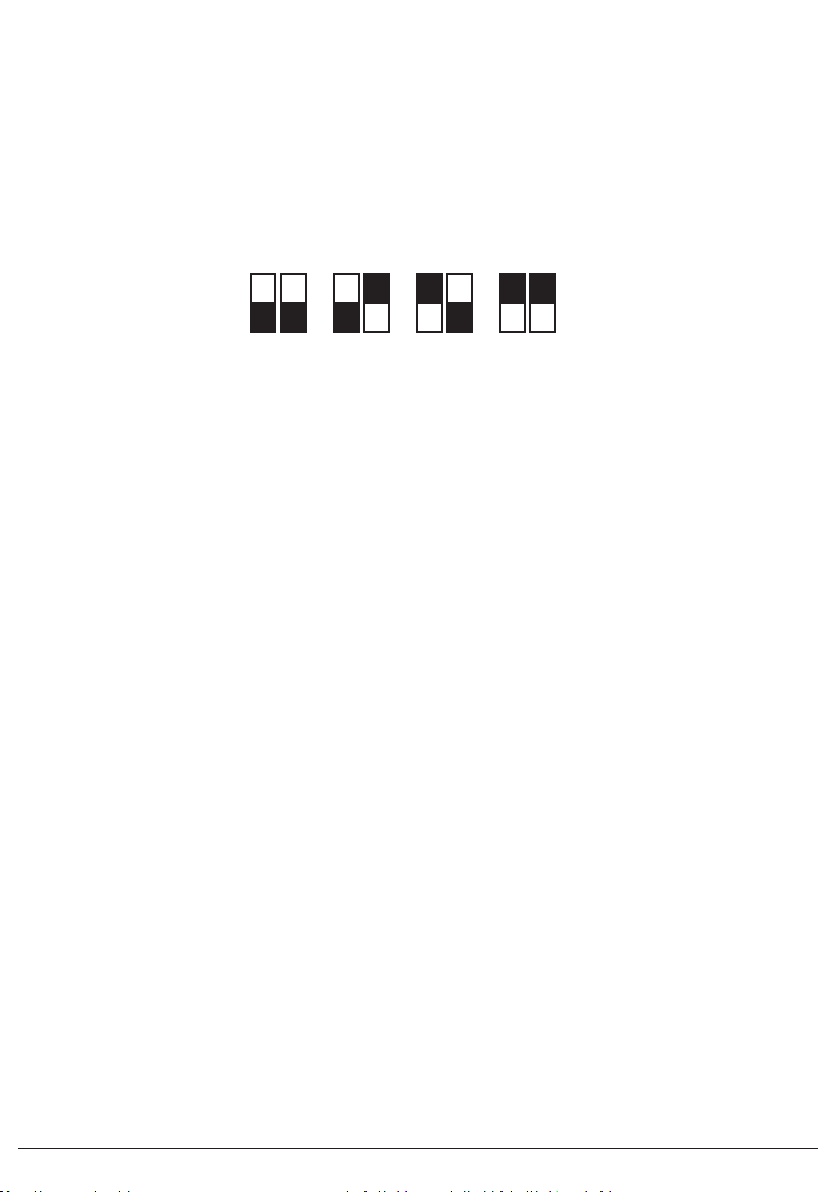
G. USB 3.1 Input H. RAID Mode Setting Switch I . Reset Switch

SE-RM-19-RAID-1U-323-U Rev. 1 200201033000 P. 4
3 Installa�on
Step 1 Open the package and take out the product and make sure that all the enclosed contents are not
damaged or missing. Should you nd damages or missing contents, please contact your supplier
immediately.
Step 2 Remove all Power and USB connection from the enclosure
Step 3 Remove the 3 screws on the back to open the top cover
Step 4 Slide the Hard Disk Mount side way and then pull it slightly upward to remove the Mount out from the case
as shown in gure 2
Figure 1 Figure 2
Step 5 Mount the hard disks to the Mounting Brackets with 4 pieces of screws included in the package
( As shown in Figure 3 )
Step 6 Slide the Mounting Brackets with Hard Disk back to the metal stud and make sure that the SATA connector
of Hard Disk are inserted properly into SATA connector on PCB of the enclosure
Step 7 Lock the Mounting Brackets with 2 screws included in package to bottom case of the enclosure ( Figure 4)
Figure 3 Figure 4
Step 8 Insert the Top Cover back and lock the 3 screws on the back of the case
Step 9 If the case is to be mounted in a server rack, you can install the 2 Sever Cabinet Mounting Brackets included
to left and right side of front panel
Step 10 Plug in Power AC/DC adapter and the USB cable to Server or PC, your storage enclosure is now ready for operation

SE-RM-19-RAID-1U-323-U Rev. 1 200201033000 P. 5
Storage Mode Denition for Supported RAID mode
Independent mode ( JBOD ) : Two independent storage disks. ( this is the factory default setting )
Speed mode ( Raid 0 ) : One large independent storage disk for fast data access, but no data redundancy.
Safe mode ( RAID 1) : Mirrored storage capacity allowing data protection.
Span : One large storage disk without fast data access and without data redundancy.
To Change the RAID model setting, Plesae follow the following procedures :
Step 1 Set the DIP switches at the back of the unit to the RAID Mode you need ( Figure 5 )
Step 2 Press the reset switch at the back for 10 seconds and release it
Step 3 Power O the unit and Power On it again
Step 4 The required RAID mode is now set
Important Remark :
1) Hard Disk will be re-formatted during RAID Mode change, make sure you have back up all data before make the change
2) To change the RAID mode from RAID 0, RAID 1 and SPAN to other setting, you need to set it back to PM / JBOD mode rst.
Then set it again to the RAID Mode you need as shown from Step 1 to Step 4 above
1 2 1 2 1 2 1 2
PM / JBOD RAID 0 RAID 1 SPAN
Figure 5 : RAID Mode DIP Switches Setting
No driver installation is required for all Windows / Mac OS / Linux.
You may need to Initialize your RAID storage , set storage partitions and format the Drives to NTFS, HFS+ ..etc
according to your system
Table of contents