SEMaudio Insight ip-85 User manual


CONTENTS
IMPORTANT SAFETY & NOTICE
............................................................................................... E-1
SYSTEM BASICS
Location of Controls - Main Unit .......................................... E-2
Location of Controls - Remote .............................................. E-3
Power Supply ......................................................................... E-3
Preparation of Remote Control .............................................. E-3
Connection of Speaker Boxes................................................. E-4
Subwoofer .............................................................................. E-4
Lightcurrent© Wireless Audio Technology ............................ E-4
GENERAL FUNCTION
Repeat Playback Function...................................................... E-5
Shuffle Playback Function ..................................................... E-5
Mute Function ........................................................................ E-5
Using the Audio Line In Connection ..................................... E-5
iPod OPERATION
Preparation of iPod Dock ....................................................... E-6
Operation with the iPod.......................................................... E-7
SPECIFICATIONS
Specifications ........................................................................ E-8

E-1
IMPORTANT SAFETY & NOTICE
The lightning flash and arrowhead within the triangle is a warning sign alerting you of “dangerous
voltage” inside the product.
CAUTION
RISK OF ELECTRIC SHOCK
DO NOT OPEN
WARNING:
To reduce the risk of electric shock, do not remove cover (or back). No user-serviceable
parts inside. Refer servicing to qualified service personnel.
CAUTION:
The exclamation point within the triangle is a warning sign alerting you of important instructions
accompanying the product.
Grounding or polarization. The precautions should be taken so that the wider blade of the AC plug
must match the slot in receptacle “wall socket”.
Do not expose to dripping or splashing liquids!
Invisible laser radiation when open and interlocks defeated. Avoid exposure to beam.
WARNING:
To reduce the risk of fire or electric shock, do not expose this appliance to dripping or splashing liquids.
NOTE:
Caution symbols are printed on rear of unit. Please refer to instruction manual.
PLEASE NOTE:
You will find the caution rating label for this product located on the rear of the unit.
To ensure safe use of this product, please follow the advice below:
1. Battery should not be exposed to excessive heat such as sunshine, fire or the like.
2. Danger of explosion if battery is incorrectly installed. Replace only with the same or equivalent type.
3. When electrostatic discharge (ESD) occurs at the front surface (whether metal or plastic) or near any
part or any button of this unit, or at the USB port and/ or SD-card slots, there may be a possibility that
the product may stop operating and/ or shut down immediately. This is a normal condition and intended
to protect the unit and internal components against damage. In such a case, please reset the unit (by
disconnecting and reconnecting the AC-power source) to revert the unit to normal operation.
E-2
SYSTEM BASICS
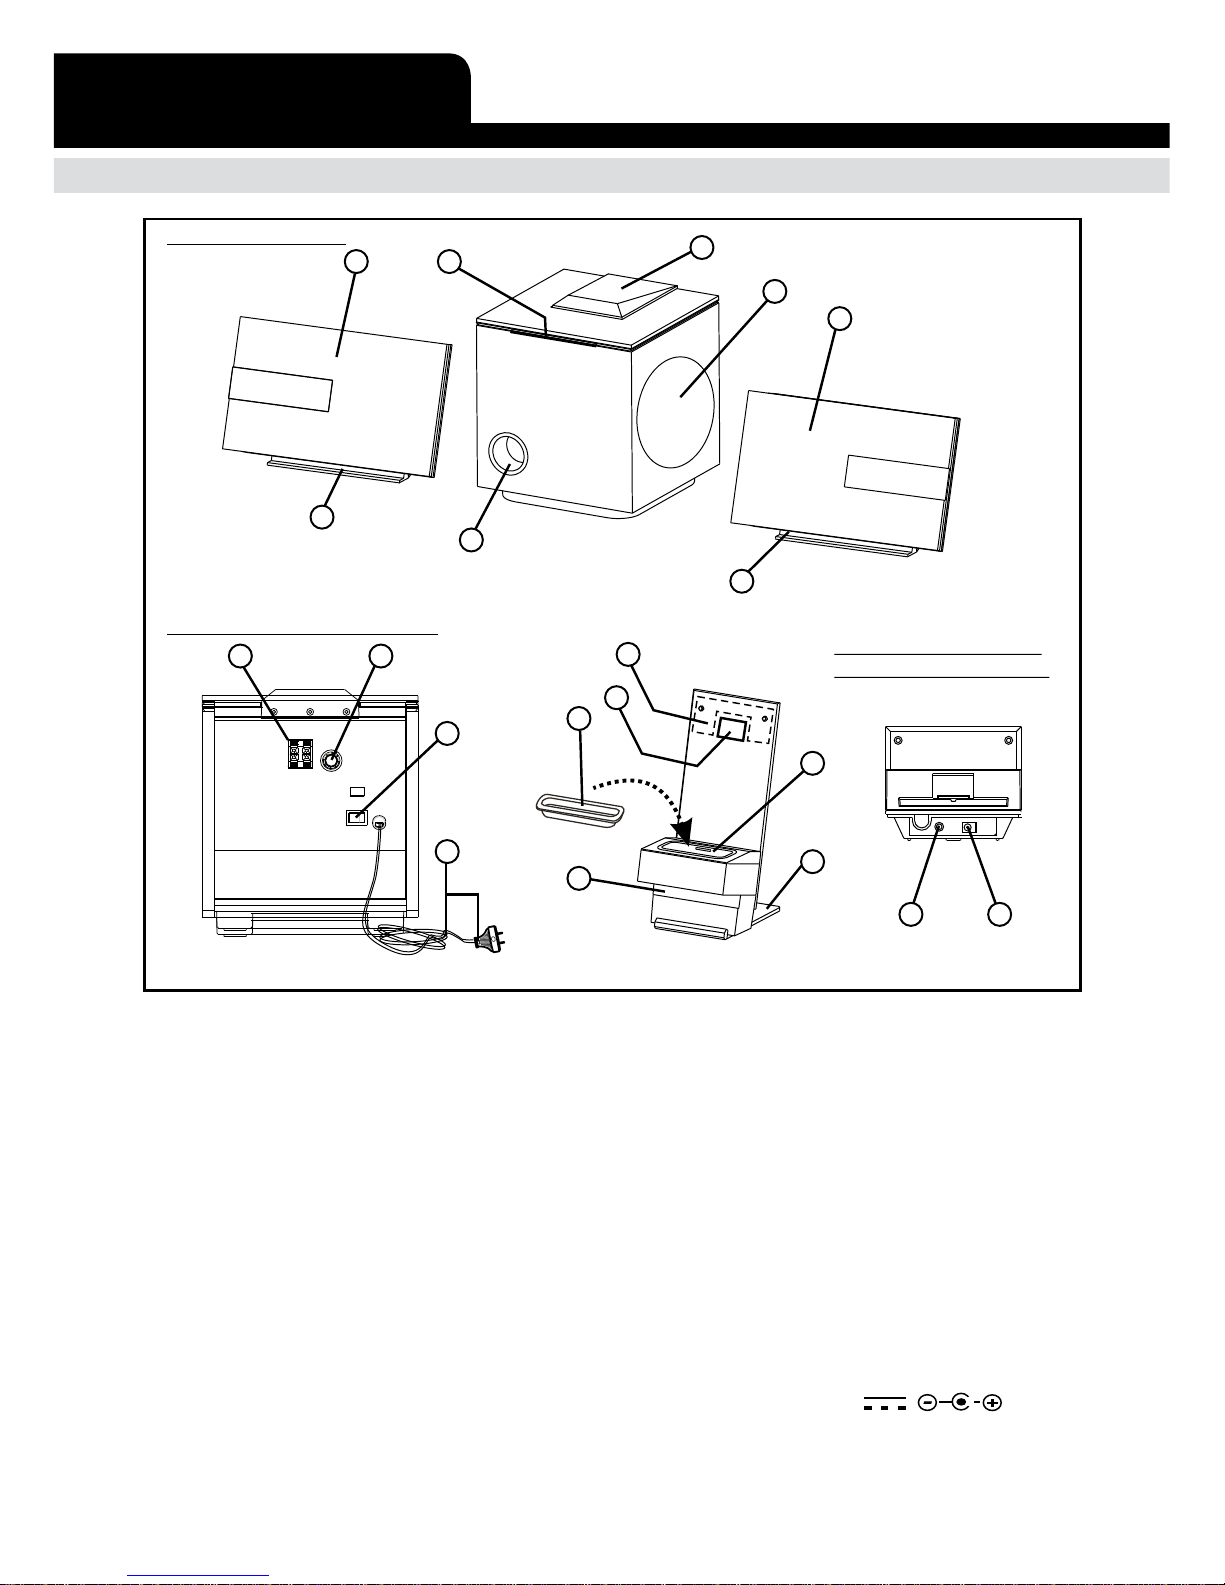
LOCATION OF CONTROLS - MAIN UNIT
1. SPEAKERS (LEFT & RIGHT)
2. AMBIENT LIGHTING
3. LIGHT CURRENT © RECEIVER
4. SUBWOOFER SPEAKER
5. STANDS (FOR SPEAKERS)
6. BASS VENT
7. SPEAKER-OUT SOCKETS
(LEFT & RIGHT)
8. BASS LEVEL CONTROL
(MIN/ MAX/ NORMAL)
9. SUBWOOFER POWER ON/ OFF
SWITCH
10.SUBWOOFER AC CORD & PLUG
11. LIGHT CURRENT © TRANSMITTER
12. POWER AND AUDIO SOURCE
INDICATOR LIGHTING
13. DOCK ADAPTOR FOR iPod
(SEVERAL DIFFERENT ADAPTORS
ARE PROVIDED)
14. REMOTE CONTROL SENSOR
15. CAVITY FOR DOCK ADAPTOR
16. STAND (FOR iPod DOCKING
PLATFORM)
17. AUX INPUT SOCKET
18. DC JACK 9V, 1.5A
1
3
4
1
5
6
5
REAR OF THE SUBWOOFER:
BOTTOM OF THE iPod
DOCKING PLATFORM:
7 8
9
13
11
14
16
15
17 18
2
10
12
SPEAKER SYSTEM

E-3
SYSTEM BASICS
LOCATION OF CONTROLS - REMOTE
1. On/ Standby key
2. Menu key
3. Select key
4. Shuffle key
5. Repeat key
6. iPod/ Aux key
7. Mute key
8. iPod Menu Up key
9. Back key
10. Play/ Pause key
11. Next key
12. iPod Menu Down key
13. Volume Down ( - ) key
14. Volume Up ( + ) key
15. Battery Compartment
1
2
3
4
5
6
7
8
9
10
11
12
13 14
15
POWER SUPPLY
AC OPERATION FOR SUBWOOFER
- This set works on normal household AC-power.
- Make sure the set voltage of the unit matches your local voltage.
- Insert the plug of the AC-cord into a wall outlet with AC-power.
- Press the power on/off switch to turn “on” the unit.
AC OPERATION FOR IPOD DOCKING PLATFORM
(EXTERNAL AC-DC POWER ADAPTOR)
- This iPod docking is equipped with a “DC-jack” capable of accepting
AC-adaptors with a rating of DC = 9V, 1.5A, and with a plug with the
following polarities as shown (center positive) :
- Please use only the supplied AC-adaptor to operate the unit. Use of
other adaptors may damage the unit or cause it to malfunction.
- Plug the tail end of the AC-adaptor into the DC-jack (socket) on the side of the main unit.
- Insert the plug the AC-adaptor into the wall ac socket.
- Press the “on/ standby” key to switch on the unit.
- This unit is designed to operate without ever being totally powered “off”. It will either
be “on” or in “standby mode”.
- Anytime during standby mode, you can switch “on” the unit by pressing the “on/ standby”
key (on remote control).
- Save energy by switching the system to “standby” mode when it is not in used.
PREPARATION OF REMOTE CONTROL
- Remove (gently pull out) the plastic “tab” from the battery compartment at the rear of the
remote control.
- Test the remote control by pressing the (on/ standby) key to check that the unit (iPod
docking system) switches on properly using the remote control.
Important : how to tell if power is “on” ?
When the power is “on”the ambient lighting will lit up with a “blue” light.
This indicates the subwoofer is switched “on” and the ambient lighting will flash
frequently when the system is not in used (in standby mode).

E-4
SYSTEM BASICS
CONNECTION OF SPEAKER BOXES (WITH SUBWOOFER)
- Unwrap the speaker-cords of both speaker-boxes.
- Please notice that each speakers cord consists of 2 wires, one is “clear” and one has a
black line.
- Insert the “clear” wire of the left speaker-box into the “red” ( + ) speaker connector beside
the main-unit, which has the “L” indication (next to the speaker-connector).
- Insert the “black” wire of the left speaker-box into the “black” ( - ) speaker connector
beside the main-unit, which has the “L” indication (next to the speaker-connector).
- Repeat the above 2 steps for the “right” speaker box, but this time, inserting them into the
red & black connectors which have the “R” indication.
- When inserting each wire into a connector, press downwards on the connector’s plastic
knob (red or black part) & push the exposed metal end of the wire all the way into the
hole above this knob.
- Place the speaker boxes as far apart as possible for best sound effect.
SUBWOOFER - BASS LEVEL CONTROL
- The bass level can be adjusted by the bass level control at the rear of the subwoofer, you
can adjust it anytime as desired.
LIGHTCURRENT© WIRELESS AUDIO TECHNOLOGY
The lightcurrent© technology uses safe invisible infrared light to wirelessly transmit count.
But unlike normal infrared systems, this new technology, lightcurrent© functions much
like a light-bulb, doing away with the need for line-of-sight, covering a wide area range
and eliminating radio frequency Emissions/interference. The docking platform transmits
an uncompressed audio signal in all directions, which bounces off walls, ceilings, and
even furniture in your environment, eventually reaching (at the speed of light) the wireless
2.1 channel speaker system - providing the luxury of cordless, uncompressed, noise-free,
uninterrupted audio with unmatched sound quality.

E-5
REPEAT PLAYBACK FUNCTION
- At anytime during playback, press REPEAT key (on remote control) repeatedly to select,
the symbol will be displayed on the iPod screen.
-
+
= To repeat the current track
-
+
= To repeat all tracks
SHUFFLE PLAYBACK FUNCTION
- This unit is able to shuffle all songs on iPod play them back in “random” order.
- To activate this function, press SHUFFLE key (on remote control) during playback.
- The “RANDOM” symbol will be displayed on the iPod screen & the songs will be played
in random order.
MUTE FUNCTION
- This set has a mute function to enable you to turn off the volume temporarily.
- Press the MUTE key (on remote control) once, the volume will turn off and the iPod
docking platform ambient light will be flashing.
- To resume the sound, simply press the MUTE key again.
USING THE AUDIO LINE IN CONNECTION (AUX-INPUT)
- You can connect the audio output of an external device such as a MP3 player to this unit,
to listen to the sound of that device through the high quality amplifier of this music system.
- To connect the external device please use a standard stereo headphone cable (3.5mm to
3.5mm plugs) to connect the “headphone-out or audio line-out” of the device to the AUX-
input socket of this unit (socket located at the bottom of the iPod docking platform).
- Switch the function to “AUX” by the “iPod/ AUX” key on remote control. The power and
audio source indicator lighting of the iPod docking platform will switch to red ambient
light in AUX-in mode.
- Switch on the unit (both iPod docking platform & the subwoofer) and the external device
(eg. MP3-player).
- Start playback of the external device and adjust the volume control of the unit to the desired
level.
- Remember to switch off the unit when you are finished using the external device.
- Press again the “iPod/ AUX” key on remote control to switch back in iPod mode.
Note: The remote control will only work in the volume control in aux-in function
GENERAL FUNCTION

E-6
iPod OPERATION
PREPARATION OF iPod DOCK
To connect an iPod with a dock connector to this unit, first insert the dock adaptor that fits
your iPod, and then connect your iPod. Your Hi-Fi includes dock adaptors that work with
several models of iPod with dock connectors. If you want to connect a different model of iPod
at a later time, you can easily remove the dock adaptor from your Hi-Fi using a fingernail,
and insert the adaptor that fits the new iPod. If there is no dock adaptor for your model of
iPod included with your Hi-Fi, an adaptor may have been included with your iPod. Please
check inside the box of the iPod you purchased for a plastic dock adaptor.
Dock Adapters: Choose the dock adapter that fits your iPod.
Your iPod fits snugly into the correct adapter.
THE NUMBER
SHOWS WHICH iPod FITS
10
OR
9
iPod classic
80GB 120GB 160GB
10
OR
9
iPod
5th generation
(video)
30GB 60GB 80GB
17
iPod nano
4th generation (video)
8GB 16GB
18
iPod nano
5th generation
(video camera)
8GB 16GB
14
16
OR
iPod touch
1st generation
2nd generation
FOR OTHER iPod MODELS:
If there is no dock adapter for your model of iPod included, you can also
use the dock adapter which was included in the box with your iPod itself.

E-7
OPERATION WITH THE iPod
- Turn on both the unit subwoofer and the iPod docking platform.
- Connect the iPod to the unit as described.
- Press the “iPod/ AUX” key until the iPod docking platform shows a blue light.
- Press the Play key on the remote control, for the iPod docking platform to begin
playback.
- The iPod display will indicate the information of the current song.
- At anytime during playback, press the Play key to pause playback. Press Play
key to resume playback of the same song & position.
- Press and hold the Play key for a few seconds to stop operation of the set.
- At anytime during playback, press and release the Next or Back key to skip
forward or backwards by one song, as desired.
- At anytime during playback, press and hold the Next or Back key to fast-
forward (cue) or fast-reverse (review) the specific song, which is currently playing.
- You can operate the iPod using either the remote control or directly
with the iPod itself.
- When the iPod has been connected with the unit, it will start charging
the battery of the iPod.
- Never remove (or unplug) the iPod from the set during playback, always hold the play
key for a few seconds to turn off the iPod power and then press the “iPod/AUX” key
to switch to “AUX” mode before removing or unplugging the iPod, to prevent damage to
your song files or memory devices.
IMPORTANT
Please note that when connecting a iPod video, the error message “the currently attached
accessory is not supported by this iPod.” will be displayed as there is no video input/
output. However, all audio functions will operate normally as outlined above.
iPod OPERATION

E-8
SPECIFICATIONS
SPECIFICATIONS
Power Supply : .................. iPod Docking: DC 9V, 1.5A though built-in DC jack
ExternalAC-DC power adaptor 100V-240V ~ 50/60Hz
Power consumption : .................. 37W
Speaker : .................. Subwoofer Speaker: 5¼”
Speaker 1½” x 2 + 4” x 2

Table of contents


