SENSORO ZODIAC II User manual

OPERATION
MANUAL
Talking Radar/Laser Detector with
Digital Vehicle Compass
11464 R03 1000318 R03

CONTENTS
1
Congratulations ........................................ 1
Features .................................................................. 1
Package Contents ................................................... 2
Identifying Parts of the Detector ........................... 3
Installing the Detector................................ 5
Mounting Guidelines ............................................. 5
Windshield Mounting ............................................ 6
Operation ................................................. 7
Power & Volume Control ....................................... 7
Brightness Control ................................................. 8
Voice Alert Language Selection ............................. 9
Audio On/Off Selection ......................................... 9
Voice On/Off Selection .......................................... 10
Highway & City Mode Selection ............................ 11
Compass Calibration ............................................. 12
Tutorial Mode ........................................................ 14
Care and Maintenance .............................. 16
Fuse Replacement ................................................. 17
Troubleshooting ....................................... 17
Specications ........................................... 19
Service and Replacement .......................... 20
Warranty Information .............................. 22

CONTENTS
1
CONGRATULATIONS
You have acquired the SENSORO ZODIAC II from
PNI Corporation, the talking radar/laser detector with
a digital vehicle compass. The SENSORO ZODIAC II
incorporates the same compass technology used in
built-in compasses for GM, Ford, and Chrysler vehicles,
to provide highly accurate and reliable compass readings
in a radar/laser detector.
Features
• Protection against all radar/laser bands
• Alert on all types of radar signals: Constant-On,
Instant-On, and POP signals
• 360° laser coverage that protects you against laser
guns in all directions
• Undetectable by all radar detector sensing devices
used in the USA
• Patented digital compass that displays 8 cardinal
points: N – NE – E – SE – S – SW – W – NW
• Dual screens: detector display at front and compass
periscope display on top
• Text display backlit by LEDs
• 4 driving modes: Highway1 – Highway 2 – City 1 – City 2
• 4-step brightness control: Bright – Dim –
Dimmer – Dark
• Audio on/off (Mute off/on) selection

CONTENTS
2
3
• Auto audio control (Auto quiet)
• Volume control by rotary thumb wheel
• Voice alert on/off selection
• Voice alert language selection – English or Spanish
• Tutorial mode that demonstrates detector operations
• Memory retention on previous user settings
• Easy-to-use windshield mounting
• Manual compass calibration
• 12V DC input power – use the power cord included
in the package
Package Contents
Your SENSORO ZODIAC II package includes the
following components:
• The SENSORO ZODIAC II detector (1ea)
• Mounting bracket (1ea)
• Suction cups (3ea)
• Coiled 12V DC power cord (1ea)
• Operation manual (1ea)
• Quick Guide (1ea)
PACKAGE CONTENTS
CONTENTS
2
3
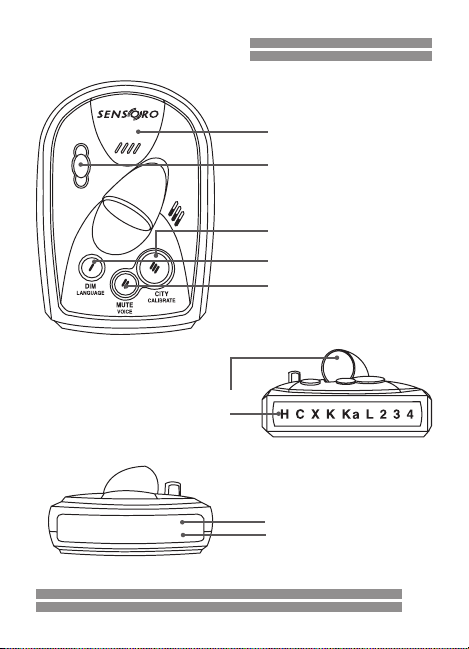
IDENTIFYING THE PARTS
BRACKET SLOT COVER
TOP LASER RECEIVER
Front Side
Back Side
COMPASS PERISCOPE DISPLAY
DETECTOR DISPLAY
RADAR RECEIVER
FRONT LASER RECEIVER
Top Side
CITY/CALIBRATE BUTTON
DIM/LANGUAGE BUTTON
MUTE/VOICE BUTTON
4
5
CONTENTS
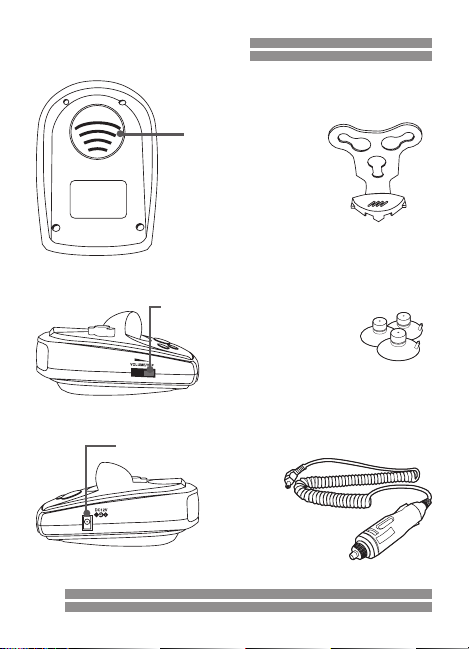
IDENTIFYING THE PARTS
MOUNTING BRACKET
SUCTION CUPS
POWER CORD
SPEAKER
POWER & VOLUME
CONTROL THUMB WHEEL
POWER CORD INPUT JACK
Bottom Side
Left Side
Right Side

4
5
CONTENTS
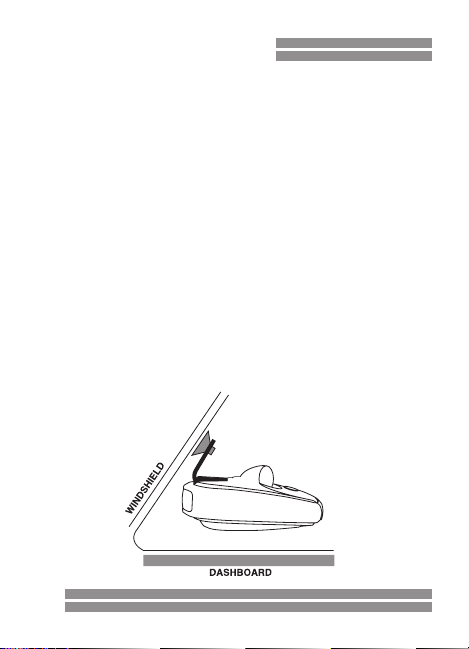
Mounting Guidelines
The SENSORO ZODIAC II can be mounted on your
windshield using the bracket provided.
• Mount on the windshield in a centered location
within the driver’s reach so that the buttons can be
easily accessed. Make sure that the mounted device
does not obstruct the view of the driver.
• Do not mount behind windshield wipers, metal
surfaces, ornaments, or mirrored sunscreen glass,
as it will affect radar/laser signals. Tinted glass does
not affect radar/laser signal reception.
• Do not mount close to strong stereo speakers, as it
will affect compass accuracy.
• Conceal the SENSORO ZODIAC II when you leave
your vehicle to prevent theft and to minimize the
detector’s exposure to extreme temperatures, which
can temporarily impair performance.
INSTALLING THE DETECTOR
CONTENTS
6
7
CONTENTS
Windshield Mounting Instructions
1. Install the suction cups by sliding them into the
holes on the mounting bracket so that combined, it
makes assembled bracket kit.
2. Pull out the bracket slot cover from the detector.
3. Place the assembled bracket kit onto the detector
where the bracket slot cover was removed.
4. Press the bracket base rmly against the windshield
until the suction cups securely take hold.
5. Bend the angle of the mounting bracket, if necessary,
to adjust for best viewing and detection angle.
6. Plug the small connector of the power cord into the
12V DC power input jack located on the side of the
detector.
7. Plug the power cord adapter into the lighter socket
in your vehicle.
INSTALLING THE DETECTOR

CONTENTS
6
7
CONTENTS
Power & Volume Control
Plug the adapter of the provided 12V DC power cord into
the lighter of your vehicle, and plug the small connector
at the other end of the 12V DC power cord into the power
jack of your detector. This will send power to the detector
when your vehicle is running. To turn on the detector,
rotate the wheel controller (located on the side of the
detector) until you hear it click. To turn off the detector,
rotate the wheel controller in the opposite direction until
it clicks again. You can also use the controller to adjust
the volume level by turning it up or down within the
range that it does not click.
• Opening Diagnosis: The detector performs a single
loop of checking and demonstrating its audio, visual,
and voice alert capability for about 3~5 seconds each
time it is powered on.
•
Voice Preamble:
While the opening diagnosis is
running, the voice preamble lets you know which
user settings you used last. The user setting options
announced by voice preamble are:
- “HIGHWAY1” or “HIGHWAY2” or “CITY1” or “CITY2”
- “BRIGHT” or “DIM” or “DIMMER” or “DARK”
- “VOICE ON” or “VOICE OFF”
One beep after the voice message of “HIGHWAY” means
Highway1, and two beeps after “HIGHWAY” means
Highway2. This is the same for City1 and City2 options
.
OPERATION

CONTENTS
8
9
CONTENTS
If the voice alert language is set to Spanish mode, the
voice preamble will occur in Spanish.
Even when the voice alert mode is turned off, the detector
will give the voice preamble. The voice alert “on/off”
feature controls alert-related voice messages only.
Brightness Control
Press the DIM button repeatedly (for less than 2 seconds
each time) to toggle between 4 different brightness
levels.
The brightness options are: Bright – Dim – Dimmer
–
Dark. Dark is not the complete blackout option. Once
the brightness level is set, a corresponding voice message
will follow. The corresponding voice messages are:
“BRIGHT (CLARO)” or “DIM (DEBIL)” or “DIMMER (MAS
DEBIL)” or “DARK (OSCURO)”. In Spanish alert mode,
the corresponding voice messages are spoken in Spanish.
The factory default mode is Bright.
When a signal is detected, alerts are always displayed in
Bright, regardless of the brightness level you’ve selected.
The display returns to your setting following the alert.
Also, even when the voice alert feature is turned “off”,
the detector will still announce which user interface you
selected because it is not an alert-related message.
OPERATION

CONTENTS
8
9
CONTENTS
Voice Alert Language Selection
Press and hold the LANGUAGE button (= DIM button)
repeatedly (for more than 2 seconds each time) to toggle
between English and Spanish mode. The factory default
is English mode. Spanish mode is engaged with the voice
message of “VOZ ESPAÑOLA” and English mode with
“ENGLISH VOICE”.
You can always choose either English or Spanish for your
voice alert system. When the detector is set in English
mode, it will speak only in English, and when in Spanish
mode, only Spanish.
Audio On/Off Selection
Press the MUTE button repeatedly (for less than 2 seconds
each time) to toggle between Mute On (Audio Off) and
Mute Off (Audio On). The factory default mode is Mute
Off. Mute On is turned on with the voice message of:
“MUTE ON (SONIDO DESACTIVADO)” and Mute Off with:
“MUTE OFF (SONIDO ACTIVADO)”. Mute On/Off can
be used when you manually turn the audio alert off, or
restored while the detector is reporting alerts.
Mute On will be automatically reset to Mute Off when
you turn the detector off. Mute On does not remain in the
detector’s memory.
OPERATION

CONTENTS
10
11
CONTENTS
•
Auto Audio Control:
Auto Audio will have
the detector report with reduced audio alarms for
continuously detected alerts. When a signal is
constantly reported for more than 5 seconds, the
detector will gradually reduce the audio level in the
following
5 seconds to the ambient noise level in your
vehicle. The reduced audio level will continue for
new alerts detected within 60 seconds from the
previous alert.
Voice On/Off Selection
Press and hold the VOICE button (= MUTE button)
repeatedly (for more than 2 seconds each time) to toggle
between Voice On and Voice Off. The factory default
mode is Voice On. Voice Off is activated followed by
the voice message: “VOICE OFF (VOZ DESACTIVADA)”
and Voice On with the voice message: “VOICE ON (VOZ
ACTIVADA)”.
Voice alert messages always occur rst. Audio and
visual alert messages occur next when the detector
is set to “VOICE ON” mode. When the detector is set
to “VOICE OFF
” mode, you will not be notied by voice
alerts, but by audio and visual alerts only.
OPERATION

CONTENTS
10
11
CONTENTS
Highway & City Mode Selection
Press the CITY button repeatedly (for less than 2 seconds
each time)
to toggle through 4 different radar band
selectivity & sensitivity modes. The modes are: Highway1
(H1) - Highway2 (H2) - City1 (C1) - City2 (C2). The
factory default mode is H1. H1 is engaged with the voice
message: “HIGHWAY (CARRETERA)” followed by one beep,
H2 with the voice message of “HIGHWAY (CARRETERA)”
followed by two beeps, C1 with “CITY (CIUDAD)”
followed by one beep, C2 with “CITY (CIUDAD)” followed
by two beeps.
The detector detects all radar band (X, K, Ka) signals at
H1 and C1, while it detects only K and Ka band signals at
H2 and C2. Also, it detects with full sensitivities at both
highway modes and with reduced sensitivities at both city
modes. It detects laser signals at all times regardless of
these highway and city modes.
• H1 detects X, K, and Ka signals with full sensitivities.
• H2 det
ects only K and Ka signals with full sensitivities.
• C1 detects X, K, and Ka signals with reduced sensitivities.
•
C2 detects only K and Ka signals with reduced sensitivities.
OPERATION
H C X K Ka L 2 3 4
H C X K Ka L 2 3 4
H C X K Ka L 2 3 4
H C X K Ka L 2 3 4

CONTENTS
12
13
Compass Calibration
Press and hold the CALIBRATE button (= CITY button)
for more than 2 seconds to access compass calibration
mode. In English mode, the calibration mode starts
with the voice message: “START YOUR CALIBRATION”
and (after 2 seconds) “DRIVE YOUR VEHICLE IN TWO
COMPLETE CIRCLES”. In Spanish mode, the messages
are: “EMPIEZA CALIBRAR” and (after 2 seconds) “HAGA
DOS VUELTAS ENTERAS EN SU COCHE”. The detector
ashes the 4 compass LEDs one after another (clockwise)
until the calibration is completed.
Perform the calibration on a level surface and following
these steps:
• Turn the detector on. (See Power & Volume Control .)
• Mount the detector on the windshield in your vehicle.
(See INSTALLING THE DETECTOR.)
• Press and hold the CALIBRATE button (= CITY
button) until you hear the detector talk and see
it ashing the compass LEDs clockwise, one after
another.
• Drive your vehicle in two circles. The size of the
circles and the direction that you drive does not
matter. The circles do not need to be perfect circles
but must be completed in the same direction. Each
circle should take a minimum of 20 seconds but no
OPERATION

CONTENTS
12
13
more than 1 minute to complete.
• Press the CALIBRATE button (= CITY button). The
detector will end the compass calibration with
the voice message: “CALIBRATION COMPLETED”
(English mode) or “CALIBRACION LOGRADA” (Spanish
mode) and with the 4 compass LEDs ashing twice.
The compass screen will indicate which direction
your vehicle is pointing. Calibration is now complete.
While the detector is calibrating, the front screen will
remain completely blacked out.
• When to Calibrate: The compass must be
calibrated:
- When the detector is used for the rst time in a
vehicle, and
- When the detector is mounted in a new location.
• Compass Display: The compass periscope displays
8 cardinal points. (See graphics next page.)
OPERATION

14
15
NORTH NORTHEAST EAST
SOUTHEAST SOUTH SOUTHWEST
WEST NORTHWEST
Tutorial Mode
Turn the detector on while holding the CITY button
and the detector will demonstrate how it operates when
each radar and laser band signal is detected. Each time
it demonstrates a different band, it starts with the
corresponding band ID voice messages: “X BAND (BANDA
X)”, “K BAND (BANDA K)”, “KA BAND (BANDA KA)”,
and “LASER BAND (BANDA LASER)”, followed by the
corresponding visual displays and audio tones.
OPERATION

14
15
• X band Constant-On signal detected operation
• X band Instant-On or POP signal detected operation
• K band Constant-On signal detected operation
• K band Instant-On or POP signal detected operation
• Ka band Constant-On signal detected operation
• Ka band Instant-On or POP signal detected operation
• Laser band detected operation
• All LEDs on
H C X K Ka L 2 3 4
H C X K Ka L 2 3 4
H C X K Ka L 2 3 4
H C X K Ka L 2 3 4
H C X K Ka L 2 3 4
H C X K Ka L 2 3 4
H C X K Ka L 2 3 4
H C X K Ka L 2 3 4
H C X K Ka L 2 3 4
H C X K Ka L 2 3 4
H C X K Ka L 2 3 4
H C X K Ka L 2 3 4
H C X K Ka L 2 3 4
H C X K Ka L 2 3 4
H C X K Ka L 2 3 4
H C X K Ka L 2 3 4
H C X K Ka L 2 3 4
OPERATION

16
17
Press any button to exit the all-LEDs-on status with one
beep sound, which is the end of the tutorial mode. The
detector automatically enters detection mode and begins
detecting signals. The detector uses the same audio,
visual, and voice alerts as used in the tutorial mode when
it reports real alerts.
• Signal Strength Meters: The numbered LEDs are
called signal strength meters when they are
displayed together with a radar band LED (X, K,
or Ka) to indicate the strength of a detected signal. The
higher the number, the stronger the signal. When the
numbered LEDs are used together with H or C LED,
they demonstrate the level of the highway or city mode
you’ve set.
CARE AND MAINTENANCE
Here are some tips to help you care for your SENSORO
ZODIAC II:
• To deter theft, remove the detector from your
windshield when you leave your vehicle.
• Avoid extended exposure to direct sunlight.
Remove the detector from your windshield when
your vehicle is parked for an extended period of
time. On hot days, the temperature inside your
vehicle can reach levels that could damage the
detector
CARE AND MAINTENANCE

16
17
• Do not expose the detector to rain, moisture, spray
cleaners, or liquids that could damage the internal
circuitry of the detector.
Fuse Replacement
The lighter socket adapter of the power cord has a
replaceable 2-Amp SAG fuse located below the silver tip.
To check or replace the fuse, slowly and carefully unscrew
the tip of the plug, making sure the spring and silver tip
located inside the plug do not y out when you remove
the cap. Check fuse and replace if necessary.
Your SENSORO ZODIAC II is designed for reliable
service. If you encounter a problem, however, please
refer to the TROUBLESHOOTING section of this manual
before making a service call.
TROUBLESHOOTING
The SENSORO ZODIAC II will not power up.
• Make sure that the Power & Volume On/Off thumb
wheel is turned on.
• Check all power cord connections.
• Check the fuse in the lighter socket adapter and
replace if necessary.
• Check lighter socket. Clean if dirty.
• Check your vehicle’s fuse panel (refer to your vehicle’s
manual).
TROUBLESHOOTING

18
19
The SENSORO ZODIAC II did not alert when passing
an ofcer.
• Not all police cars have radar/laser, or the radar/
laser may not be in use at that time you passed the
ofcer
The SENSORO ZODIAC II signal is weak.
• Set the detector to H1 or H2 mode.
• Make sure the detector is level to the road.
• Make sure the radar window or the top laser receiver
is not obstructed. Move the detector if necessary.
The SENSORO ZODIAC II beeps over bumps or when
using vehicle’s equipment or electrical accessories, such
as brakes, windshield wipers, power windows, etc.
• Check power cord for loose connections.
• Vehicle has electrical noise. Install a lter capacitor
(470µF; 35-volt, or larger capacitance value) on the
back of the lighter socket across the power
connection.
TROUBLESHOOTING
Table of contents
Other SENSORO Radar Detector manuals

Popular Radar Detector manuals by other brands


Cobra
Cobra Pro 9680 operating instructions

Beltronics
Beltronics STi Magnum Professional Series Quick reference guide

Beltronics
Beltronics RX45 owner's manual

Beltronics
Beltronics Express 795 owner's manual

Beltronics
Beltronics BEL990 International operating instructions

Cobra
Cobra PRO 7080 operating instructions


