Shenzhen Baoan Hantong Electronics COLUMBIA FRS-S14 User manual

TWO-WAY COMMUNICATOR
COLUMBIA
LOCK
LAMP
CALL
SCAN
PRIV
BEEP
OWNER’S MANUAL MODEL: FRS-S14
PLEASE READ THIS MANUAL CAREFULLY BEFORE USE.

1
COLUMBIA
CARTON CONTENTS
COLUMBIA Two-Way Communicator
User-Removable Belt Clip
Owner’s Manual
Warranty Card
* Attached to the units at the time of packaging
WARNING!
DO NOT CHARGE UNIT USING AC/DC ADAPTER WITH
REGULAR AAA ALKALINE
BATTERIES INSTALLED.
ONLY USE THE AC/DC ADAPTER WITH AAA
NI-MH RECHARGEABLE BATTERIES.
(NOT INCLUDED!)

2
FCC NOTICE
Warning: Adjustment to this unit or replacement of any transmitter
component (crystal, semiconductor, etc.) to this unit that could result in a
violation of the rules.
NOTE: This equipment has been tested and found to comply with the
limits for a Class B digital device, pursuant to Part 15 of the FCC Rules.
These limits for are designed to provide reasonable protection against
harmful interference in a residential installation. This equipment
generates, uses and can radiate radio frequency energy and, if not
installed and used in accordance with the instructions, may cause
harmful interference to radio communications.
However, there is no guarantee that interference will not occur in a
particular installation, If this equipment does cause harmful interference
to radio or television reception, which can be determined by turning the
equipment off and on, the user is encouraged to try to correct the
interference by one or more of the following measures:
Reorient or relocate the receiving antenna.
Increase the separation between the equipment and receiver.
Connect the equipment into an outlet on a circuit different from that to
which the receiver is needed.
Consult the dealer or an experienced radio/TV technician for help.
If shielded cables or special accessories are required for compliance, a
statement must be included which instructs the user to employ them, eg.
Shielded cables must be with this unit to ensure compliance with the
Class B FCC limits.
This device complies with Part 15 of the FCC Rule. Operation is
subject to the follow two conditions: (1) this device may not cause
harmful interference, and (2) this device must accept any
interference received, including interference that may cause
undesired operation.

3
FEATURE LIST
A . GENERAL
a.14 CHANNEL
b.38 CTCSS CODES PER CHANNEL
c. BATTERY (“AAA”1.5V X 4 )
d. LCD DISPLAY (RF CH, CTCSS CODE CH, RX/TX STATUS,
LOCK INDICATOR, LOW BATT. INDICATOR)
e. FIXED FLEX ABLE RUBBER ANTENNA
f. EXTERNAL EAR / MIC JACK
g. AUTO POWER SAVING CIRCUITRY
h. AUTO SCAN
B. BUTTON CONTROL
a. MONITOR BUTTON
b. PTT (PUSH TO TALK ) BUTTON
c. MODE KEY
d. LOCK KEY
e. LAMP KEY
f. CALL KEY
g. UP KEY
h. DOWN KEY
i. POWER AND VOLUME CONTROL ROTARY SWITCH
*.* FRS: Family Radio Service
*.* CTCSS: Continuous Tone Coded Squelch System
C. SPECIFICATION

4
1. FREQUENCY RANGE
CHANNEL FREQUENCY (MHz) CHANNEL FREQUENCY(MHz)
1462.5625 8467.5625
2462.5875 9467.5875
3462.6125 10 467.6125
4462.6375 11 467.6375
5462.6625 12 467.6625
6462.6875 13 467.6875
7462.7125 14 467.7125
2. CTCSS CODE FREQUENCY CHART
CODE FREQUENCY(Hz) CODE FREQUENCY(Hz)
167.0 20 131.8
271.9 21 136.5
374.4 22 141.3
477.0 23 146.2
579.7 24 151.4
682.5 25 156.7
785.4 26 162.2
888.5 27 167.9
991.5 28 173.8
10 94.8 29 179.9
11 97.4 30 186.2
12 100.0 31 192.8
13 103.5 32 203.5
14 107.2 33 210.7
15 110.9 34 218.1
16 114.8 35 225.7
17 118.8 36 233.6
18 123.0 37 241.8
19 127.3 38 250.3

5
Controls and displays
Controls and displays
1. Belt clip
2. Microphone jack
3. Speaker jack
4. Antenna
5. Mode
6. Lock
7. Lamp
8. Call
9. Down
10. Up
11. On/Off / Volume knob
12. Microphone
13. Monitor button
14. PTT (Push To Talk ) button
15. Battery door
16. Battery door clip
MON
TALK
13
14
4
5
6
7
8
9
10
11
12
15
16
1
2
3
LOCK
LAMP
CALL
SCAN
PRIV
BEEP

6
Setting Up Your FRS Radio
Battery Installation
Batteries are not included with your FRS radio, To use the radio, you
must install 4 AAA size alkaline batteries. Always use high quality
batteries in the unit, to prevent damage from leaking or corrosion.
Caution: incorrect positioning or the batteries can damage both the
batteries and the unlit.
To install batteries:
* Remove the belt clip by pulling the tab on the top of the clip back, and
adding belt clip up and off the unit.
* Pull the battery door.
* Insert four AAA batteries. Position the batteries according to the polarity
markings on the plastic.
* Replace the battery cover.
Battery level / Low battery indication.
* The LCD panel displays the battery power level according to the
number of squares inside the battery symbol.
* When the battery level is low, the battery icon will flash to indicate that
the batteries need to be changed.
Note:
When the batteries are low or need charging,
the BATT LOW indicator in the LCD display icon will blink.
Do not put batteries into fire or expose to high heat. they
may explode.
7
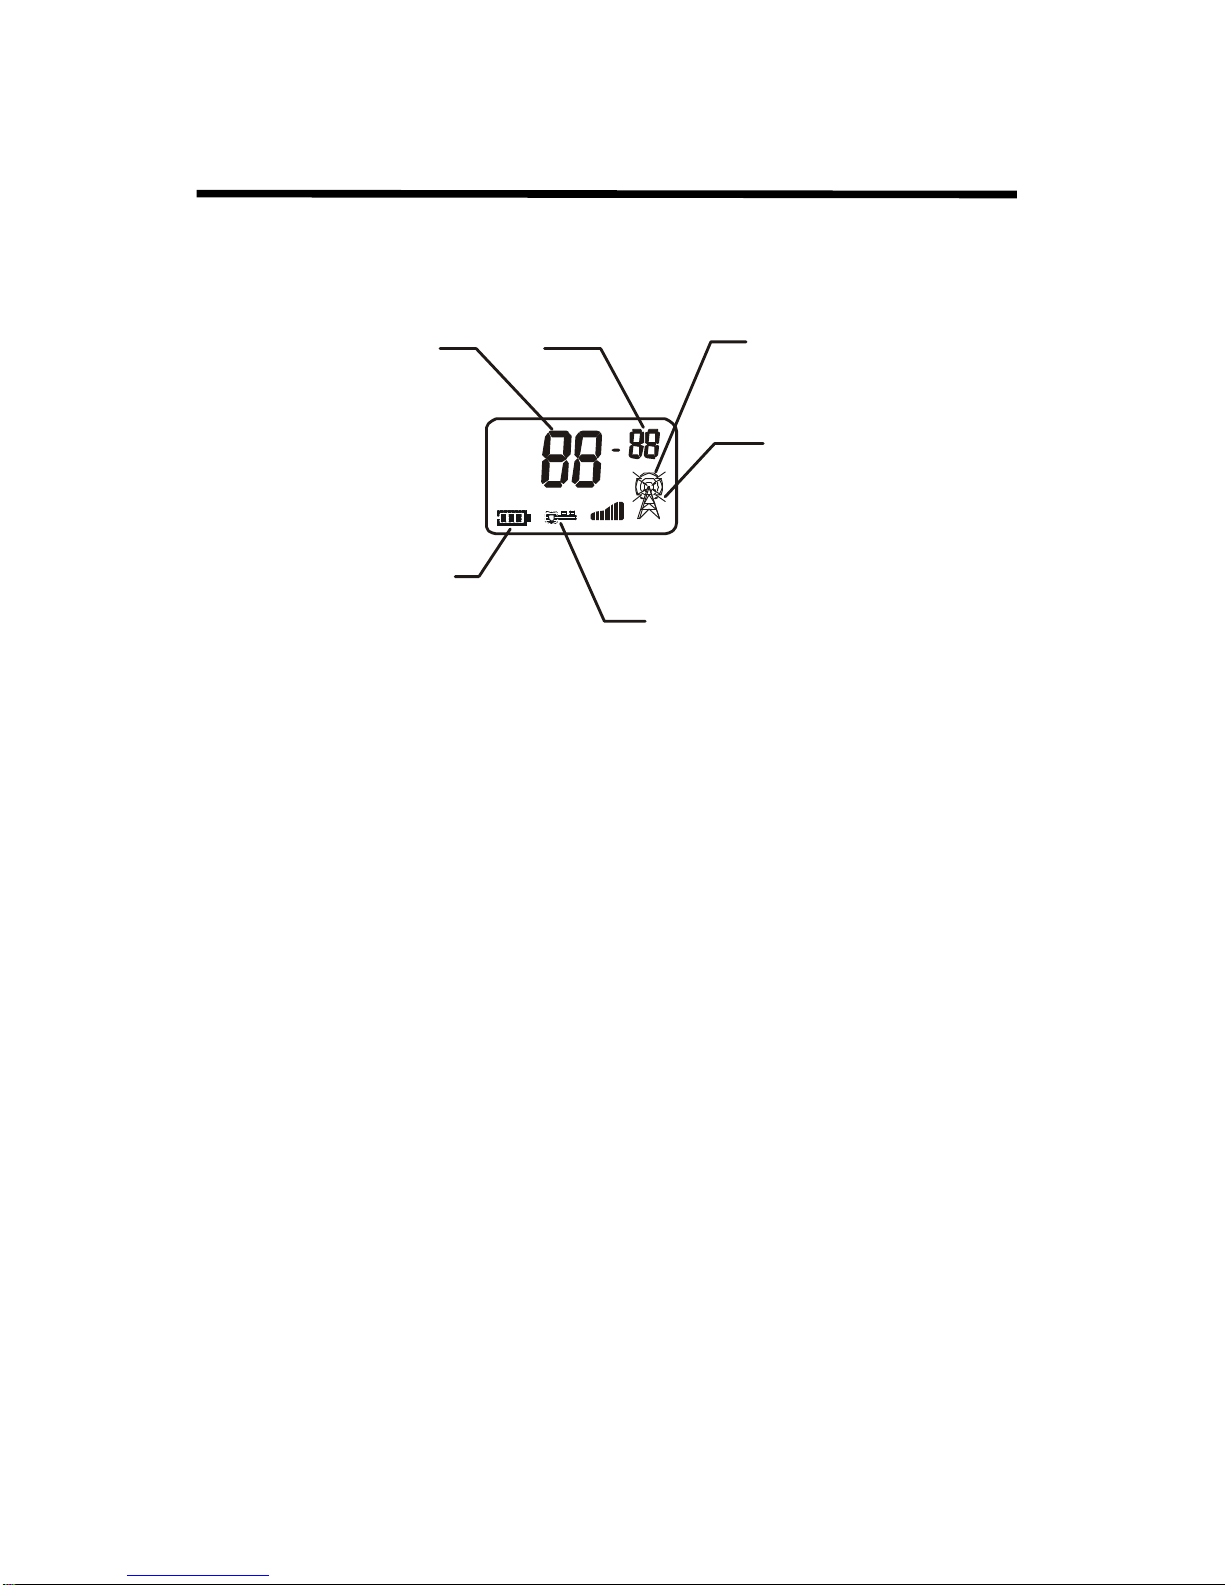
Operation
LCD Panel Display
Channel
NumberCTCSSCode
Transmit Symbol
Receive Symbol
Battery Level
Low Battery
IndicatorKaylock
Symbol
SCAN
PRIV
BEEP
Turning On Your FRS
Turn the ON/OFF Volume knob clockwise on the top of the unit.
An audible tore will generate and The RF channel indicate on the LCD.
Communication
You can communicate two ways your new FRS radio.
You can either talk directly to the other party and hear their response, or
you can call or page them with an audible tone.
Note: FRS radios can only communicate when either the TALK button
(for conversation) or the CALL button (for paging only) is pressed.
The unit can only receive when both buttons are fully released.

8
Operation
Receiving communications
When your FRS unit is turned on and is not being used to transmit voice
communication or pages, it is always in the listening mode.
You can not receive any transmissions when the TALK or CALL buttons
are pressed, even if you are not saying anything. Pressing these bottoms
automatically overrides and turns off the transmit mode.
when you are using the unit in conversation, you must release the TALK
and or CALL buttons to hear the responses of the other people.
Failure to do so will keep your unit in transmission mode, preventing you
from hearing other units.
To speak directly to an other radio
1. Push and hold the PTT button/switch to transmit. The LCD transmit
icon will light-on (see LCD PANEL SYMBOLS for details)
2. While holding the PTT button/switch, speak in a normal voice about
2 to 3 inches away form the microphone.
3. Release the PTT button/switch when you have finished transmitting.
NOTE: In order for other people to receive your transmission, they must
also be on the same channel and CTCSS code you are currently using.
Refer to the “Changing Channels”section for more information. (Page 5)

9
Operation
Changing Channels
This set has 14 available channels, To change channels:
1. Press the Mode key the channel number digit will flashes on the LCD
panel.
2. While the channel number is flashing.
* Press the UP ( ) key to increase the channel number.
* Press the DOWN (¨‹)key to decrease the channel number.
3. Press the Mode key twice to select the desired channel.
Note : Refer to the “FRS Channel Table”section of this manual for
detailed frequency listings.(Page 9)
Continuous Tone Coded Squelch System (CTCSS)
CTCSS allows you to hear only specific users, effective blocking out
unwanted calls from other users on the same channel you are using. The
FRS has 38 CTCSS codes available. To set the CTCSS code .
1. Press and the Mode key again the CTCSS code digits will flash on the
LCD Panel.
2. Press the Mode key again the CTCSS code digits will flash on the
LCD Panel.
3. While the CTCSS code is flashing.
* Press are UP ( ) key to increment the CTCSS code.
* Press the DOWN (¨‹)key to decrement the CTCSS code.
4. Press the Mode key or the PTT button/switch to select the desired
CTCSS code.
5. To turn the CTCSS feature off, set the CTCSS code to zero (0).
You will hear everyone in the channel if the CTCSS feature is turned
off.

10
Operation
Note: CTCSS codes are mainly used for blocking unwanted calls over a
crowded channel. Other users in the same channel can still hear you, but
you cannot hear them unless they have the same CTCSS code that you
have set.
Range
Your FRS unit has a range of up to 2 mites
This range can be decreased by certain atmospheric and environmental
conditions at the time of your conversation.
Some conditions that affect range are:
* Buildings
* Dense trees or foliage
* Hilly or mountainous terrain
The best range will be in flat, open terrain, without obstructions, Using
the Mon(monitor) button to override the automatic squelch will help
extend the range to the maximum limits.
Calling (paging) the other radio
To send a page
* Make sure both units are on.
* Press and release the CALL button the front of your unit.

11
Special Features
Automate Squelch
You FRS is equipped with automatic squelching circuitry, which will
automatically filter out weak transmissions and unwanted noise.
These signals may be picked up as background static, and are usually
cause by terrain conditions or if you have reached the limit of your range.
Monitor button
You can use the Monitor feature to listen in for weak signals in the
current channel. or for adjusting the speaker volume.
* Press the Monitor button for normal monitoring.
* Press and hold the Monitor for at least four seconds for continuous
monitoring.
Your range is dependent on the battery condition of the radio.
The type of terrain where you are located, and the strength of the signal
from the transmitting radio .
Key lock
This feature prevents accidental channel change and other features from
inadvertent changes. Key lock temporarily disables disable on the UP,
DOWN, and MODE key when the lock mode is turn on.
* To turn key lock ON, Press the Lock button until the lock symbol is
appear on the LCD panel.
* To turn lock OFF, Press the Lock button until the lock symbol is
disappear on the LCD panel.
Note: Only the PTT and Call key function during key lock mode.

12
Special Features
Channel scan
Your FRS unit can scan for 14 channels. To scan the unit.
* Press Mode and UP buttons at the same time.
* Channel indicator will change continue.
* Once received any signal scan will stop and listen for 4 second.
* Press talk button and talk on that channel (scan will automatically stop )
or press up key to scan continue.
* To stop the scan press Mode button.
Automatic Battery Save
Your FRS unit has special circuitry designed to extend the life of your
battery. When the radio is not used for 4 seconds, it will automatically
switch itself into a low power mode.
The battery save dose not affect the radio ability to receive transmissions.
When the unit has any activity, it automatically returns to full power.
Lamp key
Once you press the Lamp key. Turn the LCD back lit, on for 10 seconds.
Respond prompt tone
When the person talk to you from an other radio, Finish speaking and
release his. Talk button, You will hear a tone from your unit. This means
the other radio is receive mode now and you can begin your
transmission.
External Microphone / Speaker jacks.
Your FRS radio can be used with an optional external microphone and
speaker, usually sold together in a headset combination. The jacks on
the top of the unit, under the protective rubber cover, are used for this
purpose.

13
Specifications
Specifications
1. Channels available : 14 Channels (see channel table)
2. Output Power (Tx) : 0.5W (FCC Maximum)
3. Battery life : 20 Hours (typical)
FRS Channel Table
CH# FREQ (MHz) CTCSS Channels
1 462.5625 38
2 462.5875 38
3 462.8125 38
4 462.6375 38
5 462.6625 38
6 462.6875 38
7 462.7175 38
8 467.5625 38
9 467.5875 38
10 467.6125 38
11 467.6375 38
12 467.6625 38
13 467.6875 38
14 467.7125 38
CTCSS CODE FREQ (Hz) TABLE
CODE FREQ CODE FREQ
1 67.0 20 131.8
2 71.9 21 136.5
3 74.4 22 141.3
4 77.0 23 146.2
5 79.7 24 151.4
6 82.5 25 156.7
7 85.4 26 162.2
8 90.5 27 167.9
9 91.5 28 173.8
10 94.8 29 179.9
11 97.4 30 186.2
12 100 31 192.8
13 103.5 32 203.5
14 107.2 33 210.7
15 110.9 34 218.1
16 114.8 35 225.7
17 110.8 36 233.6
18 123.0 37 241.8
19 127.3 38 250.3
Table of contents


