Seals TS3 User manual


User’s Manual for TS3 Mobile Phone
Contents
User’s Manual for TS3 Mobile Phone............................................................................................................................................1
Contents..................................................................................................................................................................................................1
1. Introduction to the Mobile Phone....................................................................................................................................................1
1.1 Hard Keys........................................................................................................................................................................................................................1
1.2 Standby Display...............................................................................................................................................................................................................3
1.2.1 Status Bar ..................................................................................................................................................................................................................4
1.2.2 Applications............................................................................................................................................................................................................... 4
1.2.3 Three Fixed Soft Icons..............................................................................................................................................................................................4
1.3 Installation and Removal of Battery................................................................................................................................................................................4
1.4 Installation and Removal of SIM Card............................................................................................................................................................................6
1.5 Installation and Removal of Micro SD Card...................................................................................................................................................................8
1.6 Battery Charging..............................................................................................................................................................................................................9
2. Function Introduction.....................................................................................................................................................................10
2.1 Power-on........................................................................................................................................................................................................................10
2.2 Power-off .......................................................................................................................................................................................................................10
2.3 Making Calls..................................................................................................................................................................................................................10
2.4 Answering Calls............................................................................................................................................................................................................. 11
2.5 Input Method .................................................................................................................................................................................................................12
2.6 Contacts .........................................................................................................................................................................................................................12
2.7 Bluetooth Earphone.......................................................................................................................................................................................................12
2.8 Micro SD Card...............................................................................................................................................................................................................13

3. Menu Operation ..............................................................................................................................................................................13
3.1 3D Gallery .....................................................................................................................................................................................................................13
3.2 SIM Toolkit....................................................................................................................................................................................................................13
3.3 Wi-Fi P2P Connect Wizard............................................................................................................................................................................................14
3.4 Dialing ...........................................................................................................................................................................................................................14
3.5 Sending E-mails.............................................................................................................................................................................................................14
3.6 Pedometer......................................................................................................................................................................................................................14
3.7 Calculator.......................................................................................................................................................................................................................15
3.8 NotePad..........................................................................................................................................................................................................................15
3.9 Browser..........................................................................................................................................................................................................................15
3.10 Sound Recorder ...........................................................................................................................................................................................................15
3.11 Calendar.......................................................................................................................................................................................................................15
3.12 Settings ........................................................................................................................................................................................................................16
3.12.1 Management of SIM Card.....................................................................................................................................................................................16
3.12.2 Wireless & networks .............................................................................................................................................................................................16
3.12.3 Call Settings ..........................................................................................................................................................................................................18
3.12.4 Audio profiles........................................................................................................................................................................................................21
3.12.5 Display...................................................................................................................................................................................................................21
3.12.6 Location.................................................................................................................................................................................................................22
3.12.7 Security..................................................................................................................................................................................................................22
3.12.8 Applications...........................................................................................................................................................................................................22
3.12.9 Account and Sync..................................................................................................................................................................................................22
3.12.10 Privacy.................................................................................................................................................................................................................23
3.12.11 Storage.................................................................................................................................................................................................................23
3.12.12 Language & Keyboard ........................................................................................................................................................................................23
3.12.13 Voice input & output ...........................................................................................................................................................................................23
3.12.14 Accessibility ........................................................................................................................................................................................................ 23
3.12.15 Date & Time........................................................................................................................................................................................................23
3.12.16 Schedule power on/off.........................................................................................................................................................................................23
3.12.18 About Phone........................................................................................................................................................................................................24
3.13 Clock............................................................................................................................................................................................................................24
3.14 FM Radio.....................................................................................................................................................................................................................24

3.15 Torch............................................................................................................................................................................................................................24
3.16 Search ..........................................................................................................................................................................................................................25
3.17 Call Log.......................................................................................................................................................................................................................25
3.18 Contacts .......................................................................................................................................................................................................................25
3.19 File Manager................................................................................................................................................................................................................25
3.20 Downloads...................................................................................................................................................................................................................26
3.21 Camera.........................................................................................................................................................................................................................26
3.22 Messaging....................................................................................................................................................................................................................27
3.23 Music ...........................................................................................................................................................................................................................28
3.24 E-Compass...................................................................................................................................................................................................................28
4 Accessories.........................................................................................................................................................................................28
4.1 Charger...........................................................................................................................................................................................................................28
4.2 Data Cable .....................................................................................................................................................................................................................29
4.3 Earphone........................................................................................................................................................................................................................29
5 Notice.................................................................................................................................................................................................29
6 Troubleshooting ................................................................................................................................................................................33
1
This Manual, designed to help you properly use the mobile phone of this model provided by our company, does not contain any information about
software and hardware configuration of this product. For information about product configuration, please refer to contracts (if any) in relation to this
product, or consult the distributor selling the product to you. Our company follows a sustainable development strategy, so we reserve the right to modify
and improve this document without any prior notice.
Within the sphere permitted by law, our company, under any situation, will not make compensation for any special, incidental, indirect or secondary
damage, or for any loss of profit, data, goodwill or expected saving.
Many network functions introduced in this manual are special services provided by network service providers; it is up to the network service
provider whether these network functions can be used or not.
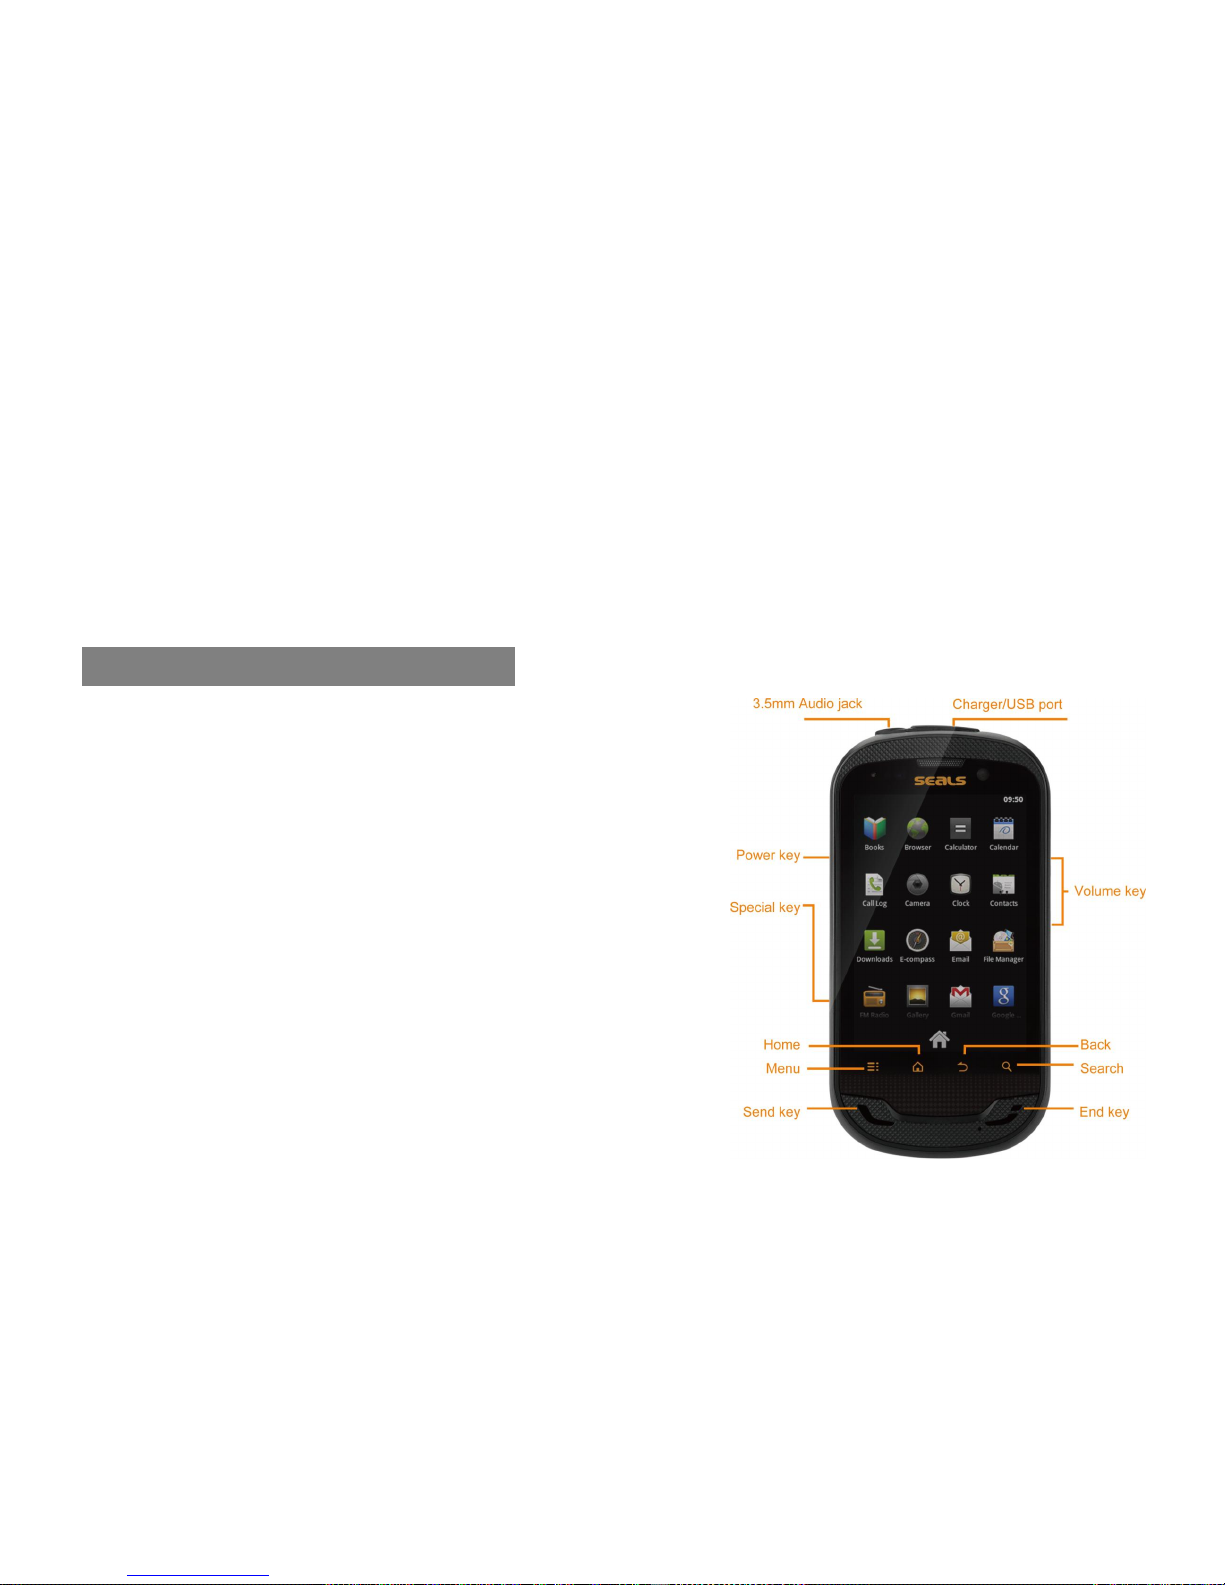
1. Introduction to the Mobile Phone
1.1 Hard Keys
Keys for this mobile phone include “Menu”, “Standby”, “Backward”, “Search”, left-side
“Power” key, left-side push key, and right-side “Volume” key (up/down).
“Menu” (a yellow icon, on the leftmost bottom of the screen)
When this key is pressed, a menu bar corresponding to the current interface will appear. In
a case when no option menu is available on an interface there will be no response when
this key is pressed.
“Standby” (on the right of the “Menu” key)
In the state of menu or editing, short press this key to go back to the default standby
interface, and long press this key to display the applications recently used.
“Backward” (on the right of the “Standby” key)
You can go back to the last operation or the previous menu interface by pressing this key;
in the state of editing, you can tap this key to hide the keyboard.
“Search” (on the right side of the “Backward” key, the rightmost bottom of the screen)

2
You can use this key to open the mobile phone search interface.
Side “Volume” Key:
It is on the right side of the mobile phone, consisting of an “Up” key and a “Down” key.
It can be used to adjust the ring volume.
In case of an incoming call, it can be used to turn off the ring tone.
During conversation, it can be used to adjust the voice volume.
During audio/video playback, it can be used to adjust the audio/video volume.
“Power” Key:
It is on the left top of the mobile phone:
When the mobile phone is off/on, long press this key to power it on/off.
When the mobile phone is not in the sleep mode, long press this key to open the mobile phone options, where you can select a corresponding
mode.
When the mobile phone is not locked, short press this key to activate the keypad lock, lock the screen and enter the sleep mode.
When the mobile phone is in the sleep mode, press this key to cancel the sleep mode and lighten the screen.
When the mobile phone is locked but not in the sleep mode, short press this key to lock the screen and switch the mobile phone into the sleep
mode.
Side Push Key:
It is on the left bottom of the mobile phone:
The default setting is the “Torch” menu interface. For shortcut setting of the Side Push Key, you can enter the menu of “Settings for Side Push Key”.
For functions of the “Side Push Key”, please refer to “3.12.17 Settings for Side Push Key”.
3
1.2 Standby Display
This mobile phone is a bar phone with single LCD. The size of the display is
3.5".
Every character displayed on the screen is a complete graph block, the size
of which depends on the font of the character.
The icons shown on the status bar of the mobile phone are used to indicate the
current status of the mobile phone, such as current battery level and network
signal.
You can tap a certain standby screen and slide the standby display from left to
right or from right to left, but cyclic sliding is not supported.
In the standby interface, you can press the “Menu” button to open the option
menu bar, where you can add screen display and carry out wallpaper setting, and
other setting, detailed as below:.
Add: You can add a menu icon for the current standby interface.
Wallpaper: You can set the wallpaper for the mobile phone.
Search: Open the search interface.
Notice: new messages, missed calls will be listed. You can tap to view. You can also tap the [Clear] icon to delete notice(s).
Setting: Please refer to “3.12 Settings”.
Style Switch: You can switch the style of the current standby interface.
If a standby interface is not fully occupied by application icons, you can long press a blank area in the standby interface to open a menu list; four
menus, namely, Shortcut, Widget, Folder and Wallpaper, can be displayed on this list interface. You can carry out the following operations.
Shortcut: Enter the shortcut list and you can tap to select a certain shortcut.
Widget: Enter this menu, tap to select a certain application, and it can be displayed on this standby interface.
Folder: You can tap to select a folder and display it on this standby interface.
4
Wallpaper: You can set the wallpaper for the standby interface.
1.2.1 Status Bar
The first line on the screen of the mobile phone is the status bar. Icons of the current status of the mobile phone are shown on this status bar,
including signal strength, battery level, whether alarms are set currently, and other information. If there is an icon shown on the left side of the status bar,
it means a missed call, a new message, etc..
Press the status bar and slide downwards to open the notice menu list:
The notice list will display the current prompt messages given by the mobile phone, including new messages, missed calls and other information.
You can tap to enter the view interface. You can also tap the [Clear] icon to delete the notice.
1.2.2 Applications
When tapping an application icon shown on the standby screen, you will enter the menu interface of this application and can carry out relevant
operations; long press an application icon to select this application, where a dustbin icon will be shown in the lower part of the screen; drag the selected
icon to the dustbin, and the selected application will disappear from the standby screen. You can long press the blank area after the foresaid icon is
deleted and select in the displayed menu list interface to add a new application icon.
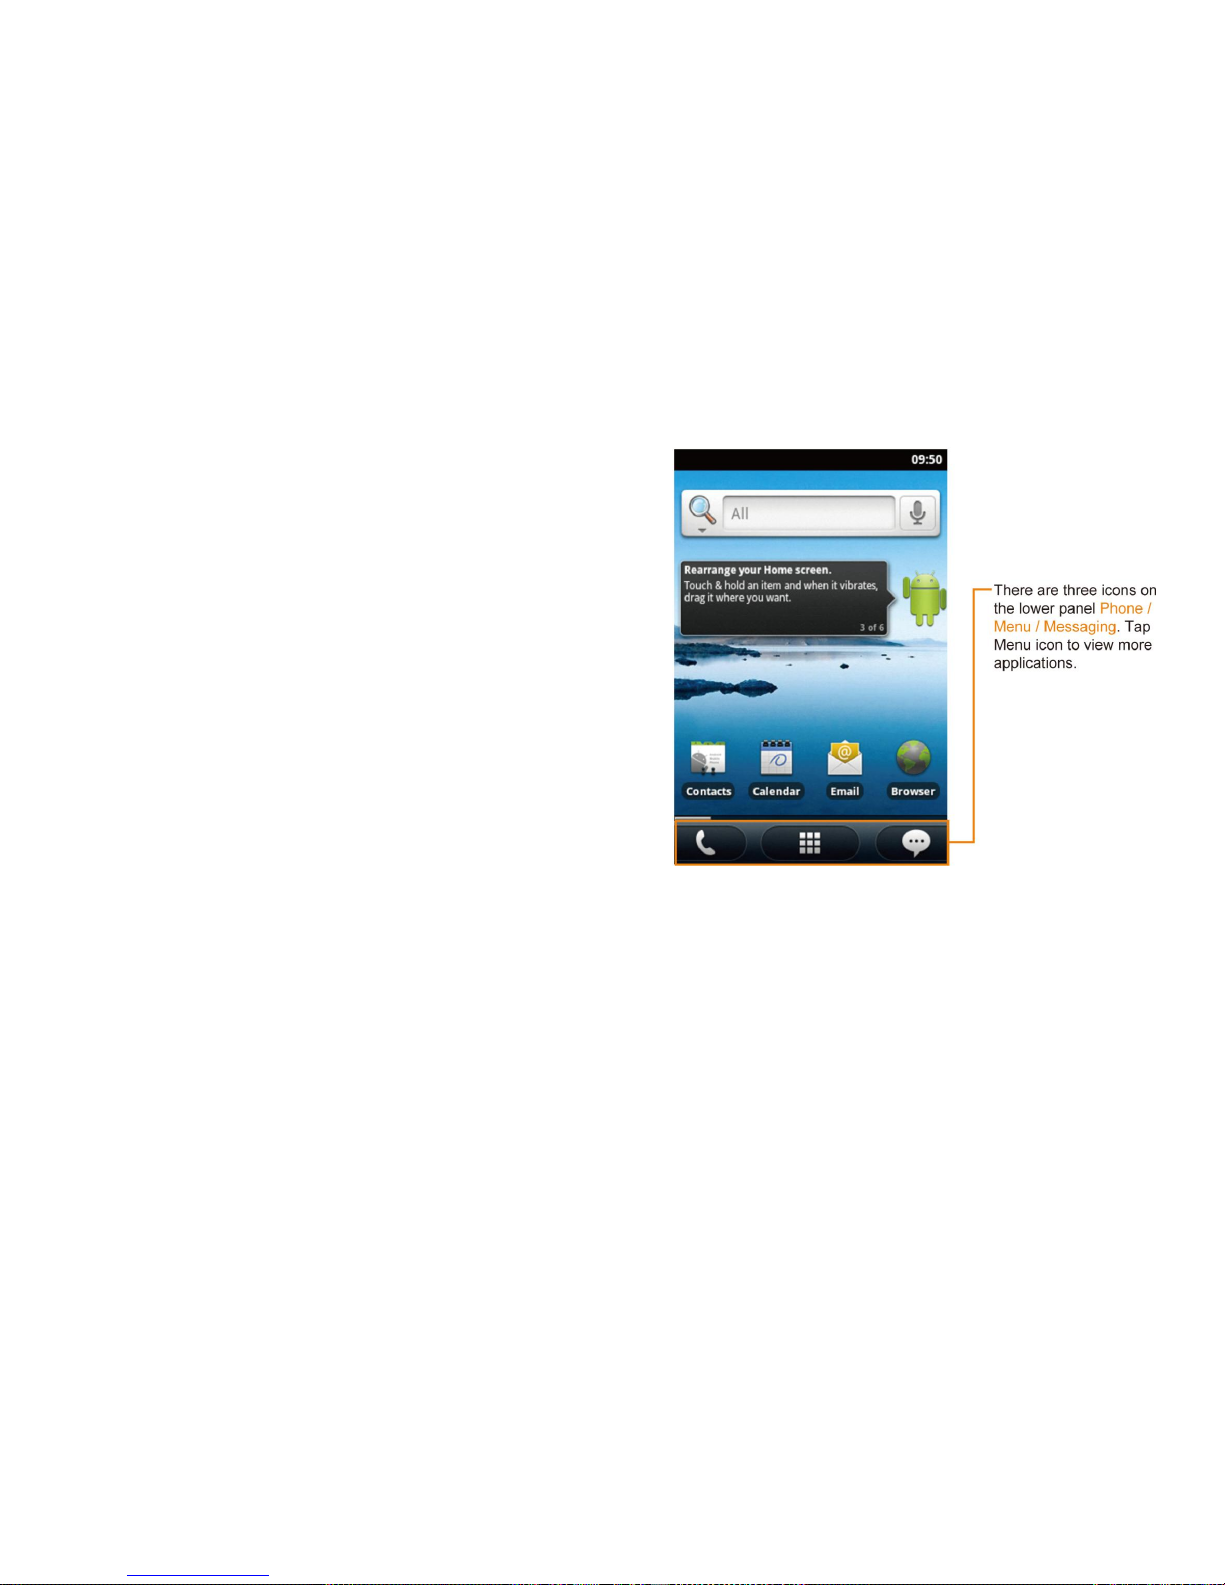
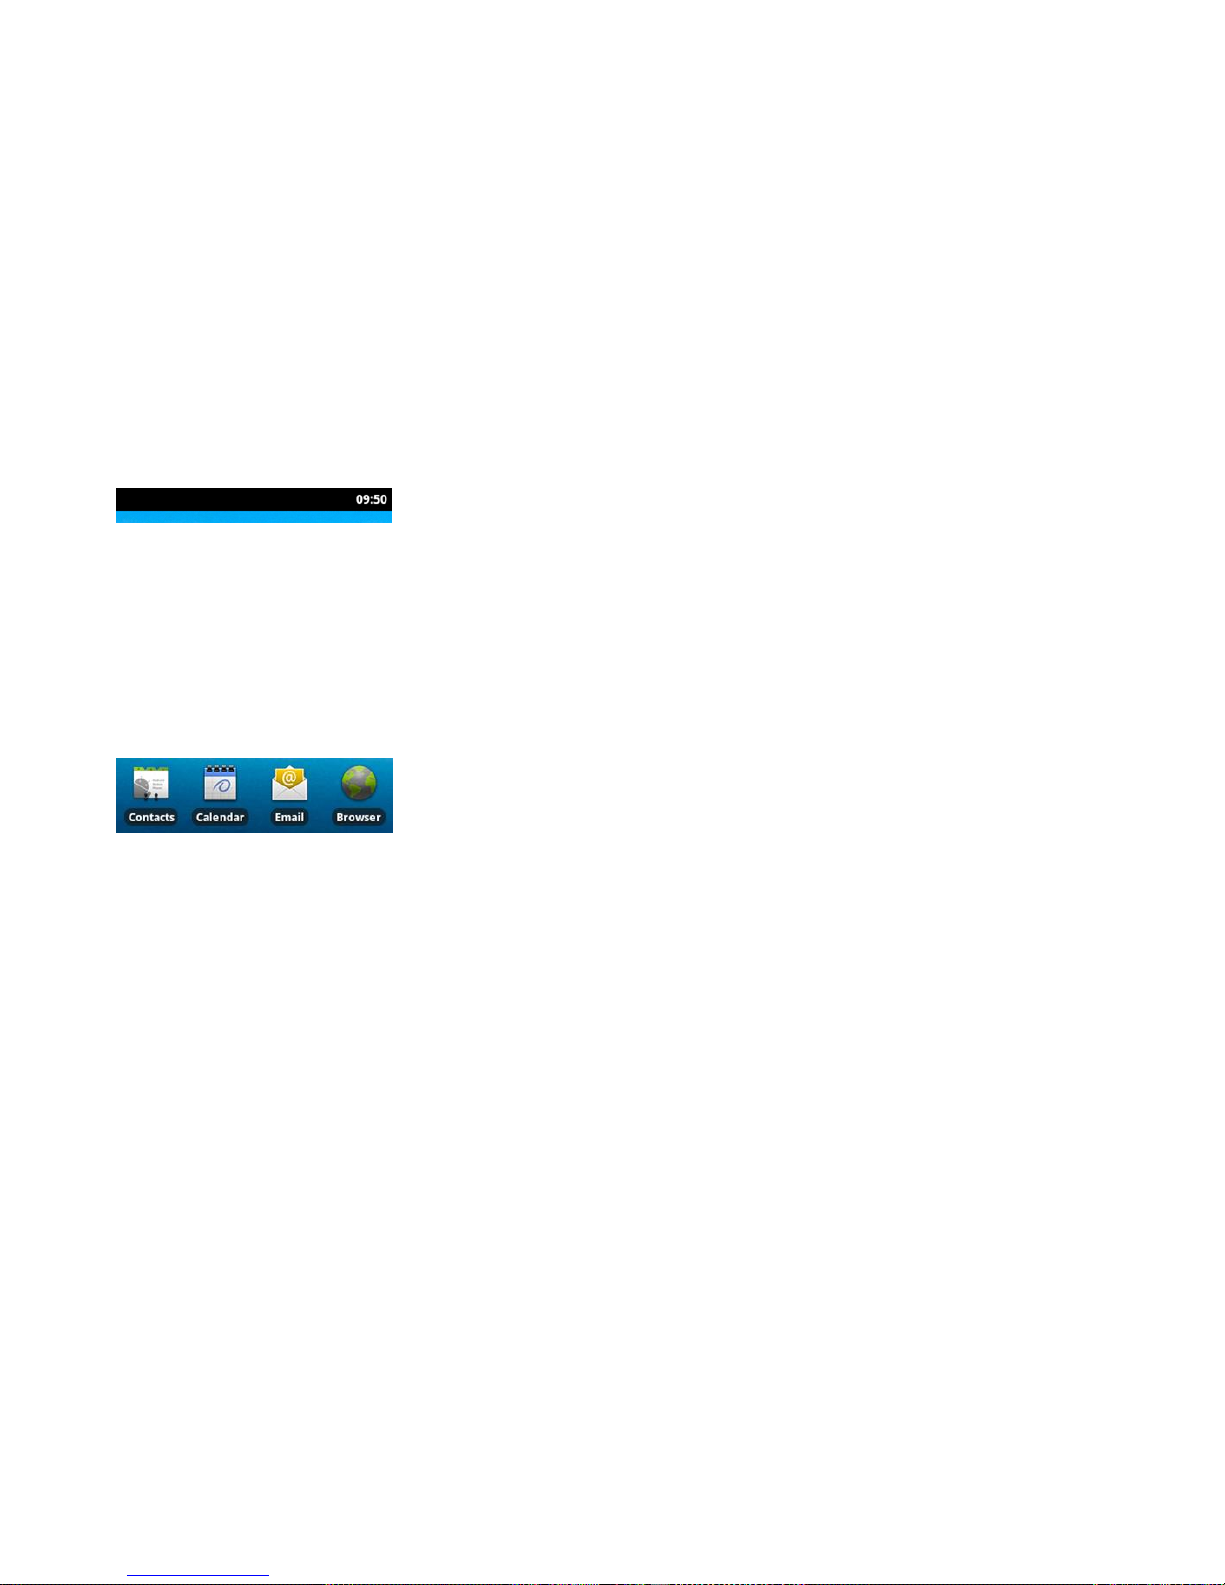
1.2.3 Three Fixed Soft Icons
There are three fixed soft icons in the lower part of the standby screen. You can use these three soft icons to create shortcuts.
Note: These three soft icons are shown only in the standby interface.
1.3 Installation and Removal of Battery
Installation of Battery
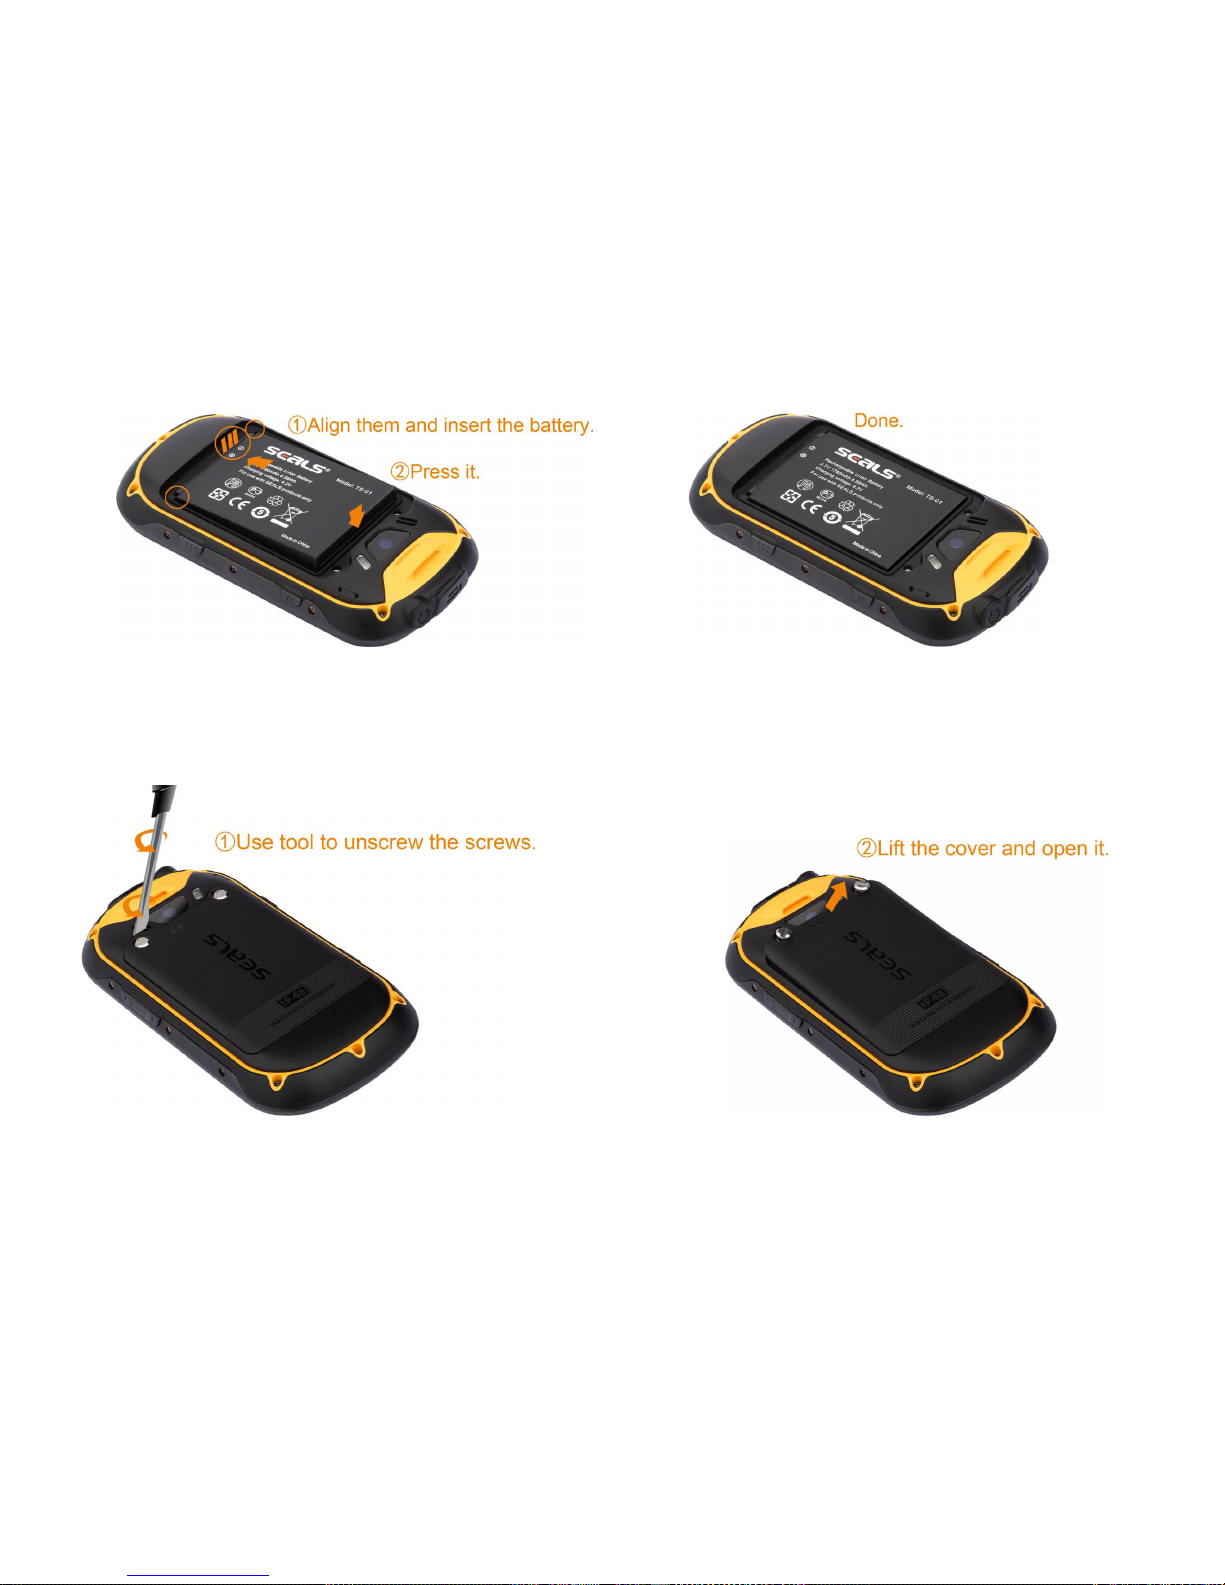
5
Turn the back of the mobile phone upwards; hold the mobile phone body with a hand; align the 3 small metal pieces of the battery with the 3 small
metal columns of the battery compartment, and put the battery in correspondingly; then press the other end of the battery to fasten it to the mobile phone,
and installation is completed.
Removal of Battery

6
Grab with fingers the bulging part at the connection between the battery and the top of the mobile phone, and press it downwards (towards the
bottom of the mobile phone); apply force outwards at the same time to separate the battery from the mobile phone body, and then take the battery out.
1.4 Installation and Removal of SIM Card
Installation of SIM Card
Please buy an SIM card from the network service provider. Your mobile phone number and user’s registration information are saved in your SIM card.
The SIM card can be used in any GSM mobile phone, and your phone number and registration information will remain the same.
Make sure the mobile phone is powered off.
Remove the back cover of the mobile phone (pick up the mobile phone, and loosen the screws fastening the mobile phone and the back cover in
the counter-clockwise direction with the accompanying small tool for opening the shell; at this moment, the top of the back cover will be
separated from the mobile phone, then the back cover can be removed easily.
Remove the battery of the mobile phone.
There are two card slots, namely, SIM1 and SIM2. You can select either of them to put the card in. SIM1 card slot simultaneously supports 2G
and 3G networks.

7
SIM1: Turn the metal face of the SIM card downwards (facing the mobile phone); please push the SIM card horizontally into SIM1 card slot
according to the diagram shown near the card slot.
SIM2: The card slot for SIM2 is covered by an iron sheet. You can press the iron sheet with your thumb and push it horizontally according to the
diagram shown near the card slot; lift the iron sheet, and insert the SIM card into the iron sheet according to the diagram shown inside the iron sheet;
then gently move the SIM card to close the iron sheet, and push the iron sheet to lock it according to the diagram.
Install the battery.
Close the back cover (align the two small bulges at the bottom of the back cover with the two grooves at the corresponding positions of the
mobile phone; then press the back cover to close it, and use the accompanying small tool for opening the shell to fasten the screws fastening
the mobile phone and the back cover in the clockwise direction).
Removal of SIM Card

8
Remove the back cover and battery of the mobile phone after the mobile phone is turned off.
Press the SIM card in SIM1 card slot with a finger, horizontally push the card outwards, and you can take the SIM card out. As to how to take
out the SIM card in SIM2 card slot, please refer to “Installation of SIM2”.
Install the battery and close the back cover.
1.5 Installation and Removal of Micro SD Card
Installation of Micro SD Card
Take off the back cover of the mobile phone.
The card slot is inside the mobile phone.
Press with your thumb the iron sheet that fixes the Micro SD card and horizontally push the sheet according to the diagram shown near the card
slot; lift the iron sheet, and put the Micro SD card in.
After the card is properly placed, horizontally slide the iron sheet according to the diagram shown near the card slot to fix it.

9
Removal of Micro SD Card
Take out the Micro SD card (for operation, please refer to “Installation of Micro SD Card”).
1.6 Battery Charging
Warning: The battery, charger and accessories used should be special for this model of mobile phone. The use of other types of battery, charger or
accessories may affect acknowledgement of the mobile phone or violate the warranty terms and conditions, and may lead to dangers. Do not put the
battery in a place where it is too hot or too cold. Please put the battery in a place out of the reach of children.
Insert the charger plug into a 220VAC socket.
Insert the adapter of the charger into the interface slot at the top of the mobile phone.
If the mobile phone is charged when it is powered on, the battery level icon on the screen will show a flashing charging status, indicating the
mobile phone is being charged. If the mobile phone is charged when it is powered off, the charging status will be shown on the screen.
After the battery is fully charged, the flashing icon at the battery icon on the status bar will disappear, and now you can disconnect the adapter of
the charger from the mobile phone interface.
Note:
The only way to stop charging after charging begins is to disconnect the charger. Please use a power socket convenient for plugging whenever possible.
10
2. Function Introduction
2.1 Power-on
Long press the “Power” key to power on the mobile phone.
Before inserting the USB cable, please make sure the mobile phone has been in the on or off status. Please do not insert the USB cable when it is
being powered on, or the playing of boot music will be affected.
Input PIN
To prevent others from randomly using your SIM card, you can set a protection password (PIN). Once PIN is set, each time the mobile phone is
powered on, the user will be required to first input the PIN to unlock the mobile phone.
Tap the input box and open the virtual keyboard; tap the numbers on the
keyboard to input the PIN. (To keep confidential, “•” is used to represent
the numbers input on the screen.)
Tap the [OK] icon; when the mobile phone confirms the PIN as correct, it
will begin network registration.
Note: If the PIN is wrongly input for successive three times, the SIM card
will be locked. In this case, please contact the SIM card provider.
2.2 Power-off
Long press the “Power” key at the top to open the option list, under which
you can select Power-off.
2.3 Making Calls
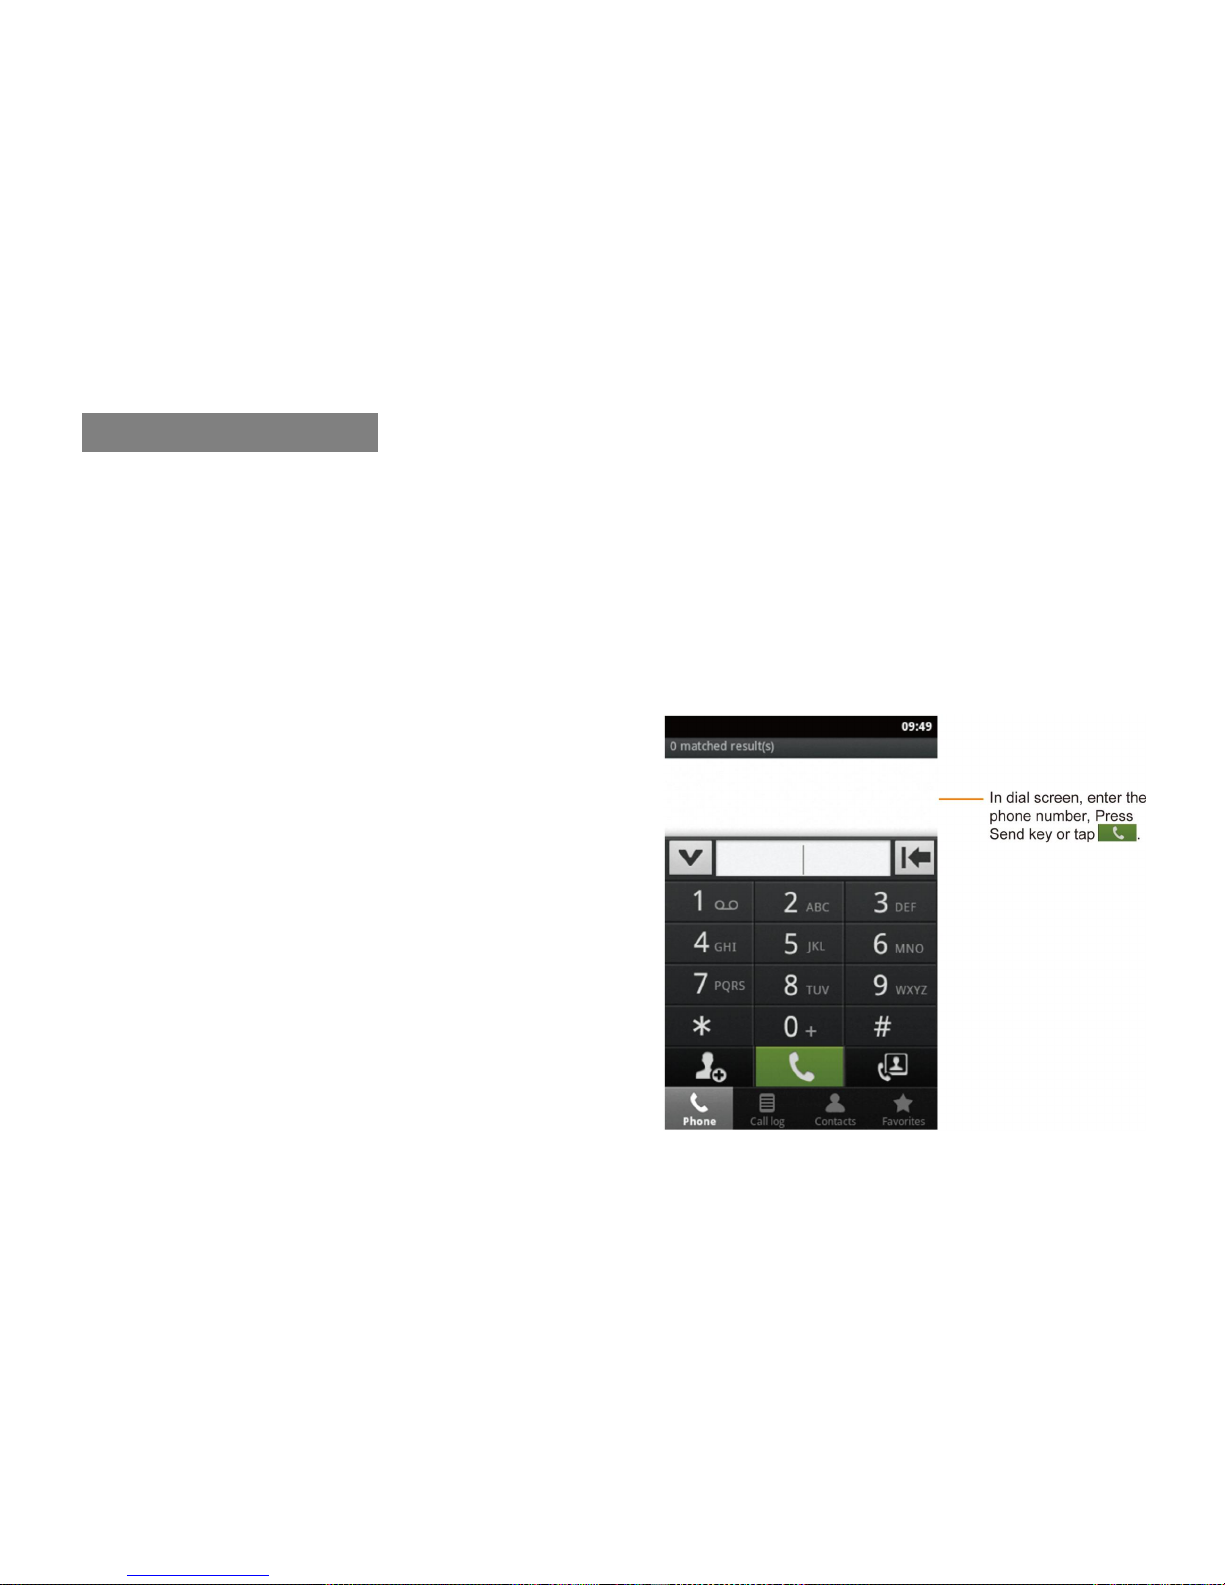
Making calls through the dial menu
This function can be used only when the network name is shown on the screen;
11
Select the [Dial] menu, or tap the phone icon in the lower part of the standby interface; open the number input screen, tap the numbers, and input
the phone number;
Tap the green [Call] icon in the lower part of the input screen to directly dial.
Making calls through the call log
Tap the “Call log” menu, or tap the [Dial] menu; select the [Call log] to show the list of call log. Select one from the list, and now you can dial
directly by tapping the number of this contact.
Making calls through the Contacts
Enter the Contacts, select a contact, and tap to enter the next screen which displays the detailed information. Now you can tap the phone icon on the
right of the number of this contact to dial directly.
Ending calls
You can tap the [End] icon to end a call.
Making international calls
Long press [0] and input “+” on the number input screen.
Tap the numbers and input the country code.
Tap the numbers and input the district code (generally not including the
first number “0”) and the phone number.
Dial the number
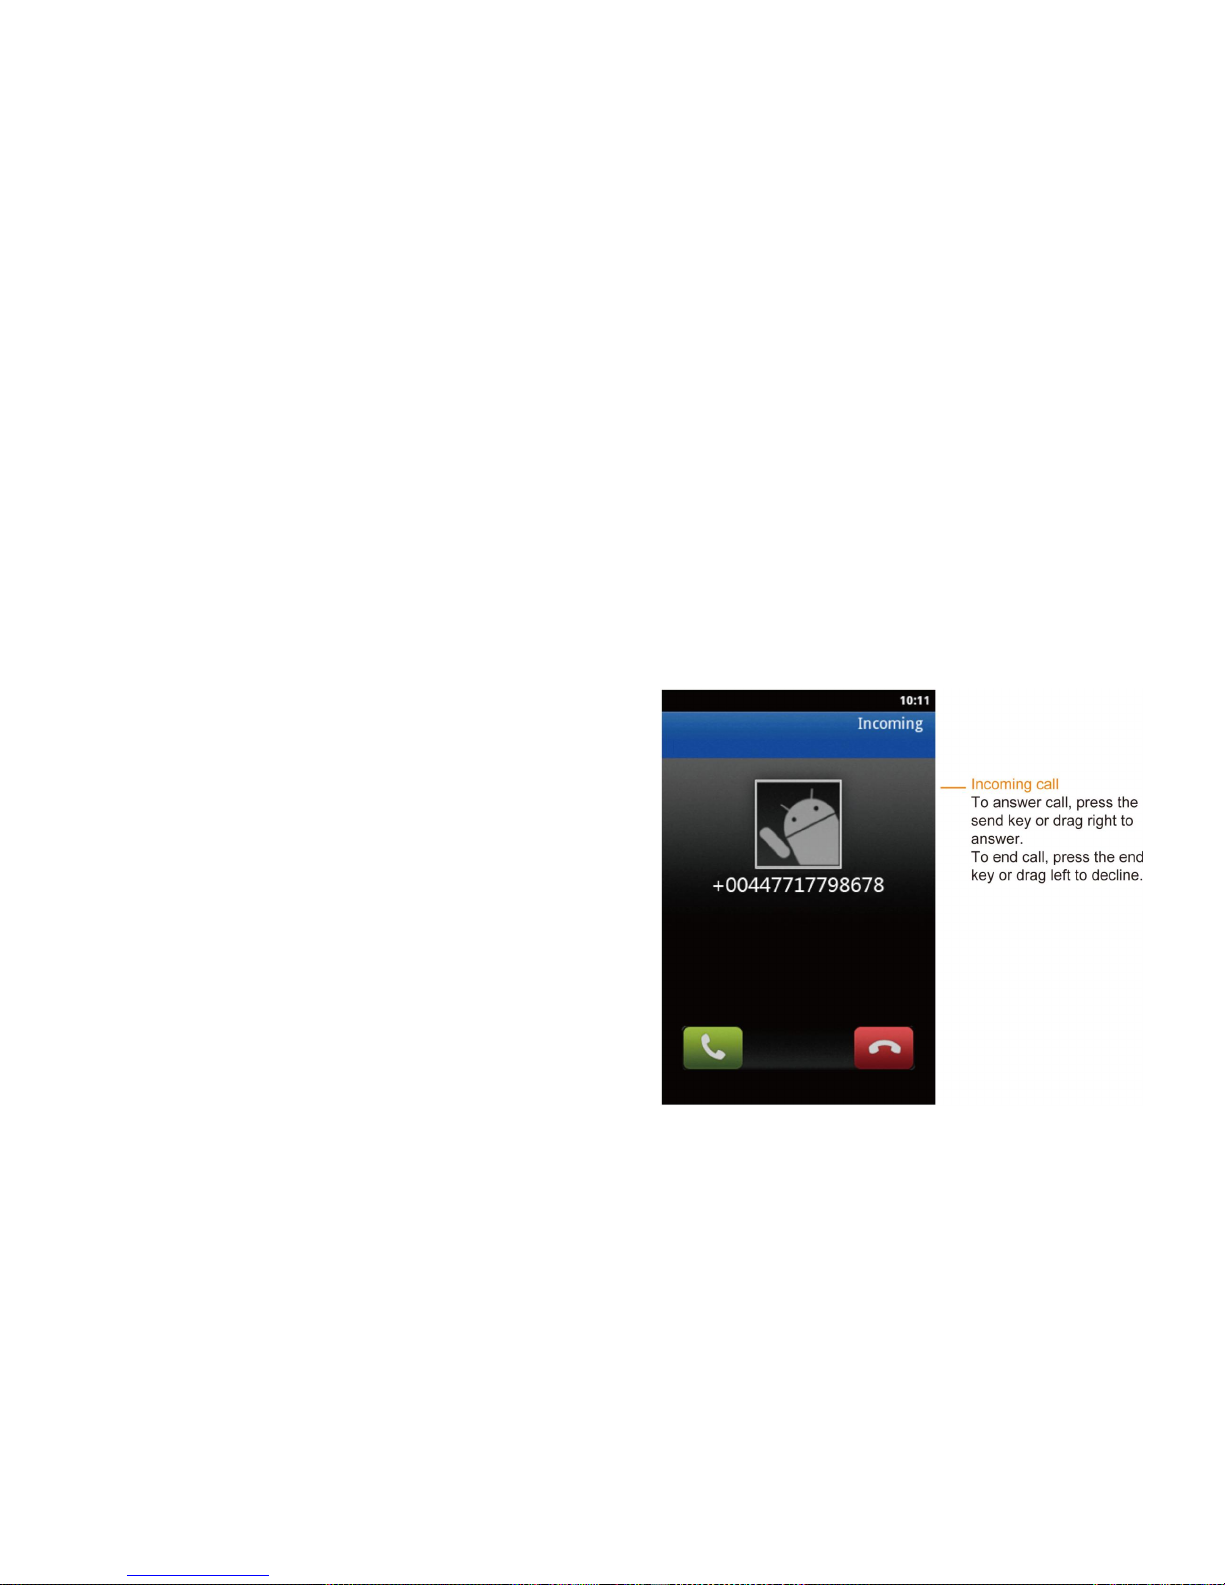
2.4 Answering Calls
Answer a call
You can slide rightwards the green [Answer] icon on the left side of the
incoming call screen to answer the call.
Decline a call

12
You can slide leftwards the red [Decline] icon on the right side of the incoming call screen to reject the call.
Also, you can press the “Menu” key, select “Send message”, and this call will be rejected and you will enter the next screen; you can select the
default rejection message or edit a relevant message (if the menu function of [Edit before sending] is already enabled), and send this message to the caller.
For the function of declining with message, please refer to “3.12.3.3.6 Settings of the Mobile Phone”.
Answer a second call (requiring network support)
If the call waiting function is set for the mobile phone, there will be a prompt when a second call comes. Now you can:
Hold the current call and answer the second call.
Reject the second call.
2.5 Input Method
When using the mobile phone, you will often need to input text information such as names in the contacts, messages and text in the notepad. The
default input method of this mobile phone is Android keyboard input method.
2.6 Contacts
This mobile phone provides the Contacts function which enables you to save the frequently used numbers and information in the SIM card or in the
contacts of the mobile phone. It also offers such functions as Search, Create, Edit, Delete, Dial and Send message.
Note: When the mobile phone is just powered on, the contacts of the mobile phone cannot be used temporarily because it is being initialized. Please
wait.
2.7 Bluetooth Earphone
This mobile supports the Bluetooth earphone function. You can establish wireless connection between the mobile phone and the Bluetooth earphone.
After connection is established, you can answer, reject or hang up a call by pressing the buttons on the Bluetooth earphone.
Prior to use of the Bluetooth earphone function, you need to enable the Bluetooth function of the mobile phone, and turn on the Bluetooth earphone.
When the Bluetooth earphone is on, put the Bluetooth earphone and the mobile phone together. Open the Bluetooth menu of the mobile phone, and
search the Bluetooth device. When the mobile phone completes searching, all Bluetooth devices searched will be listed on the screen. Select the name of
the Bluetooth earphone from the device list, and then select Connection.

13
During connection, you may need to input the authentication password to connect the Bluetooth earphone to the mobile phone. For the password
and detailed operations of the Bluetooth earphone, please refer to the operation instructions for the Bluetooth earphone.
2.8 Micro SD Card
This mobile phone supports Micro SD card. You can insert a Micro SD card, and view and operate files in the Micro SD card through the mobile
phone.
3. Menu Operation
Note: This is a dual SIM card dual standby mobile phone; its SIM1 card slot simultaneously supports 2G and 3G networks. The menu functions
introduced hereinafter can be used normally only after an effective SIM card is inserted. If the mobile phone fails to identify the SIM card, it will enter
the restricted standby state after being powered on, and limited menus can be used. When there is no SIM card, you can also dial emergency numbers
through the [Phone] menu.
Tap a certain menu to enter the next submenu of this menu. Press the “Backward” key to go back to the previous menu; press the “Standby” key to
directly go back to the standby interface.
In some menu interfaces, when you long press an element, a corresponding menu list will pop up, and you can carry out relevant operations. For
example, when you long press a contact in the Contacts, a menu list will pop up. You can view and edit the information of this contact through this list.
3.1 3D Gallery
This menu makes it convenient for you to view and manage photos saved in the memory card of the mobile phone. This menu cannot be used
normally if there is no memory card inserted in the mobile phone.
3.2 SIM Toolkit
The SIM toolkit is a value-added service provided by the network operator. If the SIM card or the network operation company does not support this
service, this function will not be applicable. Besides, since different operators provide different services, please contact the network operation company
for more information.
14
3.3 Wi-Fi P2P Connect Wizard
The mobile phone supports Wi-Fi P2P function. Wi-Fi Direct will be enabled automatically when you enter this menu. You can tap the [Start scan]
icon in the lower part of the screen to search and scan the wireless network.
3.4 Dialing
Please refer to “2.3 Making Calls”.
3.5 Sending E-mails
Through this function, you only need to go through several steps to configure e-mail settings for most accounts and to receive and send e-mails.
When entering this menu for the first time, you need to input the e-mail account
name and password, and then to tap [Next] for settings. You can also set the e-mail
account through the [Manual setup] submenu.
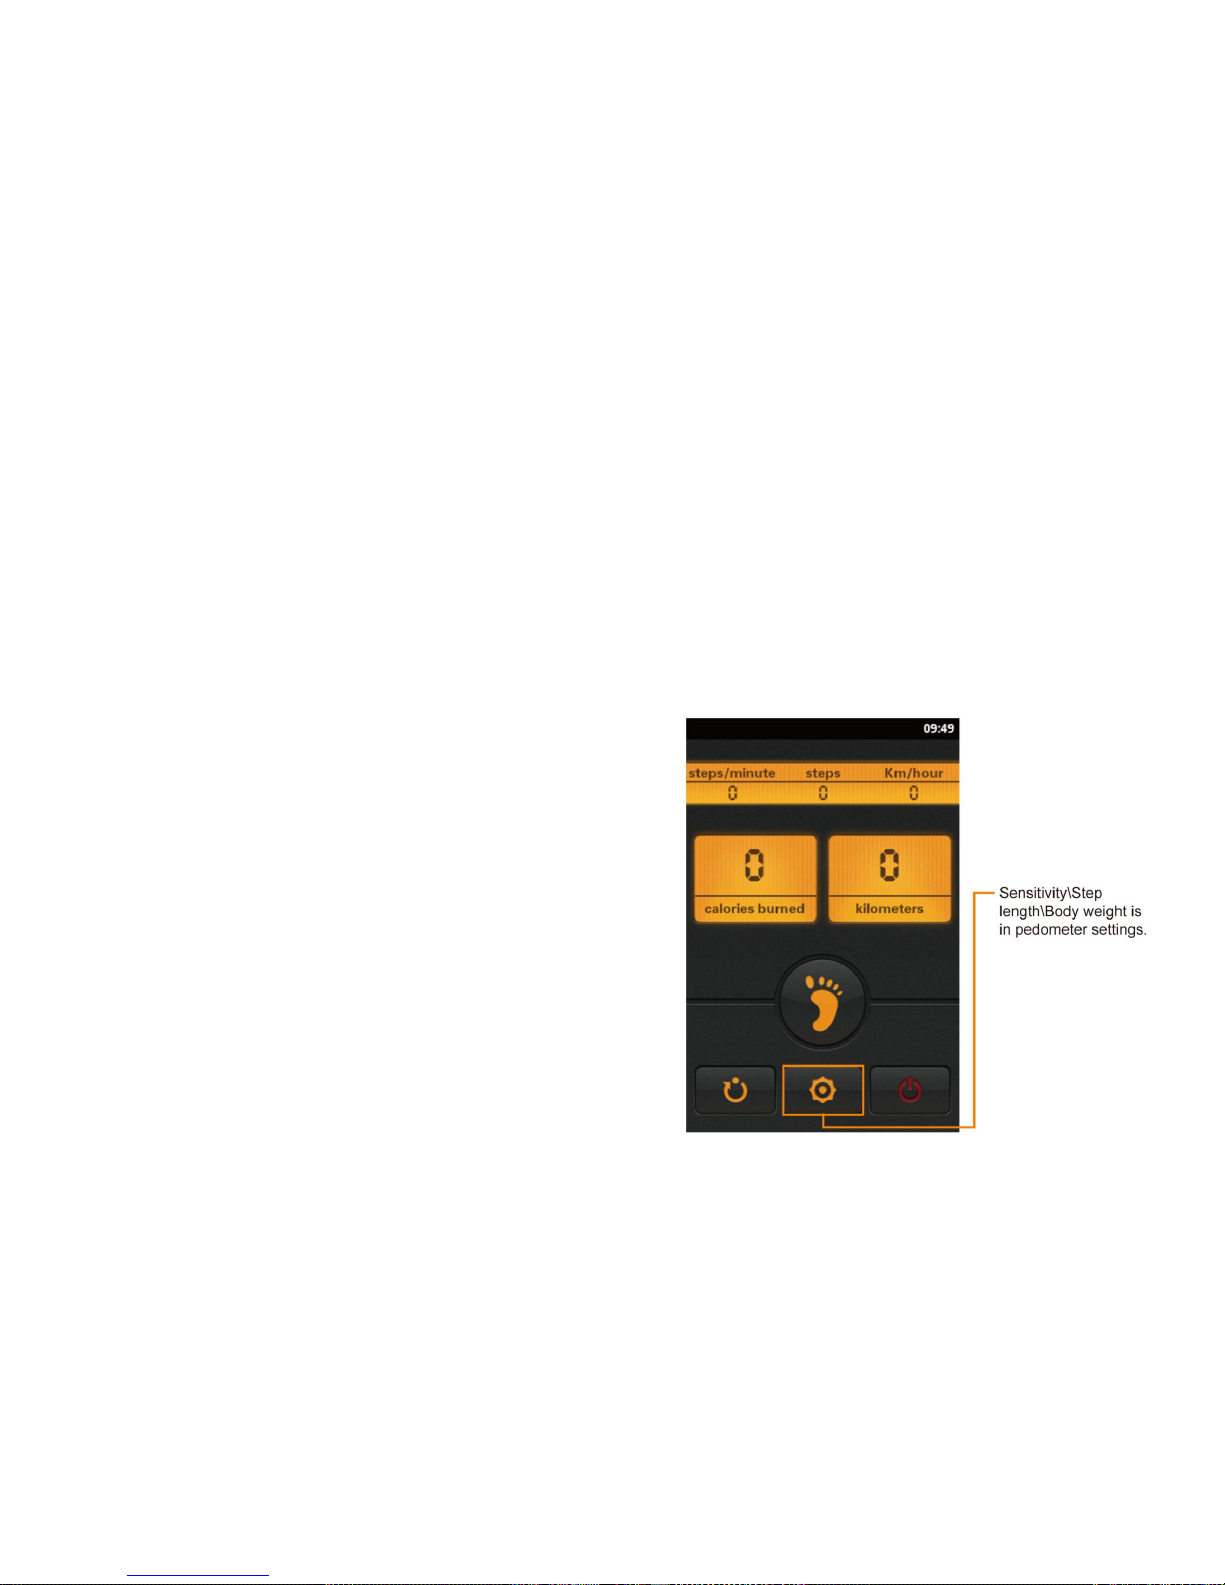
3.6 Pedometer
This mobile phone is equipped with an intelligent pedometer which is an
effective tool for improving the exercise effect. With the high-sensitivity acceleration
sensor of the mobile phone, the number of times of walk or run of the user can be
automatically sensed, and exercise speed and strength can be measured, and the
quantity of heat consumed during exercise under different intensities can be
automatically calculated.
During step counting, the menu interface can display various exercise parameters
such as walking speed, exercise distance and energy consumption in a real-time
manner.
When entering this menu, you can tap the yellow icon in the middle of the
bottom line of the screen to make settings for the pedometer, including sensitivity
level, step length and body weight.

15
3.7 Calculator
This mobile phone offers you a calculator with basic functions to facilitate simple calculations. You can tap the numbers and calculation symbols on
the calculator interface to carry out relevant calculations. During calculation, you can tap the [Clear] icon to clear the numbers.
3.8 NotePad
You can create notes through this menu, which facilitates your viewing.
After you enter this menu, the note list you have created will be displayed. You can tap to view the detailed information or carry out editing. If the
notepad is empty at this moment, you can open the option menu bar by pressing the “Menu” key, and tap the “Add note” soft key to add a note.
3.9 Browser
You can visit the Internet via the browser.
When entering this menu, you can open the option menu bar by pressing the “Menu” key; select [More] option menu to making settings for
homepage, etc. When using the browser for the first time, you can first carry out relevant configurations.
3.10 Sound Recorder
This mobile phone supports the function of long-time recording. As long as your mobile phone has enough storage space, you can record as much
as you like.
When entering the [Sound Recorder] menu, you can tap the dot icon in the lower part of the screen to start recording. During recording, you can
stop recording by tapping the square icon at the lower right corner of the screen, and then you can select to save or cancel the recorded file. You can also
tap the middle arrow icon to play this recorded file.
If the “Standby” key is pressed during recording, the mobile phone will return to the standby interface and the system will automatically stop
recording.
3.11 Calendar
This section is based on month view. Operations under other views are basically identical, and following can be taken as reference. You can switch
16
the default view among [Day], [Week] and [Month] on the option menu bar.
Through this menu, you can view, create, edit or delete an event. In this interface, you can slide the screen
upwards or downwards to select a month.
Select any date and tap to view the event list of that day. When it is long pressed, a corresponding option
menu list will pop up. In the calendar interface, press the “Menu” key to open the option menu bar, and you can
enter six option menus including [Day], [Week], [Month], [Agenda], [Today] and [More]. Through the [More]
option menu, you can carry out settings and other relevant operations.
3.12 Settings
3.12.1 Management of SIM Card
Through this menu, you can manage SIM cards. You can also set the default SIM card for making calls,
sending messages and data connection.
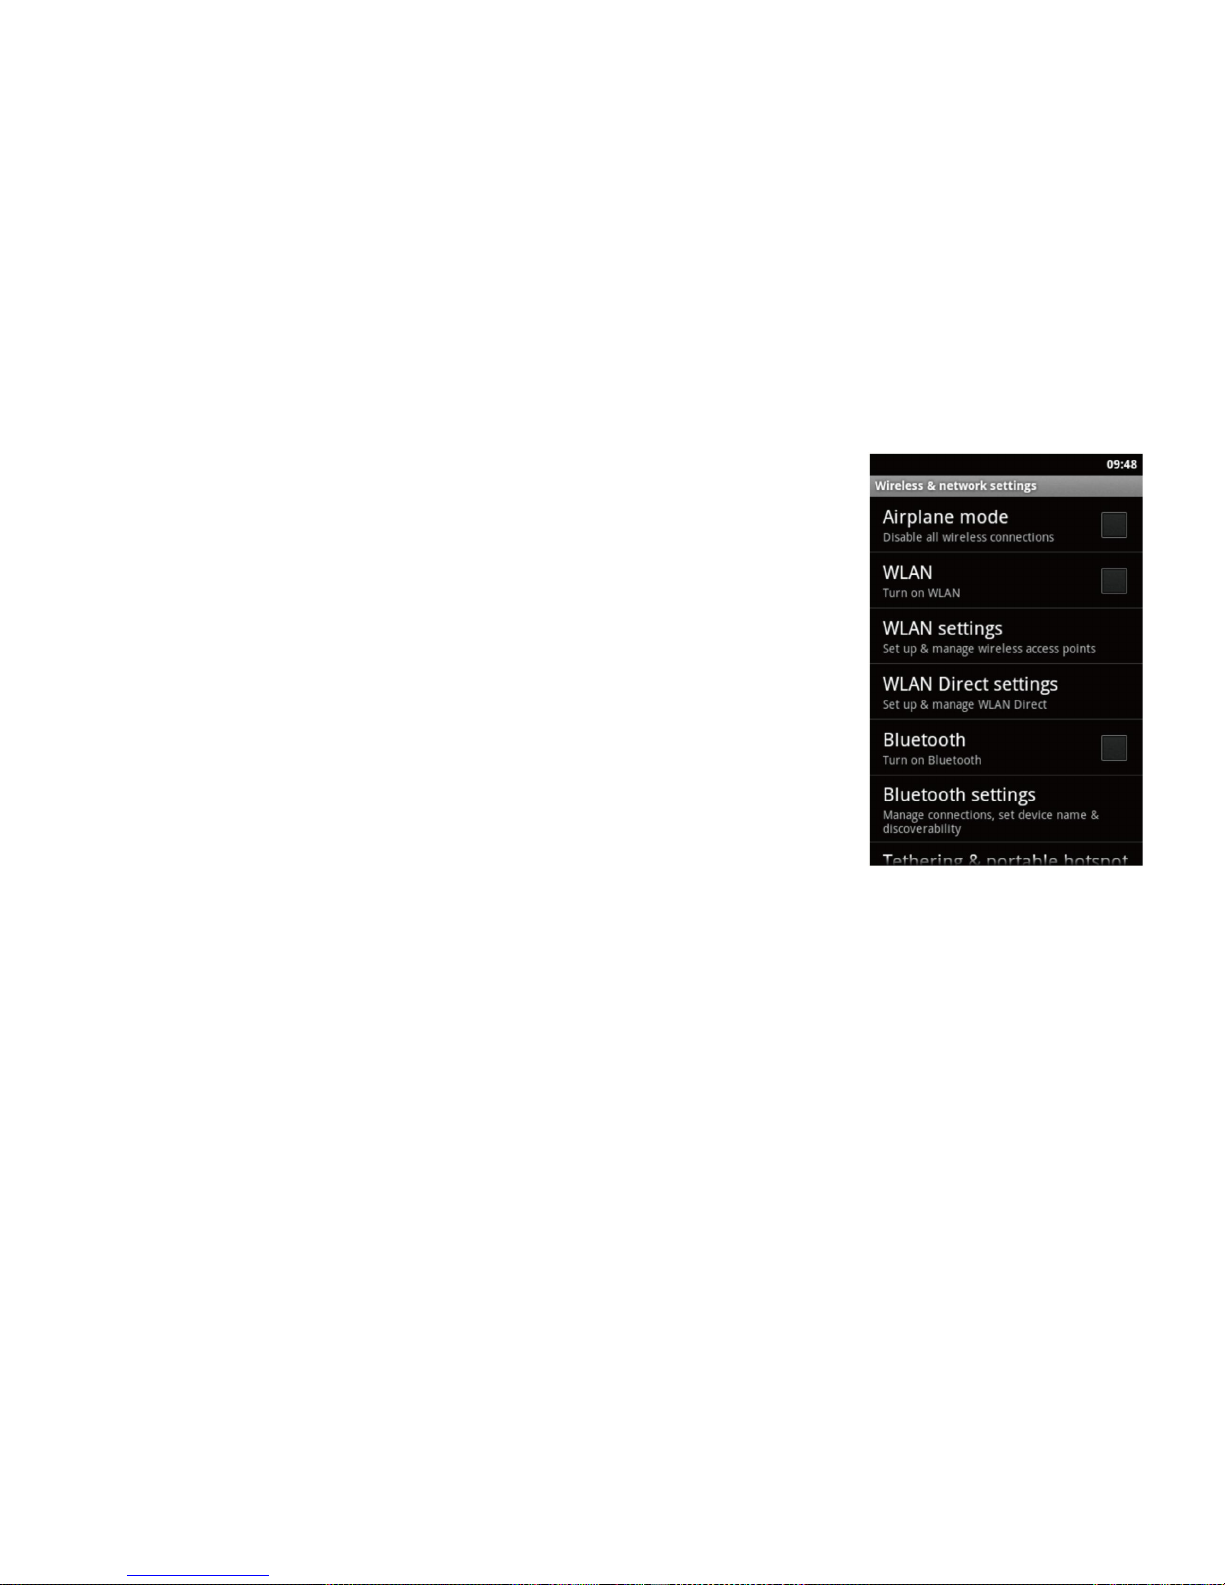
3.12.2 Wireless & networks
Through this menu, you can make settings related to network.
3.12.2.1 Airplane mode
When you enable the “Airplane mode”, the network function will be disabled. Any operation related to network will be forbidden, but you can
make emergency calls like 112.
3.12.2.2 WLAN
You can select to enable or disable the WLAN function. Generally, as long as there is wireless network, your mobile phone will be able to connect
the wireless network based on its own WLAN so that you can surf the Internet. However, if the wireless network enables the security function, you will
need to ask the wireless network administrator for the key.
When the mobile phone is successfully connected with the WLAN device, the corresponding WLAN icon will be shown on the status bar.
Note: The use of WLAN will consume extra power of the mobile phone. If you do not need the wireless network, please disable it to effectively
Table of contents
Other Seals Cell Phone manuals


