Sherpa ST53H User manual

1
OWNER’S MANUAL
PETROL LAWNMOWER
MODEL: ST53H
CAUTION:
Read and follow all Safety Rules and Instructions before operating this equipment.

2

3
Thank you for choosing the Sherpa ST53H Petrol Lawnmower
To ensure that you get the best results from your lawnmower
please read all safety and operating instructions carefully before
using this product.
CONTENTS
1. Safety Messages 4
2. Assembly 5
3. Before Operation 8
4. Operation 9
5. Maintenance 13
6. Storage 18
7. Parts 18
8. Warranty 22
9. EC Declaration of Conformity 23
4
1. Safety messages
Your safety and the safety of others is very important when operating this machine. We
have provided important safety messages in this manual and on the mower. This
information alerts you to potential hazards that could hurt you or others. Please read these
messages carefully.
Of course, it is not practical or possible to warn you about all the hazards associated with
operating or maintaining a lawn mower. You must use your own good judgment.
You will find important safety information in a variety of forms:
Safety Labels – on the lawnmower.
Instructions – how to use this mower correctly and safely.
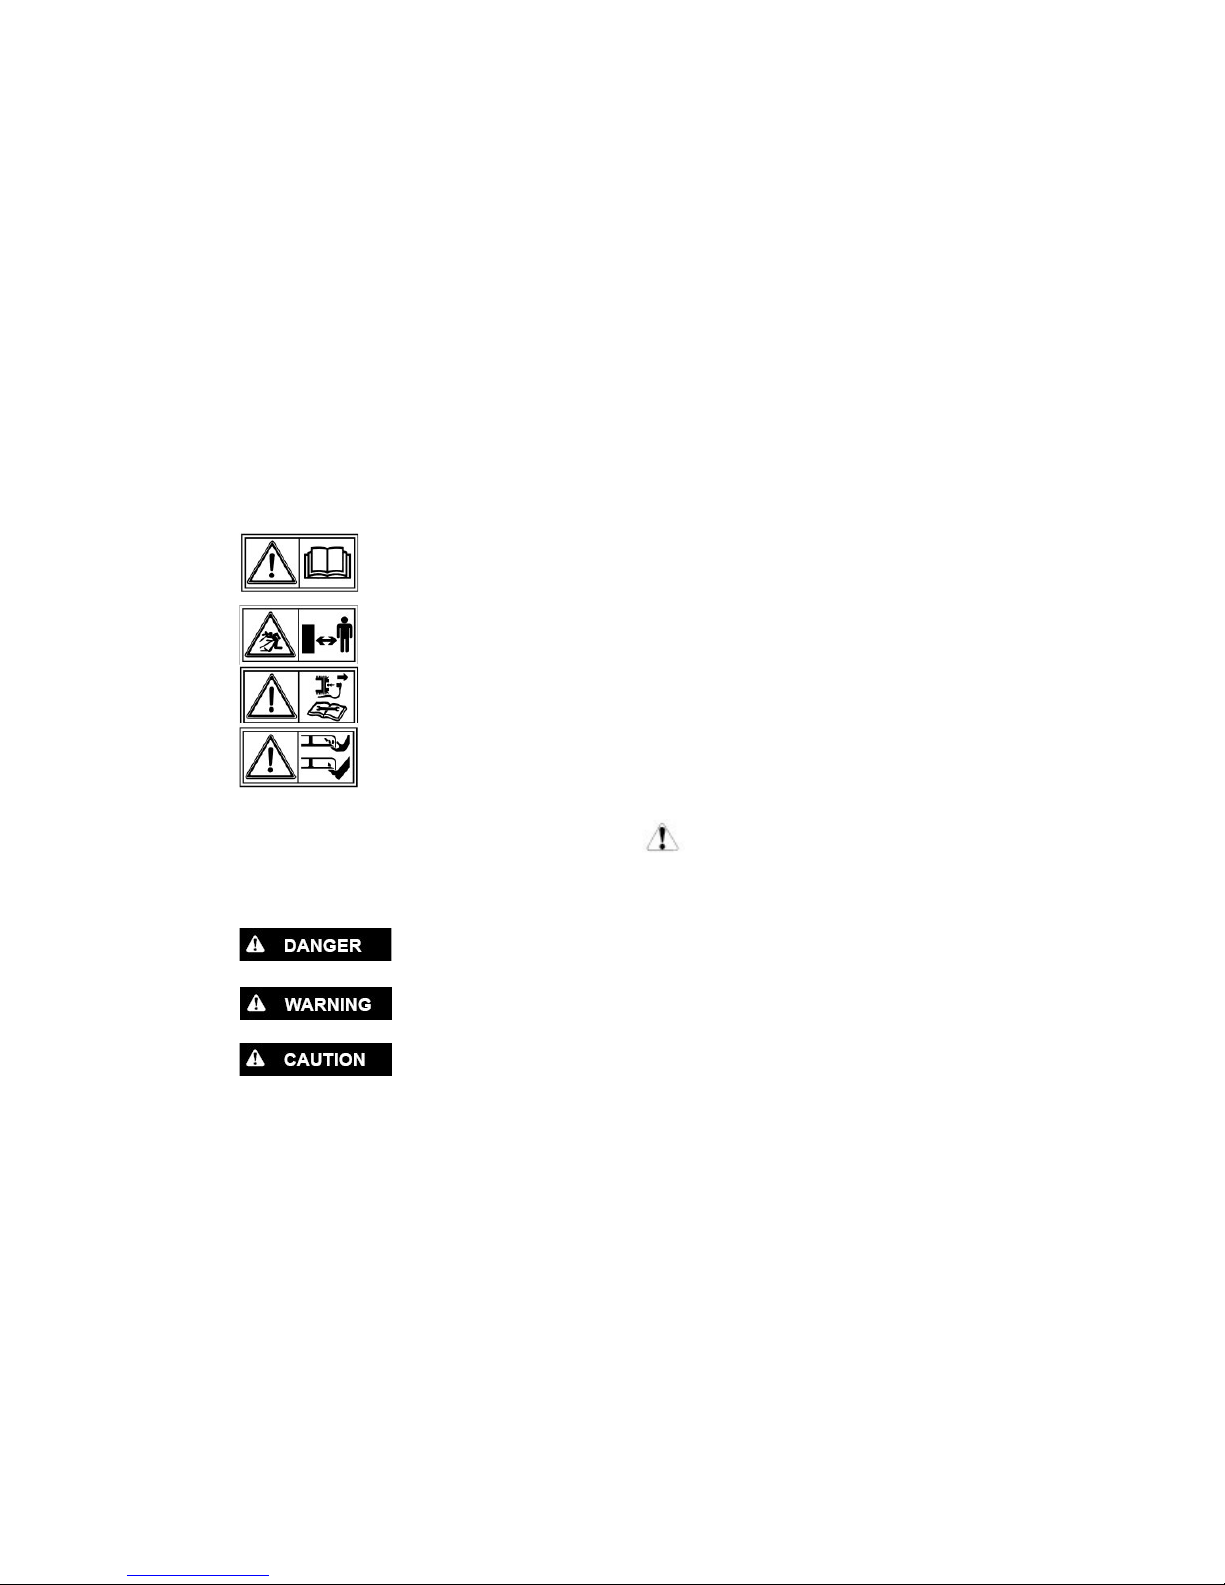
Important: Read the instruction manual before using the machine.
Danger of thrown objects.
Keep other people at a safe distance while working
Warning: Remove the spark plug cable from the spark plug and read
instructions before carrying out any repair or maintenance.
Danger of cutting yourself.
Blades in movement. Do not put hands or feet near or under the opening
of the cutting deck.
Safety Messages – preceded by a safety alert symbol and one of three signal
words: DANGER, WARNING, or CAUTION.
You could be seriously injured if you don't follow instructions.
You could be seriously injured if you don't follow instructions.
You can be hurt if you don't follow instructions.
Each message tells you what the hazard is, what can happen, and what you can do to
avoid or reduce injury.
General Conditions Of Use
•This machine is to be used exclusively for cutting natural grass. Never use the
mower for any other purpose. Any other utilisation can involve danger for your safety
and can involve damage to the mower.
•Persons under 16 years of age and persons who are not familiar with the user
instructions must not use the mower.
•The user is responsible of the safety of other people in the working area. Keep
children and domestic animals at a safe distance while the mower is in use.

5
•Before mowing, remove all foreign object from the lawn which may be thrown by
the machine, stay alert for any foreign objects which may have been missed.
2. Assembly
Unpacking
Remove lawn mower from packaging and check thoroughly for additional loose parts.
Handle Setup And Height Adjustment
Open out the handle and screw the handles parts with the four screws and knobs.
If you want to adjust the height of the handle bar,
you can choose the” L” or “H” hole in bracket.
Fix the handle bar with screws and knobs.
The “H” hole is high position of the handle bar,
and the “L” hole is low position.
Cable Setup
Insert the brake cable and clutch cable to the hole
of the brake lever and clutch lever.
The brake lever is closest to the front of the mower, and it is pulled towards the user to
operate. The clutch lever is furthest away from the engine, and is pushed towards the
handle.
KNOB
SCREW

6
1. Cables will not be
connected on arrival.
They should look like
this.
2. Pull the bar in to
remove from locating
hole.
3. Move the bar down
slightly. Locate the
cable end in the hole
in the side of the bar.
4. Once the cable is
attached to the lever,
reinsert the bar to the
hole in the handle.
Put the recoil starter on the right of the handle and fix the cable with the plastic collar.
Pull the starter handle out slowly and thread the starter rope through the guide on the
handle.
BRAKE CABLE
CLUTCH CABLE

7
Grass Bag Assembly
•Slide the grass bag frame into the grass bag and attach the clips as shown.
•Lift the rear discharge guard, remove the mulching plug, and install the grass
bag.
Rear Discharge Guard Supports
Take out the two supports from the packaging, and lift the rear discharge guard, install the
two supports which can hold the rear discharge guard.
SUPPORT

8
3. Before Operation
Engine Oil
The mower is delivered without oil in the engine.
All engines are run at the factory prior to packaging. Most of the oil is removed prior to
shipment; however, some oil may remain in the engine. The amount of oil left in the
engine varies.
Add enough oil to bring the oil level to the upper limit mark on the dipstick as shown. Do
not overfill engine with oil.
FUEL
NOTICE:Engine delivered without petrol. Fuel
before starting the engine.
•Remove the filler cap
•Add fresh fuel treated with B3C Ethanol
Shield into the fuel tank. Do not overfill. Wipe
up any spilt fuel before starting the engine.
•Tighten the fuel tank cap.
•Turn fuel tap on.
NOTICE:Do not use fuel that you have had
stored (in a fuel can or the fuel tank) for more
than 30 days.

9
Petrol is extremely flammable. Petrol vapor can explode,
causing serious injury or death. Use extreme care when
handling petrol. Keep out of reach of children.
Refuel in a well-ventilated area with the engine stopped. Do not smoke or allow flames or
sparks in the area where the engine is refueled or where petrol is stored. Avoid repeated
or prolonged contact with skin or breathing of vapor.
After refueling, tighten the fuel tank cap securely. If any fuel was spilled, make sure the
area is dry before starting the engine.
4. Operation
Instructions For Use
•Check that all nuts, bolts and screws are well tightened.
•Before mowing place the grass catcher in its position.
•Before mowing make sure that the blade and the blade fixing screw are securely
fastened. When blade cutting edges require re-sharpening, this must be done evenly
on both sides so as to prevent any imbalance. If the blade is damaged, it must be
replaced.
•When mowing always wear a long trousers and suitable strong footwear.
•Do not run the engine in an enclosed and/or poorly ventilated area. Emissions
from the engine contains carbon monoxide, which is dangerous for your health.
•Work only when there is sufficient light.
•Do not use the lawnmower when it is raining or when the grass is wet.
•Particular precautions must be taken while mowing on slopes or banks. Mow
across the face of slopes, never down or up.
•Never lift the rear of the mower while starting the engine and never place your
hands and feet underneath the deck or into the rear discharge chute while the engine
is running.
•Never change in any way the rated speed of the engine.
•Ensure the self-propelled system is disengaged before starting the engine.
•Never lift or carry the mower while the engine is running.
•Stop the engine in these cases:
-Before any operation under the deck or the grass rear discharge chute.
-Before any maintenance, repairing or checking operations.
-Before carrying, lifting or removing the mower.
-If you leave the mower unattended or changing the cutting height.
-To remove and emptying the grass catcher.
-After hitting a foreign object, stop the engine and check thoroughly the
mower in order to see if it is damaged. Take the mower to an approved service
centre to repair if necessary.
10
After you stopped the engine, the blade will continue to
rotate for a few seconds
-If the mower vibrates in an abnormal way, take your mower to an approved
service centre.
-Check regularly that nuts, bolts and screws are securely tightened for a safe
use of the mower.
-Never tip the lawnmower on it’s side.
•PETROL IS HIGHLY FLAMMABLE
-Keep petrol in a fuel can specially made for this purpose.
-Fill up the tank with a funnel, do the operation outside.
-Do not smoke around fuel.
-Fill up with fresh petrol and oil before staring the engine. We recommend
using B3C Ethanol Shield in your fuel.
-Never open the cap of the fuel tank to add petrol while the engine is running
or still hot.
-Do not start the engine if there is spilt fuel in the area, take the mower away
from the area where petrol has been split and avoid any contact from a hot
source.
-Tighten the fuel tank cap and close tightly the jerry can cap.
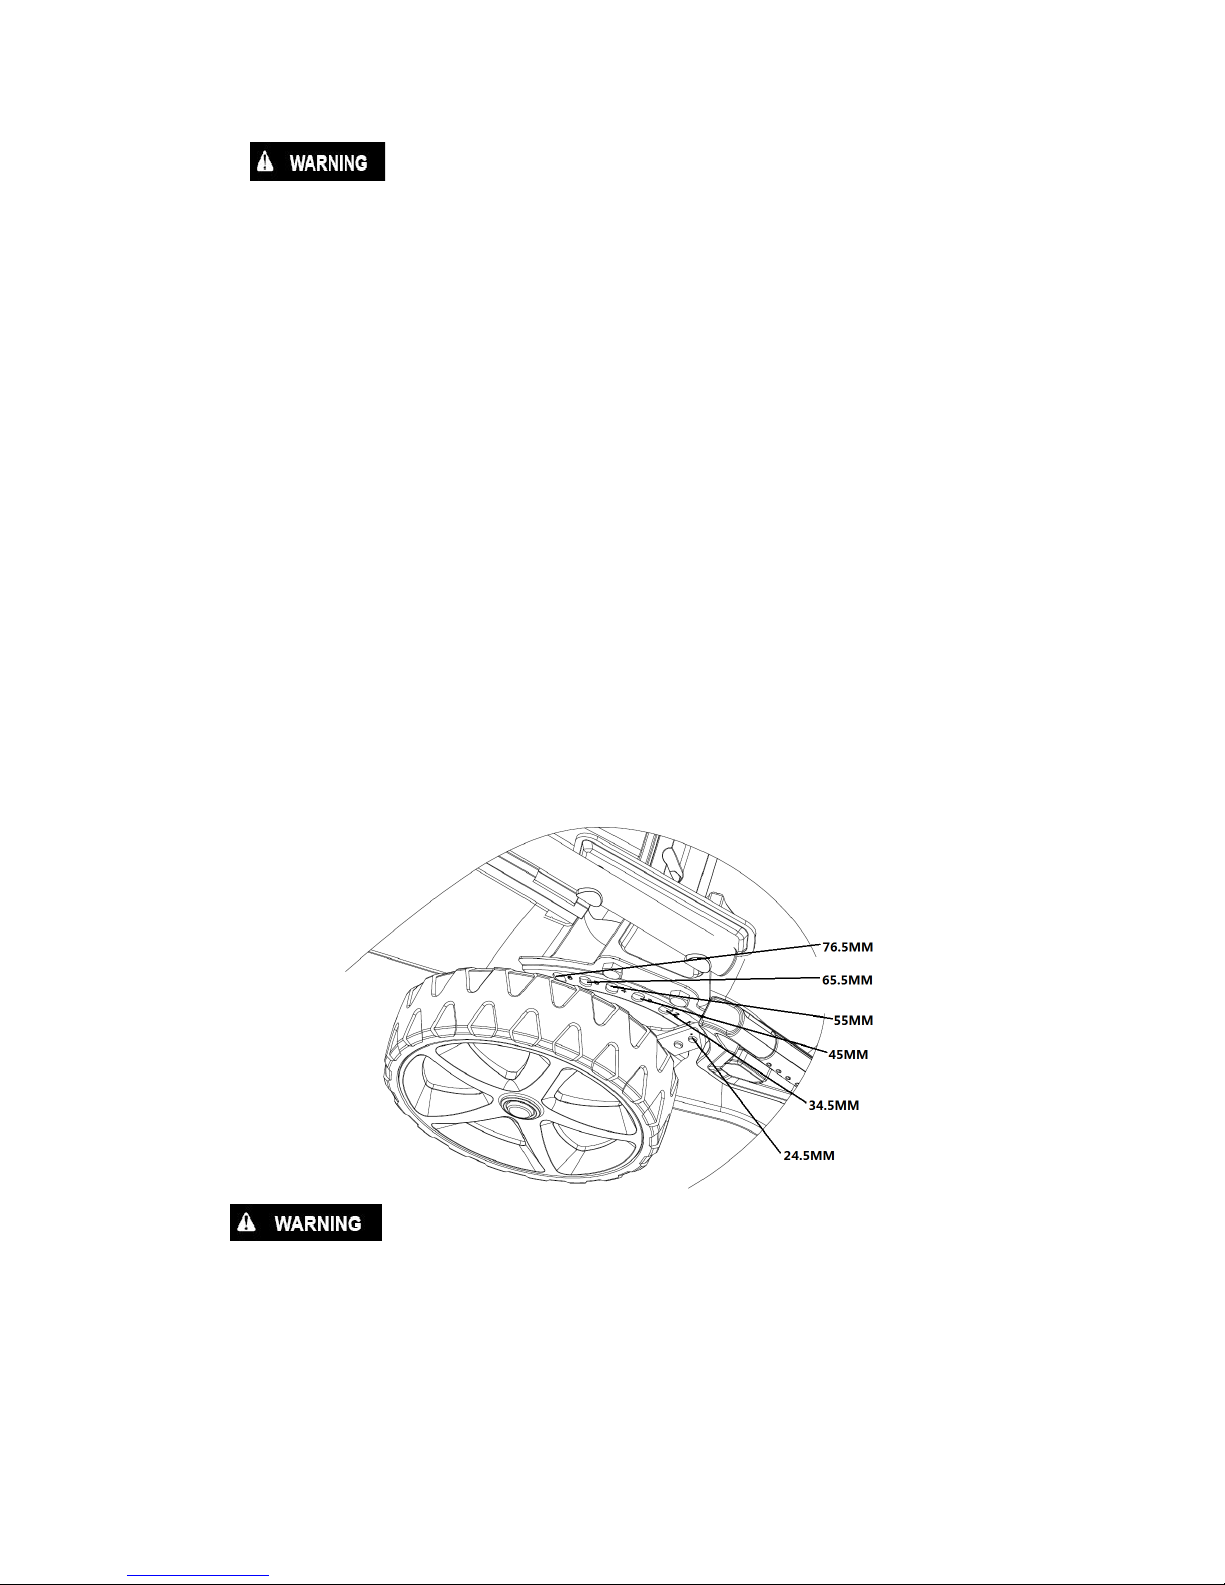
Cutting Height Adjustment
Check the cutting height settings, and make any necessary adjustments.
The blade can cause serious injury. Stop the engine
before adjusting cutting height.

11
Starting The Engine
•Ensure the engine is filled with oil and fuel
correctly.
•Switch fuel tap on.
•Pull back on the brake lever and hold it
against the handle.
•Release the clutch lever. This will prevent the mower from moving forward when
you operate the starter.
•Take the starter handle with your right hand and pull slowly until you feel extra
resistance, then pull energetically on the starter handle with starter rope through the
support. You may need to repeat this operation 2 or 3 times. If the engine still does
not start, consult the trouble shooting guide.
CLUTCH LEVER
BRAKE LEVER

12
Operation The Controls For Mowing
Blade is in action as soon as engine started. While the machine is working maintain the
brake lever in the working position. The engine will stop as soon as you release the brake
lever.
Release the lever to stop the engine whenever you need to leave the mower.
Clutch Lever
Push the clutch lever forward and hold it against the handlebar to propel the mower
forward.
Release the clutch lever to stop the mowers forward movement. Release the clutch lever
when turning the mower.
Never hold the clutch lever before starting the engine. If the clutch is engaged, the mower
will move forward.
Operate the clutch lever with a quick and complete motion, so the clutch is either fully
engaged or fully released. Hold the clutch lever against the handlebar during
self-propelled mowing. This will help to extend the service life of the clutch mechanism.
Stop Engine
•Release the clutch lever.
•Release the brake lever.
The blade will continue to rotate for a few seconds after the
engine has stopped.
BLAKE LEVER

13
Mulching Plug (Optional)
Install and remove the mulching plug by raising the rear discharge guard as shown. The
plug only fits one way.
Remove the mulching plug when using a grass bag. The side discharge chute must be
removed if mulching.
Side Discharge Cover Assembly (Optional)
Lift the side discharge guard, install the side discharge chute. When discharging cuttings
out the side of the mower, the mulching plug should also be installed.
5. Maintenance
IMPORTANT Regular maintenance is essential for the continued safety
and performance of this lawnmower.
•Keep all nuts, bolts and screws tight to be sure the equipment is in safe working
condition.
•Never store the mower with fuel in the tank inside a building where vapour may
reach a flame or a spark or a source of extreme heat.
•Allow the engine to cool before storing in an enclosed space.
•To reduce the fire hazard; keep the engine, exhaust silencer and fuel storage

14
area free of grass, leaves, or excessive grease. Do not leave the grass box with grass
cuttings inside.
•Do not use the equipment with worn or damaged parts. Parts are to be replaced
and not repaired. Use genuine spare parts. Parts that are not of the same quality can
damage the equipment and be dangerous for your safety.
•If the fuel tank has to be drained, this should be done outdoors and when the
engine is cool.
•Wear strong work gloves when removing and reassembling the blade.
•Check the blade’s balance after sharpening.
•Check the rear guard, side guard and grass-catcher frequently for wear and
deterioration.
•Whenever the machine is to be handled, transported or tilted you must:
-Wear strong working gloves;
-Grasp the machine at the points that offer a safe grip, taking account of the
weight and its distribution.
When tilting the machine for inspection or maintenance always tilt backwards
onto the handles, or to the right. Never leave the machine on its side for more
than 10 minutes.
Blade
Inspection
•Tilt the mower to the right, so the air cleaner side is up. This will help to prevent
fuel leakage and hard starting.
•Inspect the blade for damage, cracks and excessive rust or corrosion.
A dull blade can be sharpened, but a blade that is excessively worn, bent, cracked, or
otherwise damaged must be replaced.
•A torque wrench must always be used when installing the blade bolt.
Tighten to 45N.m.
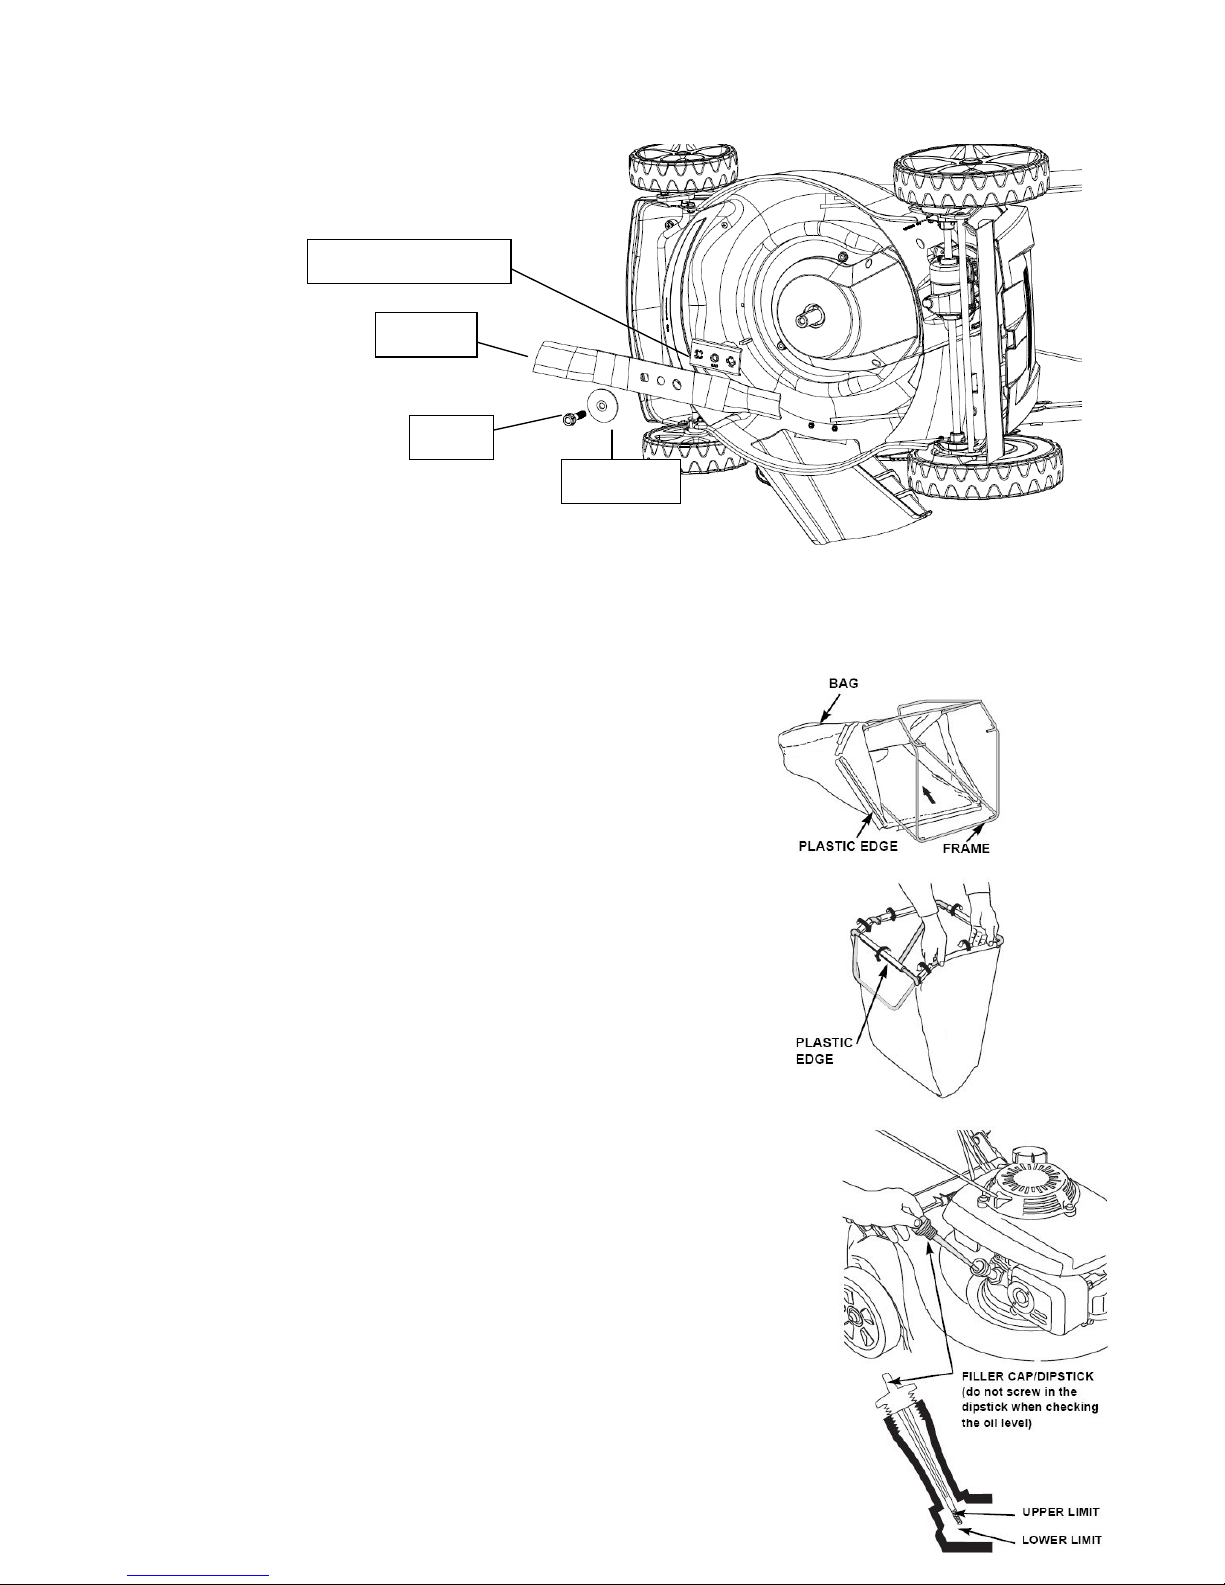
Removal and installation
If you remove the blade for sharpening or replacement, you will need a torque wrench for
installation. Wear heavy gloves to protect your hands.
•Remove the spark plug cap.
•Remove the bolt with a 16mm socket spanner. Turn bolt anticlockwise to loosen.
Use a wooden block to prevent the blade from turning when removing the bolt. Then
remove the blade.
•Install the blade using the blade bolt and special washers. Be sure to install the
special washers with the concave side toward the blade and the convex side toward
the bolt.
•Tighten the blade bolt with a torque wrench (45N.m). Turn the bolt clockwise to
tighten. Use a wooden block to prevent the blade from turning when tightening the
bolt.
15
Grass Bag Cleaning & Replacement
Cleaning
•Wash the bag with a garden hose, and allow it to dry completely before use; a
wet bag will clog quickly.
Replacement
•Unclip the plastic edges of the bag from the frame,
remove the frame from the bag.
•Insert the frame into the bag, clip the plastic edges
of the bag onto the frame.
Engine Maintenance
Check Engine Oil Level
Check the engine oil level with the engine stopped and the mower.
•Remove the oil filler cap, and wipe the dipstick clean.
•Insert the dipstick into the oil filler neck, but do not screw it
in.
•Check the oil level shown on the dipstick. If near the lower,
fill to the upper level with the oil. Do not overfill.
•Screw in the filler cap securely.
BLADE ADAPTOR
BLADE
WASHER
BOLT

16
NOTICE: Running the engine with a low oil level will cause engine damage.
Change Engine Oil
Drain the used oil while the engine is warm. Warm oil drains quickly and completely.
•Wipe the oil filler area clean, then remove the oil filler cap/dipstick.
•Place a suitable container next to the mower to catch the used oil, then tilt the
mower on its right side. The used oil will drain through the filler neck. Allow the oil to
drain completely.
•Do not dispose of it in general waste, pour it on the ground, or pour it down a
drain.
•Fill with the recommended oil. Do not overfill. Allow a couple of minutes for the oil
to settle in the engine, then measure the oil level.
•See the engine manual for more details.
The Clutch Lever Cable and Brake lever Cable Adjustment
•If the clutch lever is loose, you should turn the clutch cable adjustment to tighten.
•If the brake lever
does not sufficiently
tension the cable to allow
the engine to start then
turn the brake cable
adjustment to tighten.
CLUTCH CABLE
ADJUSTMENT

17
Maintenance Schedule
REGULAR
SERVICE PERIOD
Before
Each
Use
First
Month
or
5 Hrs
Every 3
Months
or
25 Hrs
Every 6
Months
or
50 Hrs
Every
Year
or
100
Hrs
Every
Two
Years
or 250
Hrs
ITEM
Perform at every indicated
month or operating hour
interval, whichever comes
first.
Engine oil
Check
O
Replace
O
O
Air cleaner
Check
O
Replace
O
Spark plug
Check/Adjust
O
Replace
O
Fuel tank
and filter
Clean
O
Fuel Pipe
Check
O
Cutter
Deck
Clean
O
Belt Guard
Clean
O
Belt
Check
O
Trouble Shooting
ENGINE WILL NOT START
Possible Cause
Correction
1. Check fuel tap.
Fuel tap off.
Turn tap on.
2. Check fuel.
Out of fuel.
Refuel.
Bad fuel; engine stored
without treating or draining
petrol, of refueled with bad
petrol
Drain the fuel tank and
carburetor. Refuel with
fresh petrol.
3. Remove and inspect spark
plug.
Spark plug faulty, fouled, or
improperly gapped.
Replace the spark plug.
Spark plug wet with fuel
(flooded engine).
Dry and reinstall spark
plug.
4. Take machine to an
authorised servicing dealer,
or refer to shop manual.
Fuel filter clogged, carburetor
malfunction, ignition
malfunction, valves stuck,
etc.
Replace or repair faulty
components as
necessary.
18
ENGINE LACKS POWER
Possible Cause
Correction
1.Check air cleaner
Air cleaner elements
clogged.
Clean or replace air cleaner
elements.
2. Check fuel
Bad fuel; engine stored
without treating or draining
petrol, of refueled with bad
petrol.
Drain the fuel tank and
carburetor. Refuel with fresh
petrol.
3. Take engine to an
authorized our servicing
dealer, or refer to shop
manual.
Fuel filter clogged,
carburetor malfunction,
ignition malfunction, valves
stuck, etc.
Replace or repair faulty
components as necessary.
6. Storage
•Always store indoors.
•The same fuel must not remain in the tank for more than one month, unless
using B3C Ethanol Shield fuel stabiliser or alkylate petrol.
•Thoroughly clean the mower and store it indoors in a dry place.
•Never store the lawnmower with fuel in the tank inside a building where can
reach an open flame or spark.
•To reduce fire hazard, keep the engine, muffler, battery compartment and fuel
storage area free of grass, leaves or excessive grease.
•If the fuel tank has to be drained, this should be done outdoors.
•Be careful during adjustment of the machine to prevent entrapment of the fingers
between moving blade and fixed parts of the machine.
•Allow the product to cool for at least 30 minutes before storing.
•The mower must be stored flat and level.
7. Parts
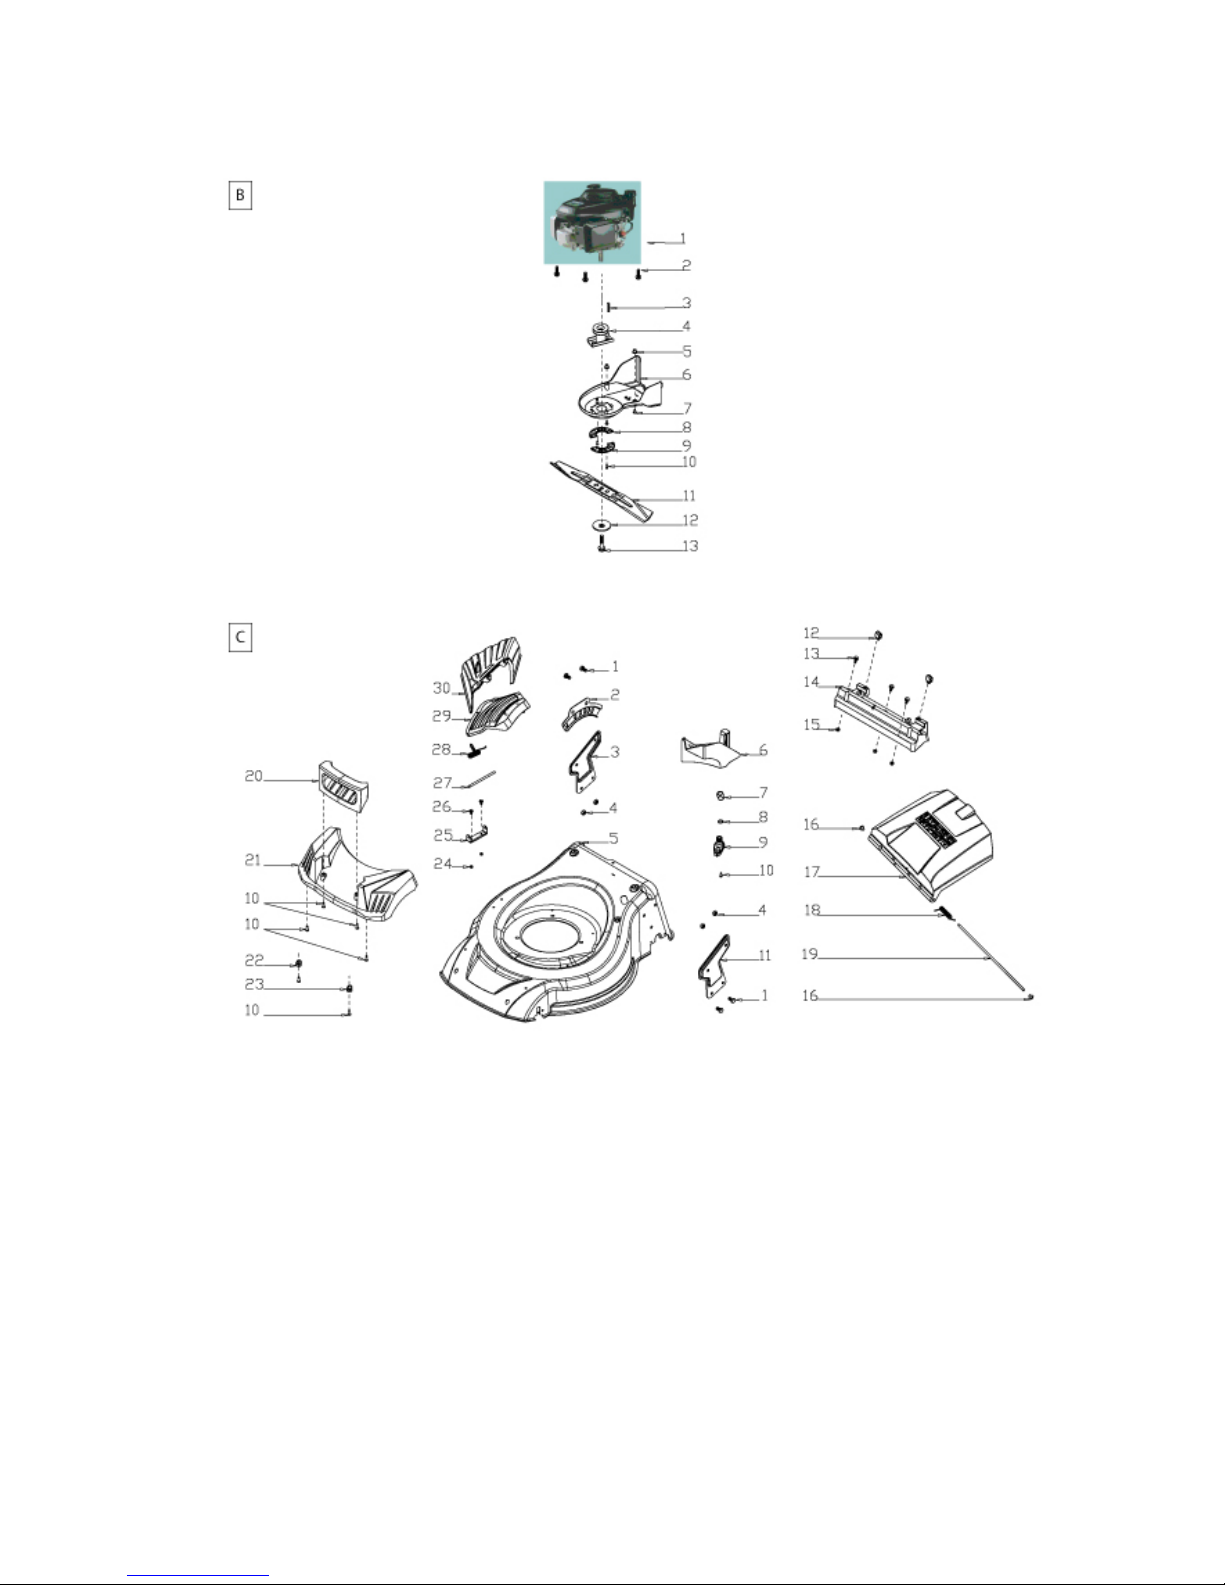
19
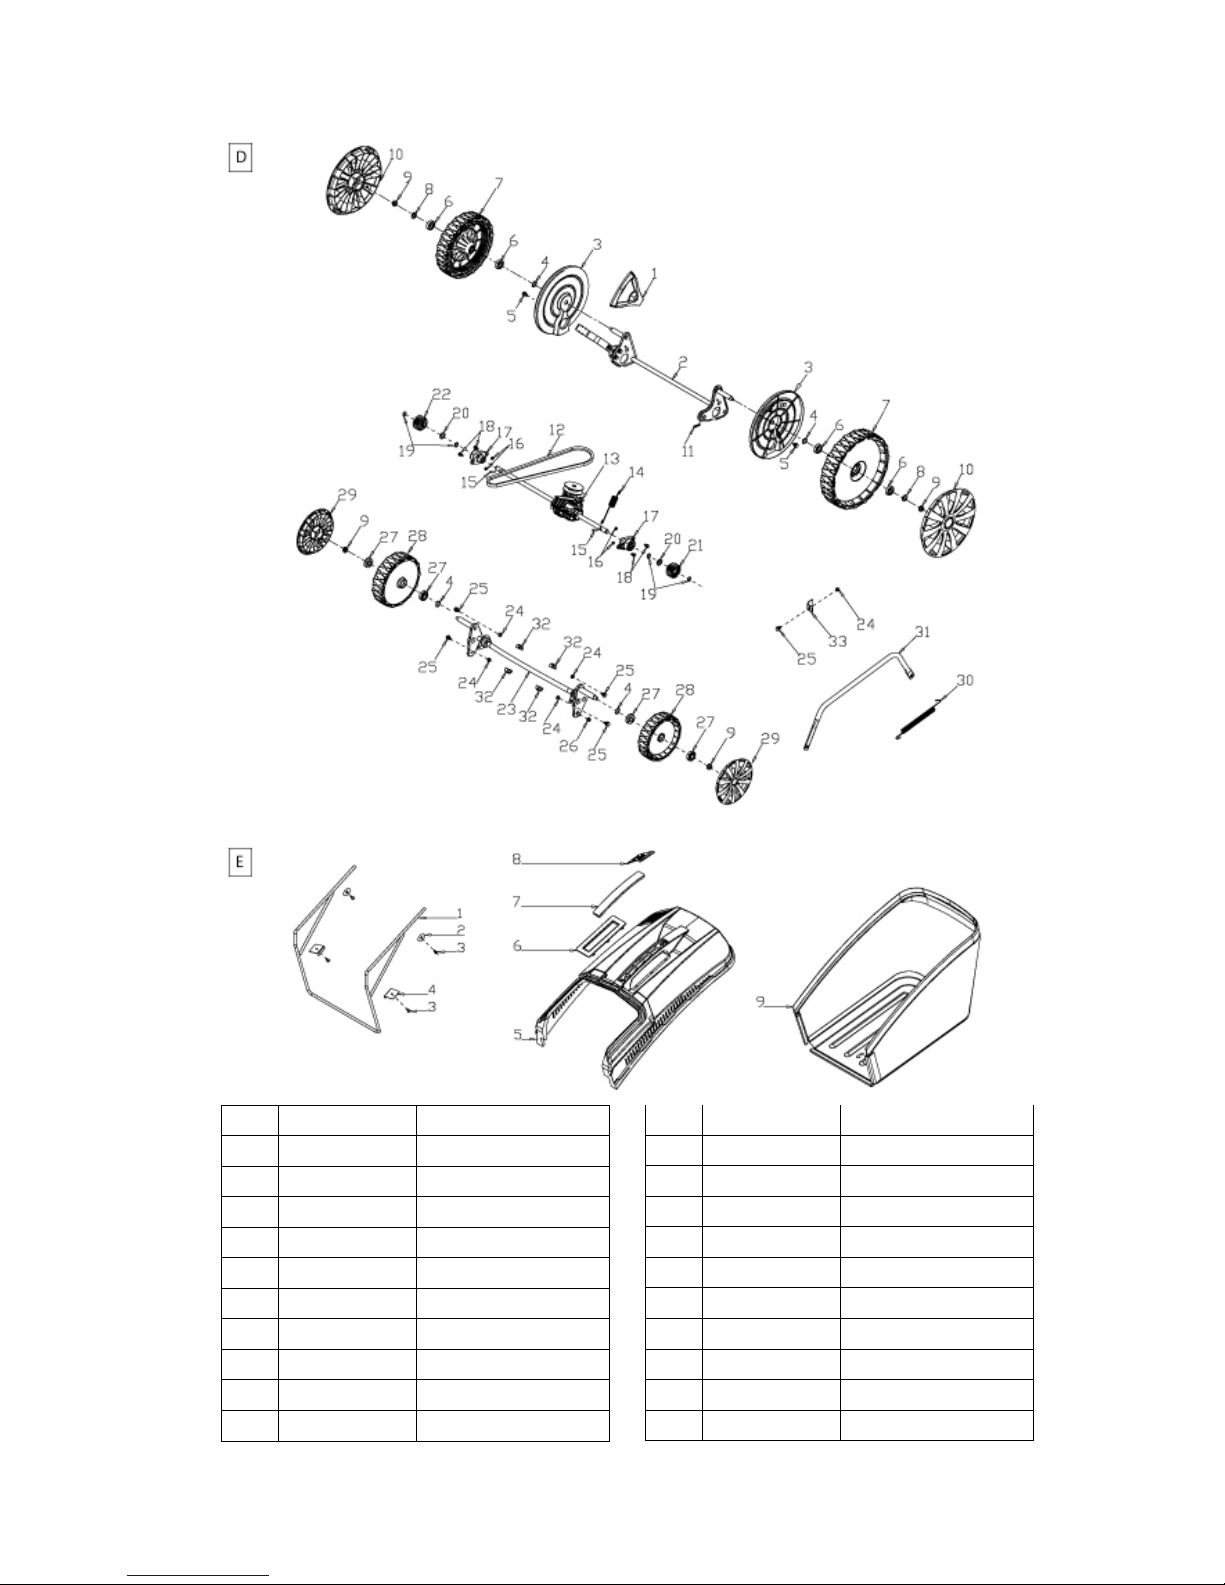
20
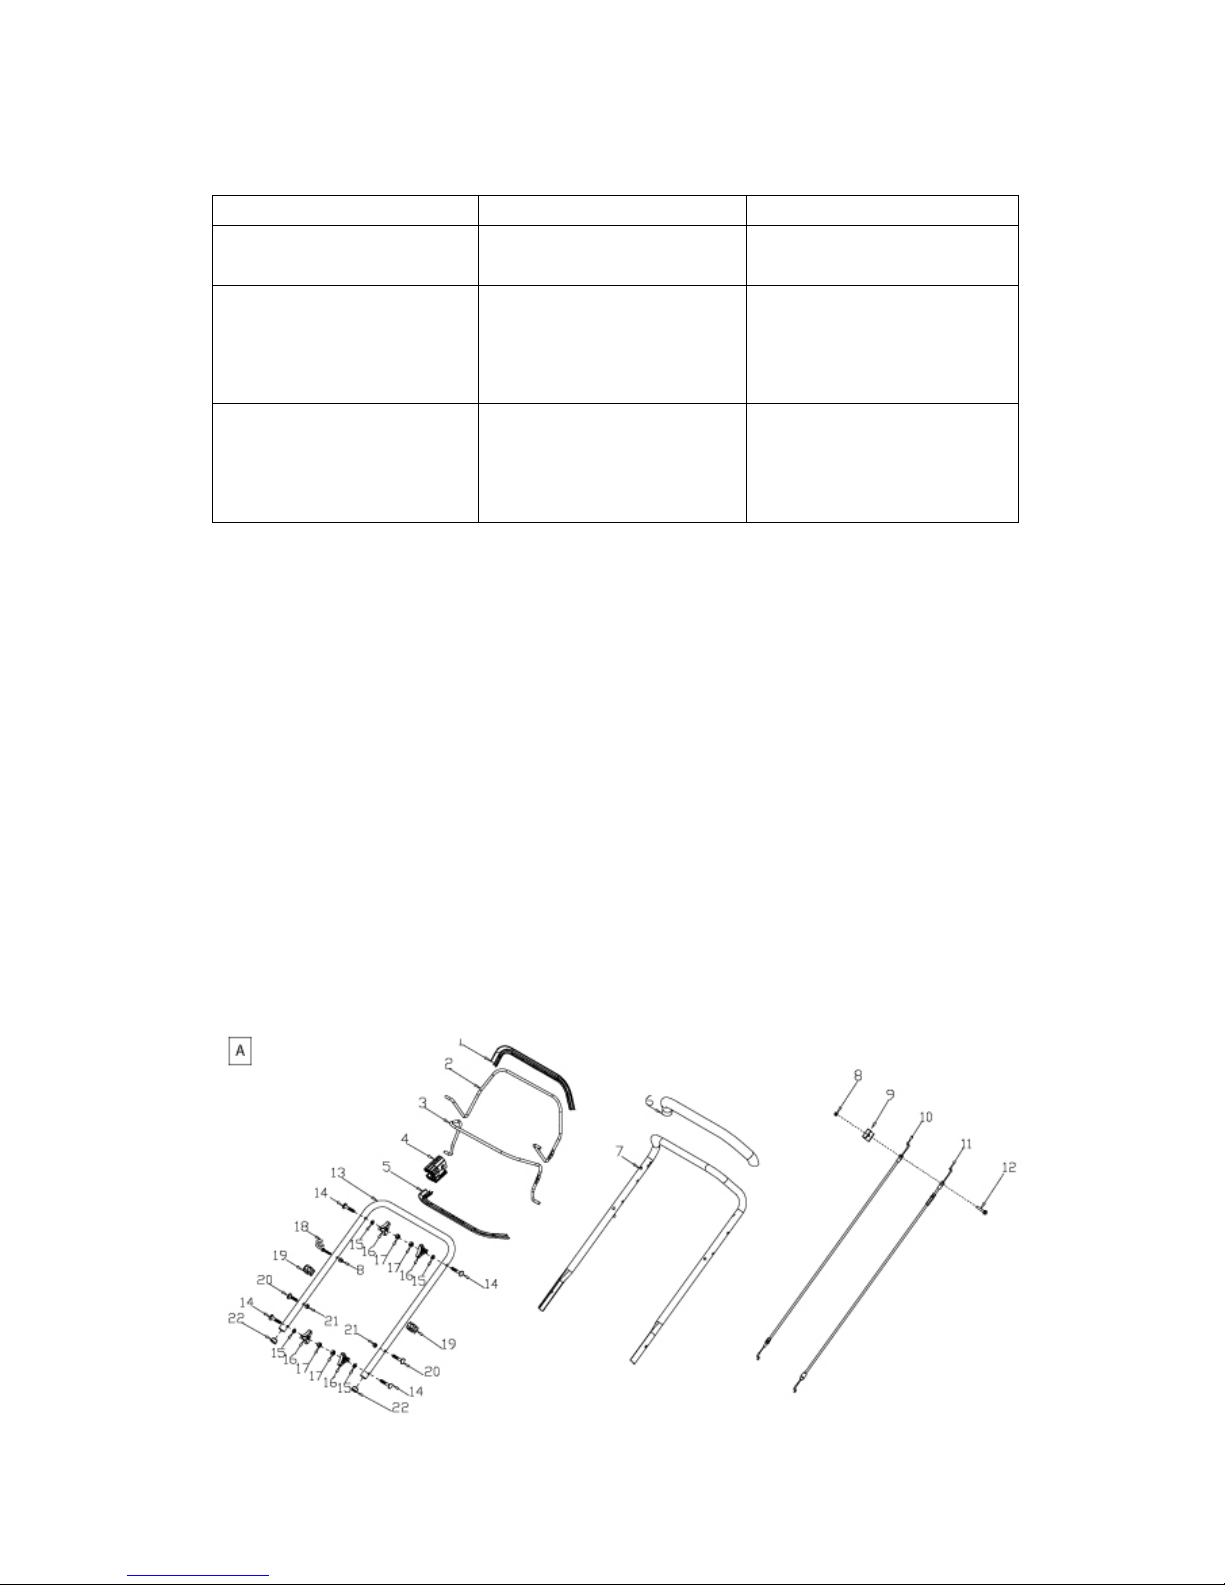
Part No.
Description
A-1
G33Q0000110
Plastic Decoration
A-2
G3375000056
Clutch Lever
A-3
G3354000056
Brake Lever
A-4
G3XW0000000
Limiting Stopper
A-5
G33Q0000119
Plastic Decoration
A-6
G3320000000
Foam Pipe
A-7
G333F000001
Upper Handle
A-8
B2011B00000
Nut
A-9
G339X300000
Cable Fixing Clamp
A-10
G639XX50000
Brake Cable
A-11
G339XYA0000
Clutch Cable
A-12
B1066W06032
Nut
A-13
G33B4000001
Lower Handle
A-14
B1088W08050
Bolt
A-15
B5019W00000
Flat Washer
A-16
G33C1100073
Knob
A-17
B2020W00000
Nut
A-18
G33K0000000
Rope Guide
A-19
G33H2000000
Cable Support
A-20
B1087W08032
Bolt
A-21
B2009W00000
Nut
Table of contents
Other Sherpa Lawn Mower manuals


