Sight mark SM11030KSM11031KSM11032K User manual
SM11030K
SM11031K
SM11032K
Solitude Spotting Scope
USER MANUALUSER MANUAL

Sightmark oers a wide range of products that include red dot scopes, reex sights,
rangenders, riescopes, laser sights, night vision, binoculars and award-winning ashlights
and boresights. Sightmark products are inspired by military and law enforcement
applications. All products are designed to be the most eective weapon accessories possible.
MAKE YOUR MARK
ABOUT SIGHTMARK®
www.sightmark.com
1
Solitude SE Spotting Scopes
The Solitude SE Spotting Scope Kit is ideal for a wide range of applications including target
shooting, long-distance game tracking, police surveillance, or sniper spotting. Built with qual-
ity materials in a variety of models, Sightmark spotting scopes are designed with comfortable
eye relief for long periods of use.
All spotting scopes come equipped with a versatile tripod and carry case that keep the optics
protected in the eld. Designed with a straight eye piece and rotatable mount ring, Sightmark
spotting scopes feature an advanced aluminum prism coating for optimal light transmission.
The Solitude spotting scopes are developed with a porro prism optical system to provide the
ability to have a wide eld of view and better depth of eld. The straight eyepiece design al-
lows users to comfortably spot for long periods of time, in many conditions.
Sightmark spotting scopes boast a rugged, lightweight, rubber-armored body that are
nitrogen-lled and O-ring sealed, making them waterproof and fogproof. Adjustable eye
cups provide a comfortable, custom t for all users whether they are wearing glasses or not.
Featuring a dustproof construction, Sightmark spotting scopes are exceptionally reliable for a
lifetime of use.
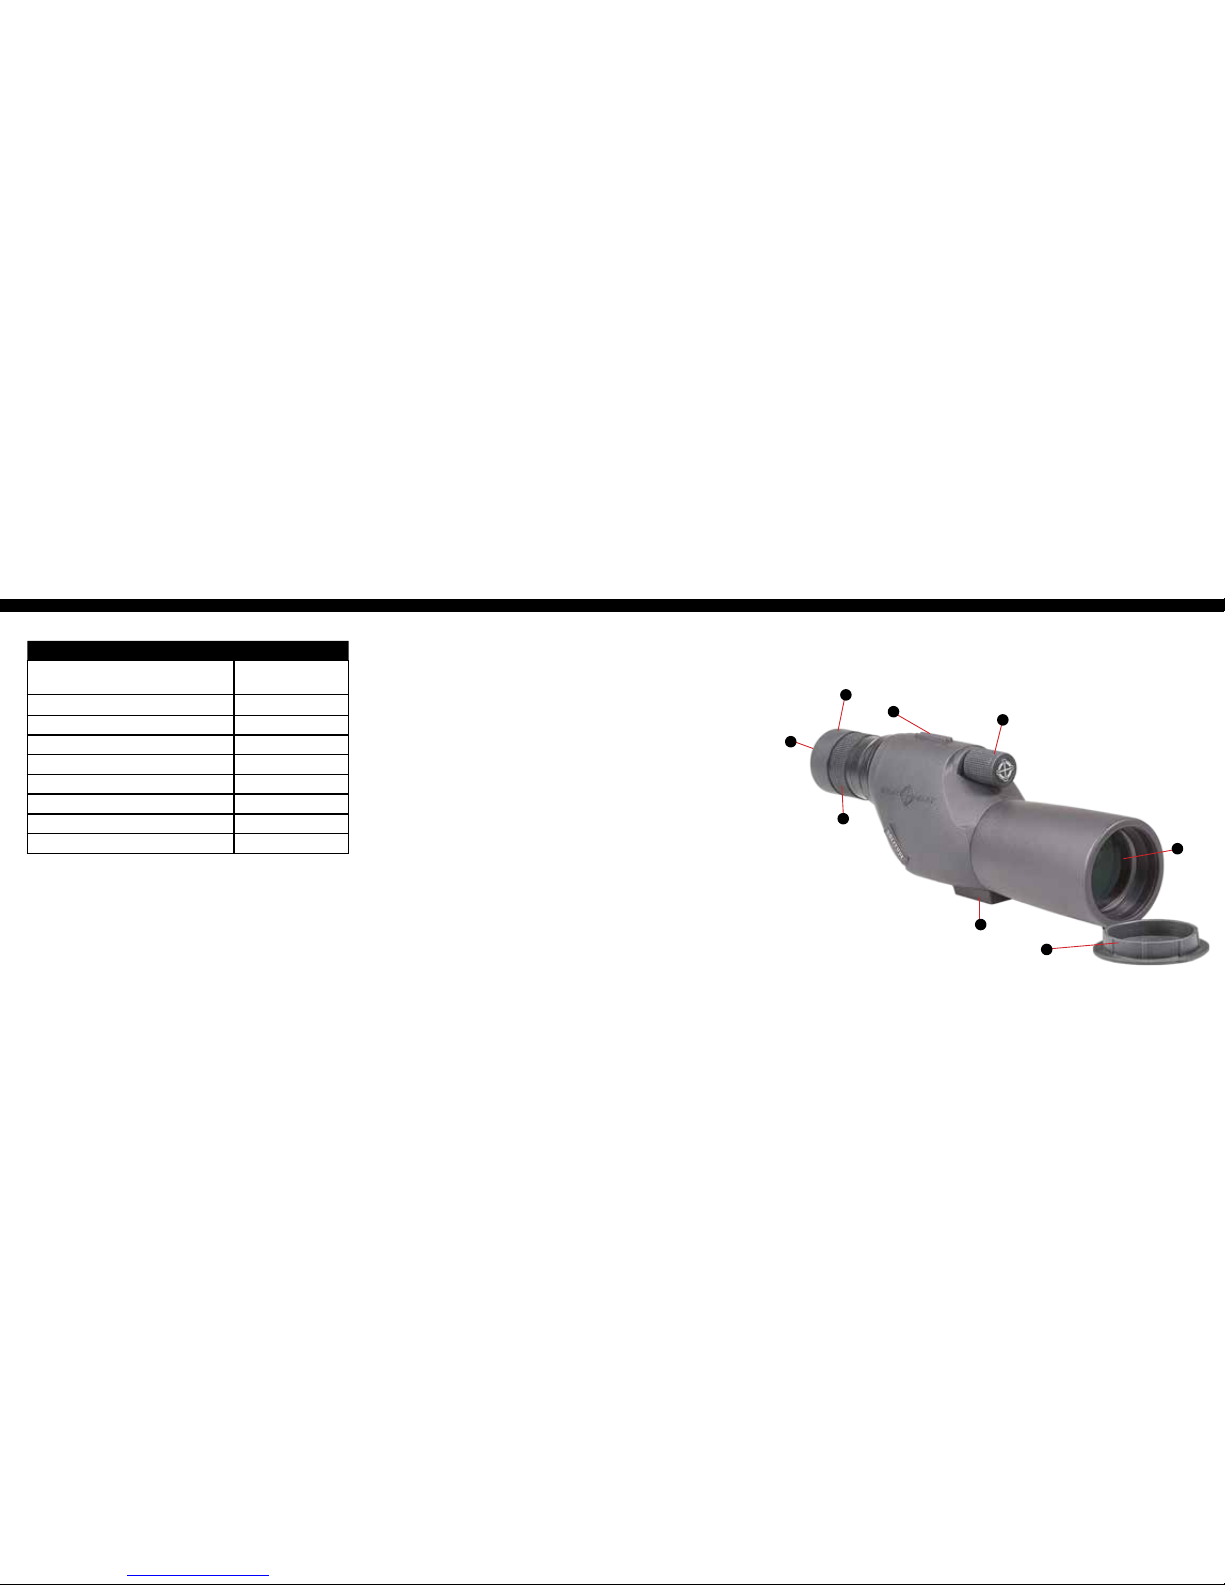
DIAGRAM
1. Eyepiece
2. Twist-up eyecup
3. Magnication adjustment
4. Alignment sight
5. Focus dial
6. Objective lens
7. Lens cap
8. Tripod mount
32
INCLUDED ACCESSORIES:
• Fully multi-coated optics
• 100% reective advanced aluminum
prism coatings
• Porro prism optical system
• Straight eyepiece design
• Compact design
• Lightweight
• Twist-up eyecup
• Built-in tripod adapter
• Waterproof and fogproof
INCLUDED ACCESSORIES:
• Carry case
• Table top tripod
• Built-in objective lens cap
• Eyepiece cover
Model Solitude 11-33x50SE
Spotting Scope Kit
Magnication (x) 11-33
Objective Lens Diameter (mm) 50
Eye Relief (in/mm) .59 - .47/ 15 - 13
Exit Pupil Diameter (mm) 4.5 - 1.5
Field of View (Ft/1,000yds) 157.2 - 77.1
Field of View (degrees)) 3 - 1.47
Minimum focus distance (ft/m) 7.5 / 2.3
Dimensions, in 11.2 x3.2 x4.7
TECHNICAL SPECIFICATIONS
1
2
3
45
6
7
8

Model Solitude 20-60x60SE
Spotting Scope Kit
Solitude 20-60x80SE
Spotting Scope Kit
Magnication (x) 20-60 20-60
Objective lens diameter (mm) 60 80
Eye relief (in/mm) .6 - .55 / 15.3 - 14 .63 - .55 / 16 - 14
Exit pupil diameter (mm) 3 - 1 4 - 1.3
Field of view (ft/1,000yds) 107.4 - 52.5 94.3 - 47.1
Field of view (degrees) 2.05 - 1 1.8 - .9
Minimum focus distance (ft/m) 14 / 4.2 20/ 6
Dimensions, in 13.9x3.2x4.7 17.7x4x4.7
Weight (oz) 36.6 50.5
TECHNICAL SPECIFICATIONS
54
INCLUDED ACCESSORIES:
• Carry case
• Table top tripod*
• Adjustable table top tripod**
• Built-in sunshade
• Built-in objective lens cap
• Eyepiece cover
FEATURES:
• Fully multi-coated optics
• 100% reective advanced aluminum prism coatings
• Porro prism optical system
• Straight eyepiece design
• Twist-up eyecup
• Built-in sunshade
• Rotatable tripod ring
• Waterproof and fogproof
*SM11031K
**SM11032K
1. Eyepiece
2. Twist-up eyecup
3. Magnication adjustment
4. Alignment sight
5. Focus dial
6. Tripod mount collar
7. Built-in sunshade
8. Objective lens
9. Lens cap
10. Tripod mount
DIAGRAM
6
1
9
8
2
3
610
74 5
6
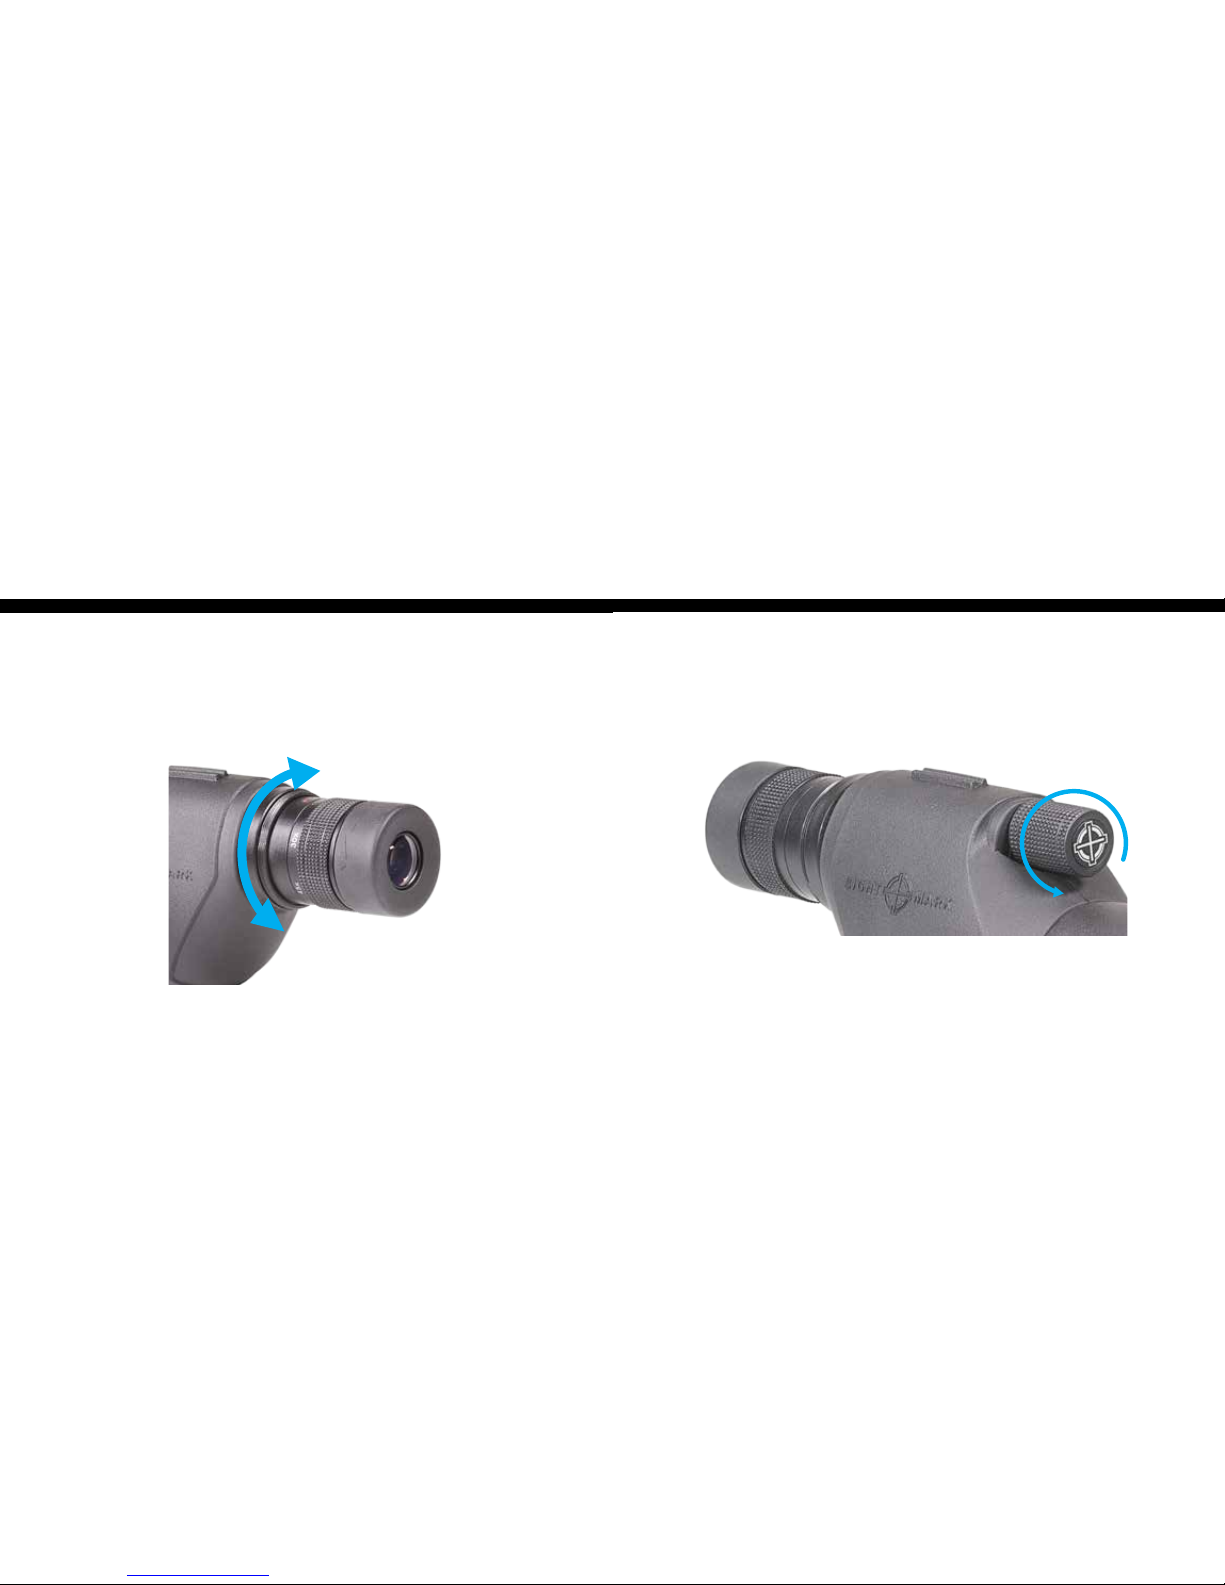
VARIABLE POWER ADJUSTMENT
All Solitude Spotting Scopes are equipped with an eyepiece cover. First remove the eyepiece cover before operat-
ing the spotting scope. Each spotting scope model is equipped with variable magnication. The low magnica-
tion of the Solitude Spotting scopes provides a wide eld of view making it easy to spot or track targets. The high
magnication makes it possible to observe details on distant targets. To change magnication:
1. Turn the magnication adjustment ring (3) to the desired level of power.
2. To increase magnication, turn the adjustment ring in a clockwise direction.
3. To decrease magnication, turn the adjustment ring in a counter-clockwise direction
7
FOCUS ADJUSTMENT
The focus dial allows the Solitude Spotting scopes to deliver a clear, sharp image. Anytime magnication is
changed, generally the image must be refocused. To focus the image:
1. Turn the focus dial (5) until the image is focused. Make sure the image is always well focused as this will
prevent eye fatigue.
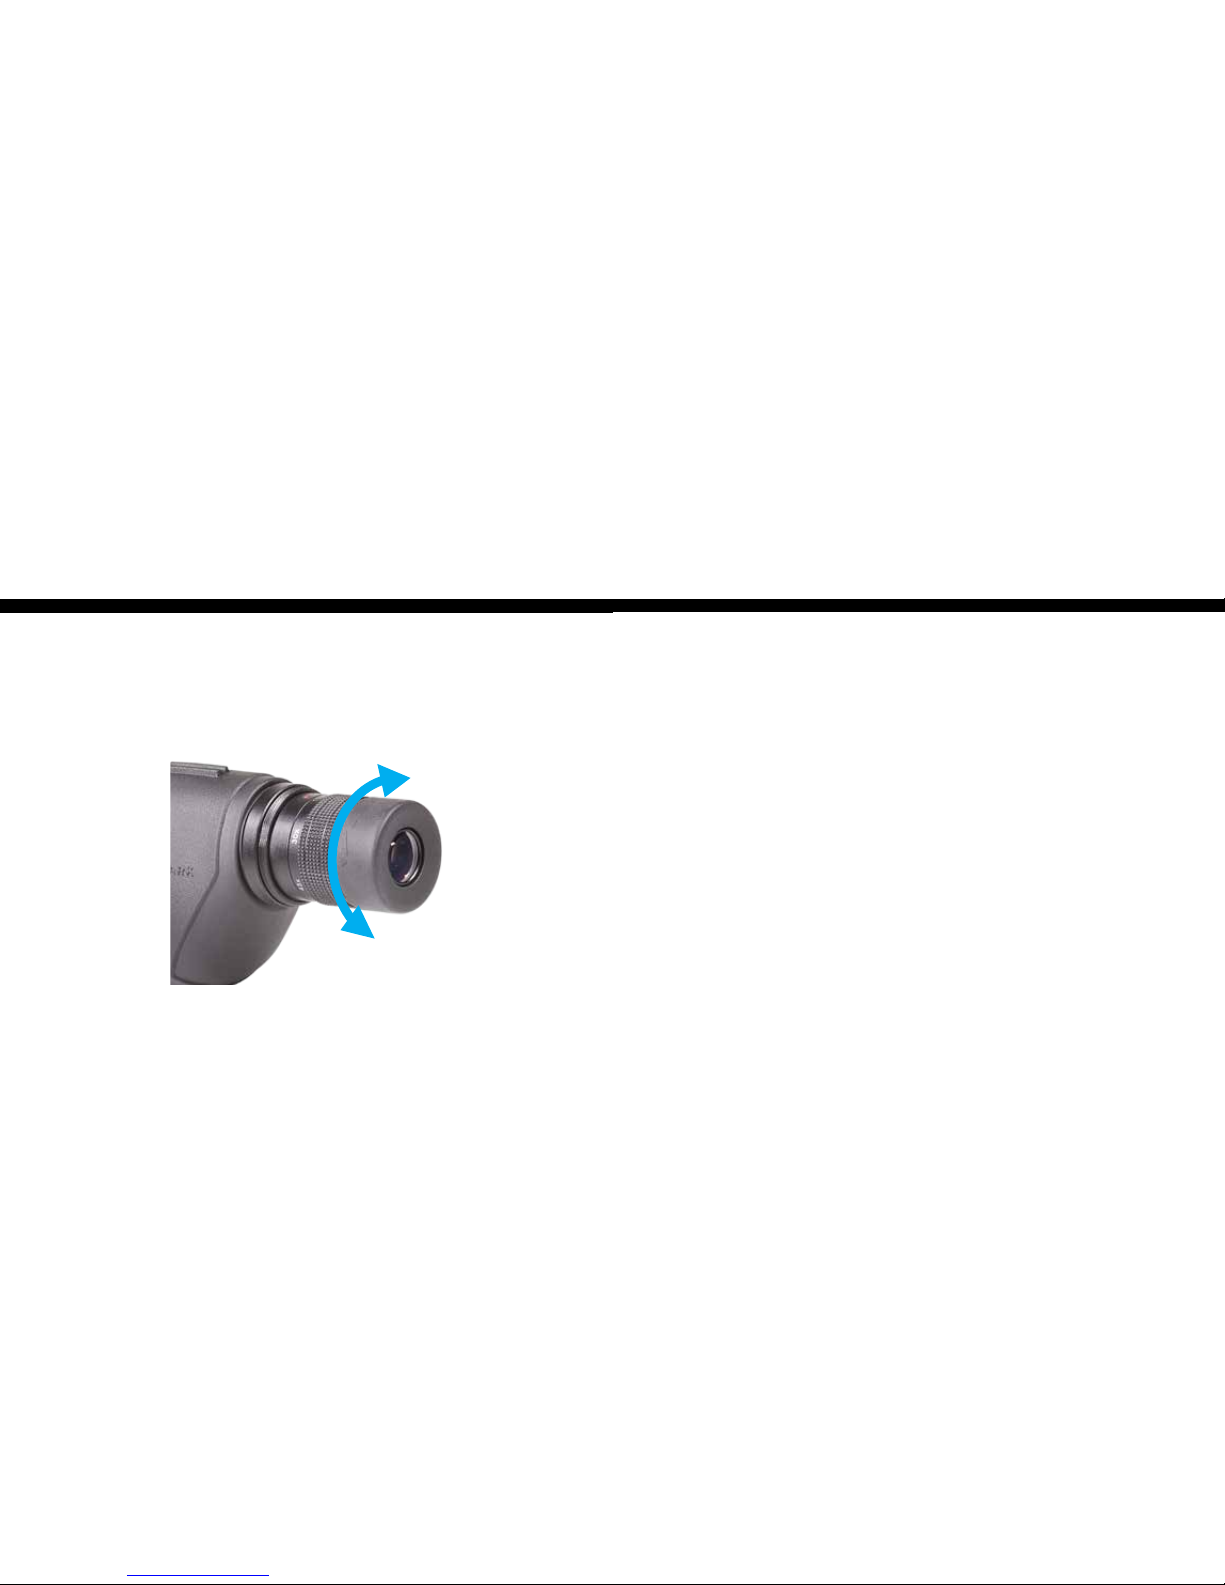
ADJUSTING THE EYECUP
Prior to using the Solitude spotting scopes, it is best to adjust the twist up eyecup to your preference. The
twist-up eyecups allow you to properly observe the full eld of view of the image without any vignette eect
or darkened edges. Even if you wear eyeglasses you can use the Solitude spotting scopes eectively. If you
wear glasses, keep the eyecup in the down position. Twist the eyecup to the up position if you do not wear
glasses. To twist the eye cups:
1. Rotate the eye cup (2) counter-clockwise to raise the eyecup.
2. Rotate the eye cup clockwise to lower the eyecup.
8 9
USING THE ALIGNMENT SIGHT
All Solitude spotting scopes are equipped with a built-in alignment sight. The built-in alignment sight
allows the spotting scope’s eld of view to be quickly aligned with the target. This prevents wasting
time trying to nd your target while looking through the high magnication of the spotting scope. It
is similar to using iron sight on a rie or pistol. To use the alignment sight:
1. First, locate the alignment sight (4) on the top of the unit.
2. Aim the spotting scope at the target intended to be viewed. Align the target between the“V” of the
alignment sight.
3. Next, view the target through the spotting scope at the lowest magnication. The target should be
within the spotting scope’s eld of view.
4. Finally, make any necessary focus, magnication or alignment adjustments to the spotting scope in
order to better align the target within the eld of view.

ADJUSTING THE SUNSHADE
All Solitude spotting scopes are equipped with a built-in sunshade. The built-in sunshade provides several advantages
such as prevention of lens glare from direct sunlight and protection of the objective lens from the elements. To use the
sunshade:
1. First, open the lens cap (9) on the spotting scope.
2. Pull on the sunshade (7) until it is fully extended.
3. To collapse the sunshade, push on the sunshade to return it to its original position.
ADJUSTING THE VIEWING ANGLE
The Sightmark Solitude 20-60x60SE and 20-60x80SE are equipped with a tripod mount collar (6). This feature allows the
spotting scope to be rotated 360º so the eyepiece can moved to any location such as 90º (left or right) or 180º (bottom).
This is helpful when the spotting scope is being used in dierent scenarios such as on a shooting bench, shooting prone,
or using the spotting scope on a window mount. The 360º rotation is designed to provide exibility and t your specic
need. To adjust the eyepiece’s angle:
1. Loosen the thumbscrew located on the side of the tripod mounting collar.
2. Rotate the spotting scope so the eyepiece is located at your preferred angle.
3. Keep the spotting scope in position and tighten the thumbscrew to secure the spotting scope in position.
10 11

MOUNTING THE TRIPOD
All Sightmark Solitude Spotting scopes include a tripod that attaches to the built-in tripod mount. The built-in
tripod mount also works with most aftermarket tripods and window mounts. The built-in tripod mount can be
used with any tripod or window mount that uses a standard 1/4-20 UNC tripod screw. To mount the tripod:
1. Align the tripod’s mounting screw with the socket on the bottom of the tripod mount (8).
2. Screw the tripod’s mounting screw so that the tripod and the tripod mount are completely connected and
rmly secured.
12 13
USING THE TRIPOD
The Sightmark Solitude 11-33x50SE includes a table top tripod. This tripod provides a stable platform when
used on a table or when lying prone on the ground. The integrated handle allows the spotting scope to
easily pan and also secures the current angle of tilt via a clamping mechanism. By rotating the handle clock-
wise, the handle tightens and increases the resistance of the tilt function. When the handle is completely
tightened, the current angle of tilt will be locked in position. To change the spotting scope’s angle of tilt,
loosen the handle by rotating is counter-clockwise.

14
USING THE CARRY CASE
All Sightmark Solitude Spotting scopes include a padded protective carrying case. The case is designed so the
spotting scope can be used with a tripod while still inside the carrying case. The case includes carry handles
and a detachable shoulder strap. Adjustment straps are integrated on the side of the carry case in order to
secure the including tripods for easy transport.
15
To use the spotting scope while in the case, unzip the back and front end of the case. Fold the front ocular cov-
er down and underneath the case. You can secure this front cover by attaching the pieces of Velcro together.
Afterwards, remove the objective lens cap. Unzip the back of the case so that the eyepiece and focus dial are
easily accessible. Next, fold the left and right side of the case down and secure them in positing by attaching
the pieces of Velcro together.

MAINTENANCE
Proper maintenance of the Sightmark Solitude spotting scopes is recommended to ensure longevity. It is
recommended that when the spotting scope becomes dirty that it is wiped down with a dry or slightly damp
cloth. Blow dirt and debris o all optics and then clean lenses with a lens cleaning cloth. To remove oils or
dried water spots, apply a small amount of denature alcohol to a lens cloth or cotton swab. Clean the surface
of the lens and let dry. Finally use your breath to clean the lens once more. To protect the spotting scope use it
at all times in the protective padded case. No further maintenance is required. Do not attempt to disassemble
any components of the spotting scope.
STORAGE
Cover with the objective lens and the eyepiece with the included lens covers. For long-term storage, place the
spotting scope in a cool, dry and ventilated area.
WARNING
Before handling the Sightmark Solitude spotting scope read and understand the contents of the Sightmark
manual.
• Avoid hitting or dropping the unit
• NEVER look directly into the sun or at other bright light sources with the spotting scope as this could
damage your eye and cause blindness.
16
Troubleshooting
Proper authorization is required before shipping any product back to Sightmark. Failure to obtain authorization
could result in your product being returned to the wrong address, lost, or damaged. Sightmark is not liable for
products returned without authorization.
The image is blurry and not in focus:
1. Rotate the focus dial until the image becomes clear and sharp.
2. Remove any dust or oil o the objective lens or eyepiece.
Please visit www.sightmark.com for warranty details and information.
SIGHTMARK LIMITED WARRANTY
17

18
NOTES:
19
NOTES:

20
NOTES:
21
NOTES:

Table of contents


