Sigma Designs REALmagic NetStream 2000 User manual

The Plug and Play Solution for Interactive MPEG-2 Video
NetStream2000
NetStream 2000 Manual 6.6.2000 6/6/00 2:47 PM Page 1

© 2000 Sigma Designs Inc. All Rights Reserved.
June, 2000
P/N 66-000347-02
Information in this manual is subject to change without notice. The software described in this manual is furnished under license and may be used or
copied only in accordance with the license agreement. It is unlawful to copy the software except as specified in the license agreement. No part of
this manual may be reproduced or transmitted in any form or by any means, electronic or mechanical, including photocopying or scanning, for any
purpose, without the express written permission of Sigma Designs, Inc.
REALmagic, REALmagic NetStream 2000, REALOverlay are trademarks of Sigma Designs, Inc. Sigma Designs and the Sigma Designs logo are
registered trademarks of Sigma Designs, Inc. Microsoft, MS and MS-DOS are registered trademarks of Microsoft Corporation. As used in this man-
ual, Windows refers to Microsoft Windows, Microsoft Corporation’s implementation of a windowing system. IBM, DOS, PC and VGAare trade-
marks of International Business Machines Corporation. All other brand and product names referred to in this manual are trademarks or registered
trademarks of their respective holders.
Please address comments or questions to:
Sigma Designs, Inc. Phone: (408) 957-9866
Customer Service Center Fax: (408) 957-9740
Milpitas, CA95035-3024 USA World Wide Web: www.sigmadesigns.com
Sigma Designs, Inc., reserves the right to use or distribute any information you supply to its Customer Service Center in any way it deems appro-
priate without incurring any obligation whatsoever.
NetStream 2000 Manual 6.6.2000 6/6/00 2:47 PM Page 2

FCC Compliance Statement
This equipment has been tested and found to comply with the limits for a Class B digital device, pursuant to Part 15 of the FCC Rules. These limits
are designed to provide reasonable protection against harmful interference in residential installation. This equipment generates, uses, and can radi-
ate radio frequency energy and, if not installed and used in accordance with the instructions, may cause harmful interference to radio communica-
tions. However, there is no guarantee that interference will not occur in a particular installation. If this equipment does cause interference to radio
or television reception, which can be determined by turning the equipment off and on, the user is encouraged to try to correct the interference by
one or more of the following measures:
• Reorient or relocate the receiving antenna.
• Increase the separation between the equipment and receiver.
•Connect the equipment into an outlet on a circuit different from that to which the receiver is connected.
•Consult the dealer or an experienced radio/TV technician for help.
Notice
This device complies with Part 15 of the FCC rules. Operation is subject to the following two conditions: (1) this device may not cause harmful
interference, and (2) this device must accept any interference received, including interference that may cause undesired operation.
Shielded cables and I/O cords must be used for this equipment to comply with the relevant FCC regulations.
Changes or modifications not expressly approved in writing by Sigma Designs, Inc., may void the user’s authority to operate this equipment.
This digital apparatus does not exceed the Class B limits for radio noise emissions from digital apparatus set out in the radio interference regulation
of the Canadian Department of Communication.
NetStream 2000 Manual 6.6.2000 6/6/00 2:47 PM Page 3

Table of Contents
Chapter 1. Introduction 1
System Requirements 1
Additional Requirements 1
Technology Overview 2
Supported File Formats 3
Transport and Program Streams 3
Chapter 2. Hardware Installation 4
Handling the Board 4
Installing the Hardware 5
Video Connection 6
Audio Connections 7
TV Connections 8
Advanced Connections 9
Chapter 3. Software Installation 10
Installing Software Under Windows 9x 10
Installing Software Under Windows NT 4.0 11
Border Adjustment and Color Calibration 12
Chapter 4. Using the DVD Station 14
Starting the DVD Station 14
Standard Buttons 16
Custom Button 17
Play List 18
Settings 19
General 20
Audio Output 20
TV 20
DVD 21
Rating Control 21
Default Language 21
Picture Control 22
DVD Navigation Buttons 23
Audio Soundtrack 23
Language Selector 23
Camera Angle 24
Subtitle Selector 24
Menu Selector 25
Title Selector 25
Joystick Controller 25
DVD Playback 25
10-Key Keypad 27
i
NetStream 2000 Manual 6.6.2000 6/6/00 2:47 PM Page 4

Video CD Playback 28
Select Buttons (Video CD 2.0 Only) 28
Playing a Video CD 2.0 29
Audio CD Playback 29
Shortcut Keys 30
Chapter 5.
Windows Media and DirectShow Support 32
Appendix A. Advanced Configuration Options 34
Manual Color Calibration 34
Advanced Color Adjustments 35
Border Adjustments 37
Appendix B. Customer Service 38
Index 40
ii
NetStream 2000 Manual 6.6.2000 6/6/00 2:47 PM Page 5

Chapter 1. Introduction
Congratulations on purchasing your new NetStream 2000. The
NetStream 2000 transforms your computer into a digital video work-
station, capable of playing extremely high-quality, MPEG-1 and
MPEG-2 digital video from local disks, DVD movie discs, or across
a network. It’s a perfect choice for entertainment, education, training
and communication.
Please refer to the README.TXT file for important information not
available when this manual was printed. You will find this file in the
REALmagic NetStream program group after software installation.
System Requirements
The NetStream 2000 requires the following:
• 2 megabytes (MB) of free hard disk space
•16 MB of RAM
•Pentium-based PC (or compatible), 133 MHz or higher
•VGAcard
•PCI 2.1 compliant expansion slot
•Plug and Play BIOS support
•Microsoft™ Windows 9x or NT 4.0
•Amplified stereo speakers (Optional: Dolby Pro Logic amplifier
and speakers may be used for Dolby surround sound)
Additional Requirements
Depending upon your particular video network needs, you may have
additional system requirements, such as:
• Additional RAM and/or faster processor speed
• Client software, such as a web browser equipped with a plug-in
• A video server, for playing video on demand
•An MPEG encoder, for creating MPEG video
•PCI-based 10BaseT, 100BaseT or ATM network adapter
Chapter 1: Introduction 1
NetStream 2000 Manual 6.6.2000 6/6/00 2:47 PM Page 6

Technology Overview
MPEG and MPEG-2
MPEG stands for Moving Picture Experts Group. It refers to a
method of data compression optimized for video and audio data. By
analyzing the changes between video "frames," an MPEG "encoder"
is able to reduce the file size of the compressed video data signifi-
cantly. This remarkably efficient compression method allows full-
screen and full-motion video, plus CD-quality audio to be stored in a
relatively small size file. Once the data has been compressed, how-
ever, it must be "de"-compressed before it can be used.
Your NetStream 2000 incorporates specialized hardware to decom-
press MPEG data at a very high speed, which allows MPEG
"streams" to play back at a data transfer rate of 500 Kilobits (Kb) to
up to 15 Megabits (Mb) per second. MPEG-2 video has a resolution
of 720 x 480 in 24-bit (16.8 million) colors at 30 frames per second
(fps). MPEG-1 video has a resolution of 352 x 240 in 24-bit (16.8
million) colors at 30 fps. The MPEG standard is a fully open stan-
dard and has been embraced by the computer and entertainment
communities as the current standard of digital video on both televi-
sion and personal computers.
DVD
DVD is a revolutionary storage medium that is currently capable of
storing up to 18 gigabytes (GB) of data on a disc the size of a stan-
dard CD. This is enough to store an entire movie encoded in the
MPEG-2 format on a single side of the disc.
Dolby Digital Surround Sound
Some MPEG-2 video uses Dolby Digital Surround Sound. Dolby
Digital Surround Sound incorporates six discrete digital audio chan-
nels to provide a full immersion surround sound system that is simi-
lar to that of a movie theatre. The six channels include left and right
front, left and right back, center, and subwoofer.
The NetStream 2000 can output the six discrete channels of Dolby
Digital audio using the S/PDIF connection. Also, it converts the six
channels into Dolby Pro Logic Surround Sound, which is carried
using a standard 1/8" (3.5mm) stereo connector. This lets you play
the Dolby Digital sound using either standard stereo speakers or
using a Dolby Pro Logic amplifier with surround sound speakers.
2Chapter 1: Introduction
NetStream 2000 Manual 6.6.2000 6/6/00 2:47 PM Page 7

Dolby Pro Logic Surround Sound
Dolby Pro Logic Surround Sound uses the standard analog stereo
signal to multiplex surround sound information, and requires a
Dolby Pro Logic receiver/amplifier to decode the signal. Pro Logic
Surround Sound differs from Dolby Digital Surround Sound by
using the same audio signals for both the front and back speakers on
the left and right channels.
Supported File Formats
Your NetStream 2000 supports the following MPEG file formats:
MPG Files
MPG is the extension used for files with MPEG-2 or MPEG-1 com-
pressed full-motion video. For MPEG-2, the video resolution is 720
x 480 at 30 frames per second (fps) with 16.8 million colors (full
CCIR601). For MPEG-1, the video resolution is 16.8 million colors
at 352 x 240, shown at 24, 25, or 30 fps. Both MPEG-2 and MPEG-
1 files may include MPEG-compressed audio (16-bit, 48kHz stereo
sound). The NetStream 2000 also supports the Half-D1 format of
MPEG-2.
DAT Files (Video CD 1.0 and 2.0)
DAT is the extension for Video CD or Karaoke CD files. The
NetStream 2000 can play both Video CD and Karaoke CD DAT
files.
VBS and ABS Files
VBS and ABS are file extensions used for some MPEG encoded
video-only bit stream and audio-only bit stream files.
Transport and Program Streams
NetStream 2000 supports MPEG-2 files on both transport and pro-
gram stream formats. It is possible to select the PID’S from a trans-
port stream, in order to choose a different audio or video stream.
Chapter 1: Introduction 3
NetStream 2000 Manual 6.6.2000 6/6/00 2:47 PM Page 8

Chapter 2. Hardware Installation
This chapter describes the steps required to install the NetStream
2000 (Figure 1).
Handling the Board
Warning: Static electricity can damage your equipment. Do not
take the board out of its static protective bag until you are ready to
work with it.
Follow these precautions when handling the board:
• Before you open the static protective bag, touch it to a metal
expansion slot cover on the back of your computer. This drains
static electricity from the package and from your body.
• Do not touch any exposed printed circuitry after opening the
package.
•Keep other people from touching the board. They might have a
static-electricity buildup.
•Limit your movement. Movement causes a buildup of static
electricity.
4 Chapter 2: Hardware Installation
Audio Output
Line Out CD In (1)
CD-S/PDIF *
* To support audio CD and DTS
audio CD through S/PDIF
CD In (2)
Figure 1. NetStream 2000
S/PDIF Output
TV-Out
VGAOut
VGAIn
NetStream 2000 Manual 6.6.2000 6/6/00 2:47 PM Page 9

Installing the Hardware
Follow the steps below to install the NetStream 2000 into your
computer.
1. Turn off the power to the computer and to the VGAmonitor.
Unplug (disconnect) the power cord from the computer.
2. Disconnect the VGAmonitor cable from your PC.
3. Remove the cover from the computer. (Refer to your PC user’s
manual for specific instructions.)
4. Locate an available PCI expansion slot. (The NetStream 2000
will not fit into an ISAslot.)
5. Remove the slot cover screw and slot cover, if applicable.
6. Open the protective sleeve containing the NetStream 2000, grasp
the circuit board by the edge of its mounting bracket, and remove
it from the protective sleeve.
7. Insert the NetStream 2000 into the PCI expansion slot. Press
down gently on the top edges of the board to ensure that all
connecting points are seated securely. Anchor the board’s mount-
ing bracket using the screw removed earlier.
8. Replace the cover of your PC and reconnect the power cord.
Note: If you install a DVD-ROM drive at the same time as the
NetStream 2000, remember to attach the CD-Audio cable from the
DVD-ROM drive to your sound card. Otherwise, you will not be
able to play CD-Audio titles with the DVD-ROM drive. This will
not affect the audio of DVD-ROM titles.
Chapter 2: Hardware Installation 5
Note: NetStream 2000 requires a bus-mastered PCI slot. Most PCI
slots support PCI bus mastering, but if you experience difficulties
with your NetStream 2000, you may wish to relocate the card to a
different PCI slot.
NetStream 2000 Manual 6.6.2000 6/6/00 2:47 PM Page 10

Video Connection
Your NetStream 2000 must be connected to your VGAcard or your
PC’s VGAoutput port in order to display MPEG video on your
VGAmonitor. (Refer to Figure 1 earlier in this Chapter for refer-
ence.) Follow the steps to connect the NetStream 2000 to your VGA
output (see Figure 2).
1. Attach the round 9-pin DIN connector of the provided External
VGAPass-Through Cable to the VGAIN connector at the back
of the NetStream 2000 (refer to Figure1).
2. Attach the other end (15-pin "D" shape) of the cable to the output
port on your VGAcard or your PC’s VGAoutput port.
3. Connect the VGAcable from your VGAmonitor to the VGA
OUT of the NetStream 2000.
6 Chapter 2: Hardware Installation
Figure 2. Video Connection
VGAOutput Port
(Attach your monitor’s
video cable here)
Connect to VGA
Card or PC Display
Output Port
External VGA
Pass Through Cable
NetStream 2000 Manual 6.6.2000 6/6/00 2:47 PM Page 11

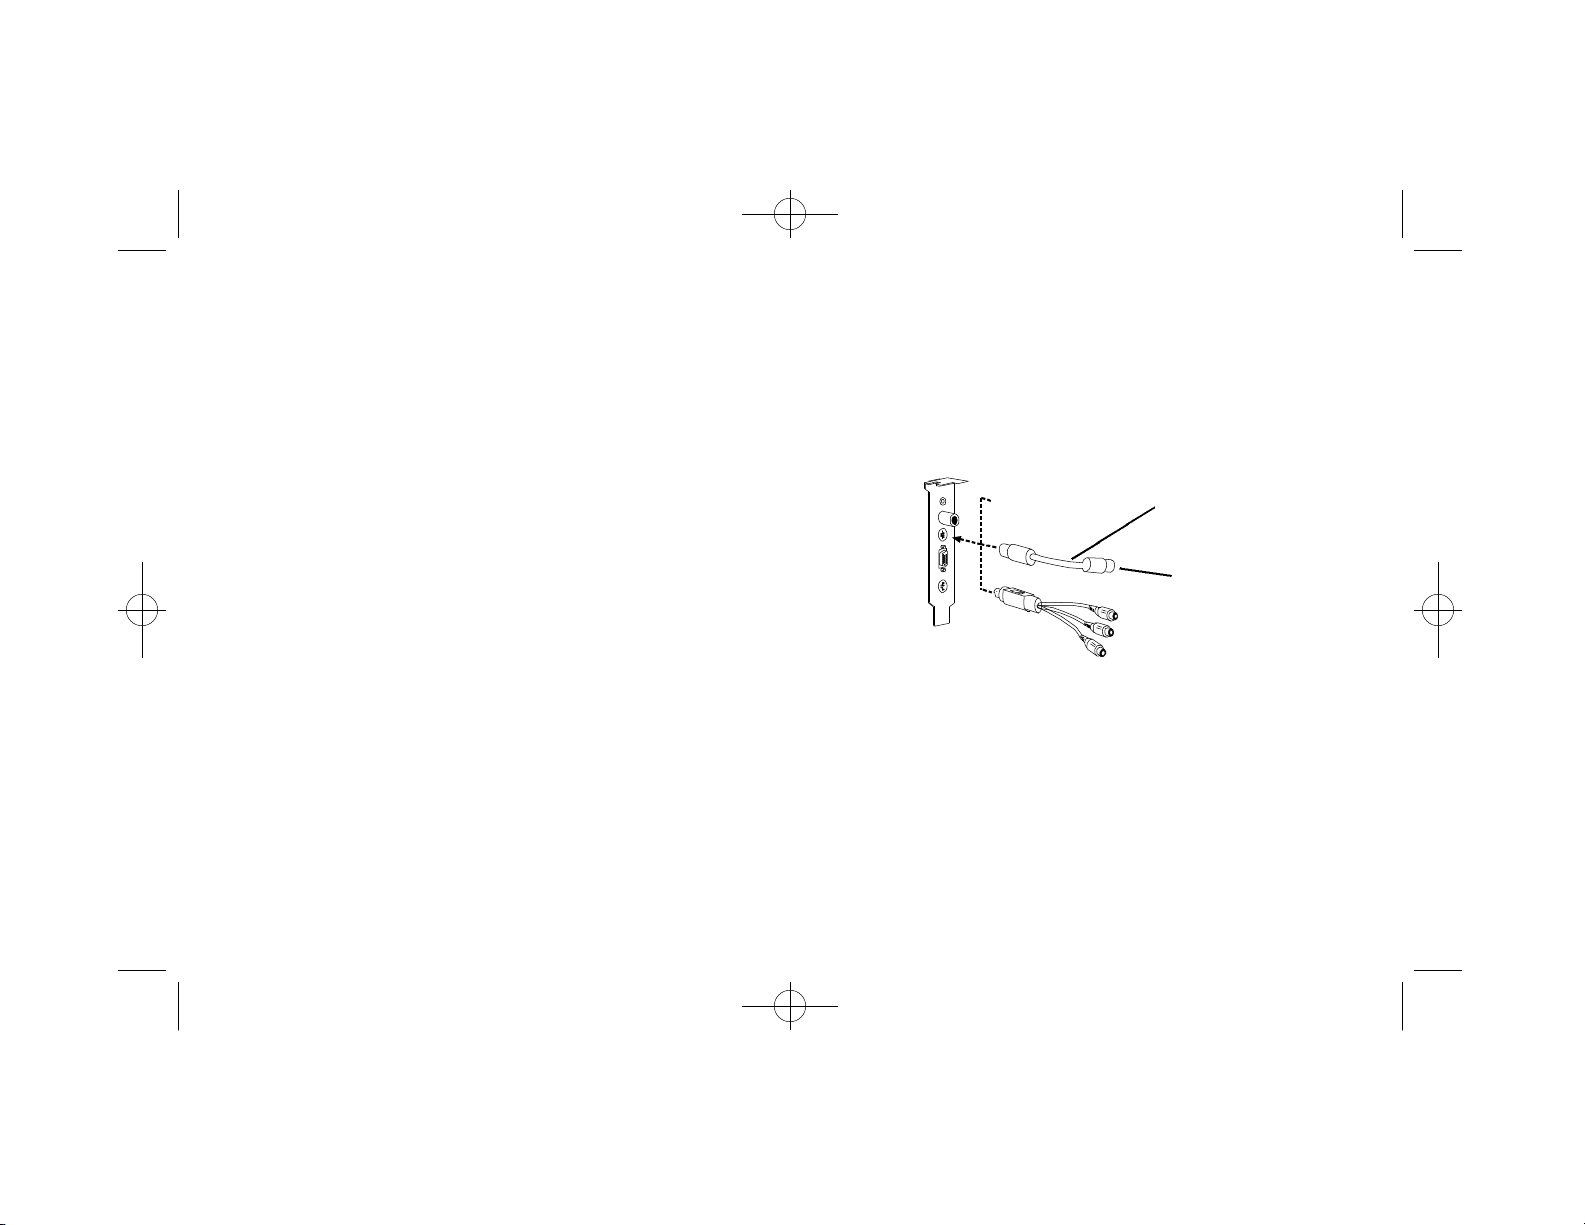
Audio Connections
The NetStream 2000 has a standard 1/8-inch (3.5mm) Stereo Output
Port. The Stereo Output Port outputs a standard analog stereo signal
that can be used by virtually any stereo receiver or amplified speak-
ers. It also contains the Pro Logic Surround Sound encoding that
allows you to achieve surround sound by attaching a Pro Logic
receiver.
If your system has a sound card, we recommend attaching the Stereo
Output signal to the LINE-IN port on your sound card, and then
attach your receiver or amplified speakers to the LINE-OUT or
SPEAKER port on your sound card. This will allow you to use one
set of speakers to listen to both MPEG-2 audio as well as other types
of audio from your sound card. It will also allow you to control the
volume by using the mixer program provided with your sound card.
Otherwise, attach this signal directly to your receiver or amplified
speakers.
Chapter 2: Hardware Installation 7
Figure 3. Audio Connection
1/8” (3.5mm)
Stereo Output
(Connect to your
sound card or
amplified speakers
NetStream 2000 Manual 6.6.2000 6/6/00 2:47 PM Page 12
8 Chapter 2: Hardware Installation
TV Connections
There are two options for connecting your REALmagic NetStream
2000 DVD/MPEG-2 Playback Card to a television: S-Video by
using a standard S-Video cable, or composite video by using an S-
Video to Composite cable.
The REALmagic NetStream 2000 DVD/MPEG-2 Playback card can
be connected directly to a TV using a S-Video cable. The S-Video
TV Out connector on the REALmagic NetStream 2000 is a 7-pin
S-Video connector, which can be connected directly to a TV using a
standard 4-pin S-Video cable. If your television set does not have an
S-Video input port, you may connect it to the REALmagic
NetStream 2000 by using an S-Video to Composite adapter cable.
Composite Video is more common and works with most televisions.
The S-Video Out connector provides better picture quality.
The component video output cable, available separately, can also be
plugged into the S-Video port. With this cable attached, NetStream
2000 can display NTSC and PAL video in the component RGB and
YUV (Y Pb Pr) formats A software utility described in the next
chapter can be used to switch between RGB and YUV modes.
Figure 4. TV Connections
Composite Video Out
Component Output (YUV )*
Red (Pr)
Green (Y)
Blue (Pb)
S-Video to Composite
Adapter Cable
Scart Connector *
RGB Output
*Optional
S-Video Out
Note: This connection will not pass any audio to your TV set.
Check audio connections.
NetStream 2000 Manual 6.6.2000 6/6/00 2:47 PM Page 13

Advanced Connections
The NetStream 2000 also includes an internal CD Audio In connec-
tor that allows you to pass MPEG audio through to the internal CD
Audio In connector on your sound card. To do this, attach the CD
Audio cable from your CD-ROM or DVD-ROM drive to the
NetStream 2000, then attach another cable from the NetStream
2000’s internal Line Out port the to the CD Audio In connector on
your sound card. Please refer to Figure 1 for the locations of these
internal connectors.
The signal from the Line Out port combines the CD Audio In signal
from the CD-ROM or DVD-ROM drive with the same signal that is
output through the Stereo Output Port on the NetStream 2000. This
solution eliminates the external audio cable that normally goes from
the NetStream 2000 to your sound card.
If you are using this solution, attach your receiver or amplified
speakers to the Line Out port of your sound card to obtain the audio
sound signal.
Note: With this solution, the volume for both CD audio and MPEG
audio will be controlled by the CD Audio portion of your mixer.
Note: For the best playback quality, make sure the NetStream 2000
is connected directly to a TV, not through a VCR.
Macrovision Copyright Notice
This product incorporates copyright protection technology that is
protected by method claims of certain U.S. patents and other intel-
lectual property rights owned by Macrovision Corporation and other
rights owners. Use of this copyright protection technology must be
authorized by Macrovision Corporation, and is intended for home
and other limited viewing uses only, unless otherwise authorized by
Macrovision Corporation. Reverse engineering or disassembly is
prohibited.
Chapter 2: Hardware Installation 9
NetStream 2000 Manual 6.6.2000 6/6/00 2:47 PM Page 14

This chapter describes the software installation procedure for the
NetStream 2000. Please follow the directions carefully. Skipping
steps may result in improper operation.
Note: Please make sure you have DirectX/DirectShow
installed before installing this software. Otherwise the
video streaming may not be available. (Depending on your
video client software)
Installing Software Under Windows 9x
Turn on the power to your computer. The Plug and Play feature of
the NetStream 2000 will cause Windows 9x to display the message
New Hardware Found with the PCI Multimedia Device signature
during boot-up. Follow the steps below to install the NetStream
2000 software:
1. When the New Hardware Found message appears, click the
option: Driver from disk provided by hardware manufacturer.
2. Click OK.
3. The Install From Disk dialog appears. Insert Disk #1, the
NetStream 2000 Drivers disk, into the floppy disk drive.
4. Make sure the dialog specifies the floppy disk drive letter (for
example, A:\ ) and click OK.This process will copy drivers and
software for the NetStream 2000 onto your hard disk.
5. When the copying is done, the Windows 9x desktop will appear.
Remove Disk #1 from the disk drive. Run Setup from Disk # 2.
6. Now you must reboot your system. Remove the floppy disk from
your PC. Click the Start button, and then click Shut Down.
Click Restart, and then click OK.
7. You must set the Border Adjustment and Color Calibration to
finalize the installation. See the section below, titled "Border
Adjust and Color Calibration."
Note: You need to run setup a second time to set the NetStream
2000 to your region code.
10 Chapter 3: Software Installation
Chapter 3. Software Installation
NetStream 2000 Manual 6.6.2000 6/6/00 2:47 PM Page 15

Installing Software Under Windows NT 4.0
If you are running Windows NT 4.0, follow these procedures to
install REALmagic NetStream 2000 software.
Important Note: Some Windows NT systems have plug and play
support installed. If Windows NT auto-detects the NetStream 2000
card during startup and prompts you to install a driver, select the
option titled "Do not install a driver (Windows will not prompt you
again)." Then follow the instructions listed below.
Note: Please make sure you have DirectX/DirectShow
installed before installing this software. Otherwise the
video streaming may not be available. (Depending on your
video client software)
1. Start Windows, if your system does not boot directly into
Windows.
2. Insert the REALmagic NetStream 2000 Windows NT Disk #1.
3. Click Start on the task bar, then click Run.
4. Type A:\SETUP in the dialog box, then click OK (this example
assumes that your floppy disk drive letter is A:).
5. You will see the Welcome screen. Click Next.
6. When prompted to choose the destination location, click Next to
accept the default or Browse to select a location of your choice.
7. At the Folder Selection window, click Next to accept the default,
or enter a name of your choice. The files are copied.
8. Insert REALmagic NetStream 2000 Windows NT Disk #2 when
prompted. Then, click OK.
9. You will be prompted to restart Windows before settings will take
effect. Click OK. You will be returned to the desktop.
10. Remove all floppy disks from the floppy disk drive.
11. Click Start on the task bar, click Shutdown, then click Restart.
12. To complete installation, you must run the REALmagic Border
Adjust utility, as described in the next section.
Chapter 3: Software Installation 11
NetStream 2000 Manual 6.6.2000 6/6/00 2:47 PM Page 16
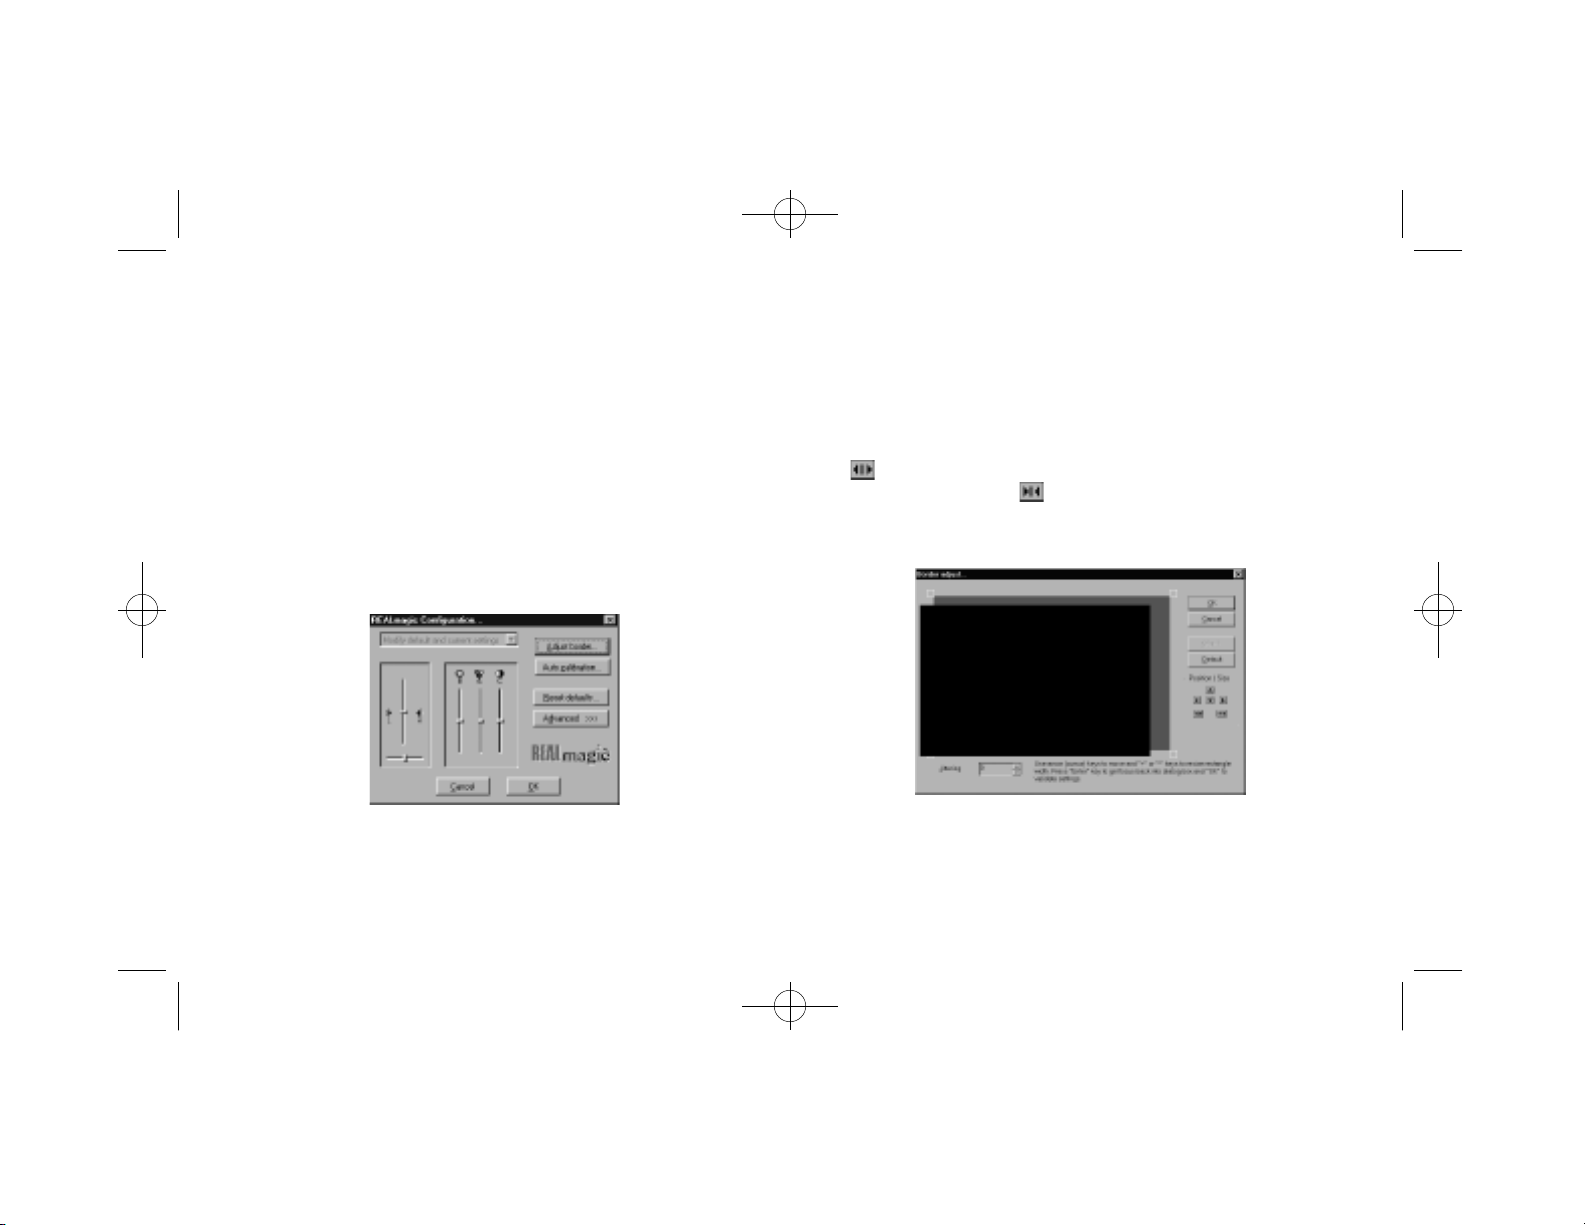
BorderAdjustment and Color Calibration
You must set the Border Adjustment and Color Calibration to final-
ize the installation. You need to set the Border Adjustment and Color
Calibration only once for each display setting (resolution, number of
colors, and refresh rate). Follow the steps below to complete the
Border Adjustment and Color Calibration.
1. After rebooting, start the Border Adjust Utility as follows: at the
Start button, click Programs, REALmagic, and BorderAdjust.
You will see the REALmagic Configuration… dialog
(Figure 5).
2. At the REALMagic Configuration… dialog (Figure 5), click
Adjust border…
3. You will see the BorderAdjust dialog (Figure 6). Use the arrow
keys in the dialog or on the keyboard to align the four corners of
the colored window within the gray outlined pink window. Click
or press the plus (+) key on the keyboard to widen the
colored window. Click or press the minus (-) key on the key
board to make the colored window narrower. When aligned,
click OK.
12 Chapter 3: Software Installation
Figure 5. REALmagic Configuration Figure 6. Border Adjust
NetStream 2000 Manual 6.6.2000 6/6/00 2:47 PM Page 17

4. The Reset Defaults button will reset the color calibration and the
border adjustment values to the factory default settings.
5. From the REALmagic Configuration dialog (refer to Figure 5),
click Auto Calibration, and then click OK. The screen will flicker
as the software automatically calibrates the colors.
6. If the Auto Color Calibration function fails, please reboot your
system and try the Auto Color Calibration function again. If the
Auto Color Calibration function still fails, you will need to per-
form a manual color calibration. See Appendix A, Advanced
Configuration Options.
Note: If the auto calibration function fails, open the Display Control
Panel and make sure that your monitor’s refresh rate is set to 72 Hz
or lower.
The Auto Color Calibration function may not work with a small
number of VGAcards on the market today.
Chapter 3: Software Installation 13
NetStream 2000 Manual 6.6.2000 6/6/00 2:47 PM Page 18

14 Chapter 4: Using the DVD Station
The DVD Station is a versatile Windows utility that allows you to
play a variety of DVD, Video CD, and CD formats. This section
describes how to use the DVD Station to play full-length feature films
recorded in the DVD and Video CD formats, and data CDs contain-
ing MPEG files and also Audio CDs. The DVD Station will automat-
ically detect the format of the disc in your DVD drive and identify the
file type in the Display Panel. The DVD Station can also detect
MPEG files in your CD-ROM and hard drives.
Your DVD drive must be DVD compliant to be able to play DVD-
Video and DVD-ROM. Check the owner’s manual for your DVD
drive to make sure your DVD drive meets these requirements before
attempting to play DVD discs.
Starting the DVD Station
Follow the steps below to start the DVD Station:
1. Start Windows, if you have not already done so.
2. Insert a DVD disc, a Video CD, or a CD-ROM containing
MPEG files into your DVD drive.
3. From the task bar, click Start, and then click Programs. Click
REALmagic NetStream 2000 and then click DVD Station.
4. The DVD Station (Figure 7) is displayed on the screen. (DVD
Station looks best if Windows has 256 or more colors.)
5. If the Auto-Play feature in DVD Station is enabled, DVD
Station will begin playing the disc in the DVD-ROM drive as
soon as one is inserted.
Chapter 4. Using the DVD Station
Figure 7. DVD Station
NetStream 2000 Manual 6.6.2000 6/6/00 2:47 PM Page 19

Chapter 4: Using the DVD Station 15
The Display Panel (Figure 8) provides specific information about the
current video or audio track, such as its track number, play time, and
aspect ratio. A progress bar at the bottom indicates the progression of
the clip as it plays. You can click on the Progress Bar to jump to a par-
ticular part of the track being played. Depending on the type of disc
you are playing, additional information may appear.
The Volume Control (Figure 9) increases or decreases the audio level.
With the mouse, move the lever up and down to adjust the volume.
Click the Mute Sound Button to mute the audio. To un-mute the
audio, click the Mute Sound Button again.
Type of
Disc Play
Track Aspect
Ratio
Mute Sound Button
Aspect
Ratio
Repeat
Mode
Play
Time
Figure 8. Display Panel
Figure 9. Volume Control
NetStream 2000 Manual 6.6.2000 6/6/00 2:47 PM Page 20
Table of contents
Other Sigma Designs Video Card manuals

Popular Video Card manuals by other brands

Nvidia
Nvidia FX4500 - Apple MAC Pro QUADRO FX 4500 Video Card... Specifications

Gigabyte
Gigabyte GV-NX88T512HP user manual

EVGA
EVGA GeForce GTX 670 4GB w/Backplate specification

Abit
Abit Siluro GF4 MX Series user manual

TerraTec
TerraTec Mystify 5800 Ultra Product information

Nvidia
Nvidia GEFORCE GT 630 quick guide


