Siku OB120N Installation instructions

OB120N


Handtrockner
1. Schraube
2. Abdeckung
3. Sensor
4. Luftausgang
Abbildung 1
Abbildung 2
Loch für Grundplatte
5. Montagedübel
6. Grundplatte
7. Schraube
8. Justierschraube für
Auslösesensibilität
Abbildung 3
9. Loch in Grundplatte
10. Klemmen für Anspeisung
11. Sensor-Verbindungskabel
12. Schraubenschlüssel
Abbildung 4
Wir danken Ihnen, dass Sie sich für unseren robusten und langlebigen Handtrockner entschieden haben, der über
einen Infrarotsensor betrieben wird. Mit seinem hervorragenden doppelten Hitzeschutz und der stromlinienförmigen
Metallabdeckung sowie einer Luftgeschwindigkeit von 30m/sec und einem Gebläsevolumen von 4,5m³/min trocknet
er die Hände rasch und ezient. Durch die um 360° verstellbare Luftaustrittsdüse lässt sich das Gerät sowohl zum
Trocknen der Hände als auch als Haartrockner verwenden und stellt daher eine ideale Lösung für den Einsatz in Hotels,
in Büros, oder auch in Studentenwohnheimen oder anderen öentlichen Einrichtungen dar.
ERSCHEINUNGSBILD
MONTAGEANLEITUNG
• Zwischen dem Gerät und dem Stromversorgungskabel sollte ein zweipoliger Leitungsschutz-Schalter montiert
werden; die Anschlussklemmen sollten größer als 3mm sein.
• Das Gerät muss geerdet werden.
1. Demontieren Sie die Abdeckung in ordnungsgemäßer Reihenfolge (4) (3) (2) (1) entsprechend der Abbildung 4.
Ziehen Sie nicht zu stark am Verbindungskabel zwischen der Abdeckung und dem Innenteil des Gerätes an, wenn
Sie die Abdeckung abnehmen.
2. Fixieren Sie die Bohrpunkte je nach Größe gemäß den in Abbildung 2 angegebenen Abmessungen und Dimensio-
nen und bohren Sie dann Löcher mit einem Durchmesser von 8mm und einer Tiefe von 35mm.
3. Fixieren Sie die Grundplatte über den Bohrlöchern mit Hilfe der beigepackten Kunststodübel und der Schrauben
(Abbildung 3).
HANDTROCKNER ANWENDUNGSBESCHREIBUNG

Kreislauf für
Infrarotstrahlen,
automatisch
gesteuert
HINWEIS
1. Dieses Gerät muss an einer Stelle installiert werden, die außerhalb der Reichweite von badenden Personen liegt.
2. Bitte verwenden Sie dieses Gerät nicht in der Nähe eines Schwimmbeckens oder einer anderen Badeeinrichtung.
3. Dieses Gerät darf nicht an einer Stelle installiert werden, die von Menschen, welche gerade eine Dusche nehmen,
erreicht werden kann.
4. Aus Gründen der Sicherheit, rufen Sie bitte einen professionellen Wartungsdienst, um ein Stromkabel zu tauschen,
falls dieses defekt ist.
5. Vermeiden Sie jeglichen Wassereintritt in das Innere des Gerätes.
6. Die Lufteingangs- und Luftausgangsönungen sind frei zu halten und dürfen keinesfalls zugedeckt werden.
7. Im Falle einer Fehlfunktion schalten Sie bitte die Stromzufuhr ab und kontaktieren sie unsere Firma, den nächstge-
legenen Fachhändler oder einen qualizierten Elektriker, um das Gerät sicher reparieren zu lassen.
ZUBEHÖR
Ein Exemplar des Benutzerhandbuches
Eine Installationsschablone
Ein Set bestehend aus 4 Schrauben, 1 Schraubenschlüssel und 4 Stück Montagedübel mit einem Durchmesser von 8mm.
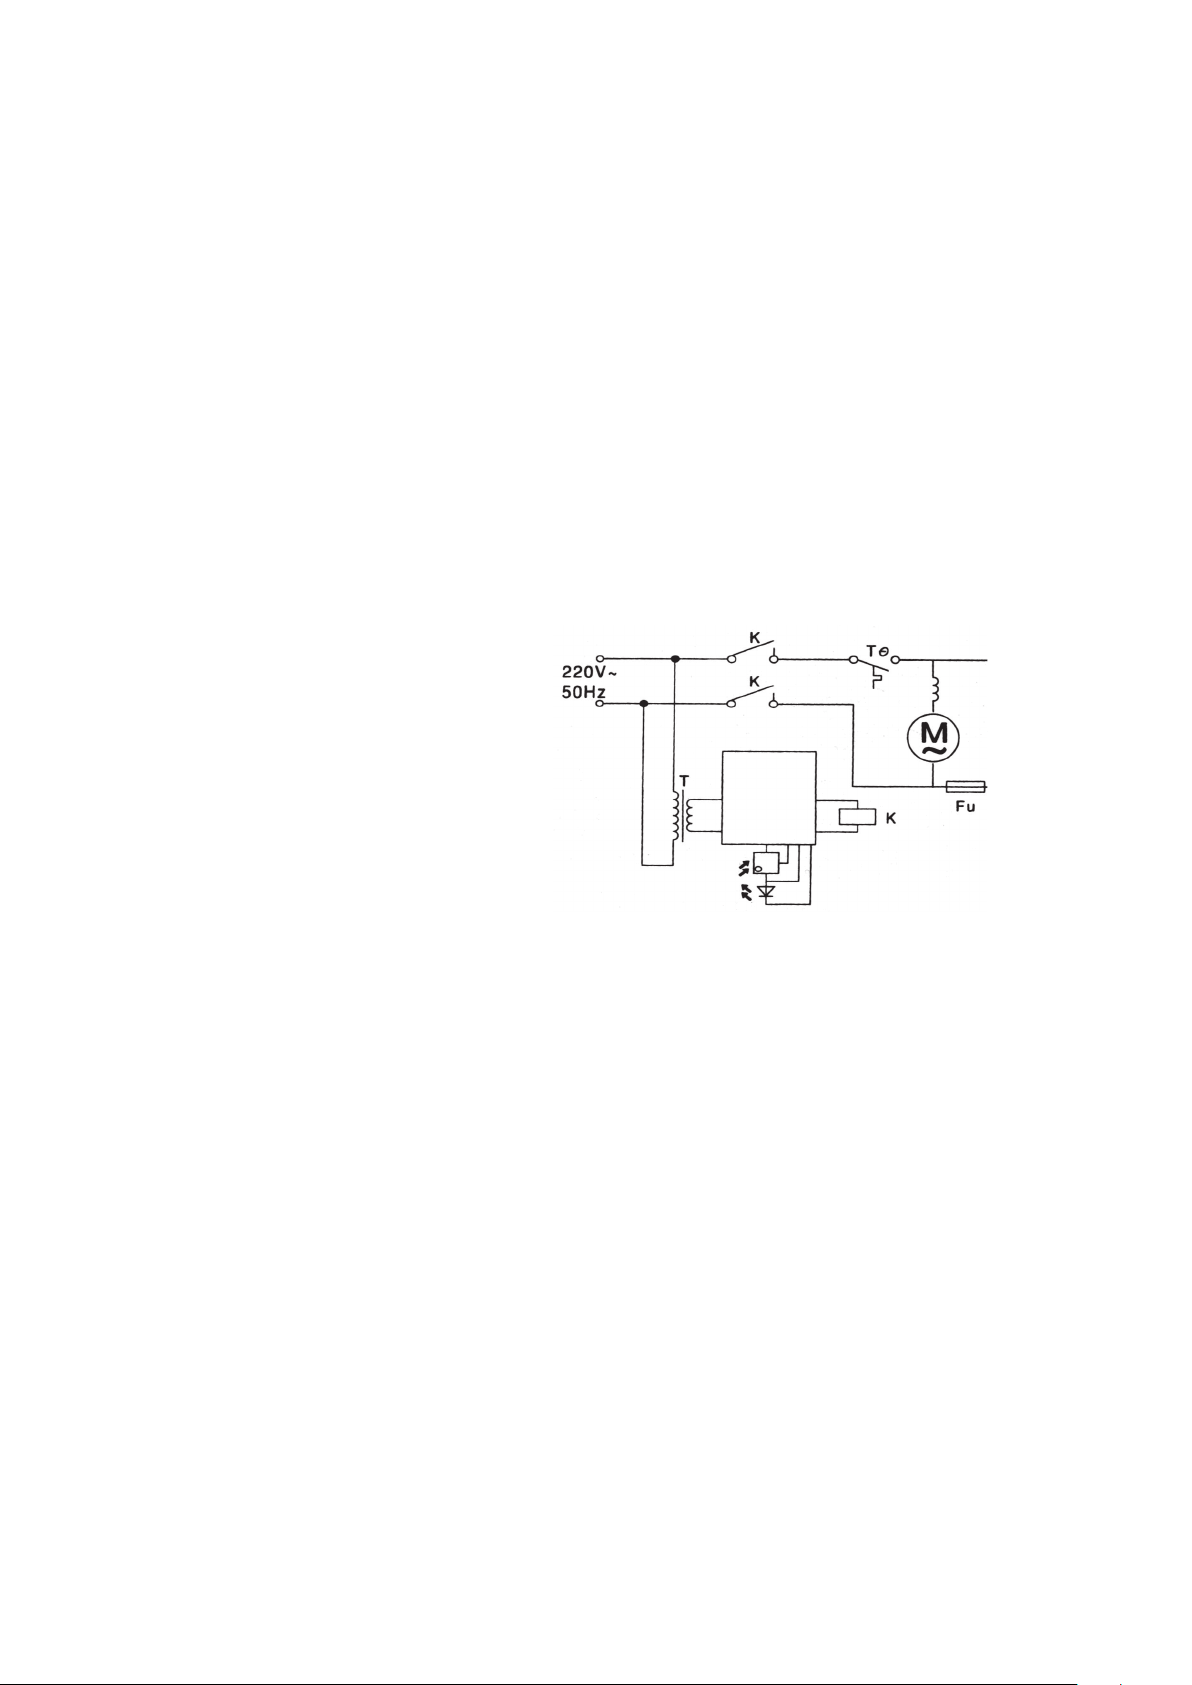
SCHALTDIAGRAMM
4. Fixieren Sie den Handtrockenapparat gemäß Abbildung 4; schließen Sie (1) das Erdungskabel an die Abdeckung
an, und schließen Sie (2) das Sensor-Verbindungskabel an die Grundplatte an. Hängen Sie (3) die Abdeckung an
der Oberseite der Grundplatte ein. Pressen Sie (4) die Abdeckung und die Grundplatte fest aneinander und schrau-
ben Sie die beiden Schrauben unter Zuhilfenahme des mitgelieferten Schraubenschlüssels fest. Schalten Sie die
Stromversorgung ein und das Gerät wird sich automatisch in Betrieb setzen, sobald sich ihm eine Hand nähert.
5. Verdeckte Elektroinstallation: kürzen Sie das elektrische Anspeisungskabel nach Bedarf, führen das Kabel durch
das Loch in der Grundplatte in den Handtrockner und schließen Sie dieses an die Klemmen „N“, „L“ und an die
Erdungsklemme an.
ANWENDUNG
1. Sobald Sie die Installation abgeschlossen haben, schalten Sie den Strom ein und das Gerät wird sich automatisch
in Betrieb setzen.
2. Es beginnt, heiße Luft auf die Hände zu blasen, sobald sich diese dem Gerät in einem Abstand von 0 bis 11 cm
nähern und schaltet sich eine Sekunde nach dem Entfernen der Hände wieder ab. Nach einer Minute ununterbro-
chenem Betrieb schaltet sich das Gerät ebenfalls ab und geht wieder in Betrieb, sobald sich eine Hand dem Sensor
nähert.
• Um den unterschiedlichsten Bedürfnissen Rechnung zu tragen, wurde die Auslösesensibilität des Gerätes werk-
seitig auf die maximale Einstellung festgelegt. Falls das Gerät nach abgeschlossener Installation übermäßig lang
läuft oder sich womöglich gar nicht in Betrieb setzt, adjustieren Sie bitte die Auslösesensibilität entsprechend der
Abbildung 3.
LEISTUNGSBESCHREIBUNG
Stromspannung: 220V≈
Frequenz: 50 Hz
Nennleistung: 2500W
Stromverbrauch: 11,4A
Schutzart: IPX1 (Tropfwasserschutz)

Hand dryer
1.Bolt
2.Cover
3.Sensor
4.Outlet
Fig. 1
Fig. 2
Mounting holes for the
base plate
5. Screw anchors
6. Base plate
7. Screws
8. Adjustment screw for
operational sensitivity
Fig. 3
9. Hole in base plate
10. Terminal for power supply
11. Infrared sensor cable
12. Wrench
Fig. 4
Thank you for having chosen our durable and reliable hand dryer, operated by an infrared sensor. With an air speed of
30m/s and ow-rate of 4.5m3/min, the provision of super heating protection and a streamline metal cover, it will dry
your hands quickly and eciently. Its adjustable 360° nozzle angle enables you to use it not only as a hand, but also
as a hair dryer. It is the ideal choice for hotels, oces, youth hostels or other public or private restrooms, or anywhere
where an ecient, dependable dryer is needed.
GENERAL
INSTALLATION INSTRUCTIONS
• A two-pole safety switch should be hard-wired into the electrical circuit between the dryer and the power supply;
the terminal size should be larger than 3mm
• The dryer must be properly grounded.
1. Disconnect the cover in the (4), (3), (2), (1) order indicated in g. 4. Do not apply too much pulling tension to the
connecting wire between the cover and the inside connection when disconnecting the cover.
2. Determine the correct location for the bolt holes to x the ground plate as shown in g.2, then drill holes of 8mm
diameter, and 35mm depth.
3. Fix the base to the holes using the attached plastic screw anchors and screws (g. 3)
HAND DRYER USER INSTRUCTION

Circuit for
infrared ray,
automatically
controlled
NOTE
1. This dryer must not be installed in a location where water is in close proximity.
2. The dryer must not be installed near a swimming pool or other bathing facilities.
3. The dryer must not be installed in a location that people could reach when taking a shower.
4. For safety reasons a professional maintenance expert must be contacted to change the power line in the event it
becomes damaged.
5. Water must never be allowed to enter the interior of the dryer.
6. The dryer air inlet and outlet must be kept free from any obstacles that might impede the airow.
7. In case of a malfunction, the power supply to the dryer should be switched o and one of the following should be
contacted: our company directly; the nearby dryer supplier; or a qualied electrician, in order to have this applian-
ce safely repaired.
ACCESSORIES
One copy of user manual
One installation template
A package containing 4 screws, one wrench, and 4 plastic screw anchors of 08mm diameter.
WIRING DIAGRAM
4. Wire the dryer as shown in g. 4, (1), Connect the ground wire to the cover (2), then connect the infrared sensor
cable to the base. Next, place (3) the cover on the top of the base. (4) Press the base and the cover rmly together,
and screw in place two screws with the help of the accessory wrench provided.
Close the safety switch and the dryer will start automatically as soon as a hand approaches.
5. Cover installation: After rst cutting o the power supply pass the wire into the dryer through the base hole, and
connect it to the terminals N and L, and to the ground terminal.
USING THE DRYER
1. As soon as the installation is completed, switch on the power supply and the dryer will work automatically.
2. Heated air will blow onto the hands as soon as soon as they approach within a distance of from 0 to 11 cm of the
dryer which will cease working one second after the hands have been moved away. It will also stop after one mi-
nute of continuous operation. Bringing the hands close again will restart the dryer.
• In order to meet a range of conditions the operating sensitivity of the dryer is factory adjusted to the highest
point. If the dryer runs too long or does not start to work after the initial installation is completed, it should be
adjusted according to g 3.
SPECIFICATION
Voltage: 220V
Frequency: 50Hz
Rated power: 2500W
Current: 11.4A
Water protection class: IPX1

Håndtørrer
1. Skrue
2. Afdækning
3. Sensor
4. Luftudgang
Figur 1
Figur 2
Hul til bundplade
5. Monteringsdybel
6. Bundplade
7. Skrue
8. Justeringsskrue til
udløserfølsomhed
Figur 3
9. Hul i bundplade
10. Klemmer til strømtilførsel
11. Sensorforbindelseskabel
12. Skruenøgle
Figur 4
Vi takker dig for, at du har besluttet dig vores robuste og holdbare håndtørrer, der betjenes via en infrarød sensor. Med
en lufthastighed på 30 m/sek, sit fremragende, dobbelte varmeskjold og strømlinede metalafdækning og et blæser-
volumen på 270m³/t tørrer den hænderne hurtigt og eektivt. Med den justerbare 360° luftudblæsningsvinkel kan
enheden bruges både til at tørre hænder samt som hårtørrer og er derfor en ideel løsning til brug på hoteller, kontorer,
eller endda i kollegier eller andre oentlige faciliteter.
UDVENDIG FREMTONING
MONTERINGSVEJLEDNING
• Mellem enheden og strømforsyningskablet skal der monteres en to-polet maksimalafbryder. Tilslutningsklemmer-
ne skal være større end 3 mm.
• Enheden skal være jordet.
1. Afmontér afdækningen i den rigtige rækkefølge (4) (3) (2) (1) i overensstemmelse med gur 4. Træk ikke for hårdt i
forbindelseskablet mellem afdækningen og den indvendige del af enheden, når afdækningen tages af.
2. Fiksér borestederne alt efter størrelse i overensstemmelse med de dimensioner, der er anført i gur 2 og bor deref-
ter huller med en diameter på 8 mm og en dybde på 35 mm.
3. Fiksér bundpladen over borehullerne med de medfølgende plastikdybler og skruer (gur 3).
HÅNDTØRRER ANVENDELSESBESKRIVELSE

Kredsløb til
infrarøde stråler,
styres auto-
matisk
HENVISNING
1. Denne enhed skal installeres på et sted, der er uden for rækkevidde af personer, der bader.
2. Brug helst ikke denne enhed ikke i nærheden af en swimmingpool eller en anden badefacilitet.
3. Denne enhed må ikke monteres i et sted, så den kan nås af personer, der lige er ved at tage et brusebad.
4. For at undgå risicisi, så ring venligst til en professionel servicevirksomhed, for at få udskiftet et strømkabel, hvis et
sådant er defekt.
5. Undgå nogen som helst vandstråler direkte på enheden.
6. Luftindtags- og udtagsåbningerne skal holdes fri og må under ingen omstændigheder være dækket til.
7. I tilfælde af en funktionsfejl, skal der slukkes for strømmen og vort rma skal kontaktes, den nærmeste forhandler
eller en kvaliceret elektriker med henblik på at få enheden repareret.
TILBEHØR
Et eksemplar af brugervejledningen
En installationsskabelon
Et sæt består af 4 skruer, 1 svensknøgle og 4 monteringsdybler med en diameter på 8 mm.
LEDNINGSDIAGRAM
4. Fastgør håndtørreapparatet som vist i gur 4. Slut (1) jordkablet til afdækningen, og tilslut (2) sensortilslutnings-
kablet til bundpladen. Hæng (3) afdækningen på oversiden af bundpladen. Tryk (4) afdækningen og bundpladen
fast sammen, og spænd de to skruer til ved hjælp af den medfølgende skruenøgle. Tænd for strømforsyningen, og
enheden vil automatisk gå i gang, så snart der nærmer sig en hånd.
5. Skjult elektrisk installation: Afkort det elektriske strømkabel efter behov, før kablet gennem hullet i bundpladen på
håndtørreren og tilslut det til klemmerne „N“, „L“ og til jordklemmen.
ANVENDELSE
1. Så snart installationen er fuldført, skal der tændes for strømmen og enheden vil automatisk gå i gang.
2. Den begynder at blæse varm luft på hænderne, så snart disse nærmer sig enheden i en afstand fra 0 til 11 cm, og
den slukker af sig selv ét sekund efter at hænderne igen er ernet. Efter et minuts kontinuerlig drift, slukkes appa-
ratet også og det går i gang igen, så snart der nærmer sig en hånd mod sensoren.
• For at imødekomme de mest forskelligartede behov, blev enhedens udløserfølsomhed indstillet til den maksimale
indstilling. Hvis enheden kører overdrevent længe efter installationen eller den måske slet ikke går i gang, så justér
udløserfølsomheden som vist i gur 3.
BESKRIVELSE AF YDEEVNE
Strømspænding: 220V≈
Frekvens: 50 Hz
Nominel eekt: 2500W
Strømforbrug: 11,4A
Beskyttelsestype: IPX1
(Beskyttelse mod vanddryp)

Vysoušeč
rukou
1. Šroub
2. Kryt
3. Senzor
4. Výstup vzduchu
Obr. 1
Obr. 2
Otvor pro základní desku 5. Montážní hmoždinky
6. Základní deska
7. Šroub
8. Justovací šroub pro nastavení
citlivosti
Obr. 3
9. Otvor v základní desce
10. Napájecí svorky
11. Propojovací kabel čidla
12. Klíč
Obr. 4
Děkujeme Vám, že jste se rozhodli pro náš robustní vysoušeč rukou s dlouhou životností, který je ovládaný infračer-
veným senzorem. S rychlostí proudění vzduchu 30 m/s, vynikající dvojjitou ochranou proti přehřátí, aerodynamickým
kovovým krytem a ventilátorem se vzduchovým výkonem 270 m³/h vysuší ruce rychle a efektivně. Díky nastavitelné-
mu úhlu výstupu vzduchu je možné přístroj používat jak k vysoušení rukou, tak i vlasů, a je proto ideálním řešením pro
využití v hotelích, kancelářích či ve studentských ubytovnách nebo jiných veřejných zařízeních.
VNĚJŠÍ POPIS
NÁVOD K INSTALACI
• Mezi přístrojem a napájecím kabelem musí být nainstalován dvoupólový jistič; svorky musí být větší než 3 mm.
• Přístroj musí být uzemněn.
1. Odstraňte kryt ve správném pořadí, (4) (3) (2) (1), podle obr. 4. Při odnímání krytu netahejte příliš silně za spojovací
kabel mezi krytem a vnitřní části přístroje.
2. Vyznačte si body pro navrtání otvorů podle rozměrů uvedených na obrázku 2 a pak vyvrtejte otvory o průměru 8
mm a hloubce 35 mm.
3. Připevněte základní desku přes otvory pomocí přiložených plastových hmoždinek a šroubů (obr. 3).
NÁVOD K POUŽITÍ VYSOUŠEČE RUKOU
Bezkontaktní,
automatické
spínání pomocí
infračervených
paprasků
UPOZORNĚNÍ
1. Tento spotřebič musí být instalován v místě, které je mimo dosah koupajících se osob.
2. Nepoužívejte tento přístroj v blízkosti bazénu či jiného koupacího zařízení.
3. Tento spotřebič nesmí být nainstalován v místě, které může být v dosahu sprchujících se osob.
4. Dojde-li k poškození napájecího kabelu, zavolejte profesionální servis, abyste předešli možnému ohrožení.
5. Zabraňte jakémukoliv přímému kontaktu přístroje s vodou.
6. Otvory pro přívod a vyfukování vzduchu musí být čisté a nesmí být zakryté.
7. V případě poruchy vypněte napájení a kontaktujte kvůli opravě přístroje naši společnost nebo nejbližšího prode-
jce či kvalikovaného elektrikáře.
PŘÍSLUŠENSTVÍ
Návod k použití
Schéma montáže
Sada sestávající ze 4 šroubů, klíče a 4 montážních hmoždinek o průměru 8 mm.
SCHÉMA ZAPOJENÍ
4. Připevněte vysoušeč podle obr. 4; připojte (1) uzemňovací kabel ke krytu a rovněž připojte (2) připojovací kabel
čidla k základní desce. Nasaďte (3) kryt na horní stranu základní desky. Přitiskněte (4) kryt a základní desku těsně k
sobě a utáhněte pevně oba šrouby pomocí přiloženého klíče. Zapněte napájení a přístroj se automaticky zapne,
jakmile se k němu přiblíží ruce.
5. Elektroinstalace pod omítkou: zkraťte napájecí kabel podle potřeby, protáhněte ho otvorem v základní desce do
vysoušeče a připojte ho ke svorkám „N“, „L“ a k zemnící svorce.
POUŽITÍ
1. Po dokončení instalace zapněte napájení a přístroj se automaticky uvede do provozu.
2. Jakmile se k přístroji přiblíží ruce na vzdálenost 0 -11 cm, začne na ně foukat horký vzduch. Vypne se vteřinu poté,
co se ruce vzdálí. Po minutě nepřetržitého provozu se přístroj rovněž vypne a spustí se znovu, jakmile se ruce přib-
líží k čidlu.
• Aby přístroj vyhověl nejrůznějším potřebám, byla jeho citlivost nastavena na maximum. Pokud přístroj po instalaci
běží příliš dlouho, nebo se snad vůbec neuvede do provozu, upravte jeho citlivost podle obr. 3.
SPECIFIKACE VÝKONU
Napětí: 220V≈
Frekvence: 50 Hz
Jmenovitý výkon: 2500W
Spotřeba elektrické energie: 11,4A
Druh ochrany: IPX1 (ochrana proti kapající vodě)


Siku Vertriebsges.m.b.H
Bundesstraße 5, A-2102 Bisamberg | Tel +43 (0)2262 61 521, Fax +43 (0)2262 61 520 | email office@siku.cc www.siku.cc
Table of contents
Languages:
Other Siku Dryer manuals

Popular Dryer manuals by other brands


Midea
Midea MDD160-V062/F01-US1305 Service manual

Whirlpool
Whirlpool WGD500RLW user manual

KitchenAid
KitchenAid Ensemble KGHS01PMT/WH Technical education

Alliance Laundry Systems
Alliance Laundry Systems LWS01M series operating instructions

Thoreson-McCosh
Thoreson-McCosh HMI/T-3 instruction manual

AEG
AEG TR822N94P user manual

Electrolux Professional
Electrolux Professional TD6 6 installation manual

Mediclinics
Mediclinics M23A Installation and operating manual

Miele
Miele T 1565C CONDENSER DRYER Operation manual

LG
LG RH90V3AV0W owner's manual

LG
LG DLEX3370 series owner's manual

Bosch
Bosch WTR86T9ESN Installation and operating instructions