Sinbo SSW 101 User manual

SSW 101 M‹N‹ D‹K‹fi MAK‹NASI
KULLANIM KILAVUZU
TR
EN
AR
RU

- 1 -
G‹R‹fi
This appliance is not intended for use by persons (including children) with reduced physical,
sensory or mental capabilities, or lack of experience and knowledge, unless they have
been given supervision or instruction concerning use of the appliances by a person
responsible for their safety. Children should be supervised to ensure that they do not play
with the appliance.
This appliance is intended to be used in household and similar applications such as:
- staff kitchen areas in shops, offices and other working environments;
- farm houses;
- by clients in hotels, motels and other residential type environments;
- bed and breakfast type environments.
Bu ürün (çocuklar dahil ) fiziksel hassasiyeti az, zihinsel olarak yetersiz, deneyimsiz ve
yeterli bilgiye sahip olmadan yada kendilerinin güvenli¤inden sorumlu olan kifliler tarafından
bu ürünü kullanmak için gerekli talimatlar verilmemifl kiflilerin kullanımına uygun de¤ildir.
De¤erli Müflterimiz,
Ürün seçiminde S‹NBO'yu tercih etti¤iniz için teflekkür ederiz.
Bu dikifl makinesiyle dikifl keyfi art›k parmaklar›n›z›n ucunda. Giysileri, yast›k ya da
perdeleri onarmak ve yeni eflyalar dikmek art›k büyük makinelerdeki kadar kolay ve
zahmetsiz. “Ben yapt›m” demenin keyfini yaflay›n.
Uzun ve verimli bir kullan›m için cihaz› kullanmadan önce bu k›lavuzu özellikle güvenlik
talimatlar›na dikkat ederek okuman›z› ve devaml› suretle saklaman›z› tavsiye ederiz.
Sayg›lar›m›zla,
Sinbo Küçük Ev Aletleri
Tasarruf Konusunda ‹puçlar›:
• Büyüyen çocuklar›n giysilerini onar›n›z/tadil ediniz. Aplike ya da dekoratif kurdeleler
dikiniz.
• ‹ndirimden ald›¤›n›z kumafllarla kendi ev eflyalar›n›z› üretebilirsiniz.
• Kumafllar› dikerek kendine has yatak odas› tak›mlar› üretebilirsiniz (ör: örtüler, yast›k
k›l›flar› ve perdeler).
• De¤iflik tarzlarda masa örtüleri ve peçeteler dikebilirsiniz.
• Bölgenizdeki kumafl ma¤azas›n›n iletiflim listesine kay›t olabilirsiniz. Kumafl çeflitleri
ve indirimlerden erken haber alabilirsiniz. Elbise patronlar› bulmaya çal›flabilirsiniz.

- 2 -
D‹KKAT!!
Ürünün üzerinde bulunan iflaretlemelerde veya ürünle verilen di¤er bas›l› dökümanlarda
beyan edilen de¤erler, ilgili standartlara göre laboratuar ortam›nda elde edilen
de¤erlerdir.Bu de¤erler, ürünün kullan›m ve ortam flartlar›na göre de¤iflebilir.
DC 6V / 800mA
Bu cihaz kalite belgesine haizdir.
EN 61000-6-1, EN61000-6-3, EN61000-3-2, EN61000-3-3
Kullanım Ömrü 7 yıldır.
Made in China
‹mal Y›l› : 2010
- TEDAR‹KÇ‹ F‹RMA / EXPORTER -
United Favour Development Limited
Unit B, 10/F Lee May Building 788-790
Nathan Road, Mongkok, Kowloon, HK.
- UYGUNLUK BEYANI / CE -
Hong Kong Timeway Technology
Development Limited
Rm. 1805, 18/F, Wu Sang House, Nathan Rd.
Mongkok, Kln. Hong Kong
EMC0407056
EEE Yönetmeli¤ine uygundur.
TEKN‹K ÖZELL‹KLER‹

- 3 -
1. AÇMA/KAPAMA Dü¤mesi
2. H›z Dü¤mesi
3. Geri Sarma Mili
4. El Tekerle¤i
5. K›sa Makara Mili
6. Üst K›sa Makara
7. ‹plik Geçirme K›lavuzu 1
8. ‹plik Geçirme K›lavuzu 2
9. ‹plik Geçirme K›lavuzu 3
10. ‹plik Geçirme K›lavuzu 4
11. Üst Mil
12. ‹plik Gerginli¤i Ayar Dü¤mesi
13. ‹plik Kelepçe Yay›
14. ‹plik Kelepçesi
15. Tansiyon Kolu
16. ‹¤ne Çubu¤u
17. Bask› Aya¤› Kolu
18. Bask› Aya¤› Tutucusu Çubu¤u
19. Bask› Aya¤› Tutucusu Yay›
20. Son ‹p Deli¤i
21. Bask› Aya¤›
22. ‹¤ne ‹plik Geçirme K›lavuzu
23. ‹¤ne Kelepçe Vidas›
24. ‹¤ne
25. Mekik Kapa¤› Levhas›
26. Adaptör Girifli
27. Ayak Pedal› Girifli
28. Mekik Kapa¤› Dü¤mesi
29. Mekik
30. Güç Adaptörü
31. Ayak Pedal›
C‹HAZIN TANITIMI

- 4 -
ÖNEML‹ GÜVENL‹K UYARILARI
• Bakım, Onarım ve Kullanımda Uyulması Gereken Kurallar
Elektrikli cihaz kullan›lmadan önce afla¤›da belirtilen temel güvenlik kurallar›na mutlaka
uyulmas› gerekmektedir:
Tan›mlar
Afla¤›daki uyar›lar kullan›ld›klar› yerlerde güvenlik, kaza ve tehlike derecelerini
belirtmektedirler.
Bu güvenlik uyar›s› simgesidir. Yaralanma riski hakk›nda kullan›c›y›
uyar›r. Bu simgeyle gösterilen tüm uyar› mesajlar›na riayet ederek olas› yaralanma ya
da ölüm olaylar›n›n önüne geçiniz.
TEHL‹KE -Kullan›c›y› önüne geçilmedi¤i takdirde ölüm ya da ciddi yaralanmayla
sonuçlanabilecek durumlar hakk›nda uyar›r. Bu uyar› ibaresinin kullan›m› yaln›zca çok
tehlikeli durumlarla s›n›rland›r›lm›flt›r.
UYARI - Kullan›c›y› önüne geçilmedi¤i takdirde ölüm ya da ciddi yaralanmayla
sonuçlanabilme potansiyeli bar›nd›ran durumlar hakk›nda uyar›r.
D‹KKAT - Kullan›c›y› önüne geçilmedi¤i takdirde hafif/orta derece yaralanmayla
sonuçlanabilme potansiyeli bar›nd›ran durumlar hakk›nda uyar›r.
ÖNEML‹ - Kiflisel yaralanmaya yol açmayacak yaln›zca ürünün ve/ya da eflyan›n hasar
görmesine neden olabilecek durumlar› aç›klar.
Bu cihaz› ya da baflka herhangi bir elektrikli cihaz› kullan›rken mutlaka bu temel güvenlik
uyar›lar›n› dikkate al›n›z.
UYARI
Bo¤ulma Tehlikesi - Küçük parçalar içermektedir. 3 yafl›ndan küçük çocuklardan uzak
tutulmal›d›r.
C‹HAZI KULLANMADAN ÖNCE TÜM TAL‹MATI OKUYUNUZ.
UYARI - Yang›n, elektrik floku ya ciddi yaralanma riskini asgari düzeye çekmek için:
• Bu cihaz ticari amaçl› olmayan kumafl dikimi için tasarlanm›flt›r. Ürünü baflka amaçlarla
kullanmay›n›z.
• Ürünü çocuklar›n ve ev hayvanlar›n›n eriflemeyece¤i bir yerde tutunuz. Bu ürün oyuncak
de¤ildir ve çocuklar taraf›ndan kullan›lmamal›d›r. Bu cihaz çocuklar›n ya da ev hayvanlar›n›n
yak›n›nda kullan›l›rken çok dikkatli olunmal›d›r.
• Kullan›m s›ras›nda cihaz›n bafl›ndan ayr›lmay›n›z. Cihaz kullan›lm›yorken ya da flarj
oluyorken ya da i¤neden iplik geçiriliyorken fiflten çekili ve pilleri ç›kart›lm›fl olmal›d›r.
• Üretici taraf›ndan tavsiye edilmeyen ya da sat›lmayan aksesuarlar› kullanmay›n›z.
• Bu ürün dikifl makinesine özel bir Güç Adaptörü (ürünle birlikte gelen) kullanmaktad›r.

- 5 -
ÖNEML‹ GÜVENL‹K UYARILARI
Ürün düzgün bir flekilde monte edilmediyse ürünü prize takmaya kalk›flmay›n›z. Yaln›zca
ürünle birlikte gelen Güç Adaptörünü kullan›n›z.
• Ürünü suya ya da herhangi baflka bir s›v›ya sokmay›n›z.
• Güç Adaptörünü (birlikte gelen) kesinlikle ›slak elle, ç›plak ayakla ya da suyun içinde
ya da ›slak yüzeyde duruyorken kullanmaya kalk›flmay›n›z. Ürünü lavabo ya da içi su/s›v›
dolu kaplar›n içine düflebilecekleri flekilde konumland›rmay›n›z. Ürün suya ya da baflka
bir s›v›ya düfltü¤ü takdirde suyun/s›v›n›n içine elinizi sokmaya kalk›flmay›n›z. Cihaz›
sudan/s›v›dan ç›karmadan önce fiflini derhal prizden çekiniz.
• Güç Kablosunu s›cak yüzeylerden uzak tutunuz.
• Cihaz› herhangi bir parça takmadan ya da ç›karmadan önce fiflten çekiniz ve pillerini
ç›kar›n›z.
• Ürünün adaptörünü prizden ç›karmak için fifli kavrayarak çekiniz; kablodan çekmeye
kalk›flmay›n›z. Ürün adaptörüne ba¤lanan Güç Kablosunun soyulmamas› ya da kopmamas›
için ezilmemesini sa¤lay›n›z.
• Güç Kablosu kopmufl, hasarl› ya da telleri ç›km›fl durumdayken ürünü Adaptörle
çal›flt›rmay›n›z.
• Güç Kablosunu ya da Fifli suya ya da baflka s›v›lara maruz b›rakmay›n›z ya da içine
sokmay›n›z.
• Cihaz› kesinlikle Güç Kablosu ya da Fifli hasar görmüfl, ar›zal› ya da kendisi ar›zal›, yere
düflürülmüfl ve hasarl› bir adaptör kullanarak kullanmaya kalk›flmay›n›z. Bu üründe
kullan›c› taraf›ndan onar›labilecek hiçbir parça bulunmamaktad›r. Ürünün ana motor
muhafazas›n› kesinlikle açmay›n›z. Mekanizma fabrikada ayarlanm›flt›r. Bu ürünü kendi
bafl›n›za incelemeye ya da onarmaya kalk›flmay›n›z. Her türlü servis ifllemi yaln›zca
ehliyetli servis personeli taraf›ndan gerçeklefltirilmelidir; ürünü inceleme ve onar›m için
tercih etti¤iniz bir dikifl makinesi onar›m merkezine götürünüz.
UYARI: Yaralanma riskini asgari düzeye çekmek için:
• Bu ürün kapal› alanda, ticari olmayan flekilde, endüstriyel olmayan flekilde, yaln›zca ev
içi kullan›ma yönelik olarak tasarlanm›flt›r.
• Adaptörün Güç Kablosunun üzerine bas›lacak ya da tak›l›nacak flekilde sarkmas›na izin
vermeyiniz (ör: masa ya da tezgah kenar›ndan).
• Bu makineyi birinin üzerinde bulunan kumafl›/giysiyi dikmek için kullanmay›n›z.
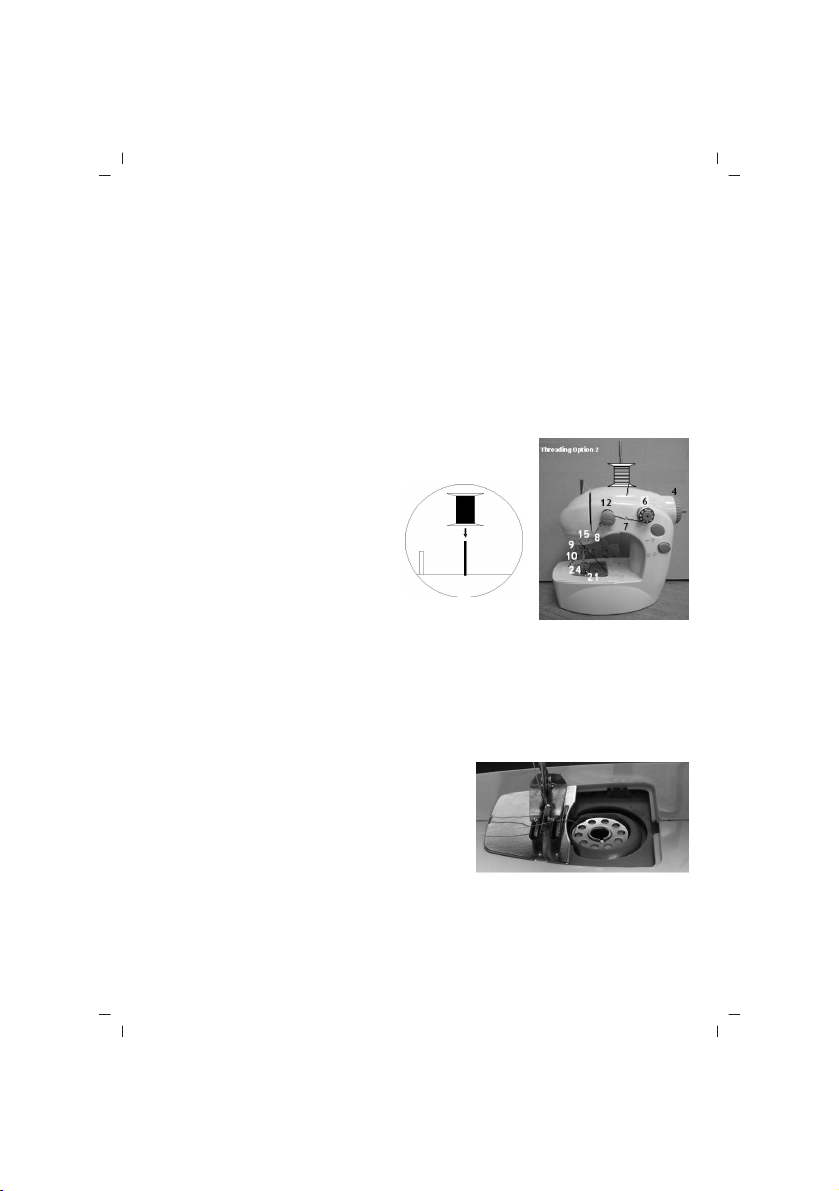
• Dikifl yapmaya bafllamadan önce ipin do¤ru flekilde tak›lm›fl oldu¤undan mutlaka emin
olunuz. ‹pin düzgün tak›lmamas›, Meki¤in ya da Mekik Kutusunun hatal› flekilde tak›lmas›
cihaz›n ar›zalanmas›na neden olabilir.
• ‹¤nenin k›r›lmas›n› ve ürünün zarar görmesini önlemek için dikifl yaparken kumafl›
çekmeyiniz yaln›zca nazikçe Bask› Aya¤›n›n alt›na do¤ru yönlendiriniz.
• Pil ömrünün uzun olmas› için makine kullan›lm›yorken pilleri içinden ç›kar›n›z. Dikifl
ifllemlerinin yar›m kalmamas› için yan›n›zda mutlaka yedek pil bulundurunuz.

- 6 -
P‹LLER‹ TAKMA VE KULLANMA
KULLANIM
‹plik Geçirme:
‹plik Geçirme Seçene¤i 1: “‹plik Geçirme Seçene¤i 1” resmine
bak›n›z:
1. Üst K›sa Makaray› Tak›n›z (6).
• K›sa Makara Milini, Yayla (5) dikkatli bir flekilde çekiniz.
UYARI: Yay f›rlayabilece¤i için dikkatli olunuz.
• Üst K›sa Makaray› (6) K›sa Makara (5) üzerine yerlefltiriniz,
Yay› K›sa Makaran›n ucuna geri tak›n›z ve daha sonra K›sa
Makaray› Dikifl Makinesine tak›n›z.
2. ‹plik geçirme ifllemine ipli¤i Üst K›sa Makaradan (6) al›p
‹plik K›lavuzu 1'den (7) geçirip makinenin önüne getirerek bafllay›n›z.
3. ‹pli¤i ‹plik Gerginli¤i Ayar Dü¤mesinin (12) alt›na getiriniz.
NOT: Dikifllerin düzgün olmas› için ipli¤in, dikifl s›ras›nda ipli¤in gerginli¤ini kontrol eden
iplik Gerginli¤i Ayar Dü¤mesi arkas›ndaki iki disk aras›na sokulmas› gerekmektedir.
4. ‹pli¤i ‹plik K›lavuzu 2'den (8) geçirip makinenin önüne do¤ru çekiniz.
5. ‹pli¤i Tansiyon Kolundaki (15) delikten geçiriniz (ipli¤i daima makinenin önüne do¤ru
geçiriniz).
6. ‹pli¤i afla¤› do¤ru çekiniz ve ‹plik K›lavuzu 3'ten (9) geçiriniz ve daha sonra ipli¤i i¤nenin
solunda, üstte bulunan ‹plik K›lavuzu 4'ten sokunuz.
NOT: ‹pli¤i takabilmek için ipli¤in pay› yaklafl›k 15 santimetre olmal›d›r. ‹pi nazikçe çekiniz.
Zorlanma varsa ipli¤i çekerken El Tekerle¤ini (4) hafifçe geri ve ileri do¤ru döndürünüz.
Bu sayede iplik daha kolay bir flekilde çekilecektir.
UYARI: Piller yaln›zca yetiflkinler taraf›ndan tak›lmal›d›r. Pil Bölmesi Kapa¤›, Pil Bölmesine
ürünün kullan›m talimat›nda belirtilen flekilde tak›l› de¤ilse çocuklar›n bu ürünü
kullanmalar›na izin vermeyiniz.
• Üreticinin güvenlik ve kullan›m talimat›na uyunuz.
• Pilleri çocuklardan ve hayvanlardan uzak tutunuz.
• Kullan›lm›fl pillerle yeni pilleri, ya da farkl› tiplerdeki ya da boyutlardaki pilleri bir arada
kullanmay›n›z.
• Pilleri pil yuvas›n›n içinde gösterilen do¤ru polariteyi (+/-) dikkate alarak tak›n›z. Pillerin
kutuplar›n›n yanl›fl olarak tak›lmas› yaralanmaya ve/ya da hasara neden olabilir.
• Tükenmifl ya da boflalm›fl pilleri üründen ç›kar›n›z. Ürünü uzun bir süre boyunca
kullanmayacaksan›z pilleri mutlaka ç›kar›n›z.
• Pilleri kesinlikle atefle atmay›n›z. Pilleri atefle ya da di¤er ›s› kaynaklar›na maruz
b›rakmay›n›z.
• Tükenmifl/boflalm›fl pilleri yürürlükte olan kanunlara göre elden ç›kar›n›z ya da geri
dönüflümlerini sa¤lay›n›z. Daha ayr›nt›l› bilgi için yerel kat› at›k yönetimi yetkilileriyle
ba¤lant›ya geçiniz.
BU TAL‹MATI BAfiVURU KAYNA⁄I OLARAK MUHAFAZA ED‹N‹Z.

- 7 -
KULLANIM
Yeterli iplik pay› b›rak›ld›ktan sonra El Tekerle¤ini (4) döndürerek i¤ne deli¤ine rahatl›kla
ulaflabilmek için ‹¤nenin (24) en yüksek pozisyonda durmas›n› sa¤lay›n›z (parçalar›n
konumlar› için “Parçalar” bölümüne bak›n›z).
7. ‹pli¤in ucunu ‹plik Geçirme Seçene¤i 1'de gösterilen flekilde ‹¤nenin (24) deli¤inin
içinden makinenin önünden arkas›na do¤ru geçiriniz [Gerekiyorsa bir ‹¤neye ‹plik Geçirme
Aparat› (ayr›ca temin edilir) kullan›n›z].
8. Dikifl Makinesinin arkas›ndaki Bask› Aya¤› Kolunu (17) yukar› iterek Bask› Aya¤›n› (21)
kald›r›n›z.
9. ‹¤neden (24) yaklafl›k 25 santimetre iplik geçiriniz. (Daha önce aç›kland›¤› üzere ‹pli¤in
kolayl›kla çekilebilmesi için El Tekerle¤ini (4) hafifçe geri ve ileri do¤ru döndürmeniz
gerekebilir.) ‹pli¤i kendinizden makinenin arkas›na do¤ru çekerek Bask› Aya¤›n›n (21)
alt›ndaki zemine b›rak›n›z.
‹plik Geçirme Seçene¤i 2:
Bu iplik geçirme seçene¤i için ‹plik
Geçirme Seçene¤i 1'de aç›klanan yöntemi
1. ad›m yerine Üst Mile (11) ‹plik Makaras›
takarak uygulay›p ipli¤i resimde
gösterilen flekilde makineye tak›n›z.
NOT: Üst Mili (11) uzatmak için mili yerine
kilitlenene kadar yukar› do¤ru çekiniz.
‹ki-Renkli, Dekoratif Üst Dikifl:
Dekoratif iki renkli üst dikifl yapmak için makineye iki farkl› renkte iplik geçirmeniz
gerekmektedir, bir iplik, ‹plik Makaras›ndan ve di¤er renkteki iplik Üst K›sa Makaradan
(6) gelmelidir.
NOT: ‹plik Geçirme Seçene¤i 1 ve ‹plik Geçirme Seçene¤i 2'ye iliflkin talimat› birlikte
uygulayarak iki ipli¤i de makineye geçirtiniz.
Mekik Yerlefltirme:
1. Mekik Kapa¤› Levhas›n› (25) ç›karmak için Mekik
Kapa¤› Dü¤mesine (28) bas›n›z ve Mekik Kapa¤›
Levhas›n› (25) kald›r›n›z.
2. Bofl Meki¤i (29) ç›kar›n›z ve tercih etti¤iniz renkteki
iple sar›lm›fl olan meki¤i (29) tak›n›z. ‹plikte yaklafl›k
25 santimetre pay b›rak›n›z ve bunu resimde görülen
flekilde Bask› Aya¤›n›n (21) alt›na yerlefltiriniz.
Notlar:
• En iyi dikifl sonuçlar›n› elde etmek için mekikteki iplik mutlaka yukar›daki iplikle ayn›
a¤›rl›k ve kal›nl›kta olmal›d›r.

• Meki¤in ipini sarmaya iliflkin talimat için “Mekik Sarma” bölümüne bak›n›z.
3. El Tekerle¤ini (4) ters saat yönünde çeviriniz (kendinize do¤ru). ‹¤ne (24) afla¤› inecek
ve Meki¤in ipli¤ini yakalayacakt›r. El Tekerle¤ini (4) ‹¤ne (24) tamamen inene ve yeniden
en yüksek noktaya ç›kana kadar çeviriniz. ‹¤ne (24) yeniden afla¤›ya inmeye bafllad›¤›
zaman durunuz.
4. Bask› Aya¤›n› (21) kald›r›n›z ve pay b›rak›lm›fl makara ipli¤ini makinenin önüne getiriniz.
Nazikçe yukar› çekti¤inizde Meki¤in ipini yakalam›fl oldu¤unu göreceksiniz. ‹ki ipi de
Dikifl Makinesinin arkas›na (kendinizden uza¤a) do¤ru çekiniz ve Bask› Aya¤›n›n (21) alt›na
b›rak›n›z.
5. Mekik Bölmesinin rayl› kapa¤›n› geri tak›n›z ve hafifçe bast›rarak yerine yerlefltiriniz.
UYARI:
• ‹pin makineye düzgün tak›lmamas›, makinenin ve/ya da dikilen kumafl›n zarar görmesine
neden olabilir.
• Mekik Kapa¤› Levhas›n›n (25) k›r›lmas›n› önlemek için özellikle yerine iterken çok dikkatli
bir flekilde hareket ediniz.
NOT: ‹plik geçirme iflleminin düzgün flekilde tamamlanm›fl olmas› çok önemlidir. Projenizi
dikmeye bafllamadan önce numune bir kumafl parças› üzerinde birkaç dikifl denemesi
yap›n›z.
Dikifl:
220 Volt AC Adaptörünün Kullan›m›:
a) Güç Adaptörünü (30) ürünün arkas›nda
bulunan Adaptör Girifline (26) tak›n›z.
b) AÇMA/KAPAMA dü¤mesinin (1) KAPALI
konumda oldu¤undan emin olunuz ve Güç
Adaptörünü 120 volt AC prize tak›n›z.
NOT: Cihaz KAPALI konumdayken
AÇMA/KAPAMA Güç Dü¤mesi (1) d›flar›da
kal›r. Cihaz AÇIK konumdayken
AÇMA/KAPAMA Güç Dü¤mesi (1) cihazla
ayn› hizada kal›r.
Pille Kullan›m:
Pilleri yerlefltirmeden önce AÇMA/KAPAMA Güç Dü¤mesinin (1) KAPALI konumda
oldu¤undan emin olunuz. Ürünün alt›nda bulunan pil bölmesine dört adet “AA” boyutunda
pil (ayr›ca sat›n al›nacak) tak›n›z. Pil yuvas›n›n içerisinde bulunan +/- iflaretlerini dikkate
al›n›z.
D‹KKAT: Bu ürün AÇMA/KAPAMA Güç Dü¤mesi (1) AÇIK konumuna getirildi¤i anda
çal›flmaya bafllar. Kumafl›n Bask› Aya¤›n›n (21) alt›nda oldu¤undan ve Bask› Aya¤›n›n (21)
kumafl›n üstünde duracak flekilde afla¤›ya bast›r›lm›fl oldu¤undan emin olunuz.
UYARI: Piller düzgün bir flekilde hizalanmad›¤› ürün ar›zalanabilir.
- 8 -
KULLANIM
Pil bölmesi
kapa¤ı
Pil bölmesi
açma
mandalı
Pil bölmesinin
içi

- 9 -
KULLANIM
Ayak Pedal›n›n Kullan›lmas› (Birlikte gelen):
1. AÇMA/KAPAMA Güç Dü¤mesinin (1) KAPALI konumda oldu¤undan emin olunuz.
NOT: Ayak Pedal› (31) kullan›yorken makineyi açmak için AÇMA/KAPAMA Güç Dü¤mesini
(1) kullanmay›n›z. Ayak Pedal› (31)tak›l›yken AÇMA/KAPAMA Güç Dü¤mesini (1) AÇIK
konumuna getirdi¤iniz takdirde Ayak Pedal› (31) çal›flmayacakt›r.
2. Güç Adaptörünü (31) ürünün arkas›nda bulunan Ayak Pedal› Girifline (27) tak›n›z.
3. Dikifl ifllemine bafllamadan önce kumafl numunesi üzerinde dikifl denemesi yap›n›z.
Kumafl numunesi Bask› Aya¤›n›n (21) alt›ndayken ve ‹¤ne (24) kumafl›n içindeyken Ayak
Pedal›na (31) basarak dikifl ifllemine ba¤lay›n›z. Makineyi durdurmak için aya¤›n›z› Ayak
Pedal›ndan (31) çekiniz.
Cihaz›n Ayak Pedal› Kullan›lmadan Çal›flt›r›lmas›:
1. El Tekerle¤ini (4) saat yönünde (ileri do¤ru) hafifçe döndürerek ‹¤neyi (24) Bask› Aya¤›n›n
(21) üstüne kald›r›n›z.
2. Dikifl Makinesinin arkas›ndaki Bask› Aya¤› Kolunu (17) yukar› iterek Bask› Aya¤›n› (21)
kald›r›n›z.
3. Dikilecek kumafl›, dikifl çizgisi ‹¤nenin (24) tam alt›nda olacak flekilde Bask› Aya¤›n›n
(21) alt›na konumland›r›n›z. El Tekerle¤ini (4) ‹¤ne (24) kumafl›n içine girene kadar
döndürünüz.
4. Bask› Aya¤› Kolunu (17) b›rakarak Bask› Aya¤›n› (21) indiriniz.
5. H›z Dü¤mesine (2) basarak dikifl h›z›n› seçiniz (“H›z Dü¤mesini Kullanma” bölümüne
bak›n›z). Hassas dikifl iflleri için düflük h›z seçene¤ini kullan›n›z. Uzun ve kesintisiz dikifller
için yüksek h›z kullan›n›z.
D‹KKAT: AÇMA/KAPAMA Dü¤mesi AÇIK konuma getirildi¤i anda dikifl makinesi dikifl
yapmaya bafllayacakt›r. Parmaklar›n›z› ‹¤neden (24) uzak tutunuz. ‹¤ne (24) parmaklar›n›zla
temas etti¤i takdirde derinizi delebilir.
6. AÇMA/KAPAMA Güç Dü¤mesini (1) AÇIK konumuna getiriniz. Dikiflin düz olmas›n›
sa¤lamak için kumafl› parmak uçlar›n›z yard›m›yla nazikçe yönlendiriniz. Kumafl› çekerek
itmeye kalk›flmay›n›z.
D‹KKAT: Parmaklar›n›z› ‹¤neden (24) uzak tutunuz. ‹¤ne (24) parmaklar›n›zla temas etti¤i
takdirde derinizi delebilir.
7. Dikifl tamamland›ktan sonra AÇMA/KAPAMA Güç Dü¤mesini (1) KAPALI konumuna
getiriniz.
8. El Tekerle¤ini (4) döndürerek ‹¤neyi (24) kald›r›n›z ve Bask› Aya¤›n› (21) yükseltiniz.
Kumafl› kendinize do¤ru kumafl ve makine aras›nda yaklafl›k 25 santimetre kalacak kadar
çekiniz.
NOT: ‹plik kolayl›kla çekilemiyorsa kumafl› zorla çekmeye kalk›flmay›n›z. Bir elinizle El
Tekerle¤ini (4) hafifçe geri ve ileri do¤ru döndürerek ve di¤er elinizle kumafl› çekerek 25
santimetrelik iplik pay› b›rak›n›z.
9. ‹pli¤i kumafltan yaklafl›k bir inç uzakta kesiniz. Dikiflin bitti¤i k›sm›n atmas›n›

- 10 -
KULLANIM
önlemek için kumafl›n üzerindeki ipli¤e dü¤üm at›n›z.
10. Di¤er dikiflleri de ayn› flekilde gerçeklefltiriniz.
‹plik Gerginli¤ini Ayarlama:
‹plik gerginli¤i fabrikada ayarlanm›flt›r ve hiçbir ayarlama gerektirmemektedir. ‹plik
Gerginli¤i Ayar Dü¤mesi (12) son derece hassast›r. Ayar için yaln›zca tercih etti¤iniz
ehliyetli dikifl makinesi teknisyenine baflvurunuz.
NOT: Mekik gerginli¤i için ayar yap›lamaz.
‹¤neyi De¤ifltirme:
NOT: ‹¤neler numaralarla tan›mlanan çeflitli
boyutlarda gelmektedirler; numaras› küçük olan
i¤ne daha incedir. Nazik kumafllar için ince
i¤neleri, kal›n kumafllar için kal›n i¤neleri tercih
ediniz. Yedek ‹¤ne boyutu 14 numarad›r (Avrupa
90 numara).
KAPALI konumda oldu¤undan ve ürünün fiflten
çekildi¤inden emin olunuz.
2. El Tekerle¤ini (4) döndürerek ‹¤neyi (24) en
yüksek pozisyona kald›r›n›z.
3. ‹¤ne Kelepçesi Vidas›n› (23) ters saat yönünde
(kendinize do¤ru) döndürerek gevfletiniz.
4. ‹¤neyi (24) kelepçeden ç›kana kadar afla¤› do¤ru
nazikçe çekiniz.
5. ‹¤neyi yuvas›na tak›n›z ve ‹¤ne Kelepçesi
Vidas›n› (23) s›k›flt›r›n›z.
NOT: ‹¤neyi (24) de¤ifltirirken ‹¤nenin (24) üst
k›sm›nda kalan düz taraf›n içe ve ‹¤ne Kelepçesi
Vidas›nda (23) do¤ru bakt›¤›ndan emin olunuz.
H›z Dü¤mesinin (2) Kullan›m›:
Dikifl h›z›n›n yavafl olmas› H›z Dü¤mesine (2) bas›n›z. Bu h›z kal›n kumafllar› dikmek için
idealdir. H›z Dü¤mesine (2) bas›l› olmad›¤›nda makine daha ince kumafllar› dikmek üzere
daha yüksek h›zda çal›fl›r.
Meki¤in Sar›lmas›:
Dikim s›ras›nda dikifllerin eflit olmas› için Mekikteki ipin ‹plik Makaras›ndaki iplikle ayn›
a¤›rl›kta olmas› gerekmektedir.
1. AÇMA/KAPAMA Güç Dü¤mesinin (1) KAPALI konumda oldu¤undan emin olunuz.
2. Mekik Kapa¤› Dü¤mesine (28) basarak Mekik Kapa¤› Levhas›n› (25) ç›kar›n›z ve Meki¤i
(29) boflalt›n›z.
‹¤ne iplik geçirme
deli¤i
‹plik
K›lavuzu
4‹¤ne Kelepçesi Vidas›
‹¤ne Kelepçesi
Düz taraf› ‹¤ne
Kelepçesi Vidas›na
bakan i¤ne
Bask› aya¤›
‹¤nenin üst k›sm›n›n
düz taraf›
NOT: ‹¤ne tak›l›
oldu¤unda
‹¤nenin düz taraf›
i¤ne ayar vidas›na
do¤ru bakar.

- 11-
KULLANIM
• Ba¤lantı veya Montajın Nasıl Yapılaca¤ını Gösterir fiema ile Ba¤lantı veya Montajın
Kimin Tarafından Yapılaca¤ına (tüketici, yetkili servis) iliflkin bilgiler
Cihaz›n›zla birlikte gelen aksesuarları kolayl›kla kendiniz tak›p ç›kartabilirsiniz.
Olası bir arıza durumunda cihazın içini açmayınız.Aksi takdirde cihaz garanti dıflı kalacaktır.
• Ürünü düflürmeyiniz,
• Darbelere maruz kalmamas›n› sa¤lay›n›z,
• S›k›flmamas›n›, ezilmemesini sa¤lay›n›z,
• Ambalaj üzerindeki iflaretlemelere uyunuz.
• Orjinal ambalajıyla taflımaya özen gösteriniz.
TAfiIMA ESNASINDA
Çevre korumas›na siz de katk›da bulunabilirsiniz!
Lütfen yerel düzenlemelere uymay› unutmay›n: Çal›flmayan
elektrikli cihazlar›, uygun elden ç›karma merkezlerine götürün
Kullanım sırasında insan ve çevre sa¤lı¤ına tehlikeli veya zararlı olabilecek bir durum
söz konusu de¤ildir.
3. Üst Mile (11) bir iplik makaras› tak›n›z ipli¤in ucunu Meki¤in deliklerinin
birinden geçiriniz ve ipli¤i sabitlemek için Meki¤in (29) çevresine birkaç tur
sar›n›z.
4. Meki¤i (29) Geri Sarma Milinin (3) üstüne s›k›ca yerlefltiriniz.
5. Bir sonraki ad›mda Meki¤in (29) düzgün flekilde sar›lmas› için h›zl› bir flekilde yapman›z
gereken ifllemler bulunmaktad›r.
a. AÇMA Dü¤mesine bas›n›z ve ipe k›lavuzluk yaparak Meki¤in (29) üzerine
eflit bir flekilde sar›lmas›n› sa¤lay›n›z.
NOT: Dikimin düzgün yap›labilmesi için Mekik ipinin Mekik (29) üzerine eflit bir flekilde
sar›lmas› gerekmektedir.
b. Meki¤in (29) Geri Sarma Milinden (3) kaymas›n› önlemek için Meki¤e (29) iplik sar›l›yorken
Meki¤e parma¤›n›zla hafifçe bast›rman›z gerekebilir.
c. Mekik (29) doldu¤unda [Meki¤in (29) kenar›ndan 1.5 mm] makineyi kapal› konuma
getiriniz.
d. Meki¤i (29) Geri Sarma Milinden(3) ç›kar›n›z.
e. Meki¤i (29) Mekik bölmesine “Meki¤in Tak›lmas›” ve “Bafllarken” bölümlerindeki
talimata göre tak›n›z.
ÇEVRE VE ‹NSAN SA⁄LI⁄I

- 12 -
TEM‹ZL‹K VE BAKIM
• Tüketicinin Kendi Yapabilece¤i Bakım, Onarım veya Ürünün Temizli¤ine ‹liflkin Bilgiler
D‹KKAT: Cihaz› temizlemeye bafllamadan önce mutlaka prizden ç›kar›n›z. Elektrik flokuna
maruz kalmamak için kabloyu, fifli ya da cihaz› suya ya da herhangi baflka bir s›v›ya
sokmay›n›z. Her kullan›mdan sonra fifli mutlaka prizden ç›kar›n›z.
Cihaz› temizlemeye bafllamadan önce mutlaka güç kablosunu fiflten çekiniz!
Cihaz›n d›fl k›sm›n› yaln›zca hafif nemli yumuflak bir bezle siliniz. Cihaz›n yüzeyine zarar
verebilece¤i için deterjan ya da sert cisimler kullanmay›n›z!
Cihaz› kesinlikle akan suyun alt›nda temizlemeye, durulamaya ya da suya dald›rmaya
çal›flmay›n›z!
• Periyodik Bakım Gerektirmesi Durumunda, Periyodik Bakımın Yapılaca¤ı Zaman
Aralıkları ile Kimin Tarafından Yapılması Gerekti¤ine ‹liflkin Bilgiler
Cihaz periyodik bak›m gerektirmez.
Her kullan›mdan sonra temizli¤inin yap›lmas›nda fayda vard›r.
Cihazınızı, beyan edilen voltaj ile çal›flt›r›n›z.Bulundu¤unuz yerin voltaj›n›n uygun olup
olmad›¤›n› kontrol ediniz.
Meydana gelebilecek ar›zalardan firmam›z kesinlikle sorumlu de¤ildir, ve cihaz›n›z garanti
kapsam› d›fl›nda ifllem görecektir.
SORUN G‹DERME
Dikime devam ederken dikifller gittikçe gevflek oluyor.
‹plik, ‹plik Germe Dü¤mesinin arkas›ndaki disklerin aras›ndan ç›km›fl. ‹pli¤i makineye
yeniden tak›n›z.
Dikifl s›ras›nda iplik kopuyor.
‹plik dolanm›fl olabilir ya da dü¤ümlenmifl olabilir. ‹pli¤i makineye yeniden tak›n›z.
Üst taraftaki dikifller düzgün görünüyor ancak alttaki dikifllere ba¤lanm›yor.
Dikifl yaparken kumafl› çekmeyiniz.
Büyük iplik makaras› dikifl s›ras›nda ç›k›yor.
1. Makaran›n ucunda beyaz mil kapa¤›n›n bulundu¤undan emin olunuz.
2. Milin makineye sabitlendi¤inden emin olunuz.
Makine çal›flm›yor.
1. Pillerin düzgün bir flekilde tak›lm›fl oldu¤undan emin olunuz. Pil yuvas›n›n içerisinde
bulunan +/- iflaretlerine dikkat ediniz.
2. Pillerin zay›f olmad›¤›ndan emin olunuz.
Makine çok yavafl dikim yap›yor.
1. Pillerin zay›f olmad›¤›ndan emin olunuz.
2. Mil kapa¤›n›n makaray› çok s›k› tutmad›¤›ndan emin olunuz.
3. Kal›n bir kumafl dikmek makinenin yavafl çal›flmas›na neden olabilir.
KULLANIM HATALARINA ‹L‹fiK‹N B‹LG‹LER

- 13 -
ENGLISH
SINBO SSW 101
SEWING MACHINE
INSTRUCTION MANUAL
IMPORTANT SAFEGUARDS
Definitions
Whenever used, the following terms identify safety and property
damage messages and designate a level of hazard seriousness.
This is the safety alert symbol. It alerts you to potential personal
injury hazards. Obey all safety messages that follow this symbol to avoid possible injury
or death.
DANGER – Indicates an imminently hazardous situation, which, if not avoided, will result
in death or serious injury. Usage of this signal word is limited to the most extreme
situations.
WARNING – Indicates a potentially hazardous situation, which, if not avoided, could result
in death or serious injury.
CAUTION – Indicates a potentially hazardous situation, which, if not avoided, may result
in minor/moderate injury.
NOTICE – Addresses practices not related to personal injury, such as product and/or
property damage.
When using this or any other electrical appliance, always follow these basic safety
precautions:
READ ALL INSTRUCTIONS BEFORE USE.
WARNING- To reduce the risk of fire, electric shock, or serious personal injury:
• This product is intended for non-commercial use for sewing fabrics. Do not use the
product for any other purpose.
• Keep the product out of the reach of children and pets. This product is not a toy and is
not intended for use by children. Extra caution is necessary when using this product near
children or pets.
• Do not leave the product unattended while it is in use. Always unplug the product from
the electric outlet and remove the batteries when not in use or
when changing or threading the needle.
• Do not use attachments not recommended or sold by the product manufacturer.
• This product uses a Power Adapter (included) for the sewing machine. Never plug the
product into an electric outlet unless it is properly assembled. Use only the Power Adaptor
provided.

- 14 -
IMPORTANT SAFEGUARDS
• Do not place the product in, or expose it to, water or other liquids.
• When using the Power Adapter (included) never operate the product with wet hands,
without shoes on, or while standing in water or on a wet surface. Never locate the product
where it may fall into a sink or other water/liquid filled container. If the product falls into
water or other liquid, do not touch or reach into the water/liquid. Immediately unplug it
from the electric outlet before retrieving it from the water/liquid.
• Keep the Power Cord and product away from heated surfaces.
• Unplug the product from the electric outlet and remove batteries prior to putting on or
removing parts.
• To disconnect the product adapter from an electric outlet, pull directly on the Plug; do
not pull on the Power Cord. Do not put any stress on the Power Cord where it connects
to the product adapter, as the Power Cord could fray and break.
• Do not operate the product with the Adapter if the Power Cord is cut, damaged, or if the
wires are exposed.
• Do not immerse or expose the Power Cord or Plug to water or other liquids.
• Never operate this product with the Adapter if the Power Cord or Plug is damaged,
malfunctions or is not working properly, has been dropped, or damaged. This product
has no user-serviceable parts. Never open the main motor case of the product. The
mechanism has been factory adjusted. Do not attempt to inspect or repair this product
yourself. Only qualified service personnel should perform any servicing; take the product
to a sewing machine repair shop of your choice for inspection and repair.
CAUTION-- To reduce the risk of personal injury:
• This product is intended for indoor, non-commercial, non-industrial, household use
only.
• Do not allow the Adapter’s Power Cord to hang (e.g., over the edge of a table or counter)
where it may be tripped over or pulled.
• Do not sew with this machine on fabric/clothing a person is wearing.
• Always check the threading of the product before sewing. Improper threading or
improper placement of the Bobbin in the Bobbin Case could damage the machine.
• To avoid breaking the needle and causing damage to the product, do not pull on the
fabric as you sew; gently guide the fabric under the Presser Foot.
• To prolong battery life, remove the batteries when the machine is not in use. Always
keep extra batteries available to avoid interruption in sewing projects.
Battery Handling and Usage
WARNING: Only adults should handle batteries. Do not allow a child to use this product
unless the Battery Compartment Cover is securely attached to the Battery Compartment
in accordance with all product usage instructions.
• Follow the battery manufacturer’s safety and usage instructions.
• Keep batteries away from children and pets.
• Do not mix a used battery with a new battery, or mix different chemistries or sizes of
batteries.

- 15 -
IMPORTANT SAFEGUARDS
18. Foot Holder Pole
19. Foot Holder Spring
20. Final Thread Loop
21. Presser Foot
22. Needle Thread Guide
23. Needle Clamp Screw
24. Needle
25. Bobbin Cover Plate
26. Adapter Jack
27. Foot Pedal Jack
28. Bobbin Cover Button
29. Bobbin
30. Power Adapter
31. Foot Pedal
1. ON/OFF Power Button
2. Speed Button
3. Rewind Spindle
4. Hand Wheel
5. Short Spool Spindle
6. Top Short Spool
7. Thread Guide #1
8. Thread Guide #2
9. Thread Guide #3
10. Thread Guide #4
11. Top Spindle
12. Thread Tension Adjustment Knob
13. Thread Clamp Spring
14. Thread Clamp
15. Take-Up Lever
17. Presser Foot Lever
16. Needle Pole
• Insert the batteries observing the proper polarity (?/?) as indicated inside the battery
compartment. Failure to properly align the battery polarity can cause personal injury
and/or property damage.
• Remove spent or discharged batteries from the product. Remove the batteries when
not using the product for an extended period.
• Never throw batteries into a fire. Do not expose batteries to fire or other heat sources.
• Dispose or recycle spent/discharged batteries in compliance with all applicable laws.
For detailed information, contact your local solid waste authority.
SAVE THESE INSTRUCTIONS FOR FUTURE REFERENCE
Sewing fun is right at your fingertips with this Sewing Machine. Mending clothing, repairing
pillows or curtains, and creating new items are as easy as using a big machine, but without
all the hassle. Satisfaction comes from saying, “I did it myself!”
Money Saving Tips:
• Mend/alter clothing to fit growing children. Add appliqués or decorative ribbons.
• Make your own home accessories out of sheets purchased on sale.
• Use sheets to create custom bedroom ensembles (e.g., comforter, pillow shams, and
curtains).
• Make your own tablecloths and napkins for different holiday looks.
• Get on the mailing list of your local fabric shop. You’ll get advance notice for fabric
sales and classes available. Watch for pattern sales, too.
Parts and Accessories

- 16 -
USING
Threading the Product:
Threading Option 1: See Photo “Threading Option 1”:
1. Attach the Top Short Spool (6).
• Carefully pull out the Short Spool Spindle with the Spring
(5).
NOTICE: Use care as the Spring will pop off.
• Place the Top Short Spool (6) onto the Short Spool (5),
replace the Spring onto the end of the Short Spool, and then
insert the Short Spool into the Sewing Machine.
the threading by pulling the thread from the Top Short Spool
(6) and put it through Thread Guide #1 (7) in the direction
of the front of the machine as shown.
3. Bring the thread under the Thread Tension Adjustment Knob (12).
NOTE: To ensure proper stitching, the thread must be positioned between the two disks
behind the Thread Tension Adjusting Knob, where the thread tension is controlled during
stitching.
4. Insert thread through Thread Guide #2 (8) toward the front of the machine.
5. Insert the thread into the hole in the Take Up Lever (15) (always threading toward the
front of the machine).
6. Pull the thread down and insert thread into Thread Guide #3 (9), and then insert the
thread through Thread Guide #4 (10), located at the top, left of the needle.
NOTE: In order to thread the needle, you will need to have a lead of thread approximately
six inches long. Pull gently on the thread. If there is resistance, rotate the Hand Wheel
(4) slightly back and forth as you pull on the thread. This will make the thread pull more
easily. When you have sufficient thread lead, rotate the Hand Wheel (4) until the Needle
(24) is in its highest position to accept the thread at the tip (see “Parts” section for location
of parts).
7. Insert the end of the thread [use a Needle Threader (not included) if necessary], through
the eye of the Needle (24) from the front of the machine toward the back as shown in
Threading Option 1 Photo.
8. Raise the Presser Foot (21) by lifting up on the Presser Foot Lever (17) at the rear of
the Sewing Machine.
9. Pull about ten inches of thread through the Needle (24). (Again, you may need to rotate
the Hand Wheel (4) back and forth slightly as explained earlier to allow the thread to pull
easily.) Lay the thread on the deck under the Presser Foot (21) pulling it away from you
toward the back of the machine.

- 17 -
USING
Threading Option 2:
For this option, thread the machine as
described for Threading Option 1 except
step 1 is extension of the Top Spindle (11)
and placement of a Thread Spool as
shown.
NOTE: To extend the Top Spindle (11)
pull up until it locks in place.
Two-Color Decorative Topstitching:
To make decorative two-color topstitching, thread the machine
with two colors of thread simultaneously, using one color from the Thread Spool and a
contrasting color from the Top Short Spool (6).
NOTE: Thread both strands of thread at the same time combining the instructions for
Threading Option 1 and Threading Option 2.
Bobbin Placement:
1. To remove the clear Bobbin Cover Plate (25), press the Bobbin Cover Button (28) and
lift off the clear Bobbin Cover Plate (25).
2. Remove the empty Bobbin (29) and replace it with a Bobbin (29) filled with the thread
color of your choice. Leave approximately ten inches of thread lead and place it under
the Presser Foot (21) as shown.
NOTES:
• For best sewing results, the Bobbin’s thread should
always be the same weight and thickness as the top
thread.
• For instructions on winding the Bobbin’s thread,
see the “Winding the Bobbin” section.
3. Turn the Hand Wheel (4) counterclockwise (toward you). The Needle (24) will go down
and pick up the Bobbin’s thread. Turn the Hand Wheel (4) until the Needle (24) has
descended completely and then come up again to its highest
point. Stop when the Needle (24) starts to go down again.
4. Raise the Presser Foot (21) and bring the spool thread lead around to the front of the
machine. Pull it gently up and you will see it has caught the Bobbin’s thread. Pull the
two threads toward the rear of the Sewing Machine (away from you) and lay them under
the Presser Foot (21).
5. Slide the cover back over the Bobbin Compartment and gently press it into place.
NOTICE:
• Improper threading of the machine may damage the machine and/or the fabric being
stitched.

- 18 -
USING
Using Batteries:
Ensure the ON/OFF Power Button (1) is in
the OFF position before inserting the
batteries. Install four “AA” size batteries
(not included) into the battery compartment
on the underside of the product. Follow the
+/- indications on the inside of the battery
compartment.
CAUTION: The product will begin to sew as
soon as the ON/OFF Power Button (1) is
pressed ON. Ensure that the fabric is under
the Presser Foot (21) and
the Presser Foot (21) is down against the fabric.
NOTICE: Failure to properly align the batteries could cause damage to the product.
Using the Foot Pedal (Provided):
1. Ensure that the ON/OFF Power Button (1) is in the OFF position.
NOTE: Do not use the ON/OFF Power Button (1) to turn the machine on when using the
Foot Pedal (31). If you put the ON/OFF Power Button (1) to the ON position with the Foot
Pedal (27) attached, the Food Pedal (31) will not function.
2. Plug the Foot Pedal (31) into the Foot Pedal Jack (27) on the end of the product.
3. Before sewing, test stitch on scrap fabric. With scrap material under the Presser Foot
(21) and the Needle (24) in the material, press the Foot Pedal (31) to begin sewing. Remove
pressure from the Foot Pedal (31) to stop the
machine.
Battery
Compartment
Cover
Battery
Compartment
Latch
Battery
Compartment
Inside
• To avoid breaking the Bobbin Cover Plate (25), handle it gently and use extra care in
pressing it back into place.
NOTE: It is important that threading is completed properly. Always practice a few stitches
on scrap fabric before sewing on your project.
To Sew:
Using 220 Volt AC Power:
a) Plug the Power Adapter (30) into the back of the product into the Adapter Jack (26).
b) Ensure that the ON/OFF Power Button (1) is in the OFF position, and plug the Power
Adapter into a 120 volt AC electrical outlet.
NOTE: In the OFF position the ON/OFF Power Button (1) protrudes. In the ON position,
the ON/OFF Power Button (1) is flush with the side of the product.

- 19 -
USING
Without Using the Foot Pedal:
1. Lift the Needle (24) above the Presser Foot (21) by turning the Hand Wheel (4) slightly
in the clockwise direction (away from you).
2. Raise the Presser Foot (21) by lifting up on the Presser Foot Lever (17) at the back of
the machine.
3. Position the fabric to be sewn under the Presser Foot (21) with the seam line directly
under the Needle (24). Turn the Hand Wheel (4) until the Needle (24) is in the fabric.
4. Lower the Presser Foot (21) by releasing the Presser Foot Lever (17).
5. Select the sewing speed by pressing the Speed Button (2) (see “Using the Speed Button”
section). Use low speed for intricate work. Use high speed for long uninterrupted seams.
CAUTION: When the ON/OFF Button is in the ON position, the sewing machine will
immediately begin sewing. Keep fingers away from the Needle (24). The Needle (24) will
pierce your skin if your finger comes in contact with it.
6. Press the ON/OFF Power Button (1) to the ON position. Gently guide the fabric with
your fingertips to keep the seam straight. Do not pull on the fabric.
CAUTION: Keep fingers away from the Needle (24). The Needle (24) will pierce your skin
if your finger comes in contact with it.
7. When finished sewing the seam, press the ON/OFF Power Button (1) to the OFF position.
8. Raise the Needle (24) by turning the Hand Wheel (4), lift the Presser Foot Lever (17).
Pull the fabric toward you leaving approximately ten inches of thread between the fabric
and the machine.
NOTE: Do not pull on the fabric if the thread does not pull easily. Turn the Hand Wheel
(4) slightly back and forth with one hand while pulling on the fabric with the other hand
until there is a ten-inch thread lead.
9. Cut the thread approximately one inch from the fabric. Tie the thread ends on the fabric
into a knot to secure the end of the seam.
10. Continue sewing other seams in the same manner.
Adjusting the Thread Tension:
The factory has set the thread tension and no adjustment should be necessary. The Thread
Tension Adjustment Knob (12) is extremely sensitive. Adjustments should be made by a
qualified sewing machine technician of your choice.
NOTE: Bobbin tension cannot be adjusted.
Changing the Needle:
NOTE: Needles come in various sizes designated by numbers; the smaller the number,
the thinner the needle. Use smaller needles for more delicate fabrics and larger needles
for heavier fabrics. Replacement Needle size is #14 (#90
Table of contents
Languages: