SMART AirLiner WS100 User manual

AirLinerTM WS100
Installation
Guide
Wireless Slate
FCC Warning
This device complies with Part 15 of the FCC Rules. Operation is subject to the following two conditions: (1) this
device may not cause harmful interference, and (2) this device must accept any interference received, including
interference that may cause undesired operation.
This equipment has been tested and found to comply with the limits for a Class B digital device, pursuant to Part
15 of FCC Rules. These limits are designed to provide reasonable protection against harmful interference in a
residential installation.
This equipment generates, uses and can radiate radio frequency energy and, if not installed and used in
accordance with the instructions, may cause harmful interference to radio communications. However, there is
no guarantee that interference will not occur in a particular installation.
You can determine whether the equipment is causing interference by disconnecting it from your computer. If the
interference stops, it was probably caused by the equipment.
If the equipment does cause interference to radio or television reception, you may be able to correct the
interference by using one or more of the following measures:
!
Rotate the television or radio antenna until the interference stops.
!
Move the equipment farther away from the television or radio.
!
Plug the equipment and computer into an outlet that is on a different circuit from the television or radio.
If necessary, consult SMART Technologies Inc. or an experienced radio/television technician for help.
Changes or modifications to this product not authorized by SMART Technologies Inc. could void the FCC
Certification and negate your authority to operate the product.
Trademark Notice
SMART Board, AirLiner, Notebook, DViT, and the SMART logo are trademarks of SMART Technologies Inc.
Windows is either a registered trademark or a trademark of Microsoft Corporation in the U.S. and/or other countries.
The Bluetooth word mark and logos are owned by the Bluetooth SIG, Inc. and any use of such marks by SMART
Technologies Inc. is under license. All other third-party product and company names may be the trademarks of their
respective owners.
Copyright Notice
© 1992–2005 SMART Technologies Inc. All rights reserved. No part of this publication may be reproduced,
transmitted, transcribed, stored in a retrieval system or translated into any language in any form by any means
without the prior written consent of SMART Technologies Inc. Information in this manual is subject to change
without notice and does not represent a commitment on the part of SMART.
Portions of the software that ships with this product are copyrighted by Intel Corporation.
Portions of the software that ships with this product are copyrighted by ParaGraph, a business unit of Vadem.
U.S. Patent Nos. 4,878,553; 4,999,461; 5,028,745; 5,448,263; 5,466,896; 5,600,105; 5,644,108; 5,679,930;
6,141,000; 6,326,954; 6,337,681; 6,741,267 and 6,747,636.
Canadian Patent No. 2,058,219. Other U.S., Canadian and foreign patents pending.
Printed in Canada 12/2005
In the past, we’ve made new features available as free software
upgrades. Register your SMART product to be notified of free
upgrades like these.
Keep the following information available in case you need to contact
Technical Support:
Serial Number
Date of Purchase
Register online at www.smarttech.com/registration
Registration Benefits

Important Information i
Important Information
Please read this manual carefully before setting up and using your AirLiner™ WS100 wireless
slate.
WARNING
Keep all batteries out of the reach of children.
WARNING Don’t puncture, crush, heat or disassemble the battery, expose it to fire or any
liquid, short its terminals, or abuse the battery in any other way as this may cause
the battery to explode or ignite, and could cause a fire or personal injury.
WARNING
If the battery leaks, ensure you don’t get battery fluid in your eye. If you do,
immediately rinse the affected eye with water and seek medical attention.
WARNING Don’t install the battery backwards or reverse the polarity. Don’t install other battery
types in your AirLiner WS100 wireless slate. Both of these actions can cause
damage to the slate and can cause a fire or personal injury. For more information
on installing the battery, see page 5.
WARNING Don’t recharge the battery with any power adapter other than the one supplied.
Don’t recharge other battery types in your AirLiner WS100 wireless slate with the
supplied power adapter. Both of these actions can cause damage to the slate and
can cause a fire or personal injury.
If the AirLiner WS100 wireless slate becomes excessively warm or emits an
unusual smell while the battery is recharging, immediately disconnect the power
adapter from the power outlet and turn off the slate. For more information on
recharging the battery, see page 7.
WARNING When you dispose of the lithium polymer battery, cover the terminals with adhesive
tape to prevent possible contact with metal objects. As an additional precaution,
don’t transport the battery with metal objects. If the battery comes into contact with
a metal object, the battery could short, and cause personal injury or fire.
WARNING When regulations require that wireless devices are turned off, for example, on
commercial aircraft, ensure that the AirLiner WS100 wireless slate is turned off and
can’t be turned on accidentally.

ii Important Information
Other Precautions
• Don’t disassemble the AirLiner WS100 wireless slate or its tools. If you disassemble the slate
or its tools, you’ll void your warranty.
• Don’t attempt to twist the pen open. It must remain a sealed unit to ensure proper
performance.
• To maintain the sensitivity of your pen tip, don’t store the pen in a container where it will rest on
its tip.
• Don’t leave the tethered pen or the cordless mouse on the slate’s workspace when you aren’t
using them, as this may interfere with pointer positioning.
• If you drop the battery onto a hard surface, you should replace the battery even if there is no
obvious damage, as it may be damaged internally. This will prevent potential damage that
could occur to the slate if a damaged battery leaks after you’ve installed it.
• If the battery loses all of its charge, you can’t recharge it.
• Don’t clean the slate with volatile liquids such as paint thinner or benzene, as they may
damage the overlay. Instead, regularly clean the slate with a soft, damp cloth to remove dust
and dirt particles. If necessary, dampen the cloth using very mild soap that is diluted with
water.
• When you’re not using the AirLiner WS100 wireless slate and its tools, store them in a clean,
dry place.
• Avoid exposing this product to extreme hot or cold. The operating temperature range is from
32°F to 104°F (0°C to 40°C). The AirLiner WS100 wireless slate functions best at room
temperature.
WARNING Don’t use the AirLiner WS100 wireless slate in a facility control system or any other
environment that requires extremely high reliability, or where the use of a wireless
device may cause interference; the slate may interfere with or cause other
electronic devices to malfunction, or other wireless devices may interfere with or
cause the slate to malfunction. Where use is prohibited, turn off the slate to prevent
the possibility of it interfering with or causing other electronic devices to
malfunction. SMART doesn’t accept any liability for direct or consequential
damages.

iii
Contents
Important Information............................................................................................................... i
Other Precautions ..................................................................................................................... ii
About the Slate......................................................................................................................... 1
Features.................................................................................................................................... 1
Installing the Slate ................................................................................................................... 5
Enabling the Wireless Connection ............................................................................................5
Installing the Battery.................................................................................................................. 5
Recharging the Battery ............................................................................................................. 7
Installing SMART Board Software........................................................................................... 10
Installing the Underlay.............................................................................................................10
Installing the Anti-Slip Feet .....................................................................................................11
Turning on the Slate and Establishing a Wireless Connection......................................... 13
Terminating the Bluetooth Wireless Connection ..................................................................... 16
Turning off the Slate................................................................................................................ 16
Using the Slate and its Tools................................................................................................ 17
Using the Battery-Free, Tethered Pen .................................................................................... 17
Using the Cordless Mouse ...................................................................................................... 20
Using the Function Buttons ..................................................................................................... 21
Customizing the Slate ...........................................................................................................23
Customizing the Tethered Pen................................................................................................ 23
Customizing the Cordless Mouse ........................................................................................... 25
Customizing the Function Buttons .......................................................................................... 26
Customizing the Tool Strip ......................................................................................................28
Mapping to Multiple Monitors .................................................................................................. 30
Maintaining the Slate............................................................................................................. 33
Cleaning the Slate................................................................................................................... 33
Replacing the Pen Nib ............................................................................................................ 33
Replacing the Battery.............................................................................................................. 33
Troubleshooting..................................................................................................................... 35
Optimizing the Bluetooth Wireless Connection ....................................................................... 35
Troubleshooting Scenarios ..................................................................................................... 36
Customer Support ................................................................................................................. 43
Contacting SMART Technical Support ................................................................................... 43
General Inquiries..................................................................................................................... 43
Warranty.................................................................................................................................. 43
Registration ............................................................................................................................. 43

iv
Sending Feedback ..................................................................................................................44
Obtaining More Information on SMART Products................................................................... 44
Index........................................................................................................................................ 45

About the Slate 1
About the Slate
The AirLiner™ WS100 wireless slate is a tablet that enables you to manipulate and select on-
screen objects, create and save notes, launch applications, and more. You can achieve all of this
using SMART Board software and the slate’s customizable tools including a tethered pen, a
cordless mouse, function buttons and a touch-sensitive tool strip.
The slate communicates wirelessly with your computer and is powered by a rechargeable battery.
You can work remotely from the monitor or interactive whiteboard without any physical
connections between the slate and your computer or an external power source.
Features
The slate provides flexibility and freedom in the way you control your computer.
Front View
The slate’s workspace detects the location of any slate tool within 1/4" (6.5 mm) of the surface.
You can use the customizable function buttons to right-click, middle-click, move to the next page,
move to the previous page, launch the Floating Tools, launch Notebook software and more. For a
list of the available functions, see page 26.
The pen storage compartment provides a convenient, easily accessible location to store the
tethered pen.
The Power indicator indicates the slate’s current operational status.
The Charging indicator indicates if the power adapter cable is currently connected, and if so,
whether the battery is fully charged.
Pen Storage Compartment
Power Button
Power
Indicator
Charging
Indicator
Customizable
Function Buttons
Workspace

2About the Slate
Side View
If you connect the power adapter cable to the Power Connector port, you can recharge the battery
or use an external power source to power the slate. For information on recharging the battery, see
page 7.
You can insert a printed underlay between the overlay and the workspace. The supplied underlay
includes a tool strip. You can press a tool strip icon with the pen to activate functions or launch
software. The locking sliders hold the overlay in place.
Back View
Press the Connect button to switch the slate into discoverable mode, which allows your computer
to detect the slate when you search for devices. The slate remains in discoverable mode for three
minutes. For information on establishing a connection between the slate and your computer, see
page 13.
The battery compartment houses the rechargeable lithium polymer battery. For information on
recharging the battery, see page 7.
The four anti-slip feet keep the slate stable on flat surfaces.
Locking Sliders
for Overlay
Power
Connector
Port
Overlay
Battery
Connect
Button
Battery
Compartment
One of the Four
Anti-Slip Feet

About the Slate 3
The Bluetooth wireless adapter connects to your computer and enables wireless communication
between your slate and your computer. For more information, see the instructions that came with
the adapter.
NOTE: You don’t need to install this adapter if your computer already has an installed Bluetooth
wireless adapter or built-in Bluetooth wireless support.
The slate uses a rechargeable lithium polymer battery. For information on installing the battery,
see page 5. For information on checking the battery’s charge, see page 8.
The power adapter cable has two parts: the adapter that connects to the slate’s Power Connector
port and the cable that connects to an external power outlet, enabling you to recharge the battery
or power the slate using an external power source. For information on recharging the battery, see
page 7.
The battery-free, tethered pen works like a mouse, enabling you to select, edit and erase objects,
images and text. For information on using the tethered pen, see page 17.
The pen’s side switch has two customizable functions that you can select by pressing the upper or
lower half of the switch respectively. The default functions for this switch are Eraser and Black Ink,
but the other available functions include right-click, middle-click, next page, previous page, launch
Floating Tools, launch Notebook software and more. For information on customizing the side
switch, as well as the tethered pen’s other properties, see page 23.
Bluetooth® Wireless Adapter
Rechargeable Battery
Power Adapter Cable
Battery-Free, Tethered Pen
CAUTION Don’t leave the pen on the slate’s workspace when you aren’t using it. This may
interfere with pointer positioning. Instead, place the pen in the pen storage
compartment or lay it flat on your desk.
Side Switch
Replaceable
Pen Nib

4About the Slate
You can use the cordless mouse to perform any task that you would with a standard mouse.
The left and right mouse buttons are set to click and right-click respectively, and you can rotate the
wheel button to scroll up and down in the active window. For information on using the cordless
mouse, see page 20. For information on customizing the properties of the cordless mouse, see
page 25.
Cordless Mouse
Customizable
Buttons
Wheel Button

Installing the Slate 5
Installing the Slate
To install the AirLiner WS100 wireless slate, you need to:
• enable the wireless connection (this page)
• install the battery (this page)
• recharge the battery (page 7)
• install SMART Board software on the connected computer (page 10)
• install the underlay (page 10)
• install the anti-slip feet (page 11)
Enabling the Wireless Connection
The slate connects to your computer using Bluetooth wireless technology. This is a radio-
frequency technology, so the slate doesn’t necessarily need to have a line of sight to your
computer. The radio signal can pass through non-metallic objects such as walls and bookshelves.
However, interference from other networks that operate in the 2.4 GHz band, other devices that
connect to your computer and use Bluetooth wireless technology (especially audio devices), and
metallic objects in or along the line of sight can negatively impact the slate’s performance and
operating distance.
If you choose not to install the provided adapter, you must either use a computer with built-in
Bluetooth wireless support, or purchase and install a commercially available USB-to-Bluetooth
wireless adapter. If you choose to install an adapter other than the one supplied, purchase an
adapter that complies with Bluetooth wireless specification v1.2 or higher with a Human Interface
Device (HID) profile.
NOTE: The equipment described in this manual generates, uses, and can radiate radio-frequency
energy. If the equipment isn’t installed and used properly, it may cause interference with radio or
television reception.
If you wish to install the supplied Bluetooth wireless adapter, or purchase and install a
commercially available USB-to-Bluetooth wireless adapter, connect this adapter to an available
USB port on the required computer, install the adapter’s driver software, and enable the wireless
connection as detailed in the instructions that came with your adapter.
If you wish to use a computer with built-in Bluetooth wireless support, ensure that the support is
enabled. For more information, see the instructions that came with your computer.
Installing the Battery
Before you can use the slate, you must install the provided rechargeable battery.
To enable the wireless connection
WARNING
Don’t install other battery types in your slate, as this could damage the slate and
can cause a fire or personal injury.
6Installing the Slate
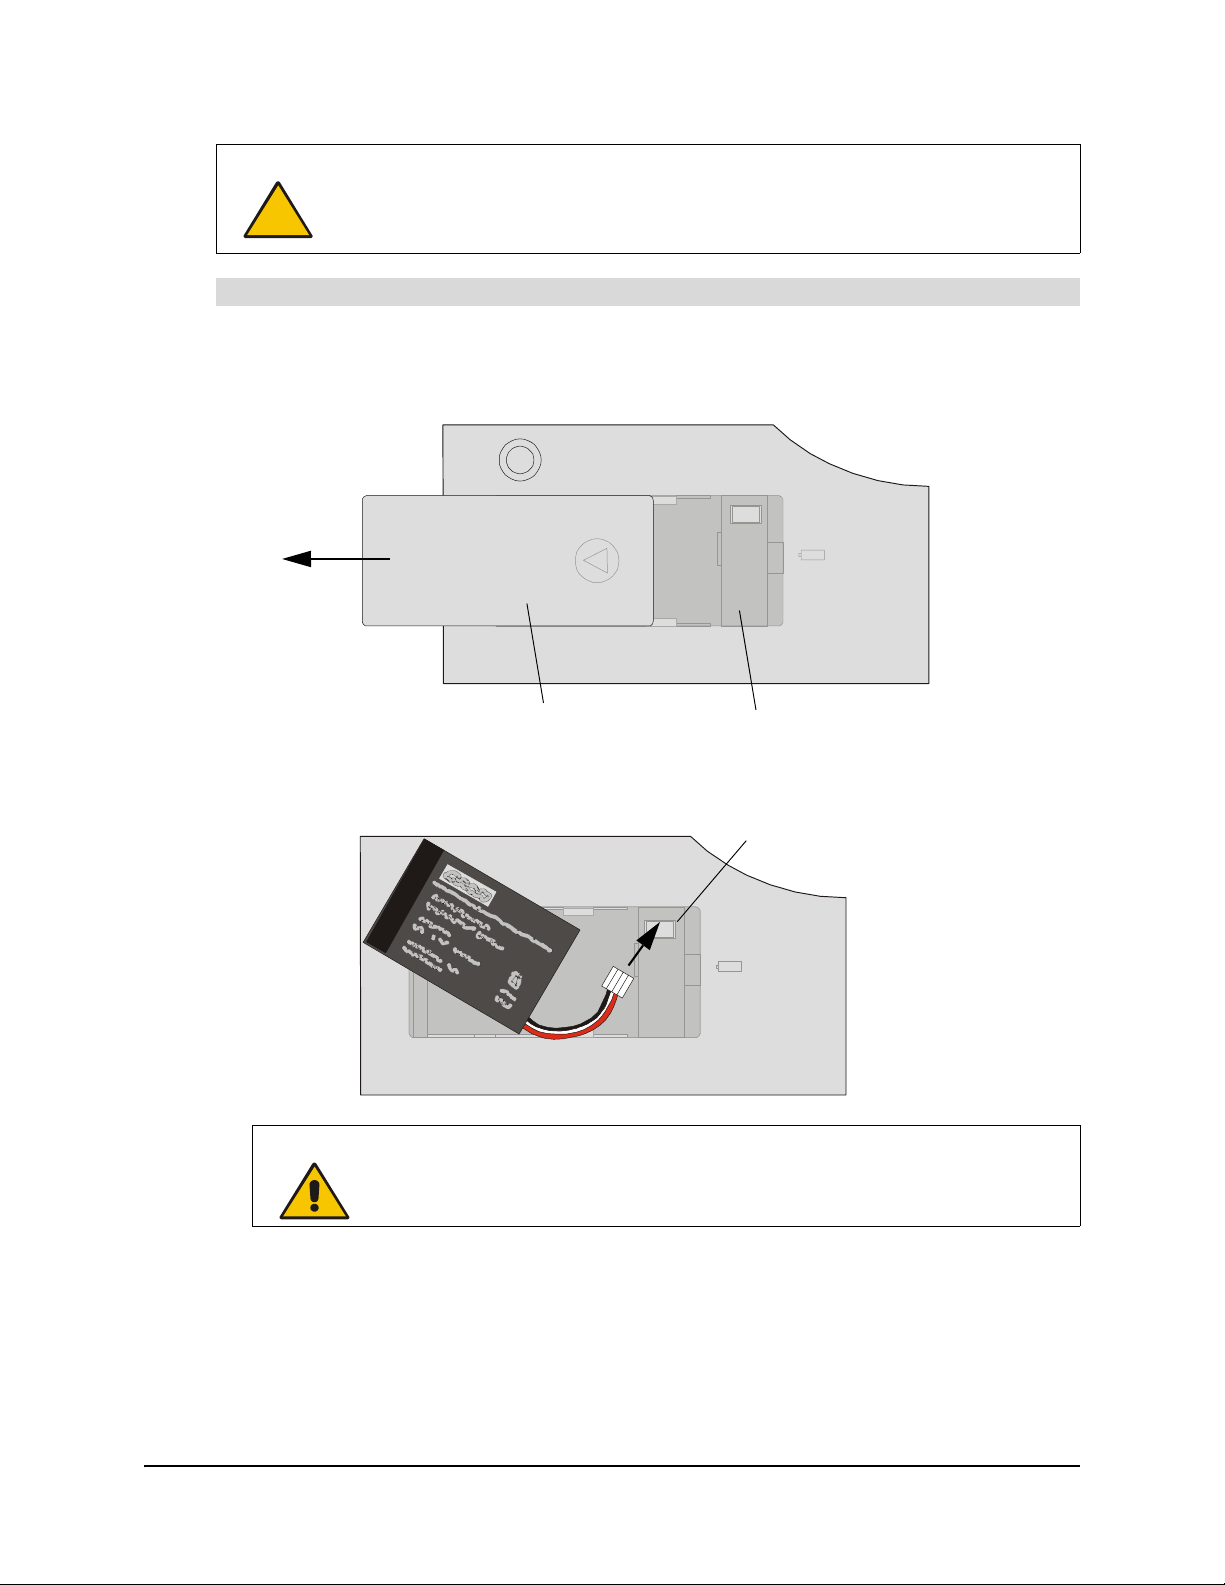
1. Place the slate upside down on a flat surface.
2. Slide open the battery compartment door.
3. Insert the battery’s plug into the battery socket in the compartment. Install the plug with the
black wire on the left and the red wire on the right.
CAUTION If you drop the battery onto a hard surface, you should replace the battery even if
there is no obvious damage, as it may be damaged internally. This will prevent
potential damage that could occur to the slate if a damaged battery leaks after
you’ve installed it.
To install the battery
WARNING
Don’t install the battery backwards or reverse the polarity as this can cause
damage to the slate and can cause a fire or personal injury.
Battery
Compartment Door Battery Compartment
Battery
Battery
Battery Socket
Installing the Slate 7
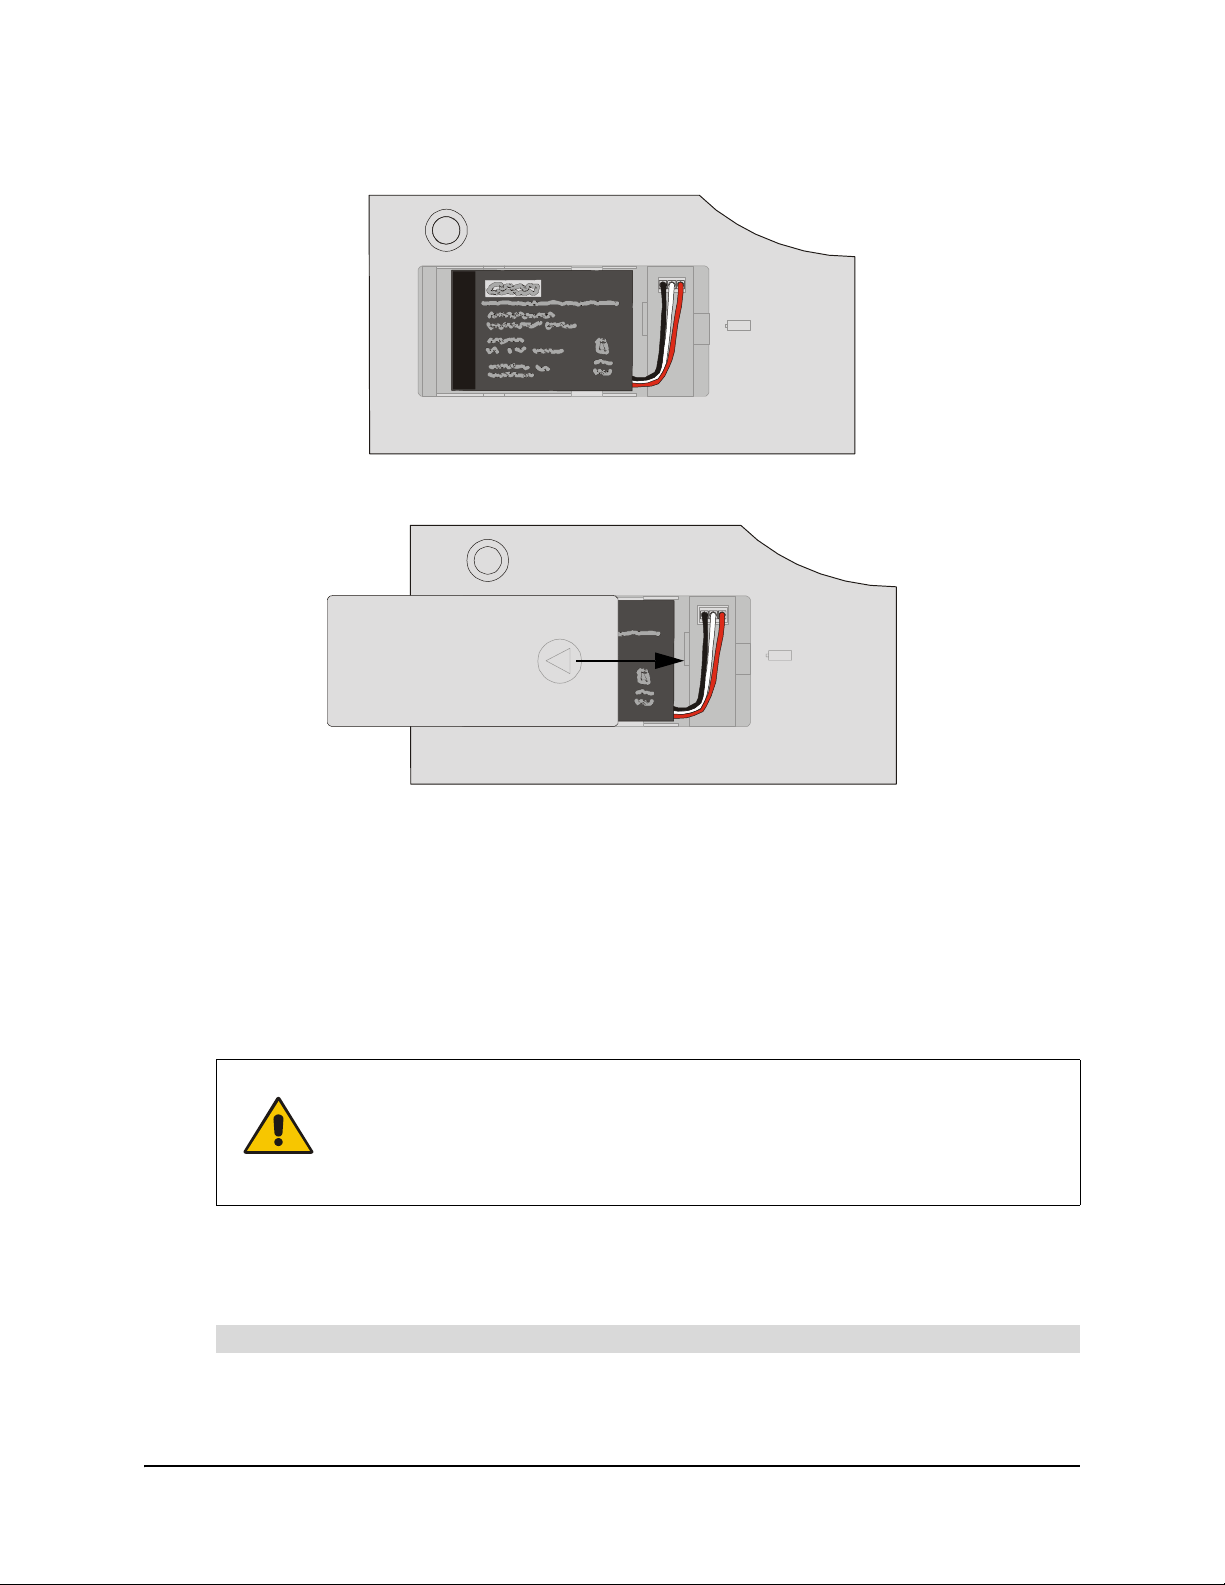
4. Insert the battery into the battery compartment.
5. Close the compartment door.
Recharging the Battery
The slate uses a rechargeable lithium polymer battery as the power source for mobile operation,
and a power adapter cable is included for recharging the battery or for powering the slate from an
external power source.
Before you use the slate for the first time, connect the power adapter cable and charge the battery.
You can continue with the installation and use the slate while the battery is charging. A new, fully
charged battery lasts for approximately 25 hours of constant use.
NOTE: The time required to fully recharge the battery varies depending upon factors such as the
battery’s charge and whether the slate is in use. If the battery charge is low, the battery takes
approximately five to six hours to fully recharge.
1. The power adapter cable has two parts, the adapter and the cable. If you haven’t already done
so, connect the adapter to the cable.
WARNING Don’t recharge the battery with any power adapter other than the one supplied, as
this can cause damage to the slate and can cause a fire or personal injury.
If the slate becomes excessively warm or emits an unusual smell while the battery
is recharging, immediately disconnect the power adapter cable from the power
outlet and turn off the slate.
To recharge the battery
Battery
Battery
Battery

8Installing the Slate
2. Plug the round end of the power adapter cable into the Power Connector port.
3. Connect the other end of the power adapter cable to an active power outlet.
4. The battery immediately begins to recharge whenever the power adapter cable is connected
and the battery isn’t fully charged. The battery recharges whether the slate is turned on or off.
The Charging indicator behaves as follows:
– If the indicator glows orange, the slate is connected to an external power source and the
battery is recharging.
– If the indicator glows green, the slate is connected to an external power source and the
battery is fully charged.
– If the indicator is off, the slate isn’t connected to an external power source. Check that the
power adapter cable is connected correctly to the slate and that the power outlet is
working. If the indicator still doesn’t glow, the battery can no longer hold sufficient charge
and must be replaced (page 33).
1. Press the SMART Board icon in the system tray (Windows® computers) or in the Dock
(Macintosh computers), and press Control Panel.
The SMART Board Control Panel dialog box appears.
2. Press SMART Board Settings.
The SMART Board Settings dialog box appears.
To check the battery’s charge
Charging Indicator

Installing the Slate 9
3. If the SMART Board Settings dialog box shows more than one SMART product, press
AirLiner.
The battery’s charge is illustrated in the bottom right corner.
The battery symbol is illustrated as green arrows when the battery is charging.
4. Close the SMART Board Settings and the SMART Board Control Panel dialog boxes.
Follow the advice below to conserve battery charge and ensure that the slate is always ready for
use.
• Turn off the slate when you finish working with it.
• Recharge the battery if you don’t expect to use the slate for a number of days.
NOTE: The slate still draws a small amount of current from the battery, even when the slate is
turned off.
Recharging the battery ensures that the battery still has some charge when you next use it.
There is a built-in protection circuit that prevents the battery from overcharging.
• If you won’t be using your slate for an extended period of time (a month or longer), unplug the
battery from the slate.
• (Windows computers only) When the battery’s charge falls below 20%, an alert in the system
tray reminds you to recharge the battery. When this happens, connect the slate to an external
power source using the power adapter cable. You can continue to use the slate while the
battery is recharging.
Tips and cautions on recharging the battery
CAUTION
If the battery loses all of its charge, you can’t recharge it.
A blue border
surrounds the
selected SMART
product
Battery Status:
Battery Status:

10 Installing the Slate
• When the battery is nearly empty, the Power indicator flashes slowly. The slate may stop
operating properly and will soon turn itself off. Connect the slate to an external power source
immediately using the power adapter cable. You may continue working while the battery is
recharging.
• You can’t extend the battery’s life by completely draining the battery’s charge before you
recharge it.
Installing SMART Board Software
Without SMART Board software installed, you can use the slate as an alternative to a mouse.
However, to use all the functions offered by the slate, you must install SMART Board software on
the connected computer.
NOTE: If you uninstall SMART Board software, you can’t use these additional functions, but you
may still use the slate as a mouse device. For information on uninstalling SMART Board software,
refer to the SMART Board software online Help.
1. If you haven’t already done so, turn on the computer.
2. Close all open applications.
3. Insert the SMART Board software CD into your CD drive. The CD starts automatically.
If the CD doesn’t start automatically:
– for Windows computers, select Start >Run and enter x:\autorun.exe (where x: is your
CD drive).
– for Macintosh computers, click the SMART Installer icon to open your CD drive and
double-click the Software application file.
4. Follow the on-screen instructions.
Installing the Underlay
Included with your slate is an underlay, which you can insert between the slate’s workspace and
the transparent overlay. Printed on the underlay is a tool strip, enabling you to activate functions
and launch software by pressing the appropriate icon with the pen.
1. Locate the two locking sliders on each side of the slate, and slide them towards the slate’s top
edge.
To install SMART Board software
To install the underlay
Locking Slider

Installing the Slate 11
2. Grasp the overlay’s upper edges with your finger tips and lift the overlay away from the slate.
3. Place the underlay on the slate with the tool strip on the right side.
4. Insert the tabs on the overlay’s lower edge into the slots on the slate.
5. Lower the overlay.
6. Slide the locking sliders towards the bottom of the slate. This locks the overlay in place and
protects your underlay.
The tool strip works automatically with SMART Board software. If you like, you can customize the
icon functions (page 28).
Installing the Anti-Slip Feet
You can insert four anti-slip feet to keep the slate stable when you use it on flat surfaces.
Push the anti-slip feet into the appropriate holes on the back of the slate.
To install the anti-slip feet
Battery
Anti-Slip FeetAnti-Slip Feet

12 Installing the Slate

Turning on the Slate and Establishing a Wireless Connection 13
Turning on the Slate and Establishing a Wireless
Connection
This chapter shows you how to:
• turn on the slate and establish a Bluetooth wireless connection (this page)
• terminate a Bluetooth wireless connection (page 16)
• turn off the slate (page 16).
To operate properly, the slate must either have sufficient charge in its battery or be connected to an
external power source.
The Power indicator indicates the slate’s status.
When you’ve enabled Bluetooth wireless support (page 5), you can connect the slate to your
computer using either an installed Bluetooth wireless adapter or, if available, your computer’s built-
in Bluetooth wireless support. The following instructions explain how you can establish a wireless
connection between your slate and your computer using Bluetooth wireless technology.
If you turn on your slate and the slate was previously connected to a computer, the slate
automatically attempts to reestablish its most recent wireless connection (page 15).
NOTE: The use of wireless devices is regulated in most countries. If you’ll be traveling with your
AirLiner WS100 wireless slate, check with the appropriate regulatory authority for any restrictions
that may apply.
Power Indicator Status
Steady blue The slate is active, but the pen tip, side switch, mouse
buttons and function buttons aren’t in use
Green The slate is active, and either the pen tip, a side switch, a
mouse button or a function button is in use
Slowly flashing blue The battery has a low charge and needs to be recharged
(page 7)
Quickly flashing blue The slate is attempting to establish a Bluetooth wireless
connection (page 13)
Off Off
WARNING When regulations require that you turn off wireless devices, for example, on
commercial aircraft, turn off the AirLiner WS100 wireless slate and ensure it can’t
turn on accidentally.
Power
Indicator
Power Button

14 Turning on the Slate and Establishing a Wireless Connection
1. Enable the computer’s wireless connection (page 5).
2. Press the Power button on the slate and then immediately press the Connect button.
The slate switches into discoverable mode, which allows your computer to detect the slate in
the next step. The slate remains in discoverable mode for three minutes, as indicated by the
Power indicator flashing quickly, or until it can establish a wireless connection with your
computer.
NOTE: You can only establish the wireless link between the slate and your computer when the
slate is in discoverable mode.
3. Open the control panel for your Bluetooth wireless device.
4. Select the option to add or set up a device.
5. Carefully follow the on-screen instructions.
WARNING Don’t use the AirLiner WS100 wireless slate in a facility control system or any other
environment that requires extremely high reliability, or where the use of a wireless
device may cause interference; the slate may interfere with or cause other
electronic devices to malfunction, or other wireless devices may interfere with or
cause the slate to malfunction. Where use is prohibited, turn off the slate to prevent
the possibility of it interfering with or causing other electronic devices to
malfunction. SMART doesn’t accept any liability for direct or consequential
damages.
To turn on the slate and establish a wireless connection
IMPORTANT The procedure required to establish a wireless connection varies depending on
whether you’re using a Bluetooth wireless adapter (and if so, which adapter
you’re using), or your computer’s built-in Bluetooth wireless support. The
following steps provide a general overview, but for a detailed procedure, refer
to the instructions that came with your adapter (if you’re using an installed
USB-to-Bluetooth wireless adapter) or your computer (if you’re using your
computer’s built-in Bluetooth wireless support).
Power Button
Battery
Connect Button
Other manuals for AirLiner WS100
1
Table of contents
Other SMART Graphic Tablet manuals


