smarvo A-MAX AVENGER 20 User manual

AVENGER
GUITAR
AMPLIFIERS
USER'S MANUAL
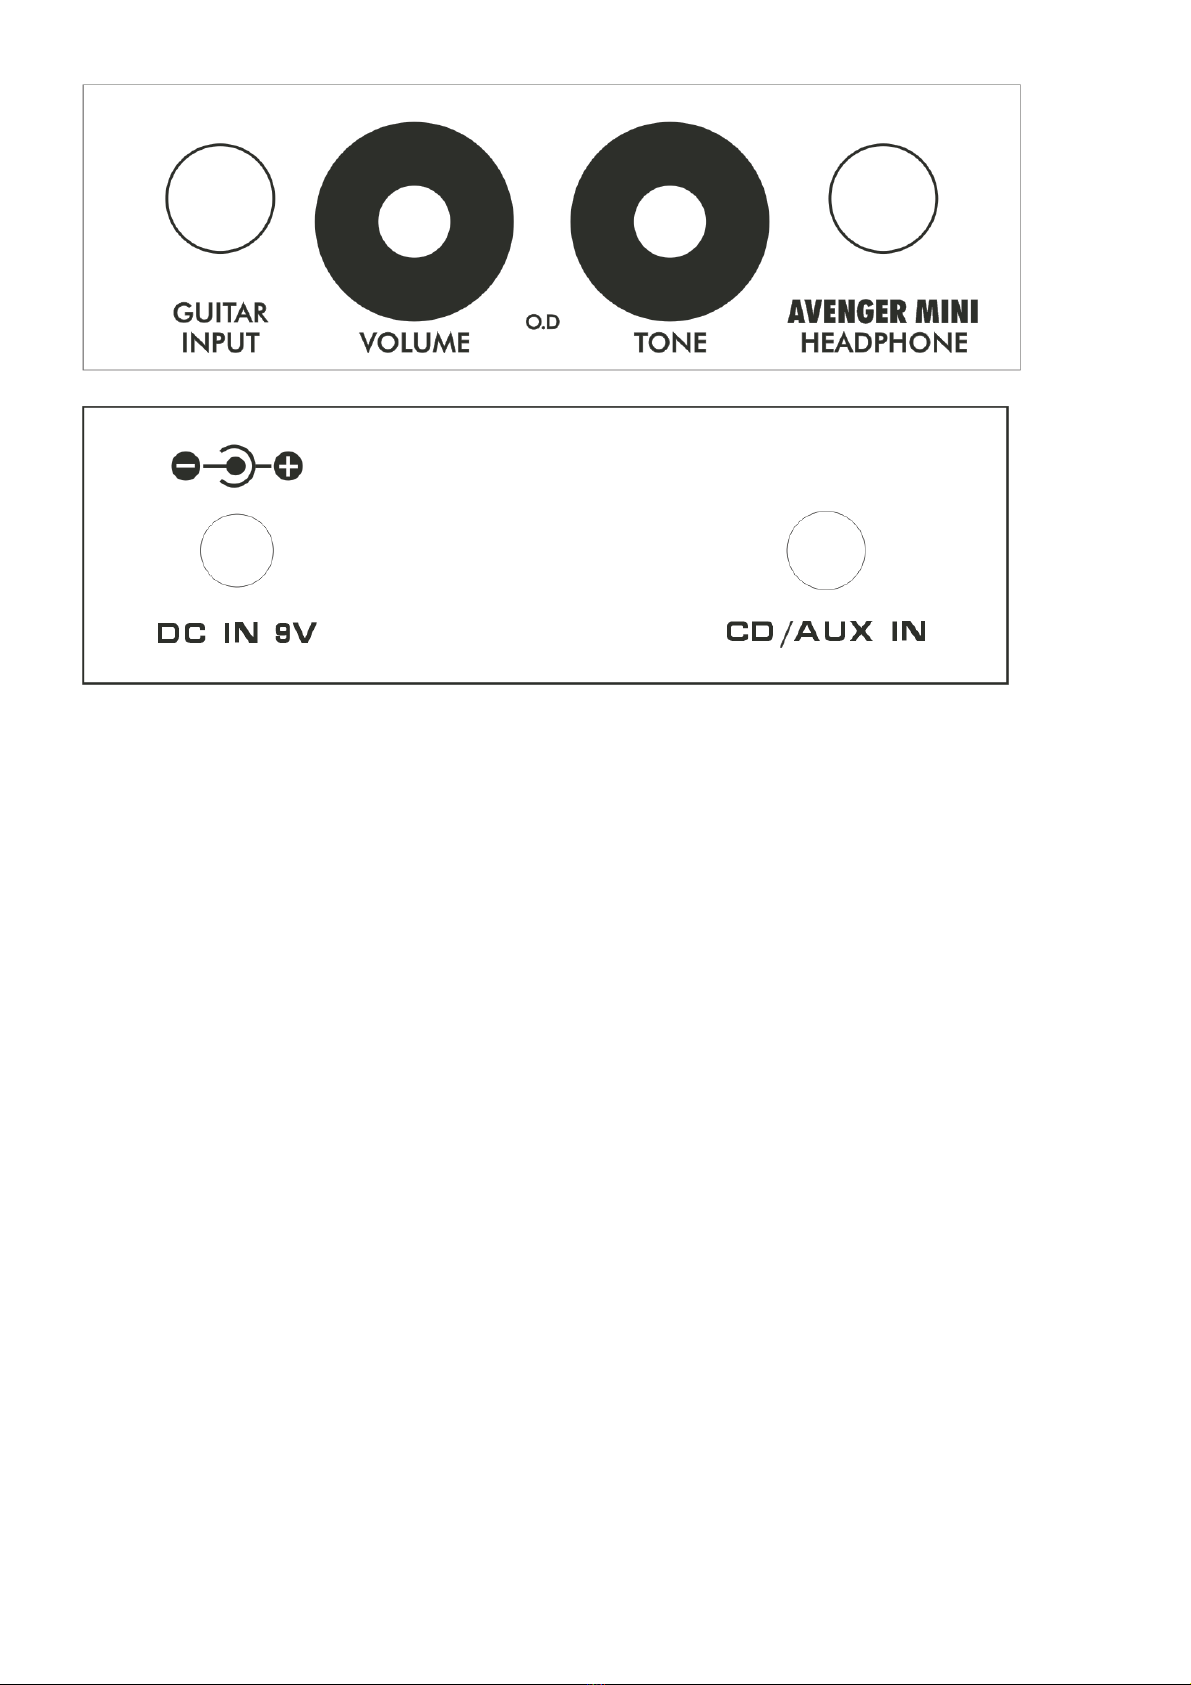
AVENGER MINI
INPUT:Connect the guitar to amplifier
VOLUME: Control overall level
O.D:Select between normal and O.D.
TONE:Control the level of frequencies.
PHONES:Connect headphone
Rear Panel
DC in 9V Powered by DC 9V
CD/AUX IN For an external audio source.
Front Panel
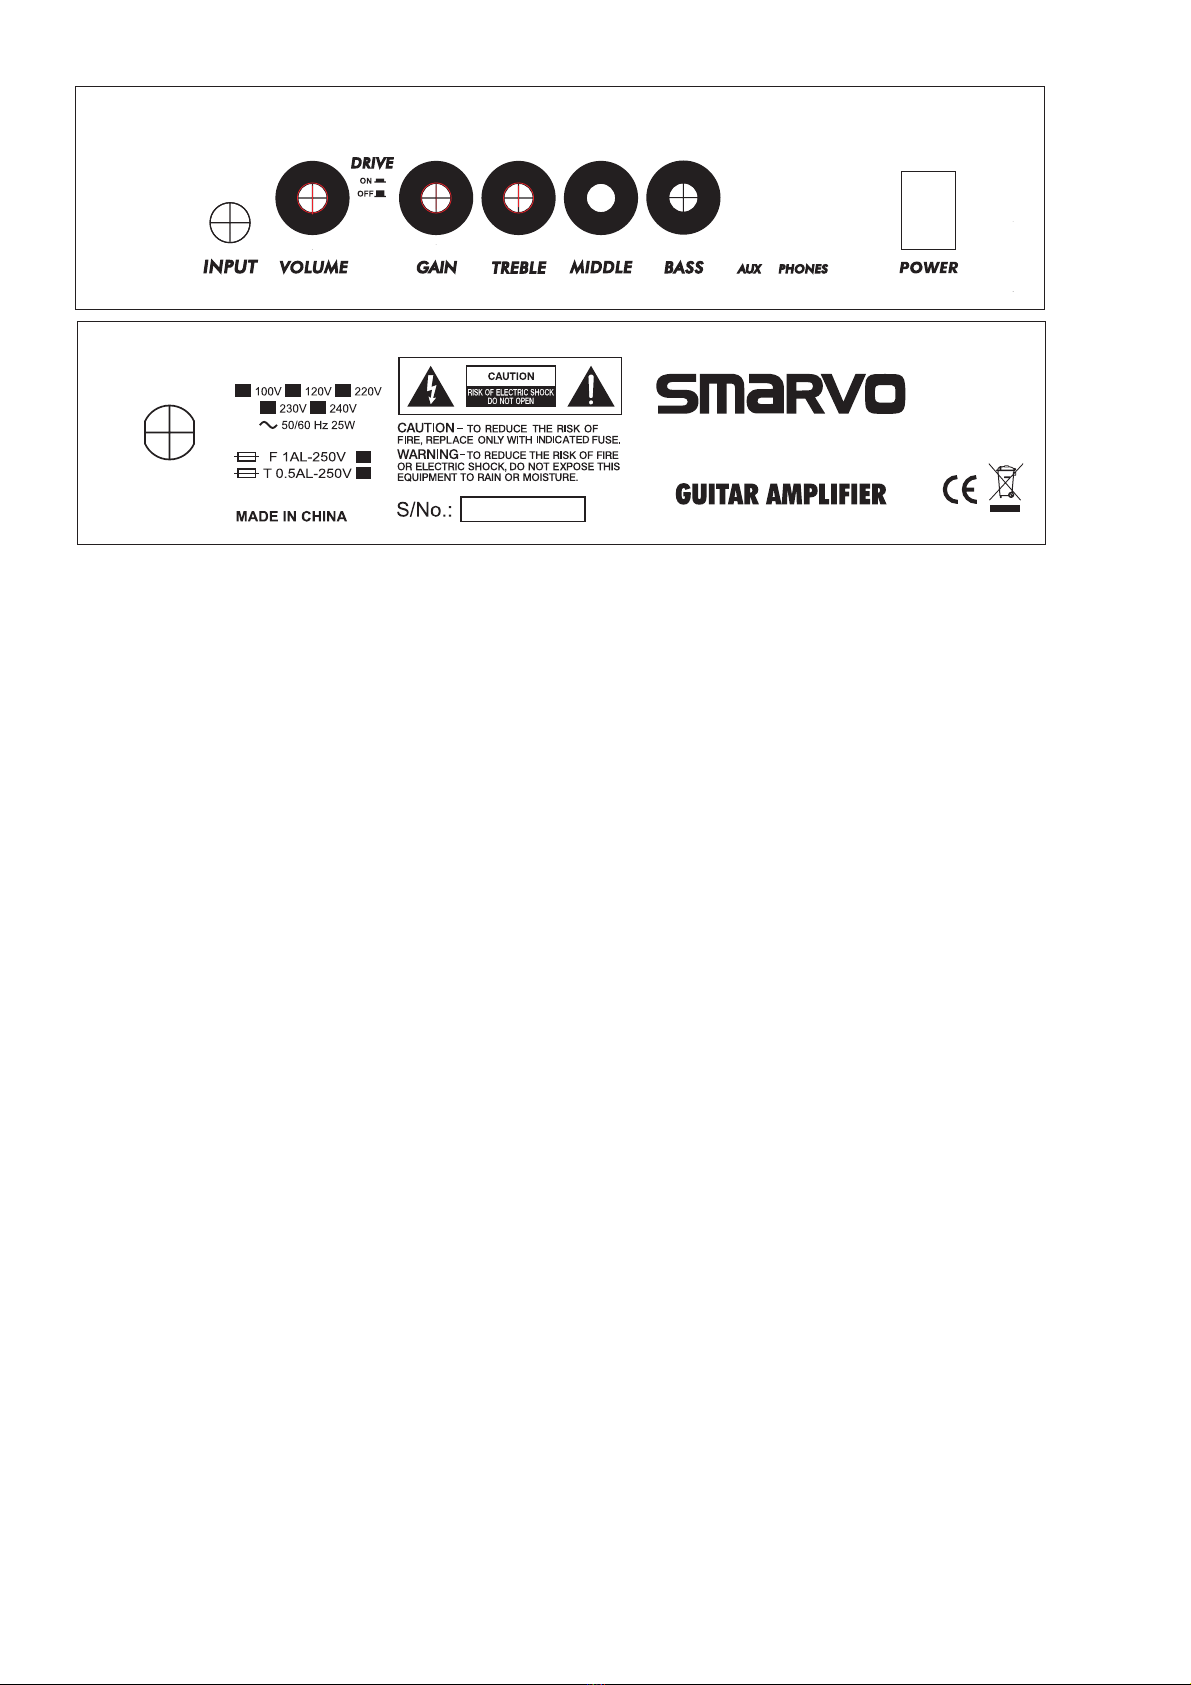
AVENGER 106 / 158AVENGER
INPUT:Connect the guitar to amplifier
VOLUME: Control overall level
DRIVE SW:Select between normal and O.D.
GAIN:Control the level of the input signal,
provides more distortion when turned clockwise
PHONES:Connect headphone
Rear Panel
AC Inlet: Connect AC power cord.
Front Panel
TREBLE:Control the higher frequency of the tone,
turn clockwise to increase the treble.
MIDDLE:Control the middle frequency of the tone,
turn clockwise to increase the middle.
AUX:For an external audio source.
POWER:Turn the amplifier On and Off.
BASS:Control the lower frequency of the tone,
turn clockwise to increase the bass.
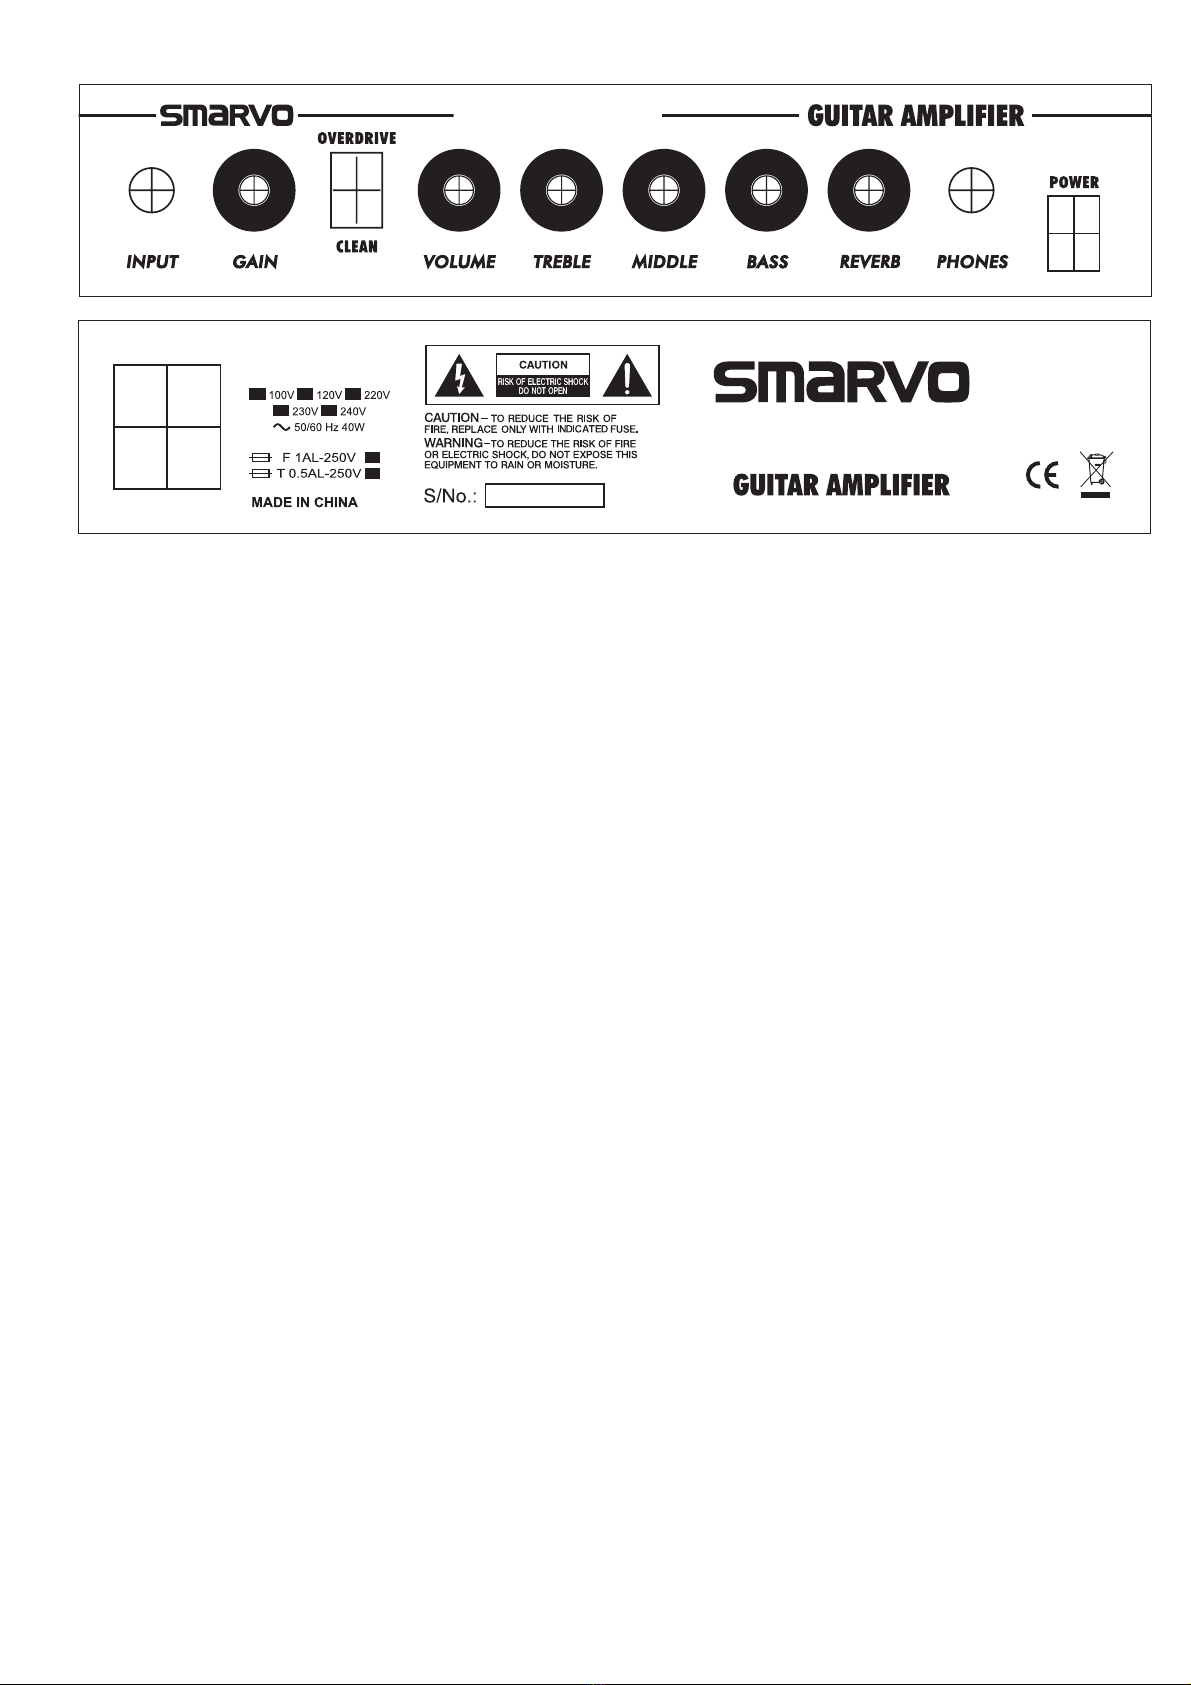
AVENGER 20
INPUT:Connect the guitar to amplifier
VOLUME: Control overall level
CHANNEL SELECT:Select between 2 channels (OD and Clean)
GAIN:Control the level of the input signal,
provides more distortion when turned clockwise
PHONES:Connect headphone
Rear Panel
AC Inlet: Connect AC power cord.
Front Panel
TREBLE:Control the higher frequency of the tone,
turn clockwise to increase the treble.
MIDDLE:Control the middle frequency of the tone,
turn clockwise to increase the middle.
REVERB:Adjust Level of Reverb effect.
POWER:Turn the amplifier On and Off.
AVENGER 20
AVENGER 20
BASS:Control the lower frequency of the tone,
turn clockwise to increase the bass.

AVENGER 20 DFX
INPUT:Connect the guitar to amplifier
LEVEL:: Control overall level
CHANNEL SELECT:Select between 2 channels (OD and Clean)
GAIN:Control the level of the input signal,
provides more distortion when turned clockwise
PHONES:Connect headphone
Rear Panel
AC Inlet: Connect AC power cord.
Front Panel
TREBLE:Control the higher frequency of the tone,
turn clockwise to increase the treble.
MIDDLE:Control the middle frequency of the tone,
turn clockwise to increase the middle.
DSP Effects : Select Effect Type Between Reverb/Delay/Choru/Flanger
/Phaser/Tremolo. Adjust Their Parameters and Level
POWER:Turn the amplifier On and Off.
BASS:Control the lower frequency of the tone,
turn clockwise to increase the bass.
5 5 555
INPUT GAIN LEVEL
OVERDRIVE
TREBLE MIDDLE BASS
CLEAN
EFFECTS DLY./REV.
DIGITAL EFFECTS
FLANGER PHASER
CHORUS TREMOLO
REVERB
DELAY
5
LEVEL
CLEAN
100V 120V
230V
50/60 Hz 50W
220V
240V
F 1AL-250V
T 0.5AL-250V
POWER
ON
PHONES
LEFT
RIGHT
CD IN
CD IN: For an external audio source.

AVENGER 40
INPUT:Connect the guitar to amplifier
LEVEL: Control overall level of normal channel
CHANNEL SELECT:Select between 2 channels (OD and Clean)
GAIN:Control the level of the input signal,
provides more distortion when turned clockwise
PHONES:Connect headphone
Rear Panel
AC Inlet: Connect AC power cord.
Front Panel
TREBLE:Control the higher frequency of the tone,
turn clockwise to increase the treble.
MIDDLE:Control the middle frequency of the tone,
turn clockwise to increase the middle.
REVERB:Adjust Level of Reverb effect.
POWER:Turn the amplifier On and Off.
BASS:Control the lower frequency of the tone,
turn clockwise to increase the bass.
LEVEL: Control overall level of O.D. channel
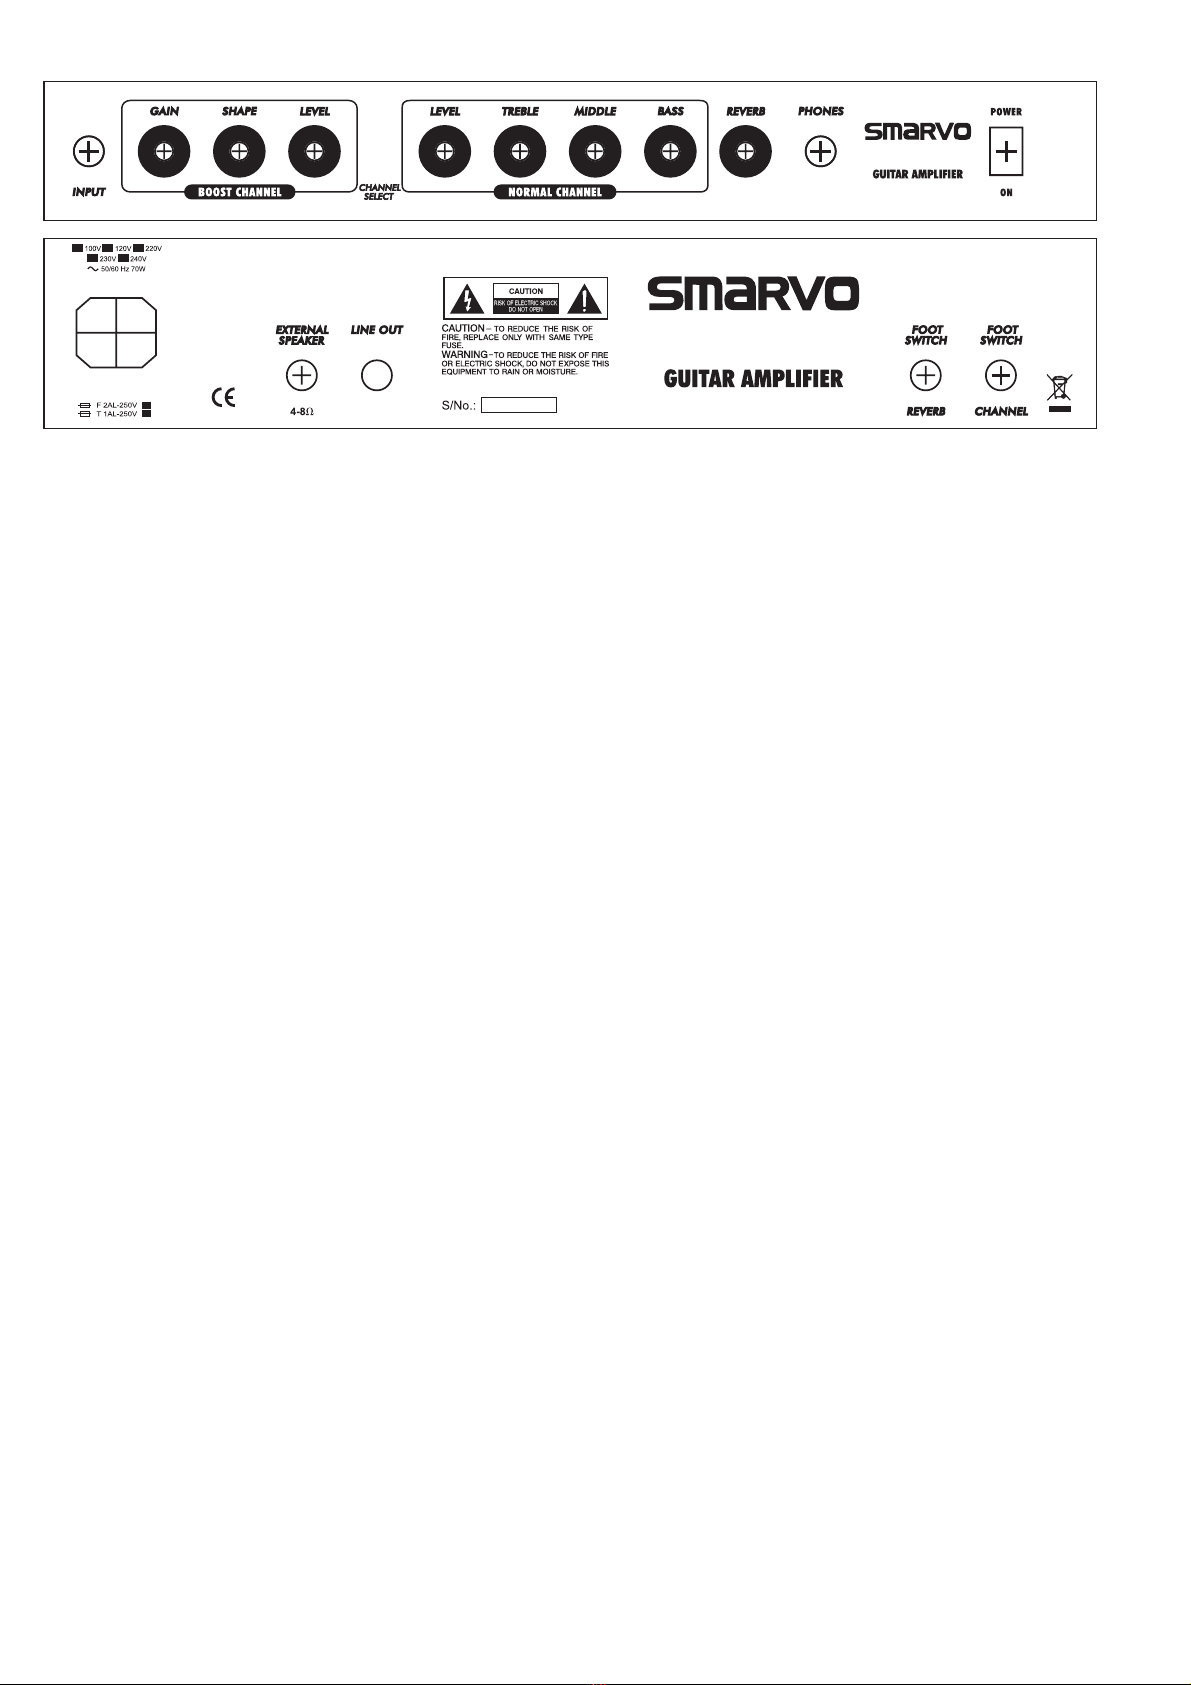
AVENGER 60 / 80AVENGER
INPUT:Connect the guitar to amplifier
LEVEL: Control overall level of normal channel
CHANNEL SELECT:Select between 2 channels (Boost and Normal)
GAIN:Control the level of the input signal,
provides more distortion when turned clockwise
PHONES:Connect headphone
Rear Panel
AC Inlet: Connect AC power cord.
Front Panel
TREBLE:Control the higher frequency of the tone,
turn clockwise to increase the treble.
MIDDLE:Control the middle frequency of the tone,
turn clockwise to increase the middle.
REVERBAdjust Level of Reverb effect.
POWER:Turn the amplifier On and Off.
BASS:Control the lower frequency of the tone,
turn clockwise to increase the bass.
LEVEL: Control overall level of boost channel
SHAPE: Change the sound by boosting and cutting certain mid frequencies.
EXTERNAL SPEAKER: Connect to external speaker load
LINE OUT: Connect a unit with line level input, e.g. Mixer
FOOT SW: Connect a footswitch to switch reverb ON and OFF.
FOOT SW:Connect a footswitch to select clean/overdrive channel
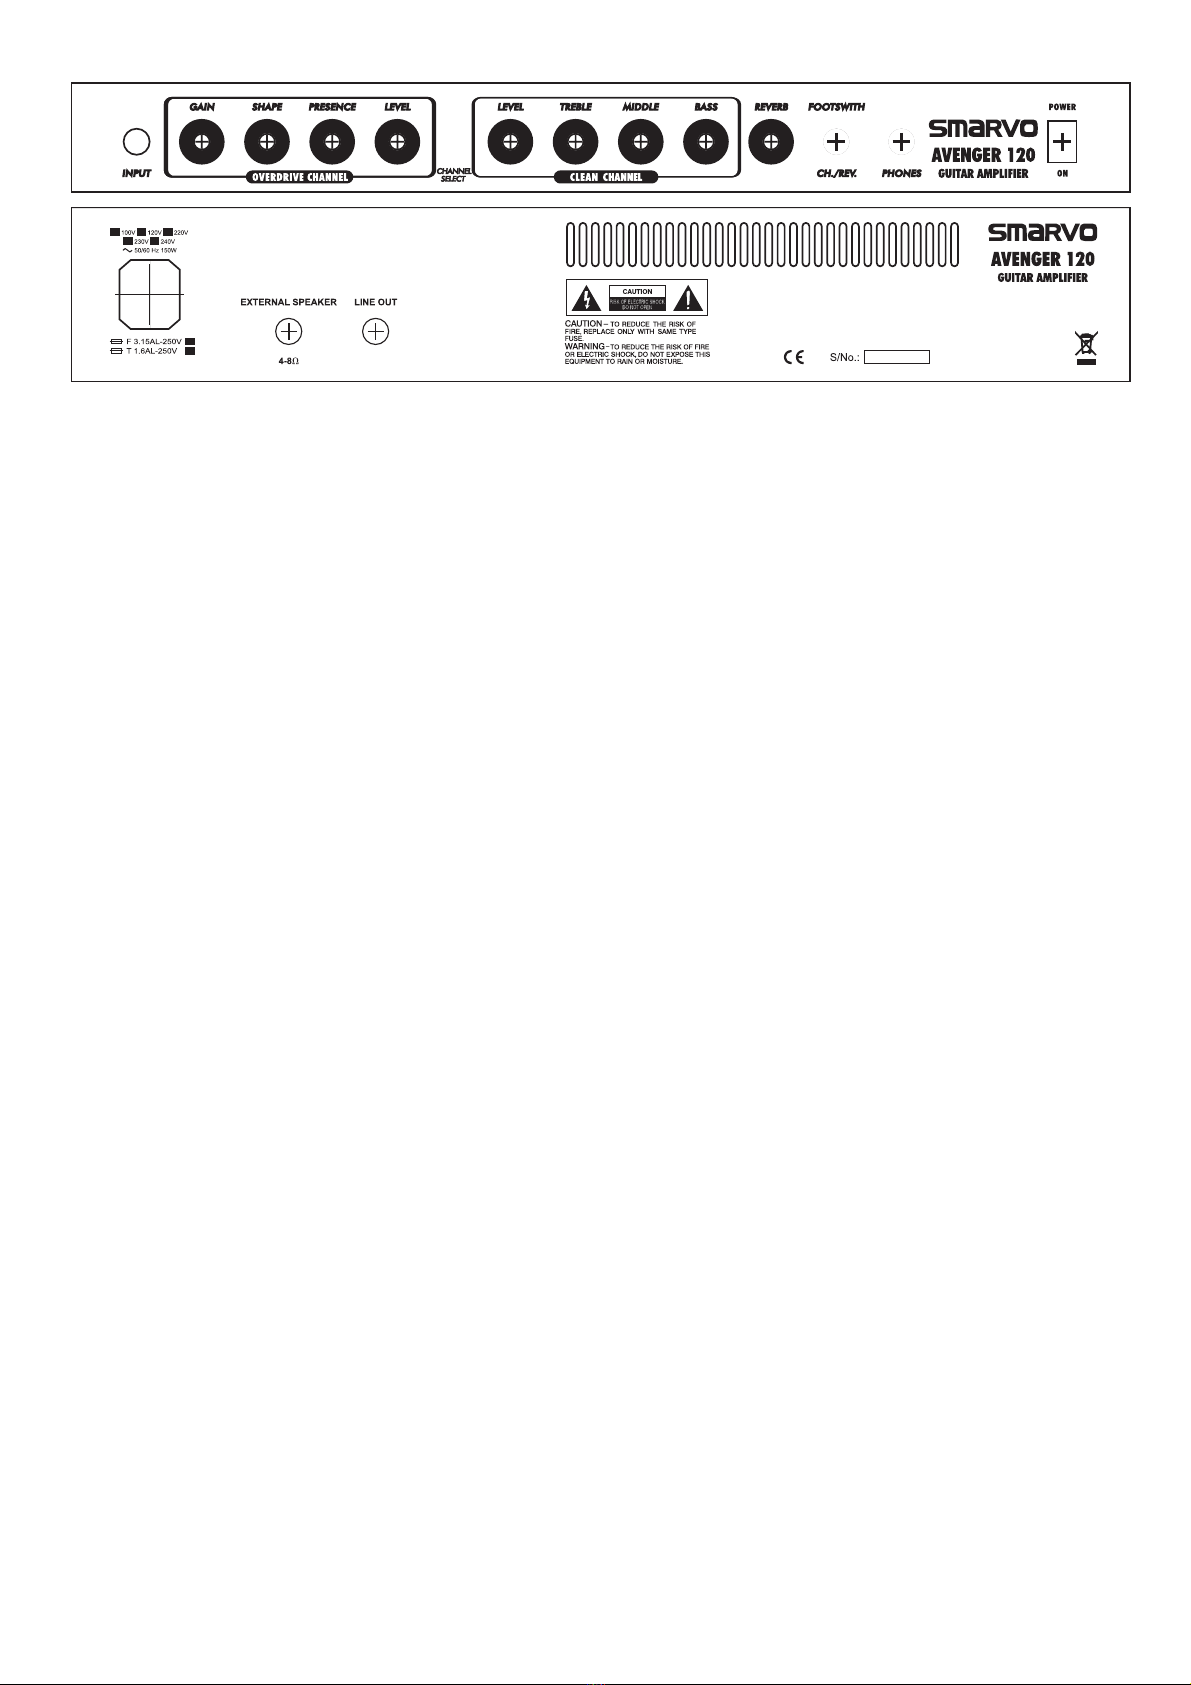
AVENGER 120
INPUT:Connect the guitar to amplifier
LEVEL: Control overall level of clean channel
CHANNEL SELECT:Select between 2 channels (OD and Clean)
GAIN:Control the level of the input signal,
provides more distortion when turned clockwise
PHONES:Connect headphone
Rear Panel
AC Inlet: Connect AC power cord.
Front Panel
TREBLE:Control the higher frequency of the tone,
turn clockwise to increase the treble.
MIDDLE:Control the middle frequency of the tone,
turn clockwise to increase the middle.
REVERB:Adjust Level of Reverb effect.
POWER:Turn the amplifier On and Off.
BASS:Control the lower frequency of the tone,
turn clockwise to increase the bass.
LEVEL: Control overall level of O.D. channel
SHAPE: Change the sound by boosting and cutting certain mid frequencies.
EXTERNAL SPEAKER: Connect to external speaker load
LINE OUT: Connect a unit with line level input, e.g. Mixer
PRESENCE:Control a specific narrow band in the middle and high
frequency area, turn clockwise to increase the Presence.
FOOT SW:Connect a footswitch to select clean/overdrive channel and reverb
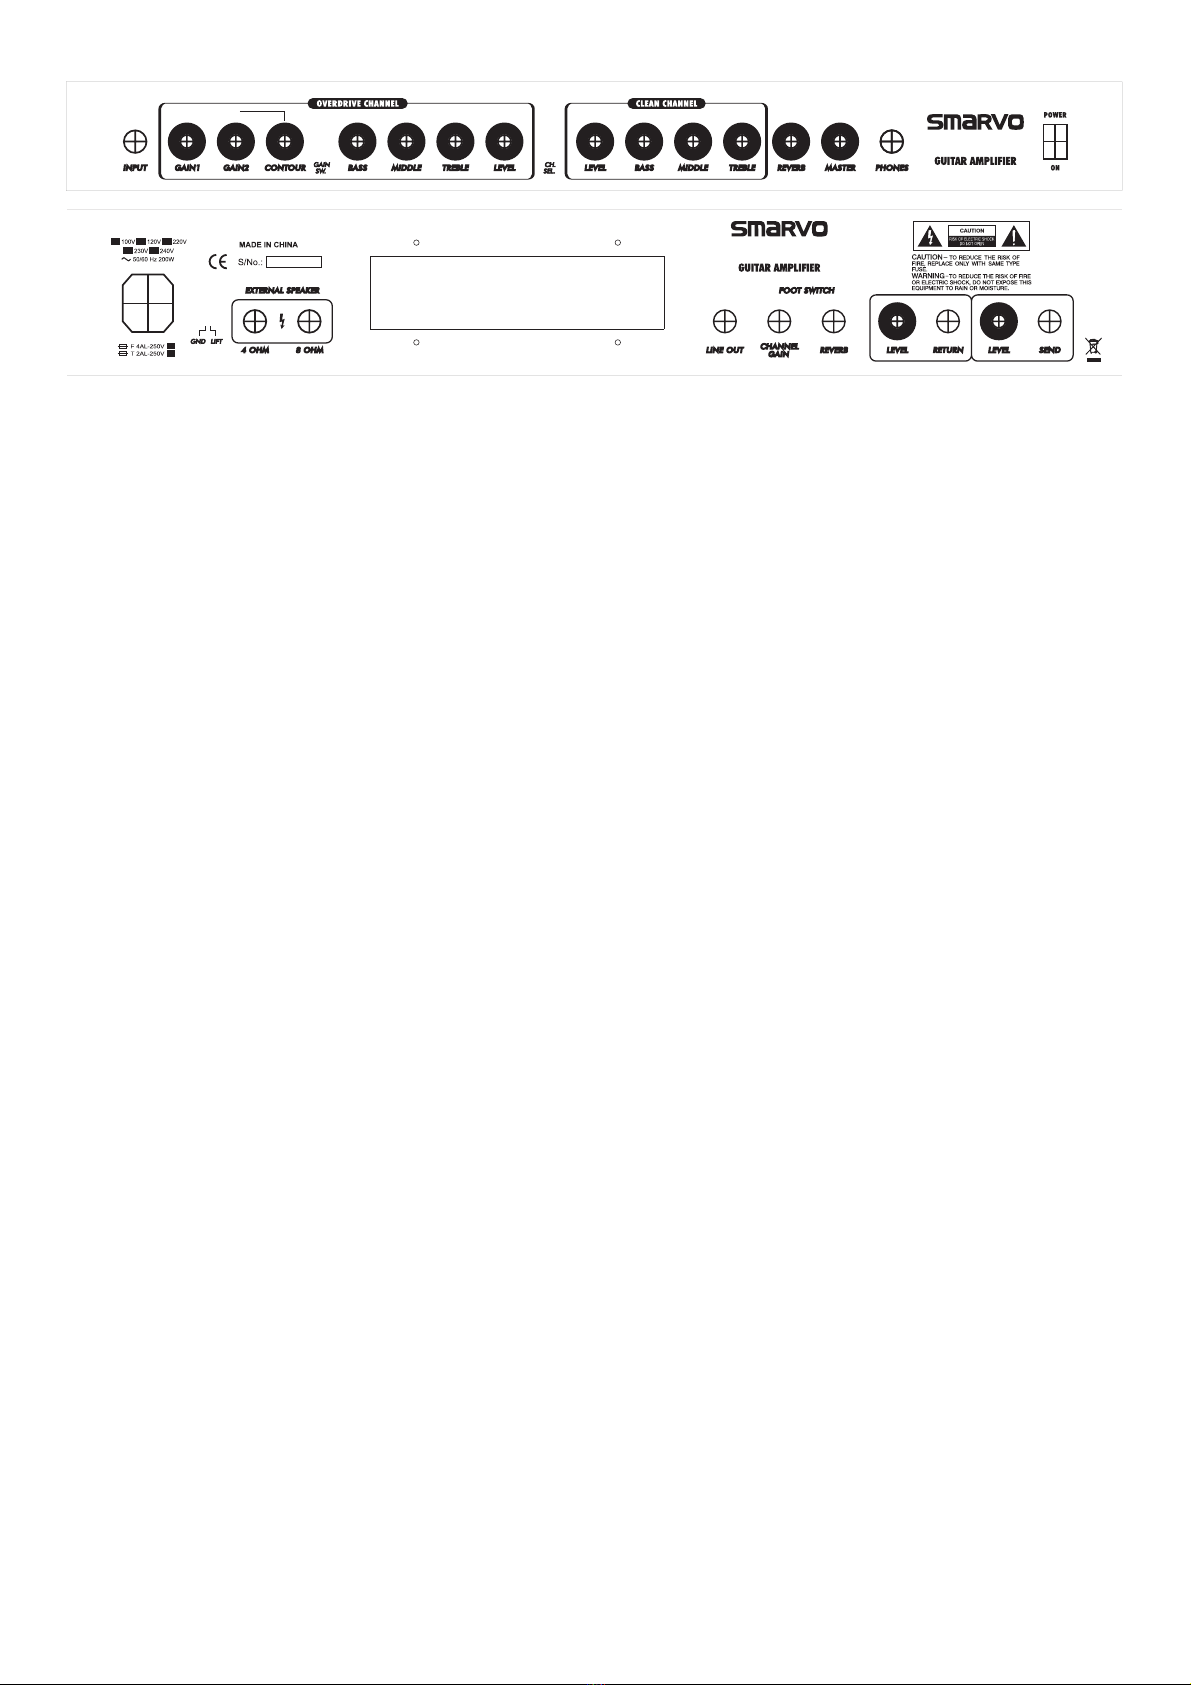
AVENGER 200 / 400AVENGER
INPUT:Connect the guitar to amplifier
LEVEL: Control overall level of clean channel
GAIN SW:Select between 2 Gains (Gain 1 and Gain 2)
GAIN1:Control the level of the input signal,
provides more distortion when turned clockwise
PHONES:Connect headphone
Front Panel
TREBLE:Control the higher frequency of the tone,
turn clockwise to increase the treble.
MIDDLE:Control the middle frequency of the tone,
turn clockwise to increase the middle.
REVERB:Adjust Level of Reverb effect.
BASS:Control the lower frequency of the tone,
turn clockwise to increase the bass.
CONTOUR: Change the sound by toosting and cutting certain mid frequencies.
MASTER:Control the overall volume of the Amplifier.
GAIN 2: As Gain 1, but can be set to give different distortion when selected.
BASS:Control the lower frequency of the tone,
turn clockwise to increase the bass.
MIDDLE:Control the middle frequency of the tone,
turn clockwise to increase the middle.
TREBLE:Control the higher frequency of the tone,
turn clockwise to increase the treble.
LEVEL: Control overall level of O.D. channel
CHANNEL SELECT:Select between 2 channels (OD and Clean)
FOOT SW:Connect a footswitch to select clean/overdrive channel and gain 1/gain 2 channel.
FOOT SW:Connect a footswitch to switch reverb or chorus ON and OFF.
Rear Panel
AC Inlet: Connect AC power cord.
POWER:Turn the amplifier On and Off.
GND LIFT: Remove ground from the circuit to eliminate excessive hum.
RETURN LEVEL: Control the returning signal level.
EXTERNAL SPEAKER: Connect to external speaker load
LINE OUT: Connect a unit with line level input, e.g. Mixer
RETURN JACK: Connect the guitar amplifier to output of an effects unit.
SEND LEVEL:Control the sending signal level.
SEND JACK:Connect the guitar amplifier to input of an effects unit
This manual suits for next models
7
Table of contents
Other smarvo Musical Instrument Amplifier manuals


