Socionext Jade IdeaBoxx User manual
Jade IdeaBoxx™
Product Manual

IdeaBoxx™Product Manual – © 2015 2
Table of Contents
Standards Used in This Guide ...............................................................................................................................3
Glossary of Terms and Acronyms..........................................................................................................................3
IdeaBoxx Kit Contents............................................................................................................................................4
Hardware Module.............................................................................................................................................4
Suite of Software Tools ....................................................................................................................................4
Introduction ............................................................................................................................................................5
Hardware Setup...................................................................................................................................................... 5
Serial Console .................................................................................................................................................. 5
HDMI Output..................................................................................................................................................... 5
Display Controller Outputs ..............................................................................................................................5
Schematic – Front of Board............................................................................................................................. 6
Schematic – Back of Board .............................................................................................................................6
Trying Out Other Demos ........................................................................................................................................ 7
Software Development in a Linux Environment....................................................................................................7
Import the Linux Appliance into VirtualBox....................................................................................................7
Starting the Linux Appliance with VirtualBox................................................................................................. 7
Building the Bootloader, Linux Kernel, and Root Filesystem........................................................................7
Bootloader........................................................................................................................................................ 8
Linux Kernel .....................................................................................................................................................8
Root Filesystem................................................................................................................................................ 8
Building the Linux Kernel with the Default Configuration.............................................................................9
Compiling User Code....................................................................................................................................... 9
Setup.................................................................................................................................................................9
Building the Kernel..........................................................................................................................................9
Building a Root Filesystem Image .................................................................................................................. 9
C/C++ Cross-Compilers................................................................................................................................... 9
Important File Locations .................................................................................................................................9
Support References ....................................................................................................................................... 10
Jade ................................................................................................................................................................ 10
Memory Layout............................................................................................................................................... 10

IdeaBoxx™Product Manual – © 2015 3
Standards Used in This Guide
In this guide different fonts will be used to make these instructions clearer.
• Standard descriptive text will be in this font.
• Commands to be typed at the console prompt will be in this font.
• File and folder paths will be in this font.
All paths are given in UNIX format. For example, /demo is a folder called demo in the root of the specified device.
Glossary of Terms and Acronyms
Jade – Socionext MB86R0x family of processors
SoC – System on Chip
SoM – System on Module
PCB – Printed Circuit Board
LCD – Liquid Crystal Display
GUI – Graphical User Interface
USB – Universal Serial Bus
BSP – Board Support Package
HDMI – High Definition Multimedia Interface
TFTP – Trivial File Transfer Protocol
NFS – Network File System
IdeaBoxx™Product Manual – © 2015 4
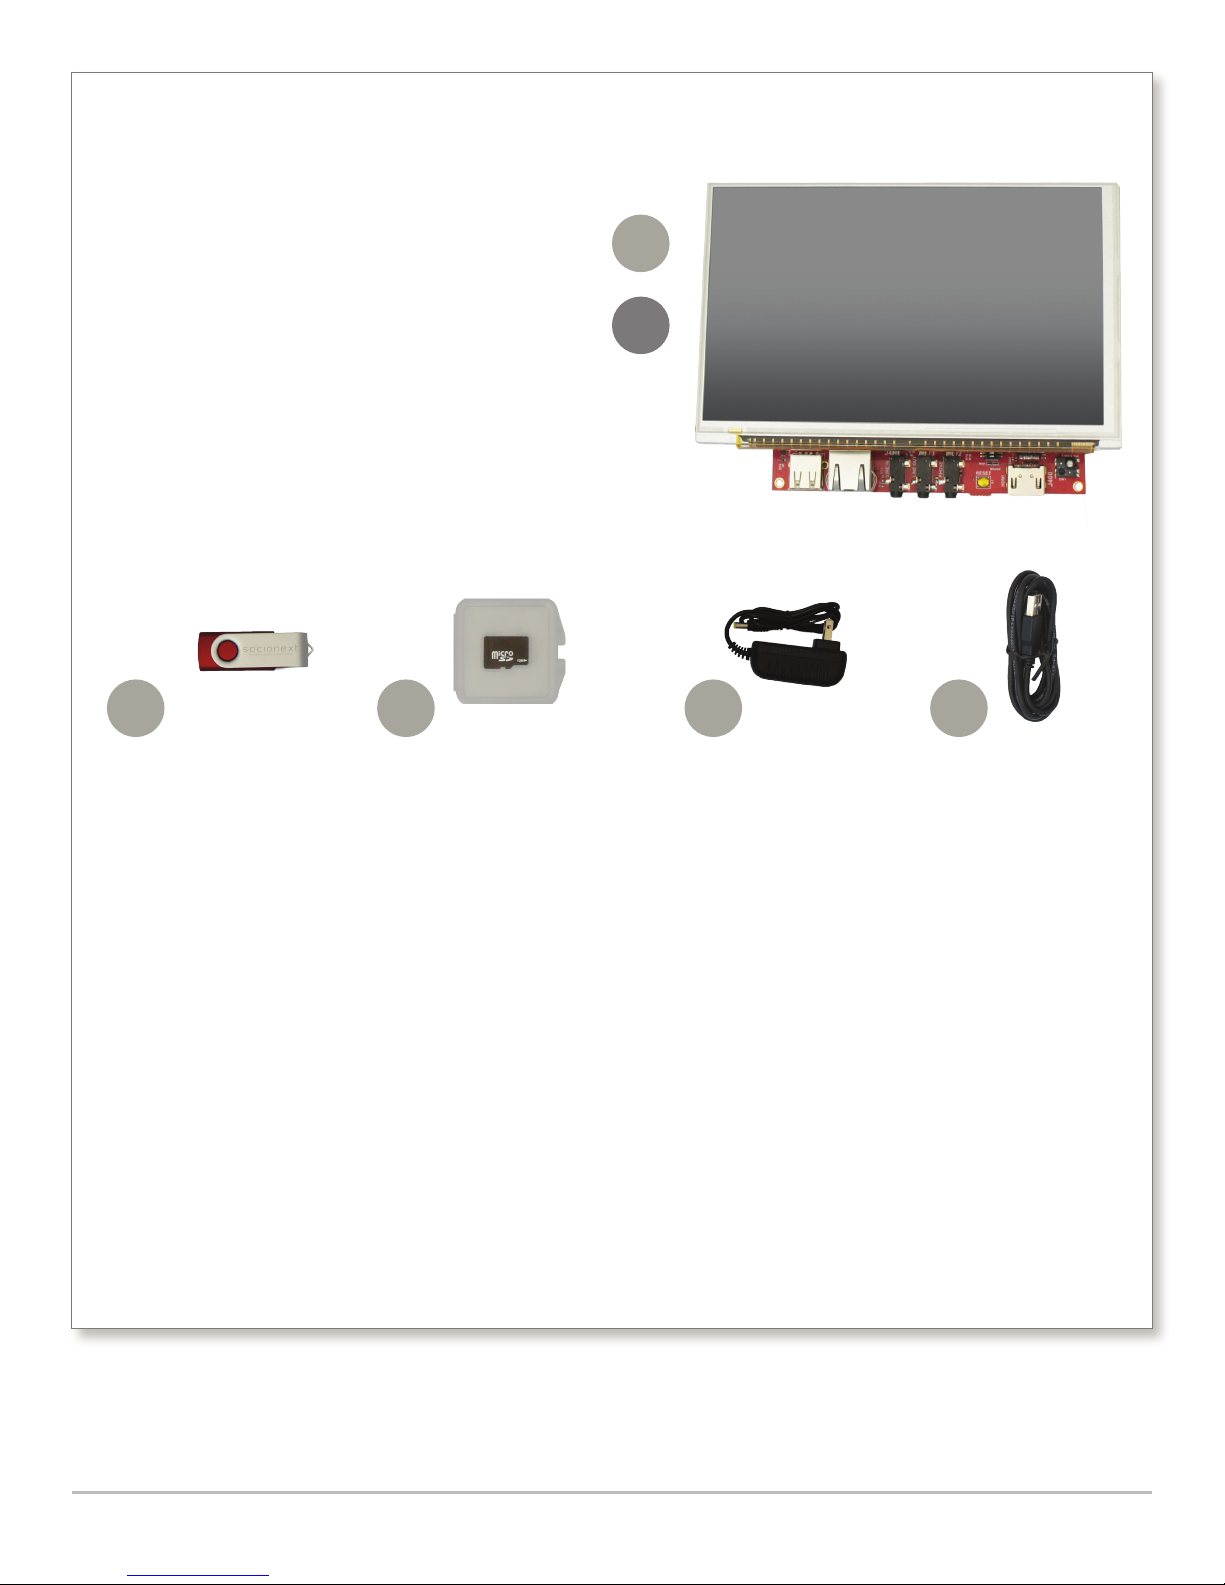
IdeaBoxx Kit Contents
The Jade IdeaBoxx kit includes the following components:
Hardware Module
1. PCB with Socionext’s Jade SoM, processor, graphics
memory (frame buffer), Flash memory and RAM
memory
2. 7-inch backlit LCD with capacitive touch screen
3. USB stick containing documentation, and preloaded
touch and non-touch demos
4. SD card
5. Power supply
6. USB cable for console access
Storyboard Suite is a trademark of Crank Software, Inc.
VirtualBox is a trademark of Oracle Corporation.
ARM® is a trademark of ARM® Limited.
1
2
3 4 5 6
Suite of Software Tools
• USB stick containing documentation, and preloaded
touch and non-touch demos (some of which are
self-running).
• Datasheets and application notes for Jade
IdeaBoxx
• Board files to create reference design platforms
• Libraries and tools free of charge and royalties*
• Schematics and Altium Designer project files for
all PCBs
• Linux BSP virtual appliance image
• U-boot bootloader
• Linux kernel version 3.0.3
• Functional root file system
• GCC-based cross-compiler
• A 30-day demo version of Crank Software’s
Storyboard Suite GUI design software

IdeaBoxx™Product Manual – © 2015 5
Introduction
The Socionext IdeaBoxx is a fully self-contained, graphics-centric SDK with everything a user needs to create a complete
graphical sub-system in minutes. The principal concept behind IdeaBoxx is to provide a fast, easy-to-use and reliable real-
world embedded environment that simulates how graphics would appear on the finished product. IdeaBoxx reduces the
development timeline by incorporating all necessary hardware and software in an optimized bundle so users don't need to
source anything. Everything in the IdeaBoxx has been designed and tested to work in a plug and play method so that users
can focus completely on the creative elements of the design right out of the box.
Designed as a series of products, IdeaBoxx complements the far-reaching capabilities of Socionext’s Graphics Display
Controllers. IdeaBoxx Jade is the first of three product rollouts. Jade IdeaBoxx allows users to produce an innovative
design environment that simplifies and streamlines the process for developing 3D graphics.
To get started, simply install the development system and use the precompiled demos located on the enclosed USB
drive. Run the compiled software and preview graphic files to compare the differences in performance between the BSP
and a more powerful PC development environment. The capabilities of the embedded processor can be investigated and
appropriate changes made to the resolution or size of images for quicker loading.
A Linux BSP, including the Linux kernel sources used, is also provided to allow the adventurous to develop more complex
applications. A complete set of documentation, schematics, gerber files, and source code is included to ensure users can
fully realize their ideas.
This document summarizes the features of the Jade IdeaBoxx and gives instructions for setting up and starting the BSP,
running the software and viewing graphical files.
Hardware Setup
• Unpack the IdeaBoxx kit. Ensure that the microSD card is fully seated in its slot on the bottom of the board.
• Plug the power supply into the IdeaBoxx board and then into the wall. Toggle the power switch to the ON position. The
scale demo should startup automatically.
Serial Console (13)
The serial console is available via the mini-USB connector P7 on the bottom of the board. The USB device is an FTDI
serial-to-USB converter. Most operating systems have the driver built in. However, if the driver is not included, users can
download it from FTDI at http://www.ftdichip.com/FTDrivers.htm. The serial port is configured to operate at standard
115200,8,n,1 serial settings. Users can log in as “root” with no password.
HDMI Output (4)
The HDMI output at jack J400 can be enabled by setting switch S2-1 and switches S400-5 and S400-6 to the ON position.
These are the default settings. The default resolution is factory set to 800x480 pixels to match the LCD panel.
Note: HDMI output may not display correctly on all televisions and monitors.
Display Controller Outputs (1–2)
The included LCD panel is connected to the 50-pin header labeled “LCD 0” header connected to display controller 0. Display
controller 1 is also available via a second 50-pin header labeled “LCD 1”. The LCD panel assembly must be removed to access
these headers.

IdeaBoxx™Product Manual – © 2015 6
12 11
10
9
7
6
5
4
8
1. LCD1 Output
2. LCD0 Output
3. 5-Way Joystick
4. HDMI Output
5. Reset Switch
6. Headphone Output
7. Line Level Output
8. Line Level Input
9. Ethernet
10. USB Connector
11. Power Switch
12. Power connector
13. Mini USB
14. Micro SD slot
Schematic – Front of Board
13 14
Schematic – Back of Board
31 2

IdeaBoxx™Product Manual – © 2015 7
Trying Out Other Demos
The demos are located in the folder /prebuilt_demos on the USB drive. Use the directions below to run demos on the
IdeaBoxx board.
1. Slide the power switch to OFF.
2. Remove the microSD card from the IdeaBoxx board.
3. Insert the microSD card into the computer.
4. Delete all the files on the microSD card. Note that if the microSD card is reformatted, it must be formatted as a FAT32
drive.
5. Copy all the files from the demo folder of the user’s choice to the microSD card. For example, to put the scale demo
on the microSD card, copy all the files under
/prebuilt_demos/scale/. Do NOT copy the folder scale.
6. Copy all the files from the /prebuilt_demos/common folder to the microSD card. Do NOT copy the folder common.
7. Safely remove the microSD card from the computer.
8. Insert the microSD card back into the IdeaBoxx board.
9. Turn on power to the IdeaBoxx board by sliding the power switch to ON.
Software Development in a Linux Environment
Import the Linux Appliance into VirtualBox
To use VirtualBox:
1. Select and launch VirtualBox.
2. Select File | Import Appliance.
3. Select the appliance (demonstration file) from the USB drive.
4. Select OK.
5. Select “Yes” to accept all the settings.
6. Click “start” to import the file into VirtualBox.
7. Run the software.
Starting the Linux Appliance with VirtualBox
1. Click on the Appliance image in the left-hand pane.
2. Click Start (button at the top, changes to “show” when VM is running). The VirtualBox splash screen will appear
momentarily. Once the VM boots up, a login screen will appear.
3. At the login screen, enter the user ID “jade” and the password “jade” (all lower case).
4. Open a terminal window by doing one of the following:
• Click Start | Accessories | Terminal
• Double-click on the LXTerminal icon on the Linux desktop
• Press F12 to open up the guake terminal.
Building the Bootloader, Linux Kernel, and Root Filesystem
The three major things an engineer might need to rebuild in Linux are the bootloader, Linux kernel and root filesystem.
Each can be rebuilt using the build.sh script in its respective folder.

IdeaBoxx™Product Manual – © 2015 8
Bootloader
The bootloader source code is in /opt/jade/bsp303/sources/u-boot. To rebuild it, use the ./build.sh shell script
provided in the source code folder. The result will be multiple files in the top-level source code folder. The new binary
bootloader file will be named /opt/jade/bsp303/sources/u-boot/u-boot.bin.
To program the bootloader into the Jade board:
1. Turn on power to the IdeaBoxx board.
2. Press a button to stop the bootloader.
3. Type tftp 40000000 u-boot.bin
4. Type erase 10000000 1002FFFF
5. Type cp.b 40000000 10000000 $filesize
6. Type reset and Jade will reset and execute the new bootloader.
Linux Kernel
The Linux kernel source tree is in /opt/jade/bsp303/sources/xxsvideo/linux-3.0.3.
Before reconfiguring or building the kernel for the first time, the user must execute make jade-ideaboxx_defcong.
To reconfigure the Linux kernel (e.g., to add or remove drivers), execute make menucong. To rebuild it, change to the top-
level directory of the kernel source tree and execute ./build.sh. This will create a new kernel as
/opt/jade/bsp303/sources/xxsvideo/linux-3.0.3/arch/arm/boot/uImage. The new kernel will also be
copied to /tftpboot/uImage303-$YYYYMMDD-HHMM where the date and time are given as a four-digit year and two-
digit month, day, hour (24-hour format) and minute. A symbolic link to that file is also created as /tftpboot/uImage.
To program the new kernel into the Jade board:
1. Turn on power to the IdeaBoxx board.
2. Press a button to stop the bootloader.
3. Type tftp 40000000 uImage
4. Type erase 10060000 102FFFFF
5. Type cp.b 40000000 10060000 $filesize
6. Type reset and Jade will reset and execute the new Linux kernel.
Root Filesystem
The root filesystem is in /opt/jade/bsp303/rootfs-final. To build a new root filesystem image suitable to be
programmed into Flash, change to the root filesystem directory and execute ./build.sh. This will create a new root
filesystem binary image as
/opt/jade/bsp303/sources/xxsvideo/linux-3.0.3/arch/arm/boot/uImage. The image will also be copied
to /tftpboot/rootfs303-$YYYYMMDD-HHMM where the date and time are given as four-digit year and two-digit month,
day, hour (24-hour format) and minute. A symbolic link to that file is also created as /tftpboot/rootfs.bin.
To program the new image into the Jade board:
Turn on power to the IdeaBoxx board.
1. Press a key in the serial terminal program to stop the bootloader.
2. Type tftp 40000000 rootfs.bin
3. Type erase 10300000 11dfffff
4. Type cp.b 40000000 10300000 $filesize
5. Type reset to reset Jade and boot the new filesystem.

IdeaBoxx™Product Manual – © 2015 9
Building the Linux Kernel with the Default Configuration
To rebuild the Linux kernel with the default configuration, execute the following commands. Note that this will delete any
existing local kernel configuration, so users should copy it to another directory before proceeding if they want to save the
kernel.
cd /opt/jade/bsp303/sources/xxsvideo/linux-3.0.3
make distclean
make jade-ideaboxx_defcong && ./build.sh
Compiling User Code
A C and C++ compiler are included in the BSP. They are
/home/jade/opt/crosstool/gcc-4.2.3-glibc-2.7/arm-unknown-linux-gnueabi/bin/arm-unknown-
linux-gnueabi-gcc and
/home/jade/opt/crosstool/gcc-4.2.3-glibc-2.7/arm-unknown-linux-gnueabi/bin/arm-unknown-
linux-gnueabi-g++ respectively. This path is included in the system path variable. These are cross-compilers
built from GCC sources and use the same command-line arguments. To compile a single-source-code program, arm-
unknown-linux-gnueabi-gcc hello.c –o hello will generate a binary file hello that will run on Jade.
Setup
The BSP is included on the USB drive as a VirtualBox appliance. Users need to have VirtualBox installed on their computer
in order to run it. The BSP was created and tested with VirtualBox 4.3.6. VirtualBox software can be downloaded from
https://www.virtualbox.org/wiki/Downloads. Once installed, the appliance can be imported into VirtualBox.
The Jade IdeaBoxx board can boot from Flash (the default) or from TFTP + NFS via Ethernet. The default IP address of the
board is 192.168.1.230. U-boot is configured to look for TFTP and NFS servers at address 192.168.1.130. The VirtualBox
appliance has these servers configured and active out of the box. To boot via Ethernet, press any key on the serial console
immediately after power on to stop u-boot. Then execute run netboot from the u-boot prompt.
Building the Kernel
To rebuild the Kernel, navigate to /opt/jade/bsp303/sources/xxsvideo/linux in the development filesystem. The
kernel can be rebuilt with make jade-ideaboxx_defcong then ./build.sh.
Note make jade-ideaboxx_defconfig only needs to be run once or after running make distclean. The resulting
image will be /tftpboot/uImage.
Building a Root Filesystem Image
To build a root filesystem image suitable for flashing into the Jade SOM, navigate to /opt/jade/bsp303 in the
development filesystem. The filesystem image can be built with ./build.sh. The resulting image will be .
C/C++ Cross-Compilers
The C compiler provided is a GCC-based cross-compiler. It can be executed with arm-unknown-linux-gnueabi-gcc.
Likewise, the C++ compiler provided is a GCC-based cross-compiler. It can be executed with arm-unknown-linux-
gnueabi-g++.
Important File Locations
u-boot source: /opt/jade/u-boot
Linux kernel source: /opt/jade/bsp303/sources/xxsvideo/linux
Root filesystem top-level directory: /opt/jade/bsp303/rootfs-final
TFTP boot file location: /tftpboot

Support References
http://www.socionext.com/en/
http://www.cranksoftware.com
http://www.kernel.org
http://www.denx.de/wiki/U-Boot
Jade
The Jade GDC at the hub of the first IdeaBoxx is Socionext's most cost-effective, SOC-based display controller. Based on an
ARM™ 926EJES processor running at 333MHz, Jade has a fixed-pipeline, 3D graphics engine powerful enough to produce
sharp, crisp graphics on screen sizes up to 1024 x 768. Fabricated in Socionext’s standard 90nm process, this graphics
display controller is designed to provide the optimal balance of power, via low leakage current, and performance. Jade can
support two screens independently, along with dual-capture ports, and can apply video images to 3D meshes via texture
mapping. This combination of features makes Jade ideal for many industrial and medical applications where screen sizes
of 4 to 10 inches are common.
A hierarchical bus system isolates high-performance functions (e.g., 3D graphics processing) from routine operations (e.g.,
low-speed I/O). Socionext has designed the ARM processor to run at twice the rate of the graphics core to reduce memory
bus contention between these two primary functions.
Memory Layout
Jade’s memory layout, both RAM and Flash, is described below.
RAM: 128MB @ 0x40000000
0x40000000 – 0x43FFFFFF – System RAM
0x44000000 – 0x47FFFFFF – Video RAM
NOR Flash: 32MB @ 0x10000000
0x10000000 – 0x1002FFFF – u-boot
0x10030000 – 0x1005FFFF – u-boot arguments
0x10060000 – 0x102FFFFF – Linux kernel
0x10300000 – 0x11DFFFFF – Root filesystem
0x11E00000 – 0x11FFFFFF – Optional u-boot splash
screen (.BMP file)
Socionext America, Inc.
1250 E. Arques Ave. M/S 335, Sunnyvale, CA 94085
Tel: (844) 680-3453 Fax: (408) 737-5444
©2015 Socionext America, Inc.
All company and product names are trademarks
or registered trademarks of their respective owners.
Printed in the U.S.A. GRA-UM-30124-06/2015
Table of contents


