Sokon Automotive DFSK Glory 580 User manual
DFSK GLORY 580 HANDBOOK

Introduction
Thank you for choosing a Glory as your new vehicle.
This manual provides you with important information on the operation and maintenance of your
vehicle. Please be sure to carefully read and use this manual as required.
This manual is for the DFSK Glory 580 passanger car. There are some congurations in the car you
may not have.
As our products are in continuous development and improvement, the company reserves the right
to upgrade the technical state and parameters at any time.
Sokon Automotive.

Car modication
Please do not modify the vehicle mechanicals or any of the identication systems. Modication may affect the performance, safe-
ty or durability of the vehicle, and may even violate national regulations. In addition, any damage or performance failures caused
by modications will invalidate the vehicle warranty.
The information in this manual applies to all models of this vehicle, including some optional congurations, so you may nd that
some of the information does not apply specically to your car.
All the information, specications and illustrations in this manual are the specications at the time of printing. DFSK reserves the
right to modify the specication or design of the vehicle without notice at any time.
Read rst and drive safely
Before operating your vehicle, please read this manual carefully and it will ensure that you are familiar with the control and main-
tenance requirements that will help you drive your car safely.
This manual uses “ warning” mark to demonstrate an action could lead to severe injury or death. To avoid or reduce danger,
the rules should not be violated.
This manual also uses “ caution” mark to demonstrate an action could lead to slight damage to people or vehicle. To avoid
danger, the rules should not be violated.
The mark “ notice” will provide assistance.
2
Important Information
!
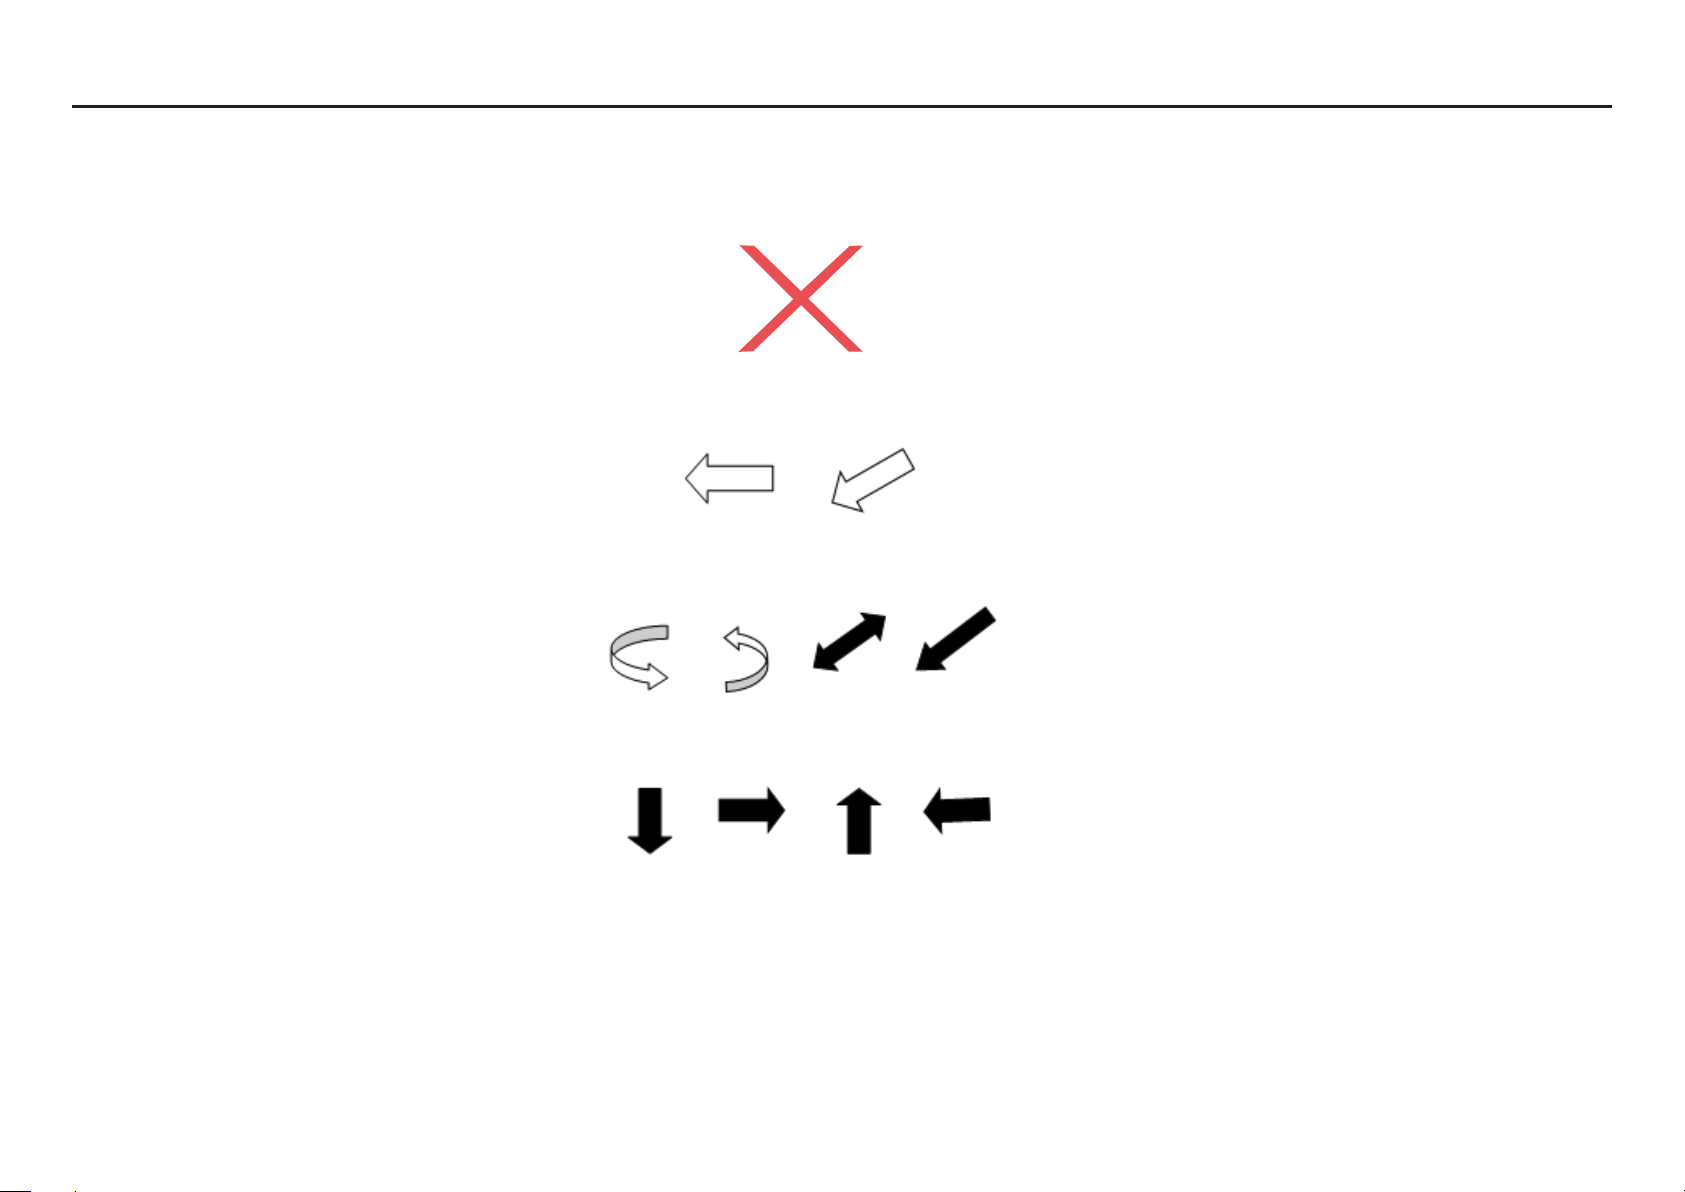
This cross mark means “should be avoided” or “should not let it happen”
In the gures above, the arrow symbol indicates the front of the vehicle
In the illustrations above, the arrow symbol indicates movement or action
In the illustrations above the arrow symbol draws your attention to the indication.
3
Important Information
Important Information
4
Contents
I. Illustration Index
II. Safety Devices - Seats, Seat Belts And Auxiliary Restraints
III. Instrumentation And Control Switches
IV. Items To Check And Adjust Before Driving
V. Reversing Video System, Heater And Air Conditioner, Sound System
VI. Startup and Driving
VII. Emergency Measures
VIII. Routine Maintenance Checks
IX. Technical Information
X. Handover Procedure
XI. Warranty Procedure
XII. Service Record
XIII. Breakdown Recovery
5
11
21
36
43
47
54
60
69
74
75
77
77

Illustration Index
5
1. Assisted Front Impact Airbag (including Side Airbag)
2. Seat belt
3. Headrest
4. Three-point seat belt
5. Front seat
6. Three-point seat belt
7. Second-row seats
8. Third-row seats
I. Illustration Index
123 4
6 7 85
Seat Belts and Supplementary Restraint Systems (SRS)
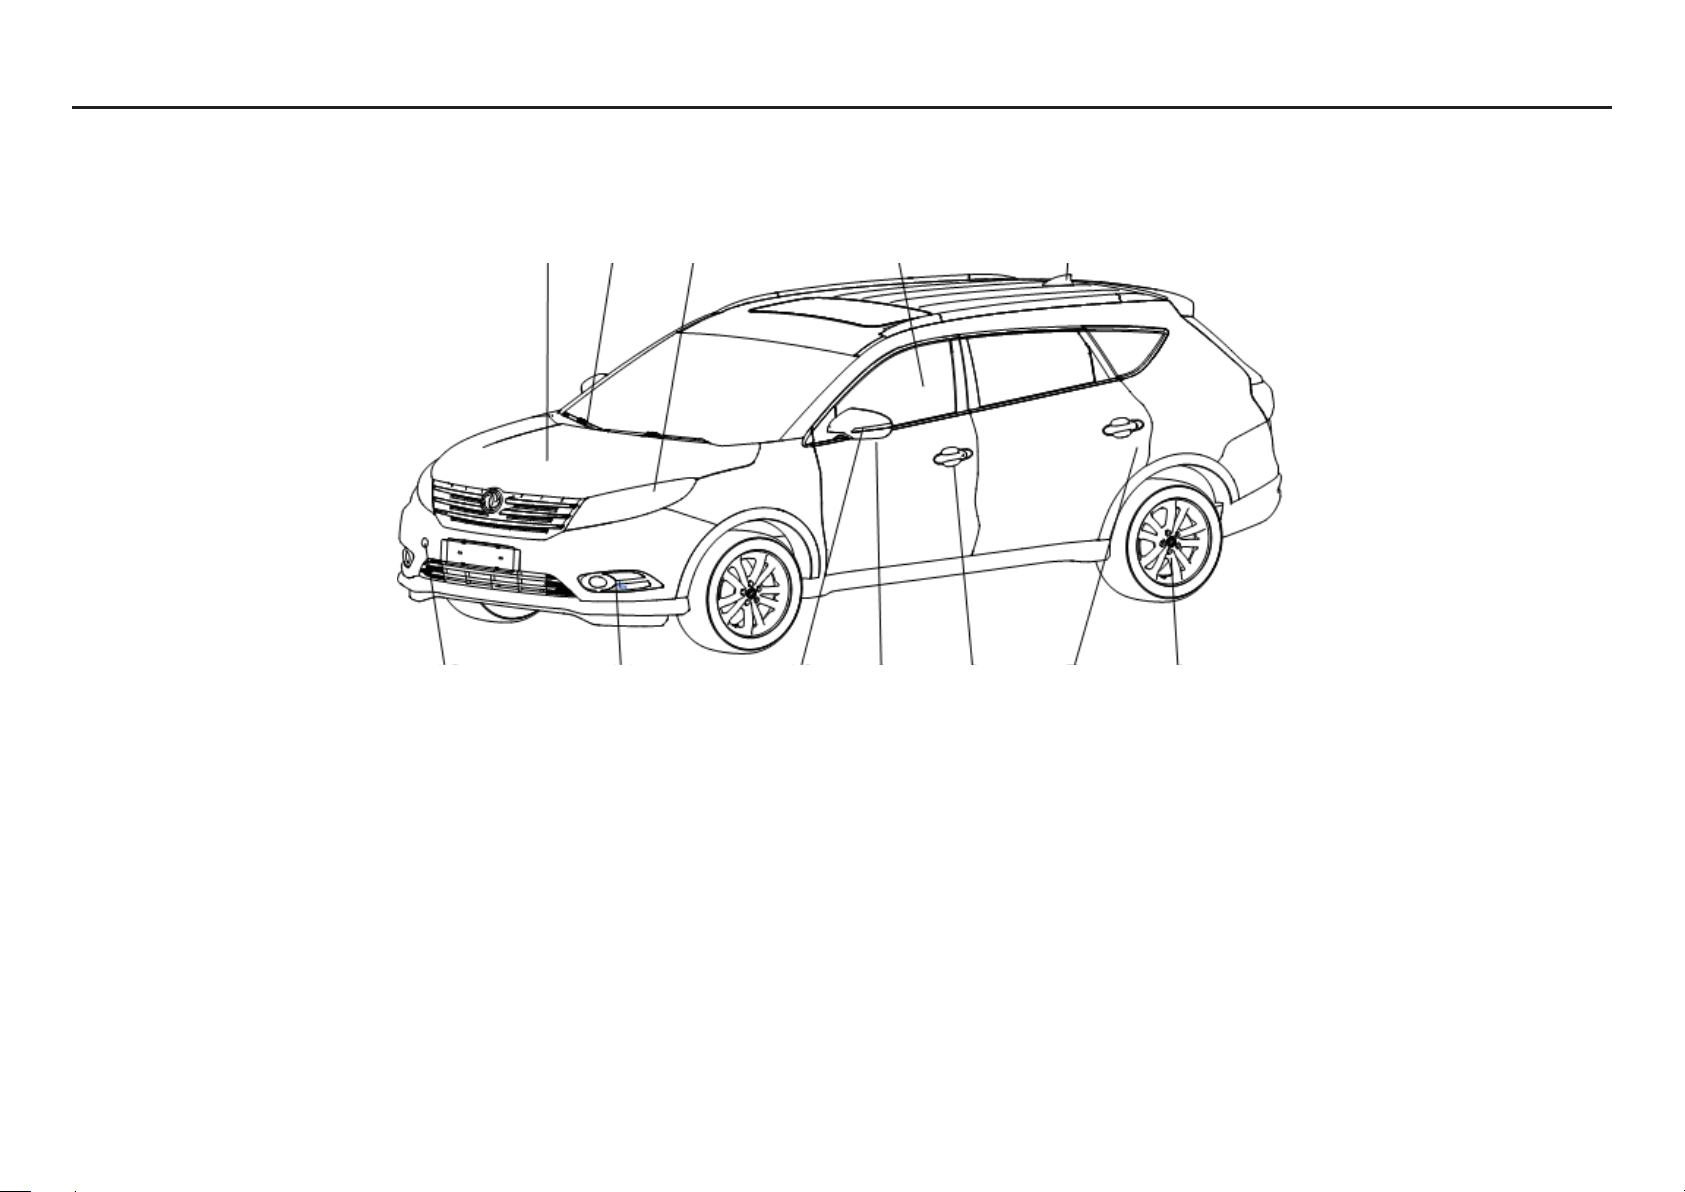
1. Bonnet
2. Front windshield wiper and washer
- Operation switch
- Windshield washer uid
3. Headlamp cluster, indicators and day-
time running lights
Operation switch
• Replace the lamp
4. Windows
5. Antenna
6. Tyres:
• Tyres and wheels
• Tyre Pressure Label
7. Back door child safety lock
8. Door – key – Door lock
9. Exterior Mirror
10. Side indicator:
• Operation switch
• Replace the lamp
11. Fog lamps - Replace the lamp
12. Towing eye
Illustration Index
6
Front Appearance
1 2 3 4 5
12 11 8 7 610 9
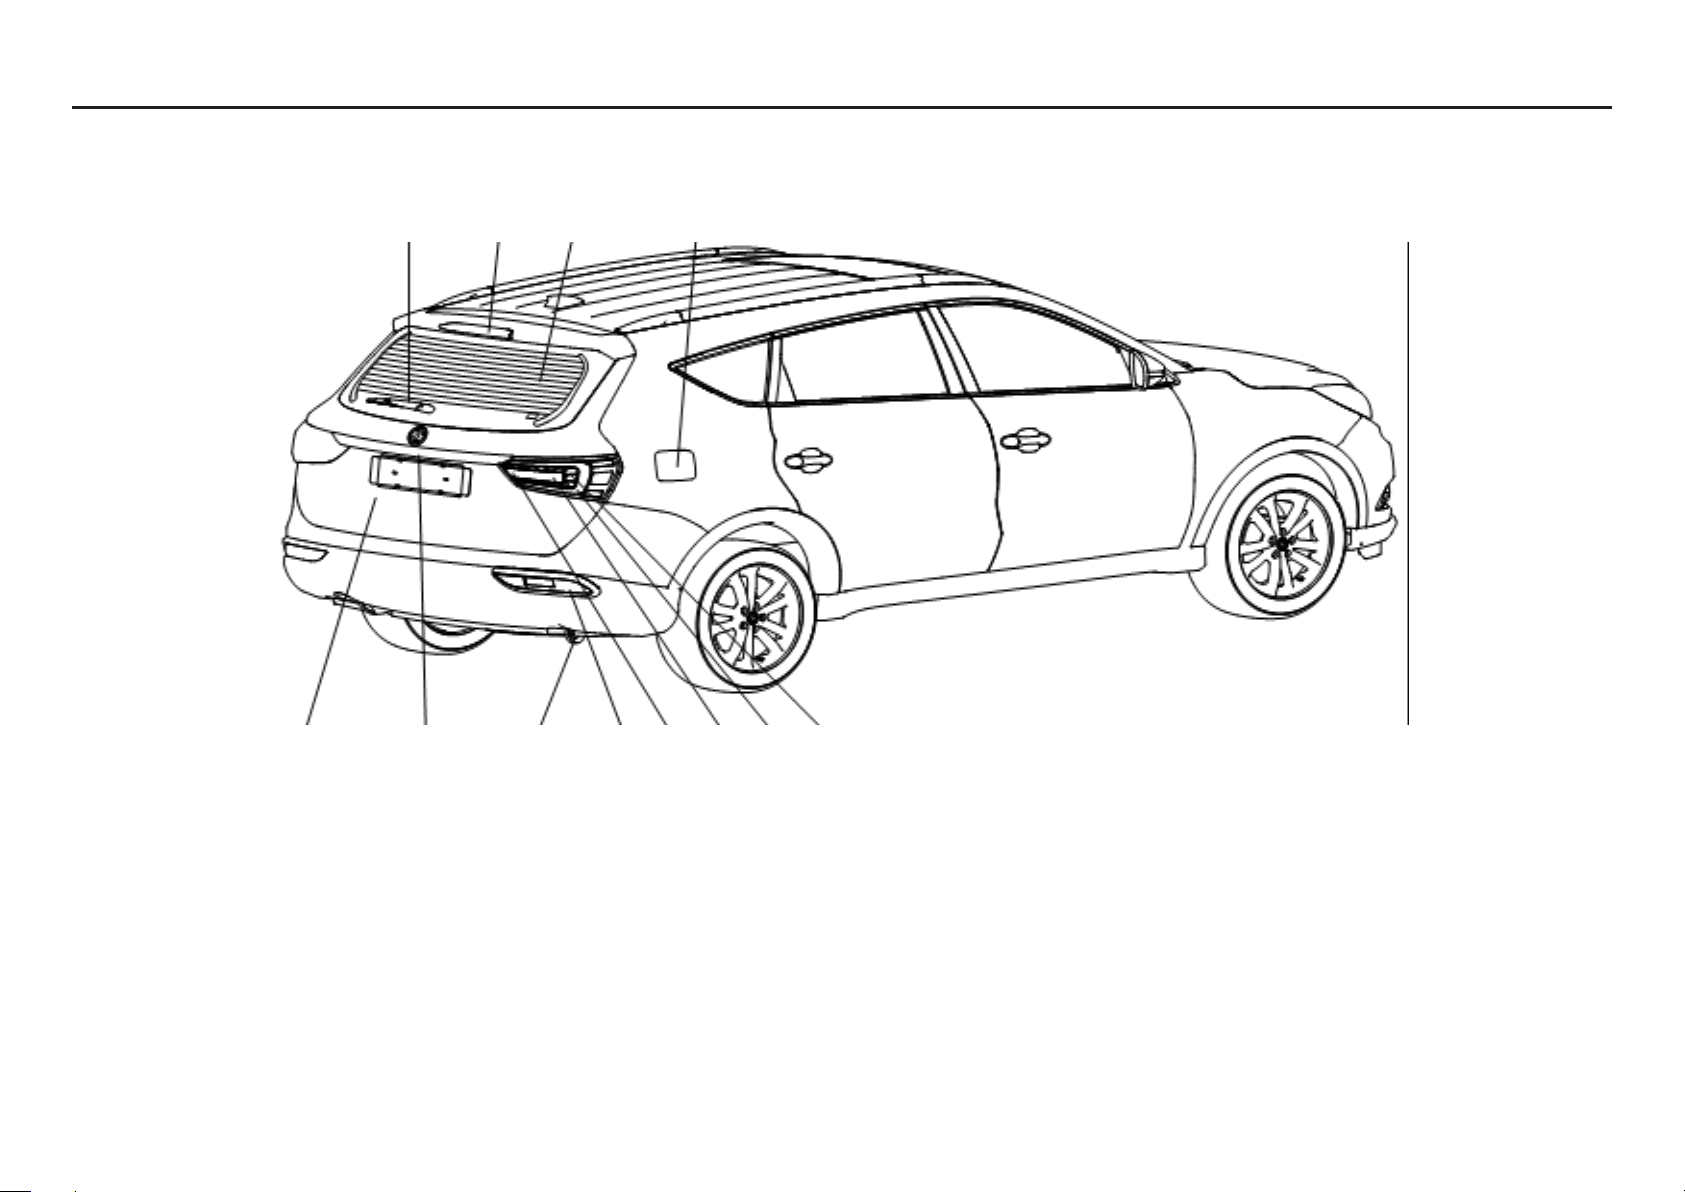
1. Rear wiper
2. High-level brake light
3. Heated Rear Window
4. Fuel ller cap:
• Start operation
• Fuel recommended
5. Rearlight cluster including breaklight
6. Taillights and indicators
7. Reversing lights
8. Fog lights- Operation switch:
• Replace the lamp
• Operation switch
9. Licence plate lights
10. Tailgate
Illustration Index
7
Rear Appearance
12 3 4
10 9 8 7 6 5
1. Interior rear-view mirror
2. Sun visor
• Bill Clips
• Make-up Mirror
3. Front Reading Lamp
4. Interior rear light
5. Storage devices
• Middle cup holder and storage box
• Toolbox stored in the boot
• Small Storage Box
• Bottle holder and map bag
6. Door handrails
• Electric central locking and window switch
7. Luggage compartment
• Tailgate
Illustration Index
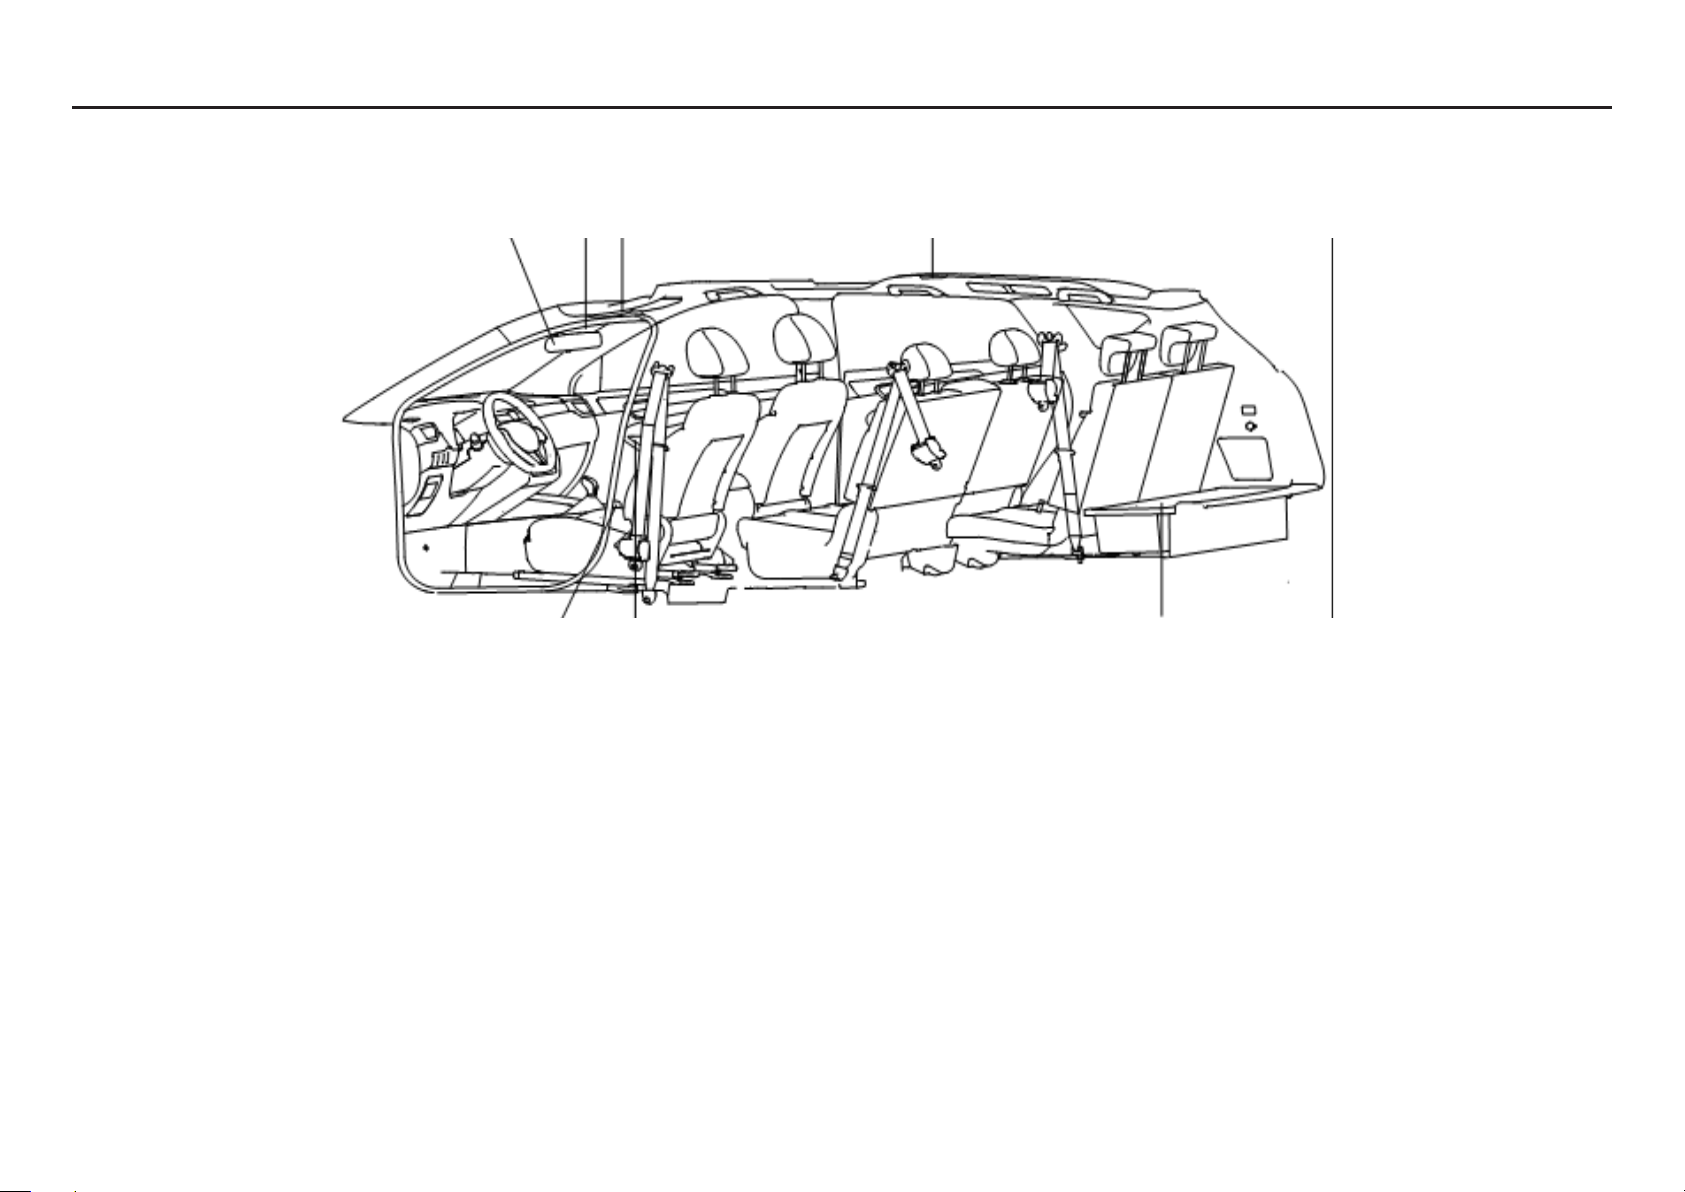
8
Cabin
1 2 3 4
5 6 7
1. Access port
2. Steering wheel
• Electric Power Steering System
3. Electric horn button
4. Cigarette lighter
5. Gear leaver
6. Parking Brake
7. Ashtray
8. Combination switch
9. Combination Meter
10. Ignition switch
11. Passenger airbag
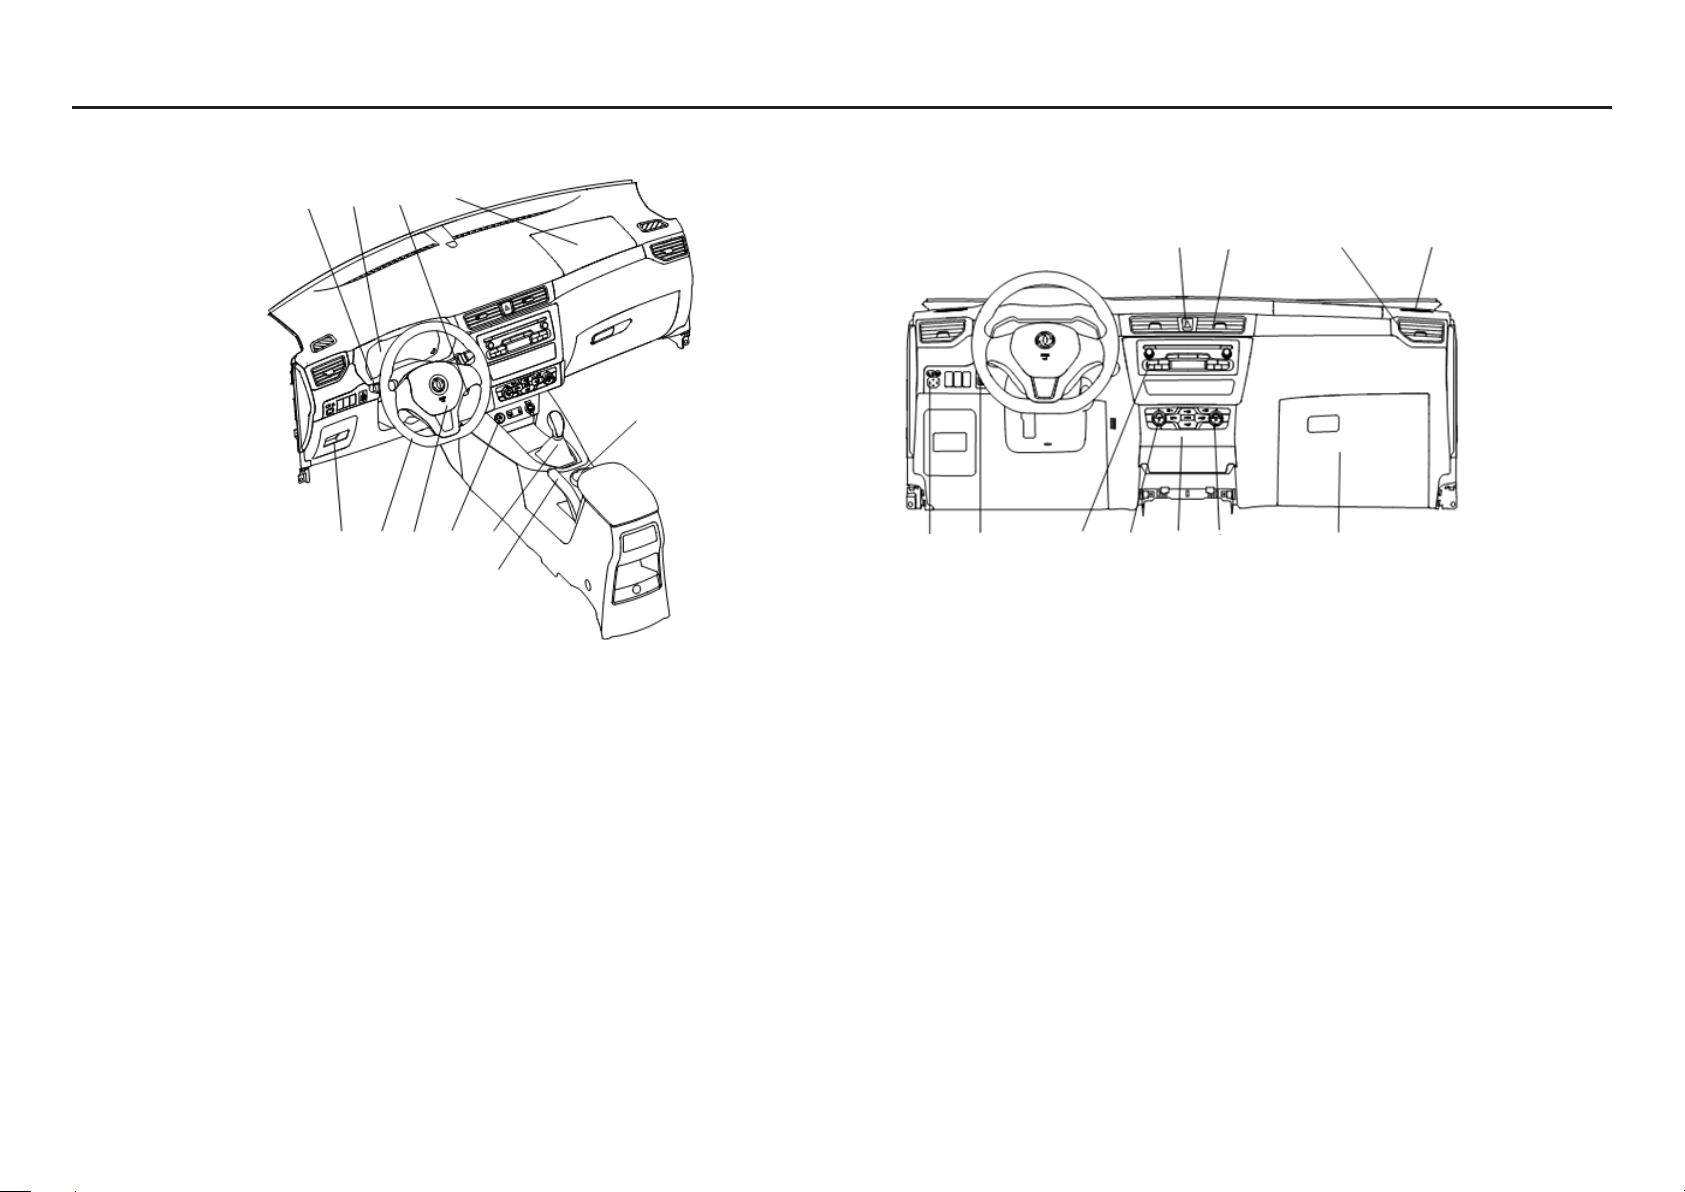
1. Power Mirror Adjustment Switch
2. Headlight height adjustment switch
3. Sound system
4. Air Conditioning Control
5. Heater Control
6. Defrost Switch
7. Glove box
8. Hazard warning switch
9. Central air outlet
10. Side air outlet
11. Side defrost air outlet
Illustration Index
9
Fascia Dashboard
1 2 3 4 5 6 7
8 9 10 11
1 2 3 4 5
6
7
8 9 10 11
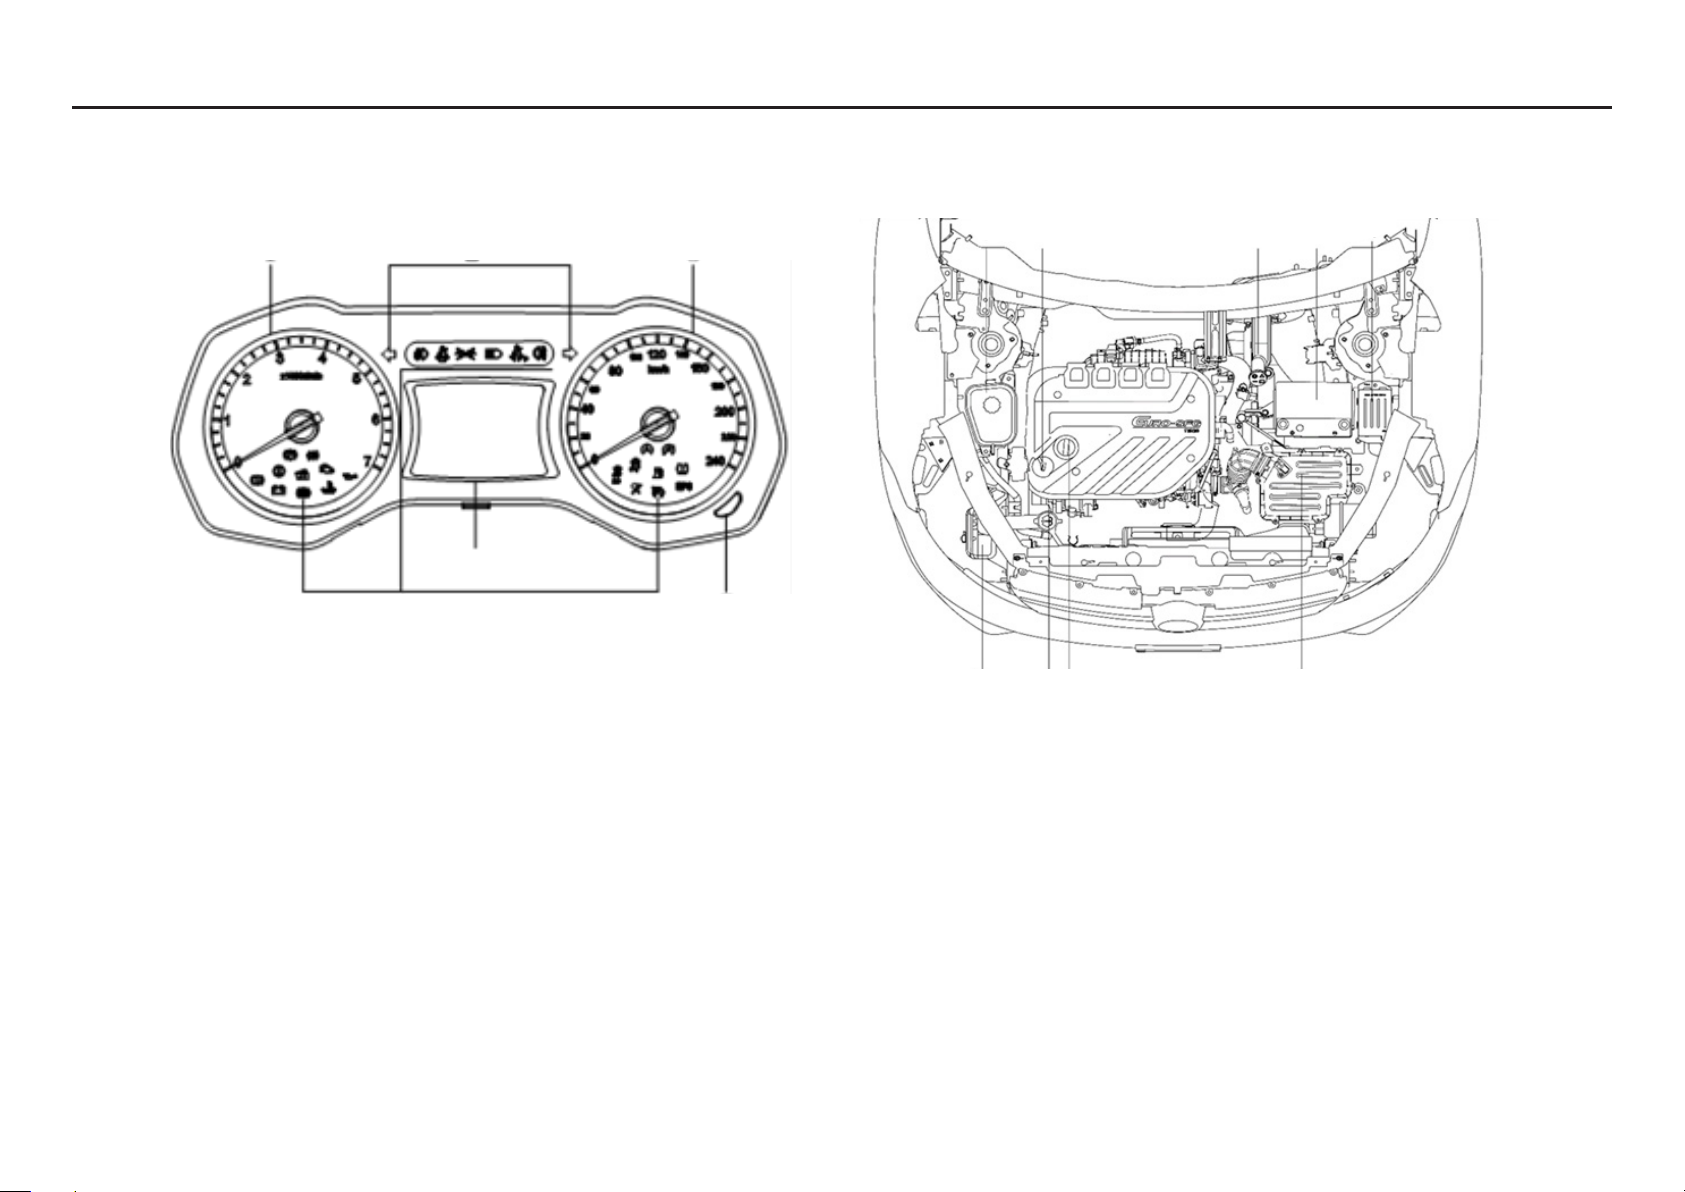
1. Engine Tachometer
2. Left / Right Turn Indicator
3. Speedometer
4. Function Indicators
5. Reset Button
6. LCD screen display
1. Engine oil gauge
2. Oil ller cap
3. Brake uid reservoir
4. Battery
5. Fuse / fuse block
6. Windshield cleaning liquid storage tank
- Windshield washer uid
7. Engine coolant reservoir
8. Engine drive belt
9. Air lter box
Illustration Index
10
Combination Dash (General Instrument) SFG15T Engine
1 2 3
4 5
6
2
689
1345
7
II. Safety Devices - Seats, Seat Belts and
Auxiliary Restraint
Seats
Warning
When adjusting the seat position, be careful not to touch any
moving parts to avoid possible injury or damage.
Front seats
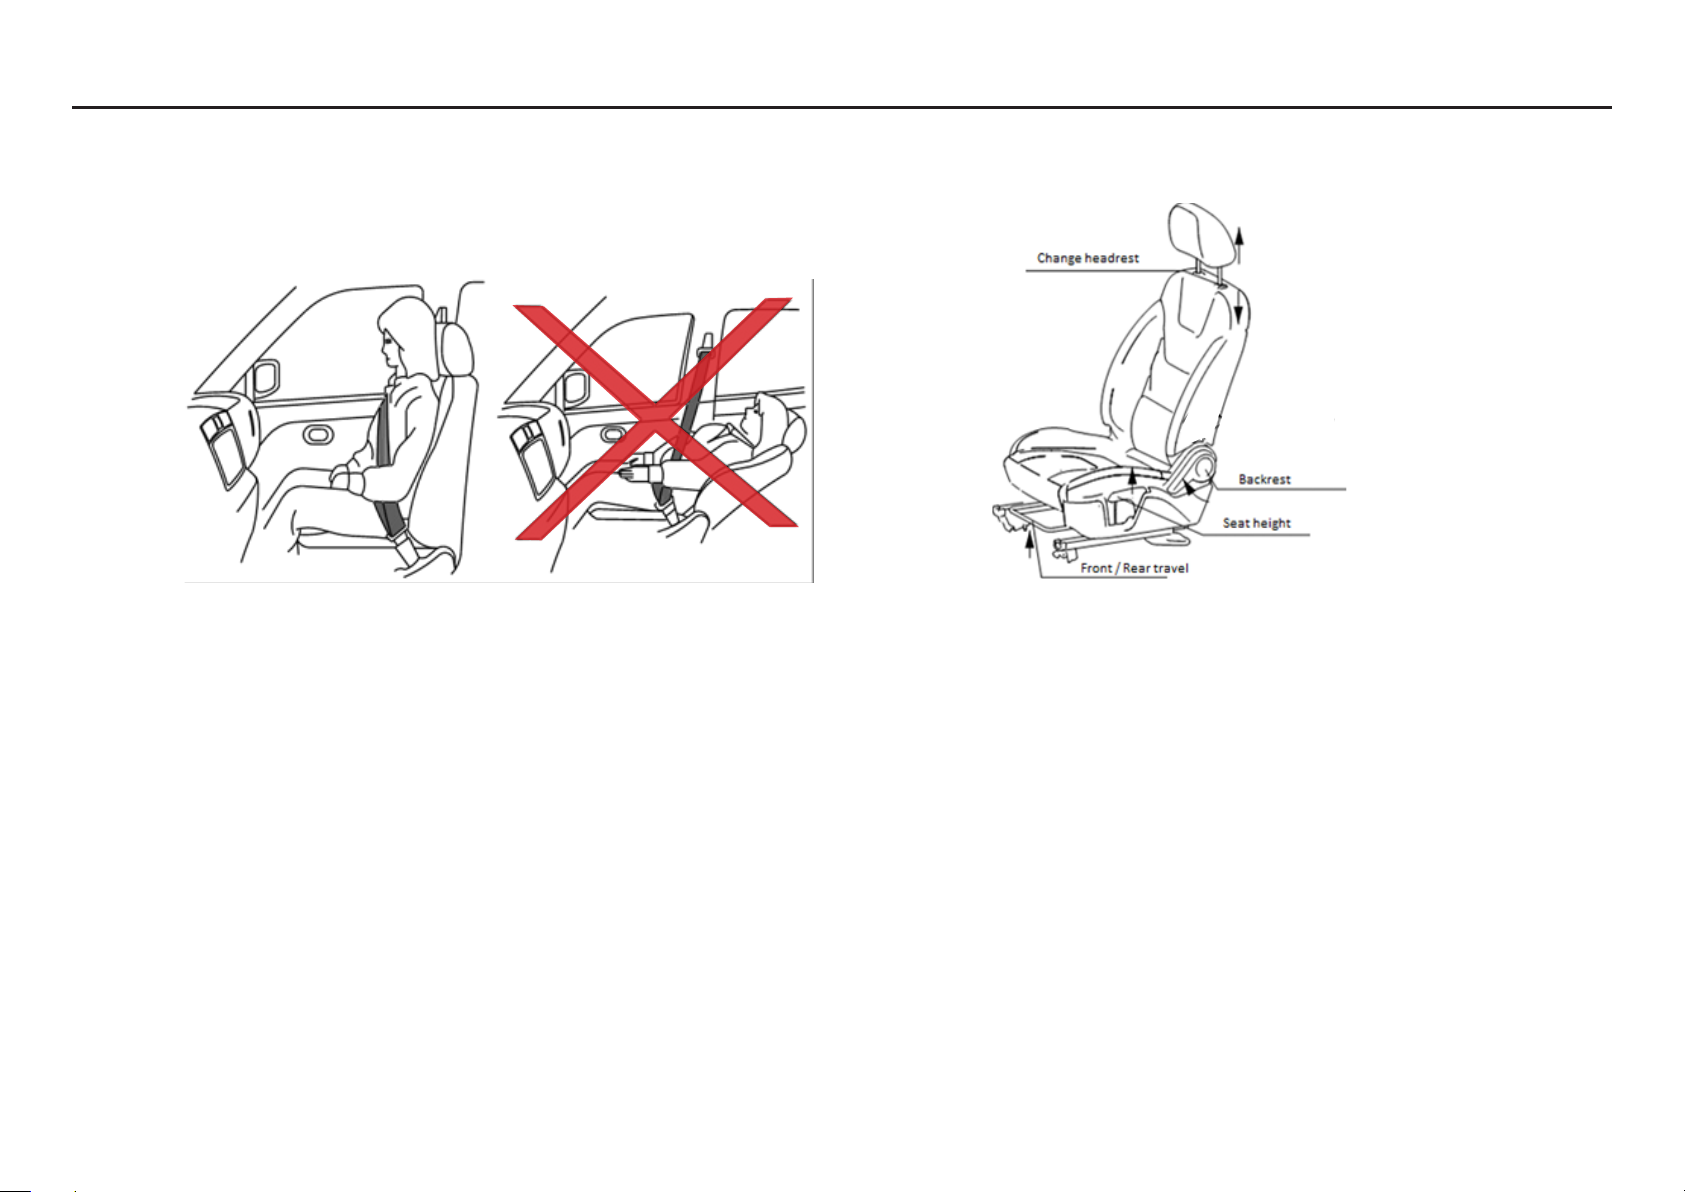
Adjustment of seat back angle front
Lift the adjustment handle located on the outside of the seat,
adjust it to the appropriate angle, and then release.
Seat height adjustment
Lift the handle and adjust to the appropriate height.
Headrest height adjustment
While holding down the lock release button, adjust the headrest
up or down to the appropriate position and release the button
to lock it.
Removal of the head restraint
Hold down the lock release button, while removing.
Safety Devices
11
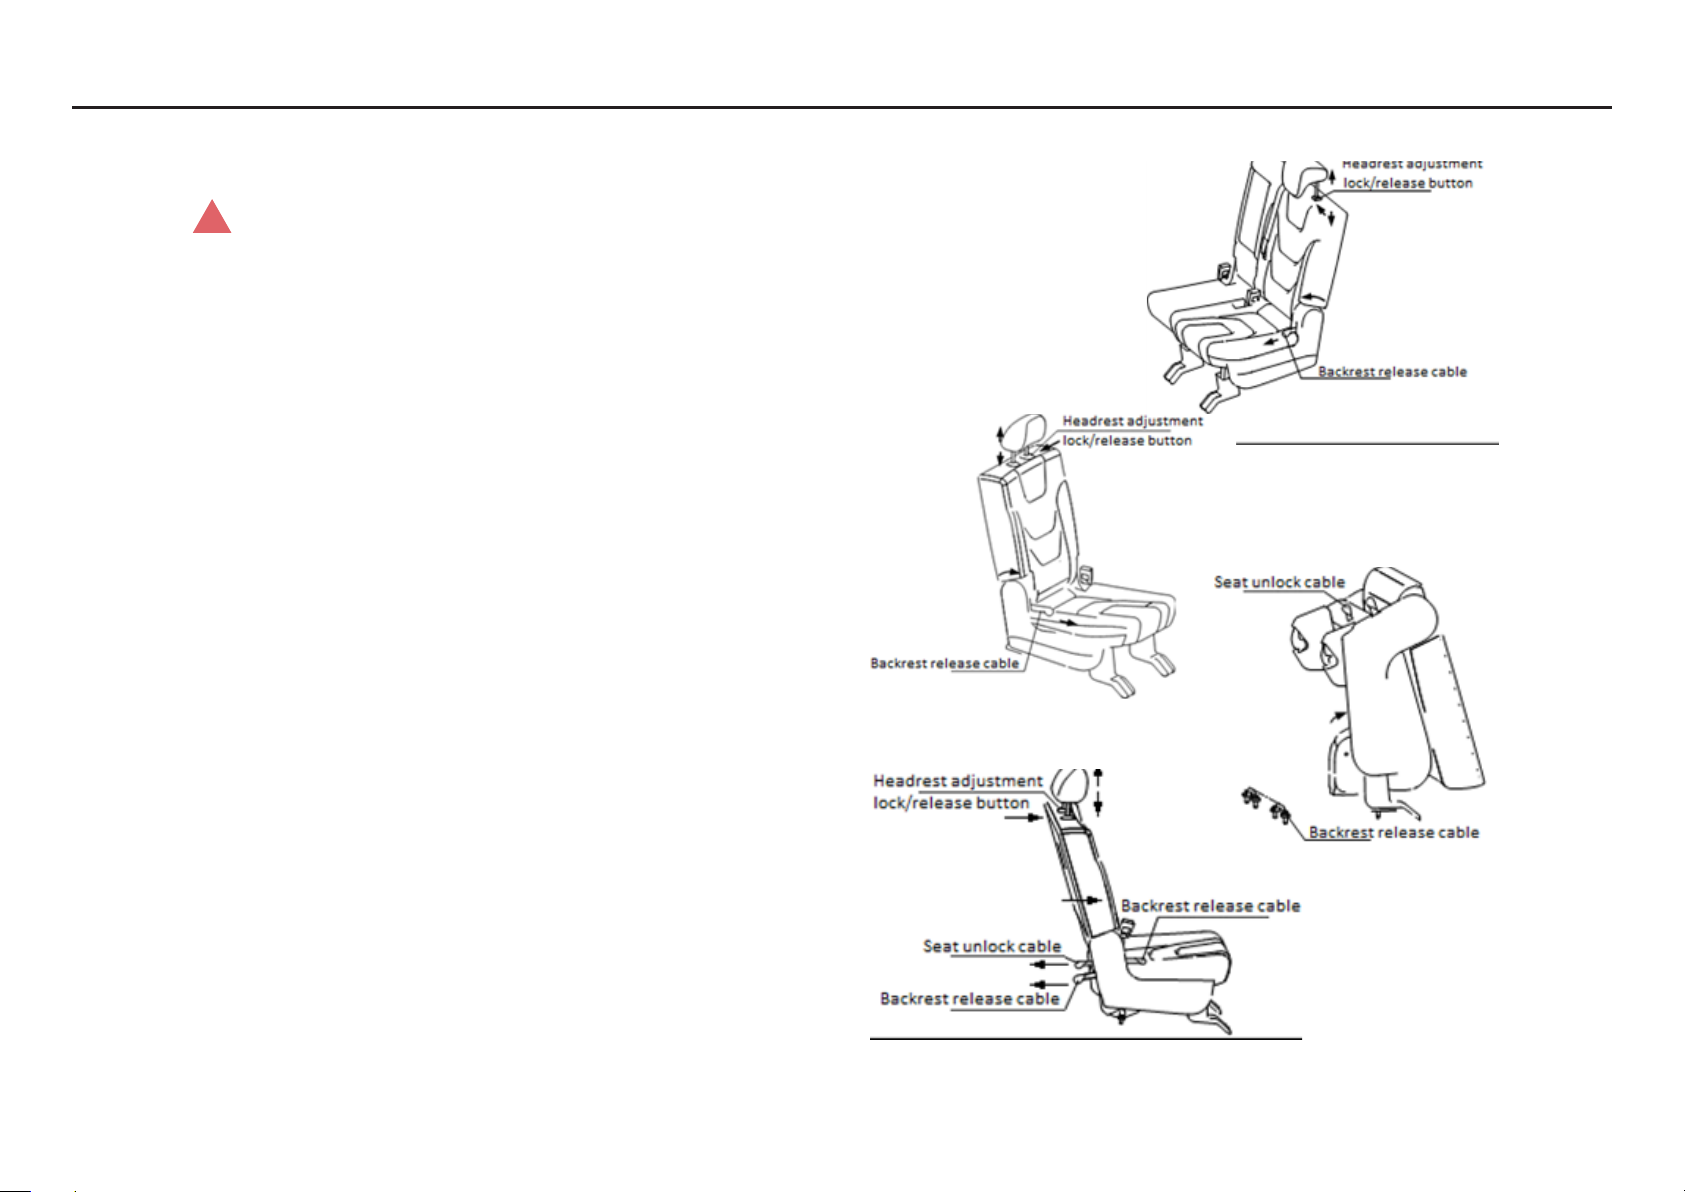
The second row of four-six seats
Warning
• Do not apply more than 20 kg of load to the folded seat
back.
• The second row of seats cannot be folded down when
passengers or baggage are occupying them.
The second-row seats
On the second seat row the seat, backrest angle can be adjusted
for comfort.
Adjustment of seat back angle on the middle row seats.
Method for the six-seat seat rollover
Lock the headrest to the lowest position, pull the seatback
release cable to level the backrest, and then pull the seat release
cable to disengage the latch and ip the seat upwards. The
purpose of ip seats is to facilitate the entry and exit of rear seat
passengers.
Safety Devices
12
!

Third row seats
The third row of seats fold at to allow extra luggage capacity.
Seat Folding
No backrest angle adjustment function is available. The headrest
is locked in the lower limit position. To adjust the seat back pull
the backrest locking belt to unlock, then fold the back down at.
Headrest height adjustment
As per the front seat.
Removal of the head restraint
As per the front seat.
Warning
During vehicle operation, passengers should not occupy the
third seat row if the second row of seats is folded down.
Fold
Warning
• Secure baggage to prevent it from sliding or moving. Do not
place luggage higher than the seat back.
• When returning seat to the upright position, make sure
that it is securely fastened in the locked position. If not fully
locked, the user may be injured during an accident or when
braking.
• Securely store the removed headrest (optional) to prevent it
from being thrown out during sudden braking or accident.
• The head restraint should be adjusted to the specied
desired position to prevent neck injury. If the head restraint
is moved for some reason it should be adjusted and put
back into its original position.
Headrest
Warning
It is dangerous to drive the
vehicle when the headrest
is removed. Correct use of
head restraints can be vital in
an accident reducing injury.
Subsequent drivers should
check the head restraint
height before driving the
vehicle.
Correct headrest adjustment method shown in the illustration:
Safety Devices
13
!
!
!
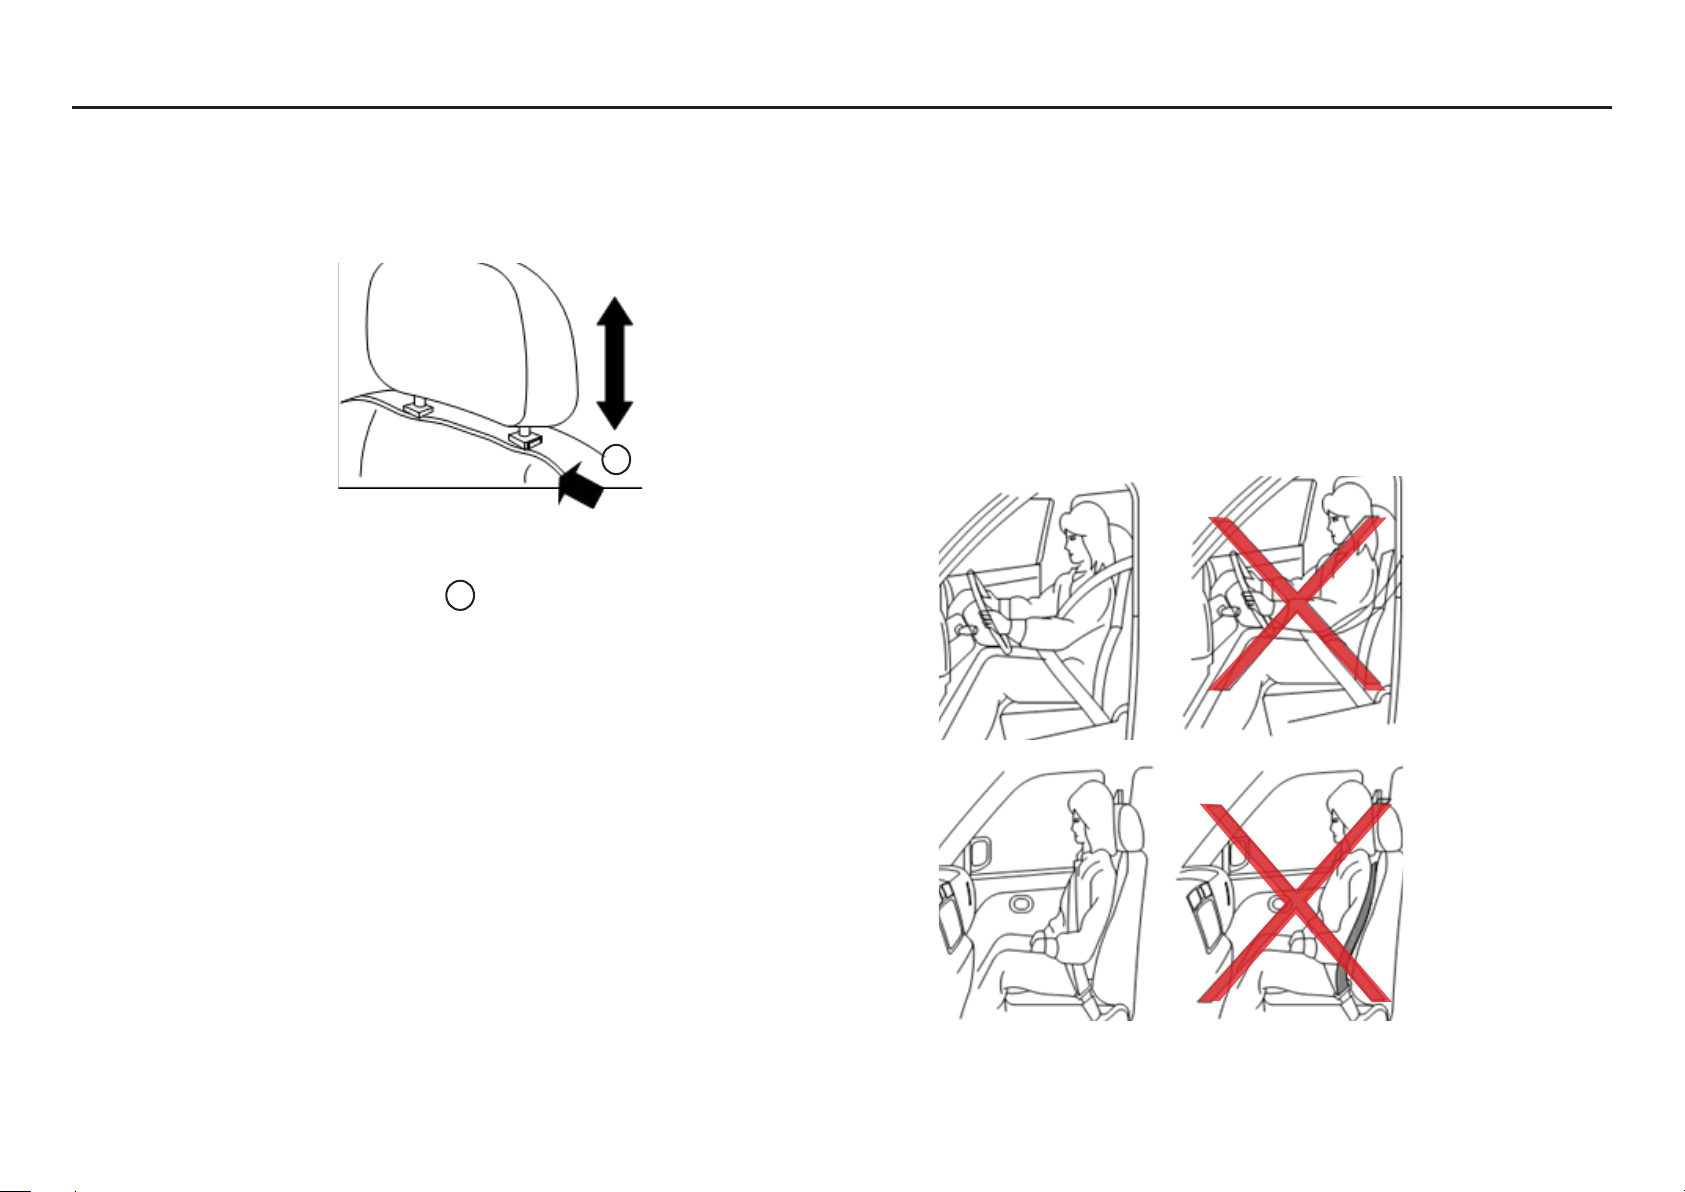
Adjust the height of the head restraint so that the centre of the
headrest and the centre of the ear are on the same horizontal
line.
1. Pull up the headrest and raise it to the desired position;
2. Push in the lock button and lower the headrest to the
correct desired position.
The headrest position must be locked in place using the grooves
on the two headrest bars.
When you need to remove the headrest in a folded seat etc. you
should push the lock and pull out the headrest. This should be
stored safely.
Seatbelt
Seatbelt use precautions:
To adjust the seat belt properly sit upright and lean against the
seat. The chance of injury and the severity of the injury will be
signicantly reduced in the event of an accident.
Seatbelts must always be used by all passengers when the
vehicle is moving. Not wearing a seatbelt will signicantly
increase the risk of injury should an accident occur and in
addition will make you liable for prosecution.
Safety Devices
14
1
1

Child safety
Warning
•A rear-facing child safety seat of any kind should never be
used in a front seat, due to the passenger side airbag.
• Children should never sit
in the 3rd row seats
• Infants and children
should use special
protective devices. Seat
belts on vehicles are not
suitable for children. In
the event of an accident,
improper use of safety
belts can cause serious
or fatal injury.
•Always use the appropriate child safety seats and suitable
protection devices. The appropriate protection device
depends on the size of the child’s body.
Infants and young children
DFSK recommended using a child safety seat. You should choose
a child safety seat system that ts your child’s size/weight and
vehicle, and install and use it exactly as described by the seat
manufacturer.
Older children
Warning
•Children should always be fastened in an appropriate child
seat when the vehicle is in operation.
•Children who are too large to use child safety seats should
use seat belts while riding. If the seat belt is near their face
or neck, they should use an auxiliary cushion (commercially
available) to help solve any issues. An auxiliary booster
cushion should be used to raise children so that the straps are
properly positioned over the shoulder and the belt around the
hip below. Auxiliary cushions must be suitable for the car seat.
•Always refer to your child’s seat manufacturer’s instructions
when using a seat or booster cushion.
A Universal Child Safety Seat System Fixing System Is Installed in
The Second Row Seats
When choosing any child safety seat, you should pay attention
to the following points:
•Select a child safety seat that complies with GB 27887-2011
standard.
•Place your child in a child safety seat and check all adjustable
positions to ensure that the seat ts your child. Carry out the
procedures recommended by the seat manufacturer to install
in the vehicle.
•Check the child safety seats on your vehicle to ensure
compatibility with the vehicle’s seat belt system.
Safety Devices
15
! !
Child Seat Positions
• Refer to the table below to install a child safety seat that ts
in your vehicle at a specied location
L :Suitable for seat belt child safety seats
I :Suitable for ISOFIX child seat safety xed
* :Only for post-type seat
ISOFIX Child seat safety xtures
Your vehicle is tted with a special xing point for child safety
seats with ISOFIX child seat safety xtures on the second row of
seats, on the outside seats.
Fixing accessories for ISOFIX child safety xtures
The child seat with ISOFIX safety xtures has two rigid
connectors for connecting the two xed points on the car seat.
This negates the need to use the vehicle seat belt to secure the
child seat. Check that the label on your child safety seat conrms
the item is ISOFIX compliant. Instructions for child safety seats
are also included.
Using a three-point seat belt to secure the child seat
Facing: be sure to use your child safety seat properly, as in the
product manual. With these steps, the front-facing child restraint
can be mounted on the rear seat using a three-point seat belt
with no auto-lock mode:
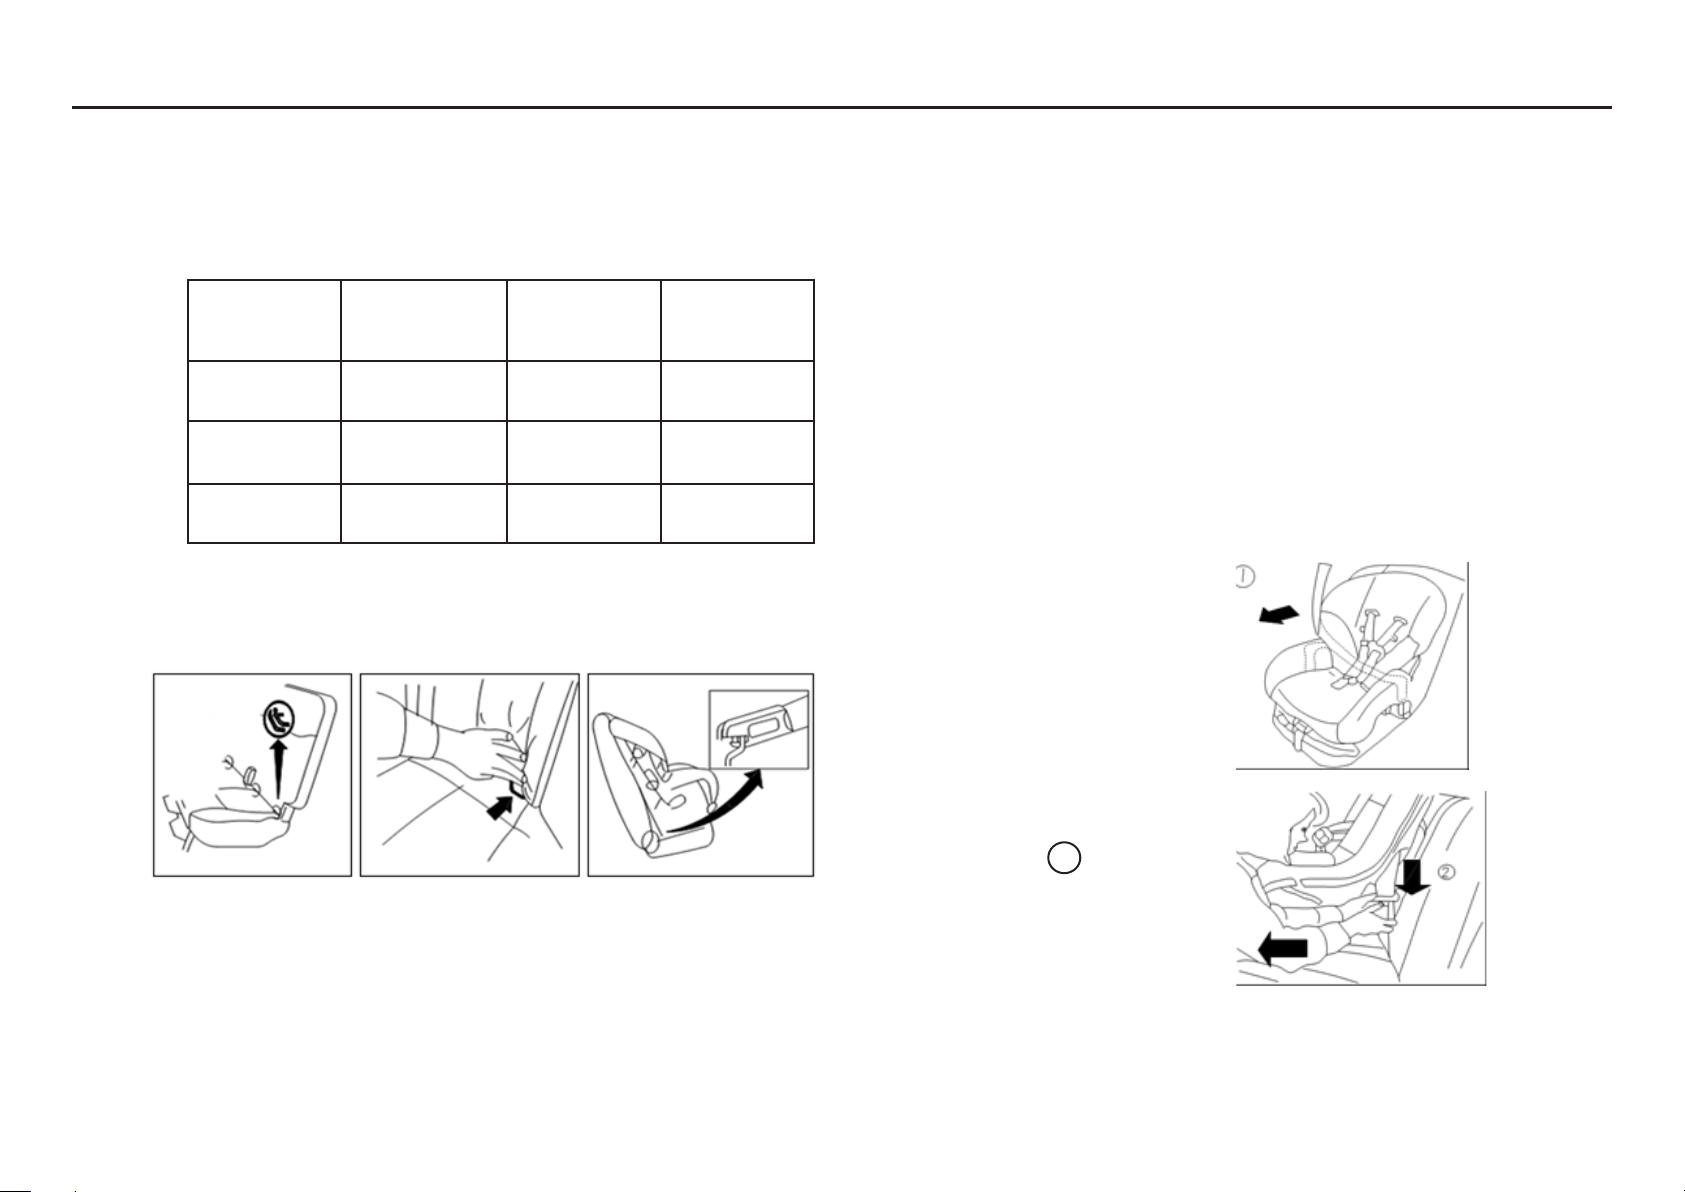
1. Place the child safety seat in
the car seat
2. Pass the seat belt latch through
the child safety seat in the
insertion latch until you feel
and hear the lock click
Safety Devices
16
Age Group Front
passenger seat
(with air bag)
Middle row
seat
Rear 3rd row
seats
0 - 13 kg
0 - 24 months
xL, L*, I, I* x
13 - 18 kg
9 - 24 months
xL, L*, I, I* x
15 - 36 kg
4 - 12 years
xL, I x
2

3. In order to prevent belt loosening,
before you put the child into the child’s
safety seat to check ; try to shake
the child seat to conrm that it has
been xed safely and appropriately
4. Remove the excess slack after the
seat belt is secured; pull the seat belt
up and down with your knees and press
the middle of the child restraint against
the seat cushion and backrest
5. Before each use you must check
whether the child safety seat is xed
safely and properly. If it has loosened,
follow steps 3 through 5 to reinstall
Installation in the front seat
!Warning
• AS THE FRONT PASSENGER SEAT IS EQUIPPED WITH AN
ACTIVE AIRBAG A REAR-FACING CHILD SEAT CANNOT BE
MOUNTED ON IT. When the airbag is activated, the impact is
great. When an accident occurs, the child safety seat may be
impacted, seriously injuring the child, or even causing loss of
life.
• Do not install the child safety seat on the front seat.
• Child safety seats for infants and young children can not be
mounted on the front passenger seat. It is recommended to
always install the child safety seat in the second row of seats.
Supplementary restraint system (SRS)
The Supplementary Restraint System (SRS) section of this
chapter provides important information regarding the front
airbags and front seat belts for drivers and passengers.
Front Impact Airbag System:
The front airbag inates during a head-on crash, helping to
cushion the driver and front passenger (optional) from the
impact of the head and chest.
Safety Devices
17
5
Safety Devices
18
The SRS is designed to provide additional protection to the
driver and front passenger in the event of a collision and is
not a substitute for seat belt protection. SRS can help save
lives and reduce serious injuries. However, the airbag may also
cause scratches or other injuries, the airbag can not protect a
shorter person. The seatbelt must always be properly worn at
all times whilst the vehicle is moving. In addition the occupant
should be at the correct distance from the steering wheel and
instrument panel (see “Safety belt” section). In order to protect
the occupant, the airbag inates very rapidly. If the occupant is
too close or facing away during the airbag ination, they may be
injured by the expansion force.
Only when the ignition switch is in the “ON” or “START” position
is the SRS is in working condition.
When the ignition switch is in “ON” or “START” position, the
SRS airbag warning light will light, after 3 seconds this warning
light will go out. (see the following “SRS airbag warning light”
section).
!Warning
• The auxiliary front airbag will not activate when the vehicle
is subject to side-impact, rear contact, rolling, or slight head-
on contact. Always fasten your seat belt to help reduce the
risk of injury in a variety of accidents.
• When you are sitting and the backrest is upright, the seatbelt
and the front impact airbags are most effective. If you and
your passengers sit too freely, tilt forward, slant, or deviate
from the correct position, there is a greater risk of injury or
death when an impact occurs. If you and your passenger
hit an airbag that is being activated, it can also be serious
or fatal. Always lean against the back and keep the steering
wheel and dashboard as far away as possible.
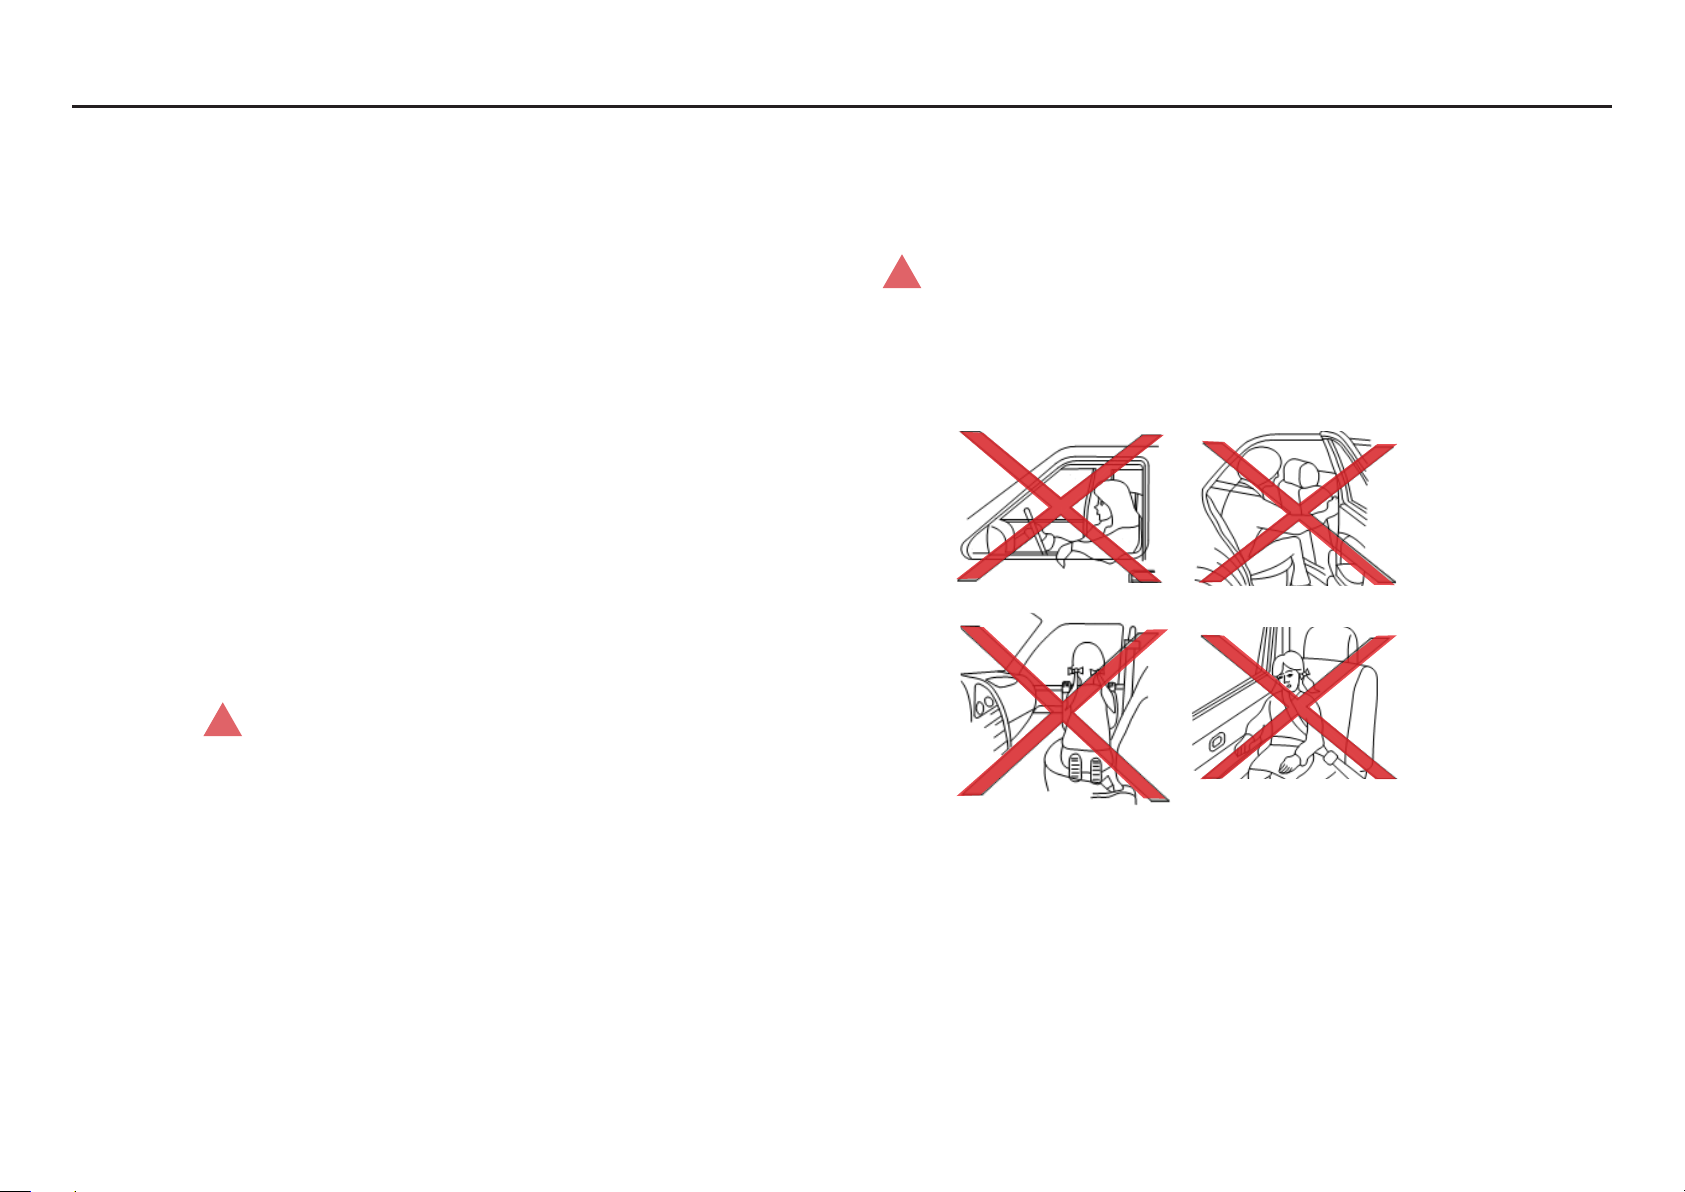
!Warning
Do not allow anyone sitting in the front seats to extend their
hands out the window or lean against the door. The illustrations
show some dangerous sitting posture examples.
Special attention must be paid to children, and appropriate
protective measures should be taken
SRS airbag
The warning label is located on the passenger side sunshade.

SRS Front Passenger Front Airbag And Front Side
Air Bag
!Warning
Do not install a rear-facing child safety seat on the passenger
side seat. When a rear-facing child safety seat is installed on the
passenger seat, an airbag activation may cause serious injury or
loss of life to a child if a collision happens.
Do not put seat covers on the front seats – this will prevent the
side airbags from deploying properly.
SRS Airbag Warning Light
The SRS airbag warning light is displayed on the dash as a circuit
that monitors the condition of the auxiliary front airbag and
preloaded seatbelt system.
The SRS airbag warning light circuit is composed of a fault
diagnosis sensor unit, a master / slave airbag module, an airbag
ECU, a front side airbag module and associated lines.
When the ignition switch is in “ON” or “START” position, the
airbag warning light will light up, after about 3 seconds the
airbag warning light will go out, indicating that the system is in
working condition.
The airbag system needs service if any of the following
conditions occur:
• SRS airbag warning lights continue to light after 3secs
• SRS airbag warning light ashes
• The SRS airbag warning light does come on
In these cases, the auxiliary front airbag system may not function
normally. Please immediately contact DFSK authorised service
outlets for inspection and repair.
!Warning
•Do not place anything on the steering wheel horn cover,
instrument panel, or front seat, nor place anything between
the occupant and the steering wheel, instrument panel, and
front seat. Once the airbag is activated, some of the airbag
components will be hot. Do not touch them, or you may get
burned.
•Unauthorised modication of any component or circuit of
the airbag system could result in accidental activation of the
airbag or damage to the airbag system. Modication of the
airbag system can result in serious personal injury. These
modications include placing items on the steering wheel
horn cover, instrument panel, or installing other decorative
materials around the airbag system.
• Operation on or around the airbag system must be
carried out by DFSK authorised service outlets. Do not
use unapproved electrical test equipment and detection
equipment to test the airbag system.
• When the secondary airbag is activated, a large sound will
be produced, followed by smoke emission. The smoke is
harmless and does not cause a re. However, please note this
smoke should not be intentionally inhaled.
Safety Devices
19
Table of contents


