SON HANDYCAM DCR-HC36 User manual
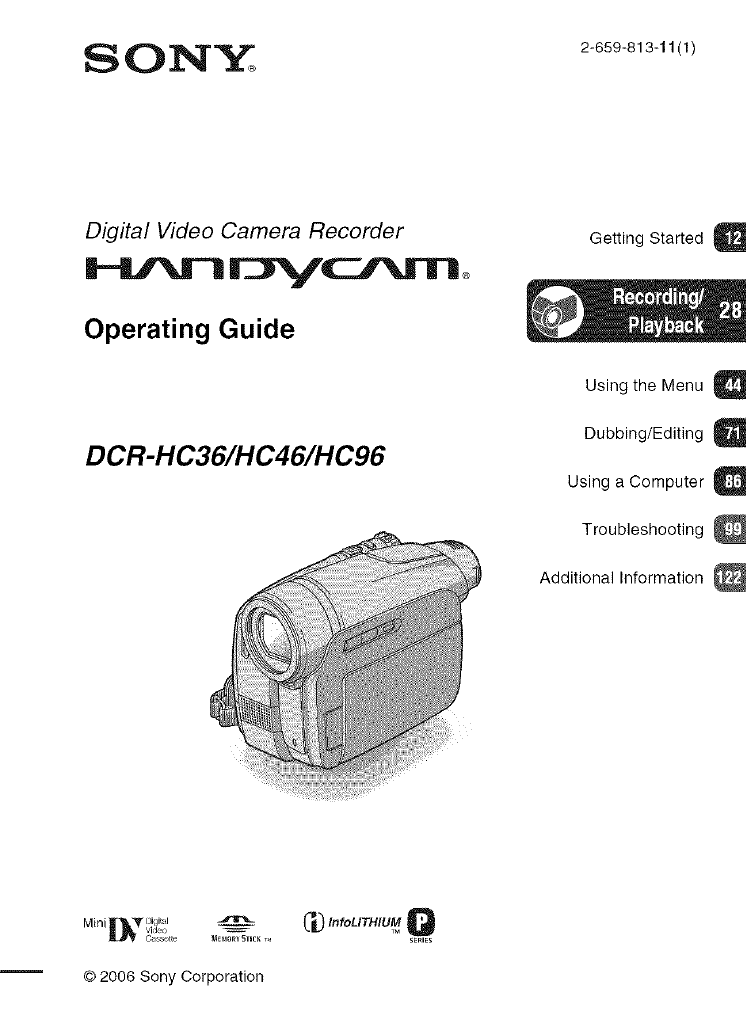
Digital Video Camera Recorder
Operating Guide
DCR-HC36/HC46/HC96
Getting Started
Using the Menu
Dubbing/Editing
Using a Computer a
Troubleshooting
Additional Information
Min i_i_L_ _v_ ial,, _,o _ _ I_ InfoLITHIUM
Ca s_,te MEMORYSTIC__, SERIES
© 2006 Sony Corporation
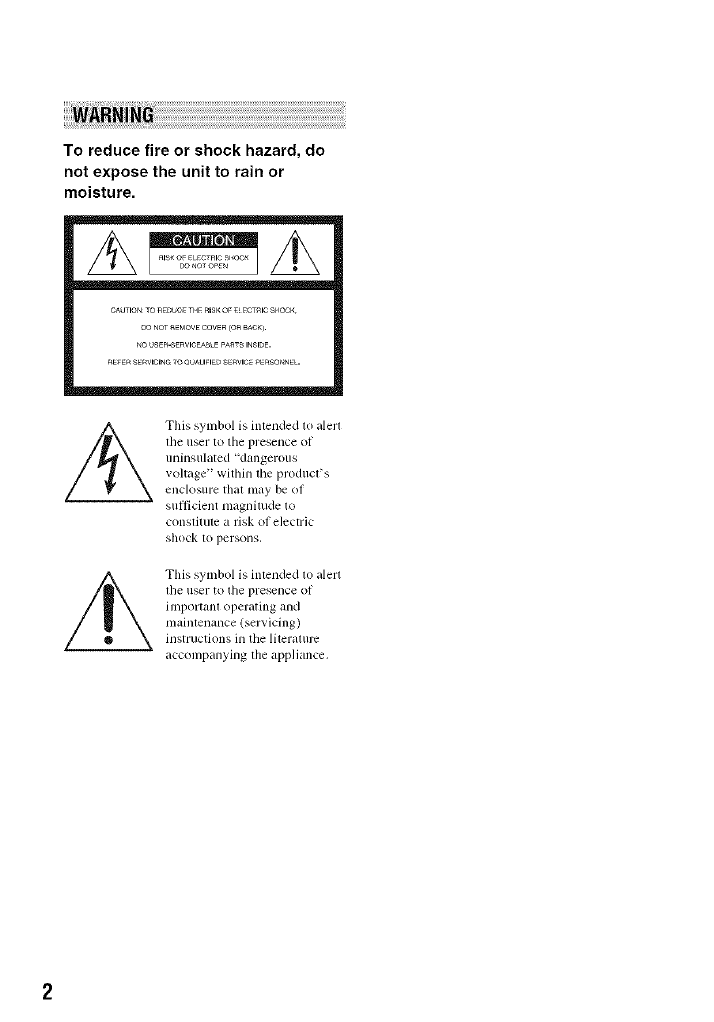
To reduce fire or shock hazard, do
not expose the unit to rain or
moisture.
CAUTIONTO_DUC_ THFRISKOF_ _CTRI¢S_=OCK
DO_OTREMOVECOVER(OaBA¢_}.
_OUSER-SE_VlCE^_LE_AaTSINSIDE.
_EFERSERWCINaTOO_UFI_ SE_VlC__RSO_N_L.
This symbol is intended to alert
the riser to tile presence of
tlnh_stllated _d_tngerotls
voltage" within the product's
¢nclosule that may be of
sufficient magnitude to
constitute a risk of electric
shock to persons,
This symbol is intended to alert
lhe user to the presence of
importanl operating and
maintenance (servicing)
instructions in tile liter_llurc
accompanying the appliance.

IMPORTANTSAFEGUARDS
For your protection, please read these safety
iustrttctions completely before operating
the appliance, and keep this manual for
future reference.
CarelMly ubserve all wamittgs, precautions
and inslructions on the appliattce, or the one
described in the operating ittslructions and
adhere to them.
PowerSources
This set should be operated only h'onl tile type oI
power source indicated on tile marking label. If
you are not sure of tile type of electrical power
supplied to your home. consull your dealer or
h)cal power company, For fllose sets designed to
operate Ironl haltery power, or other sources, rc|Pr
to the oper_llhlg hlSIIUClIOIlS,
Polarization
This set may be equipped with a polarized _1c
power cord plug h' phlg having one blade wider
than the other).
This plug will fit into the power oul]el only one
way. This is a salcty Ieatum. If you are unable 1o
insert the plug hilly into the outlet, try reversing
the phlg. If the plug should slill lull to fit. conlact
your electrician to have a suilable oullet installed.
Do nol delcal the satcty purpose of file polarized
plug by lorcing il in.
Overloading
Do llOt o_, el'h)ad w_lJl outlets, extension cords or
comenience receptacles beyond their capacity,
since this CUllresull ill tire or electric shock.
ObjectandLiquid Entry
Ne_er push objects of any kind into tile _t
through openings _,s tile}' may touch dangerous
xoltage points or short (l/It pur[s that could rcs/llt
in a fire or electric shock. Never spill liquid of any
kind on the set.
Attachments
Do 110[ USe iRtilchlnenls not rccolnlnended by lhe
ii/anuJilcturcr, as they may cause hazards.
Cleaning
Unplug tile set h+om tile wall outlet belore
cleaning or polishing it. Do not use liquid cleaners
or _,erosol cleaners. Use a cloth lightly dampened
with water I_)rcleanillg tile exterior oI tile set.
WaterandMoisture
Do not u_ power-line operated sets near \wlter
lot example, he,iv a bathtub, washbowl, kitchen
sink, or l_iundry tilt), ill it wel baselnenL or near it
swimming pool, etc.
Power-CordProtection
Route lhe power cord so Ihilt it is llO[ likely lo be
walked on or pinched by items placed upon or
againsl lhenl, paying purticular auention to the
plugs, receptacles, and the poinl where the cord
exils Ii+()tlltile appliance.
Accessories
[)O HOt place tile set OH illl unstable cilrI, St)llld,
tripod, bracket, or lable. The sel may tall. causing
serious injury to a child or an adult, and serious
damage to tile set. Use only a cart, sland, tripod,
bracket, or table recommended by the
nlanuJ;iclurcr,
Ventilation
The shas mid openings ill tile cubinet are pro_ ided
lot necessaly ventilation. To ensure reliable
operation of tile set. _lnd to protect it h'onl
overheating, these slots and openings inusl never
be blocked or covered.
Never cover the slots and openings with a cloth
or ()tiler materials.
Never block tile slots and openings by placing
tile set on a bed. solh, Itlg, or olher similar
surl_/ce.
Never place the set in a confined space, such as
a bookcglse, or built-in cabinel, unless proper
venlilation is provided.
Do not place tile set near or over a radiator or
Ileal rcgisler, or where il is exposed to direct
sunlighL
Continued-_ 3
INPOSTaNT SAF[GUgRD$(gsstisssd)
Lightning
For added protectkm tbr this set during a lightlfing
storm, or when it is lelt unattelMed and Ulmsed k_r
long periods ol time, unplug it troln tile wall
outlet and disconnecl tile alltenna or cable systenl.
This will prevent damage to the set due to
lighming and powe>line surges.
Safety Check
Upon completion ol any service or repairs to tile
set, as tile sel'_,ice lechlliCi_Hl to pellornl ro/itine
salcty checks (g_sspecified by the manul*_cturer)
to determine lhal the set is in salP operaling
conddion,
DamageRequiringService
Unphlg the set fix)m tile wall outlet and rclPr
sezMcing to qualified service persozmel under tile
Iollowing conditions:
When tile power cord or phlg is damaged or
fi:ayed.
It liquid has been spilled or ot_iects have fallen
illlo the set.
If the _t has been exposed to rain or water.
If tile set has been subject to excessive shock by
being dropped, or the cabinet has been
damaged.
If the _t does not operate normally when
Iollowing the operating instructions. Ac[just
only those controls thai are specified in the
operating instructions. Improper adjustment of
other controls may result in damage and will
often require extensive work by a qualified
technician to reslolv the set to normal operation,
When the set exhibits a distinct change in
perlbrmancc this indicates a need lbr service.
Servicing
Do not al_etllpt to Sel'vic*$ tile set yoursell iLs
openhlg or r_lllO_ illg co_ els nlay expose you to
dangerous voltage or ot]ler hil/itrds.
RelPr all servicing to qualified service personnel.
Replacementparts
When replaccmezlt parts arc required, be sure tile
ser_ ice techniciml has used replacement pm'ts
specified by tile manuhlcmrer that have tile slune
characteristics as tile original pm'ts.
Unauthorized substitutions may result in fire,
electric shock, or other hazards.

Readthisfirst
Before operating the unit, please read this
manual thoroughly, and retain it for future
reference.
Replace the battery with the
specified type only. Otherwise, fire
or injury may result.
RECYCLINGLITHIUM-10NBATTERIES
Lithiuln-h)n batteries are @
recychtble. You can help preserve
our ellvironlllelll by relurnillg
your used rechargeable batteries
to the collection and recycling
location nearest you.
For more inlornlation regarding recycling ol
rechargeable batteries, call toll flee 1-800-822-
8837, or visit bltp://www.rbrc,org/
Caution: Do not handle damaged or leaking
Lilhium-km balteries.
Batterypack
This de_ice complies with Part 15 of tile FCC
Rules. Operatkm is subject 1o file lollowing two
conddions:
(1) This device may not cause harmflfl
intcrlPmnce, and (2) l]lis device nmst accept any
interlPrence received, including inlerlcrcnce thai
may call_ illldesired operation.
This Class B digital apparatus complies willl
Canadian ICES-003.
If you have arty questions about this
product, you may call:
Sony Customer Inlbrmation Center 1-8()()-
222-SONY (7669).
The number below is lk)rthe FCC related
matters only.
RegulatoryInformation
Declaration of Conformity
Trade Name: SONY
Model NO.: DCR-HC36
Responsible Party: Sony Eleclronics Inc.
Address: 16450 W. Bemardo Dr, San Diego,
CA 92127 U.S.A.
Telephone Number: 858-942-2230
This device complies wilh Part 15 of the FCC
Rules.
Operation is subjecl m file lollowing two
condilions:
(1) This device may nol cau_ harmflfl
interlcrence, and (2) this device nnlst accept any
interlcrence received, including imerlcrence
lhal illzly cause undesired operation.
Declaration of Conformity
Trade Name: SONY
Model NO.: DCR-HC46
Responsible Party: Sony Elecnonics lnc.
Address: 16450 W. Bernardo Dr, San Diego,
CA 92127 U.S.A.
Telephone Number: 858-942-2230
This device complies with Pan 15 of the FCC
Rules.
Operation is subject m lhe lbllowing two
conditions:
(1) This device may nol cau_ harmflfl
interlcrence, and (2) this device must accept any
interlerence received, including interlcrence
lhal inay cause undesired operalion.
Continued-_ 5
Readthis first {go_ti_ed}
Declaration of Conformity
Trade Name: SONY
Model No.: DCR-HC96
Responsible Pmty: Sony Electronics lnc.
Address: 16450 W. Bemardo Dr. San Diego.
CA 92127 U.S.A.
Telephone Number: 858-942-2230
This device complies with Part 15 of lhe FCC
Rules.
Operation is subject to the lollowing two
condilions:
( 1) This device lnay not cause hamlhll
interli:rence, and (2) lhis device lllUSt accept any
interli:rcnce received, including interlcrcnce
thai may cause undesired operalion.
Notes
•DCR-HC46 is to be used with tile Handycam
Station Model DCRA-C 151 and AC Adaptor
Model AC-L25A/L25B.
• DCR-HC96 is lo be used with lhe Handycam
Station Model DCRA-C 152 and AC Adaptor
Model AC-L25A/L25B.
Owner'sRecord
The model and serial numbers are located on lhe
bottonl, Record tile serial number in tile space
pro_ ided below. Retlrr to these numbers whene_ er
you call upon your Sony deMer regarding lhis
product.
Model No. DCR-HC
Serial No.
Model NO. AC-
No.
CAUTION
You are caulioned Ihilt iuly challges or
modifications not expressly appro_ ed in this
manual could xoid your authority to operate this
equipment.
Note
This equipment has been tested and lound to
conlp]y wifll file ]inlits 1or a Class B digital
device, pursuant to Part 15 ol tile FCC Rules.
These limits are designed to prmide reasonable
protection against harmlul interllrrence in a
residentiM installation. This equipment generates.
uses, and can radiate radio hvquency energy and,
il not installed and used in accordance with the
instructions, may CZlUSe harlnhl] inlerlcrcnce to
radio conlnlunications.
However, lhel_ is no guarantee that interlcrence
will not occur in a particular inslallation. If this
equipment does cause harmlul interli:rcnce to
radio or tcleviskm reception, which can be
determined by turning file equipment off and on.
the user is encouraged lo tl)' to correct the
interli:rence by one or more of the lollowing
measures:
teorienl or relocate the receiving antenna.
Increase the separalion between lhe equipnlenl
and receiver.
Connecl the equipment into an outlet on a
circuit diflcmnl flom thai 1o which file receiver
is connecled.
Consult the dealer or an experienced radio/TV
lechnician tot help.
The supplied intelqlz_ce cable nmst be used wilh the
equipmenl in order to comply with the limits Rw a
digilal device pursuant to Subpart B ol Part 15 ol
FCC Rules.
Yourcamcorderis suppliedwith two
kindsof operationguides.
"Operating (-;uide" (This manu:d)
"First Step Guide" for connecting the
camcorder to a computer and using the
supplied software (stored on the supplied
CD-ROM)
Typesofcassetteyou canuse in your
camcorder
Youcan use mini DV cassettes m:wked
with Mn_[_V.Mini DV cassettes with
CassetteMemory are incompatible (p. 123).

Types of "Memory Stick" you can use
in your camcorder
There are two sizes uf "Memory Stick."
You can use "Memory Stick Duu" marked
with MEMORYSTICKDUBor
MEMOr¥STICKPRgDUo(p. 124).
"Memory Stick Duo"
(This size can be used with your
camcerder.)
"Memory Stick"
(You cannot use it in your camcorder.)
Using the camcorder
•Do not hold the camcurder by the
following parts.
Viewfinder Battery pack
• You cannot use any type uf memory card
except "Memory Stick Duo."
• "Memory Stick PRO" and "Memory Stick
PRO Duo" can be used only with
"Memory Stick PRO" compatible
equipment.
When using a "Memory Stick Duo"
with "Memory Stick" compatible
equipment
Be sure to insert the "Memory Stick Duo"
into the Memory Stick Duo Adaptor.
MemoryStick DuoAdaptor
LCD panel Shoe cover
(DCR-HC96)
•The camcorder is not dustprouf, drippruof
ur waterproof.
See "Maintenance and precautiuns"
(p. 128).
• Befure connecting your camcorder to
anuther device with a USB ur i.LINK
cable, be sure to insert the conuectur plug
the correct way, and not forcibly to avuid
damaging the terminal, or cause a
malflmction uf your camcorder.
•For DCR-HC46/HC96:
Disconnect the AC Adaptor l?'oln the
Handycam Statiun holding both the
Handycam Statiun and the DC plug.
• For DCR-HC46/HC96:
Be sure to slide the POWER switch tu
OFF (CHG) when you insert the
camcorder intu the Haudycam Statiun or
remove the camcorder from it.
Aboutmenuitems, LCDpanel,
viewfinder, and lens
• A menu item that is gra_ed out is nut
available under the current recording ur
playback conditions.
Continued--b 7

Rea_this first/go_ti_e_}
• The LCD screen aud tile viewfinder are
manufactured using extremely high-
precisiun technology, su uver 99.99% of
the pixels are operational l%r elTcctive
use. Huwever. there may be sume tiny
black points and/or bright points (white.
red. blue. or green in color) that appear
constantly on the LCD screen and the
viewfiuder. These points are normal
results of the manufacturing prucess and
do not affect the recording in any way.
or green point
• Expusiug tile LCD screen, the viewfinder,
or the lens to direct sunlight for long
periods of tinm may cause mallimctions.
• Do not aim at the sun. Doing so might
cause your camcorder to malfunction.
Take pictures of tile sun only in low light
conditions, such as at dusk.
Onrecording
• Before starting to record, test tile
recording function tu make sure the
picture and sound are recorded without
any problems.
• Compensation for the contents of
recordings cannot be provided, even if
recording or playback is not possible due
to a malfunction of the camcorder, storage
media, etc.
• TV color systems dilTcr depending on the
countries/regions. To view your
recordings on a TV, you need an NTSC
system-based TV.
• Television prugrams, films, video tapes,
and other materials may be copyrighted.
Unauthorized recording of such materials
may be contrary to the copyright laws.
Aboutthismanual
• Tile iumges of tile L('D screen :rod tile
viewfinder used in this mauual fur
illustratiuu purposes are captured using a
digital still camera, and therefure may
appear dilTcrent.
• The on-screen displays in each lucal
language are used for illustrating the
operating procedures. Change tile screen
language before using your camcorder if
necessary (p. 69).
• The illustrations used on this mauual are
based on the model DCR-HC96. The
mudel uame is indicated uu the bottum of
your camcorder.
• Design and specifications of recording
media and accessories are subject to
change without notice.
AbouttheCarlZeisslens
• Your camcorder is equipped with a Carl
Zeiss lens, which was developed jointly
by Carl Zeiss, in Germany, and Sony
Curporatiun. and produces superior
images. It adopts the MTF measurement
systmn for video cameras and offers a
quality typical of a Carl Zeiss lens.
MTF= Modulatiun Transfer Function.
The number value indicates the amount uf
light from a sul2ject coming into tile lens.
• For DCR-HC96:
The lens l%ryour camcorder is T*-coated
to suppress unwanted reflections and
faithfully reproduce culors.

Tableof Contents
IMPORTANT SAFEGUARDS .................................................................. 3
Read this first ........................................................................................... 5
Step 1: Checking supplied items ............................................................ 12
Step 2: Charging the battery pack .......................................................... 13
Step 3: Turning the power on and holding your camcorder firmly .......... 18
Step 4: Adjusting the LCD panel and viewfinder .................................... 20
Step 5: Using the touch panel ................................................................ 21
Changing the language setting .................................................................... 21
Checking the screen indicators (Display guide) .......................................... 21
Step 6: Setting the date and time ........................................................... 23
Step 7: Inserting a tape or a "Memory Stick Duo" .................................. 24
Step 8: Selecting the aspect ratio (16:9 or 4:3) of the recording picture
(DCR-HC46/HC96) ....................................................................... 26
Easy Recording/Playback (Easy Handycam) ......................................... 28
Recording ............................................................................................... 30
Playback ................................................................................................. 31
Functions used for recording/playback, etc ............................................ 32
Recording
To use zoom
To use the flash (DCR-HC96)
To record in dark places (NightShot plus) (DCR-HC36/HC46)
To record in dark places (NightShot) (DCR-HC96)
To adjust the exposure for backlit subjects (BACK LIGHT)
To adjust the focus for an off center subject (SPOT FOCUS)
To fix the exposure for the selected subject (Flexible spot meter)
To record in mirror mode
To use a tripod
To use a Shoulder belt
Playback
To play back the images in sequence (SLIDE SHOW)
To use PB zoom
Recording/playback
To check the remaining battery (Battery Info)
To turn off the operation confirmation beep (BEEP)
To use special effects
To initialize the settings (BESET)
Continued=_ g

10
Other part names and functions
Indicators displayed during recording/playback ..................................... 36
Searching for the starting point .............................................................. 39
Searching for the last scene of the most recent recording
(END SEARCH) .................................................................................. 39
Searching manually (EDIT SEARCH) ........................................................... 39
Reviewing the most recently recorded scenes (Rec review) ....................... 39
Remote Commander .............................................................................. 40
Searching quickly for a desired scene (Zero set memory) .......................... 40
Searching for a scene by date of recording (Date search) .......................... 41
Playing the picture on a TV .................................................................... 42
Using the menu items ........................................................... 44
Menu items ............................................................................................ 46
_. CAMERA SET menu ........................................................................ 49
Settings to adjust your camcorder to the recording conditions (EXPOSURE/
WHITE BAL./STEADYSHOT, etc.)
MEMORY SET menu ...................................................................... ,55
Settings for the "Memory Stick Duo" (BURST/QUALITY/IMAGE SIZE/
ALL ERASE/NEW FOLDER, etc.)
PICT.APPLI. menu ......................................................................... 59
Special effects on pictures or additional functions on recording/playback
(SLIDE SHOW/PlOT. EFFECT/FRAME REC, etc.)
_ EDIT/PLAY menu ........................................................................... 64
Settings for editing or playing back in various modes (VAR.SPD PB/
END SEARCH, etc.)
@Z_ STANDARD SET menu .................................................................. 65
Settings while recording on a tape or other basic settings (REC MODE/
MULTI-SOUND/LCD/VF SET/DISP OUTPUT, etc.)
_:@ TIME/LANGU. menu ....................................................................... 69
(CLOCK SET/WORLD TIME/LANGUAGE)
Customizing Personal Menu .................................................................. 69
Dubbing to VCR/DVD device, etc .......................................................... 71
Recording pictures from a TV or VCR/DVD device, etc ......................... 74
Dubbing pictures from a tape to a "Memory Stick Duo" ......................... 77
Dubbing sound to a recorded tape ......................................................... 78
Deleting recorded pictures from the "Memory Stick Duo". ..................... 80
Marking images on the "Memory Stick Duo" with specific information
(Print mark/Image protection) ....................................................... 81
Printingrecordedimages(PictBridgecompliantprinter)........................82
Jackstoconnectexternaldevices..........................................................84
m
Before referring to the "First Step Guide" on your computer .................. 86
Installing the software and "First Step Guide" on a computer ................ 89
Viewing "First Step Guide" ..................................................................... 93
Creating a DVD (Direct Access to "Click to DVD") ................................. 94
Connecting an analog VCR to the computer via your camcorder
(Signal convert function) (DCR-HC96) ......................................... 97
Troubleshooting ...................................................................................... 99
Warning indicators and messages ....................................................... 117
Using your camcorder abroad .............................................................. 122
Usable cassette tapes .......................................................................... 123
About the "Memory Stick". .................................................................... 124
About the "lnfoLITHIUM" battery pack .................................................. 126
About i.LINK ......................................................................................... 127
Maintenance and precautions .............................................................. 128
Specifications ....................................................................................... 132
Index ..................................................................................................... 137
11
Ge_w $tatfod
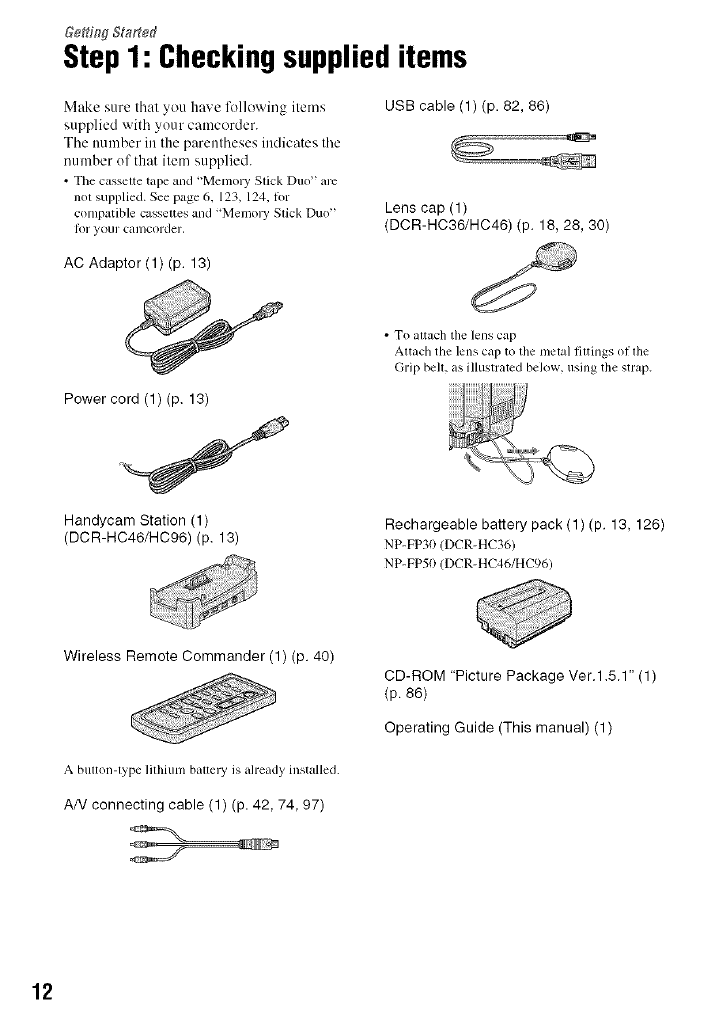
Step1: Checkingsupplieditems
Make sure that you have lkHlowing items
supplied with your camcorder.
The ttumber in the parentheses indicates the
number of that item supplied.
• The casseue tape and "Memo W Slick Duo" arc
nlu supplied. See page 6, 123, 124, lot
compatible casseues and "Memory Slick Duo"
Ik_l your cumcorder,
AC Adaptor (1) (p. 13)
USB cable (1) (p. 82, 86)
Lens cap (1)
(DCR-HC36/HC46) (p. 18, 28, 30)
• To allach tile lens cap
Altach tile lens cap to the metal fiuings of lhe
Grip bell, as illustrated below, using the strap.
Power cord (1) (p. 13)
Handycam Station (1)
(DCR-HC46/HC96) (p. 13) Rechargeable battery pack (1) (p. 13, 126)
NP-FP3(t (DCR-HC36)
NP-FP50/DCR-HC46/HC96)
Wireless Remote Commander (1) (p. 40)
A buuon-lype lilhium bauery is already installed.
AN connecting cable (1) (p. 42, 74, 97)
CD-ROM "Picture Package Ver.1.5.1" (1)
(p. 86)
Operating Guide (This manual) (1)
12

Step2: Chargingthe batterypack
You can charge the "InfoLITHIUM"
battery pack (P series) (p. 126) after
attaching it to your camcorder.
ForDCR-HC46/HC96:
1Align the terminals of the battery
pack and your camcorder (@),
then attach the battery pack and
click it into place (@).
CD
E
Power cord
Fer DCR-HC36:
POWER switch
rib
/Slide the POWER switch in the
direction of the arrow to OFF
(CHG) (The default setting).
POWER
Connect the AC Adaptor to the
DC IN jack on the Handycam
Station for the DCR-HC46/HC96 or
on your camcorder for the DCR-
HC36.
For DCR-H(!46/H('96:
DC INjack
Power cord
With the • mark facing up
Continued-_ 13
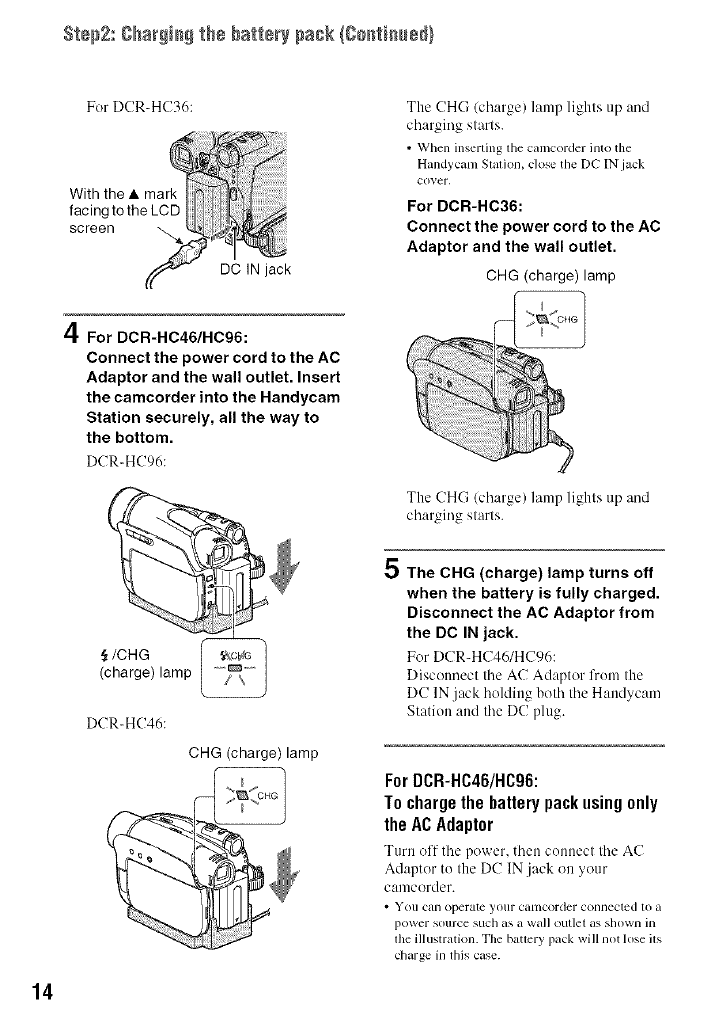
Step2: gha_i_ the batte_' pask {ge_ti_÷d}
14
For DCR-HC36:
With the • mark
facing to the LCD
screen
DC IN jack
4For DCR-HC46/HC96:
Connect the power cord to the AC
Adaptor and the wall outlet. Insert
the camcorder into the Handycam
Station securely, all the way to
the bottom.
DCR-HC96:
JOHG
(charge) lamp
DCR_HC46:
CHG (charge) lamp
5
The CHG/charge) lamp lights up and
charging starts.
• When inserting the camcorder into the
Handycam Station, closetile DC IN jack
cover.
For DCR-HC36:
Connect the power cord to the AC
Adaptor and the wall outlet.
CHG (charge) lamp
The CHG/charge) lamp lights up and
charging starts.
The CHG (charge) lamp turns off
when the battery is fully charged.
Disconnect the AC Adaptor from
the DC IN jack.
For DCR-H('46/HC96:
Disconnect tile AC Adaptor from the
DC IN jack holding both tile Handycam
Station and tile DC plug.
ForDCR-HC46/HC96:
T0 charge the battery pack using 0nly
the AC Adaptor
Turn off tile power, then conllect tile AC
Adaptor to the DC IN.jack on your
canlcerder.
• You tun operate your canlcorder connected lo a
power source sIIch as a wail outlet as showll ill
lhe illustration. Tile batlery pack will not lose ils
charge in lhis case.
POWER switch
With the • mark
facing to the LCD
screen
DC plug DC IN jack
To the wall outlet
AC Adaptor
Power cord
ForDCR-HC46/HC96:
To remove your camcorder from the
HandycamStation
Turn off the power, then remove the
camcorder from the Handycam Station
holding both your camcerder and the
Handycam Station.
ForDCR-HC36:
To use an outside power source
You can operate _our camcorder using the
power from the wall outlet by making the
same connections as you do when charging
the battery pack. The batte Upack will not
lose its charge in this case.
To remove the battery pack
(_) Slide the POWER switch to OFF
(CHG). Hold down the • BATT
(battery) release lever with one hand.
(_) Remove the battery in the direction of
the arrow with the ether hand.
POWER switch
• BATT (battery)
release lever
When storing the battery pack
Fully discharge the battery before storing it
for an extended period/p. 126).
Chargingtime
Approxim:de time/min.) required when
you fully charge a fully discharged battery
pack.
h_r
NP-FP30 *_ I 15
NP-FP5/).2 125
NP-FP70 155
NP-FP71 170
NP-FI_)/) 220
.1 supplied with DCR-HC36
*2 supplied wilh DCR-HC46/HC96
Recordingtime
Approximate time (min./availahle when
you use a fully charged batlery pack.
m.
Continued _15
St÷p2: gha_i_ the batte_' pask {go_ti_÷d}
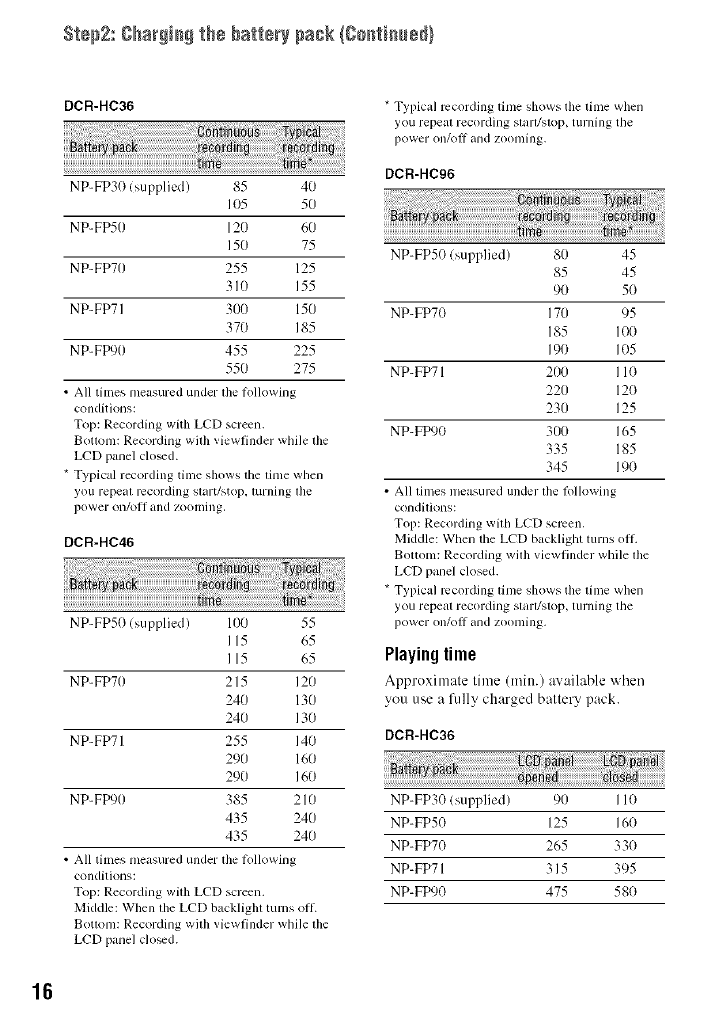
DCR-HC36
NP-FP30 (supplied) 85 40
IO5 50
NP-FP50 120 60
150 75
NP-FP70 255 125
310 155
NP-FP71 300 150
370 185
NP-FP90 455 225
550 275
• All times nleasured under lhe fl)llowing
conditions:
Top: Recording wifll LCD screen.
Botlonl: Recording wilh viewfinder while lhe
LCD panel cloud.
* Typical recording tinle shows the lime when
you repeal recording slart/stop, lurning lhe
power on/oil and zooming,
DCR-HC46
NP-FP50 (supplied) 100 55
115 65
115 65
NP-FP70 215 120
240 130
240 130
NP-FP71 255 140
290 160
290 160
NP-FP90 385 2 l0
435 240
435 240
• All times nleasured under lhe lollowing
conditions:
Top: Recording wilh LCD screen.
Middle: When file LCD backlight turns oil.
Botlonl: Recording wilh viewfinder while lhe
LCD panel cloud.
*Typical recording linle shows tile linle when
you repeal recording slarl/slop, tllrnlng the
power on/ol_ and zoonling,
DCR-HC96
NP-FP50 (supplied) 80 45
85 45
90 5(}
NP-FP70 170 95
185 100
190 105
NP-FP71 200 I10
220 12(}
230 125
NP-FP90 300 165
335 185
345 190
• All limes illeasurcd under tile lbllowing
condilions:
Top: Recording will/LCD screen.
Middle: When the LCD backlight turns oil
Bottonl: Recording wilh viewfinder while lhe
LCD panel closed.
*Typical recording lime shows the lime when
you repeal recording slarl/slop, tllrning tile
power on/off and zoonling,
Playingtime
Approxinmte time (rain.) av:ulable "_ hen
you use a fidly charged battery pack.
DCR-HC36
NP-FP30 (supplied) 90 110
NP-FP50 125 160
NP-FP70 265 330
NP-FP71 315 395
NP-FP90 475 580
16
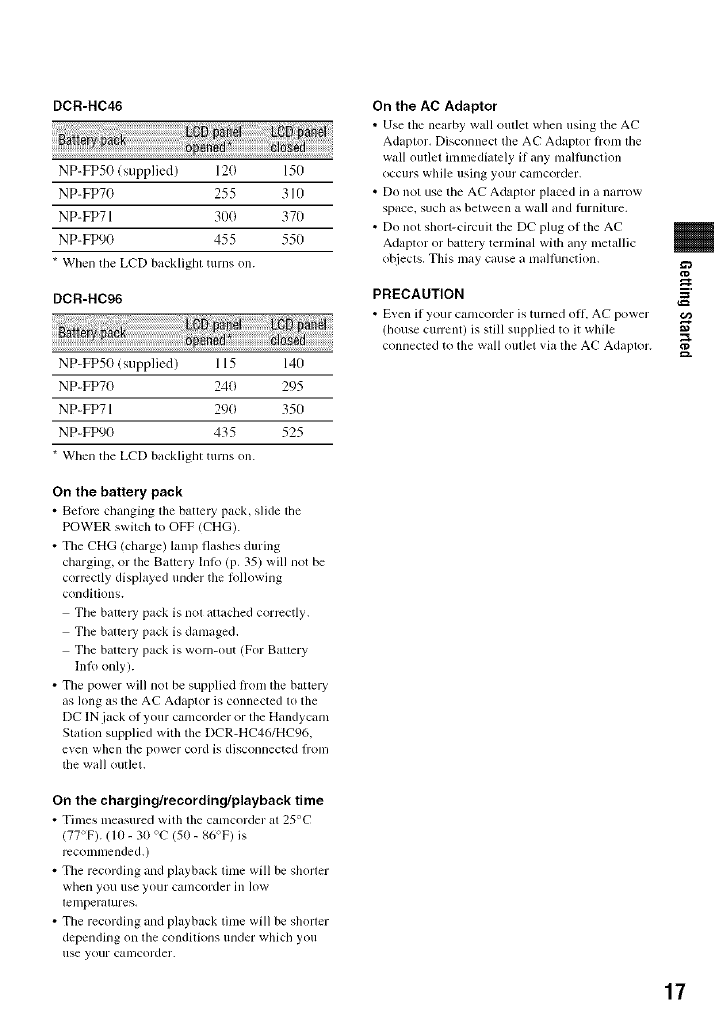
DCR-HC46
NP-FP50 (supplied) 120 150
NP-FP70 255 310
NP-FP71 300 370
NP-FP90 455 550
* When tile LCD backlighl turns on.
DCR-HC96
NP-FPh0 (supplied) 115 140
NP-FP70 240 295
NP-FP71 290 350
NP-FP90 435 525
* When the LCD backlighl turns on.
On the battery pack
• Before changing lhe batlm T pack, slide lhe
POWER switch to OFF (CHG).
• The CHG (charge) lamp flashes during
charging, or the Battery Inkl (p. 35) will not be
correctly displayed under the lbllowing
condilions.
Tile baltc W pack is nol altached correctly,
The battc W pack is damaged.
The battc W pack is worn-out (For Ballery
lnlo only).
• The power will not be supplied lrom lhe battery
as hmg as the AC Adaptor is connected lo the
DC IN jack of your camcorder or lhe Handycam
Station supplied with the DCR-HC46/HC96,
even when tile power cord is disconnected l]Olll
the wall outlet.
On the charging/recording/playback time
• Times measured with the camcorder at 25°C
(77°F). (lO - 30 %" (50 - 86°F) is
rccomnlended.)
• Tile recording and playback time will be sholler
when you use your camcorder ill lOW
lelnperalures,
• Tile recording and playback lime will be shorter
depending on the condilions tinder which you
use your calllcorder.
On the AC Adaptor
• Use the nearby wall outlet whell using tile AC
Adaptor. Disconnect the AC Adaptor lrom lhe
wall outlet immediately if any malhmction
Occurs while using your camcorder.
• Do not use the AC Adaptor placed in a narrow
space, such as belween a wall and hlrniture.
• Do not short-circuil the DC plug of lhe AC
Adaptor or battery temfinal with any metallic
o[_jects, This may cause a nmlhmction.
PRECAUTION
• E_en if your camcoMer is turned off, AC power
(house cunent) is still supplied to it while
connected to the wall outlet via the AC Adaptor. a=
17

Step3: Turningthe poweronand holdingyour
camcorderfirmly
To record or play back. slide the POWER
switch repeatedly to turn on the respective
lamp.
When using it lk_rthe first time. the
[CLOCK SET] screen appears (p. 23).
POWER
switch
Lamps that light up
CAMERA-TAPE: To record on a tape.
CAMERA-MEMORY: To record on a
"Memory Stick Duo."
PLAY/EDIT: To play or edit pictures.
• After you have _1 tile date and time
([CLOCK SET], p. 23),filenexl time you
turn on the power of your calllcorder, tile
currem dale and lime will be displayed on
the LCD screen lot alPw seconds.
2Hold the camcorder correctly.
.4
/ Slide the POWER switch
repeatedly in the direction of the
arrow to turn on the respective
lamp.
For DCR-HC36/HC46:
Remove tile lens cap by pressing bolh
knobs on tile sides of the cap. 3Ensure a good grip, then fasten
the Grip belt.
For DCR-HC96:
The lens cover opens automatically
when the POWER switch is set to
CAMERA-TAPE or CAMERA-
MEMORY.
If the POWER
switch is set to OFF
(CHG), slide itwhile
pressing the green
button.
®
18

Toturnoffthe power
Slide the POWER s'a itch to OFF (('HG).
For DCR-HC36/HC46:
Attach the lens cap after turning off the
power.
• At lhe linle of purchase, file power will be _1 to
mm off automatically if you leave your
cguncorder withoul ally operalion *lltclnptcd l_>r
approximalely 5 minutcs, to save battm T power
([A.SHUT OFFI, p. 68).
• If warning messages appear on the screen,
Iklllow tile instl-uclions (p. 118). €/a
E
19

Step4: Adjustingthe LCDpanelandviewfinder
i
Open tile LCD panel 90 degrees to the
camcorder/(_)), then rotate it to the best
angle to record or play (Q).
DISP/BATT INFO
180degrees
(max.)
@
90 degrees to
90 degrees the camcorder
(max.)
• Do not press the buttons on tile LCD hame
accidentally when you open or adjust the LCD
panel.
• If you rotate the LCD panel 180 degrees to the
lens side, you can close the LCD panel with the
LCD screen lacing (>lit+This is convenient
dtlring playback operations.
ForDCR-HC46/HC96:
Toturn offthe LCDbacklightto make
the batterylastlonger
Pressandhold DISP/BATT INFOfor a le_
seconds until _k'_o_ appears.
This setting is practical when you use your
camcorder in bright conditions or where
you want to save battery power. The
recorded picture will not be affected by the
setting. To turn on the LCD backlight, press
and hold DISP/BATT INFO for a few
seconds until "U'do_ disappears.
• gee [LCD/VF gET] - [LCD BRIGHTI/P- 66) to
adjust lhe brightness of file LCD screen.
You can view pictures using the viewfinder
to avoid wearing down the battery, or when
the picture seen on the LCD screen is poor.
Viewfinder_
-- Viewfinder lens adjustment
lever
Move it until the picture is
clear.
• You can al/iusl lhe brighlness of tile viewfinder
backlighl by _lecling [LCD/VF SETI - [VF
B.LIGHT] (p. 66).
• You can adjusl the [FADERI and the
[EXPOSUREI _tting using lhe viewfinder
(p. 60),
2O
This manual suits for next models
2
Table of contents
Other SON Camcorder manuals


