SONAMAGNA 9 in 1 Drive User manual
USER
GUIDE

IMPORTANT! FOR YOUR PROTECTION, PLEASE READ THE FOLLOWING:
WATER AND MOISTURE: Product should not be used near water (near a bathtub, washbowl, kitchen sink, laundry tub, in
a wet basement, or near a swimming pool, etc). Care should be taken so that objects do not fall and liquids are not spilled
into the enclosure through openings.
POWER SOURCES: The product should be connected to a power supply only of the type described in the operating
instructions or as marked on the product. Unplug the product during lightning storms or when unused for long periods of
time.
GROUNDING OR POLARIZATION: Precautions should be taken so that the grounding or polarization means of product
is not defeated.
POWER CORD PROTECTION: Power supply cords should be routed so that they are not likely to be walked on or
pinched by items placed upon or against them, paying particular attention to cords at plugs, convenience receptacles, and
the point where they exit from the product.
HEAT: Do not install near any heat sources such as radiators, heat registers, stoves, or other apparatus (including
amplifiers) that produce heat.
SERVICING: The user should not attempt to service the product beyond that described in the operating instructions. All
other servicing should be referred to qualified service personnel.
SOUND LEVELS: DO NOT operate for a long period of time at a high volume level or at a level that is uncomfortable, as
hearing loss could occur.
CLEANING: Clean product using a soft, dry cloth.
LIMITED WARRANTY
Your 9 in 1 Drive pedal, when used solely in the US, is guaranteed against failure for ONE YEAR unless otherwise stated.
SonaMagna will service and supply all parts at no charge to the customer providing the unit is under warranty. Shipping
costs are the responsibility of the customer. SonaMagna DOES NOT PAY FOR PARTS OR SERVICING OTHER THAN
OUR OWN. A COPY OF THE ORIGINAL INVOICE IS REQUIRED TO VERIFY YOUR WARRANTY. SonaMagna
assumes no responsibility for horn drivers or speakers damaged by this product. This warranty does not cover, and no
liability is assumed, for damage due to: natural disasters, accidents, abuse, loss of parts, lack of reasonable care,
incorrect use, or failure to follow instructions. This warranty is in lieu of all other warranties, expressed or implied. No
representative or person is authorized to represent or assume for SonaMagna any liability in connection with the sale or
servicing of SonaMagna products. SonaMagna SHALL NOT BE LIABLE FOR INCIDENTAL OR CONSEQUENTIAL
DAMAGES. SonaMagna reserves the right to make changes in design, or make additions to, or improvements upon this
product without incurring any obligation to install the same on products previously manufactured. Modifications of the
product not expressly approved by SonaMagna may void this warranty.
When RETURNING merchandise, you may contact SonaMagna through the SonaMagna.com website or email
[email protected] for a return authorization number. Describe in writing each issue. If your unit is out of warranty,
you will be charged the current FLAT RATE for parts and labor to bring your unit up to factory specifications.
COMPLIANCE
This equipment has been tested and found to comply with the limits for a Class B digital device, pursuant to Part 15 of the
FCC rules. These limits are designed to provide reasonable protection against harmful interference in a residential
installation. This equipment generates, uses and can radiate radio frequency energy and if not used in accordance with
the instructions, may cause harmful interference to radio communications and there is no guarantee that interference will
not occur in a particular installation. If this equipment does cause harmful interference to radio or television reception,
which can be determined by turning the equipment off and on, the user is encouraged to try to correct the interference by
one or more of the following measures: reorient or relocate the receiving antenna, increase the separation between the
equipment and receiver, connect the equipment into an outlet on a circuit different from that of the receiver. Consult the
dealer or an experienced radio/TV technician if help is needed with interference.
Use only shielded interconnecting cables. Modifications of the product not expressly approved by SonaMagna may void
the user’s authority to operate this product.

RESTRICTIONS
The FIRMWARE program is copyrighted. You may not engage in reverse engineering or reproduction of the FIRMWARE
by other conceivable methods. You may not reproduce, modify, change, rent, lease, resell, or distribute the FIRMWARE in
whole or in part, or create derivative works from the FIRMWARE.
DISPOSAL / TRADE IN PROGRAM
Protect the environment by not disposing of this product with household waste. Check your local authority for recycling
advice and facilities. Alternatively, visit the SonaMagna website or email us at [email protected] for information
about new product discounts when trading in equipment, both operational and non-operational.

9in1Drive
870001 Rev A_1
- 4 -
Thank you for purchasing the
9in1Drive
by SonaMagna. To get the most out of this
product, we urge you to thoroughly read this user guide before use.
CONTENTS
OVERVIEW....................................................................................................................5
SETUP ...........................................................................................................................6
PRESETS & BANKS......................................................................................................7
BASIC CONTROL SETTINGS.......................................................................................8
DRIVE MODES & EQ.....................................................................................................9
PRESET NAME............................................................................................................10
LOAD FACTORY PRESETS........................................................................................10
USING MIDI .................................................................................................................11
UPDATE FIRMWARE..................................................................................................12
SPECIFICATIONS .......................................................................................................13
FACTORY PRESET VALUES......................................................................................14
CUSTOM PRESET VALUES.......................................................................................15
NOTE: The information contained in this user guide is subject to change at any time without notification. Some
information contained in this user guide may also be inaccurate due to undocumented changes in the product or
operating system since this version of the user guide was completed. The information contained in this version of
the user guide supersedes all previous versions.

9in1Drive
870001 Rev A_1
- 5 -
OVERVIEW
The
9in1Drive
guitar pedal is a great sounding, easy to use, multi-tool of a pedal which includes overdrive, distortion,
fuzz, metal distortion, metal fuzz, sweep-able EQ, adjustable mid-scoop, and clean boost effects. Its analog signal
processing and innovative control setup - no "edit", "save", or "menu" buttons! - make it possible to replace multiple
stomp-boxes at a fraction of the cost and space. MIDI control and USB included. SonaMagna pedals are built using time
proven, robust techniques.
1. OUT: Output jack to guitar amp.
2. PWR: 9V to 12V DC power input jack.
3. MIDI: MIDI jack.
4. USB: Full speed USB port for control firmware updates.
5. IN: Guitar input jack.
6. DRV & MODE: Sets the amount of drive gain and also
acts as a button to select 6 different drive modes
7. LCD Screen: Displays information about the 9 in 1’s
effect presets and also changes color to indicate the
current bank (Red, Green, or Blue).
8. TONE & WP: Varies the amount of high end for all
drive modes except clean (“cln”) mode. Pressing the
TONE knob enables or disables write protect mode
(WP).
9. EQ/SCP & NAME: Sets the amount of boost or cut of
the EQ. In metal modes the EQ/SCP control adjusts
the amount of mid scoop. Pressing the EQ/SCP
control enables changes to the preset name.
10. FREQ: Sets the center frequency which is boost or cut.
In metal modes the FREQ control sets the pre-
emphasized midrange frequency.
11. FX VOL: Adjusts the volume of drive and EQ effects for
each individual preset. This control is disabled when
the effects are off.
12. EDGE: Adjusts the drive clipping presence - smoother
(counter-clockwise) or harder edged (clockwise). Not
active when drive mode is set to “cln” or when the
effects are disabled.
13. LEDs: The LEDs indicate which preset within a bank is
currently active and change color to indicate the current
bank (Red, Green, or Blue). If the effects are off (i.e.
no preset is active) all 3 LEDs will be off.
14. FOOTSWITCHES: Press the footswitches to select a
preset within a bank, or to change banks.
9in1Drive
870001 Rev A_1
- 6 -
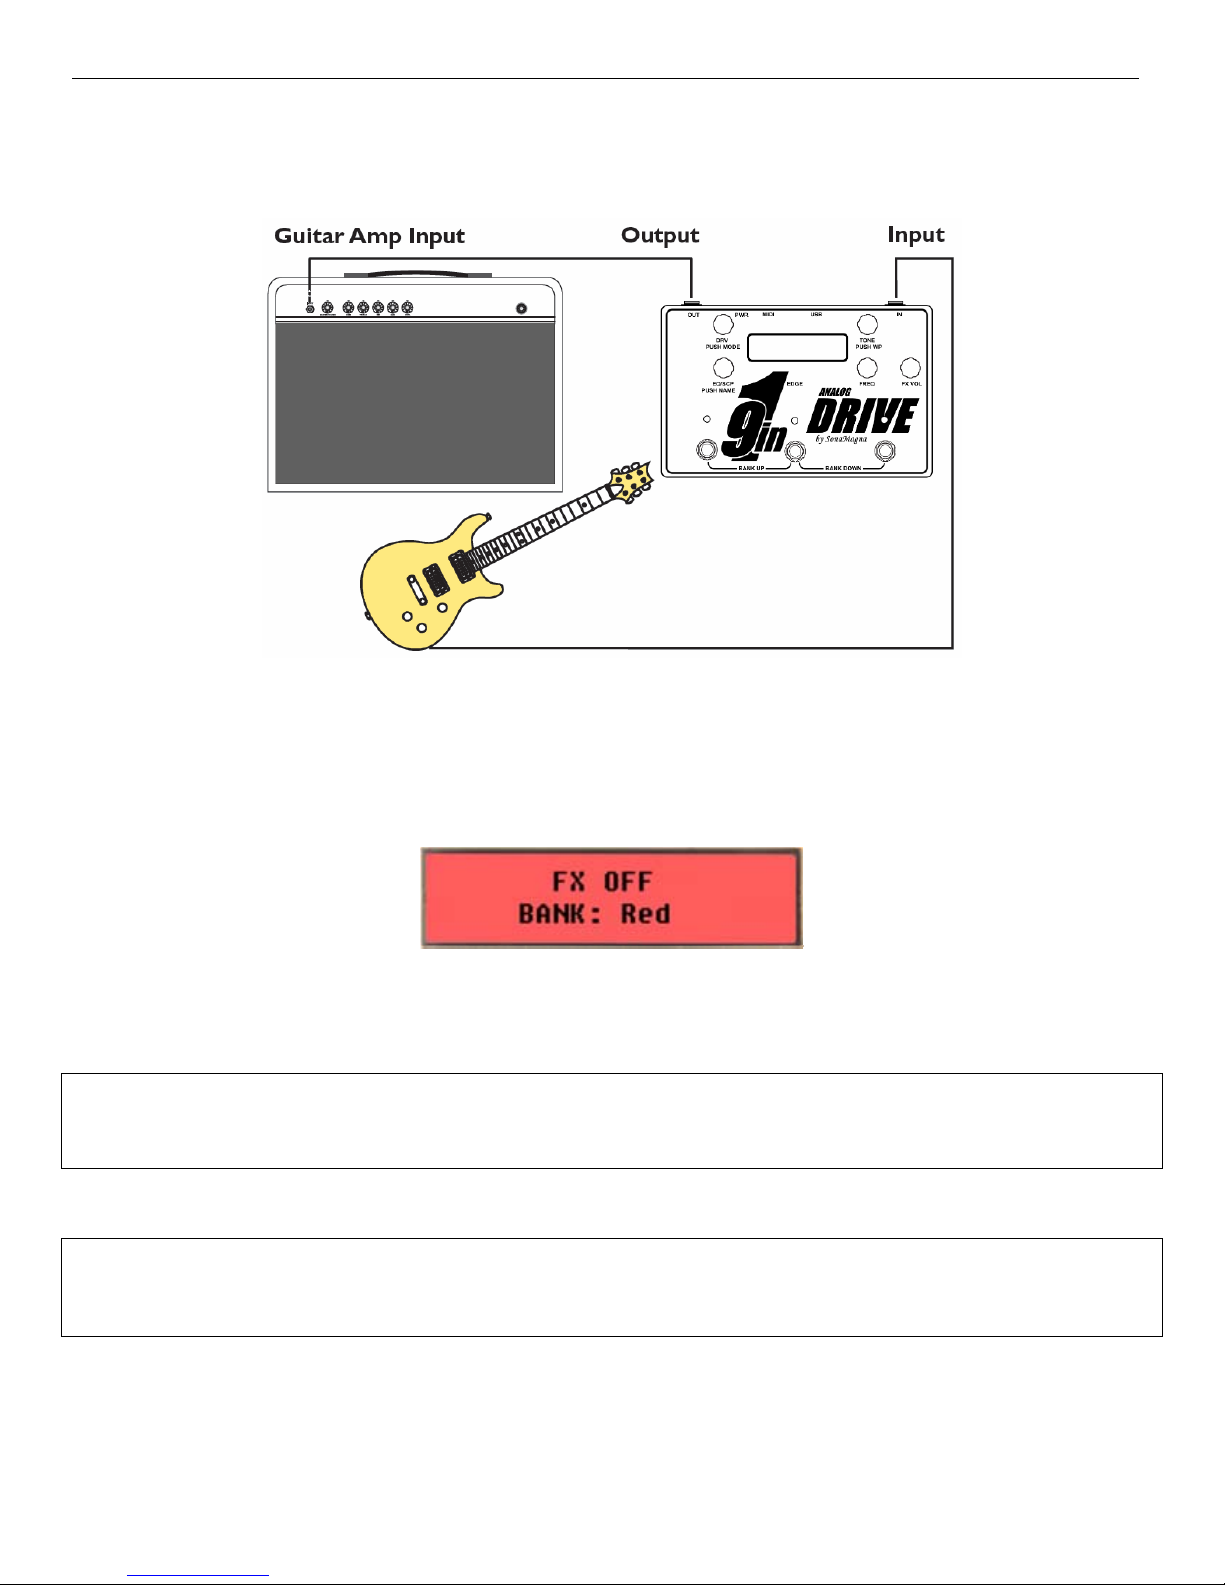
SETUP
Plug in your guitar, amp, and power supply to the
9IN1DRIVE
. The LCD will light up the color of the current bank (Red),
display a quick splash screen with the firmware revision, and will then display that the effects are off and the current bank
is “Red”, as shown below. When the effects are off your clean guitar sound will go through the pedal.
* TIP: The
9in1Drive
will typically work best as the first pedal in your chain. If you use other high gain drive pedals, or
pedals which sound better when a guitar is plugged directly into them, place those in front of the
9in1Drive
.
* TIP: When looping excess power supply cable in order to manage cabling, keep the loop away from power supply blocks
(i.e. the “wall wart” part) to help reduce noise.

9in1Drive
870001 Rev A_1
- 7 -
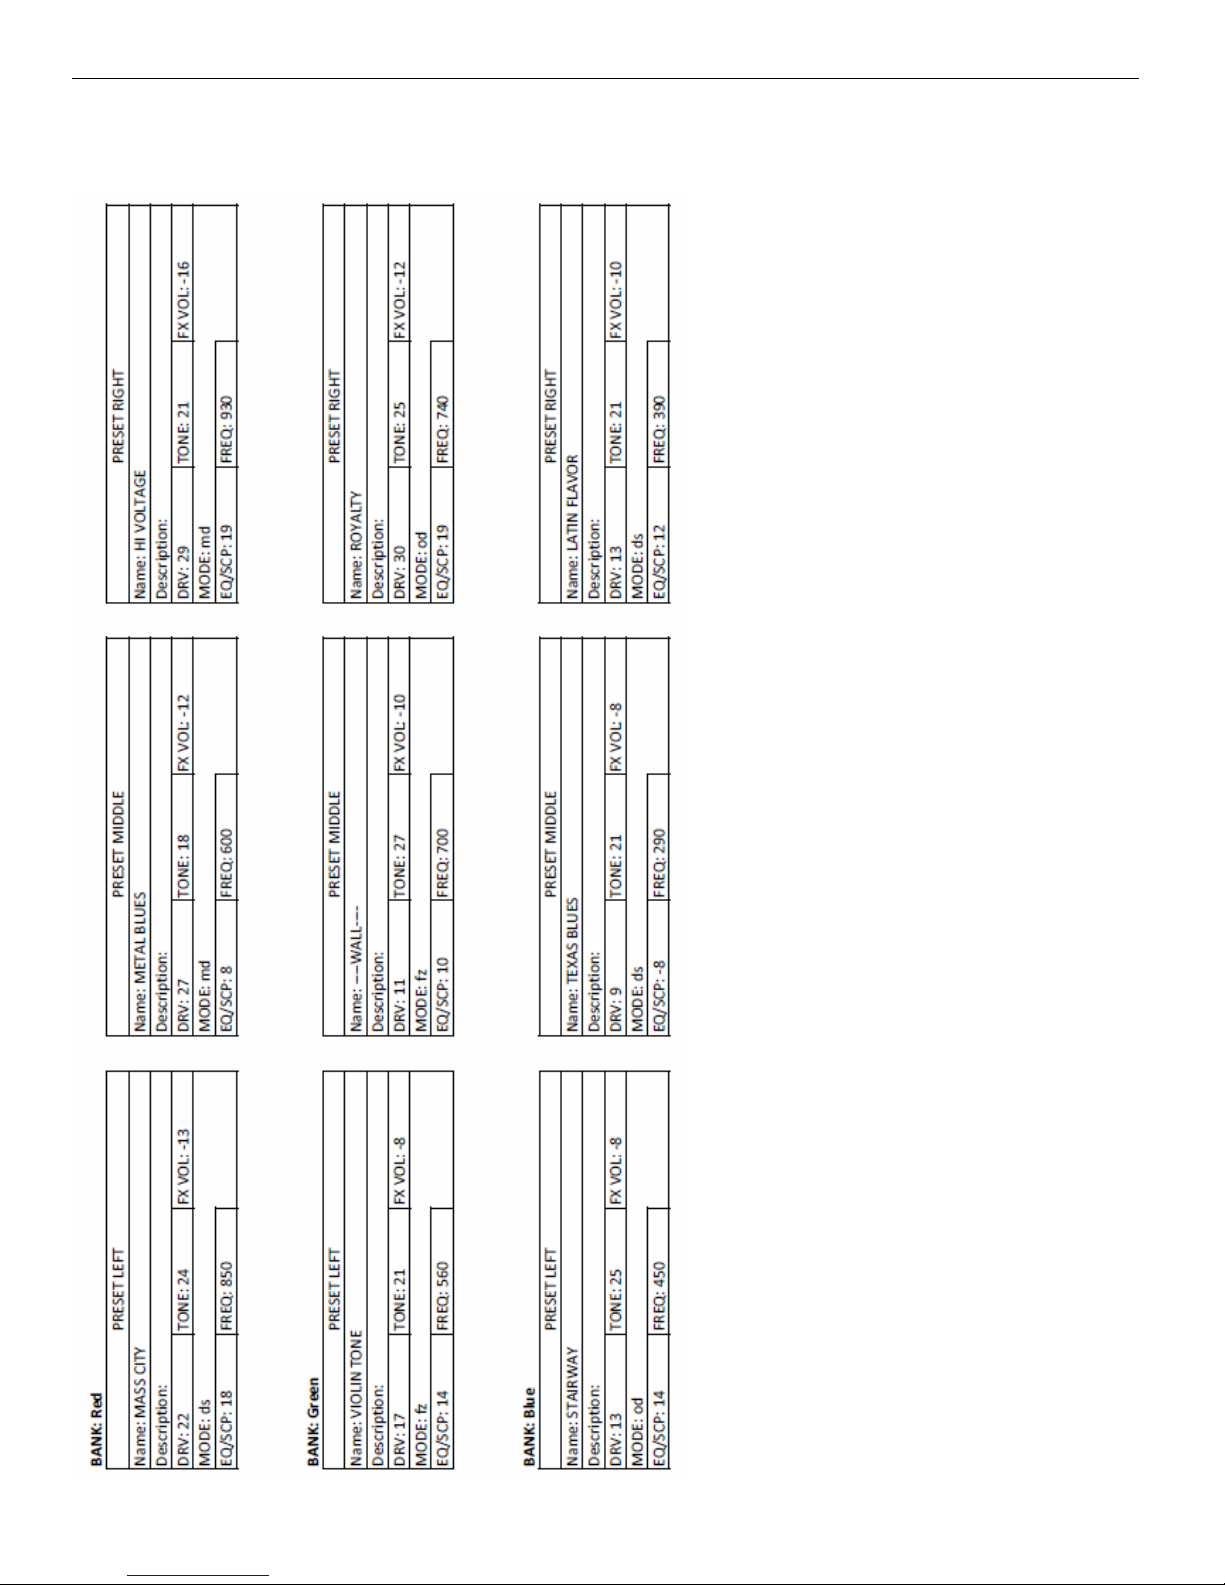
PRESETS & BANKS
The
9IN1DRIVE
effect presets are arranged in 3 banks of 3 presets each, providing a total of 9 tone presets in 1 pedal.
To enable an effect preset, press a footswitch. The LCD will display the preset name. The LED above the pressed
footswitch will light up and its color will indicate the currently selected bank.
To turn the effects off, press the footswitch corresponding to the currently active preset (i.e. press the footswitch under the
lit LED). You can switch to any of the 3 presets by pressing the other footswitches.
To select another bank of 3 presets, press the left and middle footswitches (or right and middle footswitches) at the same
time. Pressing both the left and middle footswitches multiple times will scroll through the banks in the following order:
Red, Green, Blue (i.e. bank UP). Pressing both the right and middle footswitches multiple times will scroll through the
banks in the following order: Red, Blue, Green (i.e. bank DOWN). The LCD and LEDs will change color depending on
which bank is currently selected. The color coded banks and multi-color LCD make it easy to tell which bank is selected
even when the effects are off.
* TIP: When changing banks, the preset enabled in the newly selected bank will correspond to the first of the two
footswitches pressed during the bank change.
* TIP: Try to setup your presets so that you don’t have to change banks during a song. Consider duplicating presets in
more than one bank if needed.

9in1Drive
870001 Rev A_1
- 8 -
BASIC CONTROL SETTINGS
The
9IN1DRIVE
was designed with the idea of making a programmable pedal as easy to setup as a regular stomp-box.
With that in mind, you’ll see there are no edit, save, or menu buttons on the pedal. Whenever a preset is active, you can
change its settings by simply turning or pressing the knobs, similar to how you’d use a regular stomp-box. The LCD
changes automatically to display the information. And changes are saved automatically.
The control knobs on the
9IN1DRIVE
correspond to the control values displayed on the LCD. With the exception of the
FX VOL control knob, each control knob is located closest to its corresponding control value shown on the LCD. To
adjust a preset’s control values, turn or press the knob labeled with the control setting you’d like to change. When a knob
is turned, the display will show the preset’s effect control setting values. The values for each effect control are shown
after the control knob name. The drive mode (e.g. “od”) is shown after “DRV:” and its control value. For example, to
adjust the tone control value, turn the control knob labeled “TONE” and the tone value on the LCD will change as will the
guitar tone. As another example, to change the drive mode, push the control knob labeled “DRV” and the drive mode
shown on the LCD will change as will the drive sound.
The FX VOL control adjusts the volume of the drive and EQ effects for each individual preset. This control is disabled
when the effects are off. When the FX VOL control knob is turned, the LCD will automatically update to show the FX VOL
control value, and will switch back to show the other control values automatically.
* TIP: Use the FX VOL settings to adjust the relative volumes of your presets so that your guitar sits well in the mix for
rhythm and lead parts. Use the master volume control on your amp to control your overall volume level.
Pressing the TONE knob enables or disables write protect mode (WP). Enable write protect mode to preserve the control
values of your presets. When WP is active, temporary changes to the control values can be made but are not saved. The
letters “wp” will appear at the right side of the LCD when write protect mode is enabled. WP mode is enabled on power
up by default. Additionally, all the knobs have detents to keep them from turning while you’re playing.
* TIP: While write protect mode is enabled you can experiment with changes to the effect control values without over-
writing your current preset values. If you like the changes you made, disabling then enabling write protect mode will save
those changes to the current preset.

9in1Drive
870001 Rev A_1
- 9 -
DRIVE MODES & EQ
The DRV control knob sets the amount of drive gain. The DRV knob also acts as a button and can be pressed to toggle
through 6 different drive modes: clean mode “cln”, overdrive mode “od”, distortion mode “ds”, fuzz mode “fz”, metal
distortion mode “md”, and metal fuzz mode “mf”. To change the amount of drive, turn the DRV knob and the LCD will
update the values as they are changed and the guitar’s drive will increase. To scroll through the 6 different drive modes,
press the DRV knob multiple times.
The TONE control knob varies the amount of high frequencies for the drive modes except when the drive mode is set to
clean (“cln”). When the drive mode is set to clean, the display will show “cln” for the DRV mode and “na” for the TONE
value, as shown in the example display below.
* TIP: When using overdrive (“od”) or distortion (“ds”) modes, try rolling back the volume control on your guitar to clean up
the guitar sound without having to change presets or disable the effect.
The EQ/SCP control knob sets the amount of boost or cut of the EQ. The FREQ control knob sets the center frequency
which is boost or cut, and is adjustable over a wide frequency range. These controls provide powerful tone shaping which
can be helpful to getting focused tones.
In metal modes the EQ/SCP control adjusts the amount of midrange scoop (increasing scoop boosts highs and lows) and
the display will show “SCP:” (scoop) in place of “EQ:”. In metal modes the FREQ control sets a pre-emphasized midrange
frequency, so you can get different variations of metal style tones.
Use the EDGE control to adjust the presence of your drive tones. The EDGE control can affect how your guitar sound sits
in the mix with other instruments. This control is applied to all 9 presets (i.e. it is a global control). It is not active when
the drive mode is set to clean (“cln”) or when the effects are disabled.
* TIP: Start with the EDGE control set to 12 o’clock and use the TONE control to adjust the smoothness of the drive sound
for each of your presets (higher TONE values produce a brighter, more aggressive sounding drive tone, lower TONE
values produce smoother, mellower sounding drive tones). Turning the EDGE control clockwise can help your drive tones
cut through a mix when playing along with other instruments.
9in1Drive
870001 Rev A_1
- 10 -
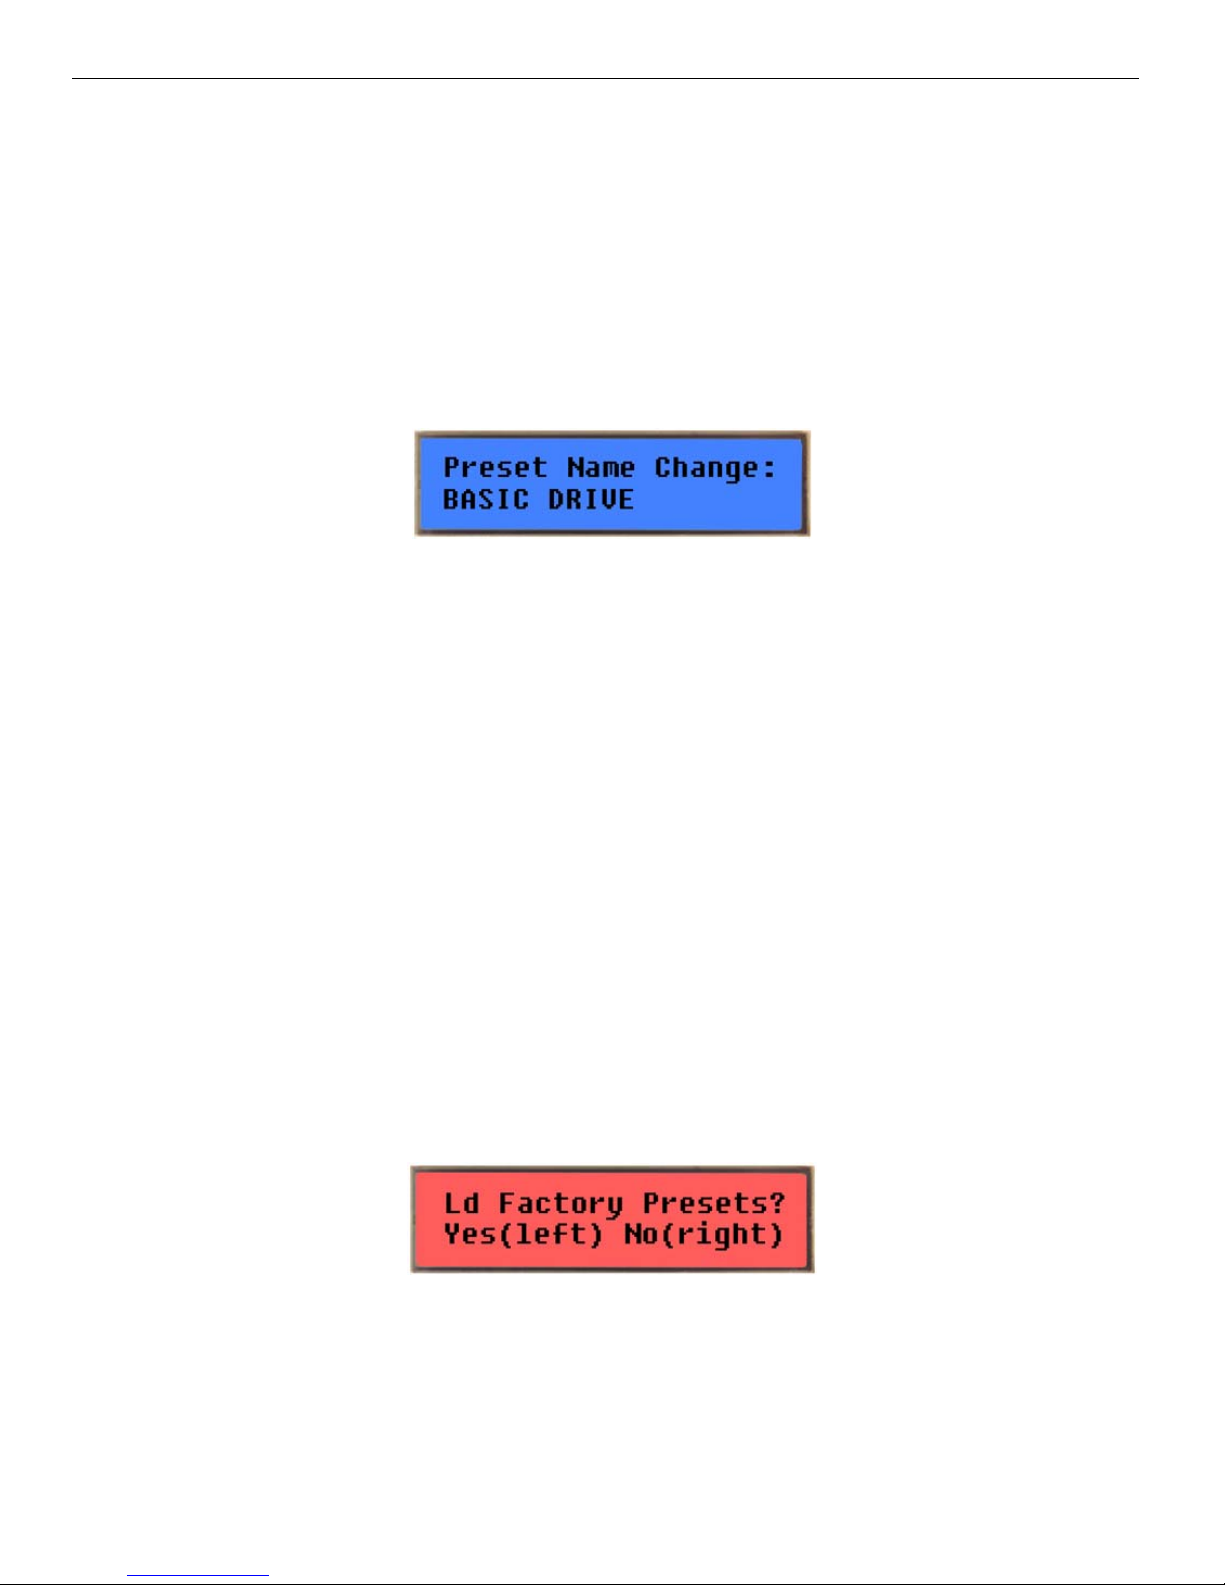
PRESET NAME
Each preset in the
9IN1DRIVE
can be given a unique name to help you remember what type of tone the preset is setup
for. When a preset is active, pressing the EQ control knob changes the LCD so that you can modify the preset name.
Turn the EQ/SCP control knob to select different letters or characters at the underlined cursor location, then press the
EQ/SCP control knob to advance the character selection. 12 characters may be used in the preset name. When the
EQ/SCP control knob is pressed after the 12th character has been selected, the name is saved (even if write protect is
enabled) and then displayed on the LCD. Pressing any footswitch while changing a preset name will exit “Preset Name
Change” mode without saving changes.
NOTE: The LCD and preset LEDs will automatically turn off any colored lights after about 15 minutes if no foot-switches,
knobs, or buttons have been pressed. Your guitar signal will continue to have drive effects applied if the effects are
enabled. Pressing a foot-switch or button, or turning a knob will turn the lights back on again.
LOAD FACTORY PRESETS
WARNING: performing these steps will erase any custom presets which may be saved in your
9IN1DRIVE
unit.
To load the factory default presets, remove power from the unit then power it back up. When the splash screen with the
firmware revision is displayed, press and hold the middle footswitch. Press the left footswitch to load the factory default
presets. Press the right footswitch to keep your present settings.
9in1Drive
870001 Rev A_1
- 11 -
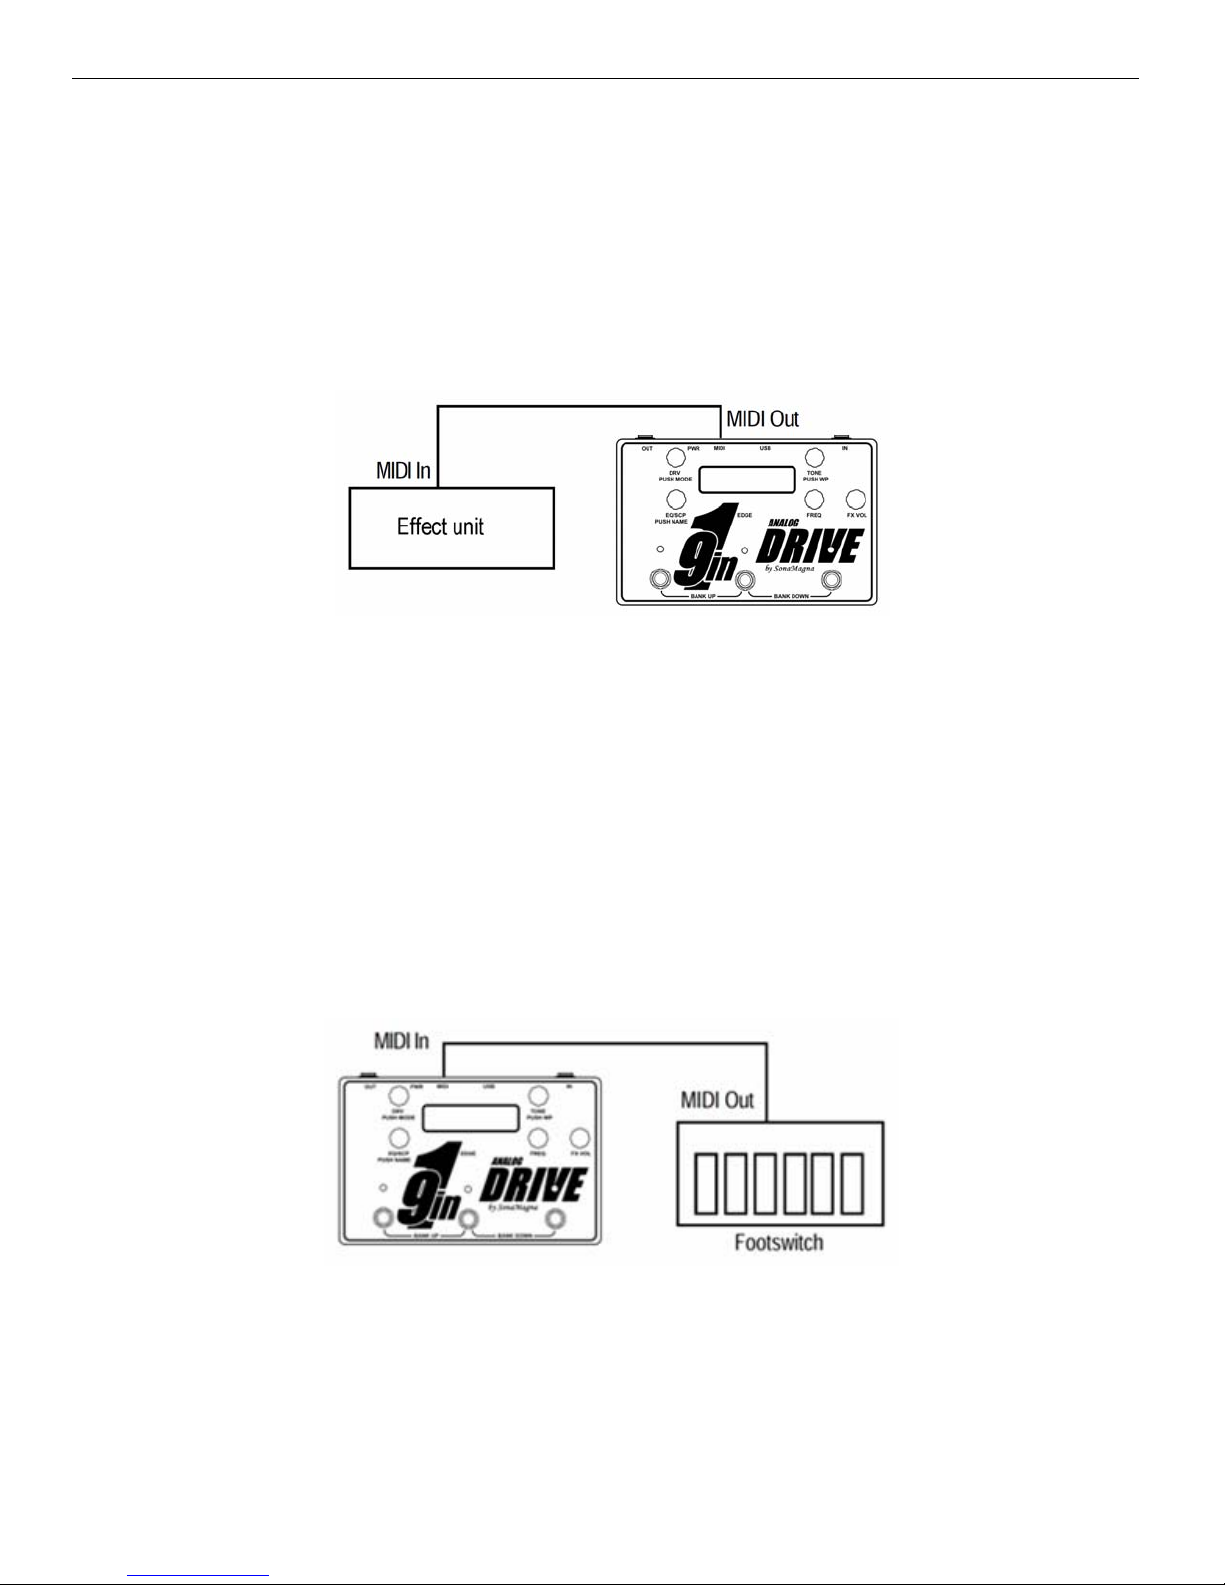
USING MIDI
USING MIDI TO CONTROL ANOTHER EFFECT UNIT:
The MIDI jack on the
9IN1DRIVE
is normally configured as MIDI OUT. Connect a MIDI cable from the
9IN1DRIVE
’s MIDI
jack to the MIDI IN jack of the effect unit you’d like to control. Plug the power cable into your
9IN1DRIVE
. Set the MIDI
channel of the effect unit you’d like to control to channel 9. A MIDI program change message is sent when a footswitch
on the
9IN1DRIVE
is pressed. A program value of “0” is sent when the effects are disabled and program values of “1” thru
“9” are sent when presets are activated.
USING MIDI TO ALLOW ANOTHER EFFECT UNIT TO CONTROL THE
9IN1DRIVE
:
NOTE: MIDI IN is available as a custom option. If your
9IN1DRIVE
is configured with MIDI IN, the letters “IN” will appear
at the end of the serial number on the back of the unit.
Connect a MIDI cable from the
9IN1DRIVE
’s MIDI jack to the MIDI OUT jack of the effect unit which will control the
9IN1
DRIVE
. Plug the power cable into your
9IN1DRIVE
. Set the MIDI channel of the effect unit which will control the
9IN1
DRIVE
to channel 9. MIDI program change messages with values of “0” or values greater than “9” will disable the effects
on the
9IN1DRIVE
. Program change values from “1” through “9” will activate the different presets of the
9IN1DRIVE
.

9in1Drive
870001 Rev A_1
- 12 -
UPDATE FIRMWARE
WARNING: performing these steps will erase any custom presets which may be saved in your
9IN1DRIVE
unit. A
PC running Win7 is required to update firmware. Check your pedal’s splash screen for its current version of firmware and
check the sonamagna.com website to see if a newer version is available. To update the control firmware, perform the
following steps:
1. Download the latest firmware .hex file from the SonaMagna.com website.
2. Download the USB_bootloader ZIP file from the SonaMagna.com website and unzip the files. Double click
“9in1_Drive_bootloader.bat” to start the program.
3. Remove power from the
9IN1DRIVE
.
4. Plug a USB cable into the PC and into the USB port of the
9IN1DRIVE
.
5. Press the DRV knob and power the
9IN1DRIVE
back up while keeping the DRV knob pressed.
6. Click “File | Import Firmware Image“and select the new firmware file (e.g. “9in1_prodA.hex”).
7. Click “Program | Erase/Program/Verify Device”.
8. Make sure the program verifies the download ok (“Verify Complete”).
9. Unplug the USB cable and power from the
9IN1DRIVE
10. Power the
9IN1DRIVE
back on and load the factory defaults if desired.

9in1Drive
870001 Rev A_1
- 13 -
SPECIFICATIONS
EFFECT CONTROL VALUE RANGES
Control Range Notes
DRV (knob) 1 to 32 1=min distortion, 32=max distortion (can get loud!)
DRV MODE (button) Mode “cln”, mode “od”,
mode “ds”, mode “fz”, mode
“md”, mode “mf”
Toggles through clean, overdrive, distortion, fuzz, metal
distortion, and metal fuzz modes
TONE 1 to 32 1=max high cut (mellower tone), 32=no high cut (edgier tone) -
- not active when DRV mode is set to “cln” mode
WP (TONE button) Enabled or disabled Control value changes (except preset name) are not saved
when write protect mode is enabled
EQ -11 to 20 -11=max cut, 0=no cut or boost, 20=max boost
SCP (metal modes) 1 to 32 1=min amount of mid scoop, 32=max amount of mid scoop
(highs and lows boosted)
NAME (EQ button) Characters A thru Z plus
some non-alpha Preset name can be up to 12 characters long
FREQ 200 to 4000 Hz varies in steps
FX VOL -40 to 23 -40=min volume, 0=same volume as with effects off (only when
drive is set to “cln” mode), 23=max volume
MIDI Program Changes
(sent/received) 0 to 9
Program changes are sent/received on MIDI channel “9”.
Program value “0” is sent when effects are off. Program values
“1”, “2”, or “3” are sent when presets in bank Red are selected;
“4”, “5”, or “6” for bank Green; “7”, “8”, or”9” for bank Blue.
Received program change values activate the corresponding
presets as detailed above if your unit is configured for MIDI IN.
ELECTRICAL SPECIFICATIONS
Power Supply: +9V to +12V dc @ 60mA
Frequency Response: 250 Hz to 10 KHz (drive enabled); 20 Hz to 20 KHz (effects off or drive “cln”)
Input Impedance: 500 Kohms
Output Impedance: 150 - 500 ohms
Sweep-able EQ Range: variable from 200 Hz to 4 KHz
Sweep-able EQ Cut/Boost: variable from -10 dB to +15 dB
Metal SCP Frequencies: 110 Hz, 5 KHz
Metal SCP Boost: variable from 0 dB to +10 dB
Clean Boost: variable from 0 dB to +10 dB
9in1Drive
870001 Rev A_1
- 14 -
FACTORY PRESET VALUES
9in1Drive
870001 Rev A_1
- 15 -
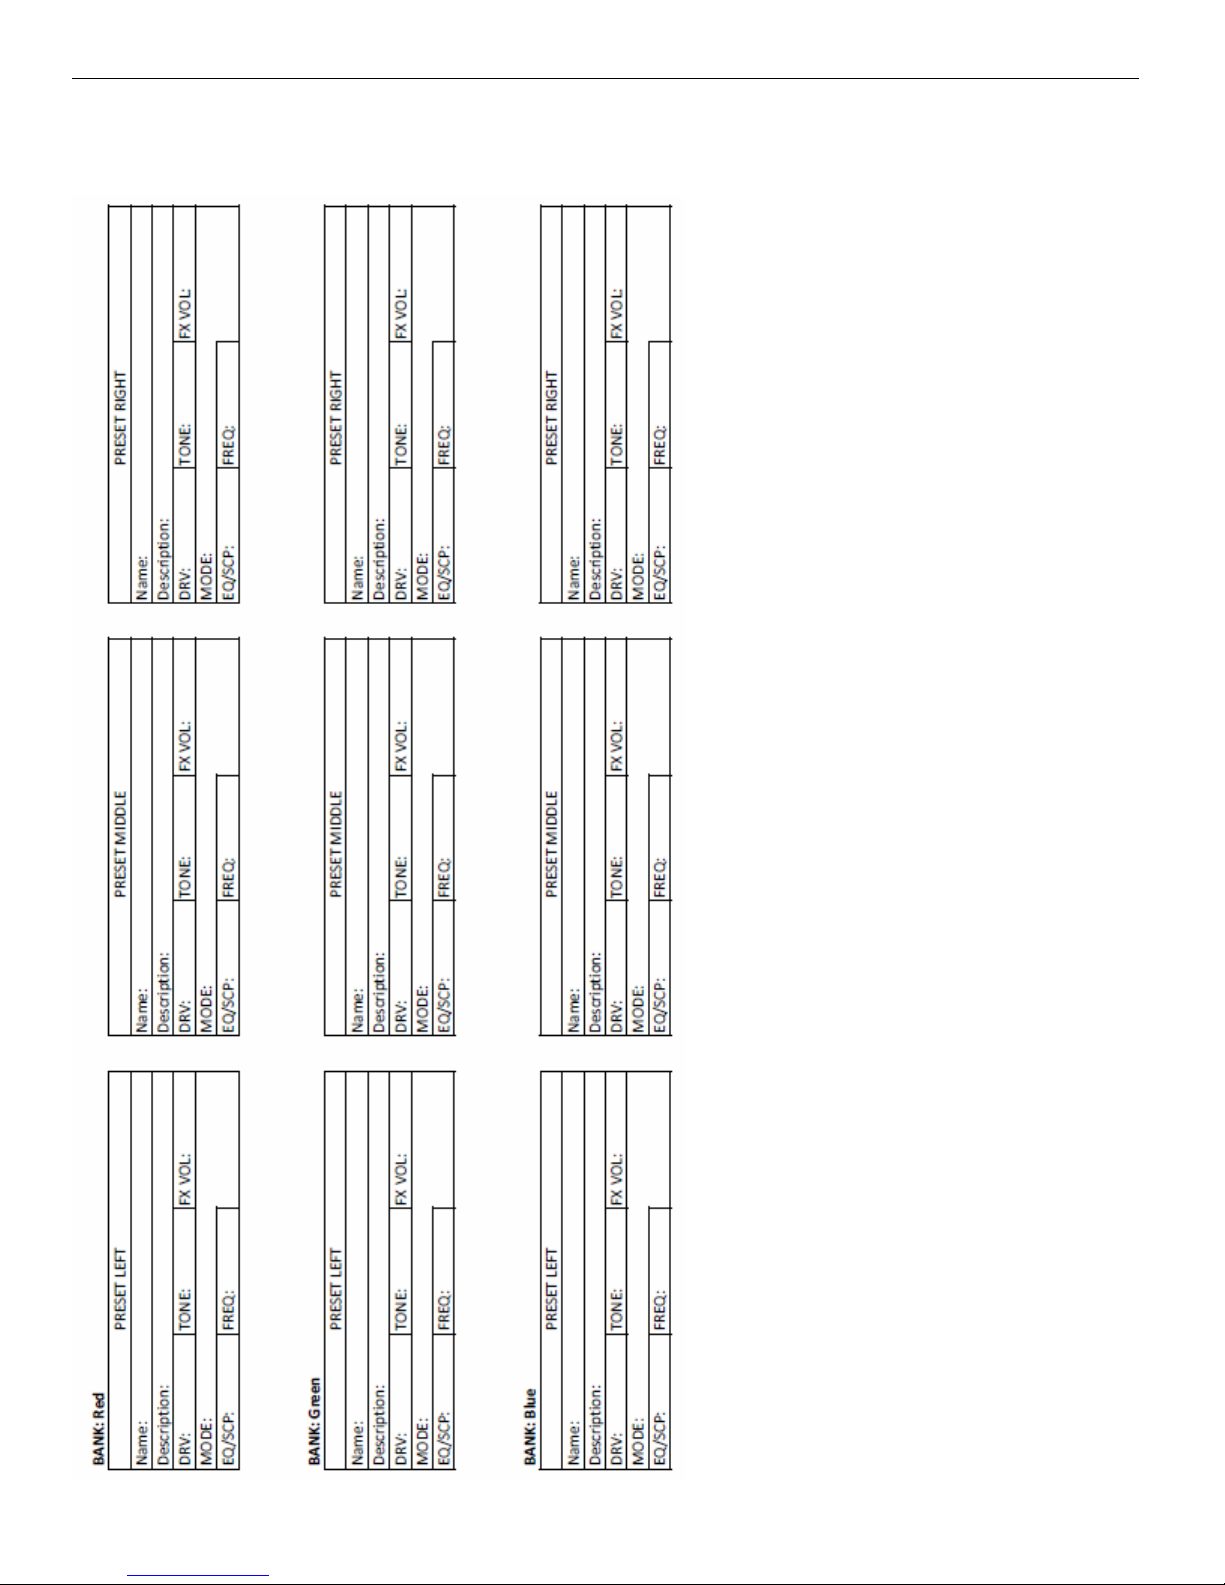
CUSTOM PRESET VALUES

9in1Drive
870001 Rev A_1
- 16 -
SonaMagna, LLC
Web Site: https://sonamagna.com/
9in1Drive
patent pending: Application Number 62505352
Table of contents


