SONIC-POTIONS Erica Synths LXR-02 User manual
OWNERS MANUAL
© Julian Schmidt


TABLE OF CONTENTS
1 INTRO
2 OVERVIEW
2.1. Front
2.2. Back
2.3. Menu Navigation
3 QUICK START
4 MEMORY MANAGEMENT
4.1. SD Card
4.2. Projects
4.3. Kits
4.4. Patterns
4.5. Songs
5 VOICES
5.1. Drum voices (voice 1-3)
5.2. Snare voice (voice 4)
5.3. Cymbal/Clap (voice 5)
5.4. Hi-hat voice (6)
5.5. Voice parameter menu sections
Oscillator Page (OSC)
Amplitude Envelope Page (AEG)
Modulation Page (MOD)
Frequency Modulation Page (FM)
Transient Generator Page (Click)
Filter Page (FIL)
LFO Page (LFO)
Mixer Page (Mix)
6 SEQUENCER
6.1. Tracks
Select tracks
Mute tracks
Unmute all tracks
Track length
6.2. Bars
6.3. Steps
6.4. Step parameters
Available Step Parameters
6.5. Automation
Choosing the active automation track
How to assign parameter automation
Clear automation data
6.6. Pattern
Basic pattern editing
6.7. Copy sequencer data
6.8. Clear sequencer data
Clear Pattern
Clear Track
7 OPERATION MODES
7.1. Voice edit mode
Pattern editing
Sound editing
Clear kit / Init sound
7.2. Step (Edit) mode
Step Parameter editing
7.3. Performance Mode
Basic performance menu
Manual Roll
Morph
Shuffle
7.4. Loading and saving
Display description
Menu navigation
Kits
Morph Kits
Songs
Patterns
Project
7.5. Pattern Generator Mode
Menu location
Pattern generator menu
Generating patterns
7.6. Global settings menu
Menu location
Menu options
Screensaver
Loading and saving of global settings
7.7. Pattern Menu
Changing the pattern
7.8. Song Mode
Editing songs
Using the sequencer buttons to add patterns
Inserting an removing lines
Special Patterns
Playing a song
7.9. FX Mode
Menu location
Drive
Ringmodulator
Compressor
Delay
7.10. Reload Button
8 SYNTH MODULES
8.1. Oscillator
8.2. Filter
Frequency
Resonance
Drive
Filter types
8.3. Envelopes
Attack/Decay times
Slope
Repeat
8.4. Transient generator
Snappy mode
Offset mode
Sample mode
Parameters
8.5. Sample Rate Reduction
8.6. Distortion
8.7. LFO
Setting up modulations
8.8. Velocity modulation
8.9. Output Routing
9 MIDI
9.1. MIDI channel
Global MIDI channels
Voice MIDI channel
9.2. Midi routing (midi soft thru)
9.3. MIDI filtering
9.4. MIDI Sync
9.5. Record incoming MIDI
Recording melodies
9.6. Transmitting sequencer data to the MIDI out
9.7. MIDI CC list
9.8. MIDI NRPN list
10 FIRMWARE UPDATE
10.1. Update procedure
10.2. Bootloader error messages
11 INTRODUCTION TO DRUM SYNTHESIS
11.1. Kicks
11.2. Snare
11.3. Clap
11.4. Hi-hat
11.5. Cymbal ride
11.6. Bells
Realistic bells
808 style cowbell
11.7. More info about drum sound design
12 TECHNICAL INFORMATION
12.1. Electrical Specification
12.2. Hardware
12.3. Physical Specification
7
7
7
8
8
9
9
10
10
10
10
10
10
10
11
11
11
11
11
12
13
13
14
14
14
15
15
15
15
15
16
16
16
16
16
16
17
17
17
17
17
18
18
18
18
18
18
18
19
19
19
19
20

1 INTRO
2 OVERVIEW
2.1. Front
2.2. Back
2.3. Menu Navigation
3 QUICK START
4 MEMORY MANAGEMENT
4.1. SD Card
4.2. Projects
4.3. Kits
4.4. Patterns
4.5. Songs
5 VOICES
5.1. Drum voices (voice 1-3)
5.2. Snare voice (voice 4)
5.3. Cymbal/Clap (voice 5)
5.4. Hi-hat voice (6)
5.5. Voice parameter menu sections
Oscillator Page (OSC)
Amplitude Envelope Page (AEG)
Modulation Page (MOD)
Frequency Modulation Page (FM)
Transient Generator Page (Click)
Filter Page (FIL)
LFO Page (LFO)
Mixer Page (Mix)
6 SEQUENCER
6.1. Tracks
Select tracks
Mute tracks
Unmute all tracks
Track length
6.2. Bars
6.3. Steps
6.4. Step parameters
Available Step Parameters
6.5. Automation
Choosing the active automation track
How to assign parameter automation
Clear automation data
6.6. Pattern
Basic pattern editing
6.7. Copy sequencer data
6.8. Clear sequencer data
Clear Pattern
Clear Track
7 OPERATION MODES
7.1. Voice edit mode
Pattern editing
Sound editing
Clear kit / Init sound
7.2. Step (Edit) mode
Step Parameter editing
7.3. Performance Mode
Basic performance menu
Manual Roll
Morph
Shuffle
7.4. Loading and saving
Display description
Menu navigation
Kits
Morph Kits
Songs
Patterns
Project
7.5. Pattern Generator Mode
Menu location
Pattern generator menu
Generating patterns
7.6. Global settings menu
Menu location
Menu options
Screensaver
Loading and saving of global settings
7.7. Pattern Menu
Changing the pattern
7.8. Song Mode
Editing songs
Using the sequencer buttons to add patterns
Inserting an removing lines
Special Patterns
Playing a song
7.9. FX Mode
Menu location
Drive
Ringmodulator
Compressor
Delay
7.10. Reload Button
8 SYNTH MODULES
8.1. Oscillator
8.2. Filter
Frequency
Resonance
Drive
Filter types
8.3. Envelopes
Attack/Decay times
Slope
Repeat
8.4. Transient generator
Snappy mode
Offset mode
Sample mode
Parameters
8.5. Sample Rate Reduction
8.6. Distortion
8.7. LFO
Setting up modulations
8.8. Velocity modulation
8.9. Output Routing
9 MIDI
9.1. MIDI channel
Global MIDI channels
Voice MIDI channel
9.2. Midi routing (midi soft thru)
9.3. MIDI filtering
9.4. MIDI Sync
9.5. Record incoming MIDI
Recording melodies
9.6. Transmitting sequencer data to the MIDI out
9.7. MIDI CC list
9.8. MIDI NRPN list
10 FIRMWARE UPDATE
10.1. Update procedure
10.2. Bootloader error messages
11 INTRODUCTION TO DRUM SYNTHESIS
11.1. Kicks
11.2. Snare
11.3. Clap
11.4. Hi-hat
11.5. Cymbal ride
11.6. Bells
Realistic bells
808 style cowbell
11.7. More info about drum sound design
12 TECHNICAL INFORMATION
12.1. Electrical Specification
12.2. Hardware
12.3. Physical Specification
20
20
20
20
20
20
21
21
21
22
22
22
22
22
23
23
23
23
23
23
24
24
24
24
25
25
25
25
25
25
26
26
26
26
27
27
27
28
28
28
28
28
28
28
30
30
31
31
31
32
32
32
32
33
33
33
33
34
34
34

1 INTRO
2 OVERVIEW
2.1. Front
2.2. Back
2.3. Menu Navigation
3 QUICK START
4 MEMORY MANAGEMENT
4.1. SD Card
4.2. Projects
4.3. Kits
4.4. Patterns
4.5. Songs
5 VOICES
5.1. Drum voices (voice 1-3)
5.2. Snare voice (voice 4)
5.3. Cymbal/Clap (voice 5)
5.4. Hi-hat voice (6)
5.5. Voice parameter menu sections
Oscillator Page (OSC)
Amplitude Envelope Page (AEG)
Modulation Page (MOD)
Frequency Modulation Page (FM)
Transient Generator Page (Click)
Filter Page (FIL)
LFO Page (LFO)
Mixer Page (Mix)
6 SEQUENCER
6.1. Tracks
Select tracks
Mute tracks
Unmute all tracks
Track length
6.2. Bars
6.3. Steps
6.4. Step parameters
Available Step Parameters
6.5. Automation
Choosing the active automation track
How to assign parameter automation
Clear automation data
6.6. Pattern
Basic pattern editing
6.7. Copy sequencer data
6.8. Clear sequencer data
Clear Pattern
Clear Track
7 OPERATION MODES
7.1. Voice edit mode
Pattern editing
Sound editing
Clear kit / Init sound
7.2. Step (Edit) mode
Step Parameter editing
7.3. Performance Mode
Basic performance menu
Manual Roll
Morph
Shuffle
7.4. Loading and saving
Display description
Menu navigation
Kits
Morph Kits
Songs
Patterns
Project
7.5. Pattern Generator Mode
Menu location
Pattern generator menu
Generating patterns
7.6. Global settings menu
Menu location
Menu options
Screensaver
Loading and saving of global settings
7.7. Pattern Menu
Changing the pattern
7.8. Song Mode
Editing songs
Using the sequencer buttons to add patterns
Inserting an removing lines
Special Patterns
Playing a song
7.9. FX Mode
Menu location
Drive
Ringmodulator
Compressor
Delay
7.10. Reload Button
8 SYNTH MODULES
8.1. Oscillator
8.2. Filter
Frequency
Resonance
Drive
Filter types
8.3. Envelopes
Attack/Decay times
Slope
Repeat
8.4. Transient generator
Snappy mode
Offset mode
Sample mode
Parameters
8.5. Sample Rate Reduction
8.6. Distortion
8.7. LFO
Setting up modulations
8.8. Velocity modulation
8.9. Output Routing
9 MIDI
9.1. MIDI channel
Global MIDI channels
Voice MIDI channel
9.2. Midi routing (midi soft thru)
9.3. MIDI filtering
9.4. MIDI Sync
9.5. Record incoming MIDI
Recording melodies
9.6. Transmitting sequencer data to the MIDI out
9.7. MIDI CC list
9.8. MIDI NRPN list
10 FIRMWARE UPDATE
10.1. Update procedure
10.2. Bootloader error messages
11 INTRODUCTION TO DRUM SYNTHESIS
11.1. Kicks
11.2. Snare
11.3. Clap
11.4. Hi-hat
11.5. Cymbal ride
11.6. Bells
Realistic bells
808 style cowbell
11.7. More info about drum sound design
12 TECHNICAL INFORMATION
12.1. Electrical Specification
12.2. Hardware
12.3. Physical Specification
34
34
34
34
34
35
35
35
35
35
37
39
39
39
39
39
40
40
41
41
41
41
41
42
42
42
42
42
1
2
3511
9
12
10
8
6
7
4

INTRO
THANK YOU FOR PURCHASING THE ERICA SYNTHS X
SONIC POTIONS LXR-02 SYNTHESIZER!
The LXR is a fully-fledged digital drum machine with
an integrated sequencer. Its sound engine provides
6 different instruments, each with over 30
parameters to tweak. It can produce a wide variety
of sounds, ranging from classic analogue
emulations to crunchy digital mayhem.
DISPLAY
The display is used to show parameter values
from the selected menu page.
KNOBS
The 4 encoders are used to edit the values
shown in the display above.
In this first chapter we will focus on the physical
appearance of the LXR, describing the front panel
controls as well as the connection jacks on the
back. Further, the basic menu navigation is
explained.
1
2
3
7
8
9
10
11
12
4
5
6
1
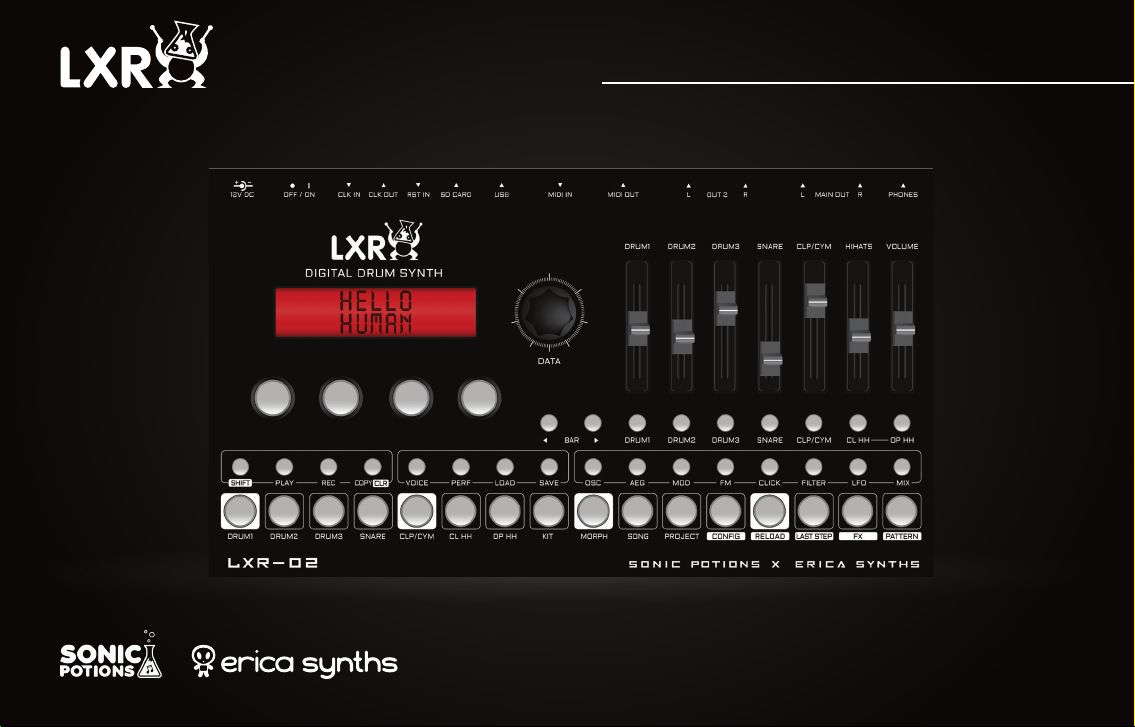
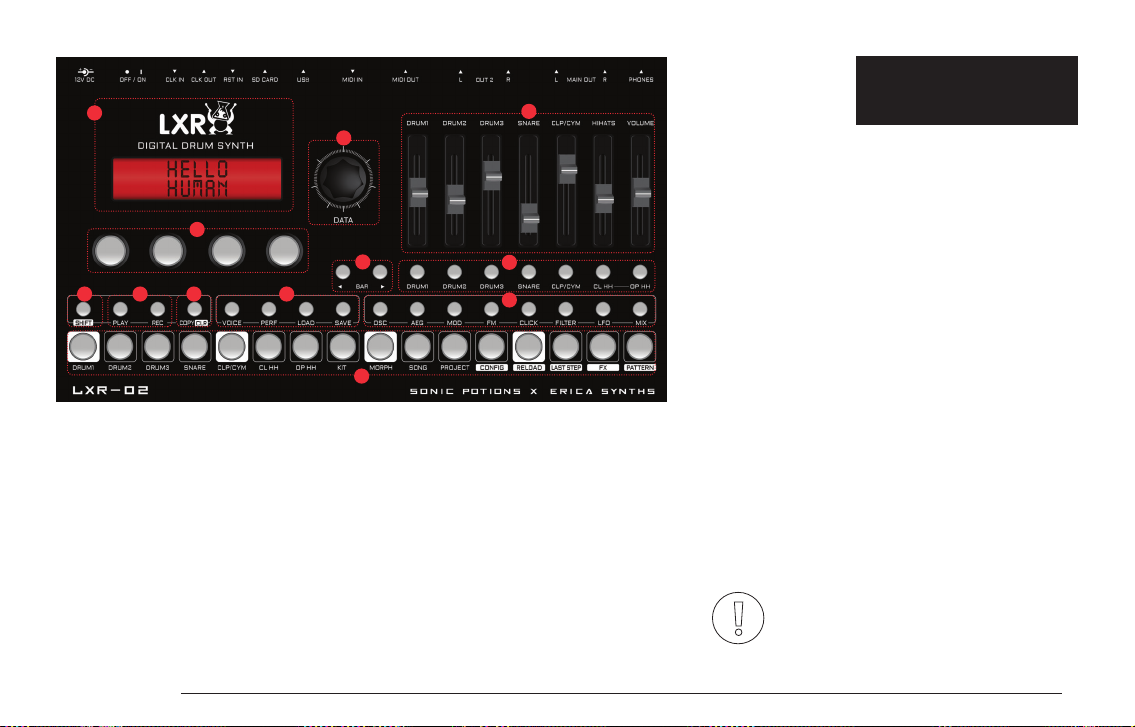
OVERVIEW
2
RECORD/PLAY BUTTONS
The PLAY button starts and stops the playback.
The current pattern is reset to the first step when
the sequencer is re-started.
The RECORD button activates the recording
function. If the LED is lit, all incoming MIDI notes
will be recorded to the active pattern. Knob
movements will also be recorded to the selected
automation track.
SHIFT BUTTON
Activates an alternate function set for some
buttons, indicated by the white background labels.
COPY/CLEAR BUTTON
Copy and clear sequencer and kit data.
16 SEQUENCER BUTTONS
Function depending on active mode
> Voice mode: set and clear active steps in the
sequencer.
> Performance Mode: Buttons 1 to 7 are used to
trigger manual rolls. Buttons 8-16 are unused at
the moment.
> Step Edit Mode: select a step to edit the step
parameters.
> Used together with the shift button, to access
special menus.
ENCODER
Navigate through the menu.
VOLUME FADERS
There are 6 faders that control the volume of the
individual voices as well as a main volume fader.
BAR BUTTONS
To edit a 64 step Pattern with only 16 sequencer
buttons, the pattern is split into 4 bars with 16
steps each. The bar buttons are used to select
which of the 4 bars to show on the buttons.
7 VOICE BUTTONS
The voice buttons select the active track to edit.
Together with the shift key they will mute/unmute
the voices.
4 MODE BUTTONS
Switch between the 4 main operating modes.
VOICE - Voice edit mode (a second push toggles
step edit mode)
PERF - Performance mode [Pattern generator
mode]
LOAD – Load data
SAVE – Save data
8 SELECT BUTTONS
Select the synthesis section to edit (Oscillators,
Mixer, Envelopes etc.)
2.1. FRONT
LXR OWNERS MANUAL 7
1st bar
1-16
2nd bar
17-32
3rd bar
33-48
4th bar
49-64
LXR OWNERS MANUAL8
1
8
9
3
2
4
5
6
7
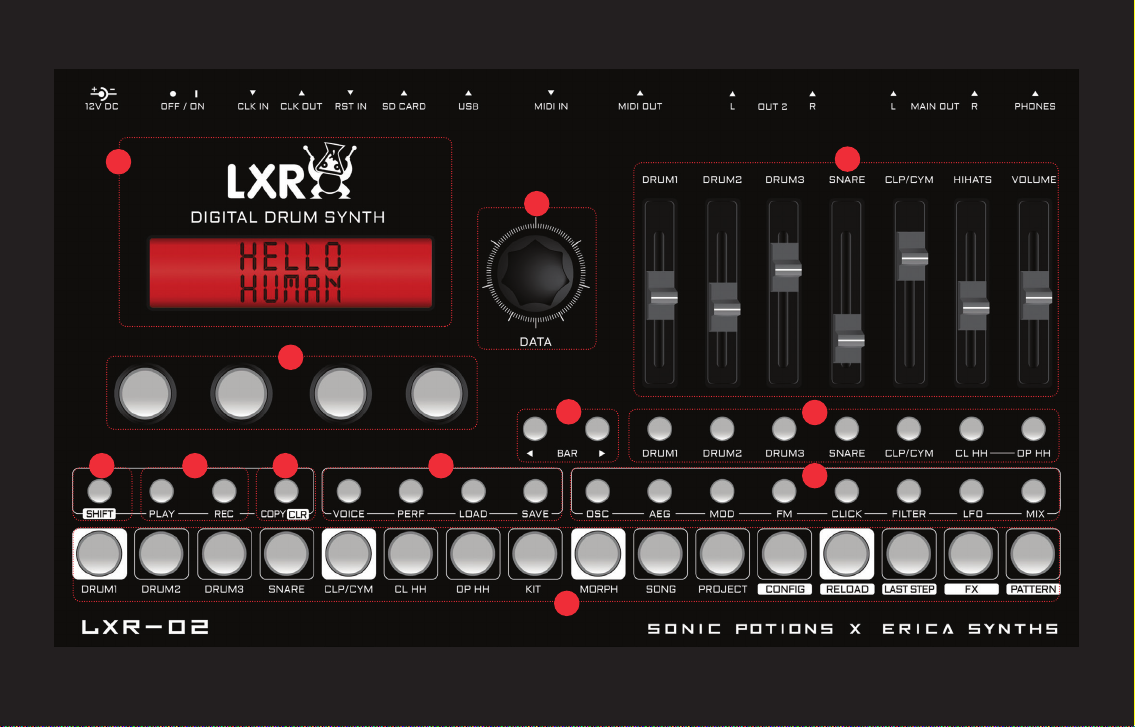
PHONES CONNECTOR
3.5 mm audio output for stereo headphones.
AUDIO OUTS
4 x 1/4” mono audio, line-level (+4dBu) outputs. Can
be used as stereo output pairs as well.
MIDI OUT
MIDI output
MIDI IN
MIDI input with soft thru option.
USB
Electrically isolated hi-speed USB 2.0 port. Class
compliant USB MIDI interface to connect the LXR
to a computer.
SD CARD
Memory card slot to save project data.
ANALOGUE CLOCK IO
Clock IO for synchronization with analogue gear
using 5V signal levels.
The upper row of the display will show the short name of
the parameter. The bottom row shows the value of the
parameter. You can change the value using one of the 4
knobs below the display.
POWER
Switch for turning the unit on and off.
DC IN
Center positive 5.5 × 2.5 mm barrel jack, 12 V DC, 1 A.
> The encoder selects a menu parameter. Capital
letters highlight the selected parameter. In our
example picture above, the 'RES' parameter is selected.
> If there are more than 4 entries in the current
menu, the next page will be shown if you scroll over
the screen boundary. A '>' or '<' sign in the right
upper corner indicates if there is a 2nd page
available and which page is active. The 2 pages of a
menu can be toggled by pressing the menu button
again.
If you push the encoder the detail page is shown
On the detail page you can see the full name of the
parameter and change its value using the encoder.
This is good for fine adjustments, where the knob
control is too coarse. By pushing the encoder again,
you return to the normal menu mode.
2.2. BACK
2.3. MENU NAVIGATION
frq
32
RES
120
typ
LP
drv >
0
Filter
Resonance 120
2
13 4 5689
7
LXR OWNERS MANUAL 9
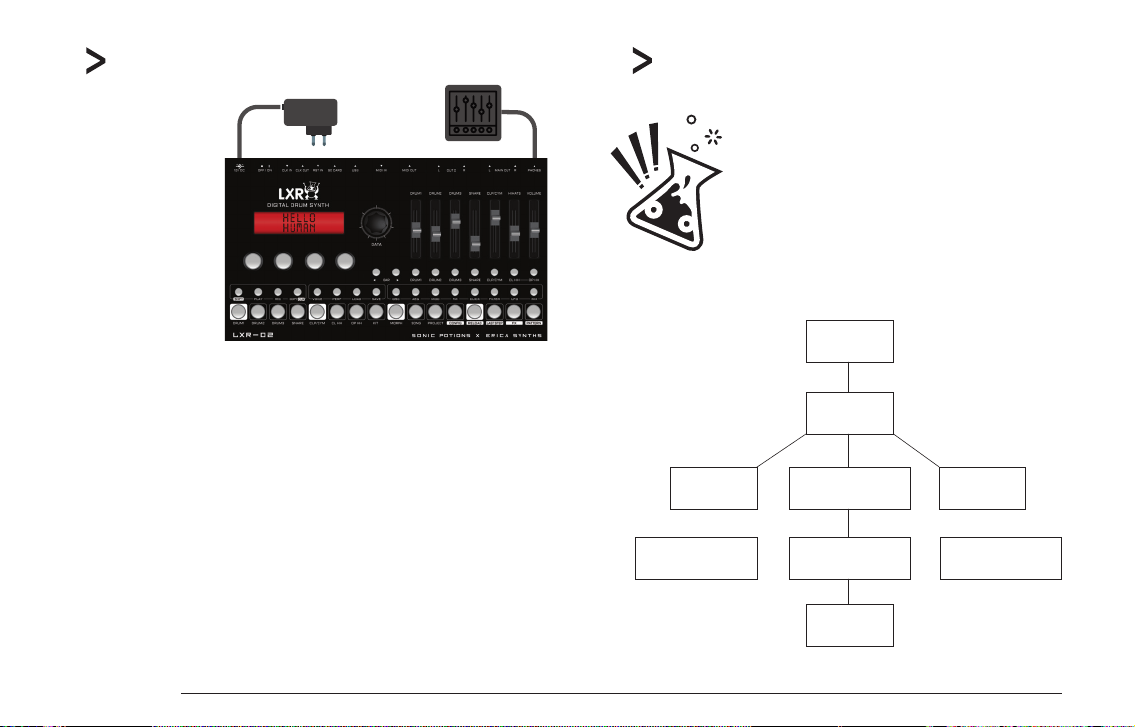
QUICK START
The LXR-02 comes with
a universal wall wart
PSU for worldwide use.
Install the appropriate
adapter on the PSU
and connect the LXR to
a power outlet. Use
cables with 6.3mm
jacks to connect the
main output to the
mixer and start making
beats!
The fastest way to get some beats out of your new box!
> Make sure the SD card is inserted in the LXR
> Power up the synth.
> Press the PLAY button. The chaselight starts running.
> Adjust the volume faders so they are not at zero volume.
> Use the 16 SEQUENCER buttons to activate some steps. Now you should hear the
first voice playing.
> Use the 7 VOICE buttons to change the active track/voice
> Again, use the 16 SEQUENCER buttons to activate some steps. The next voice should
now play as well.
> Press the LOAD + KIT (Step 8) buttons together. You are now in the kit load mode.
> Use the encoder to select another preset. Confirm the selection by pushing the
encoder. This will load a new kit and the sound will change accordingly.
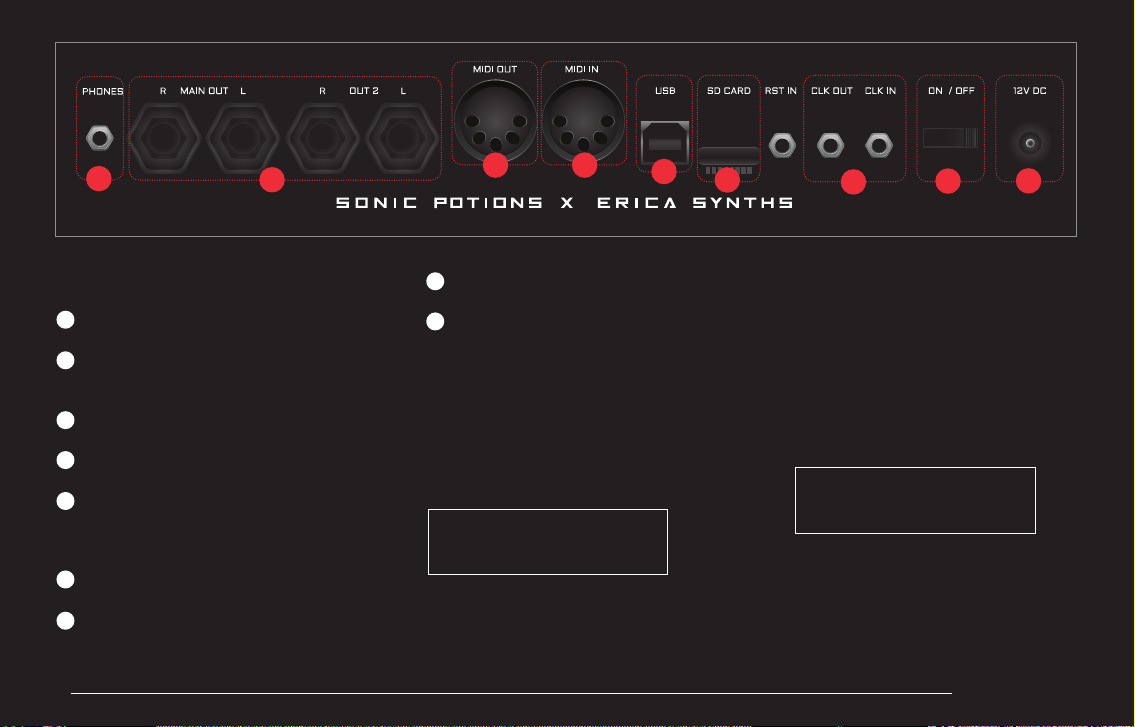
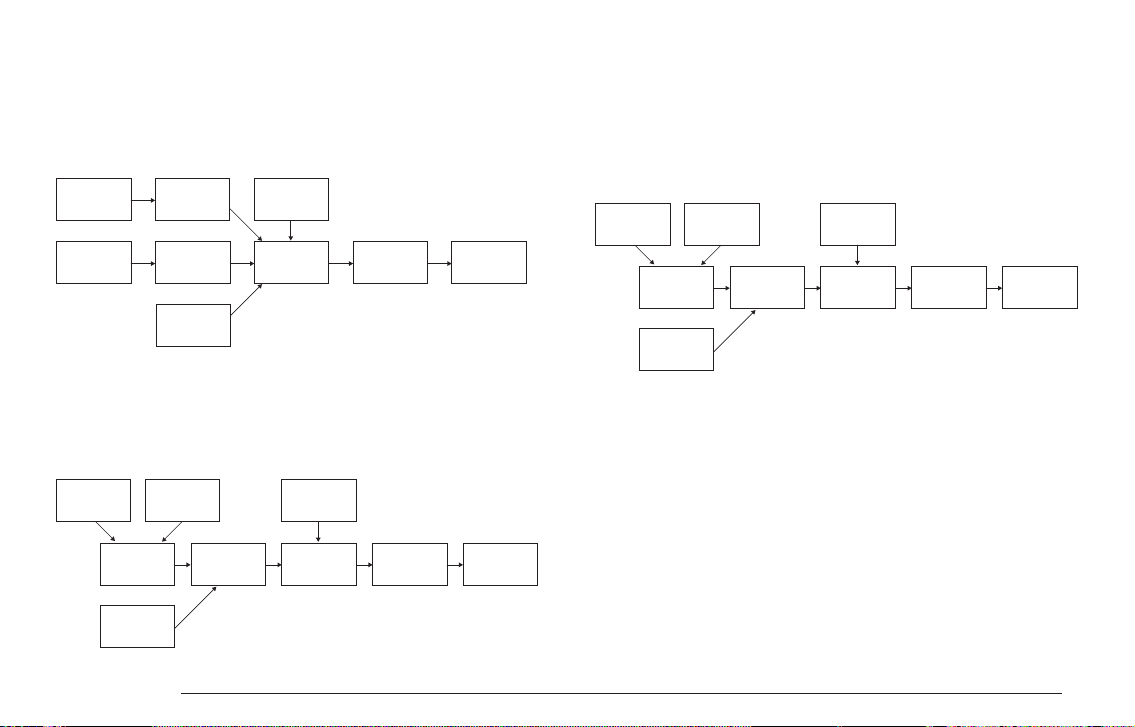
The following image outlines the LXR's data structure.
3MEMORY MANAGEMENT
The LXR operates with all data (Kits, Patterns, Songs etc)
loaded into the internal RAM. The data is loaded from the
SD card during power up. All edits are made to the volatile
copy of the files in RAM. If you power down the LXR
without manually saving the project, all changes will be
lost! Data will only be written back to the SD card for
permanent storage once a PROJECT is saved!
4
64 KITS 64 SONGS64 PATTERNS
7 VOICE TRACKS6 INSTRUMENTS 64 PATTERN SLOTS
PROJECT
64 STEPS
SD CARD

LXR OWNERS MANUAL10
4.1. SD CARD
The memory card is used as non volatile storage. Without a memory
card you are not able to save your work!
4.2. PROJECTS
The LXR can handle 64 projects stored on the SD card. A project
consists of 64 Kits, Patterns and Songs as well as the project setting
files. Projects are created as folders on the memory card.
4.3. KITS
A kit contains the instrument data for the 6 Voices. All synthesis
parameters are stored here. Kits are stored as .SND binary files inside
the Project folder. The factory preset kits are developed by Leoš Hort
aka hrtl.
4.4. PATTERNS
A Project contains 64 Patterns, each with 7 Tracks containing 64 Steps
in 4 Bars. Patterns contain the note and automation data for each
instrument. They are saved as .PAT files inside the project folder.
4.5. SONGS
A Project contains 64 Songs. Each song is a list with up to 64 Patterns
that will be played one after another.
The LXR offers 6 voices. They are optimized for different kinds of drum sounds. The type of
a voice can not be changed. There are 3 drum voices, a subtractive clap/snare voice, an FM
percussion voice and a hi-hat voice. In this chapter a diagram of the synthesis structure is
shown for each voice type, then the parameters are explained. Let's take a closer look at
the voice types.
VOICES
5
5.1. DRUM VOICES (VOICE 1-3)
The drum voices are useful but not limited to kick drums, toms, cowbells and other drum
sounds.
AMP VOL EG
OSCILLATOR
MIX MODE
FM MODE
PITCH EG FILTER AMP
TRANSIENT
GENERATOR
DISTORTION SAMPLE
REDUCER
OSCILLATOR
LXR OWNERS MANUAL 11
5.5. VOICE PARAMETER MENU SECTIONS
The synthesis parameters of each voice can be altered in voice edit mode. The
synthesis engine is grouped into 8 different sections that can be selected with the
select buttons. In this section each of those 8 menu pages and their parameters
are described.
OSCILLATOR PAGE (OSC)
Provides access to the main oscillator parameters. Frequency and waveform of
the main oscillator can be set here.
OSCILLATOR OSCILLATOR
OSCILLATOR
VOL EG
FILTER AMP DISTORTION SAMPLERATE
REDUCER
TRANSIENT
GENERATOR
OSCILLATOR OSCILLATOR
OSCILLATOR
VOL EG
FILTER AMP DISTORTION SAMPLERATE
REDUCER
TRANSIENT
GENERATOR
PITCH EG
VOL EG
OSCILLATOR AMP DISTORTION SAMPLERATE
REDUCER
TRANSIENT
GENERATOR
FILTERNOISE
5.2. SNARE VOICE (VOICE 4)
This voice is good for snare-drum and clap sounds. A noise source and a
pitched oscillator can be mixed. Only the noise source is routed trough the filter.
There is no FM capability on this voice.
5.4 HI-HAT VOICE (6)
The hi-hat voice is nearly identical to the Cymbal voice, but it offers 2 different
decay times for the amplitude envelope. The voice is shared between sequencer
tracks 6 and 7, each using one of the 2 available decay times. This allows for playing
open and closed hi-hats. The closed hat (track 6) will choke the open hat (track 7).
5.3. CYMBAL/CLAP (VOICE 5)
This voice uses a 3 operator FM to generate the sound. The main oscillator is
modulated by 2 modulation oscillators. It's great for metallic and noisy sounds!
LXR OWNERS MANUAL12
AMPLITUDE ENVELOPE PAGE (AEG)
Each voice has an amplitude envelope. The common parameters are attack and
decay time as well as the slope of the curve.
Drum 1-3, Clap, Hi-Hat
Displayed name Name Description
Coarse tuning of the main oscillator
in semitones.
coa Coarse tune
Fine tuning of the main oscillator
+/- 50 cent.
fin Fine tune
The waveform of the main oscillator.
wav Waveform
If the PWM waveform is selected,
its duty cycle can be adjusted here.
pwm Pulsewidth
Drum 1-3
Displayed name Name Description
Rise time of the envelope.
att Amplitude envelope attack
Fall time of the envelope.
dec Amplitude envelope decay
Variable slope from exp to linear
to logarithmic.
slp Amplitude envelope slope
Hi-Hat
Displayed name Name Description
Rise time of the envelope.
att Amplitude envelope attack
Envelope fall time for the hi-hats.
D1 / D2 Closed / Open hi-hat
decay time
Variable slope from exp to lin to log.
slp Amplitude envelope slope
Snare/Cymbal
Displayed name Name Description
Rise time of the envelope.
att Amplitude envelope attack
Fall time of the envelope.
dec Amplitude envelope decay
Number of retriggers.
rpt Repeat count
Variable slope from exp to linear
to logarithmic.
slp Amplitude envelope slope
Snare
Displayed name Name Description
Coarse tuning of the main oscillator
in semitones.
coa Coarse tune
Fine tuning of the main oscillator
+/- 50 cent.
fin Fine tune
Coarse tuning of the noise
oscillator.
noi Noise frequency
Mix ratio between oscillator and
noise source.
mix Oscillator mix
The waveform of the main
oscillator.
wav Waveform
If the PWM waveform is selected,
its duty cycle can be adjusted here.
pwm Pulsewidth
LXR OWNERS MANUAL 13
MODULATION PAGE (MOD)
The modulation page contains the velocity modulation parameters. Here you can turn
the velocity volume modulation on and off and route the note velocity to any synthesis
parameter you like. If the selected voice offers a second envelope, it's parameters can
be found on the modulation page as well.
FREQUENCY MODULATION PAGE (FM)
The FM page hosts the frequency, waveform and modulation amount settings for
the FM oscillators.
Drum 1-3, Snare
Displayed name Name Description
Fall time of the envelope.
dec Modulation envelope decay
Variable slope from exp to
linear to logarithmic.
slp Modulation envelope slope
Amount of the velocity
modulation.
amt Velocity mod. amount
Can be either On or Off.
If activated the note velocity
controls the voice volume.
vol Velocity to volume modulation
The note velocity can be routed
to any voice parameter. Here you
can select the target from a list.
dsr Velocity mod. destination
> Controls how strongly the
envelope modulates its target.
> The envelope is hardwired to
the pitch. This parameter controls
the pitch modulation intensity.
> In FM mode the EG is
additionally hardwired to the FM
amount.
mod Modulation envelope amount
Clap, Hi-Hat
Displayed name Name Description
The note velocity can be routed
to any voice parameter. Here you
can select the target from a list.
dst Velocity mod. destination
Amount of the velocity modulation.
amt Velocity mod. amount
Can be either On or Off. If
activated the note velocity
controls the voice volume.
vol Velocity to volume
modulation
Displayed name Name Description
FM mode: modulation amount
Mix mode: Mix ratio of the 2 OSCs.
amt Modulation amount
[mix ratio]
Coarse tuning of the FM oscillator
in semitones.
frq Frequency of the FM OSC
The waveform of the FM oscillator.
wav Waveform of the FM OSC
FM mode: the main OSC is
modulated by the FM OSC
Mix mode: The main OSC and FM
OSC are mixed.
mod Oscillator mode
LXR OWNERS MANUAL14
SNARE
Voice 4 offers no FM capabilities at the moment, so the Page is empty.
TRANSIENT GENERATOR PAGE (CLICK)
The transient generator parameters are the waveform, volume and frequency of
an additional short attack transient that can be mixed to the voice output.
Clap, Hi-Hat
Displayed name Name Description
Frequency of the first modulation oscillator.
f1
wav
vol
frq
Transient wave shape
Transient volume
Transient frequency
frq
res
typ
drv
Manual LFO rate control. Only
available when sync is turned off!
Activates the LFO clock sync. Different
sync rates can be selected (½, ¼etc.).
Controls how strongly the LFO signal
affects the target.
Select the LFO waveform.
> Sine (sin)
> Triangle (tri)
> Saw up (sup)
> Saw down (sdn)
> Square (sqr)
> Random (rnd)
> Exponential saw up (xup)
> Exponential saw down (xdn)
Filter frequency
Filter resonance
Filter type
Filter drive
Changes the cutoff frequency of the filter.
Adjusts the filter resonance.
Selects the filter characteristic.
Increases the input gain of the filter.
Selects the transient sample to play.
Volume of the transient sample.
Frequency of the transient sample.
Frequency 1
Frequency of the second modulation oscillator.
f2 Frequency 2
Gain of the first modulation oscillator.
g1 Gain 1
Gain of the second modulation oscillator.
g2 Gain 2
Waveform of the first modulation oscillator.
wav Waveform 1
Waveform of the second modulation oscillator.
wav Waveform 2
Displayed name Name Description
FILTER PAGE (FIL)
All parameters of the filter are on this page. The available parameters are
frequency, resonance, type and drive.
Displayed name Name Description
LFO PAGE (LFO)
Each voice has an LFO that can be edited on this page.
Displayed name Name Description
frq
snc
mod
wav
LFO frequency
LFO sync
Modulation amount
LFO waveform

LXR OWNERS MANUAL 15
Allows the LFO to be retriggered from
different sequencer tracks. Select the
voice that should retrigger the LFO (v1-v6)
and it will reset its phase whenever a
note is played on the selected track.
When the LFO is retriggered, it is reset to
the selected phase offset.
Select the target voice. This parameter
will change the displayed target list of the
destination select parameter.
Select the parameter to modulate. It shows
a list with the short names from all the
parameters of the selected target voice.
MIXER PAGE (MIX)
The mixer page provides access to volume, panning, routing, voice FX and
sequencer track length.
Displayed name Name Description
Adjusts the volume of the voice.
vol Voice volume
Voice panning. Only active if output
is set to a stereo channel.
pan Voice panning
Sample rate decimation.
sr Sample rate
Soft clipping amount.
drv Drive
Selects the hardware audio out for
this voice. The voice can either be
routed to one of the 2 stereo channels
or use the 4 outputs as individual
mono channels or the FX bus.
out Output
The length of the sequencer track
in 16th steps.
len Track length
MIDI channel the voice responds to.
ch MIDI channel
MIDI note the instrument responds to.
If set to “any”, the voice can be played
tonally with all notes on the channel.
nte Note
The synth has a sequencer to play and program different drum patterns. The basic
functionality is quite similar to the well known TR-x0x machines, but there is more to it.
SEQUENCER
6
6.1. TRACKS
The drum voices are useful but not limited to kick drums, toms, cowbells and other
drum sounds.
SELECT TRACKS
The active track can be changed with the 7 VOICE buttons below the volume faders.
A lit LED on the button shows the selected track.
MUTE TRACKS
If the SHIFT button is held, the sequencer tracks can be muted with the VOICE
buttons. The LEDs of the unmuted voices will light up.
While in performance mode, the function of the VOICE buttons is
inverted. They mute/unmute the tracks without holding SHIFT. This
allows for single-handed operation.
rtg
off
voi
dst
LFO retrigger
Phase offset
Destination voice
Destination select
parameter

LXR OWNERS MANUAL16
Displayed name Name Description
Note on velocity of the step (0-127). Can be used
as a mod source on the voice modulation page.
vel Step Velocity
MIDI Note number to play [C0:G10]. The note value
also depends on the set tuning of the OSC.
nte Step Note
The chance of the step being played as percent
value. If set to '0%' the step will never be played,
set to '50' and there is a 50% chance it will be
played, '100%' always plays the step.
prb Step Probability
UNMUTE ALL TRACKS
To unmute all muted tracks simultaneously, go to performance mode and hold
down the SHIFT button. Now the VOICE buttons will unmute all tracks up to the
selected track.
An example:
SHIFT + VOICE Button 4 = track 1, 2, 3 and 4 will be unmuted.
SHIFT + VOICE Button 7 = all tracks are unmuted.
TRACK LENGTH
There are multiple ways to set the track length
Mixer Page length parameter
The length of a track can be set on the mixer page of the corresponding voice
with the “len” parameter. Tracks can be anywhere from 1 to 64 steps.
Last Step Button
Another way to set the track length is to use the Last Step button.
> Press SHIFT + LAST STEP (seq 14).
> Use the SEQUENCER buttons to select the new last step.
> Use the BAR buttons to select steps above step 16.
> You can also set last step with the encoder.
> You can choose the track for which to edit the last step with the voice buttons.
> SHIFT + double LAST STEP key press enters the page where you can set last
step for all tracks at the same time.
> To exit the LAST STEP page press the VOICE button!
Bar Buttons
You can also use the BAR buttons to change the track length.
SHIFT + BAR UP extends the track length by 16 steps.
SHIFT + BAR DOWN shrinks the track length by 16 steps.
If you want, you can extend the track and copy the step data from steps 1-16 to
the steps 17-32, use COPY + BAR to fill the next bar with the current bar data.
6.2. BARS
A pattern contains up to 4 bars, each with 16 steps. The SEQUENCER buttons only
show 16 steps at a time. To view the next or previous bar, the BAR UP and BAR DOWN
buttons are used. You can also enable bar following in the configure menu with FLW
setting!
6.3. STEPS
There are up to 64 steps per track. Steps can be set/removed using the 16 sequencer
buttons.
6.4. STEP PARAMETERS
Each step has a set of parameters. To edit the step parameters in voice edit mode,
hold down the shift button. The display will now show the step parameter page and
the LED of the selected step will start flashing.
AVAILABLE STEP PARAMETERS
The display shows the following parameters:

Edit automation using the step edit menu
The automation data can also be edited manually.
> Go to the step parameter menu. (step edit mode, blinking voice mode LED).
> Use the encoder to scroll to page 2.
> There you will see:
The manual edit is the only way to assign parameter automations from one track to
another. It is advised to edit the target parameter in edit mode (push encoder), since
only then the full names as well as the destination voice is shown.
CLEAR AUTOMATION DATA
A whole automation track can be cleared.
> Hold down SHIFT and press the COPY/CLEAR button.
> While still holding the SHIFT button, use the encoder to select 'Clear [autom.1/2]?' on
the display.
> Press COPY/CLEAR again to confirm, release the SHIFT button to abort the action.
6.6. PATTERN
A set of all 7 tracks is called a pattern. You can chain different patterns to be played
after one another. See the song mode section for more information.
LXR OWNERS MANUAL 17
Displayed name Name Description
Select the target voice parameter from a list.
Set the parameter to this value on this step.
Select the target voice parameter from a list.
Set the parameter to this value on this step .
p1d
p1v
p2d
p2v
Parameter 1 Destination
Parameter 1 Value
Parameter 2 Destination
Parameter 2 Value
6.5. AUTOMATION
Parameter values can be recorded to the sequencer steps. Each step can store
2 parameter changes. They affect only a single step and are not processed if
the step is inactive. The modulation targets can be different on every step.
CHOOSING THE ACTIVE AUTOMATION TRACK
Before you start recording parameter changes select the active automation
track. There are 2 automation tracks per voice. You have to select the active
track before you record new data. If data is already present on the active track,
it will be overwritten!
> Hold SHIFT and press the REC button. The record options are shown in the
menu.
> The parameter ("trk") selects the active automation track to which the data
will be recorded.
HOW TO ASSIGN PARAMETER AUTOMATION
There are several ways to assign automation parameters to a step:
Realtime recording
> Activate the recording mode by pressing the REC button. The record LED will
light up.
> While the pattern is playing, tweak some sound parameters using the knobs.
The parameter changes will be recorded to the played steps.
Lock parameter values to a single step using the 4 knobs
You can also assign a parameter change directly to a single step.
> In voice edit mode, hold down the SEQUENCER button.
> The LED of the step starts blinking.
> Use one of the 4 knobs to assign a parameter value to the step.
> Release the SEQUENCER button.
> The changed parameter is now locked to this step.

BASIC PATTERN EDITING
Basic pattern editing is done in VOICE edit mode. Select the track you want to edit
with the VOICE buttons. The step data will be displayed on the 16 sequencer button
LEDs. You can then use the SEQUENCER buttons to set and remove steps.
6.7. COPY SEQUENCER DATA
You can copy the content of one track to another:
> Push and hold the COPY button.
> It’s LED will start flashing.
> Now, while still holding the COPY button, press the VOICE button of the track you
want to copy.
> The voice button will flash, too.
> Now push the target VOICE button of the track you want to copy to.
> All buttons stop flashing and the track is copied to the destination.
> To abort the process, just release the copy button.
6.8. CLEAR SEQUENCER DATA
The sequencer data can be cleared to start over from an empty track or pattern.
CLEAR PATTERN
The whole pattern with all tracks will be cleared.
> Press SHIFT + CLEAR
> Use the encoder to select “clear [pattern]?” on the display.
> Push CLEAR again to confirm or release the SHIFT button to abort.
CLEAR TRACK
To clear a single track in the pattern:
> Use the VOICE buttons to select the track you want to clear.
> Press SHIFT + CLEAR
> Use the encoder to select “clear [track]?” on the display.
> Push CLEAR again to confirm or release the SHIFT button to abort.
There are different modes for different tasks. Voice editing, performance or
generating patterns.
The main modes are accessible with the 4 MODE buttons. Further modes and
menus are available as alternate SHIFT functions on the SEQUENCER buttons.
7.1. VOICE EDIT MODE
The voice edit mode is used to modify the sound parameters and to do basic
pattern editing.
LXR OWNERS MANUAL18
OPERATION MODES
7
1
2
6
9
10
12
The parameters of the selected synthesis page are shown on the display.
Knobs are used to edit the visible parameters.
The SEQUENCER buttons are used to set and remove steps of the current
track.
The BAR buttons can be used to edit more than 16 steps. Up to 4 bars,
each with 16 steps, can be used per pattern.
The VOICE buttons select the voice and sequencer track to edit. Together
with the SHIFT button they are used to mute single voices.
The SELECT buttons are used to select the active synthesis page
(oscillator, envelope, mixer...).
LXR OWNERS MANUAL 19
1
2
3511
9
12
10
8
6
7
4
PATTERN EDITING
The 16 SEQUENCER buttons are used to set and remove steps in the selected pattern. Each button
is a 16th note from a 4/4 bar. If a step is set, the LED in the button is lit.
SOUND EDITING
> The 7 VOICE buttons (10) select the active voice, which is indicated by a lit LED.
> The parameters of the voice are divided into several pages which can be selected using the 8
SELECT buttons (12).
> Each voice type has its own set of parameters, but the overall page structure is the same for all
voices.
> Parameters in the display can be edited using the 4 encoders below.
Parameter editing
As an example lets
take a look at the
filter page:
To change the frequency of the filter of voice 3
> Press ' VOICE Button 3' to select the voice.
> Press ' SELECT button 6' to show the filter page.
> Use the first knob to adjust the 'frq' parameter.
CLEAR KIT / INIT SOUND
If you want to start over with a fresh sound, you can use the
‘clear kit’ option.
> Press and hold SHIFT + COPY = CLEAR and use the encoder to
select “Clear [kit]?”
> Confirm the selection by pushing the CLEAR button again.
The kit will now revert back to the init sound.
7.2. STEP (EDIT) MODE
This Mode is used to edit the step parameters volume, note
value and probability as well as automation data. You can enter
the step edit mode by hitting the VOICE button again, when you
are in voice mode. It is indicated by a blinking voice LED.
The VOICE button will toggle between voice and step mode.
Did you know?
If you have a MIDI keyboard connected, you can enter
NOTE values for a step via MIDI in Step Edit Mode.
Frq
32
res
120
typ
LP
drv
0

LXR OWNERS MANUAL20
Displayed name Name Description
Adjust the tempo of the sequencer.
Setting it to 0 or ‘Ext’ will enable slave
mode to sync the LXR to external MIDI
or clock sources.
bpm Tempo
Adjust the trigger rate for manual roll
function of sequencer buttons 1 to 7.
rol Manual roll rate
Ratio between the original sound and
the morph target.
mrp Morph amount
A global sample rate reduction effect.
sr Global samplerate
Sets the amount of global shuffle.
shu Shuffle amount
STEP PARAMETER EDITING
Step parameters consist of note value, velocity, probability and the parameter
automation. You can find more information in the step parameter section of the manual.
> Select the step you want to edit using the SEQUENCER buttons.
> The selected step button starts to blink.
> The display will show the step parameters.
> Use the knobs and encoder to change parameters.
> A flashing LED indicates the selected step on the sequencer buttons.
> You can select another step using the 16 SEQUENCER buttons.
7.3. PERFORMANCE MODE
This mode is designed to jam live. You can trigger manual rolls for each voice and access
the morph and global sample rate FX. Voice editing is not possible in this mode.
BASIC PERFORMANCE MENU
In performance mode the display shows a set of 5 parameters.
MANUAL ROLL
The first 7 sequencer buttons trigger a manual roll for each corresponding
voice. The roll rate can be adjusted in the menu using the 'rol' parameter. Rolls
are recorded to the pattern when the recording mode is active.
MORPH
The morph feature allows you to morph from one preset sound to another. You
can load any preset from the SD card as a morph target. The Morph amount
value controls the ratio between the original and the target sound. As the
morph parameter is increased, the current sound is gradually transformed into
the selected morph target sound.
For an explanation how to load a morph target, see the LOAD AND SAVE MODE
section of this chapter.
SHUFFLE
The shuffle function will shift the position of every other 16th note
The original pattern timing looks like this:
7.4 .LOADING AND SAVING
When the LXR is turned on, a project is automatically loaded from the SD card to
the machine's memory.
With increased shuffle every other 16th note is delayed, thus shifted in the
direction of the next 16th note:
x x
x
xxx
x
xxx
x
xxxx
x
xxxxxxxxx
x
x
x
x
x
x
x
Table of contents
Other SONIC-POTIONS Synthesizer manuals


