Sonodyne Micro Sub 8 User manual

Micro Sub 8
powered subwoofer •owners manual

• table of contents •
Micro Sub 8
INTRODUCTION Page 1
PRODUCT FEATURES Page 1
UNPACKING Page 1
FIG. 1: CONTROLS Page 2
AMPLIFIER FUNCTIONS & CONTROLS Page 3
FIG. 2: CONNECTIONS Page 4
CONNECTIONS & OPERATIONS Page 5
PLACEMENT OF SUBWOOFER Page 6
TROUBLESHOOTING Page 7
SPECIFICATIONS Page 8

• statutory information •
Micro Sub 8
STATUTORY INFORMATION
Thank you for selecting a Sonodyne Micro Sub 8 subwoofer.
Please read through this owner’s manual carefully for details on product
features and operation. Please unpack with care and retain the packaging for
future use.
Please do not put this unit near any source of radiation/ heat/ directly under
sunlight or in a dirty place.
WARNING
• Do not put the unit in rain or moist places which will lead to shock or fire
• Do not block the ventilation area of the unit and place any material on the
unit
• Ensure that the AC outlet has a firm earth connection
• Use only the AC cord supplied with the unit
This symbol warns there is uninsulated (dangerous) voltage in the
cabinet of the unit
This symbol indicates there is important instruction on operation
and maintenance.

Micro Sub 8 • page 1
• introduction • features • unpacking •
INTRODUCTION
Congratulations on having bought a Micro Sub 8 powered subwoofer! In order to get the
best out of your equipment we suggest that you carefully read this manual before hooking it
up with your existing system.
If you intend to use your powered subwoofer with your home theater, be prepared for
a totally new experience. All those sounds that are meant to be felt, not heard - the
explosions, the vibrations caused by the footsteps of a dinosaur, the thrust of a jet, they will
all come alive in your room! It is not only special effects that your new powered subwoofer
can deliver; with music, it introduces a new dimension to bass drum kicks, bass guitar
notes and pedal organs. Your powered subwoofer is equipped with ample reserve power to
effortlessly reproduce these very low frequencies with astounding realism, and thus allow
you to explore new depths in your music.
PRODUCT FEATURES
Your powered subwoofer has a host of features to ensure effective low frequency response.
They are:
• Built in high power, Class-D power amplifier to drive the dedicated subwoofer
driver at full volume with low distortion while consuming very little power
• Efficient subwoofer - amplifier integration that reproduces lows comfortably
down to the threshold of human hearing
• Serious internal cabinet bracing and sealing to minimize spurious noises
• Variable Crossover Frequency
• Phase Switch
• Line level and LFE inputs
These features and their operations are explained in the following pages. Also contained
in your manual are setup directions, and a few trouble-shooting tips. It is important that
you read this manual carefully to ensure that you receive all the unique benefits of this
equipment.
UNPACKING
Before installing your powered subwoofer, please ensure that the following are in the box:
1. 1 powered subwoofer
2. 4 x spikes + base
3. 1 mains cord
4. 1 x tightening lever
5. User’s manual
Please contact your dealer immediately if any of the above is absent and/or if the
components appear damaged upon removal from the carton.
Please retain the packing and carton in case you need to transport your system again.

• fig. 1: controls •
Micro Sub 8 • page 2
6 8 7
5
4
3
2
1
INPUT 230V AC,50Hz,
AC FUSE T1.6A, 250V
POWERED SUBWOOFER
MICRO SUB 8
RIGHTL EFT
INPUTINPUT LFE
/LFE
OVER-VOLTAGE
PROTECT
MAINS

• amplifier functions & connections •
Micro Sub 8 • page 3
1. LEVEL CONTROL: This control allows you to set the subwoofer volume
relative to the level of other speakers in your system. The level will
need to be set the first time only. This is not meant for use as a volume
control for constant use. You should be able to control the subwoofer volume
by the master volume on your preamplifier or AV receiver.
2. PHASE SWITCH: This switch has two positions marked 0° and 180°. When
you are playing the subwoofer with your existing amplifier and speaker
system which has, say, a fairly good bass response, it might happen
that turning the subwoofer on weakens the bass instead of reinforcing it.
This is because the low frequency signal produced by your existing system
and that produced by your subwoofer are wholly or partially 'out of phase’.
In such a situation, change the position of the Phase Switch.
NOTE: There is no hard and fast rule that governs phase setting. Do
experiment for best results.
3. FREQUENCY CONTROL: A subwoofer generally reproduces frequencies
from 150Hz and below. The lowest frequency that can be reproduced is
determined by the characteristics of the speaker unit itself while the upper
frequency limit (in this case 150Hz) is deliberately imposed. With your
subwoofer, the upper limit (corner frequency) can be varied continuously
between 50 and 150Hz. There is no rule that governs the corner frequency
setting. Do experiment with the range provided till you locate the point at
which the overall sound of your audio system is balanced.
4. INPUT: Connect the stereo output of your preamplifier to the left and right
inputs, with RCA to RCA cables.
5. INPUT LFE : This is a ‘Low Frequency Effects’ input. If you are using an AV
receiver, connect the line level output of your AV receiver marked ‘SUB OUT’
to this input. This input has +10dB or 3 times higher gain than the left and
right input. Always keep frequency control to max position when using this
input.
6. MAINS OVERVOLTAGE PROTECT INDICATOR: The Micro Sub 8 has a
protection feature which automatically shuts off the power when the mains
voltage crosses a safe upper limit. In such case, this LED will glow. Normal
operation will resume when the over-voltage condition is removed.
7. (IEC type) MAINS SOCKET: This is a fused 3-pin IEC type AC socket for
connecting to a wall outlet with the cable supplied. Ensure that the wall
outlet is properly earthed. This is in the interests of your own safety in
the event of any fault. Also ensure that the earth pin of the outlet is not
directly connected to equipment like computers, air-conditioners, etc which
can cause humming noise.
8. POWER SWITCH: This is a rocker type switch that turns on power to the
system

• fig. 2: connections •
Micro Sub 8 • page 4
connecting to the pre out/ subwoofer out of the preamplifier/ amplifier
to right and left front speakers
NOTE: While, for the sake of simplicity, a stereo amplifier has
been shown here, the same connections also hold for similar
outputs on a home theatre receiver/ multi-channel amplifier
RoarR 1108D
powered subwoofer
MAINS
OVER-VOLTAGE
PROTECT
INPUT LFE INPUT
RIGHT LEFT
/LFE
INPUT 230V AC, 50Hz,
AC FUSE T 0.8A, 250V
Micro Sub 8

• connections & operations •
Micro Sub 8 • page 5
With all audio equipment OFF
1. If you are using Left, Right input of your subwoofer: Connect to these sockets
the 'Line out' of your preamplifier, amplifier, processor, or source. (Please
refer to the ‘Notes’ if you intend to use a high level input.) (Please refer to
Fig. 2 on page 4)
2. If you are using LFE input: Connect to this socket the ‘SUB OUT’ of your AV
receiver
3. Keep the Level control at 'Min,' and the Frequency control at approximately
3 o’clock setting.
4. Plug in the Mains Cord supplied to a 230V AC outlet which has a firm earth
connection.
5. Switch 'ON' your source and amplifier/preamplifier.
6. Switch on power to the system
7. Play a section of audio that you know has good low frequency (bass)
recording.
8. Turn up the volume of your amp/preamp till you attain a comfortable listening
level.
9. Now, slowly turn up the Level of your subwoofer till you reach the maximum
undistorted volume/ the level of bass that you desire.
10. Adjust the Frequency to find a setting that gives you the most satisfying
bass response (It would be a good idea to find out the low frequency limit of
your main speakers. This should allow you to have a more educated
approach towards setting the limiting frequency of your subwoofer).
• placement of subwoofer •
Micro Sub 8 • page 6
Low frequencies below 150Hz are omnidirectional; that is, they seem to come
from all directions. Hence it would not be possible to locate the subwoofer no
matter where it is placed in your room. This, however, does not necessarily mean
that the placement of the subwoofer is not critical. Each room, depending on its
shape and dimensions, has a number of resonant frequencies that react with
each other. Thus, the level of perceived bass may vary across a room depending
on where source of sound is placed.
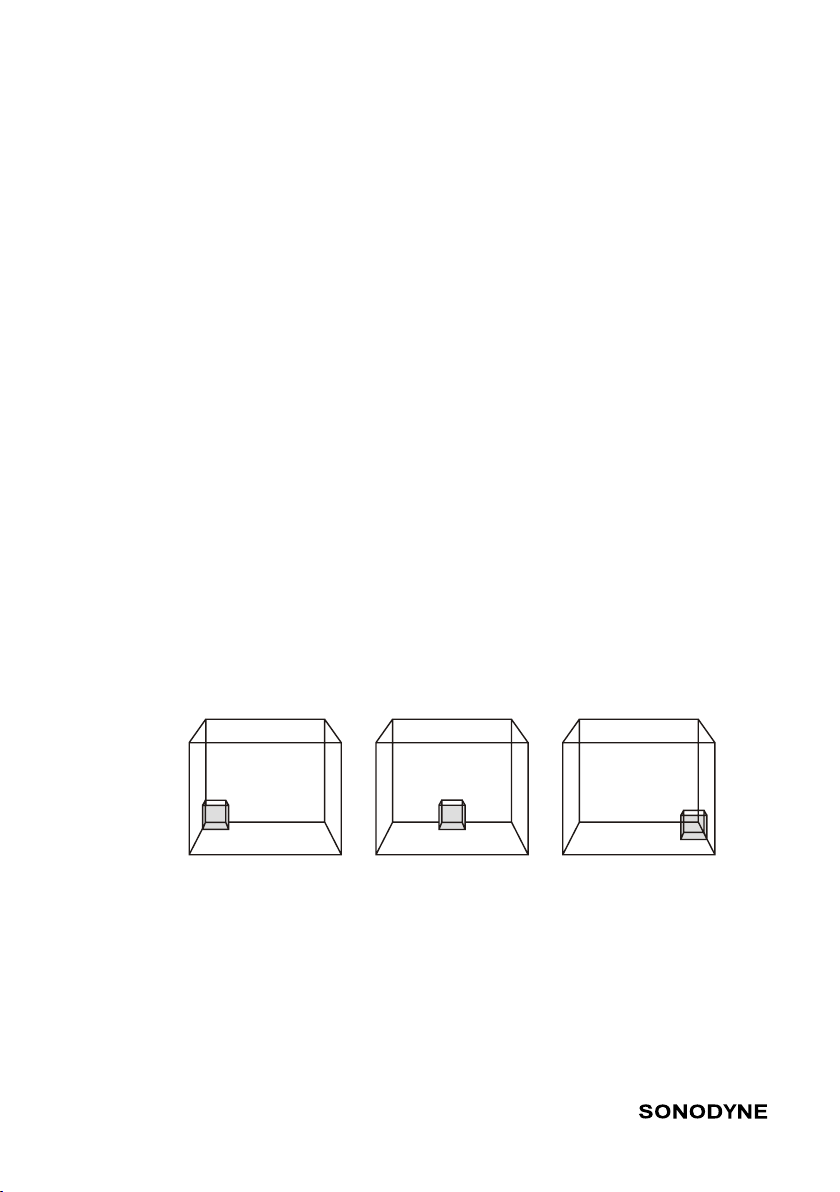
Suggestions on placement are given in the Figures below. It is important to note
that every reflecting surface increases the low frequency level by 3dB. Hence,
when you place your subwoofer up against a wall, you get a higher level of low
frequencies than when it is placed further away from any wall. Similarly, when
you place it in a corner, the three reflecting surfaces further increase the level.
However, this may result in uneven distribution of bass across your room, as
discussed before. Hence, experiment with the placement and monitor its bass
while sitting at your favorite listening spot. It may take a while before you finally
arrive at the optimum location.
IN A CORNER AGAINST A BACK WALL AGAINST A SIDE WALL

• troubleshooting •
Micro Sub 8 • page 7
Your subwoofer has undergone thorough measurement and testing in our
factory before being shipped. Manufacturing defects have thus been minimized.
However, in the unlikely event that practical inconveniences arise, the following
should assist to remedy the same.
If your concern is not cited below, please contact your local Sonodyne dealer or a
Sonodyne authorised service centre.
PROBLEM Bass response seems to be inadequate
SOLUTION A.
B.
Switch the Phase to the opposite of its current
setting. If this fails, then turn the Corner Freq. knob
further toward '150Hz.' (It might so happen that there
is inadequate low frequency information in the audio
track, and thus you need to extend the upper frequency
response of your subwoofer)
The subwoofer may not be getting adequate input drive.
This can happen if you are using only one of the 2 Line
Level inputs. Ensure that both L & R inputs of the
subwoofer are receiving the input signal (even though the
input may be mono).
PROBLEM Not powering up (Blue indicator does not light up)
SOLUTION A.
B.
C.
D.
Check that the mains cable is properly plugged into the
mains outlet.
Check that the power switch is turned on.
Check that the correct voltage is available from the wall
outlet
Check that the fuse in the IEC inlet socket has not blown.
If the fuse has blown, replace with the spare fuse inside
the fuse cover

• specifications •
DESIGN Front firing powered subwoofer vented
ENCLOSURE MDF
TRANSDUCER COMPLEMENTS 1 x 8'' high excursion subwoofer
AMPLIFIER CLASS Class D
AMPLIFIER POWER 100 watt
MAX SPL 109dB
FREQ. RESPONSE (-3dB) 35Hz
LOW FREQ. EXTENSION (-10dB) 30Hz
LOW PASS FILTER 50Hz ~ 150Hz
PHASE Switchable: 0°and 180°
CONTROLS Level control, frequency control
INPUTS Left , Right and LFE unbalanced RCA type
INPUT SENSITIVITY 80mV at level control max
DIMENSIONS (HxWxD) mm 330 x 330 x 429
NET WEIGHT 12.8kg
FINISH Front: Ash; Outer skin: Option of Black ash
or Rosewood
IN THE BOX Mains cord, user's manual, Screw-on spike,
disc and tightening lever
Due to continuous improvements, all specifications are subject to change
Micro Sub 8 • page 8

SONODYNE, India •H.O.: 98 NB Block E New Alipore, Kolkata 700053
sonodyneofficial SonodyneMusic sonodyneofficial
Table of contents
Other Sonodyne Subwoofer manuals


