Sport Camera SportyCamHD GPS User manual
Sportcamera gruppo DMT Services Via S. Gottardo, 8 –47900 Rimini (RN) [email protected] www.sportcamera.net
SportyCamHD GPS

Sportcamera gruppo DMT Services Via S. Gottardo, 8 –47900 Rimini (RN) [email protected] www.sportcamera.net
Manuale inglese
Indice
Product Introduction ……………………………………...................................................................2
Safety Instruction………………………………………….................................................................3
Camera Accessories……………………………………...................................................................4
Interface Function Instruction…………………………....................................................................5
Charge the Battery Usage…………………………………..............................................................6
Insert /Take Out SD Card…………………………………...............................................................7
Install Instruction……………………………………………..............................................................8
Key Function Description..............................................................................................................9
Basic Operation…………………………………………………...................................................9-13
Menu Setting………………………………………….................................................................13-14
GPS Introduction…………………................................................................................................15
PC Mode…………………………………………............................................................................16
Remote controller Instruction.......................................................................................................16
Technical Specification………………………………………..........................................................17
Troubleshooting…………………………………............................................................................18

Sportcamera gruppo DMT Services Via S. Gottardo, 8 –47900 Rimini (RN) [email protected] www.sportcamera.net
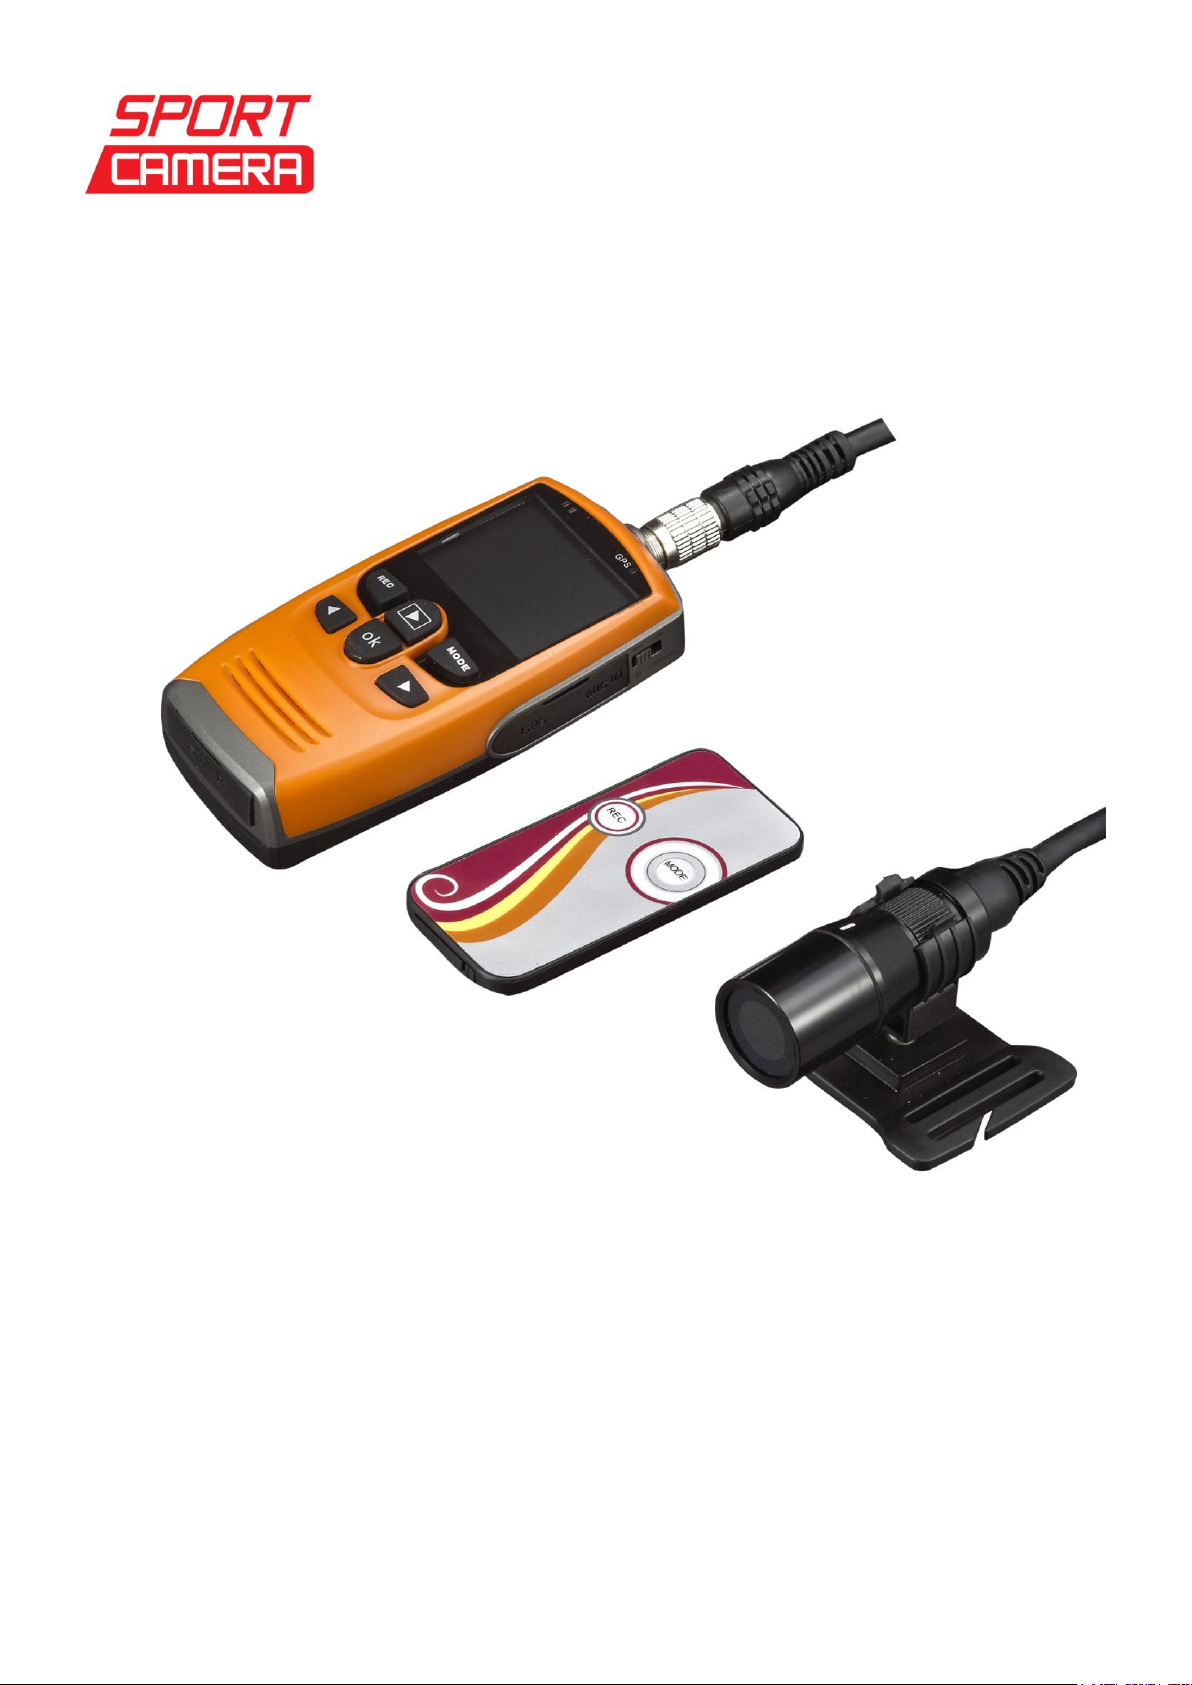
Product Introduction
This camera adopts high-speed image processing CPU, high performance photosensitive sensor
and 6G wide angle lens. It can make video more smooth and perfect,perspective is wider but
without distortion.Two-channel stereo audio input. Receiver and camera head are connected by
removable air head cable so that it can be carried and applied more easily. Infrared remote
control function makes operation more simple. 5Hz high frequency GPS positioning system, is 5
times higher than those in the same industry, it is faster and more accurate.
This camera can be operated and fixed easily; you can mount the camera in the car, on the
helmet, the shoulder, the boat and other sport equipments with the accessories provided.
Safety Instruction
In order to reduce the damages of the fire and shock accidents, please save this satety
instruction to refer it and operate the camera correctly.
Do not use the wrong plug, please install the suitable power adaptor.
Battery
If abuse operation, it may explode to cause the fire, even chemical burns. Please strictly observe
the following precautions while using this instrument.
Do not disassemble it
Do not crush or hit the battery or any other external force such as dropped and vibration
Do not make the battery short circuit; do not make any metal touch the battery end.
Do not putting the battery extremely hot environments over 60℃,such as the car under the direct
sunlight.
Don not burn or abandoned the battery in the fire.
Do not use damaged or leakage of lithium-ion batteries
Pls use original battery charger to recharge the battery.
Keep the batteries out of the reach of the children.
Please keep the battery dry.
If the camera is not to be used for long period of time, remove the battery from the camera.

Sportcamera gruppo DMT Services Via S. Gottardo, 8 –47900 Rimini (RN) [email protected] www.sportcamera.net
Camera Accessories
Main accessories:
Receiver
Remote control
Camera
Other accessories:
Bag
User manual
GPS module
USB cable
HDMI cable
Helmet grip
Camera pedestal
Universal bracket
Bicycle bracket
3M pads (3 pcs)
Elastic band
Charger
Car charger
Battery (2 pcs)

Sportcamera gruppo DMT Services Via S. Gottardo, 8 –47900 Rimini (RN) [email protected] www.sportcamera.net
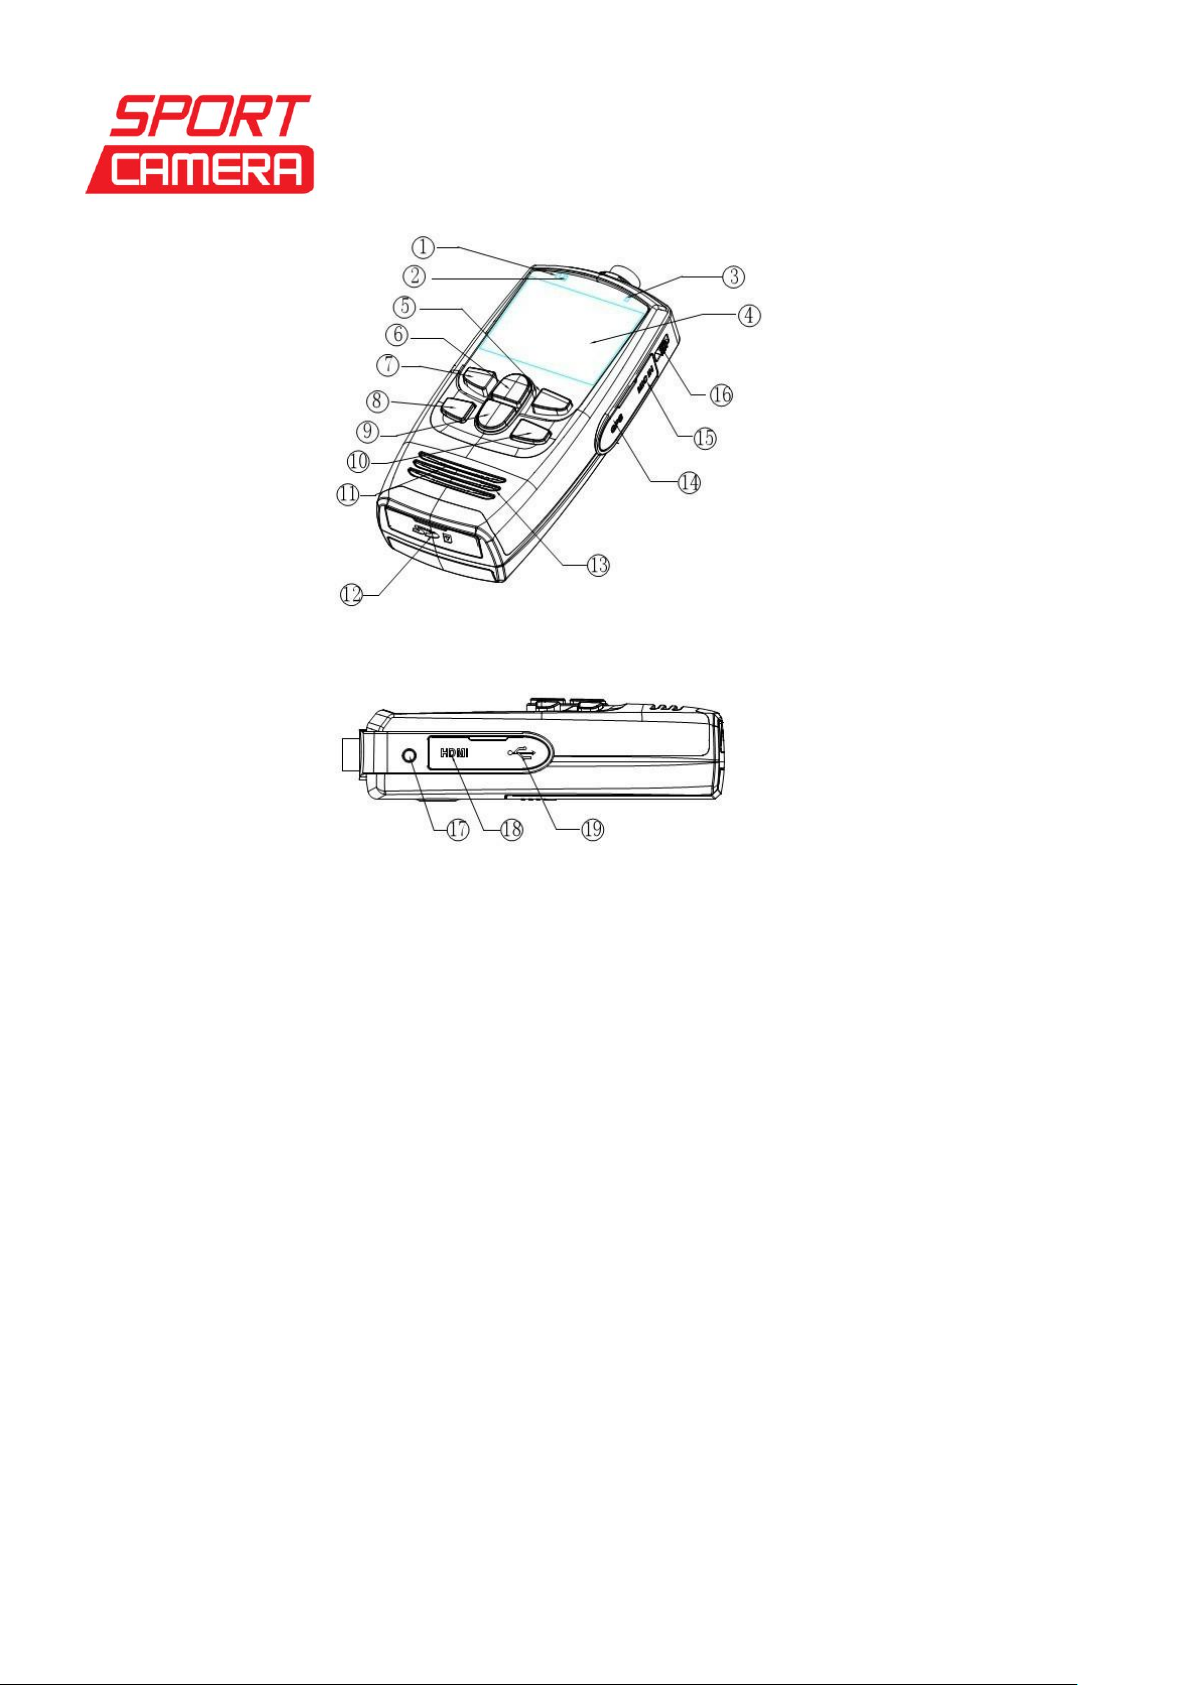
Interface Function Instruction
Sportcamera gruppo DMT Services Via S. Gottardo, 8 –47900 Rimini (RN) [email protected] www.sportcamera.net
1. Charger indicator
2. Working indicator
3. GPS indicator
4. TFT screen
5. Mode key
6. Playback key
7. REC key
8. Left key
9. OK key
10.Right key
11.Speaker
12.SD card slot
13.MIC
14.GPS input port
15.MIC port
16.Power/Lock key
17.Remote control signal reception port
18.HDMI port
19.USB port

Sportcamera gruppo DMT Services Via S. Gottardo, 8 –47900 Rimini (RN) [email protected] www.sportcamera.net
Charge the Battery Usage
1. Charge the battery
Please connect the receiver to the USB port, and then connect the charger to the power socket
for charging. While charging, the red charging indicator in left up corner of receiver is on. When
the battery is fully charged, the red light indicator is off.
Memo:
Please confirm the AC power is turned on; otherwise battery is discharged but not charged
Even if there is some power in the battery, you can charge the battery.
Charger spec: input voltage:90V-240V, output voltage: 5V(DC), output current:1.3A
While charging, in case there is any abnormal situation happened, plug out the charg
er and cut off the power immediately.
Be sure to use the original accessories equipped, for example: battery, charger, USB cable,
AV cable.
Insert SD card
1. Open the SD card slot cover.
2. Insert SD card according to the direction in the drawing on SD card slot cover, press SD card
in lightly until it is locked exactly.
3. Close the SD card slot cover.
Power on after inserting SD card, the right up corner in screen will appear SD card icon.
Memo: If SD card do not be inserted or is inserted inexactly, the screen will not appear the SD
card icon.
Take out SD card
1. Open the SD card slot cover.
2. Press SD card in lightly, SD card will eject out automatically.
3. Take out SD card and close the SD card slot cover.
Sportcamera gruppo DMT Services Via S. Gottardo, 8 –47900 Rimini (RN) [email protected] www.sportcamera.net
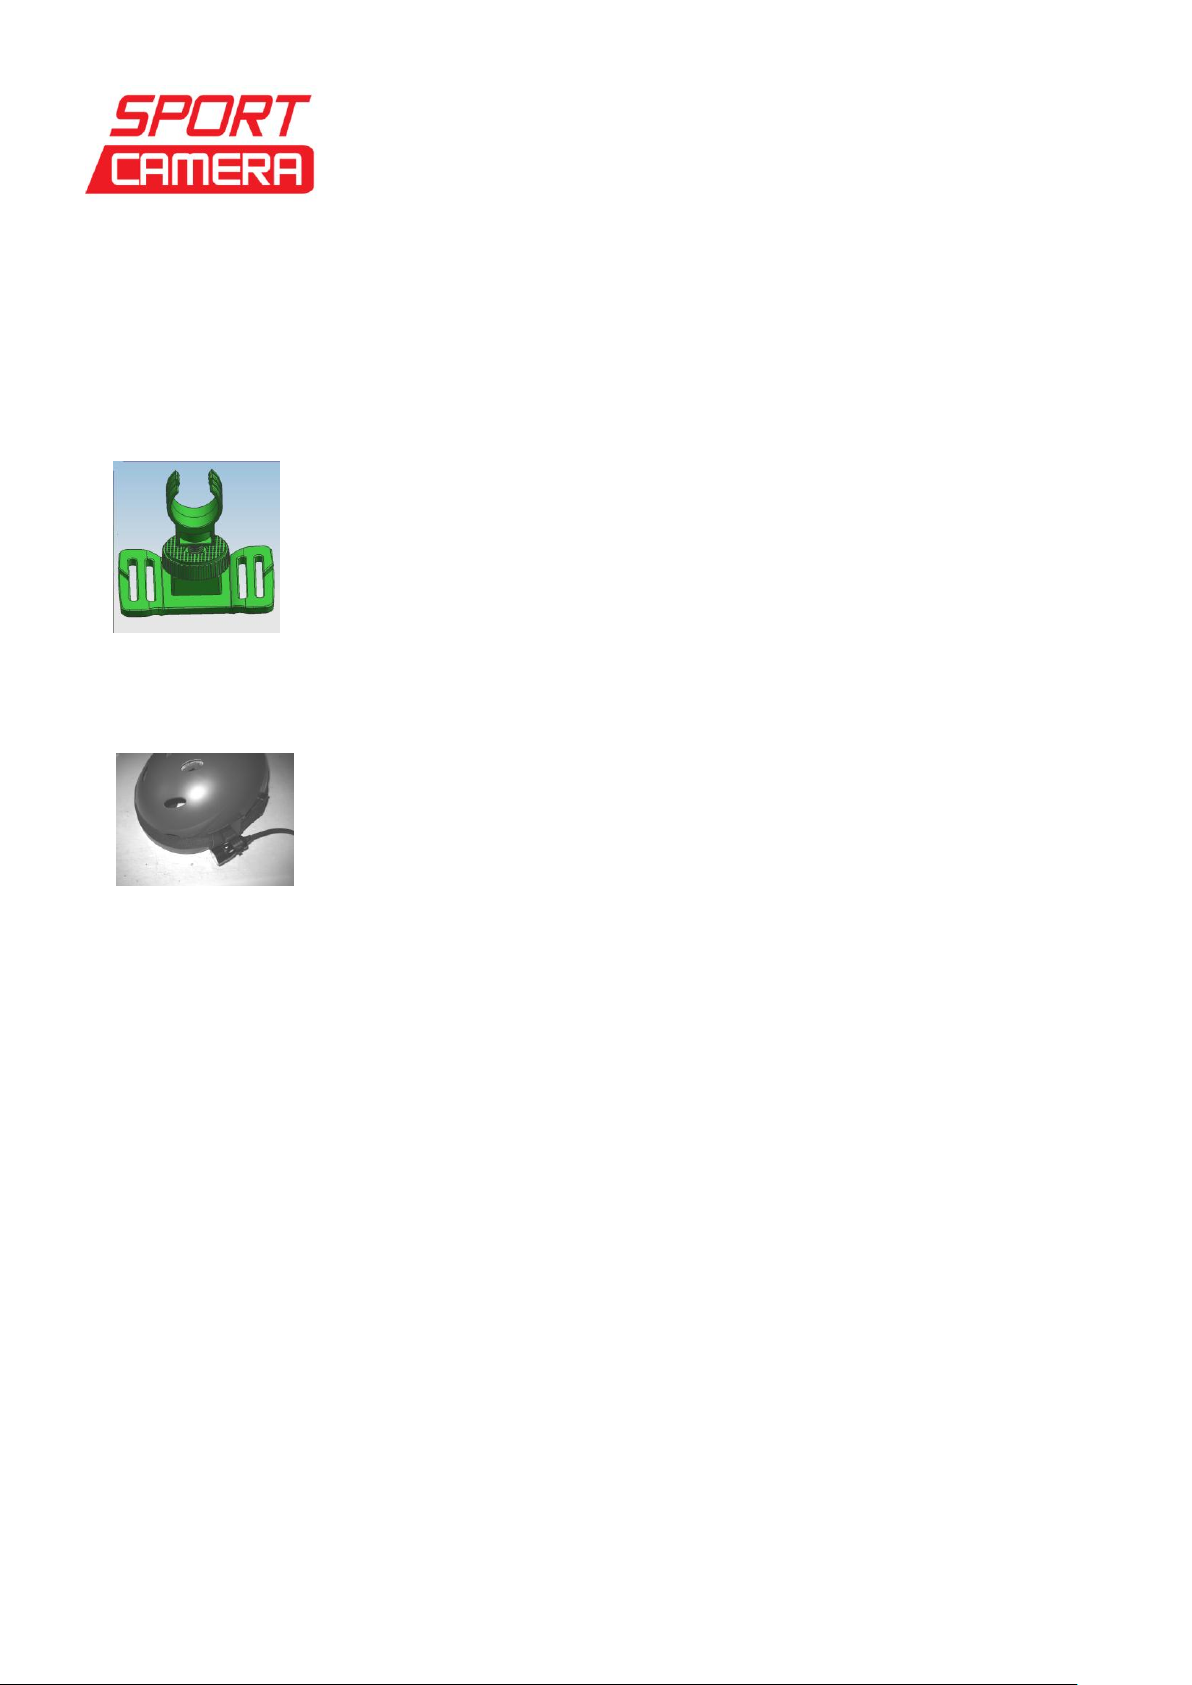
Install instruction
1. Install helmet grip
According to the picture, screw the camera pedestal into the helmet grip,adjust direction after
the rotation of the adjusting disc lock.
2. Install lens emitter
According to the picture, put the camera into the camera flat pedestal, and then put the elastic
through the slot of helmet pedestal,and bind the helt around the helmet or head.
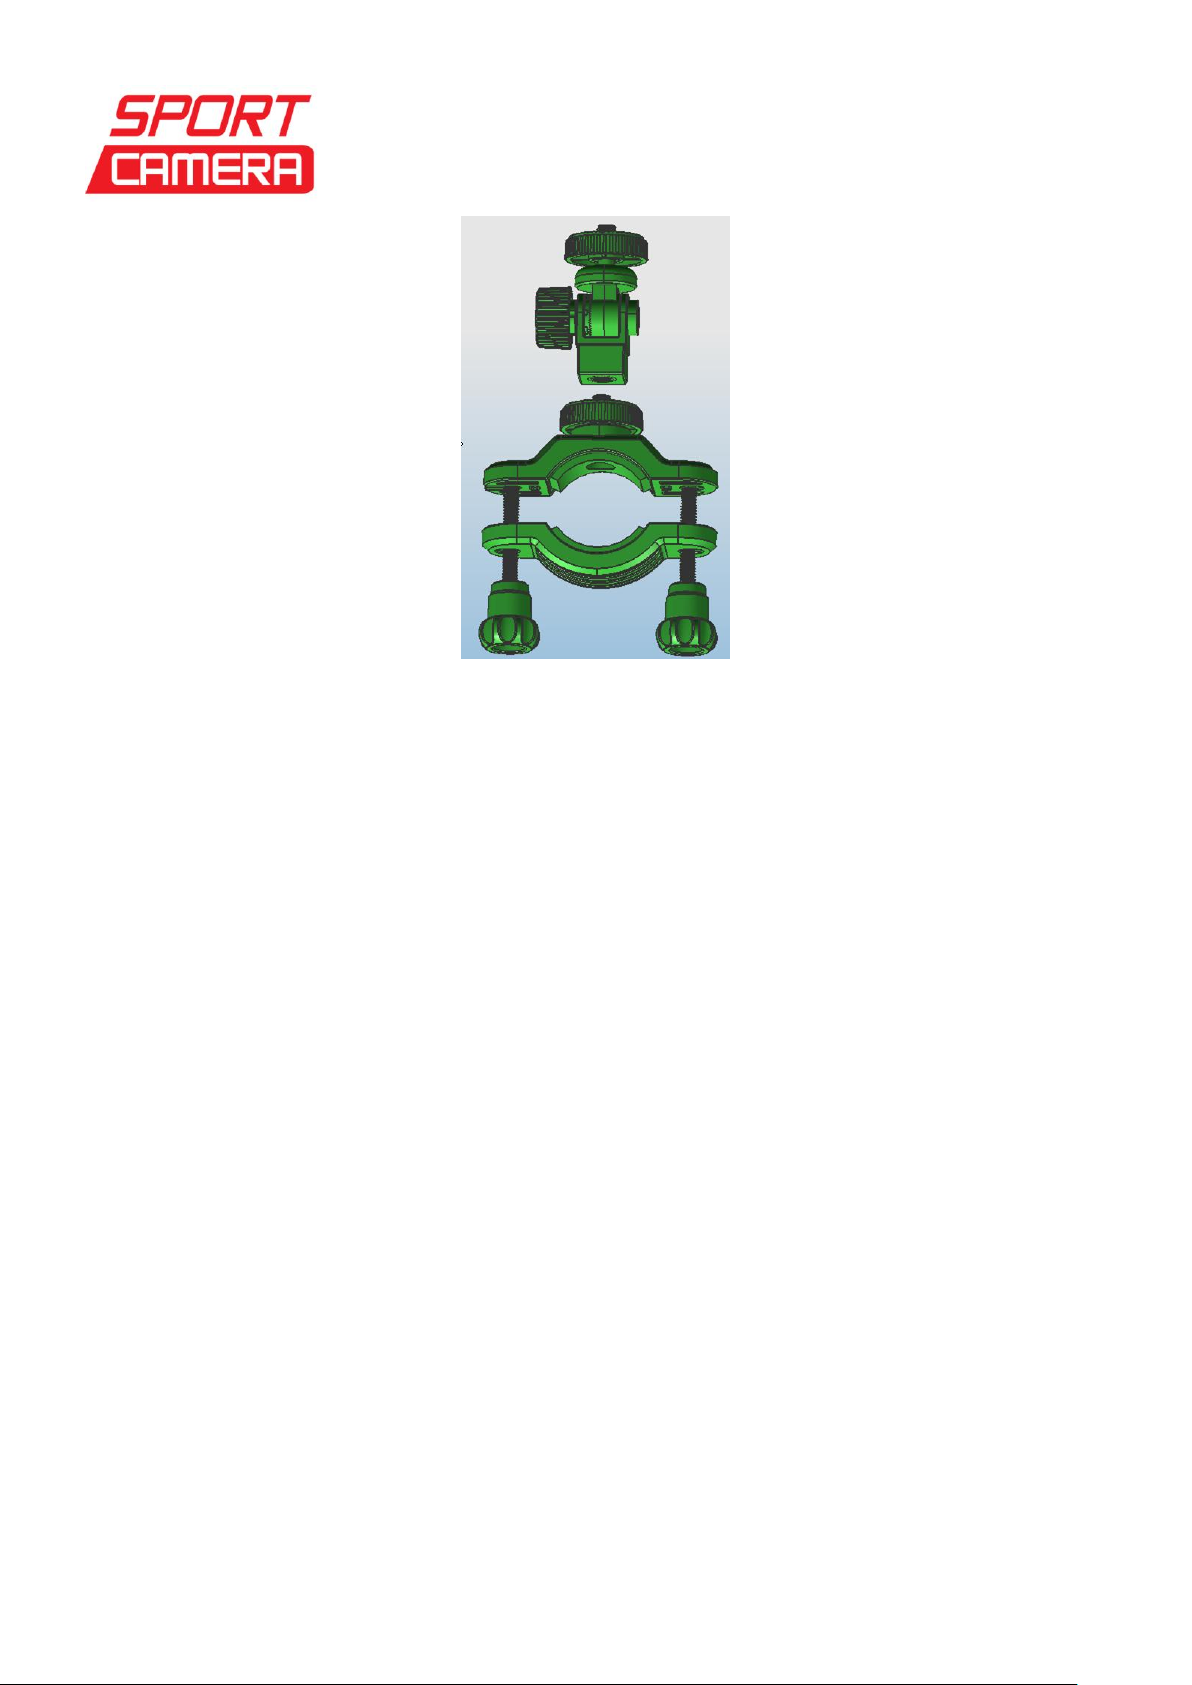
3 .Install bicycle bracket
According to picture, mount the bicycle bracket on a motorcycle or bicycle and tighten the
knob,screw the universal bracket into the bicycle bracket,then screw the camera pedestal into
the universal bracket,set the camera into the stent,finally adjust the direction,screw tightly the
adjusting disc on the universal bracket and bicycle bracket.
Sportcamera gruppo DMT Services Via S. Gottardo, 8 –47900 Rimini (RN) [email protected] www.sportcamera.net
Key Function Description
REC key: Taking video or stop; Taking pictures
Browse key: check movies and pictures.
Mode key: switch to camera/video mode; one frame playback
Left key: to zoom out the image; to select the last file or menu.
OK key: to playback videos and to pause; under setting mode to enter and confirm setting.
Right key: to zoom in the image; to select the next file or menu.
Power key: to turn on/off camera, clear screen and lock/unlock key.
Basic Operation
1. Turn on/off camera
(1) Turn on camera
Slide up and press “Power key” for 3 seconds, the blue indicator on LCD screen light up
(one beeping sound), LCD screen lights, the camera enters video monitoring
mode.Resolution appears on the up left corner of LCD screen, the remaining time appear
on the up side, battery icon and SD card icon appear on the up right corner.
(2) Turn off camera
When camera is on, slide up and press “Power key” for 3 seconds (one beeping sound), it
will turn off.

Sportcamera gruppo DMT Services Via S. Gottardo, 8 –47900 Rimini (RN) [email protected] www.sportcamera.net
2. Video Mode
(1) Normal Recording
Set “Record Overwrite” as “OFF”, press “REC key” to record videos, and “IN USE”
indicator flickers, recorded time and video icon appear on the up side of LCD screen.
Press “REC key” again to stop recording, the “IN USE” indicator stops flickering and save
videos recorded. On the top of LCD screen display the rest record time.
Audio can be recorded directly during the video recording, and also can be recorded
through the plug-in microphone to recorder the sound from one meter away.
Note: While recording, Self capture is ineffective.
(2) Loop Recording
Set “Record Overwrite” as “2 MIN”, the camera enter loop recording mode, the “C”icon
appear on the up right corner of LCD screen, press “REC key” to record videos, and “IN
USE” indicator flickers. When records up to 2 MIN (you can set different overwrite time),
the camera will stop recording and save videos automatically, then continue recording the
next video. When SD card is full, it will overwrite the first footage video, and then continue
recording, and so on.
When recording, press once “REC key” to stop recording and save videos automatically.
On the top of LCD screen display the rest record time.
Memo:
1. The camera is with “LCD Auto Turn Off” function, you can set LCD auto off time in the
menu, during recording once it reaches the set time, the LCD screen will turn off.
2. When the battery exhausts, the camera will stop recording and save videos automatically.
LCD screen displays “low power”and shut off.
Note: during video recording, if open GPS function, video footage will display GPS positioning
data: N:----- E:------ speed: 000.0Km/H and 00:00:00:0 refresh time accurate to 0.2 seconds.
3. Picture capture
1. During the process of recording, press “Mode key” to capture the image from the video.
“Snap done”displayed on the screen. When capture picture, the video recording is still
continuous working, only under the browse status can you browse the pictures you have
just captured down.
2. During playback, press “REC Key”to capture the image, you will hear beep sound. The
picture you captured can browse under the Browse status.
4. Picture shooting
(1) Taking picture
Under video monitoring mode, press “Mode key” to transfer to Camera mode.
Sportcamera gruppo DMT Services Via S. Gottardo, 8 –47900 Rimini (RN) [email protected] www.sportcamera.net
Aim at the object you want to shoot, press “REC key” to take shooting and it will save pictures
automatically.
(2) Self capture
Under camera mode, press and hold “OK key”for 3 seconds enter menu setting, and press
to select self capture (you can choose different time), press “OK key” to confirm and quit the
setting. Press “REC key”, the camera will shoot pictures according to the time you set, and
save pictures automatically.
Note: Set “Self capture”to “OFF”to cancel it, and return to normal picture shooting.
5. Zoom in/out
Under camera mode, video monitoring or video mode, press key to zoom in / out the
image.
Note: Under FULL HD (30/25fps), 720P (50fps) mode, zoom in/out function is ineffective.
6. Clear Screen
Under camera mode, video mode or playback mode, slide up “Power key” to clear all
characters on the LCD screen, slide up “Power key” again back to normal.
7. Lock Key
Under camera mode, video mode or playback mode, slide down “Power key” to lock all keys,
the locked key icon appear on LCD screen, all the keys are ineffective. Slide back “Power
key” to quit key locked status, the locked key icon disappear and keys function again.
8. Browse Mode
(1) Check Video
a. When camera is on, press key to enter check video mode,
press to select video footage, and press “OK key” twice to play
videos, press “OK key” to pause, press “OK key” again to continue
playing.
b. When playback videos, long press key to fast forward playback,
loose the key to return to normal playback; long press key to
fast reverse playback, loose the key to return to normal playback.
Press“OK key” to pause, press “OK key” again to continue.
c. During the process of playback, press once key to turn down the volume,
press once key to turn up the volume.
d. During the process of playback, press “Mode key” to enter every frame playback mode,
and if press once key to forward playback one frame; if press key to backward
playback one frame. Under every frame playback mode, press “OK key” to return normal
playback.
e. Press three times “Browse key” to quit check video mode.

Sportcamera gruppo DMT Services Via S. Gottardo, 8 –47900 Rimini (RN) [email protected] www.sportcamera.net
GPS
To playback GPS video footage needs to use the special player software to display the
location data.Refer to below picture.
GPS function
When camera is on,set GPS power “ON”in the menu, then plug GPS moulde into GPS input
port, the yellow light indicator is on, LCD screen will display the values of N:--- and E:---,
speed:000.0Km/H and 00:00:00:0 refresh time accurate to 0.2 seconds.
(2) Check Picture
a. Under video monitoring mode, press twice “Browse key” to enter pictures browse
Mode, press key to select picture, and press “OK key” to check pictures.
b. Under playback mode, press “OK key” to enter slide mode, press “OK key” again back
to normal playback mode.
c. Press twice “Browse key”to enter video monitoring mode.
(3) File Protect
Under video or pictures browse mode, press key to select the file need protected, press
and hold “OK key” for 3 seconds to enter protect mode, press “OK key” again to confirm, the
file will be protected, and locked icon displayed on the file. To unlock file, press key to
select the file unlocked, press and hold “OK key” for 3 seconds to remove protect, press “OK
key” to confirm unlock the file, the lock icon disappear.
(4) Delete File
Under browse mode, press “Mode key” to enter delete mode, press to select “All,
YES, NO”, press “OK key” to confirm (If you want to delete one file, pls select “YES” and
press “OK key” to confirm deletion). When you select “All”, LCD screen will display “YES,
NO”, and press key to select the option, then press “OK key” to confirm. (Note: the
file locked cannot be deleted) If select “NO”, press “OK key”to confirm and quit delete
mode.

Sportcamera gruppo DMT Services Via S. Gottardo, 8 –47900 Rimini (RN) [email protected] www.sportcamera.net
Menu Setting
Under video monitoring and camera mode, there are separated corresponding menu settings.
Press and hold “OK key” for 3 seconds to enter system setting mode.
Menu Setting Under video monitoring mode
1)Resolution:FULL HD30 / FULL HD 25 / 1080P30 / 1080P 25 / 720P60 / 720P 50
/720P30 / 720P 25 / WVGAP60 / WVGAP 30
2)Record Overwrite:OFF/1 MIN/2 MIN/3 MIN/5 MIN
3)Time and Date:2010.01.01 10:30(current time)
4)Quality:H/M/L
5)Flicker:Auto/50Hz/60Hz
6)TV Type:NTSC/PAL
7)White Balance:AUTO/Sunny/Cloudy/Fluorescent/Incandescent
8)Language:ENGLISH/Chinese (Simple) /Chinese (Traditional) /
ESPAÑOL/FRANÇAIS/DEUTSCH/ITALANO/ PYCCKИЙ
9)AE BIAS:-2.0/-1.7/-1.3/-1.0/-0.7/-0.3/0/+0.3/+0.7/+1.0/+1.3/+1.7/+2.0
10)Contrast:Standard/Hard/Soft
11)Sharpness:Standard/ Hard/Soft
12)AE ISO:AUTO/100/200/400
13)Internal MIC VOL:OFF/01/02/03/04/05/06/07
14)Volume:OFF/01/02/03/04/05/06/07/08/09/10/11/12/13/14/15/16
15)Beep Sound:ON/OFF
16)Default Setting:YES/NO
17)Time Stamp:ON/OFF
18)Format:NO/YES
19)Auto Power Off:OFF/1 MIN/2 MIN/3 MIN/5 MIN
20)LCD Auto Turn Off:NO/30 SEC/60 SEC
21)Firmware Version:R1345/20121103
2、Menu Setting Under Camera mode
1) Photo Size:3M/5M/8M/12M/16M
2)White Balance:AUTO/Sunny/Cloudy/Fluorescent/Incandescent
3)AE BIAS:-2.0/-1.7/-1.3/-1.0/-0.7/-0.3/0.0/+0.3/+0.7/+1.0/+1.3/+1.7/+2.0
4) AE ISO: AUTO/100/200/400
5)Contrast:Soft/Standard/Hard
6)Sharpness:Soft/Standard/Hard
7)Self Capture:OFF/3 SEC/5 SEC/10 SEC/30 SEC/60 SEC
Playback footage on TV
1. HDMI Mode

Sportcamera gruppo DMT Services Via S. Gottardo, 8 –47900 Rimini (RN) [email protected] www.sportcamera.net
Turn the camera on, connect camera to HD TV video input port and audio input port of with
the HDMI cable provided. Choose HDMI mode on TV, the LCD screen of camera will be off
automatically, all operation functions can be shown on TV.
PC Mode
Turn the camera on, connect camera to computer with USB cable. The LCD screen display “PC
connect”. Open “My computer”, appears a removable Disk, open the Disk, DCIM file,
100MEDIA file in turn, and you can playback your videos or pictures, also can check and
download your pictures and videos in MP4/JPG format.
Remote controller Instruction
1. Under video mode, press “MODE key”on the remote controller to select resolution; press
once “REC key”to record video, press “REC key” again to stop recording.
2. Under camera mode, press“MODE key”on the remote controller to select image pixels; press
once “REC key” to take pictures.
Technical Specification
Sensor 5 Mega CMOS
Lens 6G All Glass
Wide angle FULL HD 1080P (142 degree)
720P (172 degree)
WVGA (172 degree)
Image Size 3Mega 2048*1536
4Mega 2592*1728
5Mega 2592*1944
8Mega 3200*2400
12Mega 4000*3000
16Mega 4608*3456
Video File FULL HD (1920*1080) 30fps/25fps

Sportcamera gruppo DMT Services Via S. Gottardo, 8 –47900 Rimini (RN) [email protected] www.sportcamera.net
1080P (1440*1080) 30fps/25fps
720P (1280*720) 60fps/50fps/30fps /25fps
WVGA (848*480) 60fps /30fps
Screen 2 inch TFT screen, 16 Mega pixels for still picture
Zoom 4X digital zoom
Audio Built-in Microphone/speaker, external microphone
Storage SDHC slot supports up to 32G
File format JPG/MPEG4
Battery Rechargeable Li-ion battery (3.7V 1700 mAh)
USB Port USB2.0
Working Time under FULL HD mode, about 2 hours recording
Under WVGA mode, about 3 hours recording
Troubleshooting
There is no display?
Is battery properly installed?
Does the battery need replacing?
After theAction Cam is connected to my PC, it cannot find the New drive in the
“My computer’s folder.
Make sure each end of the Action Cam USB cable is properly and firmly
connected。
Make sure your USB port works. Try connecting other USB device to
Sportcamera gruppo DMT Services Via S. Gottardo, 8 –47900 Rimini (RN) [email protected] www.sportcamera.net
check if USB port has a malfunction.
I can’t capture the video footage.
Make sure there’s enough space on the internal memory of Action cam of
the SD card. The display will tell you how much time left for video
recording.
If the SD card you inserted has capacity available, make sure it is not
locked. It can’t take video footage if card is locked.
Note: Make sure Air head and the camera is properly and firmly connected.
The camera stop recording automatically for a time, or the camera is dead
after inserting SD card to record?
Format SD card
Change and use other SD card to record.
I can’t play the video footage on my television.
Make sure to turn the camera on;
Make sure each end of the AV/HDMI cable is properly and firmly
connected to Action cam and your television;
Please check if TV has been turned to the AV or HDMI mode.
The image is not clear or dim.
Check out the lens whether there has any stain or finger print; use the
Lens cloth to wipe up the Lens before shooting.
Note: This manual is for reference use, any later alteration of technical specification and product
appearance are without further notice.
Table of contents


