Standard Bearer Machines Rungu Dualie Rugged Series User manual

V2.2 2022 RUNGU Dualie Rugged/XR series
Copyright 2021 Standard Bearer Machines, LLC 1
rungu dualie® owner
manual - rugged and xr
series models
Congratulations on purchasing a Rungu Dualie®
1
! You own the latest generation of the ultimate electric
alternative to a Quad ATV for off-road utility and fun. Before you ride, please read the following
instructions carefully.
Rungu Dualie uses the Bafang BBSHD mid-drive motor with a custom Rungu 52V (nominal voltage) input
that generates more than 1.4kW of mechanical power for off-road use. You access the power by
pedaling (“Pedal Assist”) or pressing the thumb throttle. In “Pedal Assist,” the Dualie senses when you
start to pedal and engages the motor to assist your pedaling - you don’t have to use the throttle if you
don’t want to. The amount of power assist varies based on the power level you select as you ride. Unless
you have ordered your Dualie with Class 1 or Class 2 reprogramming, we ship the Dualie configured with
five selectable power levels starting with very little assistance up to full power, which is intended for use
off-road only. The power settings are discussed below.
Note: US Federal Law mandates a 750W/20 MPH limit for riding an e-bike on public roads without a
license. Please check with your local government to ensure you follow all local laws and ordinances.
Standard Bearer Machines are not liable for those who choose not to follow their local laws.
CAUTION: STANDARD BEARER MACHINES WILL NOT BE HELD RESPONSIBLE FOR PEOPLE WHO CHOOSE
TO DISREGARD THE LAW!
WARNING: IMPORTANT- STANDARD BEARER MACHINES WILL NOT BE LIABLE FOR ANY DAMAGE OR
INJURY THAT MAY OCCUR DUE TO OPERATION OF YOUR DUALIE. BY USING THE DUALIE, YOU ARE
AGREEING TO STANDARD BEARER MACHINES TERMS AND CONDITIONS AND THE WARNINGS AND
CONDITIONS OF THE GENERIC BIKE MANUAL WHICH ARE INCLUDED WITH OTHER LINKS ON THE
MANUAL GUIDE THAT COMES WITH THIS PRODUCT.
Standard Bearer Machines, LLC (Standard Bearer Machines) thanks you for your purchase!
1
As the owner, you agree and are bound by all sales and transfer conditions as defined in “SBM Rungu Sales Terms
and Conditions US 2022.” Copies of these documents are available on the list of electronic document links that
ship with the product or upon request by e-mailing sales@riderungu.com.

V2.2 2022 RUNGU Dualie Rugged/XR series
Copyright 2021 Standard Bearer Machines, LLC 2
Contents
Rungu Dualie parts identification .................................................................................................................5
Unpacking and Assembly Instructions..........................................................................................................7
1. Tools required..................................................................................................................................7
2. Instructions ......................................................................................................................................8
3. Additional Installation Instructions –Mud Guards........................................................................24
4. Additional Installation Instructions –Rungu Cargo Rack with or without range-extending battery.
.......................................................................................................................................................29
5. Additional Installation Instructions –Pannier Bags.......................................................................36
Cautions and Safety ....................................................................................................................................39
6. General Cautions and Warnings ....................................................................................................39
7. Battery Safety ................................................................................................................................40
Battery Safety Precautions..................................................................................................................41
Catastrophic Battery Failure ...............................................................................................................41
Battery Safety (In Depth) ....................................................................................................................42
Battery Failure Response Procedure ..................................................................................................43
Operating Rungu Dualie..............................................................................................................................44
8. Charging Your Main Battery without removing the battery–RUGGED MODEL ONLY..................44
9. Charging your Main Battery after removing the battery–Frame Battery.....................................48
10. Charging Dual Batteries without removing the batteries –Dualie XR Models..............................54
11. Removing dual batteries for external charging –Dualie XR ..........................................................58
12. Inflating Tires –using Presta valve adapters .................................................................................62
Using the Presta “screw-on” valve adapters ......................................................................................62
13. Before you ride –Safety Check......................................................................................................65
14. Using the control keypad and understanding the dashboard.......................................................68
Turning on Dualie................................................................................................................................68
Reading the dashboard.......................................................................................................................69
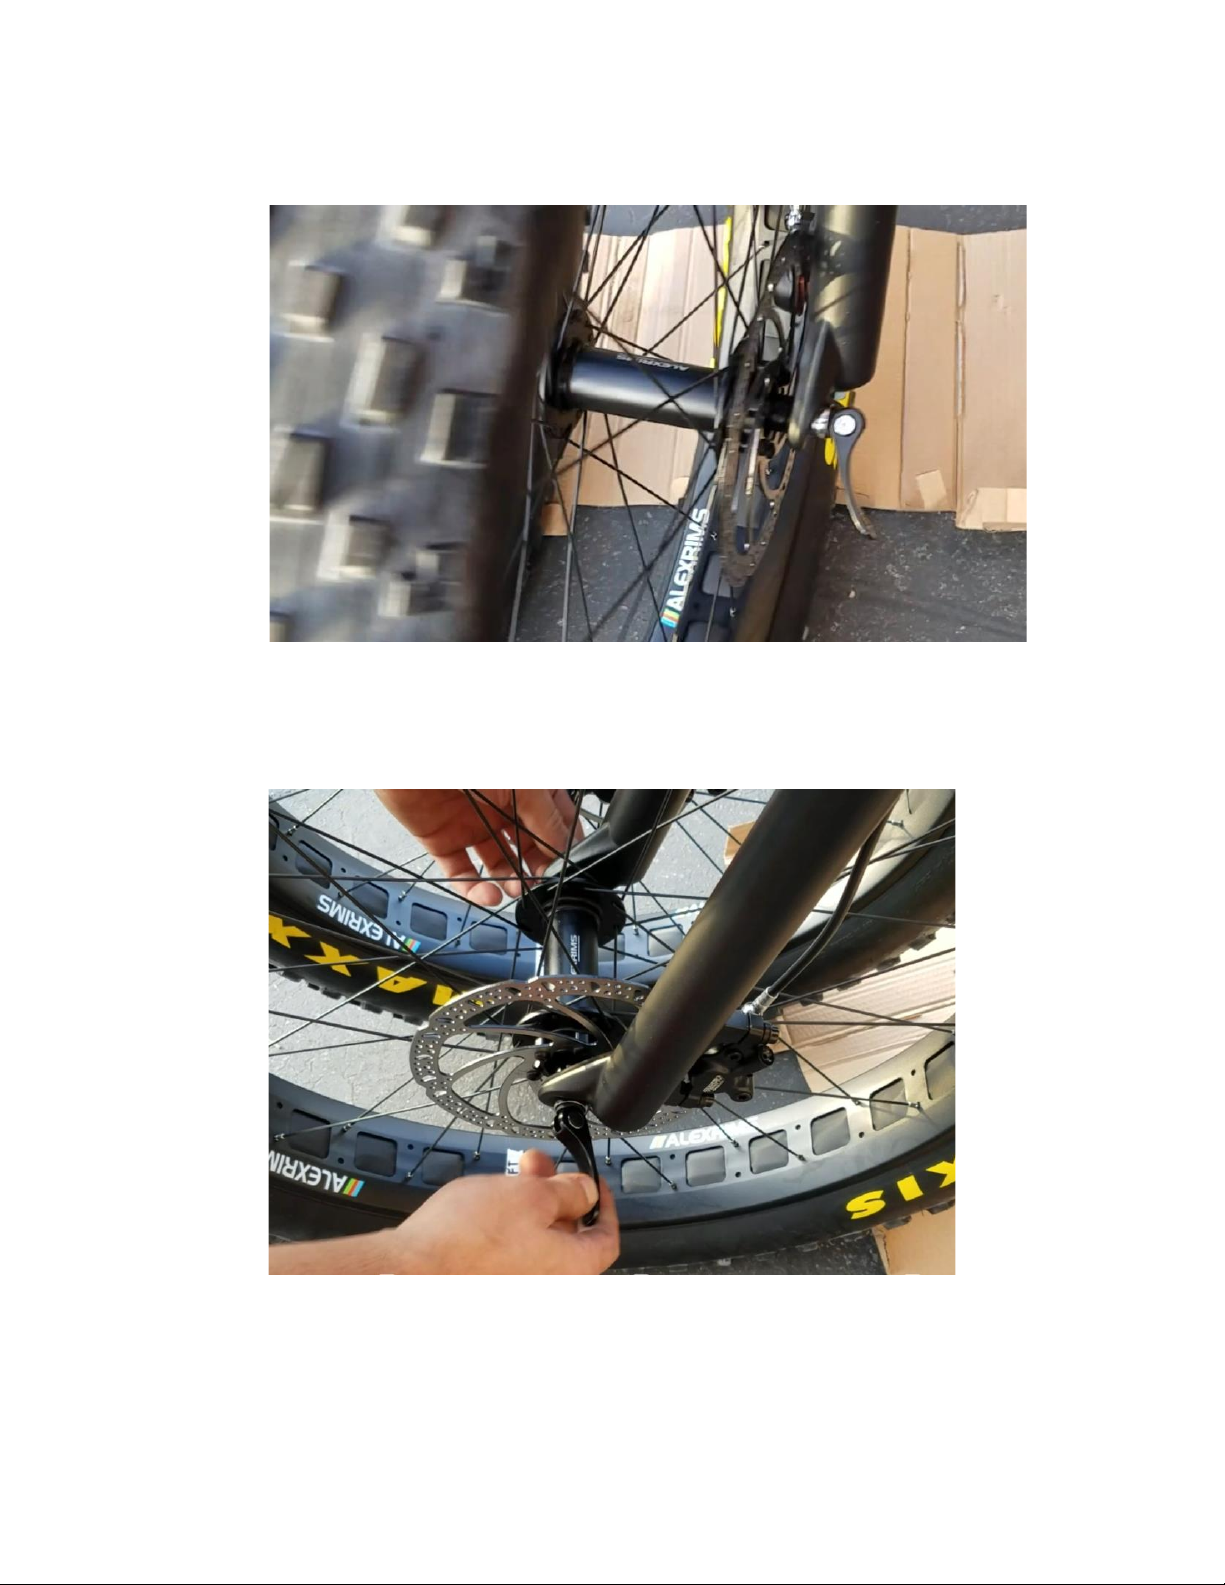
Accessing the display settings.............................................................................................................70
Toggling the Rungu E-Light on and off................................................................................................71
Turning off Dualie ...............................................................................................................................71
Built-in USB charging port...................................................................................................................71
PIN Code..............................................................................................................................................71

V2.2 2022 RUNGU Dualie Rugged/XR series
Copyright 2021 Standard Bearer Machines, LLC 3
Walk assistance...................................................................................................................................71
15. Riding the Rungu Dualie.................................................................................................................72
Riding Dualie, the first time ................................................................................................................72
Riding with long pants.........................................................................................................................72
Using Derailleur (Gear) Shifters ..........................................................................................................74
Changing gears with the BOX Prime 9 system....................................................................................74
How and when to change gears..........................................................................................................76
Understanding and changing Rungu Dualie Power Level...................................................................77
16. Power level and gear combination guidelines...............................................................................78
The Importance of Shifting into the Correct Gear..............................................................................78
Power Level selection guidelines: Problems resulting from not following gear shifting....................79
17. Rungu Dualie Operation Cautions..................................................................................................81
18. Riding Safety ..................................................................................................................................82
19. Adjusting the Front Suspension.....................................................................................................82
20. Using the parking brake.................................................................................................................83
Rungu Dualie Maintenance, Care and Repair.............................................................................................85
21. Before Each Ride............................................................................................................................85
22. Securing your Dualie......................................................................................................................85
23. After Each Ride...............................................................................................................................85
24. Battery Care ...................................................................................................................................85
25. Storage When Not Using Dualie for Periods of Two Weeks or Longer..........................................85
26. Prolonging the Life of your Battery –Best Practices .....................................................................86
27. Chain Maintenance –Cleaning and Lubrication every 40 miles of hard use.................................87
28. Maintenance –After strenuous rides, and every 500 miles or six months...................................88
29. Rear wheel removal or replacement.............................................................................................89
How to remove the rear wheel...........................................................................................................89
How to replace the rear wheel ...........................................................................................................92
30. Fixing a broken chain .....................................................................................................................95
31. Wheel magnet alignment –“Error 21”..........................................................................................98
32. Transporting Rungu Dualie ..........................................................................................................100
Technical Information...............................................................................................................................100
33. Default Display Settings...............................................................................................................100

V2.2 2022 RUNGU Dualie Rugged/XR series
Copyright 2021 Standard Bearer Machines, LLC 4
34. Dimensions...................................................................................................................................101
35. Performance ................................................................................................................................102
36. Electrical.......................................................................................................................................102
Troubleshooting........................................................................................................................................103
37. Electrical.......................................................................................................................................103
38. Motor and System Performance..................................................................................................104
39. Mechanical...................................................................................................................................105
Getting more information.........................................................................................................................106
V2.2 2022 RUNGU Dualie Rugged/XR series
Copyright 2021 Standard Bearer Machines, LLC 5
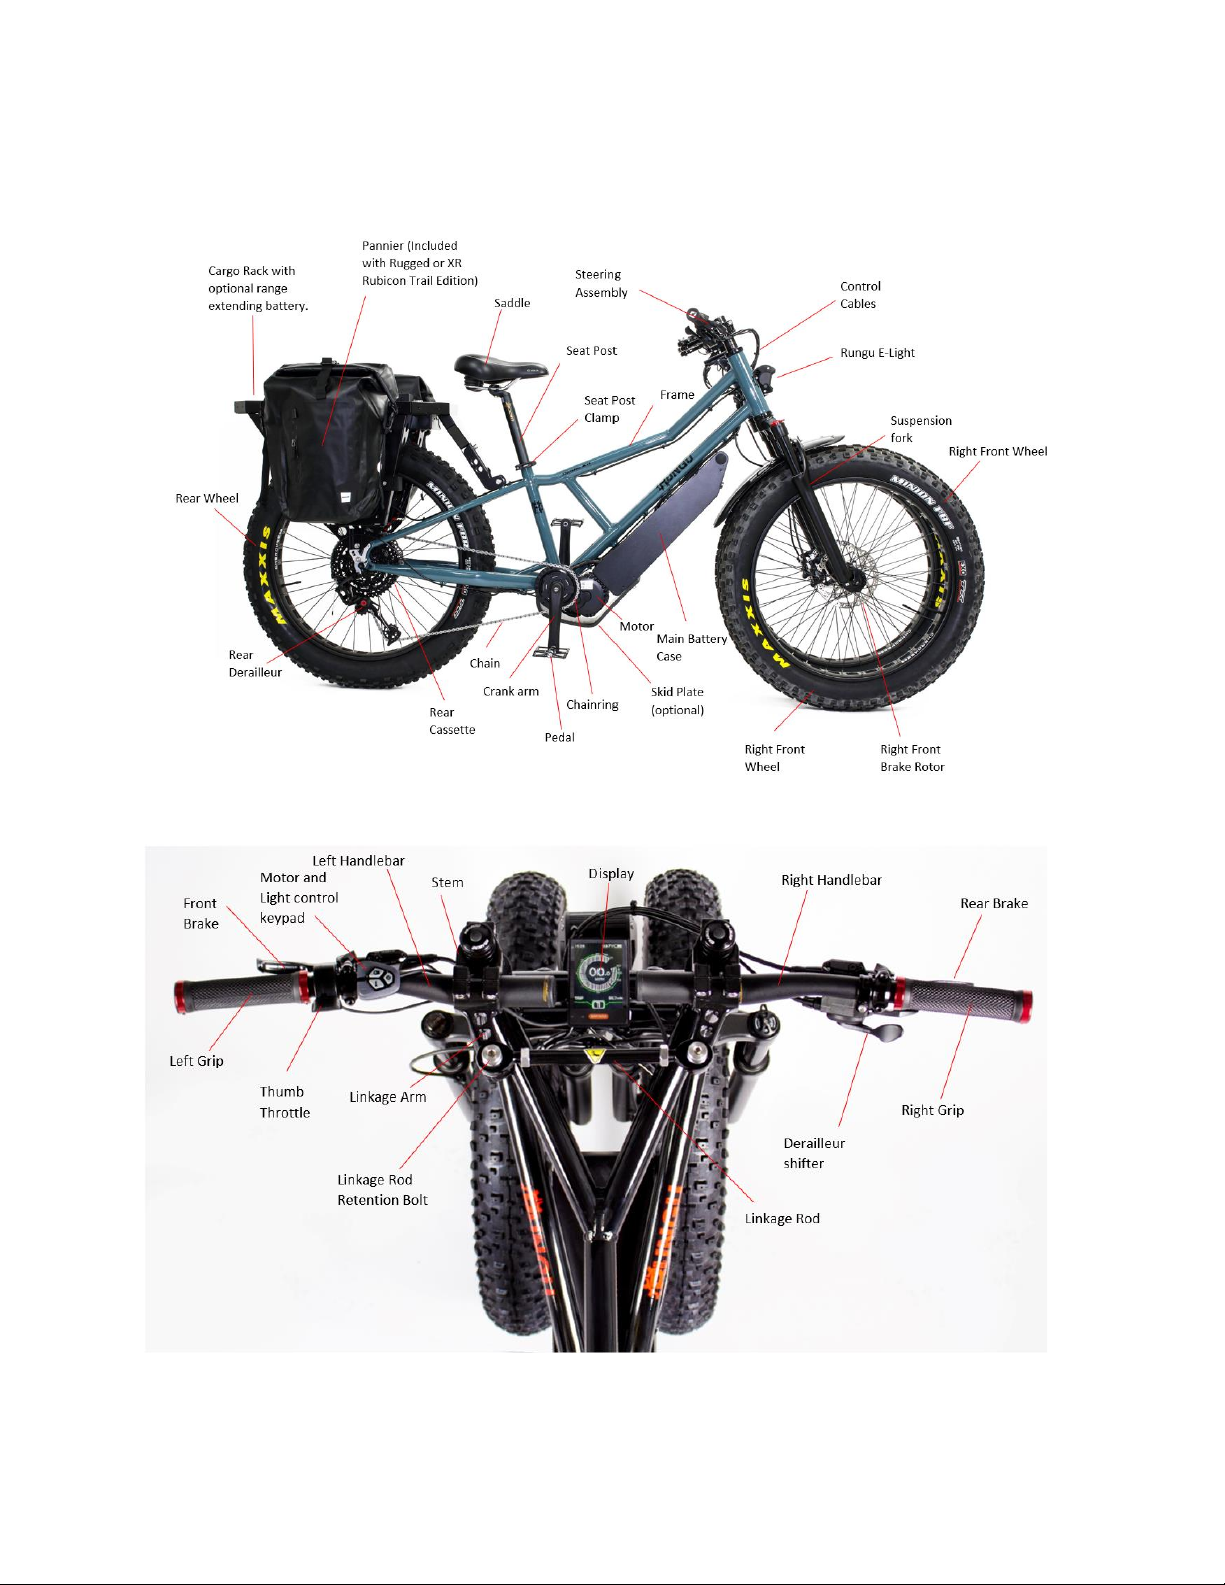
Rungu Dualie parts identification
The following images show the names of various components on a Rungu Dualie
Figure 1 Right Side View
Figure 2 Steering assembly

V2.2 2022 RUNGU Dualie Rugged/XR series
Copyright 2021 Standard Bearer Machines, LLC 6
Figure
3 Parking Brake View
V2.2 2022 RUNGU Dualie Rugged/XR series
Copyright 2021 Standard Bearer Machines, LLC 7
Unpacking and Assembly Instructions
Before you ride and make new tracks, please follow the assembly instructions carefully. The team at
Standard Bearer Machines recommends that you have the assembly performed by a qualified bike
mechanic.
WARNING: FAILURE TO FOLLOW THESE INSTRUCTIONS MAY LEAD TO INCOMPLETE OR FAULTY
ASSEMBLY THAT CAN RESULT IN ACCIDENTAL RIDER INJURY OR DEATH. IF YOU ARE NOT
COMFORTABLE PERFORMING THE STEPS BELOW, HAVE A PROFESSIONAL BICYCLE TECHNICIAN
ASSEMBLE YOUR DUALIE.
Note: If you have a high bandwidth Internet connection, click here to watch a video of these assembly
instructions.
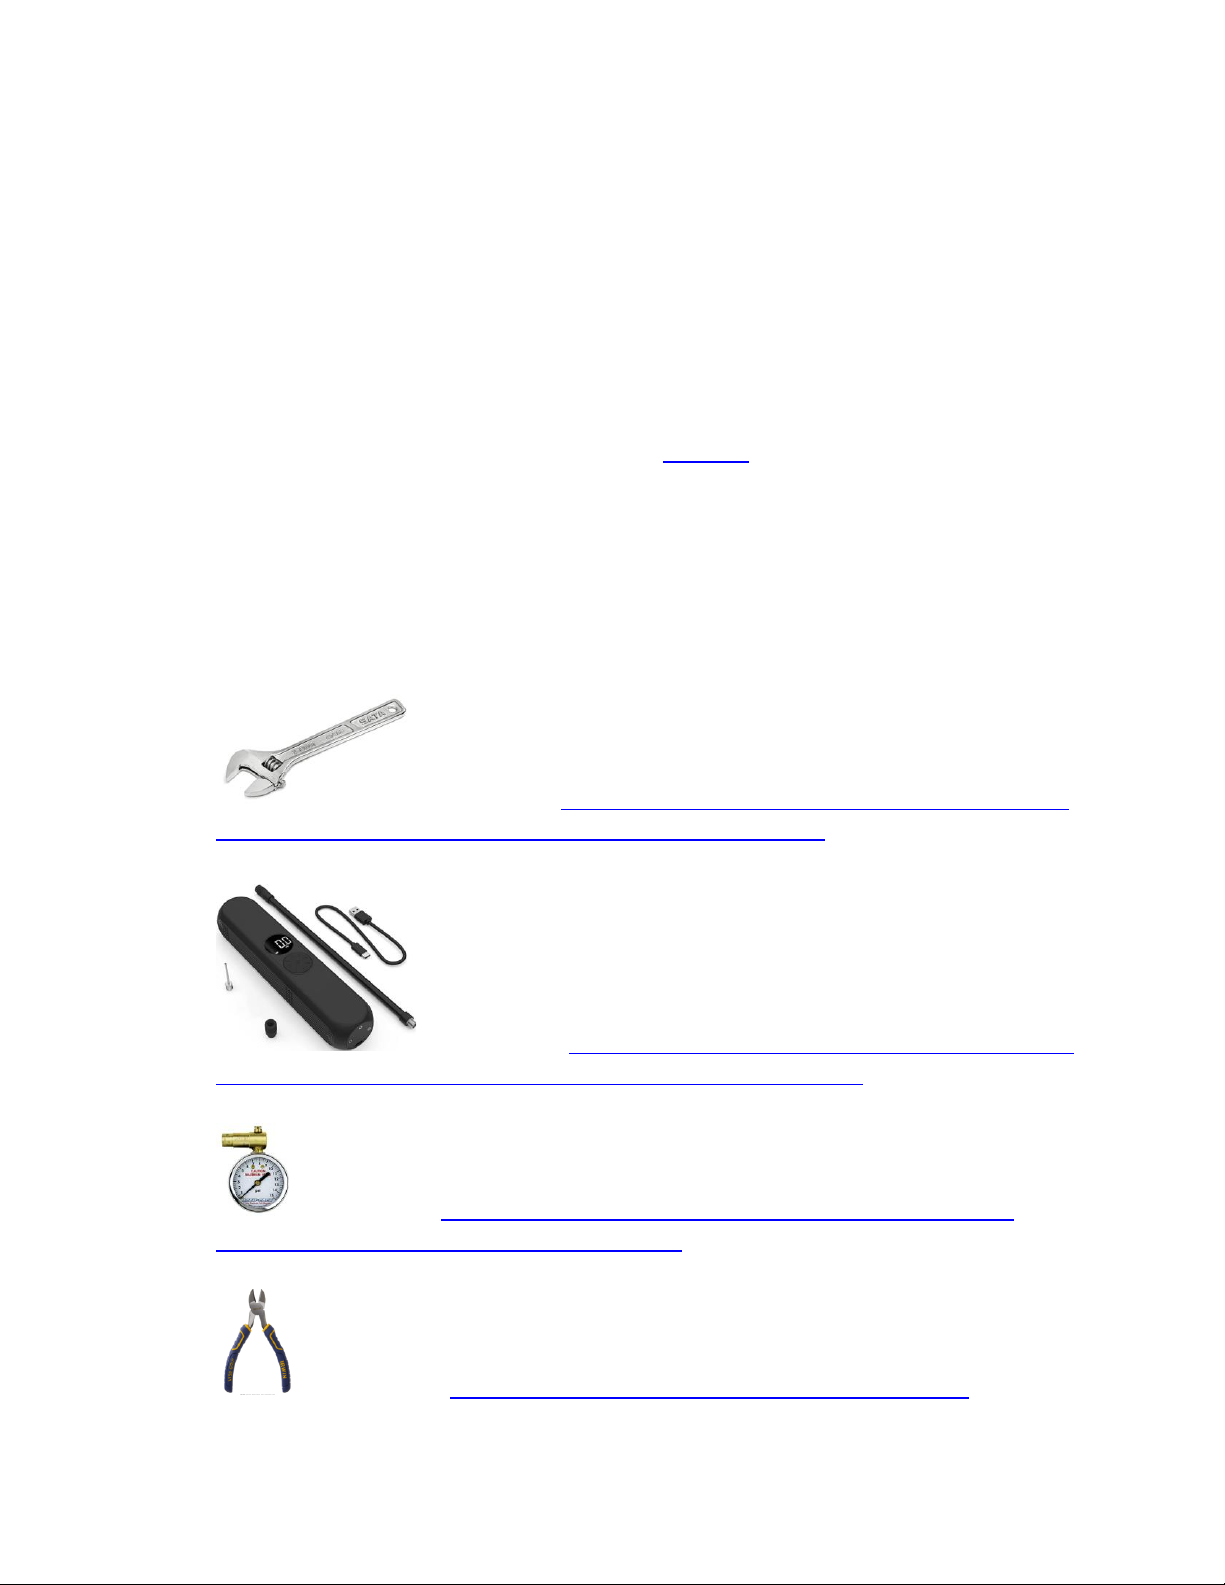
Tools required
•2.5mm Hex wrench
•5mm Hex wrench
•6mm Hex wrench
•Adjustable wrench (not included)
Recommended: SATA 6-inch Professional Adjustable Wrench with Forged
Alloy Steel Body, Wide Jaw, and a Chrome Plated Finish - ST47202SC
•Tire inflation pump (not included)
Recommended: CYCPLUS Tire Inflator Portable Air Compressor 2600mAh
Smart Cordless Electric Air Pump for Car Tires, Motorcycle, Bike, Balls A7
•Bicycle Tire pressure gauge –presta valve (not included)
Recommended: Accu-Gage by Milton Presta Valve Bike Tire Pressure Gauge with
Bleeder Valve, for 0-15 PSI - ANSI Certified (PR15BX)
•Wire cutters or scissors (not included)
Recommended: IRWIN VISE-GRIP Diagonal Cutting Pliers, 6-Inch (2078306)

V2.2 2022 RUNGU Dualie Rugged/XR series
Copyright 2021 Standard Bearer Machines, LLC 8
Instructions
Dualie comes in a cardboard carton. After you have removed the binding straps, remove the top cover.
If you intend to ship or return your Rungu, please keep all packing materials.
40. If you have purchased a model with a Rungu Cargo Rack or an optional Cargo Rack, remove the
rack and place it to one side.
41. Remove the accessory box(es) containing Quick Release Skewers, AC battery charger, tools,
Presta adapters, keys and pedals as well as other accessories that come with the specific model
you ordered.
Note: If you purchased a Dualie XR (eXtended Range) with dual batteries or a Dualie with the optional
Cargo Rack, remove the rack first and place it to the side.
42. Remove the two wheels from the carton and place them aside carefully to avoid damaging the
disc brake rotors.
43. Lift the frame and rear wheel from the carton and place the assembly on the floor gently so that
it stands upright as it was in the carton.
CAUTION: DUALIE FRAME AND REAR WHEEL WEIGH MORE THAN 60 LBS (27 KG). USE TWO (2)
PEOPLE TO REMOVE THE DUALIE FROM THE CARTON TO AVOID INJURY.
44. Remove the packaging from the front forks steering assembly and handlebars.
Accessory Box. May be
located elsewhere
inside the carton

V2.2 2022 RUNGU Dualie Rugged/XR series
Copyright 2021 Standard Bearer Machines, LLC 9
CAUTION: AVOID USING A KNIFE TO REMOVE PACKAGING. USING A KNIFE MAY SCRATCH THE
FINISH OF YOUR NEW DUALIE.
45. Use the 5mm hex wrench to loosen and remove the four bolts from the right-side handlebar
clamp
46. Open the right-side handlebar clamp to allow placement of the right-side handlebar.
47. Place the right-side handlebar in the clamp such that there’s a 1/8” gap between the handlebar
end stop and the side of the stem as seen from the front of the handlebar.
V2.2 2022 RUNGU Dualie Rugged/XR series
Copyright 2021 Standard Bearer Machines, LLC 10
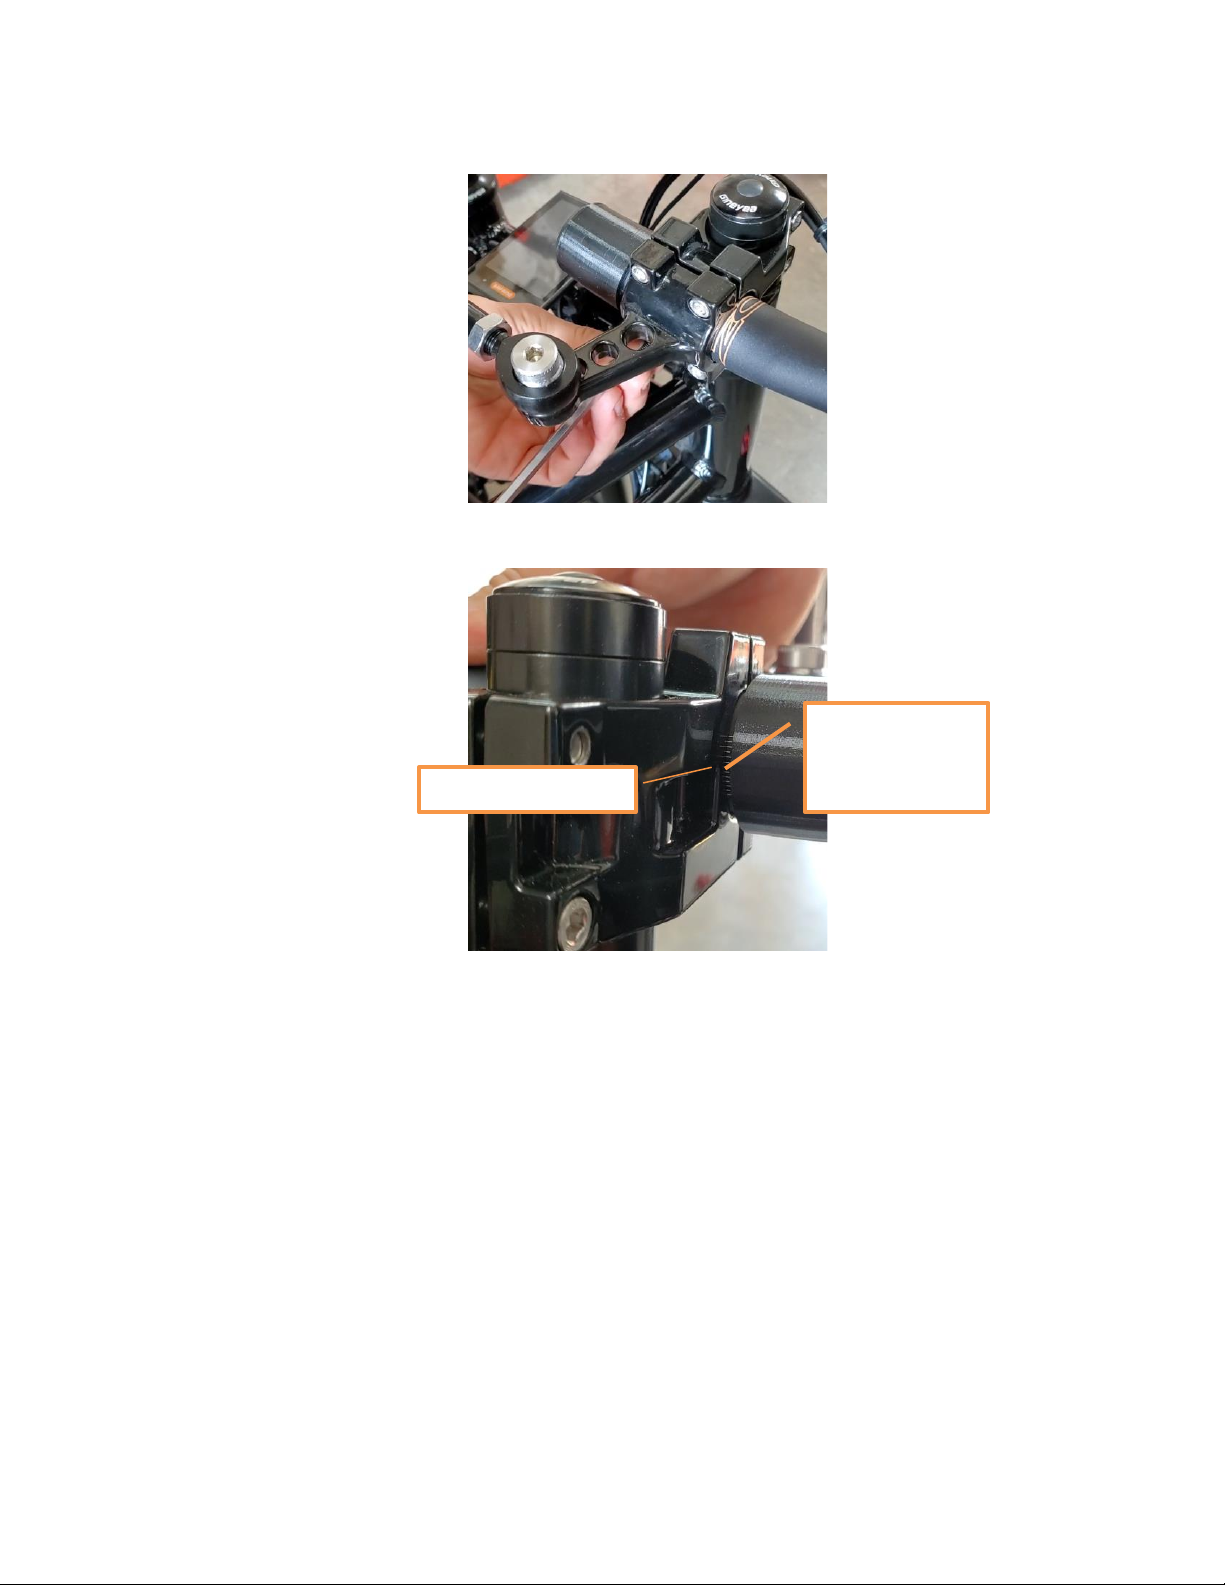
48. Replace the four bolts in the handlebar clamp and finger tighten.
49. From the front of the bike, align the handlebar by rotating it so the middle hashmark lines up
with the upper inside edge of the stem as shown below.
CAUTION: FAILURE TO EXTEND THE HANDLEBAR AS SHOWN MAY RESULT IN WHEELS MAKING
CONTACT WITH FORKS, WHICH CAN LEAD TO FORK OR TIRE DAMAGE.
Upper inside edge
Middle
hashmark

V2.2 2022 RUNGU Dualie Rugged/XR series
Copyright 2021 Standard Bearer Machines, LLC 11
50. Fasten, the right-side retention bolts using a crossing pattern (shown below) of tightening the
upper handlebar retention screw and then bottom screw instead of tightening both top screws
and then the bottom screws for each clamp.
WARNING: TIGHTENING HANDLEBAR RETENTION SCREWS BEYOND 6NM (53 IN LBS.) OR
FAILING TO ALIGN THE SCREWS WITH THE THREADS IN THE STEM MAY STRIP THREADS IN
STEM LEADING TO INSUFFICIENT TIGHTENING OF THE HANDLEBAR. FAILURE TO TIGHTEN
HANDLEBAR SUFFICIENTLY MAY RESULT IN UNEXPECTED HANDLEBAR ROTATION THAT CAN
RESULT IN ACCIDENTAL RIDER INJURY OR DEATH.
51. Repeat steps 6 through 11 for the left-side handlebar.
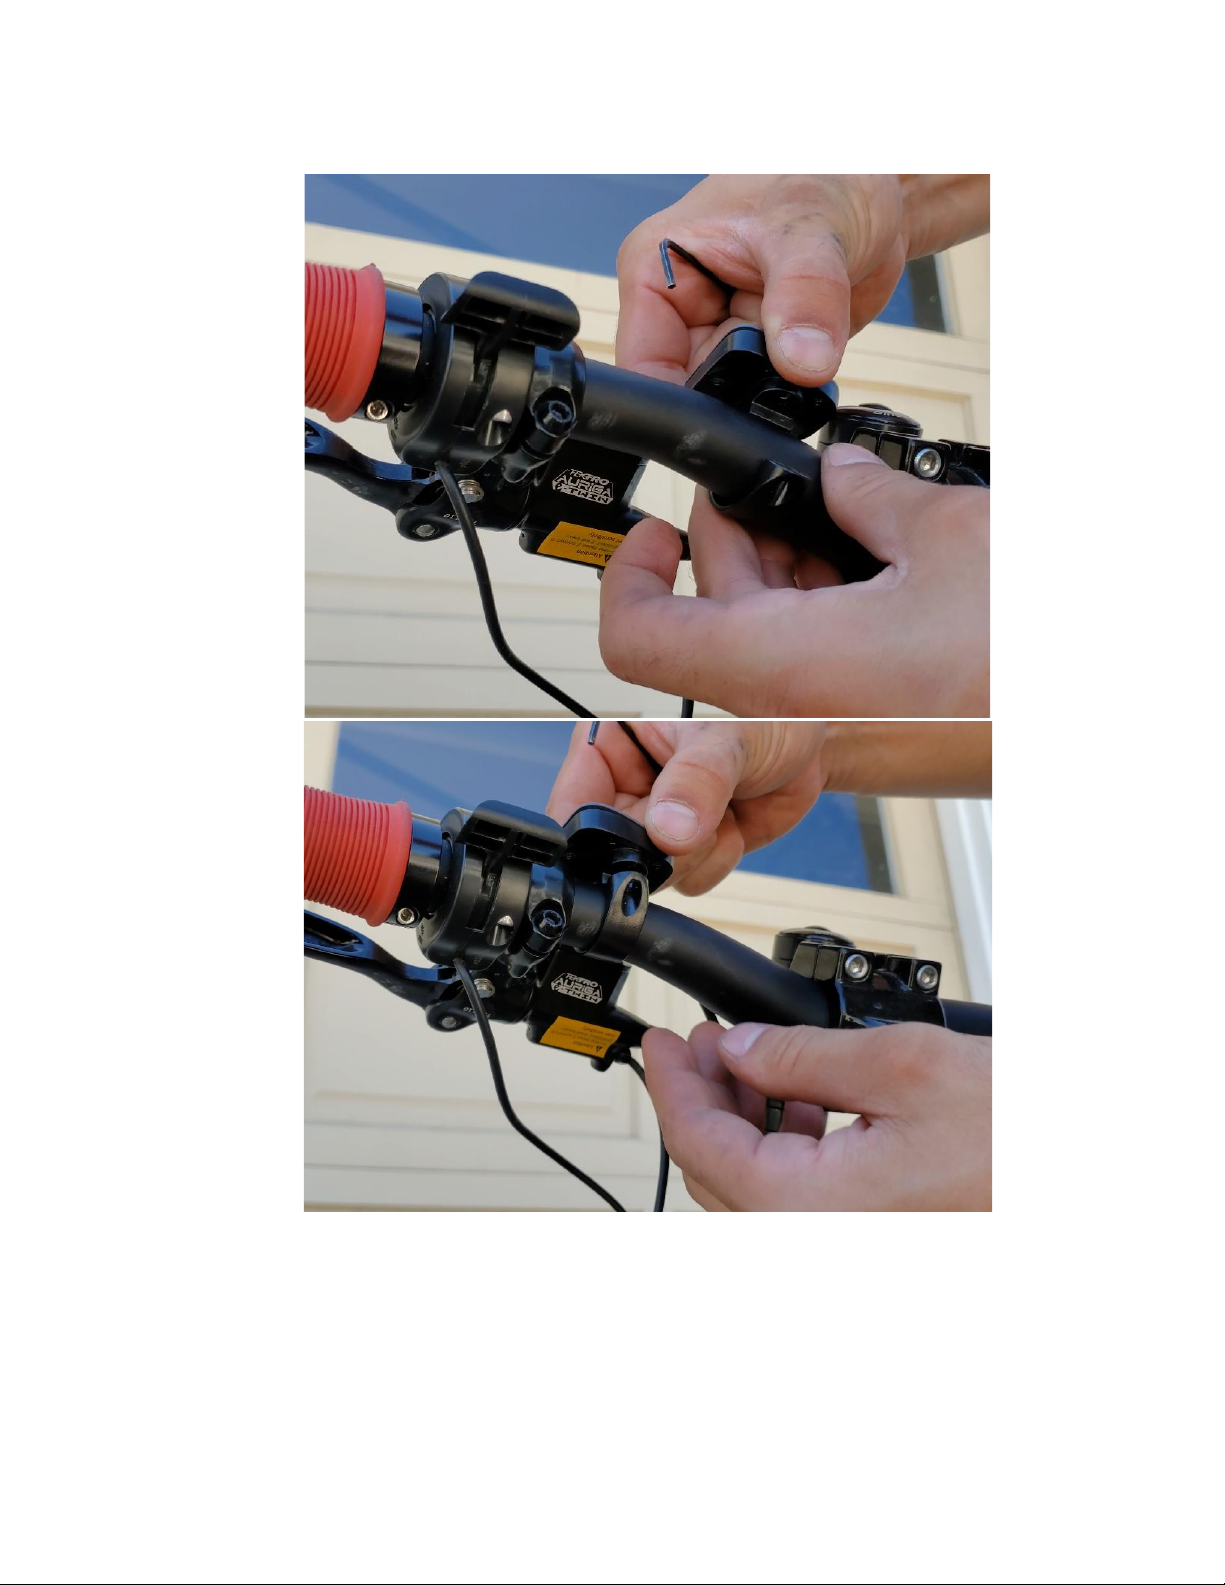
52. Install the keypad control by using a 2.5 mm hex wrench to remove the retention screw from
the back of the keypad.
1
2
4
3
V2.2 2022 RUNGU Dualie Rugged/XR series
Copyright 2021 Standard Bearer Machines, LLC 12
53. Mount the keypad onto the left handlebar and slide the keypad near the throttle.

V2.2 2022 RUNGU Dualie Rugged/XR series
Copyright 2021 Standard Bearer Machines, LLC 13
54. Reinsert the retention screw and tighten so the keypad doesn’t rotate on the handlebar.
55. Open the accessory box to remove the two quick release skewers from the packaging.
56. Select which wheel is the right-side wheel and the left-side wheel. Each wheel is labeled “Left”
or “Right”. This means that the brakes have been adjusted differently for each wheel –use the
labels to guide which wheel mounts on which side.
Note: The left side is considered the side with the brake rotors. The right side has the chain and
gearing.

V2.2 2022 RUNGU Dualie Rugged/XR series
Copyright 2021 Standard Bearer Machines, LLC 14
57. Remove the two quick release skewers from the accessories box. Unscrew the end cap nut from
the quick-release skewers and remove one of the two conical springs for each skewer.
58. Insert the skewer into the LEFT wheel from the side of the brake disc as shown below.

V2.2 2022 RUNGU Dualie Rugged/XR series
Copyright 2021 Standard Bearer Machines, LLC 15
59. Replace the conical spring (small end first) on the other side of the wheel. Screw the end cap on
a few turns to ready the wheel for installation.
60. Prep the RIGHT wheel. Insert the other skewer into the RIGHT wheel from the side OPPOSITE to
the brake disc as shown below.

V2.2 2022 RUNGU Dualie Rugged/XR series
Copyright 2021 Standard Bearer Machines, LLC 16
61. Replace the conical spring (small end first) on the other side of the wheel. Screw on the end cap
with a few turns to ready the wheel for installation.
62. Get the bike ready to mount the front wheels by making sure the parking brake is off (which is
the way the bike ships). See the section “ Using the parking brake ”on page 83 more
information.
63. Lift the front of the bike and mount the RIGHT wheel to the RIGHT fork making sure that the
rotor fits between the brake caliper pads.

V2.2 2022 RUNGU Dualie Rugged/XR series
Copyright 2021 Standard Bearer Machines, LLC 17
64. The ends of the axle will sit in the fork “dropouts” when correctly aligned. You may have to
unscrew the end cap a turn or two if the fork doesn’t drop in place.
65. Tilt the bike and mount the LEFT wheel to the LEFT fork making sure that the rotor fits between
the brake caliper pads.
V2.2 2022 RUNGU Dualie Rugged/XR series
Copyright 2021 Standard Bearer Machines, LLC 18
66. The ends of the axle will sit in the fork “dropouts” when correctly aligned. You may have to
unscrew the end cap a turn or two if the fork doesn’t drop in place.
67. Tighten the end cap nut on the LEFT wheel and close the quick-release lever. As a guideline the
end cap nut should begin to clamp onto the fork drop out when the lever points away from the
wheel at a right angle.
WARNING: MAKE SURE TO TIGHTEN THE QUICK-RELEASE IN THE FORK SO THAT THE WHEEL
CANNOT FALL OUT OF THE FORK; FAILURE TO ADEQUATELY TIGHTEN THE QUICK-RELEASE CAN
RESULT IN ACCIDENTAL RIDER INJURY OR DEATH.

V2.2 2022 RUNGU Dualie Rugged/XR series
Copyright 2021 Standard Bearer Machines, LLC 19
68. Tighten the end cap nut on the RIGHT wheel and close the quick-release lever. As a guideline the
end cap nut should begin to clamp onto the fork drop out when the lever points away from the
wheel at a right angle.
WARNING: MAKE SURE TO TIGHTEN THE QUICK-RELEASE IN THE FORK SO THAT THE WHEEL
CANNOT FALL OUT OF THE FORK; FAILURE TO ADEQUATELY TIGHTEN THE QUICK-RELEASE CAN
RESULT IN ACCIDENTAL RIDER INJURY OR DEATH.
V2.2 2022 RUNGU Dualie Rugged/XR series
Copyright 2021 Standard Bearer Machines, LLC 20
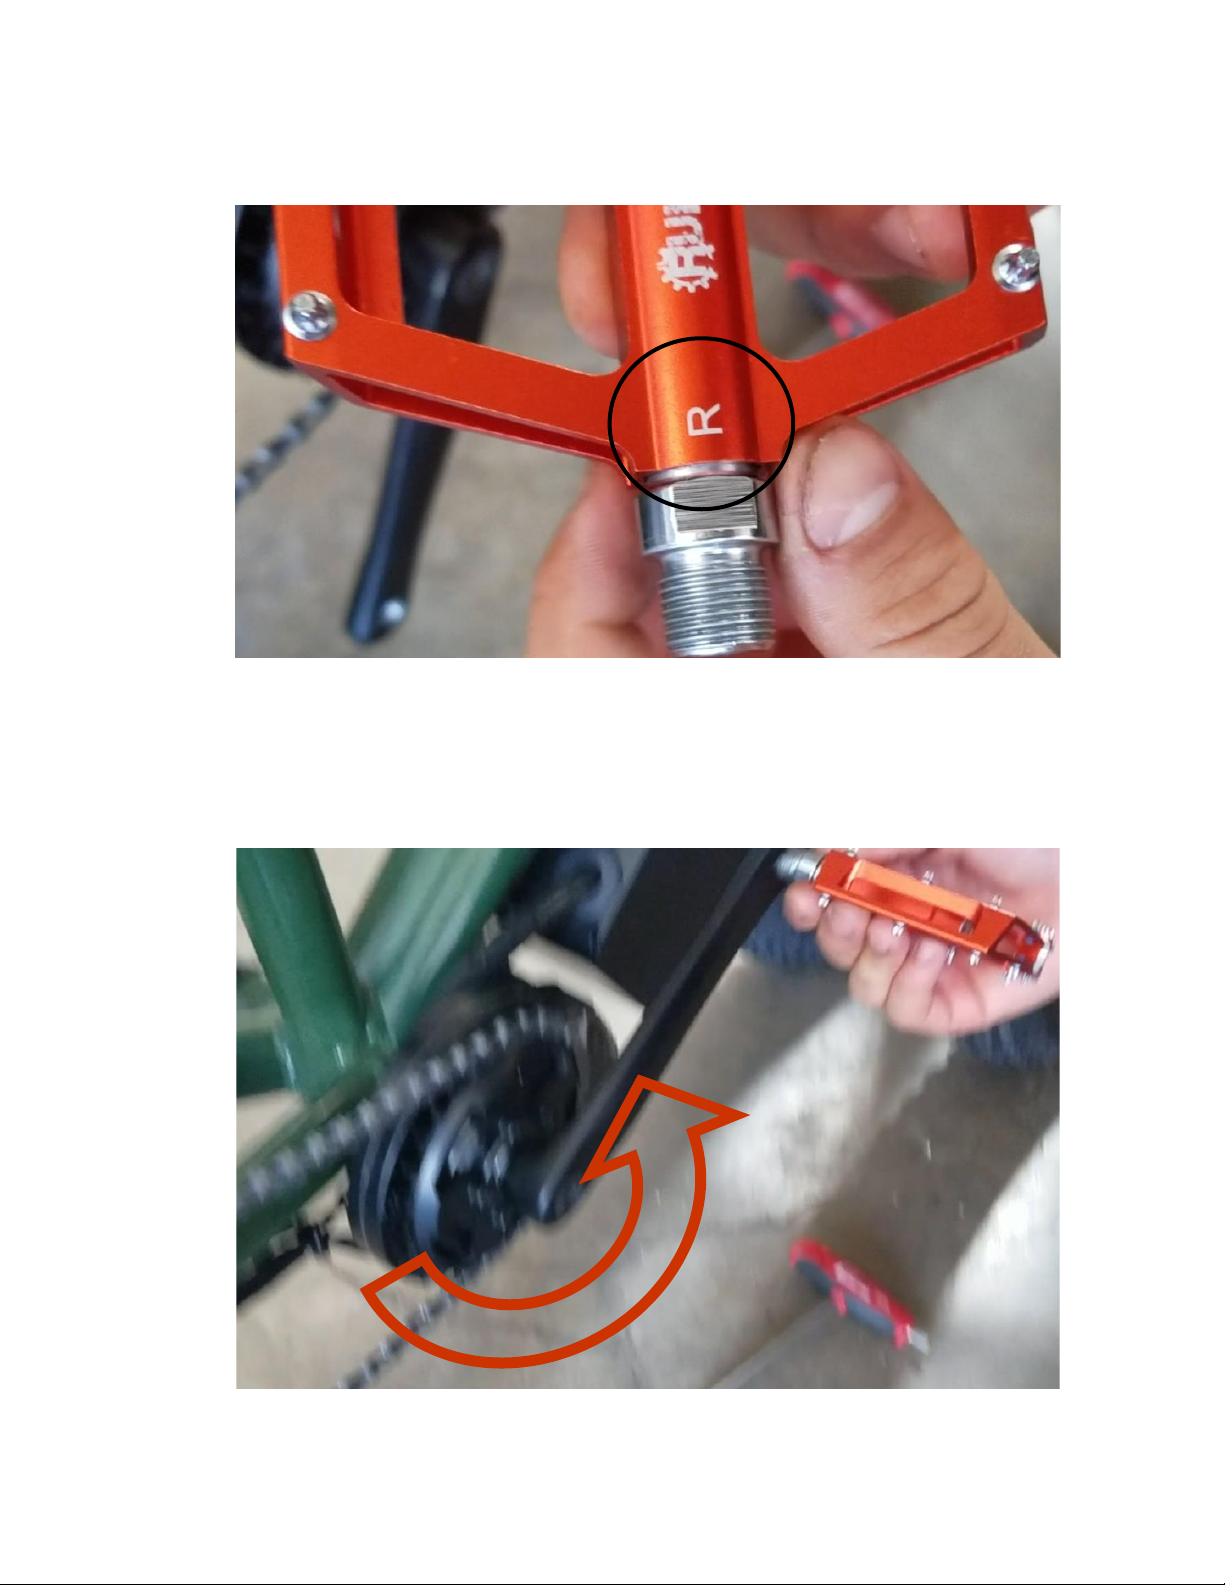
69. Remove the pedals from the box and install the RIGHT Pedal first –the RIGHT pedal is marked
with an “R” as shown below.
70. Use your fingers to thread the pedal shaft by inserting the threaded shaft into the crank arm.
Then hold the threaded section of the pedal in the crank arm mounting hole and spin the entire
crank arm in a counterclockwise motion as depicted below.
CAUTION: DO NOT FORCE THE THREADING OF THE PEDAL ONTO THE CRANKSET. WARRANTY
DOES NOT COVER REPLACEMENT CRANKS FOR STRIPPED THREADS.
This manual suits for next models
1
Table of contents


 Owner's service manual")


