Steinberg VSL 2020 User manual


VSL2020 — 2
1. Introduction
Thank you for choosing the Steinberg VSL2020 audio card. The VSL2020 digital audio card/
interface is designed specifically for use with VST System Link, Steinberg’s networking technology,
allowing sample accurate sync between several computers connected using simple optical digital
cables.
VSL2020 provides 32 ADAT channels for pristine transmission of audio and MIDI data to and
from the other computers in your network. Full support of ASIO 2.0 ensures stable, low-latency
multi-channel network operation with other computers running Cubase SX/SL or Nuendo. The
supplied V-STACK software hosts up to 16 VST instruments, and provides 8 send effects, 5 insert
effect slots and 4 master bus effects for your VSTi sounds. Let the VSL2020 card and V-STACK
increase the available music making power in your studio.
VSL2020 and V-STACK can also turn your PC into a live virtual instrument station. The VSL2020
low latency architecture allows dynamic real-time playing of VST instruments. V-STACK supports
VST, VST 2.0 and Direct X plug-ins, allowing you to load up to 16 VST instruments in V-STACK,
add high-quality effects and play them live through the VSL2020 audio interface.All this in the
same pristine 32 bit floating point audio quality users of Cubase SX/SL and Nuendo have become
accustomed to.

VSL2020 — 3
2. Package contents
VSL2020 PCI card
V-ST
ACK
CD
Adapter cable (D-type with digital and analog inputs and outputs)
3. System requirements
Minimum system requirements:
Processor: Pentium 233 MHz
RAM: 128 MB of free RAM
Operating system: Windows 2000, Windows XP
Sound card: supports ASIO 2 spec for high-end multi-channel audio cards,
supports Windows MME & DirectSound spec for standard sound cards
Recommended system:
Processor: Pentium 4 or AMD K7 XP with 1 GHz
RAM: 512 MB of free RAM
Operating system: Windows 2000, Windows XP
Sound card: supports ASIO 2 spec for high-end multi-channel audio cards,
supports Windows MME & DirectSound spec for standard sound cards

VSL2020 — 4
4. Characteristics
PCI Busmaster interface
ADAT, S/PDIF and analog outputs can be used simultaneously
S/MUX technology for using the ADAT channels with 24 bits/96 kHz
Word clock in master and slave mode
Word clock input and output
5. Technical specifications
5.1 Digital
Low-jitter S/PDIF (32, 44.1, 48, 88.2, 96 kHz)
Low-jitter ADAT (32, 44.1, 48, 88.2, 96 kHz)
Sample frequencies: 32, 44.1, 48, 64, 88.2, 96 kHz
Coaxial S/PDIF I/O
Word clock I/O
5.2 Analog
RCA connector input and output (24 bits/96 kHz)
5.3 MIDI
MIDI input and output via adapter cable

VSL2020 — 5
6. Hardware installation
a.) Make sure that the computer is switched off and that the power cable is disconnected from
the mains supply before installing the VSL2020.
b.) Before removing the VSL2020 from the protective bag, discharge any static in your body
by touching a metal surface.
c.) Open your computer‘s housing and insert the VSL2020 into a free PCI slot. Make sure
that the card is locked firmly in the slot and fasten the screw.
d.) Connect the adapter cable to the card.
e.) Replace the computer housing.
f. ) Reconnect all cables including the power cord.

VSL2020 — 6
7. Software installation
7.1 Windows ME
Once the hardware has been installed successfully (see section 6), Windows will recognize the
new hardware component and start the “Add new hardware wizard“. Please insert the Steinberg
V-ST
ACK
CD into your CD-Rom drive and follow the on-screen instructions. Afterwards, you
should restart the system to make sure that the card driver is recognized within your Windows
system.
7.2 Windows 2000 and Windows XP
The EWDM driver is easy to install under Windows thanks to the Plug and Play routine.
Once the hardware has been installed successfully (see section 6), Windows will recognize the
new hardware component and start the “Add new hardware wizard“. The driver is located in the
VSL2020 folder on the V-ST
ACK
CD. If the wizard informs you that the driver is not certified,
this is not a problem. Click “Install anyway“ and install the driver. Afterwards, you should restart
Windows to make sure the driver is working correctly.

VSL2020 — 7
8. Connections of the VSL2020
8.1 ADAT
The VSL2020 provides different types of inputs and outputs, directly on the card and via an
adapter cable. Directly on the card you can see two ADAT inputs (ADAT In 1 and 2 on the left) and
two ADAT outputs (ADAT Out 1 and 2 on the right). In normal mode the ADAT connection supports
a sample rate of up to 24 bits/48 kHz. With the S/MUX technology it is possible to use the ADAT
inputs/outputs with 24 bits/96 kHz. ADAT can only transfer 4 channels at 24 bits/96 kHz via one
ADAT port, so you need to connect bothADAT outputs to get 8 channel transfer.
ADAT In 1 ADAT In 2 ADAT Out 2ADAT Out 1

VSL2020 — 8
8.2 S/PDIF
The VSL2020 supports a coaxial S/PDIF input and output.
The supported sample rates are: 32 kHz, 44.1 kHz, 48 kHz, 64 kHz,
88 kHz, 96 kHz.
The resolution is 24 bits (internal 32 bits).
8.3 Analog
On the adapter cable you will also find two RCA analog inputs and outputs, for example to connect
directly to your local hifisystem. This is an unbalanced (-10dBV) RCA-type I/O, which supports a
sample rate of up to 96 kHz and a resolution of up to 24 bits.
8.4 Word clock
The VSL2020 supports word clock input and output. The BNC connector (FS/256xFS) can clock
external devices via the word clock output and can be slaved to external devices via the word
clock input. You can adjust the word clock settings via the control panel.
8.5 MIDI
The VSL2020 also supports MIDI on the adapter cable. It is a 16 channel in/out interface with the
standard MIDI connector.
Word clock I/O S/PDIF MIDI Analog ADAT
VSL2020 — 9
9. Control panel
The control panel is used to configure your audio card. Once you have succsessfully installed all
hardware and software and rebooted the system you will see a Steinberg logo on the right-hand
side in your taskbar. Click this icon to open the control panel. The control panel provides several
options that help you adapt the card to the requirements of your working environment (digital
mixers, AD-DA converters, V-ST
ACK
systems, etc.).

VSL2020 — 10
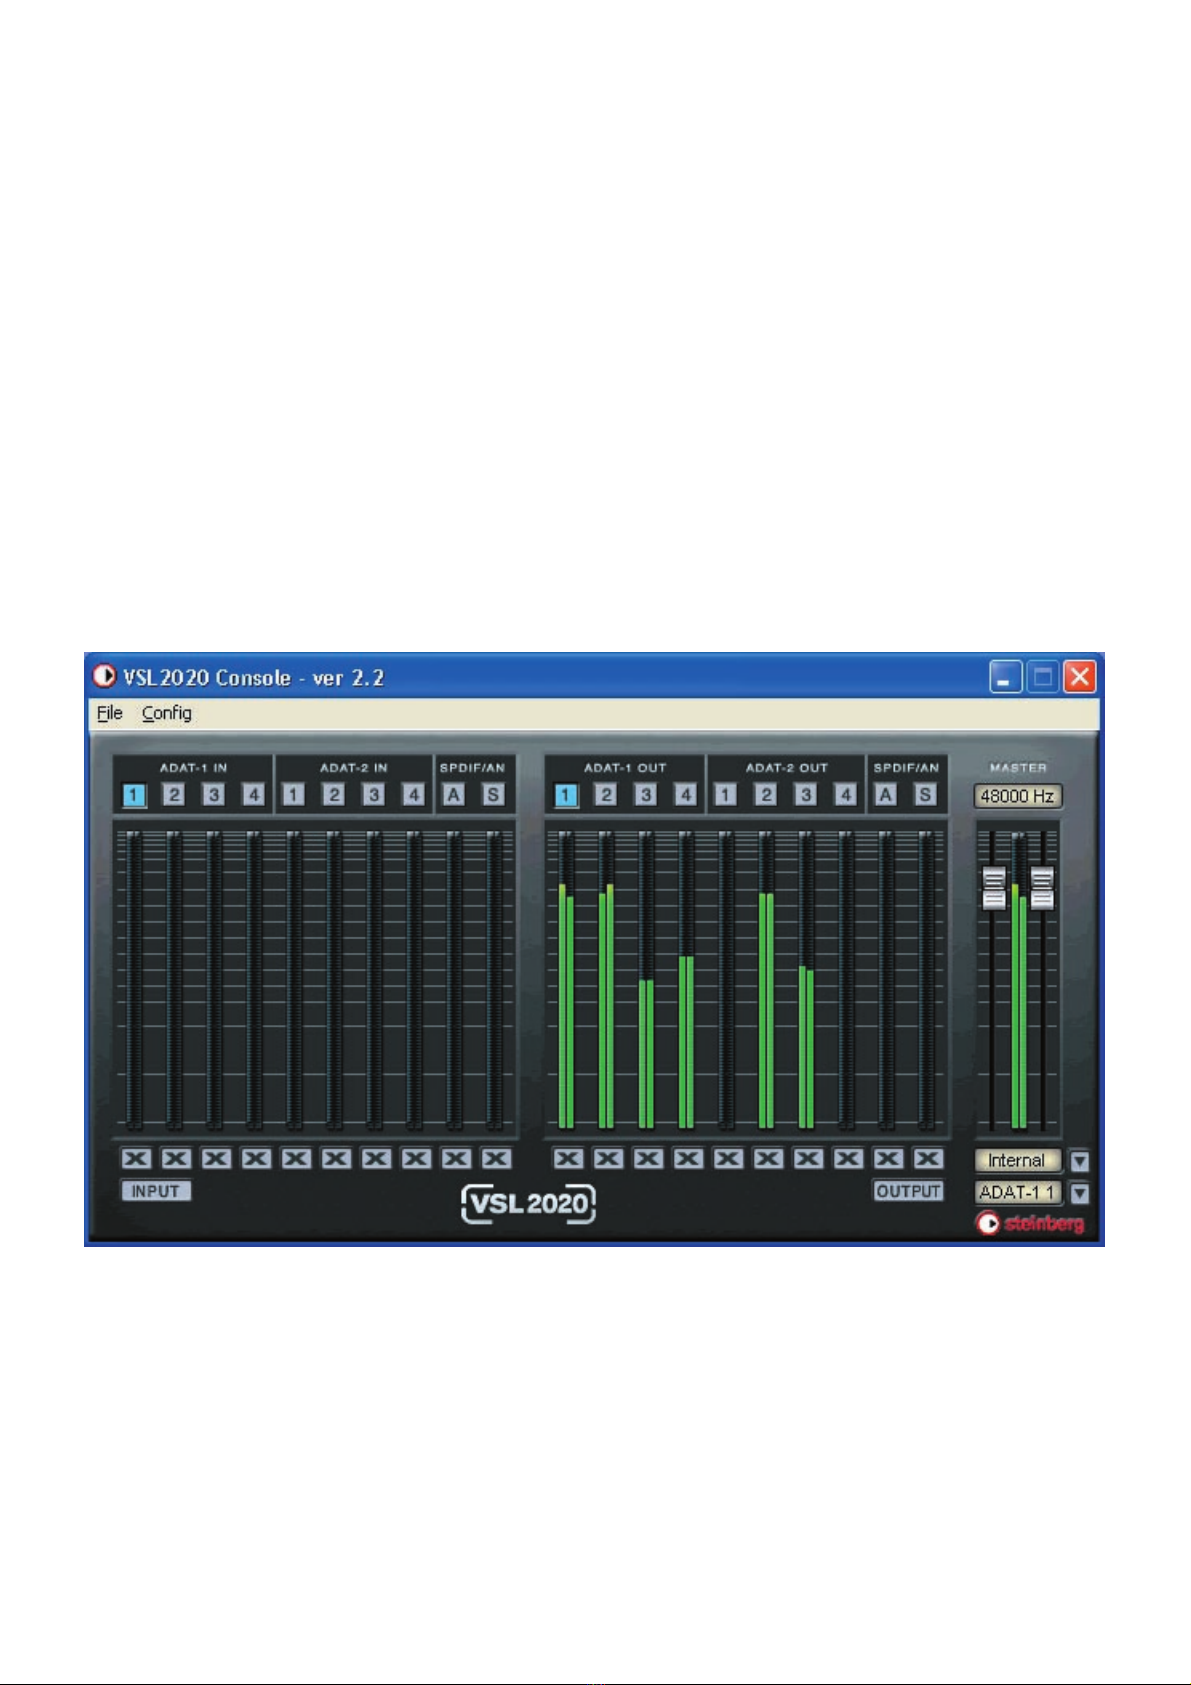
9.1 Control panel window
In the control panel, below the menu bar, all ADAT bus names are listed. On the left you find the
inputs from ADAT-1 IN (1-4) to ADAT-2 IN (5-8), plus S for S/PDIF and A for analog. On the right-
hand side you find all corresponding outputs. The names denote stereo busses, i.e. 16ADAT
channel inputs/outputs on 8 busses (2 channels each).
Below the channel level indicators is a row of buttons for muting individual inputs/outputs. You
can mute all inputs or all outputs simultaneously by clicking the INPUT or OUTPUT buttons at the
bottom of the window.
The current sample rate is displayed in the field above the master controls in the top right of the
window.
Below the master controls are two pop-up windows.
The first is used to set the clock settings of the card. You can choose between Internal, ADAT-1 IN,
ADAT-2 IN, S/PDIF or External.
Internal is for the internal 2 pin sync connector, ADAT-1 IN is for the sync from the ADAT-1 IN,
ADAT-2 IN will sync to a clock signal received via the ADAT-2 IN, S/PDIF will sync to a clock signal
received via the S/PDIF-IN, External will sync to a clock signal received via the word clock input.
Below that you find the routing pop-up. The default setting is NONE. If NONE is chosen the routing
is 1:1, which means that ADAT-1 Out is routed to ADAT-1 Out, etc. Or you can route your signal to
a specific ADAT output (ADAT 1.1 or ADAT 1.2, etc.). You can also route your signal to the analog
out. You can also choose S/PDIF as the monitor-out.

VSL2020 — 11
9.2 Configuring the VSL2020
The control panel provides two menus called File and Config. The File menu is used to exit the
control panel. The Config menu provides a number of options for the configuration of your card.
The following sections describe the configuration options.
9.2.1 Mouse Wheel
The first submenu is called Mouse Wheel. If you are using a wheel mouse, you can use the
options in this submenu to set the “resolution” of the wheel action, i.e. how far the sliders move
when moving the wheel. Step 1 is the “finest” and Step 8 the “coarsest” resolution.
9.2.2 Latency
The second submenu is called Latency. Here you can set different buffer sizes for the ASIO 2.0
driver.
There are 2 different sections:
A list of buffer sizes from 128 samples (3 milliseconds at 44.1 kHz) to 2048 samples (48
milliseconds at 44.1 kHz) and Ultra Latency, with buffer sizes from 96 samples (2,5 miliseconds)
to 32 Samples (0.75 miliseconds). When you are using a VST host program that supportsASIO
2.0 you should start with a latency of 256 samples or 512 samples to see if card operation is
stable with your configuration. If you are only using VST instruments you can lower the buffer size
to achieve better playing performance. Everything under a buffer size of 512 samples will not be
heard as latency. An advanced piano player should use a buffer size below 256 samples.
9.2.3 Factory Default
The third submenu is called Factory Default, which simply resets all settings to the factory defaults
of the VSL2020.
9.2.4 Always on Top
When you activate the Always on Top option, the control panel will always be the top window,
regardless of what other application windows are open.

VSL2020 — 12
9.2.5 Hardware Configuration
This option opens the dialog for hardware configuration.
Internal Clock can be set to 32, 44.1, 48, 64, 88.2 or 96 kHz. External Clock determines from
which source you receive a clock signal. The card then functions as a clock slave to an external
clock device. Sources could be ADAT 1 orADAT 2 or S/PDIF and Extra (word clock).
When you activate the S/MUX option, the sample rate on the ADAT ports is increased to 96 kHz.
Since ADAT streams are normally limited to a maximum 48 kHz, you have to split the audio stream
to create two 4-channel audio streams. You can then transfer a signal of 8 channels with 24 bits/96
kHz. Your ADAT digital mixer orAD-DAconverter must also support this feature, otherwise you
cannot hear the signal.
The Extra In Clock setting can be either Card Sync, Word, FS or FS 256.
Card Sync refers to the 2 pin connector on the card. Word is taking an incoming word clock signal
as the sync source. FS 256 will sync your system to a super clock.
The Extra Out Clock option will slave external devices to your internal clock settings.
You can choose between two settings: FS, which is normal word clock, or FS 256, which is super
clock, transferred through the word clock output connector.
The S/PDIF type is either Pro, i.e. AES/EBU, or Consumer, which is the normal coaxial S/PDIF
used to connect to your home hifisystem.
You can set the internal clock to either Auto or Lock. If you choose the Auto option, the card will
sync to an incoming audio clock signal received from a host application like Cubase or Nuendo.
If you choose the Lock option, you lock the settings for the internal clock, i.e. even if applications
try to access the card with a different sample rate it will not follow. Note that this can sometimes
cause errors with programs that do not support your selected sample rate!

VSL2020 — 13
9.2.6 Analog Mixer
The Analog Mixer option opens a dialog where you can set the output level and the input level of
the analog connectors.

VSL2020 — 14
10. Working with ASIO 2.0
Once you have successfully installed the VSL2020 card, open your host application (e.g. Cubase
or Nuendo), open the Devices menu and choose the Device Setup option. In the Devices list,
select VST Multitrack. On the Setup tab, select theASIO 2.0-VSL2020 driver from theASIO Driver
pop-up. Click the Control Panel button to open the card control panel if you want to make your
settings from within your host application.

VSL2020 — 15
11. Working with V-ST
ACK
You can use the VSL2020 card with any VST host application that supports ASIO 2.0, e.g. Cubase
or Nuendo. The V-ST
ACK
software supplied with your card is also a ASIO 2.0 compatible VST
host application, and can be used in combination with another computer running Cubase or
Nuendo.
With V-ST
ACK
you can set up a VST System Link network synchronized via theASIO 2.0
protocol. Just like Cubase or Nuendo, V-ST
ACK
provides the Device Setup dialog where you can
select the VST Multitrack device and choose theASIO 2.0-VSL2020 driver option from theASIO
Driver pop-up menu. In the Devices list, select Default MIDI Ports and set the VSL2020 MIDI input
and MIDI output as your desired MIDI ports.
Once these settings are made, select VST System Link from the Devices list, selectActive and set
up the connection to the “master PC“ in your network. You can then communicate with the “master
computer“, provided that VST System Link is activated and running.

VSL2020 — 16
Some things to check and observe when using V-ST
ACK
- The first and most important step is to link each computer so that each shows in the list of
connected computers without errors. Please make sure that everything is properly locked and
clock synced.
- You need to get the audio clock straight, one (!) machine must be clock master, all others must
be properly configured for clock slave operation! This is essential for smooth operation of the
network!
- All machines with loaded projects have to use the same sample rate!
- Make sure to use digital cables when connecting via S/PDIF, normal analog RCA (audio) cables
will not work!
- Always use 32 bit ASIO drivers! 16 bit drivers will most likely not work. Some ASIO drivers have
different bitwidth when using certain buffer sizes.

VSL2020 — 17
12. Compliance and copyright statements
CE
This device has been tested and found to comply with the EN55022 Class A:1998+A1:2001 and
EN55024:1998 norms for digital devices, according to the European Council directive on the
counterpart laws in the member states relating to electromagnetic compatibility (EMVG).
FCC
This device has been tested and found to comply with the requirements listed in FCC Regulations,
part 15 class “A“ digital device. FCC compliance statement: Tested to comply with FCC standards
for home or office use.
Copyrights and Trademarks
Cubase, Nuendo and VST are registered trademarks of Steinberg Media Technologies AG.
ASIO is a trademark of Steinberg Media TechnologiesAG. VSL2020, V-STACK and ASIO are
trademarks of Steinberg Media TechnologiesAG. Windows 2000, Windows XP, Windows ME
and DirectX are either registered trademarks or trademarks of Microsoft Corporation in the
United States and/or other countries. AMD is a registered trademark of Advanced Micro Devices
Corporation. Pentium is a registered trademark of Intel Corporation in the U.S. and other countries.
ADAT is a registered trademark of theAlesis Corporation.All other product and company names
are ™ or ®of their respective holders. Unauthorised copying, hiring or lending of this software is
strictly prohibited. All specifications are subject to change without notice.
All rights reserved. Made in Germany. © Steinberg Media Technologies AG, 2002.

VSL2020 — 18
13. Table of contents
1. Introduction.....................................................................................................................2
2. Package contents..........................................................................................................3
3. System requirements.....................................................................................................3
4. Characteristics................................................................................................................4
5. Technical specifications..................................................................................................4
5.1 Digital..............................................................................................................................4
5.2 Analog.............................................................................................................................4
5.3 MIDI.................................................................................................................................4
6. Hardware installation......................................................................................................5
7. Software installation.....................................................................................................6
7.1 Windows ME...................................................................................................................6
7.2 Windows 2000 and Windows XP...................................................................................6
8. Connections of the VSL2020....................................................................................7
8.1 ADAT..............................................................................................................................7
8.2 S/PDIF............................................................................................................................8
8.3 Analog............................................................................................................................8
8.4 Word clock.....................................................................................................................8
8.5 MIDI................................................................................................................................8
9. Control panel................................................................................................................9
9.1 Control panel window..................................................................................................10
9.2 Configure the VSL2020............................................................................................ 11
9.2.1 Mouse Wheel..............................................................................................................11
9.2.2 Latency.........................................................................................................................11
9.2.3 Factory Default...........................................................................................................11
9.2.4 Always on Top.............................................................................................................11
9.2.5 Hardware Configuration..............................................................................................12
9.2.6 Analog Mixer..............................................................................................................13
10. Working with ASIO.....................................................................................................14
11. WorkingwithV-ST
ACK.
................................................................................................15
12. Compliance and copyright statements.......................................................................17
13. Table of contents....................................................................................................18
Table of contents
Popular Sound Card manuals by other brands


Abocom
Abocom WR201 Specification sheet

Creative
Creative X-FI FATAL1TY - SB X-FI PLATINIUM FATAL1TY QUICKSTART BACK EN FR DE IT ES... user guide

XOX
XOX ES102 user guide

Creative
Creative CT4810 - Vibra 128 16bit Sound Card PCI user guide

Asus
Asus XONAR ESSENCE ST quick start guide

Diamond
Diamond SOUND CARD quick start guide


