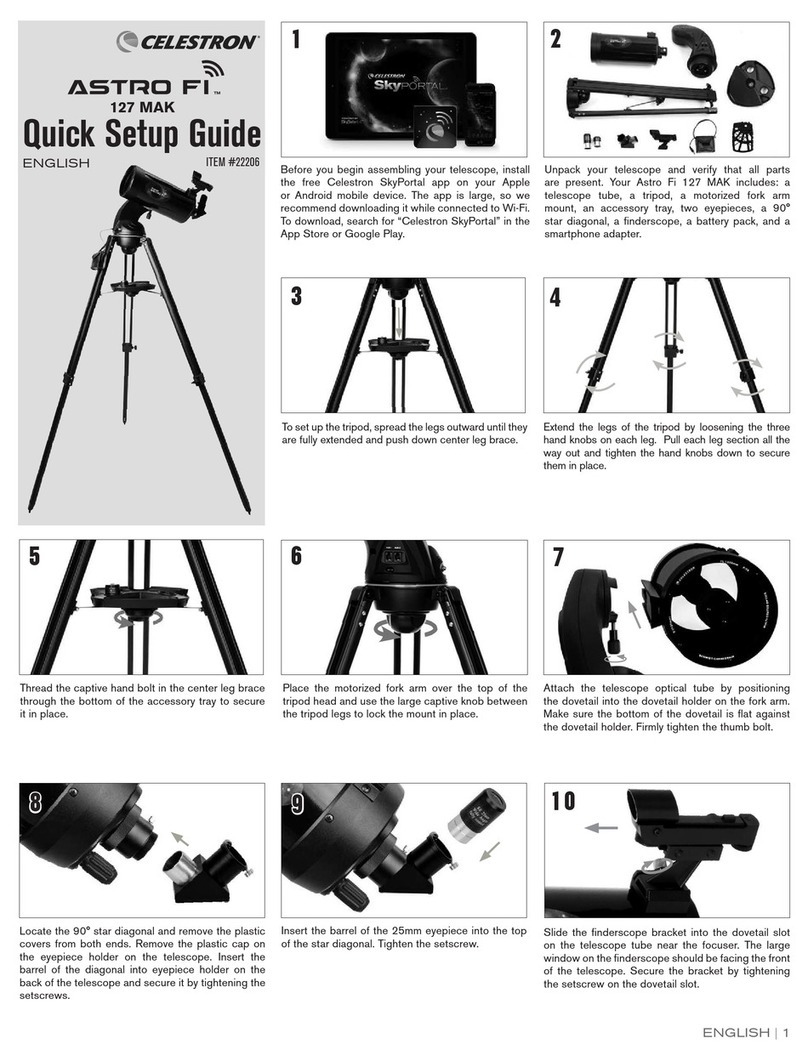
Stellar Vista Observatory Orion StarBlast 4.5 User manual

1
Orion StarBlast 4.5" Telescope
USER GUIDE
WARNING: Never look directly at the Sun
through a telescope—even for an instant —as
permanent eye damage will result. Do not point
the telescope at the Sun, as parts will melt!
Children should use this telescope only with
adult supervision.
The Telescope Lending Program is
brought to you by:
About the SVO Telescope Lending Program

2
Stellar Vista Observatory (SVO), a 501c3
nonprofit based in Kanab, UT, received a grant
from the Utah Governor's Office of Outdoor
Recreation with matching funds from the Kane
County Office of Tourism to launch its Discover
the Night Sky program.
The program encourages and facilitates
outdoor recreation opportunities for children of
all ages and levels of experience to meet
growing community interest in viewing southern
Utah's starry skies.
SVO's project is designed to enable residents of
Kane County who may not already own
astronomy equipment to enjoy exploring the
night sky.
Our Astronomy kits are maintained in great
working order by SVO members. We hope you
enjoy using them to explore Southern Utah’s
amazing dark night skies! For more information
go to the web page
www.stellarvistaobservatory.org/discover-the-night-sky
Discover the Night Sky

3
Note: Adult supervision is recommended for all
equipment setup
We suggest reading this user guide and
practicing with the telescope inside before you
take it out in the dark.
Table of Contents:
Telescope part details …………………….. 4
Telescope Setup ……………………….…… 6
Focusing ……………………………….……... 7
Using the Zoom Lens ……………………….. 8
Using the EZ Finder ……………………….…. 10
Transporting ……………………….....………. 12
Observation guide ……………………….…. 13
Keeping Equipment Clean ………………… 15
Support ………………………………..……….. 16

4
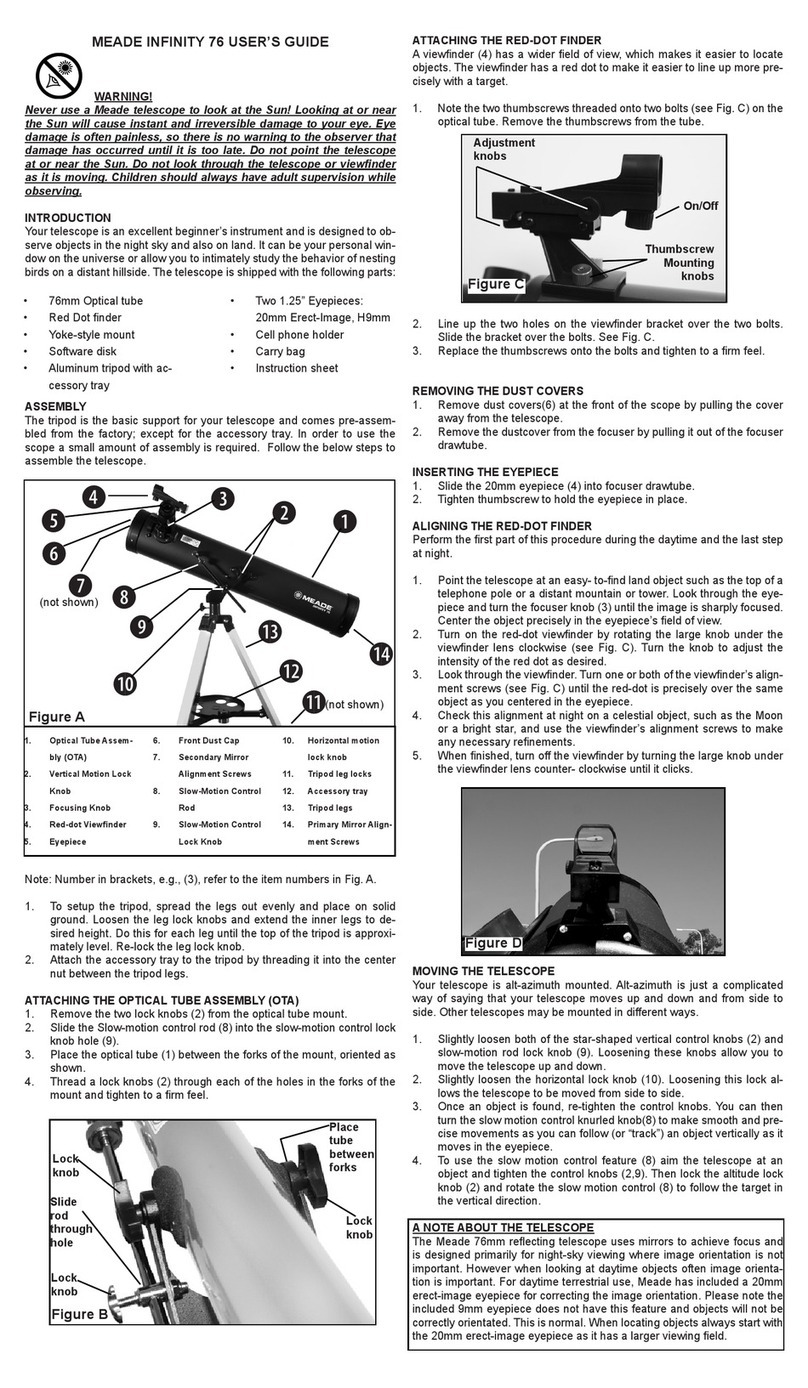
Parts of the Telescope
1) Eyepiece (7-21mm zoom)
2) EZ Finder
3) Telescope tube
4) Tube clamp
5) Altitude clamp
6) Mirror assembly
7) Support & carrying handle
8) Moon map
9) Black accessory bag (not attached)
(including flashlights, maps, books)
1
2
3
4
6
5
7
8
9

5
Details
10)Focus wheels
11)EZ Finder (ON/OFF switch on other side)
12)Eyepiece zoom
13)Dust caps
14)Moon filter
11
12
13
13
14
10

6
Getting Started
Set-up: Place the telescope on the table
provided. Remove the dust caps (13) from the
eyepiece (1) and the telescope tube (3).
This is a “push-to” telescope, meaning that the
user manually points the telescope at the
desired target. The telescope moves on two
axes: altitude (up/down) and azimuth
(left/right). To locate an object, you simply
move the telescope manually until you find
what you are looking for. Once you find an
object, you will need to reposition the
telescope occasionally, as objects will drift out
of the “field of view” (what you see through the
eyepiece) due to Earth’s rotation.

7
How to Focus: Try out the telescope during the
day when you can see what you’re doing. Aim
the telescope in the general direction of an
object on land (not the Sun) at least ¼ mile
away. Look through the eyepiece (1) and
slowly rotate either of the two focus wheels (10)
until the object comes into sharp focus.
Note: like many reflector telescopes, the image
in the eyepiece will be upside-down!

8
How to Zoom: The “power” or “magnification”
of a given telescope depends upon the
eyepiece you use. This telescope has a “zoom”
eyepiece, meaning that you can change the
magnification simply by twisting the eyepiece
barrel (12). Always begin by using the lowest
power setting to locate and center an object
(turn the body of the eyepiece so that the
pointer is at “21”). Low magnification shows a
larger area of sky in the eyepiece, making
finding and centering an object much easier.
The best view of celestial objects often comes
at low magnification. Magnifying an object too
much will make it larger, but also dimmer and
blurrier. Once you have found an object, you
can try increasing the magnification by twisting
the barrel (12) until the white triangle points to
“7”. This is recommended for small and bright
objects, like planets and double stars. The
Moon also takes higher magnifications well.
You may have to refocus a little after changing
power.

9
If you find it awkward to put your eye up to the
eyepiece, you can rotate the telescope tube
by loosening the knob on the tube clamp (4)
and rotating the telescope tube (3) until the
eyepiece and focuser are in a more
convenient position for your eyes. Be sure to
tighten the tube clamp again or the tube may
fall out!
You may find that the telescope tube is either
too hard to move or does not stay in place. Use
the altitude clamp (5) knob (it holds the
telescope to the upright part of the base) to
find the right level of tension.
If you wear glasses, first try using them when
you look into the eyepiece. You may find that
you do not need to use them. People with
severe astigmatism will generally obtain better
views while wearing glasses.

10
Locating Objects using the EZ Finder
A “finder scope” helps you point the scope,
rather like a rifle sight. The EZ Finder (2) works by
projecting a tiny red dot onto a screen
mounted in the front of the unit, so that when
you look through the screen, the red dot will
appear to float in space. When the EZ Finder is
properly aligned with the telescope, an object
centered on the EZ Finder’s red dot should also
appear in the center of the telescope’s
eyepiece. If not you may need to re-align the
EZ Finder (below).
To use the EZ Finder, move the small switch on
the battery pack (11) to the ON position. Then,
with your eye positioned near the rear of the
telescope, look through the EZ Finder with both
eyes open to see the red dot. This dot shows
you where in the sky the telescope is pointing.
Move the scope so the red dot is on the object
you want to view, and the object should
appear in the eyepiece.
Once you have the object located in the
eyepiece, be sure to turn the EZ Finder OFF!

11
Adjusting the EZ Finder: This should rarely be
necessary if the telescope is handled gently.
Checking the alignment of the EZ Finder is
easiest during daylight. Aim the telescope at a
distant object, such as the top of a telephone
pole or chimney and center it in the
telescope’s eyepiece. Now, turn the EZ Finder
on and look through it. The object should
appear near or under the red dot. If it does
not, without moving the telescope, use the two
adjustment knobs on the EZ Finder (one is
located on the bottom of the EZ Finder, the
second is located near the front of the EZ
Finder on the side) to position the red dot on
the object you have centered in the eyepiece.
Once the red dot is centered on the object in
the eyepiece, you’re done!

12
Transporting the Telescope
To carry the telescope, simply grab the carrying
handle (7) while placing your other forearm
under the telescope tube to provide support.
When transporting the telescope in a car,
place the scope on a seat and use a seatbelt
to secure it. The lap belt goes across the base
and the chest belt should cross the tube.

13
When and where to observe
Before you head out in the dark be sure to have
everything you will need.
#Plan for what to observe
#Know where objects are in the sky
#Telescope
#Black accessory bag
#Table
#Be sure weather conditions are suitable
Note: Please do not use SVO equipment in rain,
snow or windy conditions
Letting the telescope cool down outside for 20 minutes
can improve image quality.
Our FAQs provide daily astronomical weather forecasts.
www.stellarvistaobservatory.org/discover-the-night-
sky/#faq
When: Observing bright objects like planets and
stars can be done on any clear evening. But if
you want to observe star clusters, galaxies, or
other deep-sky objects, selecting a night with
no moon is essential.
Atmospheric conditions also vary significantly
from night to night. “Seeing” refers to the
steadiness of the Earth’s atmosphere at a given
time. In conditions of poor seeing, atmospheric
turbulence causes objects viewed through the
telescope to “boil.”When seeing is good, star
twinkling is minimal and images appear steady
in the eyepiece. Seeing is always best directly
overhead, and worst at the horizon.

14
Where: Southern Utah is famous for its dark night
skies. But, if your home is surrounded by bright
lights, you might need to drive a little bit to find
them. For example, Dark skies are not required
if you just want to look at the moon or planets,
but important for most other celestial objects.
For those living in Kanab, the boat ramp at
Jackson Flat Reservoir (with some ambient light)
or BLM campgrounds on Hancock Road, BLM
trailheads off US 89 and Johnson Canyon Road
offer very dark skies almost totally free of light
pollution.
For a current map of light pollution, visit:
https://cires.colorado.edu/Artificial-light
Dark Adaptation: It takes 20-30 minutes for our
eyes to adapt to the dark. Don’t expect to take
your telescope out into your backyard and see
everything if you’ve just been inside under
bright lights all evening. If you live in a city, true
dark adaptation may be impossible unless you
take the telescope to a darker location. Use
the included red LED flashlight when observing
to preserve your night vision. Red lights do not
inhibit our night vision as much as white lights or
your cell phone screen.

15
Observing the Moon:
When viewing the moon, it can be too bright,
temporarily destroying your night vision as well
as washing out the details of the moon’s
surface. To correct this, you can use the moon
filter (14) by putting the telescope tube cover in
place and sliding the filter aside to allow the
correct amount of light into the telescope. This
can bring an enormous change to the image
seen through the eyepiece.
Keeping Equipment Clean
Cleaning the mirrors and eyepiece:
Please DO NOT touch or attempt to clean or
align the mirrors inside the telescope. Let the
caretaker know if they seem dirty.
To prevent dirt and dust build-up, always put
the dust caps (13) back on the eyepiece and
telescope tube at the end of your observing
session! Always store the telescope with all the
dust caps on and the dust cover over the
telescope.

16
One more time:
WARNING: Never look directly at the Sun
through a telescope—even for an instant —as
permanent eye damage will result. Do not point
the telescope at the Sun, as parts will melt!
Children should use this telescope only with
adult supervision.
Support
SVO provides technical support from
Noon to 7:00 PM daily. If you have any
setup or observational issues, questions or
believe equipment maintenance is
needed, call 435-644-3735.
Please take care of the telescope as if it were
your own! The cost to replace this kit can be as
much as $350! By treating the equipment gently
and returning all pieces intact, others will be
able to use it to observe the night sky well into
the future!
Table of contents

