StewMac Mini-LP Guitar Kit User manual
Have a little fun.
Make a little noise.
Build a REAL guitar in a weekend.
• Easy to build, nish, and setup
• Pre-wired electronics
• All hardware included
Sheet #i-12259 Updated 06/20
MINI-LP GUITAR KIT

stewmac.com
2
These are the tools and supplies we recommend for assembling this kit. StewMac item numbers are included where applicable.
Tools
Electric hand drill
Foam sanding block (#3701 or #3699)
Phillips screwdrivers, size #1 & 2 (#3000)
Center punch or awl (#3000)
Drill bits:
1/16" (#1710)
5/64" (#1712)
10mm nut driver (#5890) or wrench (#3691)
Soldering iron (#0502)
6" StewMac Shop Rule (#4905)
12" Precision Straightedge (#3849)
Supplies
Sandpaper: 150, 220, 320, 400, 800, 1200 grits (#5562)
Light duty 3M Scotch-Brite pad (#7445) or 0000 steel wool
ColorTone Polishing Compound, Medium (#1845)
Naphtha solvent (#0766)
Glue Brush (#4167)
Rubber gloves
Finishing supplies
ColorTone Powdered Grain Filler, ebony (#0269-E)
Wipe-On Poly (#3622)
Vintage Amber Stain (#5030)
Black Fingerboard stain (#4237)
Tools and supplies
stewmac.com 3
Parts List
Neck
Body
Knobs
Strings
Slotted string nut
Neck plate with screws (not pictured)
Tuners with bushings, washers, and screws (set of 6)
Pickup with mounting ring
Control cavity cover with mounting screws
Truss rod cover with mounting screws
Wiring Kit
Bridge with mounting studs
Tailpiece with mounting studs
Output jack with mounting screws
Strap buttons with screws and protective washers (2)
4mm hex wrench for adjusting truss rod
stewmac.com
4
Getting started
The neck of your guitar ships attached to the body. The rst
step is to remove the neck using a #2 screwdriver.
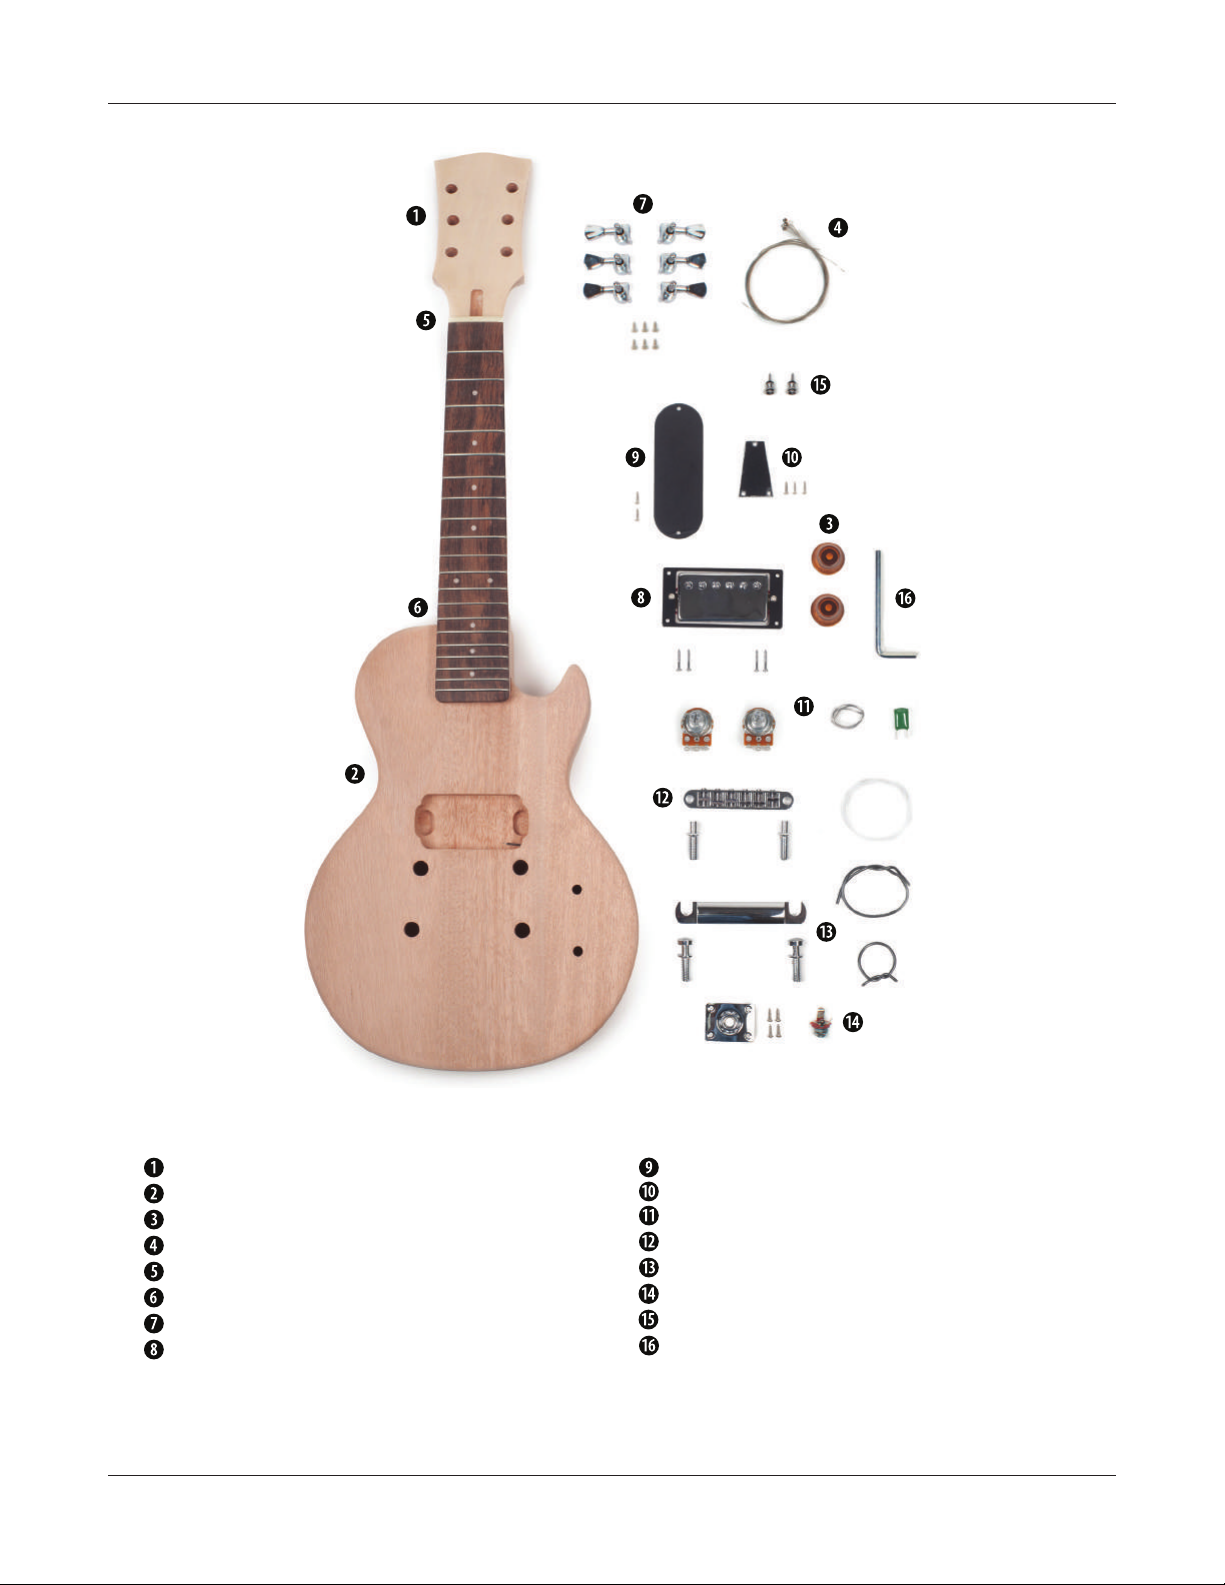
Install the bridge and tailpiece bushings
Note that there is a ground wire access hole connecting the
treble side tailpiece post hole to the control cavity; this is for
the string ground. The 4" ground wire needs to be installed
before the bushing. Strip 1/2" o of both ends and run the
wire through the hole into the cavity leaving the stripped
end to come in contact with the bushing once installed. In-
stall the tailpiece bushings. Pressing them in with a drill press
is the preferred method but they can also be installed with
gentle hammer taps using a block. Install bridge bushings
in the same fashion but without a ground wire.
Next, you will be preparing the neck and body for nish.
Preparing the neck and body for nish is just as important,
if not more important, than the nish application. The key to
a great looking nish is patience and lots of it. Be thorough
with your sanding and follow the nishing schedule on page
6 for best results.
stewmac.com 5
Prep for nishing
Inspect the body and neck for any dents, chips, or other
imperfections and repair them. Small dents can be steamed
out by placing a damp cloth over the dent and applying
heat with a soldering iron. Chips, tear out, and knotholes
will need to be lled.
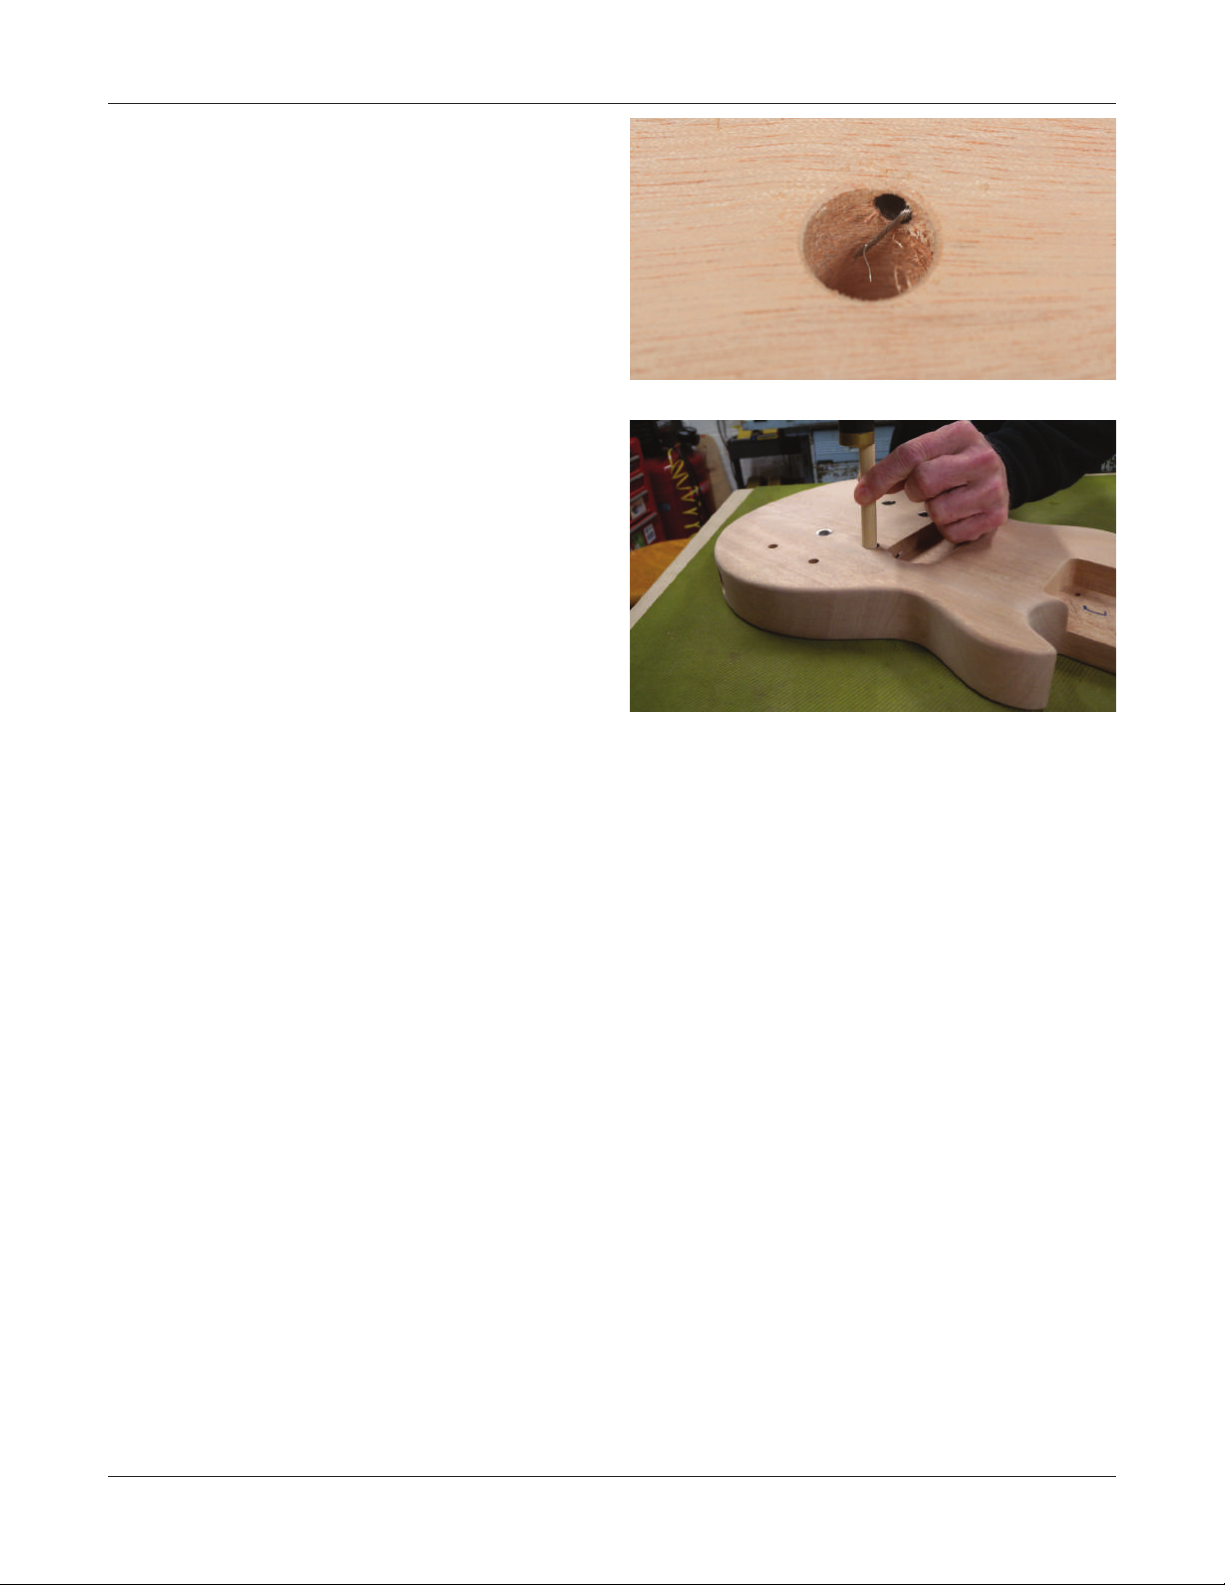
Sand the body and neck
Using 150-grit sandpaper on a at sanding block, sand the
entire body working only in the direction of the grain.
After a complete sanding, wipe the body with a damp
cloth to raise the grain and reveal bers that need more
sanding. Let the dampness dry, then sand the raised grain
with 220-grit sandpaper. After sanding, raise the grain again
and sand a third time, using 320-grit sandpaper. Follow the
same procedure with the neck, using care not to sand on
the fretboard face or frets.
Note that the peghead face is covered with a very thin ma-
hogany veneer. Very lightly sand with 320 using care not to
sand through.
Run your ngers along the edge of the fretboard and feel for
sharp fret ends. If the frets feel sharp where they meet the
edge of the neck, gently sand them back with long strokes
down the length of the neck. Use care not to change the
bevel of the frets in the process.
While sanding with 320-grit slightly break any sharp edges
on the fretboard body, ngerboard, and peghead. Soften-
ing hard edges promotes even nish coverage. Later, when
you’re nish sanding, these edges are less likely to sand
through to bare wood.
Degrease with naphtha
When you’ve nished sanding, wipe the body and neck with
a naphtha-dampened lint-free rag to remove any oils or
grease. From this point on, wear clean gloves when handling
so you won’t contaminate the wood.
Tape o the bridge and tailpiece bushings in the body, and
the string nut and fretboard face; they do not get lled or
nished.
Fill the grain
The body and neck of your guitar kit are made of mahogany,
which is an open grained wood. The grain will need to be
lled before nishing in order to achieve a at surface.
We suggest using our ebony ColorTone Powdered Grain
Filler following the instructions on the label. 2-3 applications
are recommended to get a nice at surface to build nish
coats over.
For more info on grain lling, see our article #i-0269 “Using
ColorTone Grain Filler” at stewmac.com.
stewmac.com search: i-0269
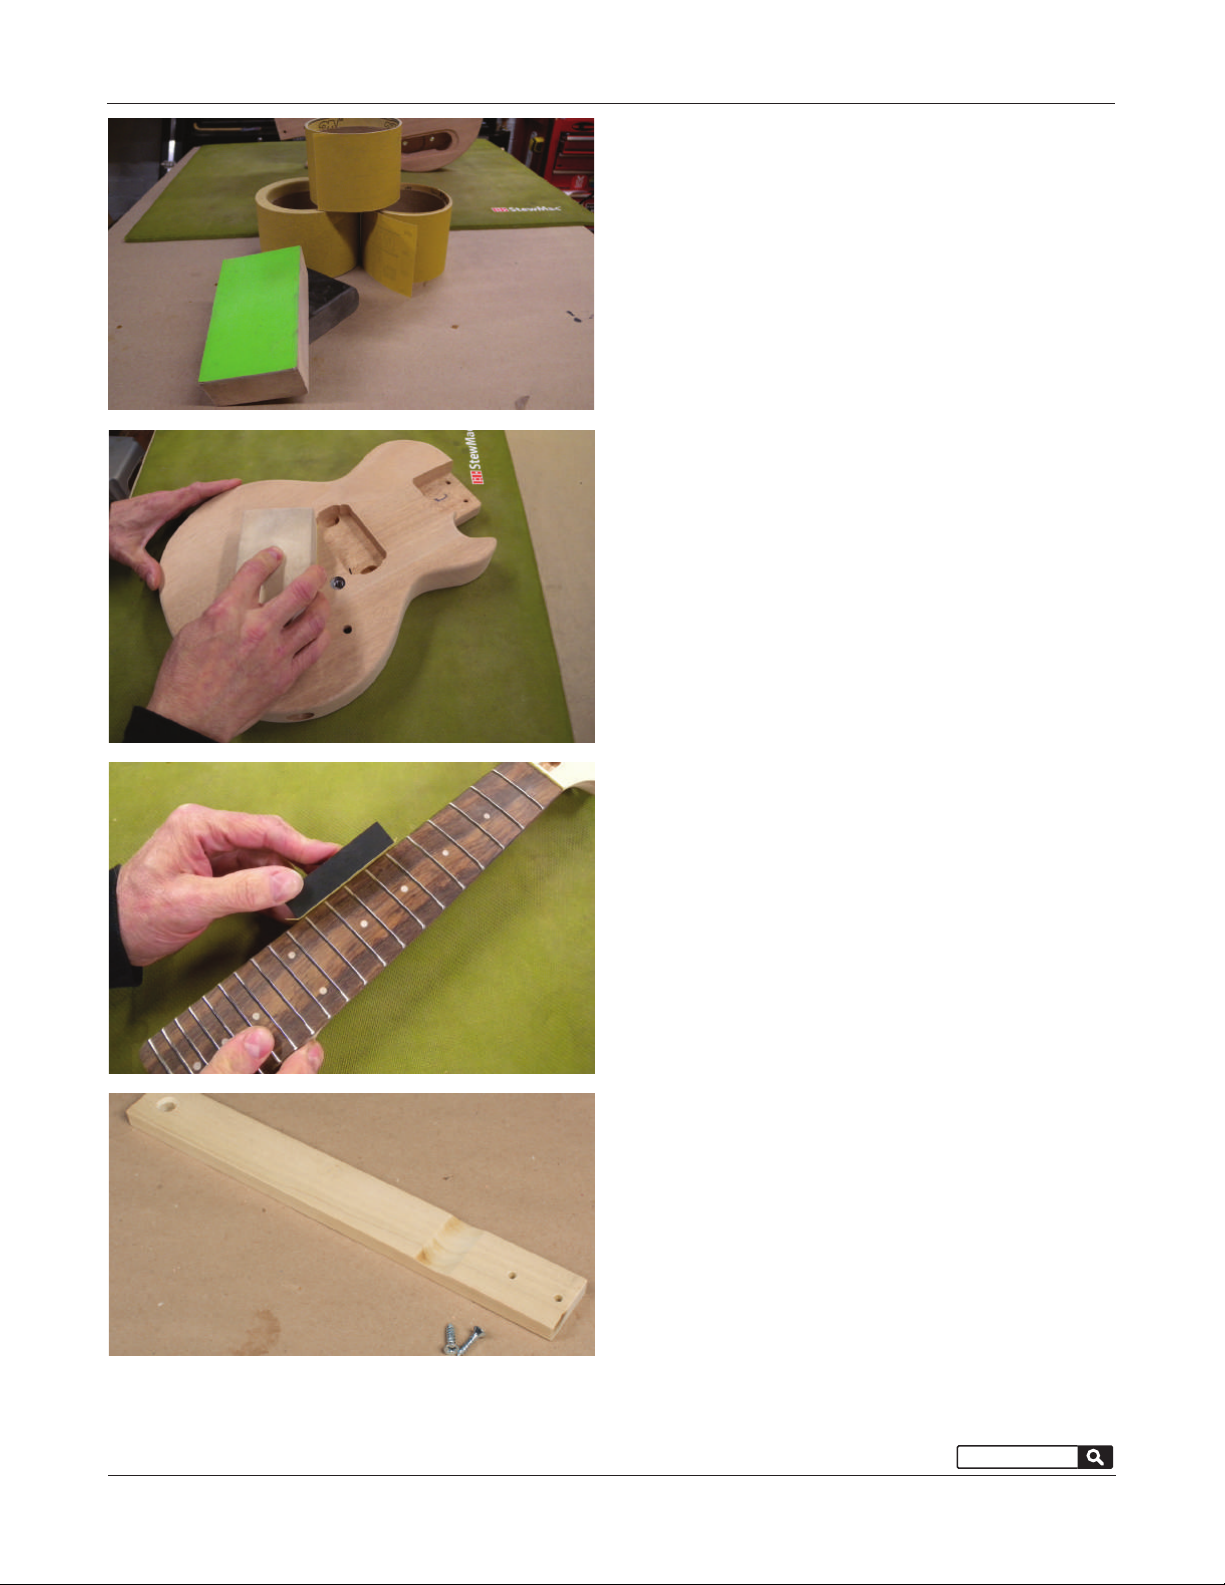
TIP! Make holding handles for the neck and body. These can
be clamped in a vise or to a bench for lling and nishing,
a hanging hole can be added for drying. Nothing fancy,
scrap wood will do.

stewmac.com
6
Tape off the edges around the peghead face—the nut
should still be taped o from lling. Use ngerboard stain to
color the peghead face black. A little goes a long way! Start in
the center and work your way out to the edges, as this helps
reduce bleed around the edges. Let dry for 1 hour. Peel the
tape and check for any signs of bleeding on the sides and
top of the peghead. Any stain that has bled onto the sides
can be removed with a scraper or sandpaper.
Color coats (optional)
ColorTone Liquid Stains mixed into Wipe On Poly make an
easy to apply and nice looking translucent nish for the body
and neck. It’s nonammable, simple to use, very forgiving,
and can be applied indoors.
Mix 1/4oz of Vintage Amber (or the color of your choice)
ColorTone Liquid Stain into 4oz of the Wipe On Poly nish
and mix well. Conduct a test on some scrap wood to ensure
the color looks the way you’d like it to. If it’s too dark, add a
little more nish to weaken the color. If it’s too light, add an
additional drop or two of stain. Remember, a small amount
of stain goes a long way!
As you apply the color watch for streaks and uneven areas.
Keep working the pad in a circular motion over these areas,
followed by long strokes running the length of the instru-
ment until you have uniform tinting over the entire surface
of the body.
Apply the color to the neck in the same fashion as the body.
Any residual nish that ends up on the fretboard face will be
scraped back once it dries.
Allow the color coats to dry 2-3 hours.
Final top coats
Do not sand on your color coats. Apply 4-8 additional coats
of clear over the top of the color or until you’ve reached your
desired thickness. Allow to dry for 24 hours.
In most cases nal sanding and bung of the ColorTone
Wipe-On Poly nish is not necessary but there are times
where it may be needed to level out uneven surfaces and
imperfections in the nish. If nish sanding is needed, we
suggest going over the instrument with 800-grit, followed
by 1200-grit sandpaper. Use care not to sand through the
topcoats into the color. Then follow up with ColorTone Me-
duim Polishing Compound on a soft cloth or bung pad.
Applying nish

stewmac.com 7
Assemble your guitar
During assembly, use a padded surface to protect the nish
from scratches and dents.
TIP! Drag the threads of all mounting screws over a bar of
soap or wax to help them thread in easier and help prevent
damaging the screw head.
Install the neck
The mounting screw holes in the neck and body come pre-
drilled for easy installation. Run the neck mounting screws
through the neck mounting plate and tighten down with a
#2 Phillips head screwdriver.
Install the tuners
Working from the bottom up, use a ruler to make sure the
tuners are square to one another. Mark out your mounting
holes with a scribe or center punch.
Tuner mounting screws are very delicate and will break o if
forced into wood without drilling. Use a 5/64" bit to drill 3/8"
deep pilot holes for the screws; if these holes are any smaller
you risk shearing o the screw heads. Lubricating the screws
by dragging them across a bar of soap or a candle will help
the screws go in smoothly.
With the tuners in place, install the screws in the pilot holes
with a #1 Phillips screwdriver. On the tuner string post, add
a washer then the threaded bushing. Tighten with a 10mm
nut driver or wrench.
Install the strap buttons
Mark the locations of your strap buttons. At the tail of the
guitar, position the button in line with the center of the neck
and bridge. The other button is typically located on the tip
of the upper horn.
Drill 1/2" deep holes with a 3/32" bit and install the strap
buttons with their protective washers using a #2 Phillips
screwdriver.

stewmac.com
8
Install the pickup
Line up the pickup and mark out the mounting screw loca-
tions. Drill 3/16" deep holes using a 1/16" bit. Install mounting
screws with a #1 screwdriver.
Drill for the jack plate
Mark out the 4 mounting screws with a scribe or punch using
care to keep the edge of the jack plate square to the body.
Drill the holes using a 1/16" bit, drilling 3/16" deep. Do not
install the jack yet.
Assemble your guitar
Install the wiring harness
Wire the pickup to the harness as shown in the diagram.
Then run the hot and ground wires through the output jack
hole on the body.

stewmac.com 9
Assemble your guitar
Wire the jack
The black ground wire gets soldered to the square (sleeve)
lug, solder the white hot wire to the round (tip). Once sol-
dered, install the jack plate with a #1 screwdriver and the
control cavity cover with a #2 screwdriver
Mark out the truss rod cover
Drill the holes using a 1/16" bit, drilling 3/16" deep.
Install the bridge and tailpiece
Tighten the tailpiece studs all the way down; the bridge
height will be set during nal set up. String up the guitar.

stewmac.com
10
Final setup
Straight neck, or a little relief?
Neck relief refers to adjusting a neck so that it has a very
slight upbow, rather than being perfectly straight. This relief
allows a little more room for string vibration, reducing the
chance of hitting the lower frets and causing fret buzz.
Depending on your playing style, and how perfectly level
your fret tops are, a neck should be anywhere from perfectly
straight to having 0.012" of relief. This measurement refers
additional string height over the 12th fret, compared to a
perfectly straight neck.
A straight neck tends to play and sound better, but very few
guitars end up with no relief at all, and several thousandths
of an inch or more is perfectly normal.
When the neck is adjusted to your satisfaction install the
truss rod cover using a #1 screwdriver.
Set the action at the nut
The string nut is pre-slotted for medium action, which is
comfortable for most players. If lower action is desired, you
can lower the slots using gauged nut les or needle les.
Set the action at the bridge
Adjust the action at the bridge by raising or lowering the
string saddles. Measure string height over the 12th fret,
between the bottom of the string and the top of the fret.
A good starting point is:
High (unwound) E string: 1/16" at the 12th fret. Low (wound)
E string: 5/64" at the 12th fret.
You can always go lower or higher depending on your
playing style.
Set the intonation
Intonate the guitar by adjusting the string lengths at the
bridge saddles so the guitar plays in tune all the way up
the neck.
Using a strobe or other accurate tuner, rst tune the strings
to pitch. Then, press the high E string lightly at the 12th fret
using just enough pressure to sound the note. Check it with
your tuner.
If the note reads at, the saddle needs to be adjusted forward
towards the nut, shortening the length of the string.
If the note reads sharp, the saddle needs to be adjusted back
away from the nut, increasing the string length.
Turn the truss rod nut
counterclockwise to bring
the neck up, adding relief.
Measure string relief
at the 12th fret.
Turn clockwise to pull the
neck back, reducing relief.
Go slow: a little does a lot!

stewmac.com 11
Adjust the pickup height
Holding down the low E and high E strings at the 22nd fret,
adjust the bass side of the pickup to 1/8" from the top of
the pickup pole to the bottom of the low E string. Adjust
the treble side to 1/8".
You’re done!
Congratulations! Your guitar is ready to play. We hope this
is the rst of many that you have fun assembling and cus-
tomizing.
Final setup

21 N. Shafer St • Athens, Ohio 45701 • USA
USA & Canada call toll-free: 800-848-2273
9am-5pm weekdays Eastern time
stewmac.com
Table of contents


