Stihl iMOW 5.0 User manual

Contents
1 Introduction................................................. 2
2 Guide to Using this Manual.........................2
3 Overview..................................................... 3
4 Safety Precautions......................................5
5 Description of Operation........................... 13
6 Preparing the Mowing Area and Robot
Mower for Operation................................. 14
7 Positioning the docking station................. 15
8 Installing the Perimeter Wire.....................22
9 Completing the Perimeter Wire Installation
.................................................................. 29
10 Installing Guide Wire.................................31
11 Electrically connecting the docking station
.................................................................. 33
12 Charging the Robot Mower....................... 35
13 Closing Bluetooth® Radio Interface..........35
14 Light patterns on the robot mower and
charging station.........................................36
15 Operating and Adjusting the Robot Mower
.................................................................. 36
16 Stopping the robot mower and activating the
device lock................................................ 37
17 Transporting..............................................37
18 Storing.......................................................38
19 Cleaning....................................................39
20 Maintenance............................................. 39
21 Repairing...................................................41
22 Troubleshooting........................................ 42
23 Specifications............................................42
24 Spare Parts and Accessories....................44
25 Disposal.................................................... 44
26 EC Declaration of Conformity................... 44
27 UKCA Declaration of Conformity.............. 45
28 Open Source Software..............................45
1 Introduction
Dear Customer,
Thank you for choosing STIHL. We develop and
manufacture our quality products to meet our
customers’ requirements. The products are
designed for reliability even under extreme con‐
ditions.
STIHL also stands for premium service quality.
Our dealers guarantee competent advice and
instruction as well as comprehensive service
support.
STIHL expressly commit themselves to a sus‐
tainable and responsible handling of natural
resources. This user manual is intended to help
you use your STIHL product safely and in an
environmentally friendly manner over a long
service life.
We thank you for your confidence in us and hope
you will enjoy working with your STIHL product.
Dr. Nikolas Stihl
IMPORTANT! READ BEFORE USING AND
KEEP IN A SAFE PLACE FOR REFERENCE.
2 Guide to Using this Manual
2.1 Applicable Documents
The local safety regulations apply.
► In addition to this User Manual, you should
also read, understand and retain the following
documents:
–Safety information for STIHL batteries and
products with built-in battery:
www.stihl.com/safety-data-sheets
Additional information on STIHL robotic mowers,
compatible accessories and FAQs can be found
at support.stihl.com, info.myimow.stihl.com or is
available at a STIHL authorized dealer.
The Bluetooth® mark designation and Bluetooth®
logos are registered trademarks owned by Blue‐
tooth SIG, Inc. These word marks and logos are
used by STIHL under license.
The robot mower is equipped with a Bluetooth®
radio interface and radio network interface. Local
operating restrictions (in aircraft or hospitals, for
example) must be observed.
2.2 Warning Notices in Text
DANGER
■ This notice refers to risks which result in seri‐
ous or fatal injury.
► Serious or fatal injuries can be avoided by
taking the precautions mentioned.
WARNING
■ This notice refers to risks which can result in
serious or fatal injury.
► Serious or fatal injuries can be avoided by
taking the precautions mentioned.
English
2 0458-011-0101-A
© ANDREAS STIHL AG & Co. KG 2023
0458-011-0101-A. VA2.E23.
Printed on chlorine-free paper
Paper is recyclable.
Translation of Original Instruction Manual
0000010370_006_GB

NOTICE
■ This notice refers to risks which can result in
damage to property.
► Damage to property can be avoided by tak‐
ing the precautions mentioned.
2.3 Symbols in Text
This symbol refers to a chapter in this
instruction manual.
3 Overview
3.1 Robot mower
1
2
3
5
6
4
0000099354_001
1 Front grip surface
Lift and transport the robot mower by simulta‐
neously gripping it at the front and rear grip
surface.
2 Charging contacts
The charging contacts connect the robot
mower with the docking station.
3 Ultrasound sensors
The ultrasound sensors detect obstacles.
4 Hood
The hood is spring-mounted and features a
bump sensor to detect obstacles on the mow‐
ing area.
5 Drive wheels
The drive wheels drive the robot mower.
6 Light strip
The light strip shows the robot mower's sta‐
tus.
7
8
9
0000099823_001
7 Rear grip surface
Lift and transport the robot mower by simulta‐
neously gripping it at the front and rear grip
surface.
8 Protective strip
The protective strip protects the user against
ejected objects and contact with the blades.
9 Control panel
The control panel features pushbuttons and a
rain sensor.
3.2 Control panel
2
1
3
4
56
7
0000099355_001
1 Light strip
The light strip shows the robot mower's status
and signals which key combination to press
for a certain action.
2 STOP pushbutton
The pushbutton stops the robot mower and
mowing unit. The pushbutton also activates
the device lock.
3 LOCK pushbutton
This pushbutton unlocks the robot mower in
conjunction with a displayed key combination.
4 START pushbutton
This pushbutton starts mowing operations.
5 HOME pushbutton
This pushbutton makes the robot mower
return to the docking station or cancels the
current mowing job if the robot mower is in
the docking station.
6 INFO pushbutton
This pushbutton starts voice output about the
current status of the robot mower.
7 Rain sensor
The rain sensor reacts to moisture. Depend‐
ing on the setting, the robot mower can take
weather conditions into account for the mow‐
ing plan.
3 Overview English
0458-011-0101-A 3

3.3 Mowing unit
123
3 4
#
0000099827_001
1 Blade disk
The blade disk serves to attach the blades.
2 Blades
The blades mow the lawn.
3 Levers
The levers secure the nut.
4 Nut
The nut secures the blade disk.
# Rating plate with the machine number
3.4 Docking station and power sup‐
ply
7
6
5
4
9
11
32
110
8
#
0000099356_001
1 Mains plug
The mains plug connects the connecting
cable to a socket.
2 Connecting cable
The connecting cable connects the power
supply to the mains plug.
3 Power supply
The power supply supplies the docking sta‐
tion with energy.
4 Charging cable
The charging cable connects the power sup‐
ply to the docking station.
5 Plug
The plug connects the charging cable to the
docking station.
6 Hood
The hood covers the docking station and pro‐
tects the internal electronics.
7 LED
The LED indicates the status of the docking
station.
8 Charging contacts
The charging contacts connect the docking
station with the robot mower.
9 Base plate
The base plate is the base for the docking
station.
10 Cable duct
The guide wire is routed in the middle cable
duct.
11 Cable duct
The perimeter wire is routed in the outer
cable ducts.
# Rating plate with the machine number
12
0000099831_001
12 Ground peg
The four ground pegs secure the docking sta‐
tion to the ground.
3.5 iMOW® Ruler and Installation
Kit
iMOW® Ruler
1
0000099832_001
1iMOW® Ruler
The ruler makes it easier to install wires and
serves to maintain the correct distance.
Installation Kit
An installation kit is required to commission the
robot mower; it is not included in the scope of
delivery of the robot mower. Appropriate installa‐
English 3 Overview
4 0458-011-0101-A

tion kits are available as accessories for different
garden sizes.
3
4
1
2
0000099833_001
1 Fixing pin
The fixing pin secures the perimeter wire and
guide wire to the ground.
2 Wire connector
The wire connector connects wire ends to
each other.
3 Cable markers
The cable markers serve to mark wire ends
on the inside of the docking station. They
facilitate the assignment of the wire ends
when connecting to the correct terminal.
4 Wire coil
The wire coil is required to install the perime‐
ter wire and guide wire.
3.6 Symbols
Meanings of symbols on the robot mower, dock‐
ing station, power supply or installed battery:
This symbol shows the diameter of the
blade disk.
This symbol indicates the direction for
unlocking the blade carrier when
changing blades.
This symbol indicates the direction for
locking the blade carrier when chang‐
ing blades.
Protection class 2, double insulated.
Do not dispose of the product with domes‐
tic waste.
The information next to this symbol indi‐
cates the energy content of the battery
according to the cell manufacturer’s specifi‐
cation. The energy content available during
use is lower.
1 LED lights up red. The battery is too
warm or too cold.
4 LEDs flash red. There is a fault in the
battery.
4 Safety Precautions
4.1 Warning symbols
Meanings of warning symbols on the robot
mower, docking station, power supply or installed
battery:
Observe safety instructions and take
the necessary precautions.
Read and understand the User Man‐
ual and keep it in a safe place.
Comply with the safety instructions
concerning ejected objects and take
the necessary precautions.
Maintain a safe distance.
Do not touch rotating blade disk with
blades.
Do not climb or sit on the robot mower.
Stop the robot mower and activate the
device lock during transport, storage,
cleaning, servicing, repair or when
there is changed or unusual behavior.
Keep children away from the robot
mower and mowing area.
Keep animals away from the robot
mower and mowing area.
Do not immerse the battery in liquids.
Protect battery against heat and fire.
4.2 Intended Use
STIHL iMOW® 5.0, 6.0, 7.0 robotic mowers are
designed for mowing and mulching grass.
The STIHL docking station and supplied power
supply DM160X-420X or DM210X-420X are
4 Safety Precautions English
0458-011-0101-A 5

used to charge STIHL iMOW® 5.0, 6.0, 7.0
robotic mowers.
The robotic mower, docking station and power
supply can be used in the rain.
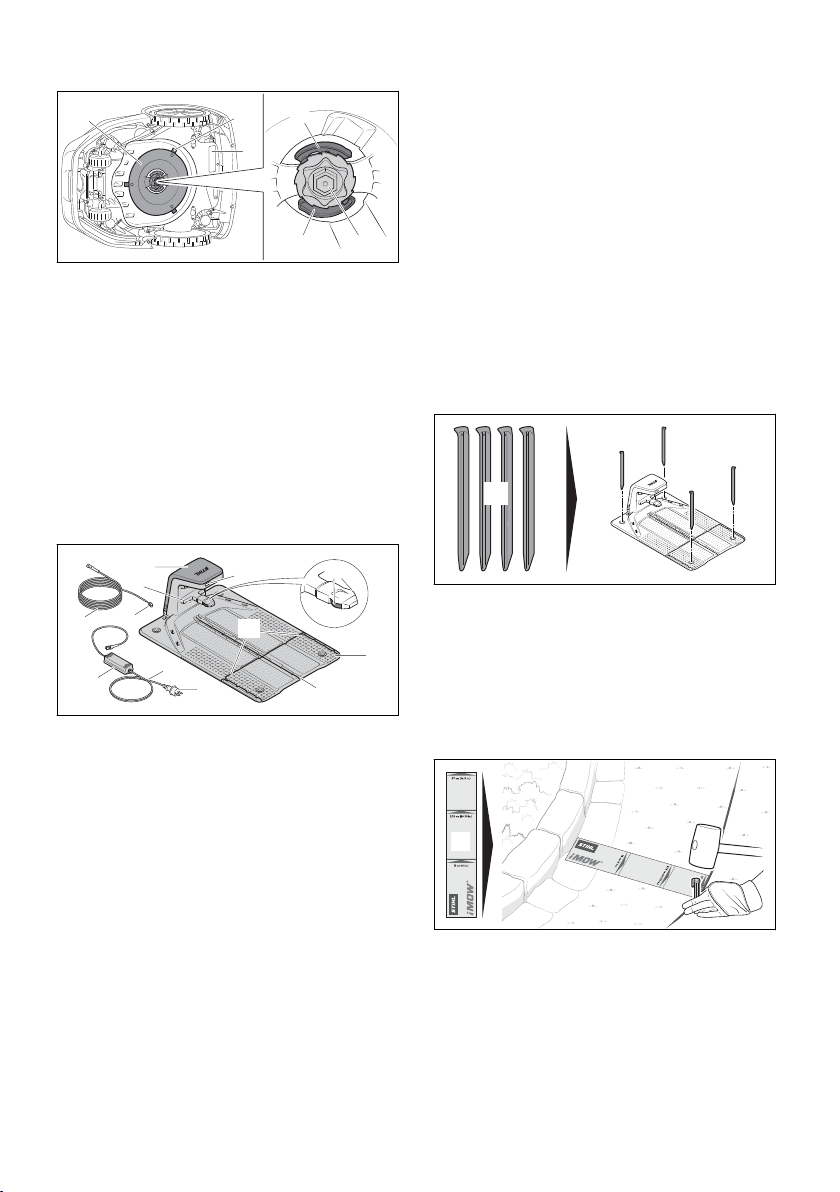
A STIHL AAI battery supplies the robotic mower
with power. The battery has been installed in the
robotic mower and may only be removed by a
STIHL authorized dealer.
The robotic mower can be configured and oper‐
ated via the MY iMOW® app.
WARNING
■ Docking stations, power supply units and bat‐
teries not explicitly approved for the STIHL
robotic mower may cause a fire or explosion.
Persons may be seriously or fatally injured,
and property may be damaged.
►Use the robotic mower with the STIHL AAI
installed battery.
►Charge the STIHL iMOW® 5.0, 6.0, 7.0
robotic mower with the STIHL docking sta‐
tion and STIHL power supply
DM160X-420X or DM210X-420X.
■Using the robotic mower, battery, docking sta‐
tion or power supply other than for its intended
use can result in serious injuries or death and
damage to property.
►Use the robotic mower, docking station and
power supply as described in this User
Manual.
4.3 Requirements for the user
WARNING
■Users without adequate training or instruction
cannot recognize or assess the risks involved
in using the robot mower, docking station and
power supply. The user or other persons may
sustain serious or fatal injuries.
► Read and understand the User Man‐
ual and keep it in a safe place for
reference.
► If you pass the robot mower, docking sta‐
tion or power supply on to another person:
Always give them the User Manual.
►Make sure that the user meets the following
conditions:
–The user is rested.
–The user is physically, sensorially and
mentally able to use and operate the
robot mower, docking station and power
supply. If the user is able to operate the
equipment but is physically, hearing,
visually or mentally impaired, the user
may only use the robot mower under
the supervision of or after receiving
instruction from a responsible person.
This includes all work with and on the
robot mower, docking station, power
supply, charging cable, guide wire and
perimeter wire.
–The user can recognize and assess the
risks involved in using the robot mower,
docking station and power supply.
–The user is an adult or is being trained
in an occupation under supervision
according to national regulations.
–The user has received instruction from a
STIHL authorized dealer or other expe‐
rienced user before using the robot
mower, docking station and power sup‐
ply for the first time.
–The user is not under the influence of
alcohol, medication or drugs.
–During installation, operation, cleaning,
maintenance and transportation of the
robot mower, keep your balance, pro‐
vide secure footing and do not run.
–The terms "operation", "use" and
"usage" include all work on the robot
mower, docking station, power supply,
charging cable, guide wire and perime‐
ter wire as well as all iMow® accesso‐
ries.
►If you are unsure: Consult a STIHL author‐
ized dealer.
4.4 Clothing and Equipment
WARNING
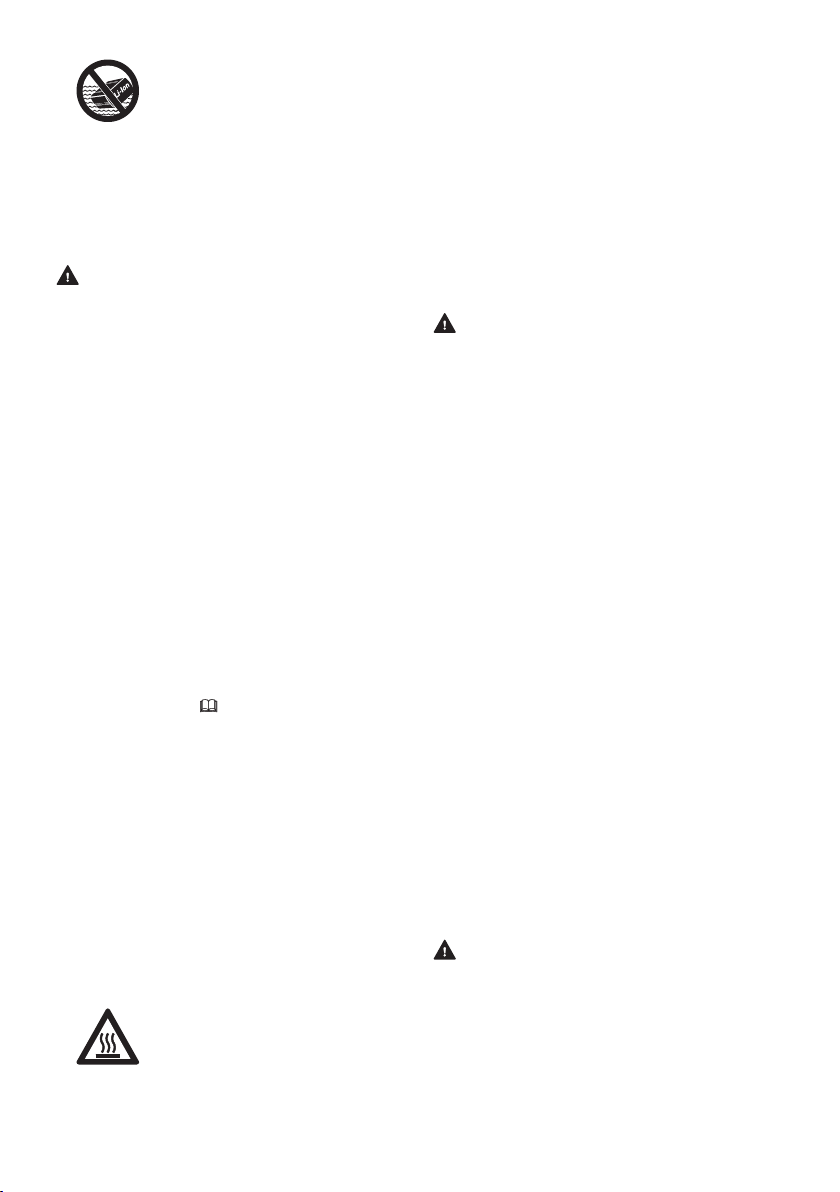
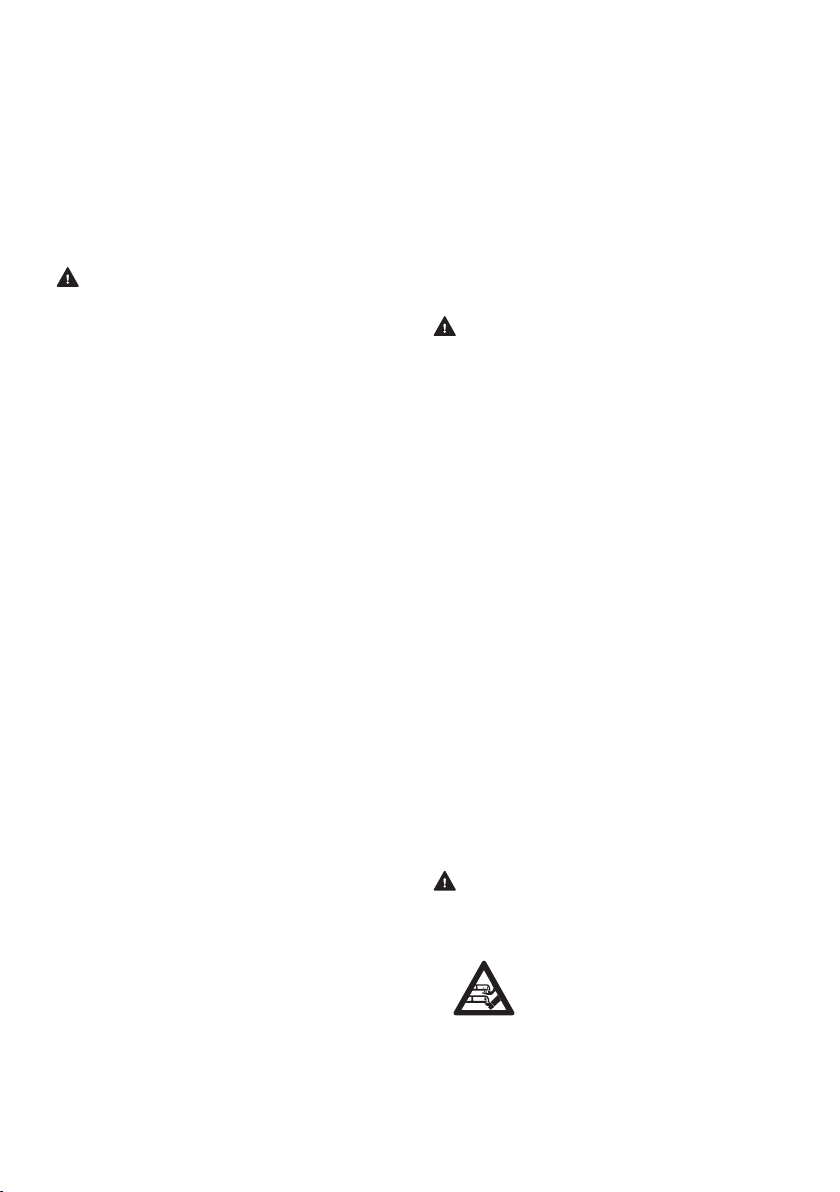
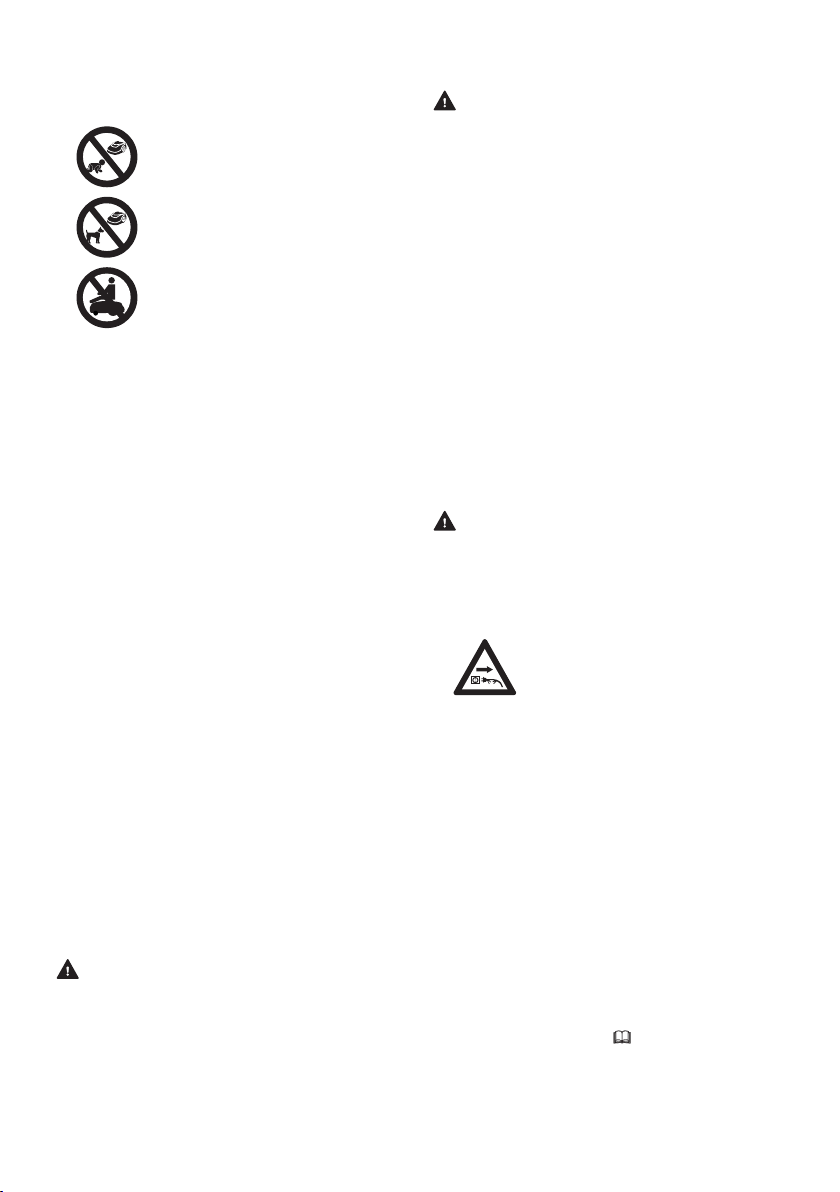
■During the routing of the perimeter wire or
guide wire and attaching the docking station,
objects may be thrown at high speed by driv‐
ing a fixing pin or earth staple into the ground.
This may result in injury to the user.
►Wear close-fitting safety glasses. Suitable
safety glasses are tested in accordance
with EN 166 or national regulations and
available commercially with the correspond‐
ing marking.
►Wear work gloves made of robust material.
■ Objects can be ejected at high speed during
the mowing operation. This may result in injury
to the user.
►If the mowing area is entered during the
mowing operation:
–Wear long pants made of robust mate‐
rial.
English 4 Safety Precautions
6 0458-011-0101-A

–Wear sturdy, closed-toed footwear with
high-grip soles.
■ Unsuitable clothing may get caught in wood,
undergrowth and in the robot mower. Users
not wearing suitable clothing may be seriously
injured.
►Wear close-fitting clothing.
► Remove scarves and jewelry.
■ The user may come into contact with the
blades during cleaning, maintenance or trans‐
port. This may result in injury to the user.
►Wear work gloves made of robust material.
■ Wearing unsuitable footwear may cause the
user to slip. This may result in injury to the
user.
►If the mowing area is entered during the
mowing operation: Wear sturdy, closed-
toed footwear with high-grip soles.
4.5 Work Area and Surroundings
4.5.1 Robot mower and mowing area
WARNING
■ Bystanders, children and animals cannot be
aware of nor assess the dangers of the robot
mower and objects being thrown into the air.
This may result in serious injury to bystanders,
children and animals and damage to property.
► Keep bystanders, children and ani‐
mals away from the mowing area
during the mowing operation.
► If the robot mower is used in publicly acces‐
sible areas: Close off mowing area and set
up signs with warning text "Warning! Auto‐
matic lawn mower! Keep children and ani‐
mals away and supervise them!" Comply
with local regulations.
►Make sure that children cannot play with
the robot mower.
► With the help of the perimeter wire, define
the mowing area as described in this User
Manual. Using the perimeter wire, mark off
designated areas that the robot mower
must not mow or navigate from the mowing
area.
►Do not operate the robot mower on gravel
or crushed stone.
■ People can trip over the perimeter wire, guide
wire or the fixing pins. This may result in injury
to people and damage to property.
►Route the perimeter wire and guide wire flat
on the ground.
► Drive the fixing pins completely into the
ground.
■ If a gardening tool is used in the mowing area,
the tool can strike and damage the perimeter
wire, guide wire or fixing pins. Objects can be
ejected at high speed. This may result in injury
to people and damage to property.
►Do not use a gardening tool around the
perimeter wire or guide wire.
■ The robot mower's electrical components can
produce sparks. Sparks may cause fires and
explosions in highly flammable or explosive
environments. Persons may be seriously or
fatally injured, and property may be damaged.
►Do not operate the robot mower in highly
flammable or explosive environments.
■ As a result of a storm, the robot mower can be
damaged, or foreign objects may be on the
mowing area. The robot mower may be in an
unsafe condition, and objects may be ejected
at high speed during the mowing. Persons
may be seriously or fatally injured, and prop‐
erty may be damaged.
►After a storm, check that the robot mower is
in a safe condition.
► Check the condition of the mowing area
and remove any foreign objects from it.
4.5.2 Battery
The battery has been installed in the robot
mower and must only be removed by a STIHL
authorized dealer.
WARNING
■Bystanders, children and animals cannot rec‐
ognize or assess the dangers of the battery.
Bystanders, children and animals may be seri‐
ously injured.
►Keep bystanders, children and animals
away from the work area.
► Do not leave the battery unattended.
► Make sure that children cannot play with
the battery.
■ The battery is not protected against all ambi‐
ent conditions. If the battery is exposed to cer‐
tain ambient conditions, the battery may catch
fire, explode or be irreparably damaged. This
may result in serious injury to people and
damage to property.
► Protect battery from heat and fire.
► Do not throw the battery into a fire.
► Do not charge, use and store the battery
outside of the specified temperature limits,
23.6.
4 Safety Precautions English
0458-011-0101-A 7

► Do not immerse the battery in liq‐
uids.
► Keep battery away from small metal parts.
► Do not expose the battery to high pressure.
► Do not expose the battery to microwaves.
► Protect the battery against chemicals and
salts.
4.5.3 Docking station and power supply
WARNING
■ Bystanders, children and animals are not
aware of and cannot assess the dangers of
the docking station or power supply. Bystand‐
ers, children and animals may be seriously or
fatally injured.
►Keep bystanders, children and animals
away from the work area.
► Make sure that children cannot play with
the docking station or power supply.
■ The docking station and the power supply are
not protected against all environmental condi‐
tions. If the docking station and power supply
are exposed to certain environmental condi‐
tions, they may catch fire or explode. This may
result in serious injury to people and damage
to property.
►Do not operate the docking station and
power supply in a flammable environment
or explosive environment.
►Do not use or store the docking station and
power supply outside of their specified tem‐
perature limits, 23.6.
►Disconnect the power supply before a
storm or when there is a risk of a lightning
strike.
■People can trip over the docking station,
charging cable, power supply or connecting
cable. People can be injured, and the docking
station, charging cable, power supply or con‐
necting cable can be damaged.
►Set up the docking station and power sup‐
ply in a clearly visible area.
► Route the connecting cable and charging
cable flat on the ground.
■ The housing of the power supply can get very
hot in direct sunlight. There is a risk of burn
injuries.
► Do not touch a hot power supply.
4.6 Safe Condition
4.6.1 Robot mower
The robot mower is in a safe condition if the fol‐
lowing conditions are met:
–The robot mower is undamaged.
–The controls function properly and have not
been modified.
–The blades are properly installed and are
undamaged.
–Original STIHL accessories designed for this
robot mower are installed.
–The accessories are correctly installed.
WARNING
■ If not in safe condition, components may no
longer operate correctly and safety devices
may be rendered ineffective. There is a risk of
serious or fatal injury.
►Operate an undamaged and functioning
robot mower.
► Do not modify the robot mower.
► If the control panel is not functioning: Do
not operate the robot mower.
► Install original STIHL accessories designed
for this robot mower.
► Install the blades as described in this User
Manual.
► Install accessories as described in this User
Manual or in the User Manual for the acces‐
sories.
►Do not insert objects in the robot mower's
openings.
► Do not bridge charging contacts with metal‐
lic objects (short circuit).
► Replace worn or damaged labels.
► If you are unsure: Consult a STIHL author‐
ized dealer.
4.6.2 Blades
The blades are in a safe condition if the following
conditions are met:
–The blades, blade disk and blade carrier are
undamaged.
–The blades are not deformed.
–The blades are properly installed.
WARNING
■If they are in an unsafe condition, parts of the
blades may come off and be ejected at high
speed. People may be seriously injured.
►Work with undamaged blades and an
undamaged blade disk and blade carrier.
► Install blades correctly.
► If you are unsure: Consult a STIHL author‐
ized dealer.
English 4 Safety Precautions
8 0458-011-0101-A

4.6.3 Battery
The battery has been installed in the robot
mower and must only be removed by a STIHL
authorized dealer.
The battery is in a safe condition if the following
points are observed:
–Battery is undamaged.
–The battery is clean and dry.
–Battery functions properly and has not been
modified.
WARNING
■ A battery that is not in a safe condition cannot
operate safely. Persons may be seriously
injured.
►Never work with a damaged battery.
► Never attempt to charge a damaged or
defective battery.
► If the battery is dirty: Clean the battery.
► If the battery is moist or wet: Allow the bat‐
tery to dry.
► Never attempt to modify the battery.
► Never insert objects in the battery’s open‐
ings.
► Never bridge the battery's contacts with
metallic objects (short circuit).
► Do not open the battery.
► Replace worn or damaged labels.
■ Fluid may leak from a damaged battery. If that
liquid comes into contact with the skin or eyes,
the skin or eyes may be irritated.
►Avoid contact with the liquid.
► If skin contact occurs: Wash affected areas
of skin with plenty of water and soap.
► In the event of contact with eyes: Rinse
eyes with plenty of water for at least
15 minutes and consult a doctor.
■A damaged or defective battery may smell
unusual, emit smoke or burn. Persons may be
seriously or fatally injured, and property may
be damaged.
►If the battery smells unusual or emits
smoke: do not use the battery and keep it
away from combustible substances.
►If the battery catches fire: Attempt to extin‐
guish the battery with a fire extinguisher or
water.
4.6.4 Docking station, charging cable, power
supply and connecting cable
The docking station, charging cable, power sup‐
ply, connecting cable and plug connections are
in a safe condition if the following conditions are
met:
–The docking station, charging cable, power
supply, connecting cable and plug connections
are undamaged.
–The docking station, charging cable, power
supply, connecting cable and plug connections
are clean.
–Original STIHL accessories designed for this
docking station are installed.
–The accessories are correctly installed.
–Docking station and power supply are not cov‐
ered during operation.
WARNING
■ If not in a safe condition, components may no
longer operate safely and safety devices may
be rendered ineffective. There is a risk of seri‐
ous or fatal injury.
►Use an undamaged docking station, charg‐
ing cable, power supply, connecting cable
and plug connections.
►If the docking station, power supply or plug
connections are dirty: Clean them.
► Do not modify the docking station, charging
cable, power supply, connecting cable and
plug connections.
►Do not insert objects into the openings of
the docking station and power supply.
► Do not bridge the electrical contacts of the
docking station, power supply and plug con‐
nections with metallic objects (short circuit).
►Do not open the docking station and power
supply.
► Do not cover the docking station and power
supply.
► Do not bury the power supply in the ground.
► Do not sit on the docking station.
► Do not stand on the base plate of the dock‐
ing station.
4.7 Mowing operation
WARNING
■The blades on the rotating blade disk can cut
the user. This may result in serious injury to
the user.
► Do not touch rotating blade disk and
blades.
► If the user approaches the robot
mower during the mowing operation
or before they want to make adjust‐
ments on the device: Press the
STOP pushbutton.
► Do not tilt or lift the robot mower dur‐
ing the mowing operation.
4 Safety Precautions English
0458-011-0101-A 9

► If the blade disk or blades are
blocked by an object: Stop the robot
mower and activate the device lock.
Only then remove the object.
► Keep children away from the robot
mower and mowing area.
► Keep animals away from the robot
mower and mowing area.
► Do not climb or sit on the robot
mower. Do not transport children,
animals or objects on the robot
mower.
■If the behavior of the robot mower changes
during operation or feels unusual, it may no
longer be in a safe condition. This may result
in serious injury to people and damage to
property.
►Press the STOP pushbutton and activate
the device lock. Contact a STIHL author‐
ized dealer.
■If the blades hit a foreign object during the
mowing operation, the blades or parts of them
can be damaged or ejected at high speed.
This may result in injury to people and dam‐
age to property.
►Remove foreign objects from the mowing
area.
► Remove broken off blades or parts of
blades from the mowing area.
■ When the STOP pushbutton is pressed, the
blade disk with the blades will continue to
rotate for a short time. People may be seri‐
ously injured.
►Wait until the blade disk is no longer rotat‐
ing.
■ If the blades hit a hard object during the mow‐
ing operation, sparks can be produced and the
blades can be damaged. Sparks can cause
fires in a flammable environment. Persons
may be seriously or fatally injured, and prop‐
erty may be damaged.
►Do not use in a flammable environment.
► Make sure that the blades are in a safe
condition.
DANGER
■If the robot mower is operating near live elec‐
tric cables, the blades can come in contact
with the cables and damage them. There is a
risk of serious or fatal injury.
►Do not operate the robot mower in the vicin‐
ity of live cables.
4.8 Charging
WARNING
■A damaged or defective power supply may
produce an unusual smell or emit smoke dur‐
ing the charging process. This may result in
injury to people and damage to property.
►Disconnect the mains plug from the wall
socket.
■ The power supply can overheat and cause a
fire if heat dissipation is inadequate. Persons
may be seriously or fatally injured, and prop‐
erty may be damaged.
►Do not cover the power supply.
4.9 Connecting to the power supply
Contact with live components may occur for the
following reasons:
–The connecting cable or the extension cord is
damaged.
–The mains plug of the connecting cable or
extension cord is damaged.
–The socket is not properly installed.
DANGER
■ Contact with live parts may result in electric
shock. This may result in serious or fatal injury
to the user.
►Check that the wires and their mains plugs
are undamaged.
If the connecting cable or the extension
cord is damaged:
► Do not touch the damaged area.
► Disconnect the mains plug from the
wall socket.
►Be sure your hands are dry before touching
the wires and their mains plugs.
► Insert mains plugs only in a properly instal‐
led and fused wall socket.
► If the wall socket is outside of a building:
Make sure that the socket is approved for
outdoor use.
►Install the power supply with a fault current
circuit breaker (30 mA, 30 ms).
► If the connecting cable or extension cable is
connected or disconnected, always grip the
plug and do not pull on the cable.
■A damaged or unsuitable extension cable can
result in electric shock. There is a risk of seri‐
ous or fatal injury.
►Use an extension cable with the correct
cable cross-section, 23.5.
► Use a splash water protected extension
cable approved for outdoor use.
► Protect plug connection between the power
supply and extension cable against water.
English 4 Safety Precautions
10 0458-011-0101-A

► Use an extension cable with the same
specifications as the power supply's con‐
necting cable.
WARNING
■An incorrect line voltage or mains frequency
can result in an overvoltage in the power sup‐
ply. The power supply may be damaged.
►Make sure the line voltage and mains fre‐
quency match the data on the power sup‐
ply's rating label.
■If the power supply is connected to a power
strip, electrical components may be overloa‐
ded during the charging process. The electri‐
cal components may overheat and cause a
fire. Persons may be seriously or fatally
injured, and property may be damaged.
►Ensure that the technical specifications for
the power strip are not exceeded by the
information on the rating plate of the power
supply and of all electrical devices connec‐
ted to the power strip.
■An improperly routed connecting cable, exten‐
sion cable or charging cable can be damaged
and cause people to trip over them. This may
result in serious injury to people and damage
to property.
►Route the wires and charging cable so that
they are outside of the mowing area.
► Route and mark the wires and charging
cable so that they will not be damaged by
work with a gardening device or tool.
►Route and mark the wires and charging
cable in such a way that people cannot trip
over them.
►Route the wires and charging cable in such
a way that they are not under tension or
tangled.
►Route the wires and charging cable in such
a way that they will not be damaged, bent,
crushed or will not chafe.
►Protect the wires and charging cable from
heat, oil and chemicals.
► Route the wires and charging cable so that
they are not on a permanently wet surface.
■ If electrical wiring and conduits are routed in
the wall, they may be damaged if the power
supply is mounted on the wall. Contact with
wiring can result in electric shock. This may
result in serious injury to people and damage
to property.
►Make sure there is no electrical wiring or
conduits in the wall at the proposed mount‐
ing site.
►Mount the power supply on a wall as descri‐
bed in this User Manual.
■ If the power supply is connected to a genera‐
tor, the electricity supply cannot be perma‐
nently ensured and the robot mower may not
function properly. The power supply may be
damaged by fluctuations in the electricity sup‐
ply.
►Only connect the power supply to a prop‐
erly installed socket.
4.10 Transporting
4.10.1 Robot mower
WARNING
■ The robot mower may tip over or move during
transport. This may result in injury to people
and damage to property.
► Stop the robot mower and activate
the device lock.
► Secure the robot mower with lashing straps,
belts or a net so that it cannot tip over or
move.
4.10.2 Battery
The battery has been installed in the robot
mower and must only be removed by a STIHL
authorized dealer.
WARNING
■The battery is not protected against all envi‐
ronmental conditions. The battery may be
damaged if it is exposed to certain ambient
conditions, and damage to property may
occur.
►Never transport a damaged battery.
■ The battery may turn over or shift during trans‐
port. Persons may be injured, or property may
be damaged.
►Pack the battery in packaging in such a way
that it cannot move.
► Secure the packaging so that it cannot
move.
4.10.3 Docking station and power supply
WARNING
■The docking station or power supply may tip
over or move during transport. This may result
in injury to people and damage to property.
►Disconnect the mains plug from the wall
socket.
► Remove the robot mower from the docking
station.
4 Safety Precautions English
0458-011-0101-A 11

► Secure the docking station and power sup‐
ply with lashing straps, belts or a net to
ensure that they cannot tip over or move.
■The connecting cable and charging cable are
not intended to carry the weight of the power
supply or docking station. The connecting
cable, power supply, charging cable or dock‐
ing station may be damaged.
►Disconnect the charging cable from the
power supply and docking station and coil
it.
►Grip the docking station by the base plate
and hold it firmly.
► Wind up the connecting cable and attach it
to the power supply.
► Grip the power supply by the housing and
hold it firmly.
4.11 Storing
4.11.1 Robotic Mower
WARNING
■ Children are not aware of and cannot assess
the dangers of the robot mower. Children may
be seriously injured.
► Stop the robot mower and activate
the device lock.
► Store the robot mower out of the reach of
children.
■ Moisture may cause the electrical contacts on
the robot mower and metal components to
corrode. The robot mower may be damaged.
►Store the robot mower in a clean and dry
condition.
■ The robot mower may start unintentionally and
begin to move if its device lock is not activated
before storage. This may result in serious
injury to people and damage to property.
► Stop the robotic mower and activate
the device lock.
■ The hood and handles are not intended to be
used to hang up the robotic mower. Safety
devices may be rendered inoperative, and the
robot mower may be damaged.
►Store the robotic mower as described in this
User Manual.
4.11.2 Battery
The battery has been installed in the robot
mower and must only be removed by a STIHL
authorized dealer.
WARNING
■ Children are not aware of and cannot assess
the dangers of the battery. Children may be
seriously injured.
►Store the battery out of the reach of chil‐
dren.
■ The battery is not protected against all ambi‐
ent conditions. If the battery is exposed to cer‐
tain ambient conditions, the battery may be
irreparably damaged.
►Store the battery in a clean and dry condi‐
tion.
► Store the battery in an enclosed space.
► Do not store the battery outside of the
specified temperature limits, 23.6.
4.11.3 Docking station and power supply
WARNING
■ Children are not aware of and cannot assess
the dangers of a docking station or power sup‐
ply. Children can be seriously injured or killed.
►Remove the robot mower from the docking
station.
► Store the docking station and power supply
out of the reach of children.
■ The docking station and the power supply are
not protected against all environmental condi‐
tions. If the docking station and power supply
are exposed to certain environmental condi‐
tions, they may be damaged.
►Remove the robot mower from the docking
station.
► If the power supply is hot: Allow the power
supply to cool down.
► Store the docking station and power supply
in a clean and dry condition.
► Store the docking station and power supply
in an enclosed space.
► Do not store the power supply outside of
the specified temperature limits, 23.6.
■ The connecting cable and charging cable are
not intended to carry the weight of the power
supply or docking station. The connecting
cable, power supply, charging cable or dock‐
ing station may be damaged.
►Disconnect the charging cable from the
power supply and docking station and coil
it.
►Grip the docking station by the base plate
and hold it firmly.
► Wind up the connecting cable and attach it
to the power supply.
► Grip the power supply by the housing and
hold it firmly.
English 4 Safety Precautions
12 0458-011-0101-A

4.12 Cleaning, maintenance and
repair
WARNING
■The robot mower may start unintentionally if
the device lock is not activated during clean‐
ing, maintenance or repair operations. This
may result in serious injury to people and
damage to property.
► Stop the robot mower and activate
the device lock.
■ Harsh detergents or cleaning with a high pres‐
sure washer or sharp metallic objects can
damage the robot mower. If the robot mower
is not cleaned correctly, components may no
longer function properly or safety devices may
be rendered inoperative. People may be seri‐
ously injured.
►Clean the robot mower as described in this
User Manual.
■ Harsh detergents or cleaning with a high pres‐
sure washer or sharp metallic objects can
damage the docking station, power supply,
connecting cable, charging cable and plug
connections. If the docking station, power sup‐
ply, connecting cable, charging cable or their
plug connections are not cleaned correctly,
components may no longer function properly
or safety devices may be rendered inopera‐
tive. People may be seriously injured.
► Disconnect the power supply's mains plug
from the wall socket.
► Clean the docking station, power supply,
connecting cable, charging cable and their
plug connections as described in this User
Manual.
■If the robot mower, docking station or power
supply are not serviced or repaired correctly,
components may no longer function properly
or safety devices may be rendered inopera‐
tive. There is a risk of serious or fatal injury.
►Do not service or repair the robot mower,
docking station and power supply yourself.
► If the robot mower, docking station or power
supply require servicing or repairs: Contact
a STIHL authorized dealer.
►Maintain the blades as described in this
User Manual.
■ The user can be cut by the sharp cutting
edges of the blades while cleaning or servicing
the mowing unit. This may result in injury to
the user.
►Wear work gloves made of robust material.
■ If the power supply's connecting cable is faulty
or damaged:
► Replace power supply.
■ If the plug of the diagnostic socket on the bot‐
tom of the robot mower does not fit correctly,
moisture and dirt can penetrate the robot
mower. The robot mower may be damaged.
►Check the fit of the plug during each clean‐
ing and blade change.
► Do not operate the robot mower with a
missing or damaged plug.
5 Description of Operation
5.1 Functional Description
1
2
3
0000099956_001
The robot mower mows the grass in randomly
selected paths. It is necessary to route a perime‐
ter wire (1) so the robot mower can identify the
boundaries of the mowing area.
The perimeter wire (1) transmits a signal to the
robot mower. The signal is generated by the
docking station.
The robot mower identifies fixed obstacles (2) in
the mowing area using ultrasound sensors and a
bump sensor.
If the robot mower identifies a fixed obstacle (2),
it will slow down, bump into the fixed obstacle
and then continue to move in a different direc‐
tion.
Areas (3) the robot mower must not navigate and
obstacles it must not come into contact with must
be blocked off from the remaining mowing area
with the help of the perimeter wire (1).
If the robot mower identifies a blocked-off
area (3), it will slow down and then continue to
move in a different direction.
In mowing operation, the robotic mower leaves
the docking station by itself and mows the lawn.
The robotic mower is operated by the
MY iMOW® app and the buttons in the control
panel on the robotic mower. Light strips on the
robotic mower as well as an artificially generated
5 Description of Operation English
0458-011-0101-A 13

voice output provide information about the cur‐
rent status of the robotic mower.
4
0000100412_001
If the battery's state of charge is low, the robotic
mower will search for the nearest guide wire (4)
during the mowing operation. If a guide wire (4)
is recognized, the robotic mower will return to the
docking station by itself. The docking station
recharges the battery. At least one guide wire (4)
must be installed in the mowing area. A maxi‐
mum of two guide wires can be installed. If the
mowing operation is canceled or the battery must
be charged, the robotic mower can be sent
directly back to the docking station using the
MY iMOW® app or HOME pushbutton.
A
B
0000099824_001
4
5
Up to three starting points (5) can be specified
on a guide wire (4). The robotic mower can move
specifically to the respective starting point and
start mowing from there.
The mowing area can be divided into several
zones (example: A and B) by the guide wire (4).
The zones are defined by a starting point (5).
The robotic mower can be directed from the
selected starting point to the left or right into the
desired zone. The robotic mower can then mow
specifically in the selected zone. The starting
points and zones are managed in the
MY iMOW® app and can be taking into account
in the mowing plan.
7
6
0000100413_001
8
If there is a confined section (6) in the mowing
area, the robotic mower navigates the confined
area, provided that a particular minimum width is
maintained between the perimeter wires. If the
minimum distance cannot be maintained, a guide
wire (7) must be routed through the confined
section (6). The guide wire (7) then guides the
robotic mower directly through the confined sec‐
tion (6) to a starting point (8). From the starting
point (8), the robotic mower can mow the mow‐
ing area behind the confined section (6). The fre‐
quency at which the robotic mower returns to the
starting point (8) can be managed by the
MY iMOW® app and taken into account in the
mowing plan.
6 Preparing the Mowing Area
and Robot Mower for Oper‐
ation
6.1 Planning and preparing mow‐
ing areas
Plan and prepare the mowing area prior to com‐
missioning the robot mower. This enables a
robust installation and smooth operation and
eliminates potential sources of faults.
Planning mowing surfaces
► Familiarize yourself with the descriptions
about the docking station and wire routing in
the following sections.
► Transfer the information to your own garden:
–Outline of the mowing area
–Position of the docking station
–Routing of the perimeter wire (note descri‐
bed distances to the edges and wire routing
cases)
–Routing of the guide wire(s) (at least one,
maximum of two)
English 6 Preparing the Mowing Area and Robot Mower for Operation
14 0458-011-0101-A

Preparing mowing areas
a
0000099957_001
► Remove any objects lying around.
► Remove metals, magnetic materials and mate‐
rials that conduct electricity as well as old
perimeter wires.
► Mow lawns with a lawn mower to the cutting
height that will later be set for the operation of
the robot mower. The default setting for the
cutting height on the robot mower is a = 6 cm.
► Level out holes and rough, uneven patches.
► Where ground is hard and dry, slightly moisten
the mowing area to make driving the anchor‐
ing stakes easier.
0000100288_001
► As a result of its design, the robot mower
leaves a strip with unmown lawn along unnavi‐
gable areas. This strip can be used, for exam‐
ple, to sow flower seeds and create areas with
blossoming vegetation for insects.
a
0000099825_001
► If you want to mow without leaving an edge
along inaccessible areas: Install edging stones
or flagstones with a minimum width of
a = 24 cm along these areas.
6.2 Preparing the robot mower for
operation
► Remove the packaging material and transport
locks.
► Ensure that the following components are in a
safe condition:
–Robot mower, 4.6.1
–Blades, 4.6.2
–Battery, 4.6.3
–Docking station and power supply, 4.6.4
►Positioning the docking station, 7
►Installing the perimeter wire, 8
►Completing the perimeter wire installation,
9.1
►Installing the guide wire, 10.1
►Electrically connecting the docking station,
11.1
►Charging the robot mower, 12.1
►Locking the Bluetooth® radio interface, 13.1
► If you cannot carry out these steps: Do not use
the robot mower and contact a STIHL author‐
ized dealer for assistance.
7 Positioning the docking
station
7.1 General requirements
1
Wi-fi
0000099842_001
7 Positioning the docking station English
0458-011-0101-A 15

► Choose the docking station location so that
the following conditions are met:
–The charging cable (1) can be installed out‐
side of the mowing area to connect to a suit‐
able wall socket.
–The docking station and power supply are
positioned in a clearly visible area.
–The docking station is in the mowing area
that is the largest or most frequently
mowed.
–If possible, protect the location against
adverse weather conditions and direct sun‐
light.
–If possible, the docking station is within
range of a wireless network (WLAN connec‐
tion).
–If possible, in a mowing area with a slope,
the docking station is in the lower area of
the slope.
0000099849_001
► Align the docking station so that the following
conditions have been met:
–The docking station has been positioned on
a level surface.
–The opening of the docking station is facing
forward toward the mowing area.
–The docking station has been aligned hori‐
zontally and is not tilted to the side, the front
or the rear.
–The base plate does not sag and lies flat on
the ground.
7.2 Positioning the docking station
The correct position of the docking station
depends on the planned location and its sur‐
roundings.
► Select the location and set up the docking sta‐
tion as described.
Positioning the docking station within the mowing
area
a
90°
1
0000100240_001
The docking station is at the edge of the mowing
area by a wall and the guide wire (1) can be
routed for a =2 m in a straight line from the dock‐
ing station to the mowing area.
a
90°
1
0000099844_001
The docking station is at the edge of the mowing
area. The adjacent area is navigable and the
guide wire (1) can be routed for a =2 m in a
straight line from the docking station to the mow‐
ing area.
90° a
1
0000100241_001
The docking station is partially in a bed and parti‐
ally on the mowing area and the guide wire (1)
can be routed for a =2 m in a straight line from
the docking station to the mowing area.
English 7 Positioning the docking station
16 0458-011-0101-A

a
90°
1
0000099845_001
The docking station is partially in the mowing
area and the guide wire (1) can be routed for
a =2 m in a straight line from the docking station
to the mowing area.
►Prepare the docking station, 7.3.
► Setting up the docking station in a mowing
area, 7.4.
Setting up the docking station outside the mow‐
ing area
a
ab
1
0000099846_001
The docking station is outside the mowing area.
The minimum lateral distance toward adjacent
areas must be at least a = 15 cm.
The minimum distance between the front edge of
the docking station and the mowing area must be
at least b = 2 m.
With this variant, it is mandatory to define a start‐
ing point (1) within the mowing area at the con‐
clusion of commissioning. The robotic mower
then starts mowing from this point and not
directly from the docking station. Starting points
can be set using the MY iMOW® app. The
approach frequency of the starting point (1) must
be set in the app at 100%.
►Prepare the docking station, 7.3.
► Setting up the docking station outside the
mowing area, 7.5.
Setting up the docking station in the center of the
mowing area
b
a
a
c
c
1
1
0000099847_001
The docking station is positioned as an island in
the center of the mowing area.
With this variant, the perimeter wire is routed
around the docking station toward the rear and
the edge of the mowing area. The guide wire is
routed toward the front to the edge of the mow‐
ing area.
The minimum lateral distance to adjacent areas
must be at least a = 37 cm (length: 1x iMOW®
Ruler).
The minimum distance between the rear edge of
the docking station and the edge of the mowing
area must be b = 2 m.
It must be possible to route the guide wire (1) for
c = 2 m in a straight line from the docking station
to the mowing area.
►Prepare the docking station, 7.3.
► Set up the docking station in the center of the
mowing area, 7.6.
7 Positioning the docking station English
0458-011-0101-A 17

7.3 Preparing the docking station
Connecting the charging cable.
NOTICE
■ In assembled condition, the plug connections
of the charging cable are protected against
contamination, e.g. dust and dirt. Contamina‐
tion of the plug connections may result in
breakdowns of the docking station.
►Protect open plug connections against con‐
tamination.
► Clean the contaminated plug connections
as described in this User Manual.
0000100046_001
Normally the charging cable is connected from
the rear.
0000100401_001
If the docking station has been positioned
directly against a wall, it is also possible to install
the charging cable under the base plate. The
charging cable can be routed out of the base
plate to the left or right.
1
0000099954_001
► Slightly bend the hood (1) toward the outside
on both sides and remove it upward.
2
3
0000100292_001
► Press the retaining latch (2) and open the
cover (3).
0000100047_001
► If you intend to connect the docking station
from the rear:
► Insert the plug (4) into the conduit (5) and
feed the charging cable (6) through.
Push the charging cable (6) upward inside
the docking station.
0000100051_001
A
B B
A
4
6
► If the docking station has been positioned
directly against a wall or you want to route the
charging cable underneath the base plate
toward the side:
► Open the edge and deburr it on the desired
side of the base plate at position (A).
► Cut out and deburr an opening in the center
of the base plate (B).
► Insert the plug (4) into the opening (B) and
feed the charging cable (6) through.
Push the charging cable (6) upward inside
the docking station.
English 7 Positioning the docking station
18 0458-011-0101-A

6
47
0000100049_001
► Secure the charging cable (6) in the cable
holder (7).
► Insert the plug (4).
The plug (4) audibly and noticeably engages
on both sides.
Securing the docking station
8
0000099826_001
► Secure the docking station on the ground with
four ground pegs (8).
Feeding the perimeter wire
9
10
0000099958_001
► Insert the beginning of the wire (9) into the
right conduit (10) and feed it through.
Push the perimeter wire (9) upward inside the
docking station.
37cm (14.5 in.)
15cm (6 in.)
27,5cm (10.75in.)
a
0000099959_001
► Feed the perimeter wire through until it pro‐
trudes upward for a = 37 cm (length:
1x iMOW® Ruler).
9
11
0000100402_001
► Using the appropriate cable marker (11), mark
the beginning of the wire (9) near the housing.
Marking will facilitate the subsequent connec‐
tion to the correct terminal.
7.4 Positioning the docking station
within the mowing area
1
2
0000099960_001
► Install the perimeter wire (1) in the base plate
so that the guide wire lies flat in the cable duct
and is secured by the hook (2).
4
1
3
0000100294_001
► Attach the perimeter wire (1) directly on the
base plate (3) with a fixing pin (4).
If the docking station is against a wall:
7 Positioning the docking station English
0458-011-0101-A 19

1
3
0000099961_001
► Route the perimeter wire (1) 37 cm (length:
1x iMOW® Ruler) away from the base plate (3)
toward the side.
► Route the perimeter wire (1) in parallel to the
base plate (3) toward the edge of the mowing
area and maintain a distance from the wall of
37 cm (length: 1x iMOW® Ruler).
► Route the perimeter wire (1) clockwise around
the mowing area, 8.
If the docking station is in an adjacent, navigable
area:
1
3
0000100296_001
► Route the perimeter wire (1) 37 cm (length:
1x iMOW® Ruler) away from the base plate (3)
toward the side.
► Route the perimeter wire (1) in parallel to the
base plate (3) toward the edge of the mowing
area.
► Route the perimeter wire (1) clockwise around
the mowing area, 8.
If the docking station is partly positioned in a bed
and partly in the mowing area:
1
3
0000099964_001
► Route the perimeter wire (1) away from the
base plate (3) toward the side and maintain a
distance of 37 cm (length: 1x iMOW® Ruler) in
parallel to the bed.
► Route the perimeter wire (1) clockwise around
the mowing area, 8.
If the docking station has been positioned partly
in a navigable area and partly in the mowing
area:
1
3
0000100397_001
► Route the perimeter wire (1) away from the
base plate (3) toward the side and along the
navigable area.
► Route the perimeter wire (1) clockwise around
the mowing area, 8.
7.5 Setting up the docking station
outside the mowing area
1
2
0000099965_001
► Install the perimeter wire (1) in the base plate
so that the guide wire lies flat in the cable duct
and is secured by the hook (2).
1
3
4
0000100295_001
► Attach the perimeter wire (1) directly on the
base plate (3) with a fixing pin (4).
English 7 Positioning the docking station
20 0458-011-0101-A
Other manuals for iMOW 5.0
1
This manual suits for next models
2
Table of contents
Other Stihl Lawn Mower manuals

Stihl
Stihl RMA 235.1 User manual

Stihl
Stihl RME 339 User manual

Stihl
Stihl FCS-KM User manual

Stihl
Stihl RMA 410 C User manual

Stihl
Stihl RMA 235 User manual

Stihl
Stihl RMA 339 User manual

Stihl
Stihl RMA 460 User manual

Stihl
Stihl RMA 460 V User manual

Stihl
Stihl RMA 253.0 User manual

Stihl
Stihl RM 2.1 R User manual

Stihl
Stihl RME 235.0 User manual

Stihl
Stihl RME 235 User manual

Stihl
Stihl FS 110 User manual

Stihl
Stihl RMA 460 V User manual

Stihl
Stihl FC 96 User manual

Stihl
Stihl RMA 248 User manual

Stihl
Stihl FS 38 User manual

Stihl
Stihl RLA 240 User manual

Stihl
Stihl RMI 522 C User manual

Stihl
Stihl RME 235.0 User manual