Streetwize Leisurewize LWKB3 Specification sheet

Information for use
LWKB3
32 Litre Thermoelectric
Cooler & Warmer Box
Intention For Use
Product Elements
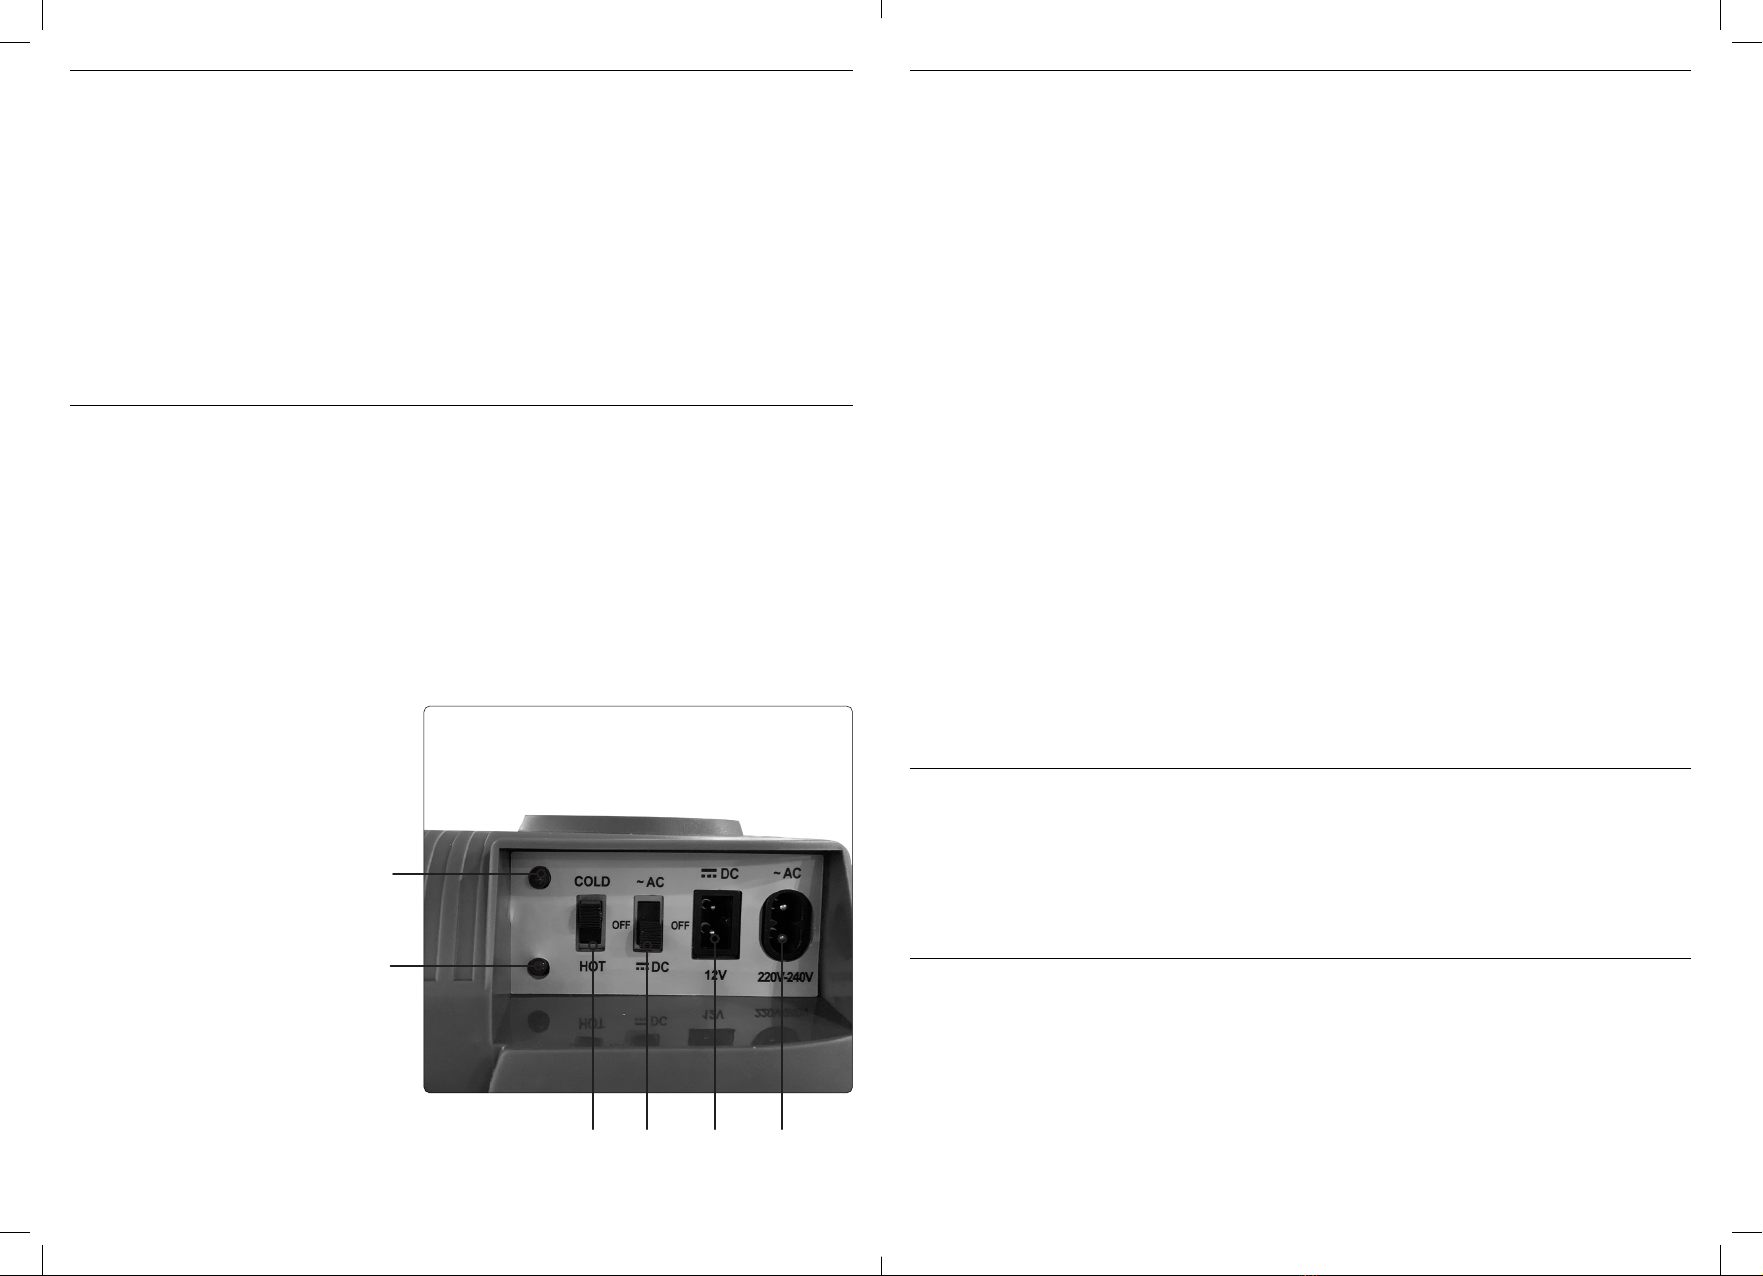
Fig. 1
Thank you for purchasing this Thermoelectric Cooler & Warmer Box from Streetwize. This
product is purposely designed to help keep your food and drink contents either cool or
warm, and you can easily switch between the warm and cold setting at a flick of switch.
This dual function cooler & warmer box is perfect for long road trips, caravan & motorhome
holiday makers, campers, coach tours, boat users and for use at home. And since it is a
low wattage cooler/warmer box, it is the perfect eco-friendly solution for preserving your
food & drink, whether you want it warm or cold, when you’re on the road.
Before using this product, we advise that you read through all the information on this
document and please keep it for future reference.
Figure 1 below shows the control panel, which also has the power input ports.
A. Green LED light
B. Red LED light
C. Hot/Cold Setting Switch
D. AC/DC Input Switch
E. 12V DC Power Input Port
F. 220-240V AC Power Input Port
1. Leisurewize 32L Thermoelectric Cooler & Warmer Box
2. 230V AC mains power cable
3. 12V DC power cable
4. Separator insert x 1
Usage Instructions
Usage Instructions
Maintenance & Care
PLEASE NOTE: This product is NOT designed to heat cold food or vice versa. It is primarily designed to
preserve the temperature of the food and drink content.
Prior to Use
Before connecting the unit to your chosen power source, please ensure both the Hot/Cold Setting Switch (C)
and the AC/DC Input Switch (D) are set to the OFF position.
Connecting to Power
230V AC Power Input: If you want to power the unit via a mains socket, you will need to connect the supplied
230V AC mains power cable into its designated port (F), then plug it into your mains socket and switch it on.
Then set the AC/DC Input Switch (D) to AC.
12V DC Power Input: If you want to power the unit via your vehicle’s 12V socket, you will need to connect the
supplied 12V DC power cable into its designated port (E), then plug it into your vehicle’s 12V socket. Then
set the AC/DC Input Switch (D) to DC and then switch on your vehicle.
Using the Warm/Cool Setting
Once the Thermoelectric Cooler & Warmer Box has been connected to power, you can choose either the cold
or warm setting.
Using the Warm Setting: To use the warm setting, place all your hot/warm food and drink contents inside the
container first. Then, simply set the Hot/Cold Setting Switch (C) to Hot. On the panel, you will notice the Red
LED light (B) flashing.
Using the Cold Setting: To use the cool setting, place all your cold/frozen food and drink contents inside the
container first. Then, simply set the Hot/Cold Setting Switch (C) to Cold. On the panel, you will notice the
Green LED light (A) flashing.
As mentioned, this product is NOT designed to heat cold food or vice versa. To get the optimum performance
out of the Thermoelectric Cooler & Warmer Box, please follow the guidance below.
Cold Setting: To obtain optimum cooling effect, we advise that you put pre-chilled or pre-frozen food and drink items.
Warm Setting: When using the warm setting, we advise that you put pre-warm or pre-hot food and drink items.
To clean the Thermoelectric Cooler & Warmer Box, please use a clean, dry cloth.
A
B
C D E F

Health & Safety
• Keep the fan free from any object such as a towel, cloth or any other solid object. Avoid getting the fan stuck
whilst the cooler/warmer box is in use as will overheat and potentially cause a fire
• Never attempt to open up or repair the product. If the product is not working properly, please take it to a qualified
professional.
• Ensure both power cables are free from damage or fault. Never use damaged or faulty cables.
• Keep the product away from any flammable substances. Risk or fire/explosion.
• Avoid using the product where there is a lot of moisture. Electrical hazard.
• Never use the appliance upside down
• Avoid dropping the product.
• Avoid splashing or spilling any kind of liquid onto the product.
Technical Specifications
Product
Supplier code
Power Output
Voltage
Refrigeration Type
Cooling system
Cold effect
Hot effect
Power cables length
Material
Filling material
Dimensions
Leisurewize 32L Thermoelectric Cooler & Warmer Box
LWKB3
AC: Cool: 60W/Warm: 55W
DC: Cool: 46W/Warm: 42W
DC12V/ AC220V~240V
Semiconductor
Thermoelectric cooling technology
Cooling 13-18°C below ambient temperature(25°C)
Warms to 50-65°C by the heater
2m
PP
EPS foam
47.5cm x 43.5cm x 44.5cm
Streetwize, Ashburton Road West,
Trafford Park, Manchester, M17 1RY
www.streetwizeaccessories.com
EU Regd. Address: Ace Supply Co (Europe) Ltd. D02 A098, ROI
For Product Support:
E: suppor[email protected]
T: +44 (0)161 447 8597
For Trade Enquiries:
T: +44 (0)161 447 8580
Other Streetwize Camping Equipment manuals


