Stump Chimney Stump remove User manual
Stump Chimney™
Instructions
Stump Chimney™, the environmentally friendly stump remover,
is a Swedish product that is patented and manufactured in
Sweden.
Read the full description before you start.
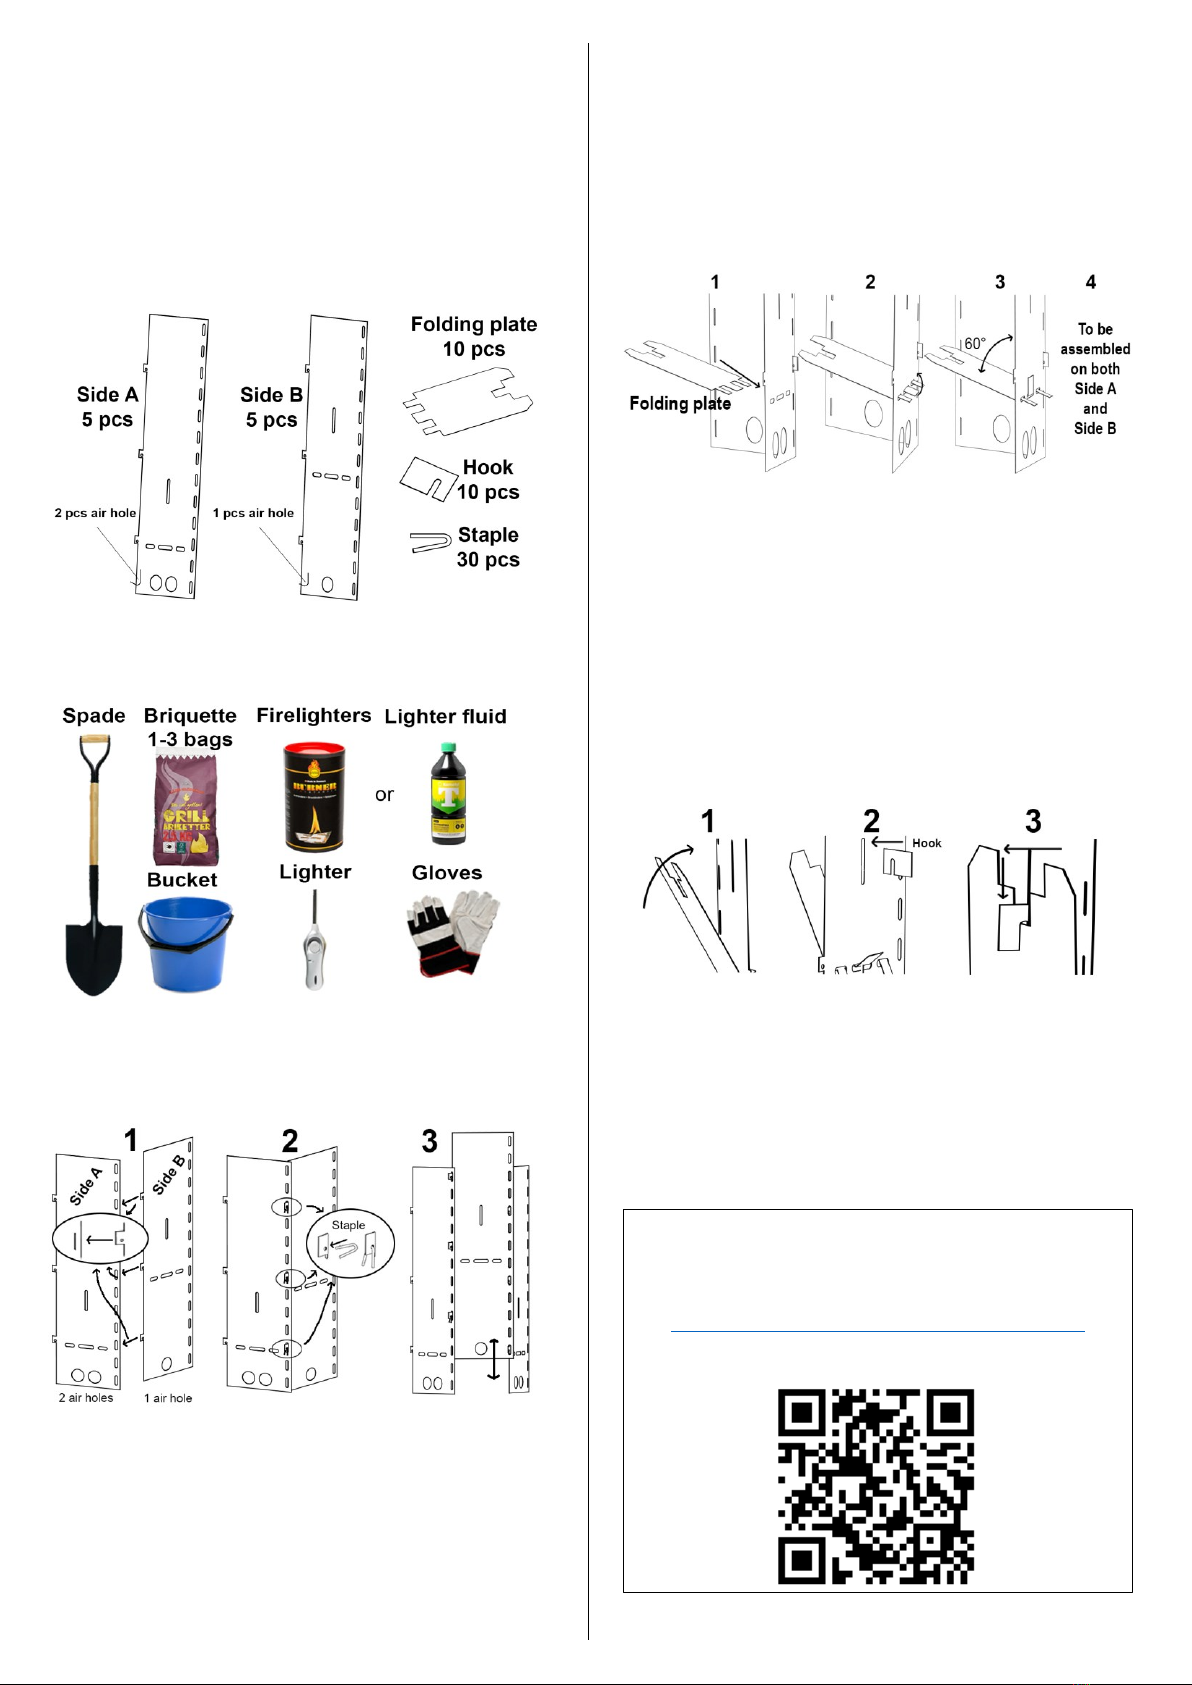
Components
These are needed in addition to a Stump
Chimney™
Assembly
1. Assemble the sides
1. Always start with side A. Insert the tongues of Side B into
the slits of Side A. The air holes should always be located
on the bottom.
2. Insert the staple into the hole on the tongue. Each tongue
must be locked with a staple. Then continue to assemble
the sides. Alternate between Side A and Side B.
3. If the ground is uneven or if there are many roots, one or
several sides can be mounted higher up or lower down than
the adjacent sides. It is sufficient that two of the three
tongues are fastened in a slot.
The number of sides depends on the size and appearance of
the stump. The ideal gap between the stump and the Stump
Chimney™ is 1 briquette. If the gap is too large, many more
briquettes are to be used and less heat is generated around the
stump.
See more under Number of sides to a stump under other
information.
____________________________
2. Attach the folding plates
When the sides are connected into a circle, the folding plates
can be mounted.
1. The folding plate is inserted into the horizontal slots from the
inside.
2. Bend up the middle tongue on the outside of the chimney.
3. The angle of the folding plate should be about 60 degrees
when hanging freely.
4. Repeat this process until all Side A and Side B have a
folding plate attached to it.
____________________________
3. Lock the folding plates in the upright position
1. Fold the folding plate on the inside so that it points straight
up.
2. Insert the Hook from the outside, into the slot above the
folding plate attachment.
3. Insert the hook until it can be lowered and lock the folding
plate.
This is done to make it easier when adjusting the Stump
Chimney™ over the stump and when filling in the grill
briquettes.
Page 1 (4)
Video for Assembly
Watch a video on how to assemble the Stump
Chimney™ by visiting
www.stumpchimney.com/assemble-stump-chimney/
or scanning the QR code

Burn down the stump
Read the full description before you start.
____________________________
1. Dig a trench
Dig a trench as best as you can around the stump that is at
least a year old. Preferably about 10 cm deep. The stump will
burn down as far as the trench is deep.
The trench also acts as a barrier, preventing hot coals from
spreading.
The sides of the Stump Chimney™ don’t get very hot. However,
it gets very hot at the bottom of the trench where the air holes
are located and above the upper opening. Make sure there is
nothing that can ignite above the chimney opening or on the
ground nearby.
____________________________
Tips for better combustion
Damp and large stumps can be more difficult to burn.
Drill holes.
Drill a few holes in the stump with a long drill. Drill diagonally
through the entire stump. The hole should start at the top edge
of the stump and end on the opposite side down near the
ground. The heat will rise into the hole and the stump will also
burn from the inside. With more holes, the stump burns up
faster. The best drill is a centre drill or twist drill, which is 400
mm long with a diameter of 16 - 20 mm. The drill can be bought
in a builder's shop and costs from £ 5 or more depending on the
quality.
Sawing with a chainsaw
Saw an X with a chainsaw. With more cuts, the stump will burn
faster.
NB! The tips mentioned above are not mandatory, but they
reduce the number of times one needs to fill with more
briquettes, and it takes less time to burn down the stump.
____________________________
2. Place the Stump Chimney™ over the stump,
fill with briquettes and light.
A. Place the Stump Chimney™ over the stump.
If there are roots protruding from the stump, they can either be
cut off or the sides of the Stump Chimney can be adjusted in
height. It is important that the Stump Chimney™ stands firmly
on the ground and does not topple over. The ideal gap between
the stump and the Stump Chimney™ is 1 briquette. If the gap is
too large, many more briquettes are necessary, and less heat is
generated around the stump.
Seal the area where the chimney stands on the ground to
prevent drafts. Use the soil produced when the trench was dug.
The air should preferably enter through the air holes at the
bottom of the chimney. If there is too much draft, the briquettes
will burn too quickly.
B. Fill with briquettes and light - use either a lighter
or lighter fluid.
NB very important! If the folding plates are not unfolded,
the briquettes will end up on top of the folding plates. Then they
won't do any good and the folding plate will be ruined.
With lighter fluid.
1. Fill the gap with briquettes between the sides of the Stump
Chimney and the stump, so that they come up to the edge
of the stump. Make sure the briquettes reach the ground.
Sometimes you have to push the briquettes down if they get
stuck.
2. Pour lighter fluid (preferably environmentally friendly) from
above and light. If lighter fluid is used, minimal smoke will be
produced.
3. Remove the hooks of the folding plates so that the folding
plates can move freely.
With firelighters.
1. Fill in some briquettes in the space between the sides of the
stump chimney and the stump. Make sure the briquettes
reach the ground. Add 1-2 firelighters to each air hole so
that they can be lit from the outside. Add more briquettes so
that they reach the edge of the stump. Sometimes you have
to push the briquettes down if they get stuck.
2. Remove the hooks of the folding plates so that the folding
plates can move freely.
3. Light all firelighters from the outside, through the air holes.
When the briquettes are about to catch fire, they produce
smoke.
NB! SAFETY! NB!
Before lighting a Stump Chimney, make sure there is something
at hand to extinguish the fire in case something unexpected
happens. It can be a fire extinguisher, buckets of water or a
water hose. Also, remove nearby objects that could catch fire.
Examine soil conditions, e.g., if the soil is peat-rich, make sure it
is damp
____________________________
Page 2 (4)
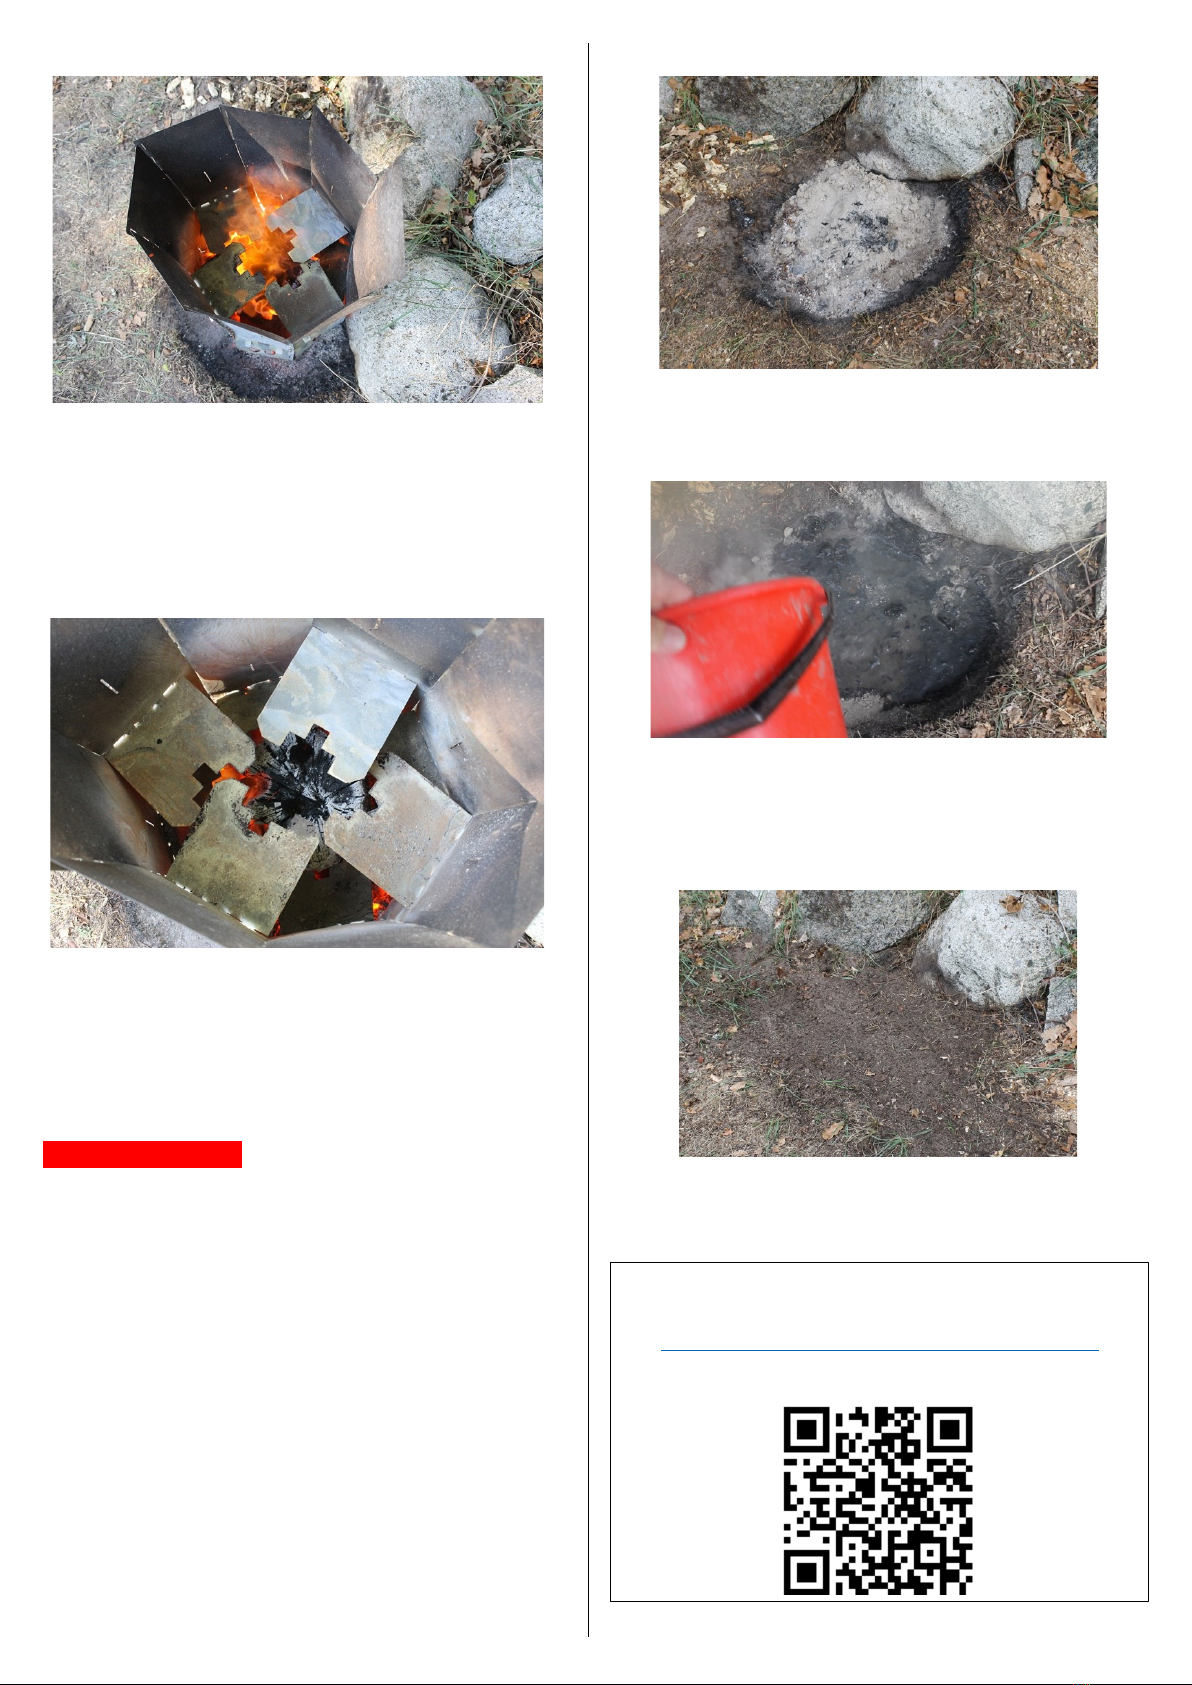
3. Let the fire burn for 1.5 - 2 hours
As the briquettes burn up, the patented folding plates will fold in
towards the stump, bringing pre-heated air towards the stump,
therefore improving combustion.
If the stump is low, the upper folding plates will not lean against
the stump. In this case they act as a barrier to keep the heat
close to the stump.
____________________________
4. The briquettes have burned up
The briquettes burn up after 1.5 to 2 hours.
For small dry stumps, there is no need to add more briquettes,
but in most cases another round of briquettes is needed.
1. Fold and lock the folding plates in upright positions. See how
in the part “Assembly” of these instructions. Wear gloves and
use a stick as the folding plates can be hot.
NB very important! If the folding plates are not unfolded,
the briquettes will end up on top of the folding plates. Then they
won't do any good and the folding plate will be ruined.
2. Fill up with the same amount of briquettes as the first time.
Make sure the briquettes reach as far down as possible.
The briquettes will catch fire from the residual heat around the
stump.
3. Remove the hooks so that the folding plates can move freely.
____________________________
5. Let the fire burn
Once the coal has burned up, the stump will not burn with an
open flame but will burn (smoulder) slowly inside the chimney.
This will take a few hours depending on the size of the stump. It
can take up to 24 hours.
____________________________
6. When the stump has burned up
Once the stump has burned up, simply lift off the Stump
Chimney™.
____________________________
7. Extinguish the remaining embers
In some cases, the remaining parts of the stump are still
smouldering. This can be difficult to see or feel. Always
extinguish it with plenty of water. Use at least two 10 l buckets,
preferably more.
____________________________
8. Fill in with soil
Now it's just a matter of filling the pit where the stump used to
be with soil and sowing in new grass or planting something
else.
Now the stump is gone
Page 3 (4)
Video How to burn down a stump
Watch a video showing all the above steps. Go to
www.stumpchimney.com/stump-chimney-how-it-works/
or scan the QR code.
Other information
Number of sides for a stump
Below are some guidelines on how many sides of the Stump
Chimney™ are needed for a stump. It all depends on what the
stump looks like.
Stump diameter
Number of sides
-19 cm
6 sides
19 - 24 cm
7 sides
24 - 30 cm
8 sides
30 - 35 cm
9 sides
35 - 40 cm
10 sides
40cm ->
See below.
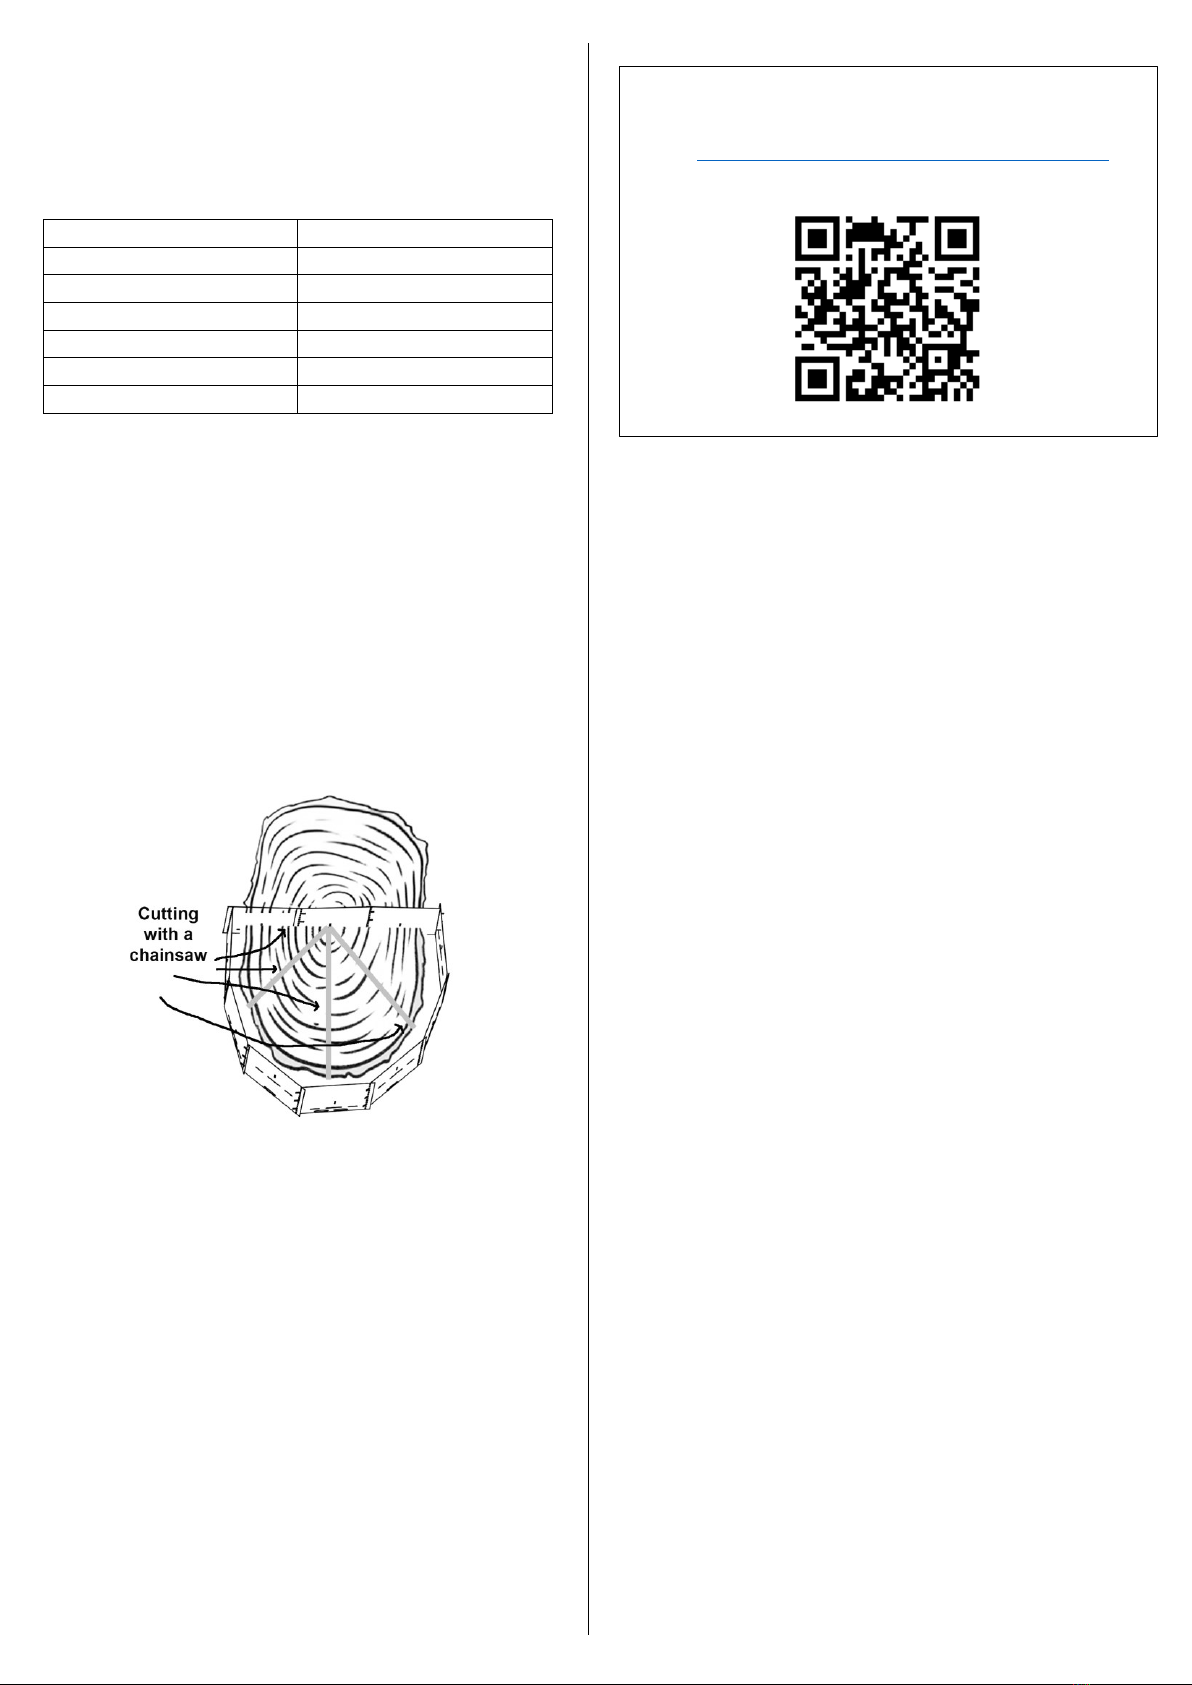
Stumps larger than 40 cm can be burnt in 2 different ways.
1. Two Stump Chimneys™. Use two Stump Chimneys to
increase the number of sides. These can be put together and
placed around a larger stump. With two Stump Chimneys, the
stump can be up to 60 cm in diameter.
2. Burn it down in stages. Cut through the stump with a
chainsaw that fits the Stump Chimney™. Cut several cuts to
speed up combustion. Adjust the Stump Chimney™ so that
some sides fit in the cut and the rest are placed around a part of
the stump. Burn down this part first. Then move the Stump
Chimney™ and burn the next part
Advantages of the Stump Chimney™
•Easy to use
•Easy to move around
•Easily adapted to the size and shape of the stump
•Can be reused for many stumps
•Less smoke than a regular charcoal grill
•Leaves no residues to be removed
•Takes up little storage space
•It is safe. The sides of the stump chimney do not get
hot.
•Environmentally friendly
•A Swedish invention that is patented and
manufactured in Sweden.
Warning
Stump Chimneys get hot. Make sure there is nothing nearby
that could start to burn.
Above the chimney opening it gets very hot. Make sure there is
nothing nearby that can catch fire.
Wear gloves when using the Stump Chimney.
Always have something handy to put out the fire in case
something unexpected happens.
Never light a fire if there is a fire ban in place.
Always make sure to use plenty of water once the stump has
burned down.
Examine the soil conditions, peat-rich soil must be damp.
If there is a lot of wind, the Stump Chimney™should not be
used.
Even if there is no fire ban in place, an assessment must be
made as to whether or not it is appropriate to burn it.
A fire should never be left unattended.
Read the full description before you start.
Other
It can be used for at least 10 stumps if the instructions for the
Stump Chimney™ are followed.
The Stump Chimney™ should be stored in a dry environment.
Otherwise, some parts may start to rust.
Once the Stump Chimney™ has been used, the ability of the
anti-corrosion surface layer to protect against rust will be
reduced and it may start to rust.
If the sides of the Stump Chimney™ are bent, the number of
times the side can be used is reduced.
When the Stump Chimney has been used, the metal in the
folding plates becomes a little more brittle. Try to minimise the
number of times the metal is bent.
Stump Chimney Instructions V7 English Page 4 (4)
See examples of how you can burn down a
stump with varying appearances
Go to www.stumpchimney.com/example-different-stumps/ or
scan the QR code.


