Summit Treestands SU82104 User manual

Dual Pro 82104, 11/2017
Dual Pro Ladder Treestand
PN#: SU82104
WARNING
!
FAILURE TO READ AND FOLLOW ALL MANUFACTURER’S
WARNINGS AND INSTRUCTIONS CONSTITUTES A MISUSE OF THIS
PRODUCT AND COULD RESULT IN SERIOUS INJURY OR DEATH!!
© 2018 Summit Treestands, LLC | 715 Summit Dr. Decatur, AL 35601
PH#: (800) 353-0634 | www.summitstands.com
PRINTED IN CHINA
• READ, FOLLOW AND UNDERSTAND ALL WRITTEN AND VIDEO WARNINGS AND INSTRUCTIONS BEFORE USE. INSPECT ALL EXPIRATION TAGS
PRIOR TO EACH USE. IF YOU DON’T COMPLETELY UNDERSTAND SAFE AND PROPER USE OF THE FULL BODY FALL ARREST HARNESS
SYSTEM (FBFAHS) OR TREESTAND, HUNT FROM THE GROUND! FAILURE TO FOLLOW ALL WARNINGS AND INSTRUCTIONS LISTED COULD
RESULT IN SERIOUS INJURY OR DEATH! IT IS REQUIRED THAT YOU WATCH AND UNDERSTAND THE DVD SUPPLIED WITH THIS PRODUCT &
THOSE SAFETY WARNINGS AND INSTRUCTIONS POSTED AT: www.summitstands.com/safety-videos
• WHEN HUNTING FROM A TREESTAND, FALLS CAN OCCUR ANY TIME AFTER LEAVING THE GROUND! ANY FALL CAN CAUSE SERIOUS INJURY
OR DEATH! THE USE OF A FULL BODY FALL ARREST HARNESS SYSTEM (FBFAHS) IS REQUIRED WHEN USING ANY TREESTAND. IF FBFAHS IS
NOT PRESENT, HUNT FROM GROUND LEVEL!
• THE USE OF THIS PRODUCT REQUIRES THE USE OF A FULL BODY FALL ARREST HARNESS SYSTEM (FBFAHS). THE FBFAHS MUST BE USED
AND ATTACHED TO THE TREE PRIOR TO GAINING ENTRY UPON THE TREESTAND PLATFORM, AND SHOULD BE WORN AND ATTACHED TO THE
TREE AT ALL TIMES WHILE USING THE TREESTAND UNTIL SAFELY BACK AT GROUND LEVEL. READ AND FOLLOW ALL INSTRUCTIONS THAT
WERE PROVIDED WITH YOUR FBFAHS.
• DO NOT USE THIS PRODUCT UNTIL YOU UNDERSTAND SAFE AND PROPER USE. READ AND FOLLOW ALL INSTRUCTIONS AND WARNINGS
PRIOR TO EACH USE!
• ALWAYS WEAR A FBFAHS THAT MEETS STRINGENT, INDUSTRY STANDARDS RECOGNIZED BY THE TMA. WEAR A FBFAHS EVERY TIME YOU
LEAVE THE GROUND, INCLUDING ASCENDING OR DESCENDING. SINGLE BELT STRAPS AND CHEST HARNESSES ARE NO LONGER ALLOWED
AND SHALL NOT BE USED! FAILURE TO USE A FBFAHS COULD RESULT IN SERIOUS INJURY OR DEATH!
• THE LENGTH OF THE HARNESS TETHER SHALL BE MINIMIZED AT ALL TIMES. IT SHALL BE ADJUSTED SO THAT IT IS ABOVE THE HEAD WITH
NO SLACK (OR SNUG) IN THE SEATED POSITION AND YOU SHALL HAVE MINIMUM AMOUNT OF SLACK POSSIBLE WHEN CLIMBING. FAILURE TO
DO SO MAY RESULT IN SUSPENSION WITHOUT THE ABILITY TO RECOVER TO YOUR TREESTAND. BE AWARE OF HAZARDS ASSOCIATED WITH
HANGING SUSPENDED IN A FBFAHS AND THE FACT THAT PROLONGED SUSPENSION IN A HARNESS MAY BE FATAL.
• ALWAYS NOTIFY SOMEONE OF YOUR HUNTING LOCATION IN CASE OF AN EMERGENCY. IF OTHERS ARE NOT AWARE OF YOUR HUNTING
LOCATION AND COMMUNICATION EFFORTS ARE UNSUCCESSFUL, YOU MUST HAVE A PERSONAL PLAN FOR RECOVERY/ESCAPE BEFORE
YOU ASCEND THE TREE - PROLONGED SUSPENSION IN A HARNESS CAN BE FATAL. IT IS IMPORTANT TO EXERCISE THE LEGS BY PUSHING
AGAINST THE TREE OR DOING OTHER FORMS OF CONTINUOUS LEG EXERCISES TO AVOID BLOOD POOLING WHILE BEING SUSPENDED.
HUNTERS WITH VARYING DEGREES OF PHYSICAL FITNESS MAY REQUIRE DIFFERENT PLANS TO RECOVER/ESCAPE IN ORDER TO AVOID
EFFECTS OF PROLONGED SUSPENSION. HAVE A PERSONAL PLAN AND PRACTICE IT IN THE PRESENCE OF A RESPONSIBLE ADULT BEFORE
LEAVING THE GROUND. NO ESCAPE/RECOVERY PLAN WILL WORK FOR EVERY HUNTER ON EVERY TREE IN EVERY CIRCUMSTANCE. ONLY
YOU CAN DETERMINE THE BEST RECOVERY/ESCAPE PLAN FOR YOUR HUNTING SITUATION AND YOU MUST HAVE A RECOVERY/ESCAPE PLAN
FOR YOUR SITUATION BEFORE LEAVING THE GROUND. HUNT FROM GROUND WHEN SELF-RECOVERY/ESCAPE ABILITY IS ABSENT.
• IF THERE ARE ANY QUESTIONS OR CONCERNS WITH INSTRUCTIONS, WARNINGS, OR PROPER USE “STOP” AND CONTACT THE
MANUFACTURER. DO NOT USE UNLESS YOU FULLY UNDERSTAND SAFE AND PROPER USE. MAINTAIN ALL WARNINGS, INSTRUCTIONS, AND
DVD(S) FOR LATER REVIEW AS NEEDED, FOR INSTRUCTION USAGE TO ANYONE BORROWING YOUR STAND/FBFAHS OR TO PASS ON WHEN
SELLING THESE ITEMS. USE ALL SAFETY DEVICES PROVIDED WITH YOUR TREESTAND AND FBFAHS.
• INSPECT THE TREESTAND PRIOR TO EVERY USE FOR UNDUE WEAR, DEFORMITY, CORROSION OR OTHER DAMAGE. INSPECT ALL STRAPS,
WEBBING AND ROPES FOR FRAYING, CUTS, TEARS, ABRASIONS, FADING, NICKS, CUTS OR ANY SIGNS THAT THE WEBBING MAY HAVE
BEEN FATIGUED OR STRESSED BY A FALL OR BY SUPPORTING EXCESS WEIGHT OR ANY OTHER TYPE OF DAMAGE. DISCONTINUE USE
IMMEDIATELY IF ANY DAMAGE IS PRESENT.
• NEVER EXCEED THE MAXIMUM RATED WEIGHT LIMIT OF THIS PRODUCT. THIS LIMIT INCLUDES USER AND ALL GEAR TAKEN TO THE
PLATFORM AREA.
• MOST FALLS IN A LADDER OCCUR DUE TO IMPROPER INSTALLATION OR BY NOT USING THE PRODUCT AS DIRECTED. ALL SUPPLIED PARTS
MUST BE USED, INCLUDING, BUT NOT LIMITED TO, THE STABILIZER BAR, ATTACHMENT STRAPS AND ALL REQUIRED HARDWARE. LADDER
SECTIONS CONNECTIONS MUST BE SECURED TOGETHER BY MEANS OF THE PINS OR BOLTS SUPPLIED. CAREFULLY FOLLOW AND DOUBLE
CHECK ALL ASSEMBLY INSTRUCTIONS TO ENSURE THAT YOU HAVE PROPERLY ASSEMBLED THE PRODUCT. IF YOU HAVE ANY QUESTIONS OR
CONCERNS, CONTACT SUMMIT AT 800-353-0634.
• THE ASSEMBLY AND INSTALLATION OF A LADDER STAND REQUIRES A MINIMUM OF THREE (3) ABLE ADULTS. NEVER ATTEMPT TO ASSEMBLE,
INSTALL, OR REMOVE THIS PRODUCT WITH LESS THAN THREE (3) ABLE ADULTS PRESENT.
• REPLACE ALL WEBBING AND CABLES EVERY (2) YEARS OR SOONER IF ANY DAMAGE IS PRESENT INCLUDING BUT NOT LIMITED TO FRAYING,
CORROSION, CUTS, TEARS, ABRASIONS, FADING, NICKS, CUTS OR ANY SIGNS THAT THE WEBBING OR CABLES HAVE BEEN FATIGUED OR
STRESSED BY A FALL OR BY ANYTHING INCLUDING BUT NOT LIMITED TO SUPPORTING EXCESS WEIGHT. IF ANY OF THE DAMAGE STATED
ABOVE (OR ANY OTHER TYPE OF DAMAGE NOT LISTED) IS PRESENT, DISCONTINUE USE OF THE PRODUCT IMMEDIATELY!
• DO NOT USE ANY TREESTAND IF ICE OR SNOW IS PRESENT ON THE PLATFORM OR LADDER SECTIONS.
• ALWAYS HAVE THREE (3) POINTS OF CONTACT TO THE LADDER WHILE CLIMBING. NEVER CLIMB WITH ANYTHING ON YOUR BACK OR IN YOUR
HANDS WHILE CLIMBING. TAKE YOUR TIME, DO NOT BE IN A HURRY!!

PG 2 www.summitstands.com
• PRIOR TO EACH USE INSURE:
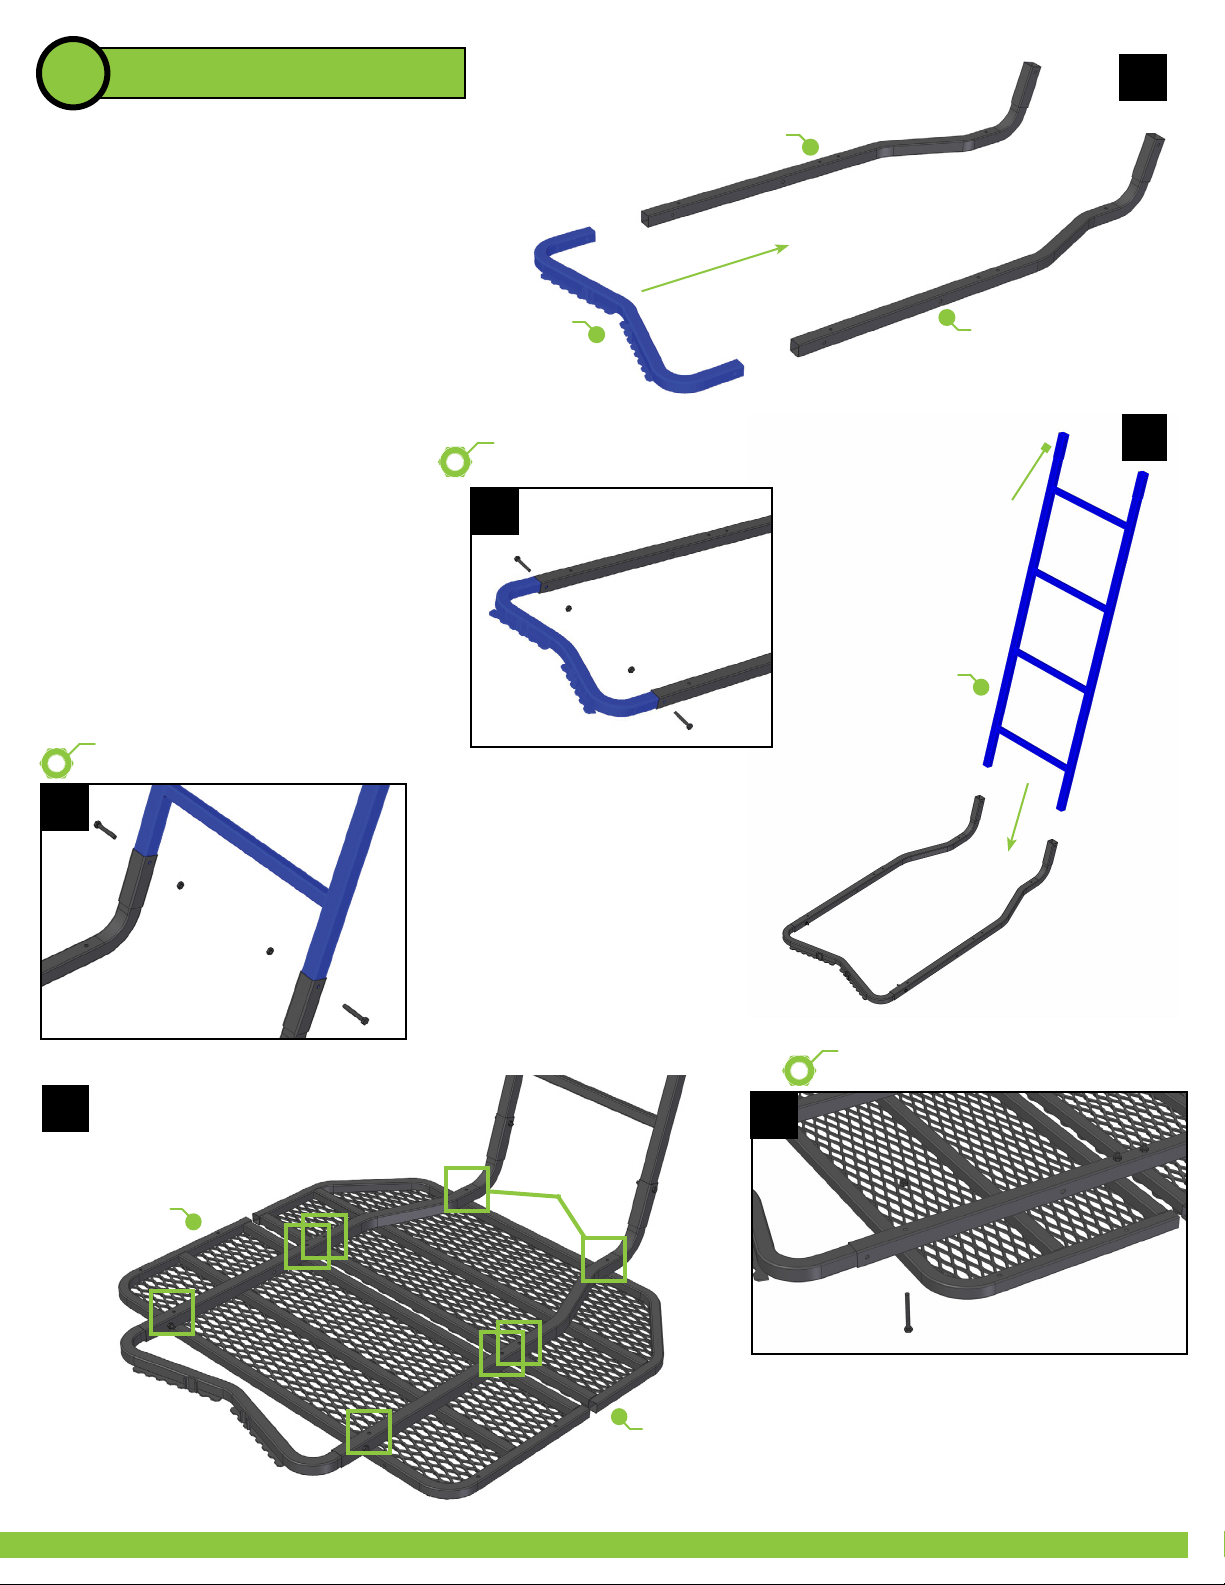
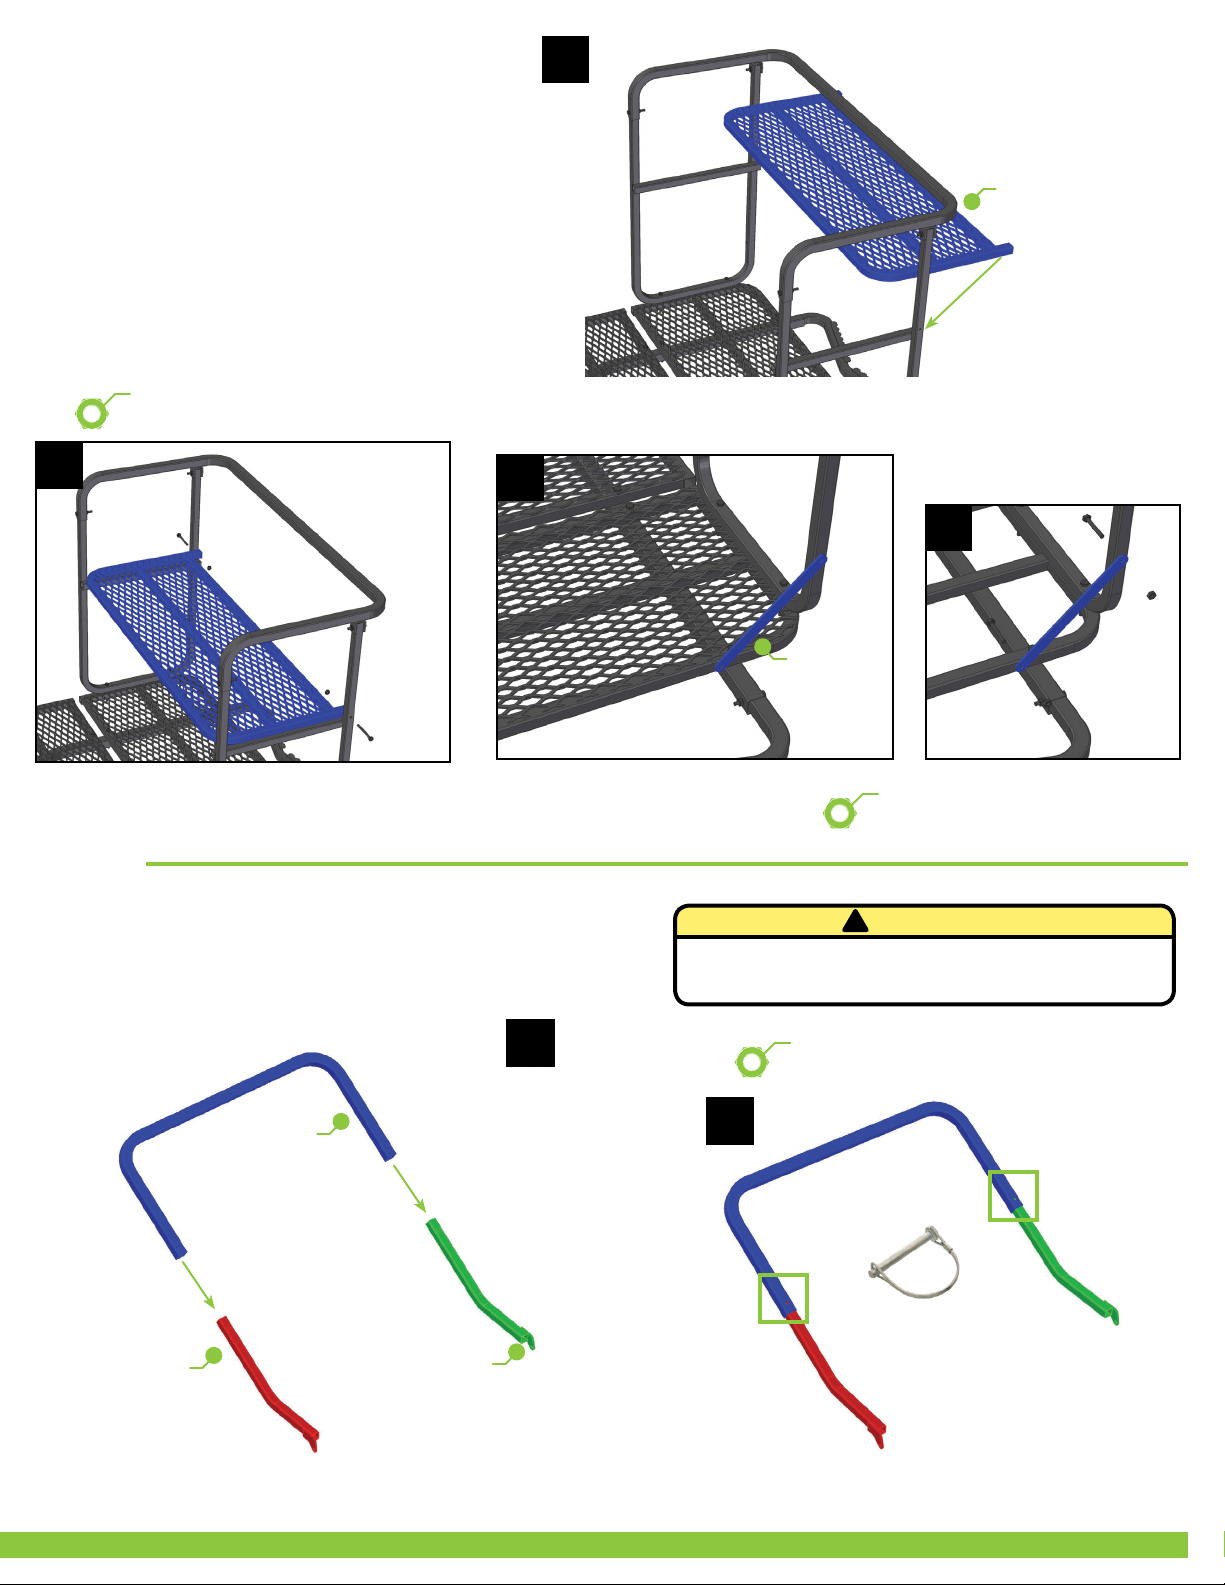
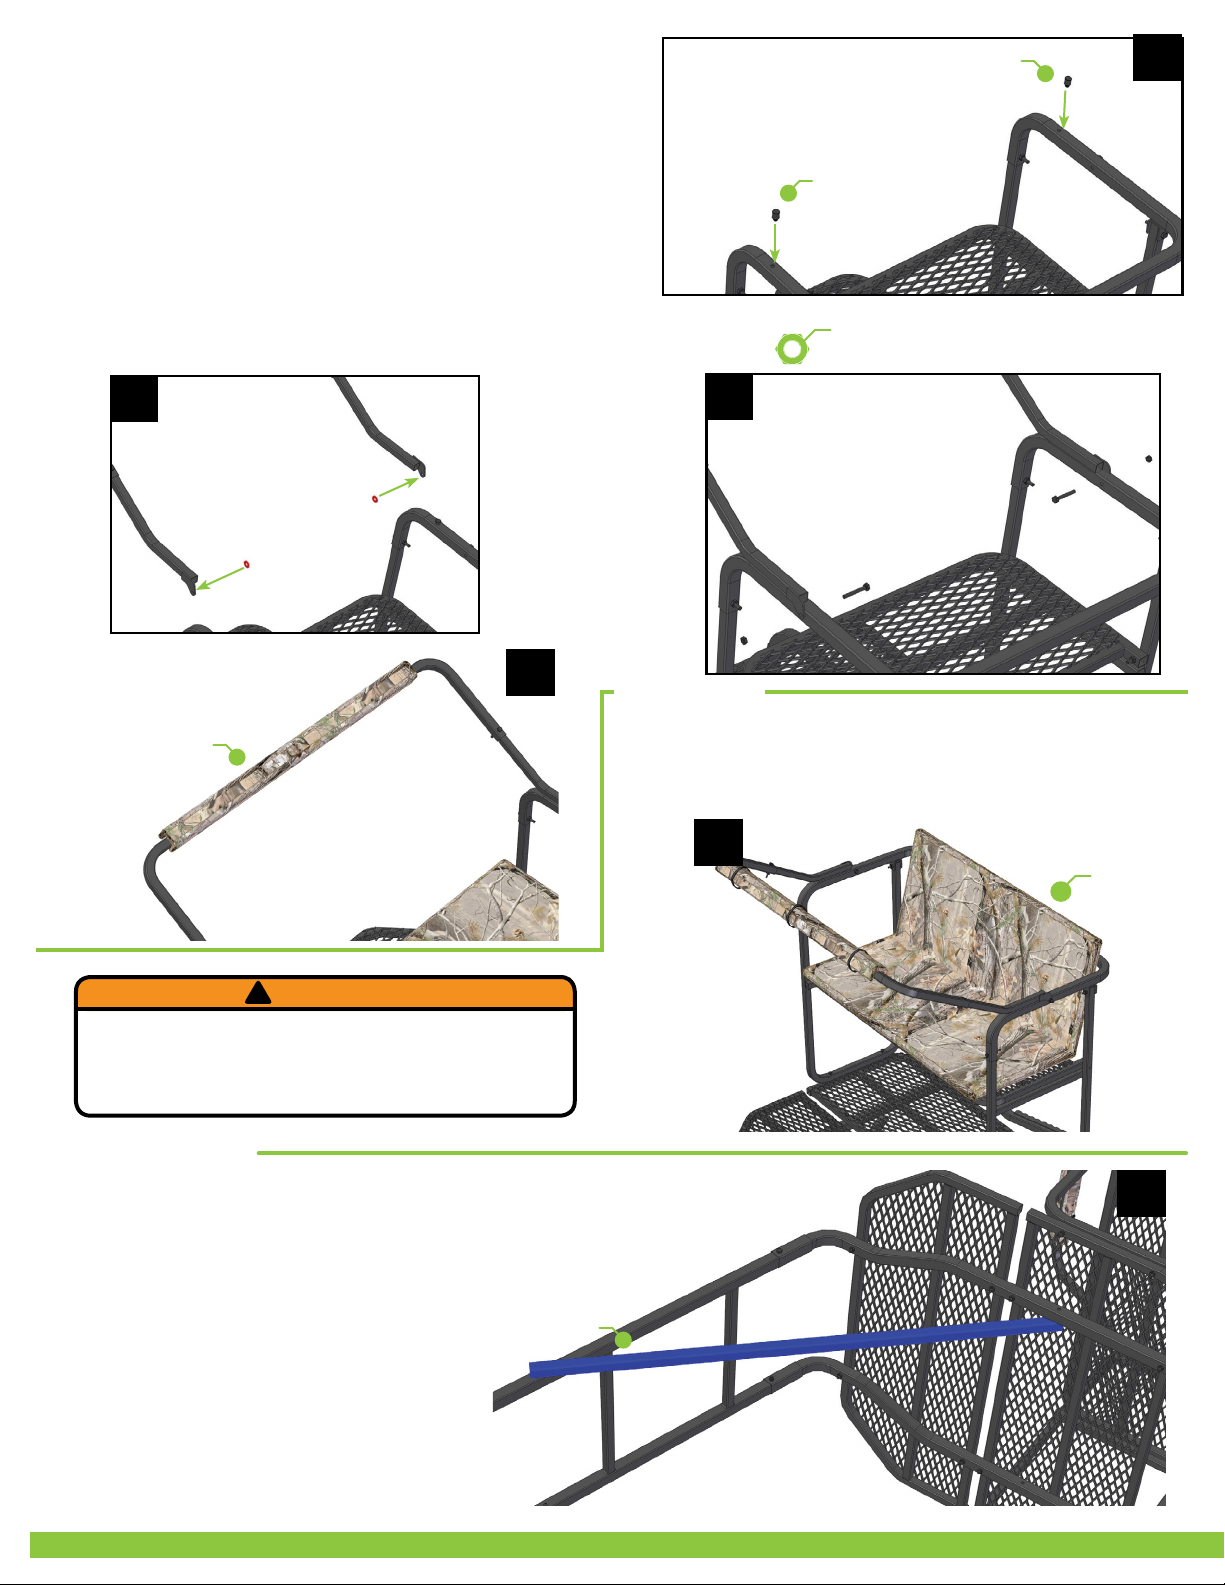
• THE CRISS/CROSS STRAPS ARE PRESENT AND SECURED CORRECTLY.
• THE ADJUSTABLE STABILIZER BAR IS PRESENT AND SECURED PROPERLY.
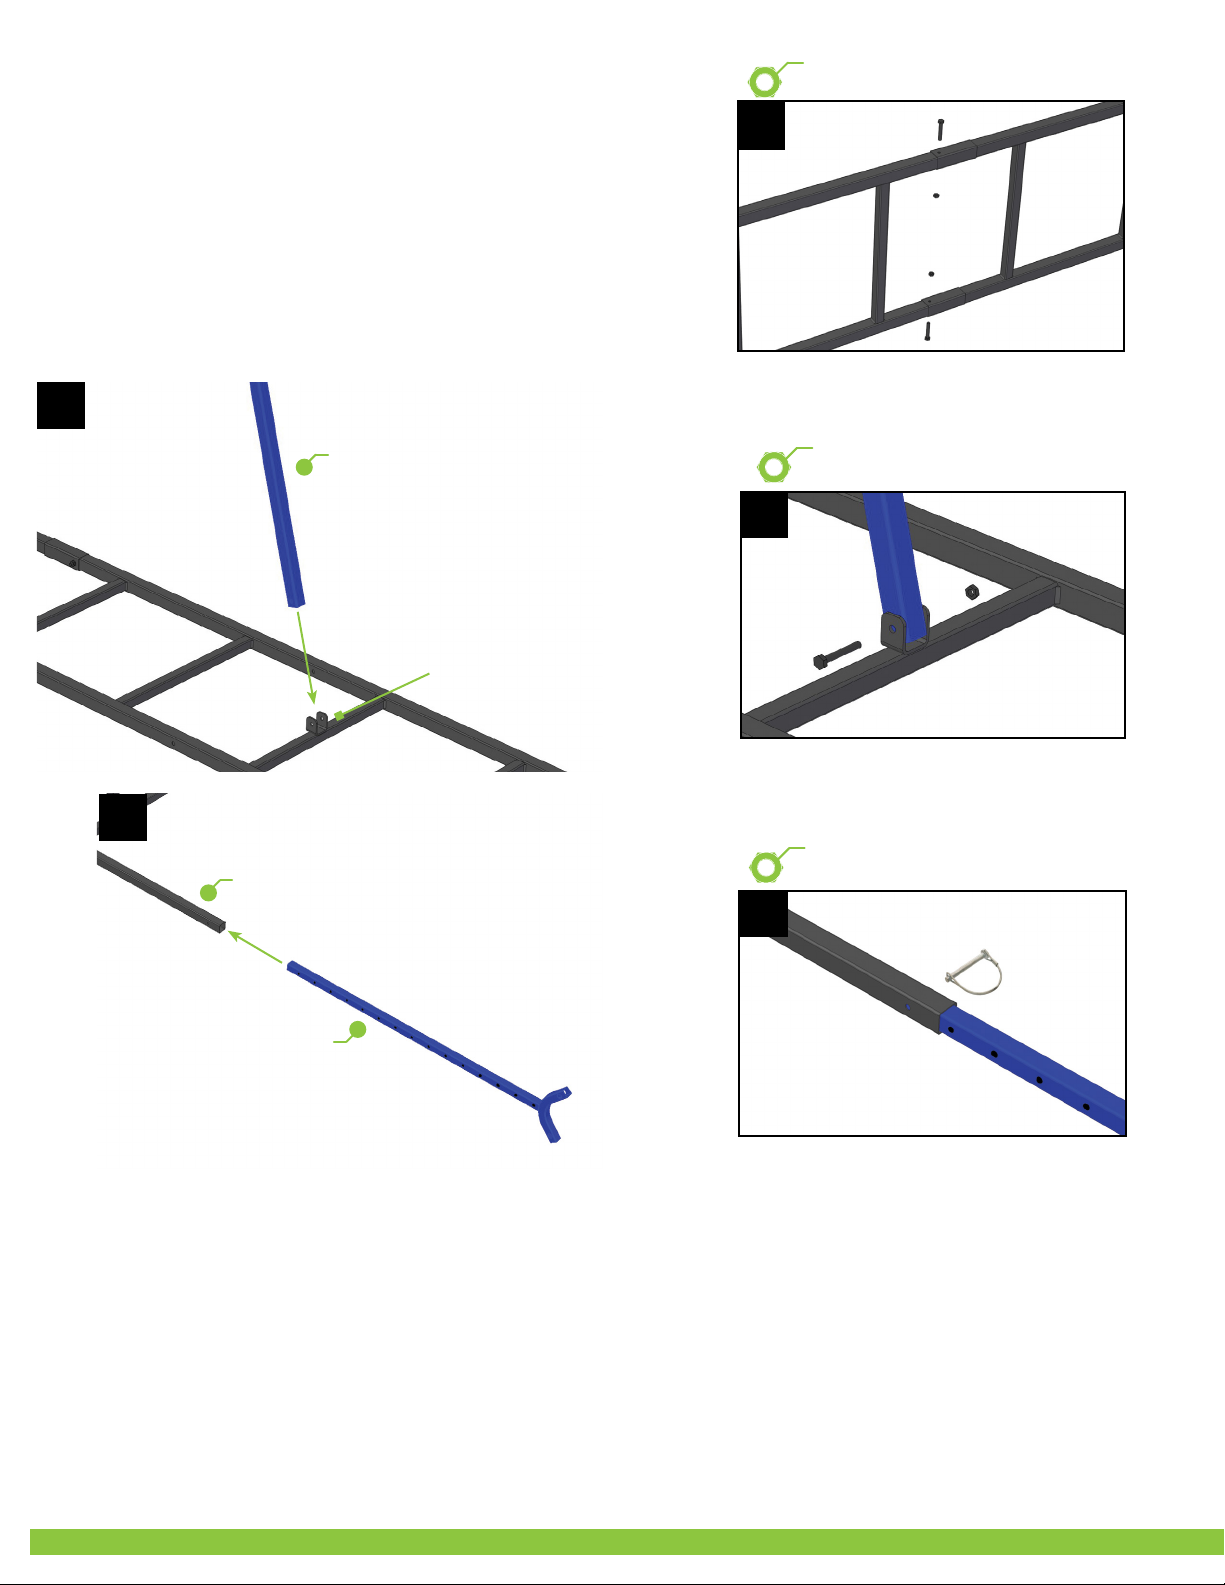
• ALL LADDER SECTIONS ARE NOT SEPARATED AND SECURED TOGETHER BY MEANS OF PINS OR BOLTS.
• THERE ARE NO VISIBLE SIGNS OF CORROSION PRESENT.
• THERE ARE NO CRACKS IN ANY TUBING.
• THERE ARE NO CRACKS IN ANY WELDS.
• THERE ARE NO LOOSE WELD JOINTS.
• THE BOTTOM LADDER SECTION IS SUNK INTO THE GROUND OR STAKED TO THE GROUND TO PREVENT MOVEMENT.
IF ANY OF THE CONDITIONS STATED ABOVE ARE NOT MET, DISCONTINUE USE OF THE PRODUCT IMMEDIATELY!
• THIS PRODUCT IS INTENDED TO BE USED BY RESPONSIBLE ADULTS OVER THE AGE OF 18. ANY PERSON UNDER THE AGE OF 18 SHOULD
NEVER USE THIS PRODUCT.
• NEVER USE TREESTAND OR FBFAHS DURING INCLEMENT WEATHER SUCH AS RAIN, LIGHTNING, WINDSTORMS, SNOW, HAIL, SLEET OR ICY
CONDITIONS. IF ANY OF THESE CONDITIONS ARE PRESENT, SAFELY CLIMB DOWN AND END YOUR HUNT. IF ANY SIGN OF BAD WEATHER IS
MOVING INTO YOUR LOCATION, SAFELY CLIMB DOWN OR DO NOT CLIMB UP INTO ANY TREESTAND.
• NEVER HURRY WHEN INSTALLING, USING, OR REMOVING THIS PRODUCT. HURRYING CAUSES ACCIDENTS WHICH MAY CAUSE SERIOUS
INJURY OR DEATH!
• NEVER USE THE FBFAHS OR TREESTAND WHILE FEELING ILL, NAUSEOUS OR DIZZY, OR IF YOU HAVE PRIOR MEDICAL CONDITIONS THAT
COULD CAUSE A PROBLEM, THAT IS, HEART CONDITION, JOINTS THAT LOCK-UP, SPINAL FUSIONS, ETC OR IF YOU ARE NOT WELL RESTED.
• NEVER USE THIS PRODUCT OR FBFAHS UNDER THE INFLUENCE OF DRUGS, ALCOHOL, OR PRESCRIPTION MEDICATION. THIS INCLUDES
MANY TYPES OF COLD & FLU MEDICATIONS PURCHASED OVER THE COUNTER AT THE PHARMACY. ALWAYS CONSULT WITH YOUR PHYSICIAN
ABOUT PRESCRIPTION MEDICATIONS, OVER-THE-COUNTER MEDICATIONS AND YOUR PHYSICAL ABILITY WHILE USING ANY TYPE OF
MEDICATIONS PRIOR TO USING THIS PRODUCT.
• DO NOT USE THIS PRODUCT UNLESS YOU ARE IN GOOD PHYSICAL CONDITION WITHOUT ANY PHYSICAL LIMITATIONS AND HAVE BEEN FULLY
RESTED THE NIGHT BEFORE. ALWAYS CONSULT WITH A MEDICAL PHYSICIAN BEFORE USING THIS PRODUCT TO ENSURE SAFE AND ABLE USE
OF THIS PRODUCT.
• DO NOT USE THIS PRODUCT IF YOU HAVE ANY HISTORY OF A HEART CONDITION OR PULMONARY ISSUES WITHOUT CONSULTING WITH YOUR
PHYSICIAN FOR SAFE AND PROPER USE OF THIS PRODUCT.
• NEVER USE A TREESTAND ON A DEAD, LEANING, DISEASED, LOOSE BARKED TREE, ON A UTILITY POLE OR ON TREES THAT HAVE ANY
OBSTRUCTIONS (SUCH AS KNOTS OR LIMBS) THAT MAY LIMIT TREESTAND USE OR STABILITY! NEVER RELY ON A TREE BRANCH FOR
SUPPORT OR AS A STEP! NEVER USE ON ANY TYPE OF TREE THAT HAS OBSTRUCTIONS THAT MAY LIMIT TREESTAND USE OR CAUSE
INSTABILITY OF THE TREESTAND.
• NEVER BOUNCE OR JUMP ON THE FOOT PLATFORM OR SEAT PLATFORM IN AN ATTEMPT TO SECURE THE STAND TO THE TREE OR FOR ANY
OTHER REASON. DOING THIS CAN DAMAGE THE TREESTAND CAUSING THE PRODUCT TO BE OVER-LOADED
• WHICH COULD RESULT IN SERIOUS INJURY OR DEATH!!
• ALWAYS PULL UP A BOW, BACKPACK, FIREARM OR OTHER EQUIPMENT BY MEANS OF A ROPE OR HOIST SYSTEM AND ONLY AFTER BEING
SECURED IN THE TREESTAND. FIREARMS AND CROSSBOWS MUST BE PULLED UP UNLOADED, CHAMBER OPEN AND MUZZLE DOWN
TOWARDS THE GROUND!
• NEVER MODIFY YOUR STAND IN ANY WAY BY MAKING REPAIRS, REPLACING PARTS, ALTERING, ADDING OR ATTACHING ANYTHING TO IT
EXCEPT IF EXPLICITLY AUTHORIZED IN WRITING BY THE MANUFACTURER!
• PRACTICE INSTALLING, ADJUSTING AND USING YOUR TREESTAND AT GROUND LEVEL PRIOR TO USING IT AT ELEVATED POSITIONS!
• NEVER LEAN OUT FROM OR OVER THE SIDE YOUR TREESTAND FOR ANY REASON AT ANY TIME.
• DO NOT SLEEP WHILE IN YOUR TREESTAND. SLEEP MAY CAUSE YOU TO FALL OUT OF YOUR TREESTAND WHICH COULD CAUSE SERIOUS
INJURY OR DEATH!
• DO NOT TRIM ANY TREE BRANCHES OR BREAK-OFF ANY BRANCHES WHILE IN OR ON YOUR TREESTAND AT AN ELEVATED POSITION ABOVE
GROUND LEVEL. ALL TRIMMING/PRUNING MUST BE DONE AT GROUND LEVEL!! A FBFAHS IS REQUIRED TO BE USED ANY-TIME FOR ANY
REASON WHILE USING ANY TREESTAND ABOVE GROUND LEVEL!!
• DO NOT LEAVE THIS PRODUCT IN THE TREE FOR MORE THAN TWO (2) WEEKS AT A TIME. WEATHER, ANIMALS, TREE GROWTH, VANDALS AND/
OR OTHER ENVIRONMENTAL CONDITIONS MAY DAMAGE THE PRODUCT AND ITS INTEGRITY. NEVER USE A TREESTAND THAT HAS BEEN LEFT IN
A TREE FOR MORE THAN TWO WEEKS. IF USING SOMEONE ELSE’S TREESTAND, KNOW HOW LONG THE TREESTAND HAS BEEN ATTACHED TO
TREE BEFORE USE. IF THIS INFORMATION IS UNKNOWN, HUNT FROM THE GROUND!!
• BEFORE EACH USE OF YOUR SUMMIT TREESTAND, ALWAYS INSPECT THE TREESTAND, COMPONENTS AND HARNESS FOR: CRACKS, TEARS,
CABLE WEAR, ABRASION, CORROSION, FRACTURES, DENTS OR OTHER DAMAGE THAT MAY HAVE OCCURRED IN TRANSPORTING, STORING
OR USING YOUR TREESTAND. DO NOT USE IF ANY DAMAGE IS PRESENT! CONTACT CUSTOMER SERVICE FOR THE APPROPRIATE REPAIR /
REPLACEMENT PROCEDURE!
• ALL WRITTEN AND VIDEO INSTRUCTIONS AND WARNINGS, STRAPS, AND FULL BODY FALL ARREST SYSTEM MUST BE STORED IN A
SAFE, COOL, AND DRY LOCATION. ALL VIDEO AND WRITTEN INSTRUCTIONS AND WARNINGS MUST BE REVIEWED ANNUALLY. IT IS THE
RESPONSIBILITY OF THE TREESTAND OWNER TO FURNISH ALL WARNING AND INSTRUCTIONS TO ANY PERSON THAT IS BORROWING OR
PURCHASING THE TREESTAND. NO TREESTAND IS COMPLETE WITHOUT A FULL BODY FALL ARREST HARNESS SYSTEM AND SHOULD NEVER
BE USED WITHOUT A FBFAHS ABOVE GROUND LEVEL.
• LEAVING YOUR TREESTAND OUTSIDE MAY ALLOW THE TUBES TO FILL WITH WATER, FREEZE AND CAUSE THEM TO RUPTURE OR BURST.
INSPECTION OF TREESTAND IS REQUIRED PRIOR TO EACH USE!! ANY PART OF THE OF THE TREESTAND THAT HAS TUBES THAT HAVE
DEFORMED SHAPE OR BURST DUE TO FREEZING IS NOT COVERED UNDER WARRANTY AND ITS USE SHOULD BE DISCONTINUED
IMMEDIATELY! FAILURE TO DO SO COULD RESULT IN SERIOUS INJURY OR DEATH!! REPLACEMENT COMPONENTS ARE SUPPLIED AT OWNER’S
EXPENSE.

TREE SIZE / WEIGHT LIMIT
1
STAND / COMPONENT WARNING LABELS (FOR REFERENCE ONLY)
2
STAND WARNING LABEL
WARNING
!
DO NOT REMOVE ANY WARNING LABELS FROM
THE PRODUCT!
LADDER RATCHET STRAPS
PG 3
Stand Minimum and Maximum Tree Size: 8-20” Diameter
Weight Limits: (Includes hunter’s weight PLUS weight of all gear carried into the treestand)
DO NOT EXCEED THESE WEIGHT LIMITS!
MAXIMUM RATED WEIGHT LIMIT (2 People)
500 LBS.
(Max. Weight limit for each person is 250 lbs.)
[Includes both users and all gear!!]
MAXIMUM RATED WEIGHT LIMIT (1 Person)
350 LBS.
(Max Weight limit for 1 person occupancy only!!)
[Includes user and all gear!!]

PG 4 www.summitstands.com
BOX CONTENTS
PN DESCRIPTION QTY
82066.010 CROSS TENSION BAR 2
82066.020 LADDER SUPPORT 2
82066.200 LEFT PLATFORM BRACE 1
82066.250 RIGHT PLATFORM BRACE 1
82087.100 FRONT PLATFORM 1
82087.150 REAR PLATFORM 1
82066.300 YOKE 1
82066.400 LEFT SEAT SUPPORT 1
82066.450 RIGHT SEAT SUPPORT 1
82066.600 SEAT PAN 1
82066.910 TOP LADDER SECTION 1
82066.920 MIDDLE LADDER SECTION 1
82066.930 BOTTOM LADDER SECTION 1
82066.940 STABILIZER MALE SECTION 1
82066.950 STABILIZER FEMALE SECTION 1
82066.500 ARMREST 1
82066.820 LEFT GUNREST ARM 1
82066.830 RIGHT GUNREST ARM 1
82066.810 GUNREST BAR 1
82066.850 FOAM SEAT 1
82066.840 GUNREST PAD 1
82066.700 ACCESSORY PACKET 1
ACCESSORY PACKET CONTENTS
PN DESCRIPTION QTY
82066.890 HARDWARE PACKET 1
82066.760 RATCHET WITH LOOP END 3
82066.765 SHORT STRAP FOR RATCHET 1
82066.770 CRISS-CROSS LONG STRAP 2
FOR RATCHET
SU18191 SAFETY DVD 1
SU18226 FULL BODY FALL ARREST HARNESS 1
SYSTEM (FBFAHS)
Tools
• 7/16” Wrenches and / or Socket / Ratchet
- Assembly can be made easier by the use of a powered ratchet or drill with socket adapter (take care not to overtighten
when using power tools to assemble)
- It is recommended that all bolts be sorted by thread count / length prior to assembly.
- Assemble entire product before fully tightening any bolts / locknuts.
DO NOT OVER-TIGHTEN the bolts and nuts to the point that the tubing becomes deformed or bent.
PARTS LIST
3
TOOLS REQUIRED
4
All images are representations. All fabric, paint and accessories are subject to change at
any time. Net weights of the products are approximate.
82066.890 - HARDWARE PACKET
1/4”-20, grade 5.
PN DESCRIPTION QTY
SU10601 1 3/4” BOLT, 1/4”-20 19
SU10670 2 1/2” BOLT, 1/4”-20 14
2 3/4” BOLT, 1/4”-20 4
SU10612 LOCK NUT, 1/4”-20 37
1/4” WIRE LOCK PIN 3
1/4” BUSHINGS 2
RUBBER BUMPERS FOR ARM REST 2

PG 5
PLATFORM
1. Position the Left and Right platform
Braces and the Yoke as shown in figure
1. Note that the teeth on the Yoke
should face down as shown.
2. Line up the bolt holes and secure
using one 1 3/4” bolt and lock nut per
side as shown in figure 2.
3. Position the Top Ladder Section as
shown in figure 3. Slide the ladder into
the ends of the Platform Braces.
4. Use two 1 3/4” bolts and lock nuts
to secure the ladder section (figure 4).
Leave these hand tight for now.
5. Position the Front and Rear Platform
sections under the support bars as
shown in figure 5. The expanded metal
on the platforms should face down as
shown.
6. Secure the two Platform sections
using eight 2 1/2” bolts and lock nuts at
the locations shown. Leave these bolts
hand tight until they are all started.
7. Wrench tighten all bolts from Step
4 and 6.
YOKE
(PN 82066.300)
1
LEFT
PLATFORM
BRACE
(PN 82066.200)
RIGHT
PLATFORM
BRACE
(PN 82066.250)
TOP LADDER
SECTION
(PN 82066.910)
COUPLER
3
4
1 3/4” BOLTS, LOCK NUTS -
WRENCH TIGHTEN STEP 7
1 3/4” BOLTS, LOCK NUTS -
WRENCH TIGHTEN
2
2 1/2” BOLTS, LOCK NUTS -
WRENCH TIGHTEN STEP 7
6
BOLT
HOLES
5
REAR
PLATFORM
SECTION
(PN 82066.150)
FRONT
PLATFORM
SECTION
(PN 82066.100)
ASSEMBLY
5

LEFT SEAT
SUPPORT
(PN 82066.400)
7
PG 6 www.summitstands.com
ARMREST
1. Position the Left Seat Support over the
finished platform assembly as shown in
figure 7.
2. Secure using two 2 1/2” bolts and lock
nuts as shown in figure 8. Leave these bolts
hand tight for now.
3. Position the Right Seat Support over the
platform assembly as shown in figure 9.
Secure using two 2 1/2” bolts and lock nuts
(see figure 10). Leave these bolts hand tight
for now.
4. Line up the Armrest as shown in figure 11.
Slide it down over the two Seat Supports and
secure each of the four bolt holes with 1 3/4”
bolts and lock nuts (figure 12).
5. Wrench tighten bolts from Steps 2 and 3.
6. Insert two rubber bumpers in the holes
on the Seat Supports as shown in figure 13.
Insert by pushing while twisting slightly.
8
2 1/2” BOLTS, LOCK NUTS -
WRENCH TIGHTEN STEP 5
9RIGHT SEAT
SUPPORT
(PN 82066.450)
10
2 1/2” BOLTS, LOCK NUTS -
WRENCH TIGHTEN STEP 5
11
ARMREST
(PN 82066.500)
12
1 3/4” BOLTS, LOCK NUTS -
WRENCH TIGHTEN
RUBBER
BUMPERS
13

PG 7
SEAT / BRACE
1. Position the Seat Base between the
Seat Supports as shown in figure 14.
2. Line up the holes and secure using
two 2 1/2” bolts with lock nuts. Do not
overtighten as this connection is designed
to pivot. (see figure 15)
3. Position one of the Cross Tension Bars
between the Seat Support and Platform
as shown in figure 16.
4. Secure using two 1 3/4” bolts and lock
nuts. (see figure 17)
5. Repeat for the other Cross Tension Bar.
14
SEAT
BASE
(PN 82066.600)
1 3/4” BOLTS, LOCK NUTS -
WRENCH TIGHTEN
CROSS
TENSION
BAR
(PN 82066.010)
2 1/2” BOLTS, LOCK NUTS -
WRENCH TIGHTEN
15 16
17
GUNREST
1. Slide the Gunrest Bar onto the Left and Right Gunrest Arms as
shown in figure 18.
2. Secure the Gunrest Bar using two 1/4” Wire Lock Pins as shown in
figure 19. The Wire Lock Pins allow adjustment of the Gunrest Bar by
sliding it in or out.
RIGHT
GUNREST ARM
(PN 82066.830)
LEFT
GUNREST
ARM
(PN 82066.820)
GUNREST
BAR
(PN 82066.810)
18 1/4” WIRE LOCK PINS
19
!
CAUTION
DO NOT use the Gun Rest Bar as a hand hold while
climbing into or out of this stand.

PG 8 www.summitstands.com
GUNREST
PAD
(PN 82066.855)
23
RUBBER
BUMPERS
20
22
1 3/4” BOLT, LOCK NUT -
WRENCH TIGHTEN
21
BUSHINGS
GUNREST (continued)
3. Insert two of the Rubber Bumpers into the pre-drilled holes
on each Armrest (see figure 20). Insert by pushing while
twisting slightly.
4. Each Gunrest Arm has a tab with a pre-drilled hole. Line
up these holes with the holes in the Armrests. Insert one 1/4”
Bushings between each Gunrest tab and each Armrest hole
(figure 21).
5. Use two 1 3/4” bolts with lock nuts to secure the bar to the
armrest (see figure 22.) Do not overtighten.
6. Position the Gunrest Pad as shown in figure 23. Secure by
wrapping the pad around the bar and using the hook and loop
strip to secure.
PLATFORM SUPPORT
1. Position one of the Ladder Support bars as
shown in figure 25.
2. Line up the holes and secure the Support bar to
the Ladder Column and the Platform Support (see
figure 26). Secure using two 2 3/4” bolts and lock
nuts.
3. Repeat for the other Platform Support Bar.
LADDER
SUPPORT BAR
(PN 82066.020)
25
24 FOAM SEAT
(PN 82066.850)
FOAM SEAT
1. Position the Foam Seat inside the frame as shown in figure
24. The thicker portion of the seat is the base.
2. Wrap the hook and loop straps on the bottom and back of
the seat around the frame to secure.
WARNING
!
The foam seat included with this treestand is
removable for storage. DO NOT leave your seat
outdoors when it is not being used. Replace seat
cushion every two (2) years.

PG 9
LADDER COLUMN
1. Position the Bottom Ladder Section
and Middle Ladder Section as shown in
figure 27. The welded U bracket faces
the tree when fully assembled.
The Bottom Ladder Section has no
welded sleeves.
2. Slide the Ladder Sections together,
line up the bolt holes and use one 1 3/4”
bolt and lock nut to secure each side
(see figure 28).
3. Slide the completed Bottom
and Middle ladder sections into the
completed Platform / Seat assembly to
finish assembly as shown in figure 29.
4. Secure using two 1 3/4” bolts and
lock nuts. (See figure 30)
29
BOTTOM LADDER SECTION
(PN 82066.930)
WELDED
U BRACKET
FACES TREE
MIDDLE LADDER SECTION
(PN 82066.920) COMPLETED
PLATFORM / SEAT
ASSEMBLY
1 3/4” BOLTS, LOCK NUTS -
WRENCH TIGHTEN
28
BOTTOM
LADDER
SECTION
(PN 82066.930)
MIDDLE
LADDER
SECTION
(PN 82066.920)
27
WELDED
U BRACKET
26
2 3/4” BOLT, LOCK NUT -
WRENCH TIGHTEN
WELDED
SLEEVES

PG 10 www.summitstands.com
31
U BRACKET
STABILIZER
FEMALE SECTION
(PN 82066.950)
32
1 3/4” BOLT, LOCK NUT -
WRENCH TIGHTEN
STABILIZER
FEMALE SECTION
STABILIZER
MALE SECTION
(PN 82066.940)
33
1/4” WIRE LOCK PIN
34
STABILIZER BAR
1. Position the Female Section of the Stabilizer bar as
shown in figure 31. The Stabilizer bar will attach to the
welded U Bracket. Slide the bar into the bracket and
line up the hole.
2. Secure using one 1 3/4” bolt and lock nut.
(see figure 32) Do not overtighten.
3. Position the Male Stabilizer bar as shown (figure 33).
Line up the bolt holes and secure using the Wire Lock
pin as shown in figure 34. The Stabilizer bar has several
holes to accommodate different tree sizes.
1 3/4” BOLTS, LOCK NUTS -
WRENCH TIGHTEN
30

SETUP
1. Select a straight, healthy tree without any obstructions (branches or
limbs) that might be in the path of setting up the ladder stand.
2. Lay the ladder stand on the ground so that the V-Bar is pointing up in the air and the end of the ladder section is about three
(3) feet from the tree base. Ensure all sections are pinned or bolted together (see figure 35).
3. With the ladder stand laying on the ground, connect one ratchet strap end to the stand frame at figure 36, location A.
Connect the shorter free end of the ratchet strap at location B.
4. To connect the straps to the stand, wrap the straps around the frame and bring the ratchet or the free end back through the
loop to create a cinch knot as shown in figure 37-39.
5. Attach the two long Criss-Cross straps next. Attach one at figure 36, location A and one at location B using the same cinch
strap method (refer to figure 37-39 for threading). Finished straps should look like figure 39a. Lay the Criss-Cross straps on top
of the ladder sections as shown in figure 40.
6. Connect the remaining two looped ratchet ends to the column of the ladder section below the third (3rd) ladder rung from
the end. Follow the procedure in step 4 to create a cinch knot. See figure 37-39 (for threading) and 41 (for location).
SETUP
6
PG 11
36
A
B
37 38 39
WARNING
!
Never Wrap The Stabilization Straps Around The Ladder Rungs! Wrap Them
Only Around The Ladder Columns, below the ladder rung! (see figure 41)
41
35
WARNING
!
Never use this ladder stand on dead, leaning, diseased
or loose barked trees. Never use on a utility pole or
on trees that have any obstructions that may limit
treestand use. Never rely on a tree branch for support.
39a
CRISS-CROSS STRAPS
RATCHET
STRAP
PLATFORM
SHORT STRAP
CRISS-CROSS STRAPS
40

7. See figure 32. Thread the Criss-Cross strap through the barrel of the ratchet strap (located at the third rung from the end of
the ladder sections) and pull the strap tight. Tighten ratchet until there is a slight arch in the ladder sections. See figure 43.
8. With all the straps secured to the stand, you are now ready to raise the ladder stand with three able adults. Starting at the
platform area, one person needs to be on each side of the ladder section and one person in the middle. CAREFULLY raise the
ladder stand up until the v-bar teeth come in contact with the tree. See figure 44. Pull the end of the ladder sections out away
from the tree until the foot platform is level. See figure 45.
9. Once the foot platform is level, stand on the bottom ladder rung until it sinks into the ground up to the bottom side of
bottom ladder rung. Next, release the Criss-Cross straps ratchets so that the straps are hanging freely down.
Pivot the Stabilizer bar up. Remove the wire lock pin from the Ladder Stabilizer bar shown in previous Page 10, figure 34. Slide
the Male Section of the Stabilizer bar out until it makes contact with the tree as shown in figure 35 and 36. The Stabilizer bar
should be positioned so that it is perpendicular (90 degree angle) from the ladder column as shown in figure 35. Reinsert the
wire lock pin. NOTE: There should be a slight outward arc in the ladder sections. See figure 45a
10. Run the Stabilizer bar rope from one side of the Stabilizer bar, around the tree and tie it off to the other side of the
Stabilizer bar as shown in figure 47.
PG 12 www.summitstands.com
46 STABILIZER BAR
CRISS-CROSS STRAPS
43
44
A
B
45
STABILIZER
BAR
90°
C
42
47
NOTICE
The Stabilizer bar should lean down slightly when
properly attached. This is normal.
45a
LOOSE CRISS-
CROSS STRAPS

PG 13
11. Take the two (2) straps that are hanging freely down, walk behind the tree so that the straps form an “X” in the straps as
shown in figure 48. Pull the straps around to the bottom ladder section and secure the straps to the previously installed ratchet
straps below the third ladder rung. See figure 49 A - D for proper threading of the ratchet strap. Ensure that the free end in
figure 49, step D is facing out.
IMPORTANT: DO NOT over-tighten these straps to where it starts to pull the foot platform down the tree. See figure 50.
48
WARNING
!
Always check to ensure the Stabilizer bar and Criss-
Cross straps are secured correctly before leaving the
ground.
49
A B
C D
12. Before climbing up the ladder
stand, visibly inspect to ensure the
ground below the ladder sections is
flat and level, all ladder sections are
secured together by means of pins or
bolts, Criss-Cross straps are securely
fastened correctly around the tree and
to the ladder stands, and the Stabilizer
bar is secured properly. See figure 50.
Check the ground under the
ladder stand to make sure it
is firm and level.
WARNING
!
FREE END OUT
50
CRISS-CROSS STRAPS
UPPER RATCHET STRAP
STABILIZER BAR
AND ROPE
LEVEL
GROUND

PG 14 www.summitstands.com
13. Now, put on a Full Body Fall Arrest Harness System so you can attach the ladder platform to the tree. See FBFAHS
instructions and warnings for proper use. With one person on each side of the ladder section holding the ladder stand in place,
carefully climb up the ladder stand (using 3 points of contact as you climb and with your FBFAHS already on.)
14. Upon arrival to the foot platform area, attach your Tether Strap to the tree and ensure you are secured properly to the tree
in the event that a fall might occur. Next, keeping your weight centered on the middle of the platform area, wrap the previously
installed upper ratchet strap end around the tree and pull it through the barrel of the previously installed upper ratchet strap on
the other side. Pull the strap tight and ratchet tight against the tree. Use figure 49 for proper ratchet strap threading.
IMPORTANT: ALL RATCHET STRAPS MUST BE RATCHETED AROUND THE BARREL AT LEAST TWICE!!
15. While at foot platform area, inspect all parts and bolts for any damage that may have been caused during set-up or when
carrying the product into the field. If any damage or loose hardware is found, discontinue use immediately. ALL REPAIRS MUST
BE DONE AT GROUND LEVEL!!
16. When descending the treestand, detach your Tether Strap and carefully climb down the ladder. Always use 3-points of
contact as you descend. Re-check the Stabilizer bar to ensure it is still tight against the tree and Criss-Cross straps are tight. Re-
tighten if needed.
WARNING
!
ALL STRAPS MUST BE 100% INSPECTED INCLUDING
ALL LADDER SECTIONS TO ENSURE THEY ARE
SECURED BY MEANS OF BOLTS OR PINS PRIOR TO
EACH USE. THE STABILIZER BAR MUST BE SECURED
CORRECTLY PRIOR TO LEAVING THE GROUND.
Never jump or bounce on any
other part of the treestand
in an attempt to force the
platform to seat into the tree.
WARNING
!
WARNING
!
You MUST now put on your safety harness if you have
not already done so. ALWAYS refer to your harness
instructions included with this stand for proper use of
your safety harness.
WARNING
!
YOU WILL NOT be connected to a safety rope / strap
while you climb into or out of this treestand. USE
EXTREME CAUTION while ascending or descending
the ladder. TAKE YOUR TIME and do not hurry.
WARNING
!
This ladder MUST be held in place while it is ratcheted
tight and while the top ratchet is put into place. Do
not use until all straps are securely attached.
WARNING
!
Using any Summit product, harness, or both, you acknowledge and accept the responsibility that you have
read and understood all warnings and instructions (video and written) for the harness and treestand, and
user acknowledges that the product is intended to be used with a properly worn and adjusted full body
harness attached to the tree at all times after leaving the ground, and further acknowledges that the use of
this product without a properly worn and adjusted full body harness attached to the tree at all times after
leaving the ground is a misuse of the product. Any misuse (warned, noted, stated, or otherwise applied
against in all warnings and instructions) of any Summit products is sole liability of the user which will relive
Summit Treestands LLC of ALL product and personal liabilities. If any questions, call (800) 353-0634 for
assistance.

PG 15
1. It is required to have three (3) able adults to assist you in removing this ladder stand
from the tree. Before climbing into the ladder stand, put on your FBFAHS on following
the instructions and warnings for safe and proper use.
Inspect all straps, ladder sections and the Stabilizer bar ensuring they are still properly
attached and that they are not damaged.
With one person on each side of the ladder holding for stability, carefully climb up
the ladder stand. ALWAYS use 3-points of contact with the ladder as you climb. Upon
arrival to foot platform area, immediately attach your FBFAHS to the tree.
2. While secured to the tree with your FBFAHS, carefully disengage the upper ratchet
strap from around the tree. From this point until you are back at ground level, always
ensure that two people are holding the ladder for stability.
3. Carefully disconnect your FBFAHS, and without shifting your weight around, slowly
and carefully descend the ladder using 3-points of contact.
4. Upon arrival to the ground, remove the Stabilizer bar from the tree and ladder
section. Next, disengage the Criss-Cross straps and allow them to hang freely down
under the foot platform as shown in figure 51. Next, secure the Criss-Cross to ratchet
straps connected to the ladder section below the third ladder rung and tighten until
they are tight. See figure 52.
5. Using three (3) able adults, lift up on the ladder stand to pull the bottom ladder
section out of the ground. Next, carefully walk the ladder stand down to the ground.
DO NOT stand directly in the path of the ladder stand being lowered to the
ground!!
Inspect the ladder stand for any damage possibly resulting from removing this product
from the tree.
WARNING
!
NEVER REMOVE THE CRISS-CROSS STRAPS OR
STABILIZER BAR UNTIL YOU ARE SAFELY BACK ON
THE GROUND AND THE RATCHET STRAP AROUND
THE TREE HAS BEEN REMOVED. NEVER CLIMB ANY
LADDER STAND WITHOUT THE CRISS-CROSS STRAPS
AND STABILIZER SECURED CORRECTLY!!
52
WARNING
!
NEVER re-use ratchet straps that were left in the
field for use. Call Summit Treestands to purchase
replacement straps. Sunlight, animals, or tree growth
could have affected the strap integrity which could
cause the strap to fail, causing serious injury or death!
LADDER REMOVAL
51
LOOSE CRISS-
CROSS STRAPS

• The seat on these treestands is removable. We recommend it be
removed and stored in a dry place when not in use.
• The powdercoat finish applied at the factory is very durable and
should only need touch ups in areas of heavy wear or accidental
impact. Use a high quality, outdoor spray paint to cover any bare
metal areas that might develop. Inspect the stand before use, every
time. DO NOT use if any corrosion (rust) is present.
• When transporting your Summit Treestand be sure it is securely tied
down and be sure no other objects can slide into or hit the treestand
possibly causing damage.
Should you damage any part of your Summit Treestand, contact your nearest authorized Summit dealer or the factory to obtain the
proper corrective action procedure and/or replacement parts for the treestand.
Summit Treestands have the highest structural integrity by design, material selection and manufacturing techniques, but as its owner,
only your continued care will assure trouble free performance. When the above-mentioned guidelines are followed, your Summit
Treestand will provide years of successful hunting.
(A) Warranty
Summit Treestands, LLC (Summit) warrants to the original retail purchaser that all products manufactured by it are free from defects in material and
manufacture at the time of shipment for (12) months from the date of purchase. Summit will repair or replace any part found defective if the unit claimed
to be defective shall be returned to Summit, postage prepaid, within the warranty period.
This warranty shall not apply to any product which has been subjected to misuse; misapplication; neglect (including but not limited to improper maintenance);
accident; improper installation; modification (including but not limited to use of unauthorized parts or attachments); adjustment or repair. THE FOREGOING
IS IN LIEU OF ALL OTHER WARRANTIES, WHETHER EXPRESS OR IMPLIED (INCLUDING THOSE OF MERCHANTABILITY AND FITNESS OF ANY PRODUCT FOR A
PARTICULAR PURPOSE), AND OF ANY OTHER OBLIGATION OF LIABILITY ON THE PART OF THE COMPANY.
(B) Limitation of Liability
It is expressly understood that Summit’s liability for its products, whether due to breach of warranty, negligence, strict liability, or otherwise, is limited to the
repair of the product, as stated above, and Summit will not be liable for any other injury, loss, damage, or expense, whether direct or consequential, including
but not limited to loss of use, income, profit, or damage to material, arising in connection with the sale, installation, use of, inability to use, or the repair or
replacement of Summit’s products.
Summit reserves the right to make alterations or modifications in its products at any time, which in its opinion, may improve the performance and efficiency of
the product. It shall not be obligated to make such alterations or modifications to products already in service.
Please take the time to fill out the warranty card online at http://www.summitstands.com/warranty.
LIMITED WARRANTY
9
MAINTENANCE AND CARE
7
It is necessary and very important that someone knows your hunting location and time of return. It is also very important that
you carry (on your person) emergency communication devices such as a cell phone, two-way radio, whistle, signal flare or preferably a
PLD (Personal Locator Device - FCC approved July, ‘03). When triggered, a PLD will transmit an emergency signal to local rescue teams
identifying your location via satellite GPS coordinates. PLD’s may be purchased at Wilderness outfitters or on the internet.
Suspension trauma or blood pooling can occur when suspended motionless in a harness for periods of time. This can lead to
unconsciousness and death. A suspension relief strap is furnished with your harness. Read your harness instructions to assure that you
know how to use it.
Self extraction may be necessary in the unfortunate situation that (A) no one knows your location, (B) your communication efforts
are exhausted, (C) you are confident that you have the strength, dexterity and ability
to perform self-extraction and (D) you decide this is your “absolute last resort”. It is
recommended to carry a device to assist with this self-extraction. Simple devices such
as screw-in steps or a rope “Tree Descender” (available from Summit) will allow you to
remove the weight from your harness. This may enable you to return to the treestand/
ladder/climbing steps or slowly descend the tree.
Several optional products/systems are available that offer self-recovery or self extraction
from a fall when suspended in a harness. Returning to the ground obviously also relieves suspension trauma and some systems
automatically descend the user while others allow user control. If one of these products/systems is selected for use as an additional
safety precaution against prolonged suspension, be sure to follow the manufacturers’ directions for safe use.
WARNING
!
If you have to hang in the tree before help
arrives, you need to exercise your legs by
pushing off from the tree or by using the
enclosed suspension relief strap. See the
treestand harness instructions and the
enclosed instructions for more information.
!
CAUTION
Look for nicks, gouges, cuts, cracks, bends, corrosion
or other damage that can be the result of improper use
or accidental damage. For instance, this could occur if
someone else used the treestand without knowledge of
its proper use, or if the treestand were dropped, hit by
a motor vehicle or subject to corrosive conditions, etc.
HARNESS SUSPENSION
8

Dual Pro Mirador à échelle
PN#: SU82104
© 2018 Summit Treestands, LLC | 715 Summit Dr. Decatur, AL 35601
PH#: (800) 353-0634 | www.summitstands.com
!
NE PAS LIRE ET NE PAS SUIVRE LES AVERTISSEMENTS ET
LES INSTRUCTIONS DU MANUFACTURIER CONSTITUE UNE
MAUVAISE UTILISATION DU PRODUIT ET PEUT ENTRAÎNER
DE SÉRIEUSES BLESSURES OU LA MORT!!
AVERTISSEMENT
• LISEZ, SUIVEZ ET COMPRENEZ TOUS LES AVERTISSEMENTS ET TOUTES LES INSTRUCTIONS AVANT L’UTILISATION. VÉRIFIEZ TOUTES LES DATES D’EXPIRATIONS SUR LES
ÉTIQUETTES AVANT CHAQUE UTILISATION. SI VOUS NE COMPRENEZ PAS ENTIÈREMENT L’UTILISATION SÉCURITAIRE ET CORRECTE DU HARNAIS DE CORPS COMPLET
AVEC SYSTÈME D’ARRÊT DE CHUTE (HCCSAC) OU DU MIRADOR, CHASSEZ À PARTIR DU SOL! NE PAS SUIVRE TOUS LES AVERTISSEMENTS ET TOUTES LES INSTRUCTIONS
INDIQUÉS PEUT ENTRAÎNER DE SÉRIEUSES BLESSURES OU LA MORT! IL EST REQUIS DE SURVEILLER ET COMPRENDRE LE DVD FOURNI AVEC CE PRODUIT AINSI QUE LES
AVERTISSEMENTS DE SÉCURITÉ ET LES INSTRUCTIONS AU : www.summitstands.com/safety-videos
• UNE CHUTE PEUT SURVENIR EN TOUT TEMPS LORSQUE VOUS QUITTEZ LE SOL ET QUE VOUS CHASSEZ À PARTIR D’UN MIRADOR! TOUTE CHUTE PEUT ENGENDRER DE
SÉRIEUSES BLESSURES OU LA MORT! L’UTILISATTION D’UN HARNAIS DE CORPS COMPLET AVEC SYSTÈME D’ARRÊT DE CHUTE EST REQUIS LORSQUE VOUS UTILISEZ UN
MIRADOR. SI VOUS N’AVEZ PAS DE HCCSAC, CHASSEZ À PARTIR DU SOL!
• VOUS DEVEZ UTILISER UN HARNAIS DE CORPS COMPLET AVEC SYSTÈME D’ARRÊT DE CHUTE (HCCSAC) AVEC CE PRODUIT. LE HCCSAC DOIT ÊTRE UTILISÉ ET DOIT ÊTRE
ATTACHÉ À L’ARBRE AVANT D’AVOIR ACCÈS À LA PLATEFORME DU MIRADOR ET IL DOIT ÊTRE PORTÉ ET ATTACHÉ À L’ARBRE EN TOUT TEMPS AVEC L’UTILISATION D’UN
MIRADOR ET CE JUSQU’À VOTRE RETOUR EN SÉCURITÉ AU SOL. LISEZ ET SUIVEZ TOUTES LES INSTRUCTIONS QUI VOUS ONT ÉTÉ FOURNIES AVEC VOTRE HCCSAC.
• N’UTILISEZ PAS CE PRODUIT SI VOUS NE COMPRENEZ PAS SON UTILISATION SÉCURITAIRE ET CORRECTE. LISEZ ET SUIVEZ TOUTES LES INSTRUCTIONS ET
AVERTISSEMENTS AVANT CHAQUE UTILISATION!
• PORTEZ TOUJOURS UN HCCSAC QUI RÉPOND RIGOUREUSEMENTAUX STRANDARDS DE L’INDUSTRIE TELS QUE RECONNUS PAR LE TMA. PORTEZ UN HCCSAC À TOUTES
LES FOIS QUE VOUS QUITTEZ LE SOL, EN MONTANT ET EN DESCENDANT. LES COURROIES À UNE BRETELLE ET LES HARNAIS POUR LE TORSE NE SONT PLUS PERMIS ET
NE DEVRAIENT PAS ÊTRE UTILISÉ! NE PAS UTILISÉ UN HCCSAC PEUT ENTRAÎNER DE SÉRIEUSES BLESSURES OU LA MORT!
• LA LONGUEUR DE LA COURROIE D’ANCRAGE DU HARNAIS DEVRAIT ÊTRE RÉDUITE AU MINIMUM EN TOUT TEMPS. ELLE DEVRAIT ÊTRE AJUSTÉE POUR QU’ELLE SOIT
AU DESSUS DE LA TÊTE SANS EXCÉDENT DANS LA POSITION ASSISE ET UN MINIMUM DE JEU DEVRAIT ÊTRE DISPONIBLE LORS DE L’ASCENSION. NE PAS SUIVRE CES
INSTRUCTIONS POURRAIT ENGENDRER UNE SUSPENSION SANS POSSIBILITÉ DE RÉCUPÉRATION VERS LE MIRADOR. SOYEZ VIGILANT EN CE QUI A TRAITAUX RISQUES
RELIÉS À UNE SUSPENSION DANS UN HCCSAC ET AU FAIT QU’UNE SUSPENSION PROLONGÉE DANS UN HARNAIS PEUT ÊTRE MORTELLE.
• VEUILLEZ TOUJOURS INFORMER UNE TIERCE PERSONNE DE VOTRE EMPLACEMENT DE CHASSE EN CAS D’URGENCE. SI PERSONNE N’EST AU COURANT DE VOTRE
EMPLACEMENT DE CHASSE ET QUE LA COMMUNICATION EST INFRUCTUEUSE, VOUS DEVEZ AVOIR UN PLAN PERSONNEL POUR RÉCUPÉRER OU VOUS LIBÉRER AVANT
L’ASCENSION DANS L’ARBRE. UNE SUSPENSION PROLONGÉE DANS UN HARNAIS PEUT ÊTRE MORTELLE. IL EST IMPORTANT DE FAIRE DES EXERCICES AVEC LES JAMBES
EN POUSSANT SUR L’ARBRE OU EN FAISANT D’AUTRES GENRES D’EXERCICES AVEC LES JAMBES POUR ÉVITER L’ACCUMULATION DE SANG LORS D’UNE SUSPENSION. LES
CHASSEURS POSSÉDANT DES CONDITIONS PHYSIQUES DIFFÉRENTES AURONT BESOIN DE PLANS DIFFÉRENTS POUR RÉCUPÉRER OU SE LIBÉRER ET AINSI ÉVITER LES
EFFETS D’UNE SUSPENSION PROLONGÉE. AYEZ UN PLAN PERSONNEL ET PRATIQUEZ-LE EN PRÉSENCE D’UN ADULTE RESPONSABLE AVANT DE QUITTER LE SOL. AUCUN
PLAN DE RÉCUPÉRATION OU DE LIBÉRATION NE PEUT FONCTIONNER POUR TOUS LES CHASSEURS, POUR TOUT TYPE D’ARBRE ET DANS TOUTES LES CIRCONSTANCES.
SEUL VOUS POUVEZ DÉTERMINER LE MEILLEUR PLAN POUR VOTRE SITUATION ET VOUS DEVEZ AVOIR CE PLAN AVANT DE QUITTER LE SOL. CHASSEZ À PARTIR DU SOL SI
VOUS N’AVEZ PAS LA POSSIBILITÉ DE RÉCUPÉRER OU DE VOUS LIBÉRER D’UNE SUSPENSION.
• SI VOUS AVEZ DES QUESTIONS OU DES INQUIÉTUDES QUANT AUX INSTRUCTIONS, AVERTISSEMENTS OU L’UTILISATION CORRECTE “ARRÊTEZ” ET CONTACTEZ LE
MANUFACTURIER. N’UTILISEZ PAS CE PRODUIT JUSQU’À CE QUE VOUS COMPRENIEZ ENTIÈREMENT SON UTILISATION SÉCURITAIRE ET CORRECTE. GARDEZ TOUS LES
AVERTISSEMENTS, INSTRUCTIONS ET DVD POUR UNE UTILISATION ULTÉRIEURE SI NÉCESSAIRE, POUR TOUTE PERSONNE QUI EMPRUNTRERA VOTRE MIRADOR/HCCSAC
OU POUR TRANSMETTRE À QUICONQUE ACHETERAIT CES PRODUITS. UTILISEZ TOUS LES DISPOSITIFS DE SÉCURITÉ FOURNIS AVEC LE MIRADOR ET LE HCCSAC.
• VÉRIFIEZ LE MIRADOR AVANT CHAQUE UTILISATION POUR DÉCELER UNE USURE EXCESSIVE, UNE DÉFORMATION, DE LA CORROSION OU TOUT AUTRE DOMMAGE.
VÉRIFIER TOUTES LES COURROIES, SANGLES ET CÂBLES POUR L’EFFILOCHAGE, LES COUPURES, LES DÉCHIRURES, L’ABRASION, LA DÉCOLORATION, LES ENTAILLES, LES
COUPURES OU POUR TOUT SIGNE QUE LA SANGLE PEUT ÊTRE USÉE OU ENDOMMAGÉE SUITE À UNE CHUTE OU PARCE QU’ELLE A SUPPORTÉE UN POIDS EXCESSIF OU
POUR TOUT AUTRE DOMMAGE. ARRÊTEZ L’UTILISATION IMMÉDIATEMENT SI VOUS REMARQUEZ DES DOMMAGES.
• N’EXCÉDEZ JAMAIS LA LIMITE DE POIDS MAXIMALE POUR CE PRODUIT. CETTE LIMITE INCLUE L’UTILISATEUR ET TOUT L’ÉQUIPEMENT TRANSORTÉ SUR LA PLATEFORME.
• LA PLUPART DES CHUTES À PARTIR DE MIRADORS À ÉCHELLE SE PRODUISENT SUITE À UNE INSTALLATION INADÉQUATE OU PARCE QUE LE PRODUIT N’EST PAS UTILISÉ
TEL QUE PRESCRIT. TOUTES LES PIÈCES FOURNIES DOIVENT ÊTRES UTILISÉES, INCLUANT MAIS NE SE LIMITANT PAS À LA BARRE STABILISATRICE, LES COURROIES ET
TOUTES LES PIÈCES DE QUINCAILLERIE. LES CONNECTIONS POUR LES SECTIONS D’ÉCHELLES DOIVENT ÊTRE ATTACHÉES ENSEMBLE AVEC LES GOUPILLES ET LES
BOULONS FOURNIS. SUIVEZ ATTENTIVEMENT ET REVÉRIFIEZ TOUTES LES INSTRUCTIONS DE MONTAGE AFIN DE VOUS ASSURER QUE VOUS AVEZ BIEN ASSEMBLÉ LE
PRODUIT. SI VOUS AVEZ DES QUESTIONS, CONTACTEZ SUMMIT AU NUMÉRO 800-353-0634.
• L’ASSEMBLAGE ET L’INSTALLATION D’UN MIRADOR À ÉCHELLE REQUIERT LA PRÉSENCE DE TROIS ADULTES RESPONSABLES. N’ESSAYEZ JAMAIS D’ASSEMBLER,
D’INSTALLER OU D’ENLEVER CE PRODUIT SANS LA PRÉSENCE D’AU MOINS TROIS ADULTES RESPONSABLES.
• REMPLACEZ TOUTES LES COURROIES ET TOUS LES CÂBLES À TOUS LES DEUX ANS OU AVANT SI VOUS NOTEZ DES DOMMAGES INCLUANT MAIS NE SE LIMITANT PAS À
DE L’EFFILOCHAGE, DES COUPURES, DES DÉCHIRURES, DE L’ABRASION, DE LA DÉCOLORATION, DES ENTAILLES OU TOUT SIGNE QUI INDIQUE QUE LES SANGLES OU
LES CÂBLES PEUVENT ÊTRES USÉS OU ENDOMMAGÉS SUITE À UNE CHUTE OU PARCE QU’ILS ONT SUPPORTÉ UN EXCÈS DE POIDS. SI VOUS NOTEZ TOUT DOMMAGE
MENTIONNÉ CI-HAUT (OU TOUT AUTRE DOMMAGE), CESSEZ L’UTILISATION IMMÉDIATEMENT!
• N’UTILISEZ PAS UN MIRADOR SI VOUS NOTEZ LA PRÉSENCE DE GLACE OU DE NEIGE SUR LA PLATEFORME OU SUR DES SECTIONS D’ÉCHELLES.
• AYEZ TOUJOURS TROIS (3) POINTS DE CONTACT AVEC L’ÉCHELLE LORSQUE VOUS GRIMPEZ. NE MONTEZ JAMAIS AVEC DE L’ÉQUIPEMENT SUR VOTRE DOS OU DANS VOS
MAINS. PRENEZ VOTRE TEMPS, NE SOYEZ PAS PRESSÉ!!

PG 18 www.summitstands.com
• AVANT CHAQUE UTILISATION ASSUREZ-VOUS QUE:
• LES COURROIES ENTRECROISÉES SONT PRÉSENTES ET ATTACHÉES CORRECTEMENT.
• LA BARRE STABILISATRICE AJUSTABLE EST PRÉSENTE ET ATTACHÉE CORRECTEMENT.
• LES SECTIONS DE D’ÉCHELLES NE SONT PAS SÉPARÉES ET SONT ATTACHÉES ENSEMBLE AVEC LES GOUPILLES ET LES BOULONS.
• IL N’Y A PAS DE SIGNE VISIBLE DE CORROSION.
• IL N’Y A PAS DE FISSURES DANS LES TUBES.
• IL N’Y A PAS DE FISSURES DANS LES SOUDURES
• IL N’Y A PAS DE JOINTS SOUDÉS QUI SE SONT DÉTACHÉS
• LA PARTIE INFÉRIEURE DE L’ÉCHELLE EST ENTRÉE DANS LE SOL AFIN DE PRÉVENIR TOUT MOUVEMENT.
SI UNE DES CONDITIONS CI-DESSUS N’EST PAS RENCONTRÉE, ARRÊTEZ L’UTILISATION DE CE PRODUIT IMMÉDIATEMENT!
• N’UTILISEZ JAMAIS LE MIRADOR OU LE HCCSAC PAR MAUVAIS TEMPS, PAR EXEMPLE S’IL PLEUT, S’IL Y A DES ÉCLAIRS, DES TEMPÊTES DE VENT, DE LA NEIGE, DE LA GRÊLE,
DE LA NEIGE FONDUE OU DES CONDITIONS GLACÉES. SI CES CONDITIONS SONT PRÉSENTES, DESCENDEZ DU MIRADOR ET METTEZ FIN À VOTRE CHASSE. SI LE MAUVAIS
TEMPS EST IMMINENT, DESCENDEZ DU MIRADOR OU NE MONTEZ DANS AUCUN MIRADOR.
• NE SOYEZ JAMAIS PRESSÉ POUR L’INSTALLATION, L’UTILISATION OU L’ENLÈVEMENT DE CE PRODUIT. L’EMPRESSEMENT PEUT CAUSER DES ACCIDENTS ENGENDRANT DE
SÉRIEUSES BLESSURES OU LA MORT!
• N’UTILISEZ JAMAIS LE HCCSAC OU LE MIRADOR SI VOUS ÊTES MALADE, SI VOUS AVEZ DES NAUSÉES OU DES ÉTOURDISSEMENTS OU SI VOUS AVEZ UNE CONDITION
MÉDICALE QUI POURRAIT VOUS CAUSER DES ENNUIS, TELS UNE MALADIE DU COEUR, DES ARTICULATIONS QUI BLOQUENT, DES VERTÈBRES QUI SE FUSIONNENT OU SI
VOUS ÊTES FATIGUÉ.
• N’UTILISEZ JAMAIS CE PRODUIT OU LE HCCSAC SI VOUS ÊTES SOUS L’INFLUENCE DE DROGUES, D’ALCOOL, OU D’UNE PRESCRIPTION POUR MÉDICAMENT. CECI INCLU
PLUSIEURS TYPES DE MÉDICAMENTS POUR LE RHUME ET LA GRIPPE ACHETÉS AU COMPTOIR D’UNE PHARMACIE. AVANT D’UTILISER CE PRODUIT, VEUILLEZ TOUJOURS
CONSULTER VOTRE MÉDECIN AU SUJET DES MÉDICAMENTS SOUS ORDONNANCE, DES MÉDICAMENTS ACHETÉS AU COMPTOIR AINSI QU’AU SUJET DE VOS CAPACITÉS
PHYSIQUES SI VOUS UTILISEZ TOUT TYPE DE MÉDICAMENT.
• N’UTILISEZ PAS CE PRODUIT SI VOUS N’AVEZ PAS UNE BONNE FORME PHYSIQUE SANS RESTRICTIONS ET QUE VOUS ÊTES BIEN REPOSÉ. VEUILLEZ TOUJOURS
CONSULTER UN MÉDECIN AVANT L’UTILISATION DE CE PRODUIT AFIN D’ASSURER L’UTILISATION SÉCURITAIRE DE CE PRODUIT.
• N’UTILISEZ PAS CE PRODUIT SI VOUS AVEZ UNE HISTORIQUE DE MALADIE DU COEUR OU D’UNE MALADIE PULMONAIRE SANS CONSULTER VOTRE MÉDECIN AFIN DE
L’UTILISER DE FAÇON SÉCURITAIRE ET CORRECTE.
• N’UTILISEZ JAMAIS UN MIRADOR SUR UN ARBRE MORT, UN ARBRE PENCHÉ OU MALADE, UN ARBRE AVEC UNE ÉCORCE QUI SE DÉTACHE, UN POTEAU D’UTILITÉ PUBLIQUE
OU SUR DES ARBRES QUI ONT DES OBSTRUCTIONS (TELS QUE DES NOEUDS OU DES BRANCHES) QUI AURONT POUR EFFET DE LIMITER L’UTILISATION DU MIRADOR! NE
VOUS FIEZ JAMAIS À UNE BRANCHE D’ARBRE À TITRE DE SUPPORT OU DE MARCHE! N’UTILISEZ JAMAIS DES ARBRES QUI ONT DES OBSTRUCTIONS QUI AURAIENT POUR
EFFET DE LIMITER L’UTILISATION DU MIRADOR OU DE CAUSER DE L’INSTABILITÉ.
• NE BONDISSEZ OU NE SAUTEZ JAMAIS SUR LA PLATEFORME POUR LES PIEDS OU SUR LA PLATEFORME DU SIÈGE LORSQUE VOUS ESSAYEZ D’ATTACHER LE MIRADOR À
L’ARBRE OU POUR TOUTE AUTRE RAISON. CECI POURRAIT ENDOMMAGER LE MIRADOR ET POURRAIT CAUSER UNE SURCHARGE DE POIDS ET ENGENDRER DE SÉRIEUSES
BLESSURES OU LA MORT!!
• MONTEZ TOUJOURS UN ARC, UN SAC À DOS, UNE ARME À FEU OU TOUT AUTRE ÉQUIPEMENT AU MOYEN D’UNE CORDE OU D’UN TREUIL SEULEMENT APRÈS VOTRE
ARRIVÉE SÉCURITAIRE SUR LE MIRADOR. LES ARMES À FEU DOIVENT ÊTRE MONTÉES DÉCHARGÉES AVEC LA CHAMBRE OUVERTE ET LE CANON POINTANT VERS LE SOL!
• NE MODIFIEZ JAMAIS VOTRE MIRADOR EN FAISANT DES RÉPARATIONS, EN REMPLAÇANT DES PIÈCES, EN MODIFIANT, AJOUTANT OU EN Y ATTACHANT DES PIÈCES SAUF SI
LE MANUFACTURIER LE RECOMMANDE!
• PRATIQUEZ L’INSTALLATION, L’AJUSTEMENT ET L’UTILISATION DE VOTRE MIRADOR AU NIVEAU DU SOL AVANT L’UTILISATION À UN NIVEAU ÉLEVÉ!
• NE VOUS PENCHEZ JAMAIS PAR-DESSUS LES CÔTÉS DE VOTRE MIRADOR POUR AUCUNE RAISON ET EN TOUT TEMPS.
• NE DORMEZ JAMAIS DANS LE MIRADOR. LE SOMMEIL POURRAIT ENTRAÎNER UNE CHUTE ET POURRAIT ENGENDRER DE SÉRIEUSES BLESSURES OU LA MORT!
• NE TAILLEZ PAS OU NE CASSEZ PAS LES BRANCHES D’UN ARBRE LORSQUE VOUS ÊTES SUR OU DANS UN MIRADOR DANS UNE POSITION ÉLEVÉE. TOUT ÉMONDAGE DOIT
ÊTRE FAIT À PARTIR DU SOL!! UN HCCSAC EST REQUIS EN TOUT TEMPS LORS DE L’UTILISATION D’UN MIRADOR DANS UNE POSITION SURÉLEVÉE.
• NE LAISSEZ PAS CE PRODUIT DANS L’ARBRE POUR UNE PÉRIODE EXCÉDANT DEUX (2) SEMAINES À LA FOIS. LA TEMPÉRATURE, LES ANIMAUX, LA CROISSANCE DE L’ARBRE,
LES VANDALES ET/OU AUTRES CONDITIONS ENVIRONMENTALES POURRAIENT ENDOMMAGER LE PRODUIT ET SON INTÉGRITÉ. N’UTILISEZ JAMAIS UN MIRADOR QUI A ÉTÉ
LAISSÉ DANS UN ARBRE POUR PLUS DE DEUX SEMAINES. SI VOUS UTILISEZ LE MIRADOR APPARTENANT À UNE AUTRE PERSONNE, RENSEIGNEZ-VOUS AU SUJET DE LA
PÉRIODE DURANT LAQUELLE LE MIRADOR EST ATTACHÉ À L’ARBRE AVANT SON UTILISATION!! SI CETTE INFORMATION EST INCONNUE, CHASSEZ À PARTIR DU SOL!!
• VEUILLEZ TOUJOURS VÉRIFIER VOTRE MIRADOR SUMMIT AVANT CHAQUE UTILISATION AINSI QUE SES COMPOSANTES ET SES HARNAIS POUR DÉCELER DES FISSURES,
DES DÉCHIRURES, DE L’USURE DES CÂBLES, DE L’ABRASION, DE LA CORROSION, DES RUPTURES, DES BOSSES OU AUTRES DOMMAGES QUI PEUVENT SURVENIR DURANT
LE TRANSPORT, L’ENTREPOSAGE OU L’UTILISATION DE CELUI-CI. N’UTILISEZ PAS LE MIRADOR SI VOUS NOTEZ DES DOMMAGES! CONTACTEZ LE SERVICE À LA CLIENTÈLE
POUR EFFECTUER LES RÉPARATIONS APPROPRIÉES OU POUR DES RENSEIGNEMENTS AU SUJET DE LA PROCÉDURE DE RÉPARATIONS / REMPLACEMENT!
• TOUTES LES INSTRUCTIONS ÉCRITES OU PAR VIDÉO AINSI QUE LES AVERTISSEMENTS, LES COURROIES ET LE HARNAIS DE CORPS COMPLET AVEC UN SYSTÈME
D’ARRÊT DE CHUTE DOIVENT ÊTRE ENTREPOSÉS DANS UN ENDROIT SÉCURITAIRE, FRAIS ET SEC. TOUTES LES VIDÉOS ET LES INSTRUCTIONS ÉCRITES AINSI QUE LES
AVERTISSEMENTS DOIVENT ÊTRE REVUS À CHAQUE ANNÉE. IL INCOMBE À CHAQUE PROPRIÉTAIRE DE MIRADOR DE FOURNIR À QUICONQUE EMPRUNTE OU ACHÈTE LE
MIRADOR LES AVERTISSEMENTS ET INSTRUCTIONS DU MIRADOR. AUCUN MIRADOR N’EST COMPLET SANS UN HARNAIS DE CORPS COMPLET AVEC UN SYSTÈME DARRÊT
DE CHUTE ET NE DEVRAIT JAMAIS ÊTRE UTILISÉ SANS HCCSAC AU-DESSUS DU SOL.
• LES TUBES PEUVENT SE REMPLIR D’EAU, GELER ET PEUVENT SE BRISER OU ÉCLATER SI VOUS LAISSEZ VOTRE MIRADOR À L’EXTÉRIEUR. UNE VÉRIFICATION DU MIRADOR
EST REQUISE AVANT CHAQUE UTILISATION!! TOUTES PARTIES CONTENANT DES TUBES QUI ONT UN ÉTAT DÉFORMÉ OU QUI ONT ÉCLATÉ À CAUSE DU GEL NE SONT PAS
COUVERTES PAR LA GARANTIE ET SON UTILISATION DEVRAIT ÊTRE ARRÊTÉE IMMÉDIATEMENT! NE PAS SUIVRE CES INSTRUCTIONS PEUT ENGENDRER DE SÉRIEUSES
BLESSURES OU LA MORT!! LE PROPRIÉTAIRE DOIT ASSUMER LES COÛTS DES COMPOSANTES DE REMPLACEMENT

GROSSEUR D’ARBRE/LIMITE DE POIDS
1
LES ÉTIQUETTES INDIQUANT LES AVERTISSEMENTS (POUR RÉFÉRENCE SEULEMENT)
2
ÉTIQUETTE D’AVERTISSEMENT DU MIRADOR
COURROIES À CLIQUET DE L’ÉCHELLE
PG 19
N’ENLEVEZ PAS LES ÉTIQUETTES INDIQUANT LES AVERTISSEMENTS OU LES
ÉTIQUETTES INDIQUANT LES COMPOSANTES DES PRODUITS SUR LE MIRADOR!
!
AVERTISSEMENT
Vous devez également visionné le DVD ci-joint AVANT d’utiliser votre nouveau mirador!!
LIMITE DE POIDS
LIMITE DE POIDS POUR OCCUPATION INDIVIDUELLE
227 KGS. X 1 TOTAL*
Dual Pro Mirador à échelle
NE DÉPASSER PAS CETTE LIMITE! (* Inclus tout l’équipement)
Grosseur d’arbre minimum et maximum pour le mirador: 20-50 cm de diamètre
LIMITE DE POIDS POUR OCCUPATION
INDIVIDUELLE
159 KGS. X 1 TOTAL*
LIMITES DE POIDS POUR OCCUPATION
DOUBLE (LORSQUE DEUX
UTILISATEURS UTILISENT LE MIRADOR AU
MÊME MOMENT)
113 KGS. POIDS MAXIMAL DE
L’UTILISATEUR*
227 KGS. POIDS MAXIMAL COMBINÉ
DE L’UTILISATEUR*

PG 20 www.summitstands.com
CONTENU DE LA BÔITE
PN DESCRIPTION QUANTITÉ
82066.010 BARRE DE TENSION LATÉRALE 2
82066.020 SUPPORT POUR ÉCHELLE 2
82066.200 APPUI GAUCHE DE LA PLATEFORME 1
82066.250 APPUI DROIT DE LA PLATEFORME 1
82087.100 PLATEFORME AVANT 1
82087.150 PLATEFORME ARRIÈRE 1
82066.300 FOURCHE 1
82066.400 SUPPORT GAUCHE POUR SIÈGE 1
82066.450 SUPPORT DROIT POUR SIÈGE 1
82066.600 SIÈGE 1
82066.910 SECTION SUPÉRIEURE DE L’ÉCHELLE 1
82066.920 SECTION DU MILIEU DE L’ÉCHELLE 1
82066.930 SECTION INFÉRIEURE DE L’ÉCHELLE 1
82066.940 SECTION DU STABILISATEUR MÂLE 1
82066.950 SECTION DU STABILISATEUR FEMELLE 1
82066.500 ACCOUDOIR 1
82066.820 APPUI-ARME GAUCHE 1
82066.830 APPUI-ARME DROITE 1
82066.810 BARRE D’APPUI-ARME 1
82066.850 SIÈGE EN MOUSSE 1
82066.840 COUSSINET POUR BARRE D’APPUI-ARME 1
82066.700 ENSEMBLE D’ACCESSOIRE 1
82066.890 -
POCHETTE DE LA QUINCAILLERIE
1/4”-20, classe 5.
PN DESCRIPTION QUANTITÉ
SU10601 1 3/4” BOULON, 1/4”-20 19
SU10670 2 1/2” BOULON, 1/4”-20 14
2 3/4” BOULON, 1/4”-20 4
SU10612 ÉCROU DE BLOCAGE, 1/4”-20 37
1/4” GOUPILLE D’ARRÊT 3
1/4” BAGUES 2
COUSSINETS DE CAOUTCHOUC POUR
APPUI-ARME 2
Outils
• Clés 7/16 po. et / ou Douille / Rochet
- L’assemblage peut être facilité avec l’utilisation d’un rochet électrique ou d’une perceuse avec douille (assurez-vous de ne pas serrer
trop fort lors de l’assemblage avec des outils électriques).
- Il est recommandé que les boulons soient triés par nombre de filetage et grandeur avant l’assemblage.
LISTE DES PIÈCES
3
OUTILS REQUIS
4
CONTENU DE LA POCHETTE DES ACCESSOIRES
PN DESCRIPTION QUANTITÉ
82066.890 POCHETTE DE LA QUIN CAILLERIE 1
82066.760 COURROIE À CLIQUET 3
82066.765 COURROIE COURTE DE PLATEFORME
POUR ROCHET 1
82066.775 COURROIE STABILISATRICE AVEC BOUCLE
POUR ÉCHELLE LONGUE 2
SU18191 DVD 1
SU18226 HARNAIS COMPLET AVEC SYSTÈME D’ARRÊT 1
DE CHUTE (HCCSAC)
Toutes les images sont des représentations visuelles. Tous les tissus, la peinture et les accessoires peuvent changés en tout temps.
Le poids net des produits est approximatif.
Table of contents
Languages: