Sunmax RT-50AC User manual

Operation Guide for RT-50AC Hand
Push Automatic Washing Machine

2
Content
Safety Instruction
.............................................................................................
3
For Commercial Use
.......................................................................................
3
Please Read all Instructions before Using this Machine
...................
3
1. Hand Shank...................................................................................................4
2. Control Panel.................................................................................................4
a.......Stopwatch.......................................................................................................4
b.......Battery Status Indicator.................................................................................4
c.......Brush Motor Switch ......................................................................................4
d.......Water Suction Motor Switch.........................................................................4
e.......Solution Tank Switch....................................................................................4
f.......Lock Switch ...................................................................................................4
3. Looseingn Handle of Squeezee
..........................................................................
4
4. Brush Plate Lifting Pedal ..............................................................................4
5. Pump Impeller...............................................................................................4
6.Installment Handle of Squeegee .........................................................................4
7.Squeegee..............................................................................................................4
8 Water Level Pipe of Clear Water Tank.........................................................4
Battery Installment
..........................................................................................
5
Battery Charging
..............................................................................................
5
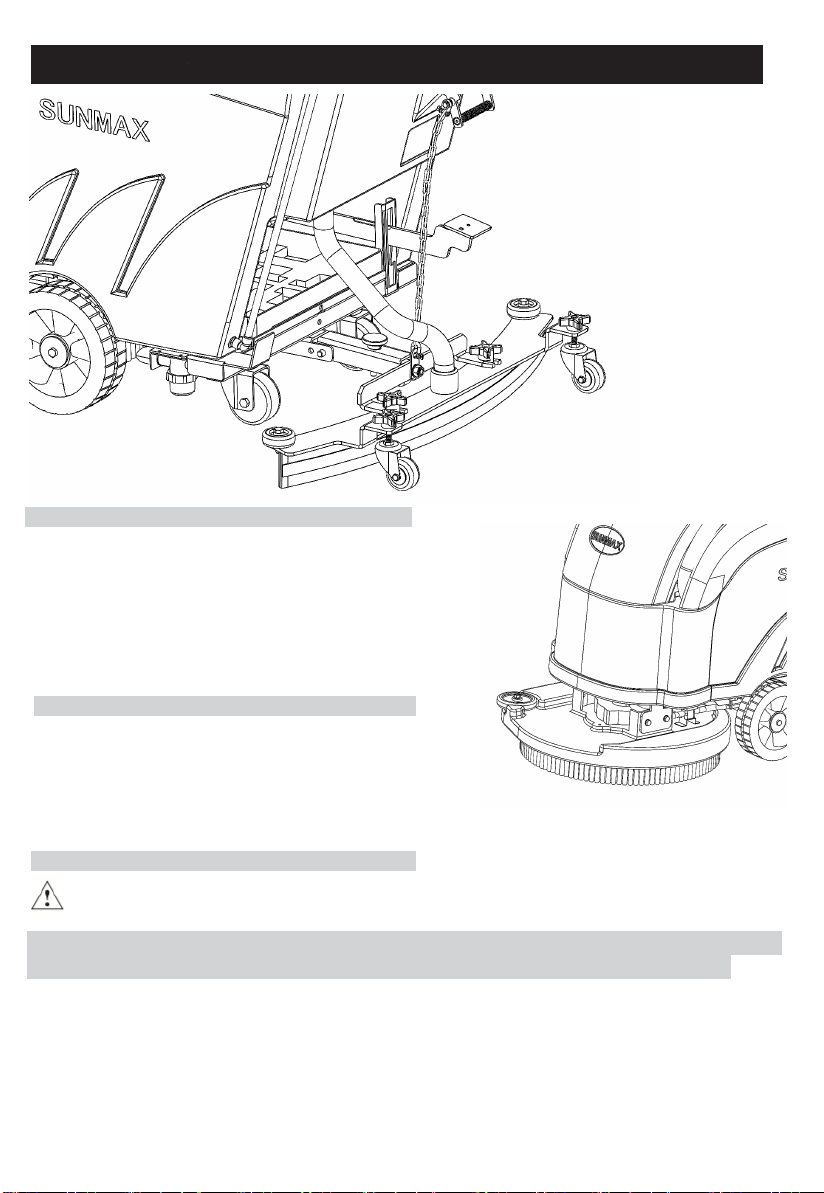
Squeegee Installment..............................................................................................5
Needle Holder and Brush Tray Installment...........................................................5
Water Injection in Clear Water Tank.....................................................................5
Water Suction Motor Switch..................................................................................6
Brush Plate/Needle Holder Lifting ........................................................................6
Squeegee Lifting.....................................................................................................6
Setting of Clear Water Tank Flow.........................................................................6
Water Suction Operation........................................................................................7
What should we do when there are too much foam in the sewage tank...............7
Sewage Tank Emptying .........................................................................................7
Current Maintenance..............................................................................................7
Weekly Maintenance..............................................................................................7
Monthly Maintenance ............................................................................................7
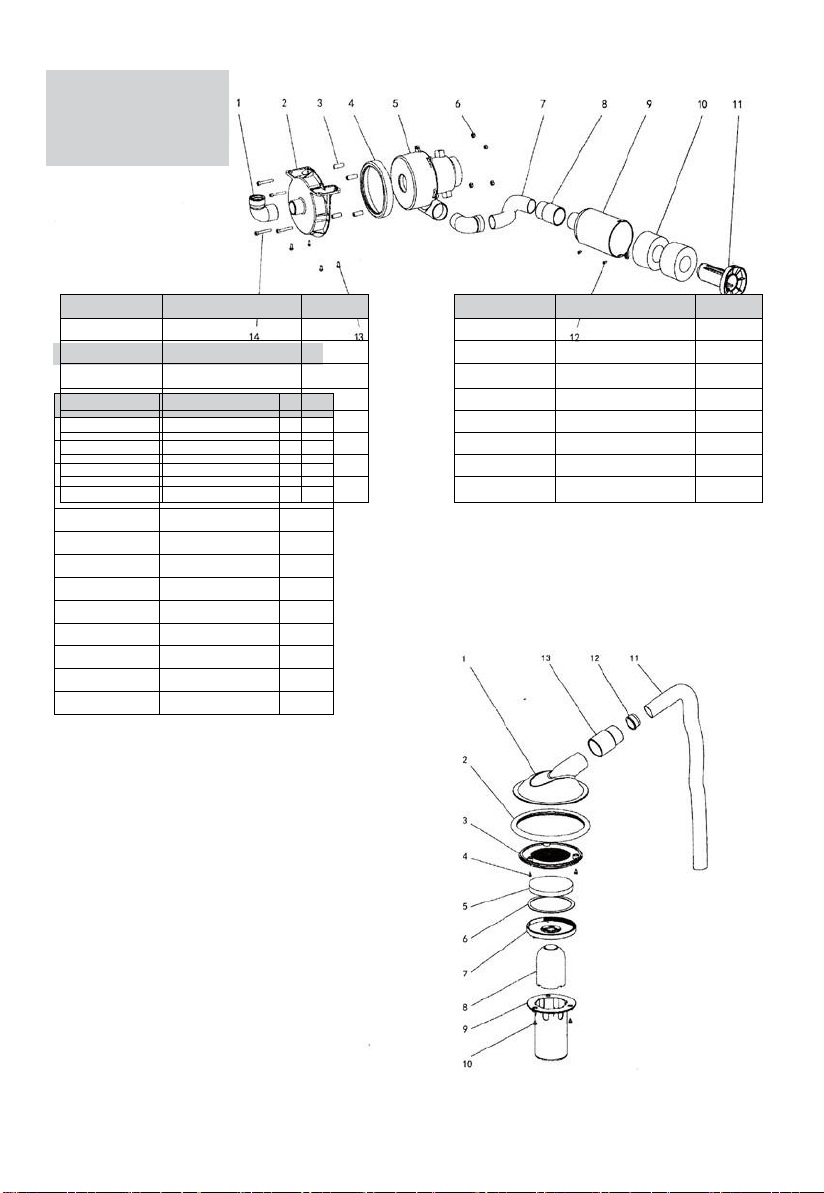
Valve components..................................................................................................6
Control Pabel Applications....................................................................................8
Floating Head components.....................................................................................9
Squeegee components............................................................................................10
Clear Water Tank components
...............................................................................
11

3
Safety
Instructio
ns
Please read all instructions
when using this machine for
business
•Used only indoors. Do not place this machine in rain.
•Do not use this machine as a toy. Be careful when operating this machine near the children.
•Use this machine only by following the instructions listed on this handbook.
•Only the accessories recommended by manufacturers can be used.
•Charge the battery in a ventilated environment. Gas released during charging may be ignited in a confined space.
The header of this machine shall be opened and the batteries shall be installed well when charging to avoid an
explosion.
•Disconnect all positive and negative battery terminals before trying to make any adjustments or maintenance to the
machine.
。Unintentional start- up of traction electric machine, water suction electric machine and machine components may
cause human injury.
•Battery acid can cause damage to the eyes or skin. Please wear goggles, gloves and protection suit before
installing the battery or charging.
•Please send the charging back to the after- sales service center when it dose not work normally (because it has
been dropped, damaged, placed outdoors or immersed in water).
•Do not pull out the plug or touch the machine with a wet hand.
•Do not place any objects in the mouth of the machine for the mouth of the machine shall be kept unimpeded.
•This machine shall be kept away from dust, thread residue, hair and any objects that may cut the air currents.
•Hair, loose clothing, fingers and any body parts shall be kept away from the openings and operating parts of the
washing machine,
•Do make sure the main power switch be disconnected before removing or installing the needle holder or brush
tray.
•Do not operate the washing machine when you are tired, drinking or taking medicine.
•Always keep yourself behind the machine when running the machine.
•Be careful when you are using the electric terminals for short circuit may cause burns.
。
•Do not place the washing machine on a slope.

4
1. Handle
2. Control Panel
a......Motor switch of brush disk
b.......Motor switch of water absorptionr
c.......Water outlet switch of clean water tank
3. Loosening handle of the Squeegee
4. Brush Tray Lifting Pedal
5. Collision Proof Wheel
6. Installment Handle of the Squeegee
7. Squeegee
8. Flip Handle of the Squeegee
9. Water Level Pipe of Clear Water Tank
10. Electromagnetic valve
11. Valve Control and Water Quantity Control of Clear Water Tank
12. Filter Net
13. Wheel
14. Brush Tray
15. Shield and Splash Guard
16. Clear Water Tank
17. Water Injection Hole of Clear Water Tank
18. Sewage Tank Drains
19. Sewage Tank
20. Water Wiper Hose
21. Vacuum Hose
22. Power plug
RT-50 Hand Push Automatic Washing Machine
Width of Brush Tray
560mm
Width of Squeegee
800mm
Volume of Clear Water Tank
50L
Volume of Sewage Tank
55L
Brush Tray Speed
170rpm
Work Efficiency
3000m2 /
小时
Voltage 110V
Power of Water Suction Motor
600W
Power of Brush Tray Motor
700W
Machine Weight
85KG
Packaging Size Length x
Width x Height
1340*640*1150mm
Machine Parameters
Machine Assembly Diagram
a b c

5
Daily Operation and
Maintenance of the
Washing achine
Installme
Squeegee Installment
1.Loosen the water absorption gripper with the handle (3).
2.Place the water absorption gripper assembly on the swing arm (4) to
ensure the guide wheel (5) to face toward the rear end of the water
absorption gripper.
3.Tighten up two plum bakelite hand wheels)(3).
4.Plug the hose of clear water tank and sewage water tank (20)into the
middle water outlet of
Needle Holder and Brush Tray Installment
1.Step on the brush disk at the back of the machine to lift the pedal (6) for
raising the brush disk shield up
2.When the brush disk (14) is in the rising status, insert (the brush disk
15) in the middle of the lower part, press the brush disk switch of
operation panel (a), and the brush disk will load automatically.
Water Injection of Clear Water Tank
Attention:You shall use a detergent producing low foam. To avoid producing large quantity of foam, you can inject a bit of
defoaming solvent before using this machine to do cleaning. Do not use pure acids.
5
5
3
3
4
20
6
14
15
Too much foam may do damage to the air suction motor, so you shall add the detergent according to the minimum amount
required by the detergent.
1.Open the water injection cover of the clean water tank17).
2.Add required capacity of clear water to the tank box(16)and the temperature of the water added shall not exceed 50 degrees.
The maximum capacity of the clear water tank is 50 liters.
3.Chemical cleaning products, acidic or alkaline cleaners can be added. Oxidizing agent, chlorine, bromine,
methyl aldehyde or mineral flux shall not be added.
Warning: Please determine whether the detergent can be used in this washing machine based on following the
instructions on the manufacturer’s production tags. Do not choose any products or solvents with no acid or alkaline
markings. This machine can only use the detergent whose PH value is between 4 and 10.

1.Insert the power cord, apply the clean water and the detergent into the clean water tank, and add the defoaming agent to the
sewage tank.
2. Press the a\b\c switches respectively to start the work.
3. The power plug must be connected to the socket with the grounding wire and the electric leakage
protection..
Turn off the brush tray motor when the brush plate is in the upward position.
How to Turn On and Turn Off the Water Suction Motor
1.The water suction motor will be started by pressing down the(I)of the left switch (C).
2.The water suction motor will be turned off by pressing down left switch(O).
Brush Tray Lifting
1.Tread the lifting pedal of the brush tray (4)downward until it is locked in the right position.
2.Tread the lifting pedal of the brush tray(4)lightly to unlock it and then slowly lift it up to lower the pedal.
Squeegee Lifting
1.Pull the handle down to lower the water wiper.(3)
2.Pull the handle up to lift up the water wiper.(3)
Setting of the Clear Water Tank Flow/ Cleaning and Replacement of Clear Water Filter Adjust the water-
carrying capacity in accordance with the dirty degree of the floor. Rotate the adjusting knob (11)to control the water- carrying
capacity. The position1 indicates where to turn off while the position 2 indicates the maximum water level.
Regularly clean the
dirt in the clear water filter
(
12
)
based on the frequency of use
(
recommended to clean once in 1-3 days.
),
and rotate to
disassemble according to the direction of the arrow. Filter body (k), filter (L), sealing ring (m), plug (n)
Machine Operating Instructions
a b c

7
Water Suction Operation
1.Make certain the squeegee is in the downward position.
2.当The squeegee will draw the detergent into the sewage tank when the washing machine is moving forward to brush the floor.
3.If necessary, rotate the knob(8)to adjust the voltage of the squeegee.(切Do not make the angle of the red rubber sheet
of the squeegee too big. Otherwise the red rubber sheet will be worn more quickly, which shall affect the cleaning
situation. The greater the angle is bending, the greater the resistance will be.)
如
If areas need cleaning are missed, please decrease the use quantity of the cleaning solution and lift up the squeegee to pull the
washing machine back to the missing areas. Lower the squeegee and move it forward to draw the remaining cleaning solution on the
floor.
What
Should We Do When There Are Too Much Foam in the Sewage Tank
观Stop operating the washing machine if there are too much foam when you are observing the the situation of waste water
accumulation in the sewage tank. Add the recommended amount of chemical defoamer(19)to the sewage tank.
Sewage Tank Emptying
Open the sewage tank pipe weep(18)to empty the sewage tank(19).
Daily Maintenance
1.Wash the sewage tank with clear water and empty it. Open the tank lid(21)to dry it.
2.Remove the water wiper components and wash and wipe it clean. Examine whether there have blockages or chippings in the
mouth of the water wiper.
3.Clean and wipe the top of the battery with ammoniated glass cleaner.
4.Fill each battery with distilled water as needed.Do not use tap water to fill the batteries. Maintenance- free storage batteries has
no need to add more liquids.
5.Charge the batteries according to the instructions listed on this handbook.
Weekly Maintenance
Do not test the strength of the batteries unless they are fully charged and fully
cooled. Test the batteries with a hydrometer.
Monthly Maintenance
1.Rinse and empty the sewage tank with clean water. Open the cover of the water tank (21) and dry
it with air.
2.Remove the water wiping element, rinse and scrub cleanly. Check if the water wiping inlet has
blockages or debris.
3.Keep the power plug and socket dry and check if the power cord is damaged or leaking the
electricity.
4.Check if the dust suction motor has debris or foreign body clogging.
5.Check if the filtering cotton of the suction nozzle in the sewage tank has foreign body clogging.
Maintenance
Operation of the Washing Machine

8
Control Panel Components
FrameComponents
Serial
NumberNumber DescriptionDescription QuantityQuantity
1 Control Cabinet 1
2 Control Panel
B
olt 6
Serial
4 Bolt 6
5 1
Serial
Number Description Quantity
1 Base Plate 1
2 Wheels 2
3 Spacer 2
4 Bearing 4
5 Shaft Cover 2
6 Bolt 2
7 Casters 2
8 Washer 4
9 Nut 8
10 Screw 4
11 Spring 8
12 8

8
2
ng Head Componentst
Floati Connecting Bracke
Seria
l
Num
5
ber
Description Quan
tity
1Top Cover
1
2Seal Ring
1
3Matching Grid
1
4Screw
3
5Filter
1
6Gasket
1
7Cover
1
8Floating Head
1
9Bucket
1
10 Screw
1
11 Hose
1
12 Hose Sleeve
1
13 Casing
1
Water Suction
Motor
Components
Serial
Number
Description Quantity
1Elbow 2
1
3Connectors 4
4Gasket 1
Water Suction Motor 1
6Nut 4
7Hose 1
8Casing 1
Serial
Number
Description Quantit
y
9Silencer 1
10 Sponge Cover 2
11 Core 1
12 Screw 2
13 Bolt 4
14 Bolt 4

9
Lifting Components
Squeegee Components
Number
Description Quantit
1
y
1Lifting Rod
2Washer 2
3Pin 2
4Eccentric Bushing 2
5Washer 2
6Screw 2
7Nut 2
8Pedal Cover 1
9Pedal 1
10 Spring Pin 1
11 Bolt 2
12 Pin 1
13 Washer 1
14 Cotter Pin 1
15 Rod 1
16 Nut 2
17 Pin 1
Warning: do this operation when you wear gloves to
avoid direct touch on the dangerous liquids.
Replacement of the Squeegee Rubber Strips
When the rear wheel of the squeegee is worn, it will not dry the floor well. If such situation emerges, you can remove the
squeegee and replace it. If you want to replace the squeegee, please follow these steps:
➢loosen the screw(6)and turn off the water suction motor.
Warning: Do this operation when you wear gloves
to avoid direct touch on the dangerous liquids.
Warning: disconnect the power source and pull out
the key when repairing it.
➢The height of squeegee shall be adjusted by
the rubber situation (see ”adjusting the height
of squeegee support parts”).
➢Select butterfly screws in the horizontal
position.
➢Dismantle the rear rubber(5)to make
replacement.
➢Make sure the main power switch is in the “0”position. Warning:
disconnect the power source and pull the key out when the
machine is in maintenance.
➢Remove the rubber fastener and link the nuts. (6,7)
➢Select the butterfly nut in the horizontal position.
➢Take down the rubber and replace it.
➢Dismantle the rubber (4) and replace it with a new one.

10
Squeegee Lifting Components
Number Description Quant
ity
1Bolt 1
2Left Baffle 1
3Pipe 1
4Handle 1
5Rear Baffle 1
6Screw 2
7Washer 1
8Screw 1
9Nut 1
10 Pad 3
11 Pull Rope
Components 1
12 Ring 1
13 Nut 1
14 Balancing Frame 1
15 Axis 1
16 Cotter Pin 1
17 Washer 1
18 Hinge Pin 1
19 AdjustmentBolt 1
20 Support Arm 1
21 Support Arm 1
22 Nut 1
23 Washer 1
24 Spring 1
25 Screw 1
26 Cotter Pin 1
27 Water 1
28 Hinge Pin 1
29 Adjustable Bolt 1
30 Adjustment
Device 1
31 Spring Pin 1

Vacuum Hose Components
Sewage Drainage Pipe Components
Clear Water Tank Components
Number Description Quantity
Vacuum Hose Components
1Hose
1
2Bolt
3
3Water Inlet
1
4Gasket
1
Sewage Drainage Pipe Components
Drainage Pipe Components
1
Clamp
1
Screw
2
Clamp
1
Screw
2
Clear Water Tank Components
Clear Water Tank
1
Clear Water Tank Cover
1
Water Level Connection
Pipe Interface
2
Water Level Pipe of Clear
Water Tank
1
Bobber
1

Malfunction Possible Causes:
Cleaning solution
does not work Water suction motor does not run
The water filter device is blocked
The sewage tank is full
Water wiper or water suction hose is blocked, damaged or not
connected in the right way
Water tank, water suction motor or water wiper is not sealed well
The pressure of water wiper is not correct
Water wiper arm and mechanical arm mechanism do not operate
well
The wiper comes
unglued There are debris on the water wiper scraping strip
The water wiper scrapping strip is worn or damaged
The floor is not cleaned before using the machine to wash
The washing operation
can not be done or
stopped accidentally
The hose or valve is blocked
Floor is not cleaned
completely, with the
dirt being not
cleaned while
the floor is not polished
The water suction motor does not work well
Excessive use of water suction device or needle holder dose a
damage to the machine
Washing the floor at a high speed
Insufficient supply of cleaning solution
Improper operation of cleaning steps


This manual suits for next models
1
Table of contents