Surtek PP520A User manual

ATENCIÓN: Lea, entienda y siga las instrucciones de seguridad contenidas en este
manual antes de operar esta herramienta.
WARNING: Read, understand and follow the safety rules in this manual, before operating this tool.
PP520A-PP620A
Podadora de Pasto a Gasolina
Gas Lawn Mower
Manual de Usuario y Garantía.
User’s Manual and Warranty.

2
ENGLISHESPAÑOL
General safety rules
Features
· Technical data
Assembly instructions
Operation instructions
Maintenance and storage
Warranty conditions
Notes
Warranty policy
Normas generales de seguridad
Características
· Especificaciones técnicas
Instrucciones de ensamble
Instrucciones de operación
Mantenimiento y almacenamien-
to
Condiciones de garantía
Notas
Garantía
8
8
9
9
9
10
10
12
14
3
4
4
4
5
6
7
12
14
CONTENIDO CONTENT
SÍMBOLOS SYMBOLS
PELIGRO, ADVERTENCIA, PRECAUCIÓN:
Indica un riesgo personal o la posibilidad de
un daño.
Herramientas tipo II: Doble aislamiento,
protege las herramientas eléctricas.
Lea el manual de usuario: Lea las instruccio-
nes contenidas en este manual.
DANGER, CAUTION, WARNING: Indicates risk of
personal injury and/or the possibility of damage.
Type II power tools: Indicates double insulation.
Read the user manual: Read all the instructions in
this manual.

3
ESPAÑOL•Manual de usuario
NORMAS GENERALES DE SEGURIDAD
IMPORTANTE: Esta podadora es capaz de
cortar las manos, pies, así como de lanzar ob-
jetos. Si no se observan las instrucciones de se-
guridad siguientes se pueden producir lesiones
graves o la muerte.
ADVERTENCIA: Siempre desconecte el cable
de la bujía y póngalo donde no pueda entrar en
contacto con la bujía, para evitar el arranque ac-
cidental, durante la preparación, el transporte,
el ajuste o cuando se hacen reparaciones.
PRECAUCIÓN: El tubo de escape del motor, al-
gunos de sus constituyentes y componentes del
vehículo contienen y desprenden productos quí-
micos conocidos como causa de cáncer y defec-
tos al nacimiento u otros daños reproductivos.
PRECAUCIÓN: El silenciador y otras piezas del
motor llegan a ser extremadamente calientes
durante la operación y siguen siendo calientes
después de que el motor haya parado. Para
evitar quemaduras severas, permanezca lejos de
estas áreas.
CONDICIONES GENERALES DE SEGURIDAD
1. Esta máquina está diseñada para cortar pas-
to natural. Nunca use la podadora para otros
propósitos. Cualquier otra aplicación puede
ponerlo en peligro y podría dañar la podadora.
2. Las personas menores de 16 años u otras per-
sonas que no estén familiarizadas con las ins-
trucciones de uso no deben usar esta máquina.
3. El usuario es el único responsable de la segu-
ridad de otras personas en el área de trabajo.
Mantenga los niños, mascotas o transeúntes le-
jos de la podadora mientras esté en uso.
4. Antes de podar retire todos los objetos ex-
traños del área de trabajo.
INSTRUCCIONES DE USO
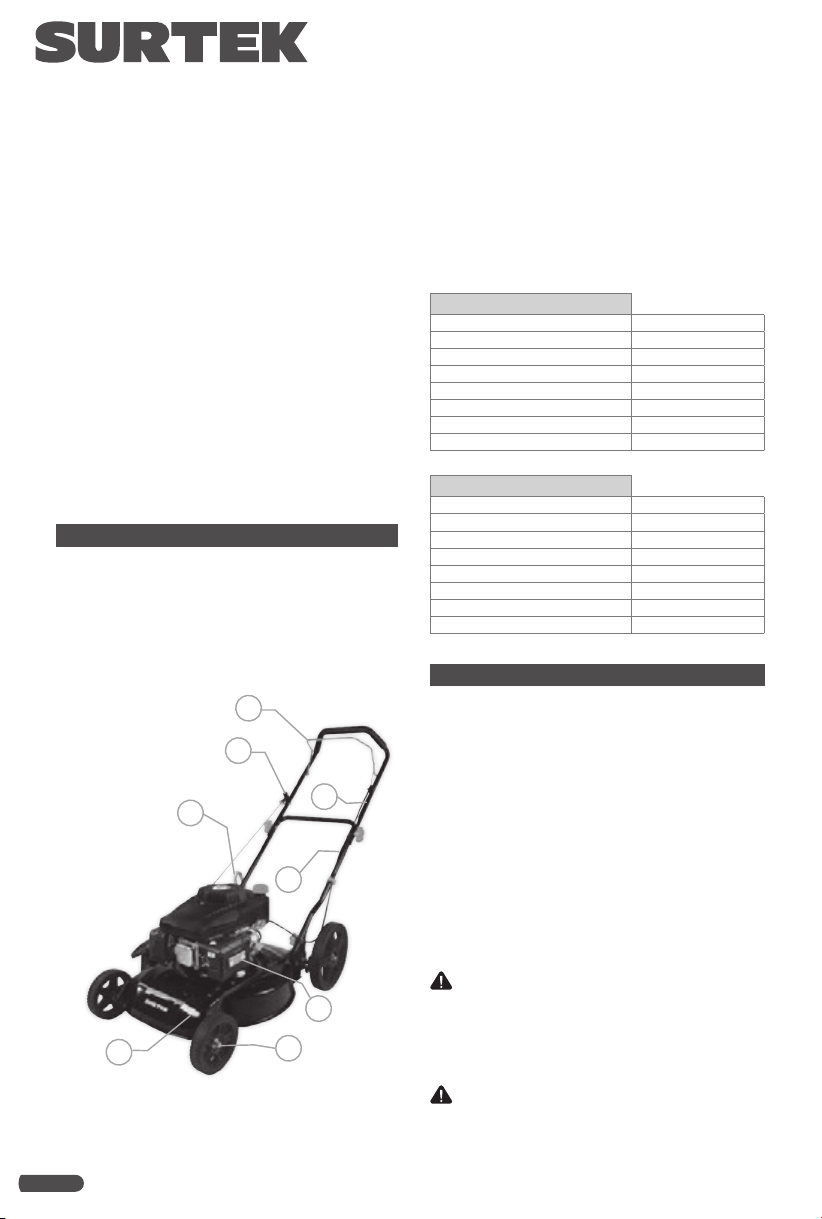
1. Verifique que todas las tuercas, tornillos y
pernos estén bien ajustados.
2. Antes de podar, coloque el colector de pasto
en su lugar.
3. Antes de podar, verifique que la cuchilla y
el tornillo de sujeción de la cuchilla estén bien
asegurados. Cuando los accesorios de corte
requieran ser afilados, esto debe hacerse de
ambos lados de la cuchilla para evitar un des-
balance. Si la cuchilla está dañada, debe ser
cambiada.
4. Cuando pode use pantalones largos y calza-
do resistente.
5. No encienda el motor en lugares cerrados o
con mala ventilación, el gas que genera el mo-
tor contiene monóxido de carbono, el cual po-
dría afectar seriamente su salud.
6. Trabaje sólo bajo buenas condiciones de ilu-
minación.
7. No use la podadora cuando esté lloviendo o
cuando el pasto esté mojado.
8. Debe tomar precauciones adicionales mien-
tras poda en pendientes o en terrenos irregula-
res. Pode las pendientes de lado a lado, nunca
de arriba hacia abajo.
9. Apague el motor si tiene que dejar la poda-
dora sin supervisión.
10. Nunca levante la parte trasera de la poda-
dora cuando encienda el motor y nunca pon-
ga sus manos o pies debajo de la podadora o
dentro del canal de descarga trasera cuando el
motor esté encendido.
11. Nunca modifique de ninguna manera el
rango de velocidad de la podadora.
12. En las podadoras autopropulsadas, desco-
necte el sistema de autopropulsión antes de
encender el motor.
13. Nunca levante o cargue la podadora cuan-
do el motor esté encendido.
14. Detenga el motor y retire la cubierta de la
bujía en estos casos:
- Antes de cualquier operación debajo de la po-
dadora o en el canal de descarga.
- Antes de cualquier mantenimiento, repara-
ción o revisión.
- Antes de levantar, cargar o mover la podado-
ra.
- Si deja la podadora sin supervisión o si va a
ajustar la altura de corte.
- Para remover y vaciar la bolsa colectora de
pasto.
- Después de haber golpeado un objeto extra-
ño. Lleve la podadora al centro de servicio para
que le hagan las reparaciones adecuadas si es
necesario.
ADVERTENCIA: Después de detener el motor
la cuchilla seguirá en movimiento por unos po-
cos segundos.
- Si la podadora vibra de una manera anormal,
trate de encontrar la razón y llévela al centro
de servicio.
- Verifique regularmente el estado de todas las
tuercas, tornillos y pernos, todos deben estar
bien apretados para usar la podadora con segu-
ridad.

4
PRECAUCIONES DE SEGURIDAD
a) Siempre use la podadora con el colector de
césped o el deflector en posición.
b) Detenga el motor antes de vaciar el colector
de césped o antes de cambiar la altura de corte.
c) Mientras el motor esté encendido, nunca in-
troduzca sus manos o pues debajo de la podado-
ra o debajo del área de eyección de pasto. Fig E
d) Antes de podar, remueva todos los objetos
extraños que puedan ser lanzados por la máqui-
na del área que va a podar.
e) Mantenga lejos a los niños, mascotas y a otras
personas a una distancia segura cuando esté
usando la podadora.
f) Nunca levante la podadora mientras encienda
el motor.
CARACTERÍSTICAS
CONOZCA SU HERRAMIENTA
Antes de intentar usar este producto, familiarí-
cese con todas sus características de operación y
requerimientos de seguridad.
Su podadora de pasto fue diseñado para reali-
zar solamente una tarea, podar el pasto, cual-
quier otro uso que le quiera dar a la podadora
no esta permitido.
1. BARRA DE CONTROL
2. MANIJA SUPERIOR
3. MANIJA INFERIOR
4. MOTOR
5. CARRO
6. LLANTA
7. ARRANQUE DE RETROCESO
8. MANIJA DE AJUSTE
ESPECIFICACIONES TÉCNICAS
CODIGO PP520A
CILINDRADA 141 cc
DIÁMETRO DE CORTE 20"(510mm)
DIÁMETRO DE RUEDAS 7" / 7"
CAPACIDAD DE TANQUE 1,3 L
CONTROL DE ALTURA 3 NIVELES
POTENCIA 2,5 kW
VELOCIDAD 2 800 r/min
PESO 23 kg ( 50,7 lb)
CODIGO PP620A
CILINDRADA 161 cc
DIÁMETRO DE CORTE 20"(510mm)
DIÁMETRO DE RUEDAS 7" / 11"
CAPACIDAD DE TANQUE 1,3 L
CAPACIDAD DE ALTURA 5 POSICIONES
POTENCIA 3,0 kW
VELOCIDAD 2 800 r/min
PESO 27 kg (59,5 lb)
INSTRUCCIONES DE ENSAMBLE
MONTAJE
NOTA: Esta unidad se envía sin gasolina ni aceite
en el motor. Llene con gasolina y aceite como se
indica en las instrucciones que se incluyen en el
manual de motor adjunto ANTES de poner en
funcionamiento su podadora.
ENSAMBLE LA AGARRADERA
1. Sujete la agarradera inferior en el dispositivo
utilizando dos tornillos y dos pequeñas perillas
en cada lado.
2. Despliegue la agarradera superior y ajústela
a la agarradera inferior usando las perillas gran-
des y los tornillos en cada lado.
ADVERTENCIA: Asegúrese de que la cuer-
da guía esté en la agarradera derecha, cuando
usted se pare detrás de la podadora.
AJUSTE
AJUSTANDO LA ALTURA DE CORTE
¡PRECAUCIÓN! Ajuste la altura de corte solo
cuando el motor esté apagado y la bujía de
arranque esté desconectada.
7
1
6
4
3
2
5
8

5
ESPAÑOL•Manual de usuario
La altura de corte es ajustada con la manija de
ajuste de la altura de corte. Puede seleccionar
diferentes alturas de corte.
Jale la manija de ajuste y seleccione la altura de
corte deseada. La manija encaja en la posición
deseada.
Desde la posición 1 a la posición 7. El rango de la
altura de corte es de 25mm a 75mm.
INSTRUCCIONES DE OPERACIÓN
El motor es entregado sin aceite: Añada 0.6 li-
tros de aceite antes de encender el motor.
LLENADO DE GASOLINA Y ACEITE
Lea a las instrucciones del manual del motor
para la información adicional sobre el motor.
1. Agregue el aceite proporcionado antes de ini-
ciar la unidad por primera vez.
2. Realice el mantenimiento con gasolina al mo-
tor, tal como se indica en el manual.
ADVERTENCIA: Tenga extremo cuidado
cuando manipule gasolina. La gasolina es alta-
mente inflamable y sus vapores pueden causar
explosiones. Nunca agregue combustible a la
máquina en interiores o mientras el motor está
caliente o en funcionamiento. Apague cigarri-
llos, cigarros, pipas y otras fuentes de combus-
tión.
ENCENDIDO
El control encendido está unido al asa superior.
Jale este control contra el asa para operar la uni-
dad. Suéltelo para detener el motor y la cuchilla.
ADVERTENCIA: El mecanismo de control,
también es un dispositivo de seguridad. Nunca
intente anular su funcionamiento.
OPERACIÓN
Encienda y apague el motor.
ARRANQUE DEL MOTOR:
Una vez que la podadora haya sido armada y
configurada correctamente, encienda el motor
como se indica a continuación:
a) Coloque la palanca en la posición de ENCEN-
DIDO.
b) Tome la manija de arranque y manténga-
la contra la manija superior, jale la manija de
arranque hasta que sienta resistencia y después
jale con fuerza.
c) Coloque la palanca en posición de MARCHA.
¡PRECAUCIÓN! : La cuchilla comenzará a gi-
rar tan pronto como encienda el motor. Mien-
tras la máquina esté trabajando mantenga la
manija de seguridad en posición de trabajo. El
motor se apagará tan pronto como suelte la ba-
rra de control.
MÉTODO DE REGULACIÓN DEL CABLE DE
CONTROL DE ARRANQUE
En el soporte del freno de arranque, hay inte-
rruptores de arranque, si el cable es alargado, el
balancín del freno no puede tocar el interrup-
tor de arranque, la bujía no genera chispas y el
motor no puede encender. Es tiempo de regular
el cable.
El método es el siguiente:
MÉTODO 1
1) Desmonte el control de arranque, y desmonte
la parte superior del cable, después use una llave
para aflojar la tuerca del regulador del tornillo.
2) Gire el regulador del tornillo para alargar el
conjunto de plásticos, después evite la longitud
del cable que se ha alargado.
3) Después de la regulación, ajuste el cable den-
tro del control de arranque.
Método simple para poner el control de arran-
que dentro de la manija superior: Primero colo-
que el extremo derecho del control de arranque
en la manija superior, después coloque el otro
extremo del control de arranque en la manija
superior.
4) Tensione el control de arranque (3) contra la
manija superior, esta vez, el ángulo del balancín
de freno a la cubierta es de 90° o la distancia del
soporte del freno al balancín del freno es de 1-2
mm, de otra manera, si esta no es la distancia, el
cable se romperá.
5) Use la llave para atornillar la tuerca después
de la regulación.
6) Contrariamente, repita el método escrito arri-
ba, hasta que la bujía haga una chispa.
MÉTODO 2
Remueva la varilla y desmonte el extremo del
cable, use la herramienta para hacer que un
ángulo mayor dependa de tirar el soporte de
cable.
FUNCIÓN 2 EN 1
TRITURADORA Y DESCARGA LATERAL
¿QUÉ ES EL SISTEMA DE TRITURADO?

6
Cuando usa la trituradora, el pasto es cortado
en un primer paso, después se tritura finamen-
te y es regresado al suelo como un fertilizante
natural.
CONSEJOS PARA USAR LA FUNCIÓN EL
TRITURADOR
- Corte regular por máximo 2 cm desde 6 cm
hasta 4 cm de altura de la hierba.
- Use una cuchilla afilada.
- No pode pasto mojado.
- Ajuste la velocidad máxima del motor.
- Solo pode a la velocidad con la que camina.
- Limpie regularmente el accesorio para triturar,
el lado interno de la cubierta y la cuchilla.
INICIO DE OPERACIÓN
Reequipamiento de la trituradora.
NOTA: Asegúrese de que el motor esté
apagado y las cuchillas estén completamente
detenidas.
- Presione el accesorio para triturar sobre el
canal de descarga. Asegure el accesorio para
triturar con la cubierta- la pestaña en el fondo
del accesorio para triturar debe encajar con la
apertura de la cubierta.
- Baje la tapa de descarga otra vez.
Reajuste para el modo de descarga lateral
NOTA: Sólo realice el ajuste cuando el motor
esté apagado y la cuchilla esté completamente
detenida.
- Levante la tapa de descarga y retire la bolsa
colectora de césped.
- Monte el accesorio para triturar.
- Levante la tapa trasera para descarga lateral.
- Ensamble el canal de descarga en el gancho de
soporte de la tapa trasera.
- Baje la tapa trasera, la tapa trasera descansa en
el canal de descarga.
MANTENIMIENTO Y
ALMACENAMIENTO
- Asegúrese de que todos los tornillos, tuercas y
pernos estén bien apretados para mantener la
podadora en condiciones seguras para su ope-
ración.
- Nunca guarde la podadora cargada de gaso-
lina en espacios cerrados donde los vapores de
la gasolina puedan alcanzar alguna fuente de
calor o chispa. Permita que el motor se enfríe
antes de guardar la podadora.
- Para reducir cualquier riesgo de in-
cendio, limpie la podadora, especialmente el
motor, el silenciador y el tanque de combusti-
ble. Evite los rastros de pasto seco, hojas o su-
perficies con grasa.
- Verifique frecuentemente la condición del de-
flector y del colector de césped, reemplácelos si
es necesario.
- En caso de tener que vaciar el aceite antes de
invierno, hágalo en exteriores.
- Use guantes de protección para ensamblar o
limpiar la cuchilla, asegúrese de que la cuchilla
esté bien equilibrada.
MANTENIMIENTO
ADVERTENCIA: : Apague el motor y desco-
necte la bujía antes de realizar cualquier mante-
nimiento, reparación o limpieza.
-Para motores de cuatro tiempos lea cuidadosa-
mente el manual del motor. Verifique continua-
mente el aceite, cámbielo o agregue más aceite
siempre que sea necesario.
- Revise frecuentemente que todos los residuos
de césped sean removidos de la parte inferior
de la podadora.
- Lubrique regularmente el eje de las ruedas con
grasa.
- Verifique seguido la cuchilla, para obtener
los mejores resultados de corte la cuchilla debe
estar bien afilada y balanceada.
- En intervalos de tiempo regulares verifique
que todos los tornillos, tuercas y pernos estén
bien apretados. Tornillos faltantes o mal apreta-
dos puede provocar serios daños al motor o a la
estructura de la podadora.
- Si la cuchilla golpea un obstáculo, apague el
motor, revise la cuchilla y acuda al centro de
servicio en caso de que sea necesario.
LA CUCHILLA: la cuchilla está hecha de acero
prensado, para obtener un trabajo limpio la
cuchilla debe ser afilada después de aproxima-
damente 25 horas de trabajo. Asegúrese de que
la cuchilla este bien balanceada, introduzca un
pequeño eje de metal (2 o 3 mm) en el hoyo
central de la cuchilla, este deberá permanecer
horizontal. Si la cuchilla no está horizontal,
balancéela quitando un poco de metal de un
lado.
SOLO DEBE USAR UNA CUCHILLA RECOMENDA-
DA POR EL FABRICANTE
Para retirar la cuchilla, desatornille el torni-
llo, verifique todo el ensamble de la cuchilla y
cambie todas las partes que estén desgastadas
o dañadas.
Cuando ensamble la cuchilla, asegúrese de que

7
los ejes de corte miren en dirección al eje de
rotación. El tornillo de la cuchilla debe ser apre-
tado con un torque de 37 Nm con una herra-
mienta dinamométrica.
SOLO USE PARTES DE REPUESTO ORIGINALES.
PARTES DE REPUESTO DE MALA CALIDAD PUE-
DEN PROVOCAR DAÑOS A LA PODADORA Y
PONER EN PELIGRO SU SEGURIDAD
CONDICIONES DE GARANTÍA
La garantía del fabricante del producto cubre 12
meses desde la fecha de adquisición para todos
los defectos de fábrica. Las podadoras que sean
usadas de manera profesional o comercial tie-
nen garantía por 3 meses. La garantía no será
válida para casos de desgaste normal.
El fabricante reemplazará bajo su cuenta las
partes de repuesto que puedan ser clasificadas
como defectuosas. En cualquier caso, el fabri-
cante no aceptará el reembolso de la máquina
(parcial o totalmente) y/o los daños e intereses
directos o indirectos.
La garantía no cubre:
- Un mantenimiento insuficiente.
- Un uso anormal o daños debidos a golpes.
- Un mal ensamble o preparación de la máquina.
- Las partes de repuesto con desgaste normal
- Costos de envío y empaquetado.
El fabricante rechazará cualquier responsabili-
dad si la máquina no fue usada para el propó-
sito que fue fabricada, o si el operador no usó
la máquina como se describe en el manual de
usuario.
Lea cuidadosamente el manual de usuario antes
de usar la podadora.
Para todas las ordenes de partes de repuesto
usted debe especificar el año de construcción,
el número de serie de la podadora o del motor.

8
ENGLISH•User's Manual
GENERAL SAFETY RULES
WARNING: This symbol points out important
safety instructions which, if not followed, could
endanger the personal safety and/or property of
yourself and others. Read and follow all instruc-
tions in this manual before attempting to oper-
ate this machine. Failure to comply with these
instructions may result in personal injury.
GENERAL CONDITIONS OF USE
1. This machine is to be used exclusively for cut-
ting natural grass. Never use the mower for oth-
er purposes. Any other utilization can involve
danger for your safety and can involve damage
to the mower.
2. Persons under 16 years of age and persons
who are not familiar with the user instructions
must not use the mower.
3. The user is responsible of the safety of other
people in the working area. Keep children and
domestic animals at a safe distance while the
mower is in use.
4. Before mowing, remove all foreign object
from the lawn which may be thrown by the ma-
chine, stay alert for any foreign objects which
may have been missed.
USING INSTRUCTIONS
1. Check that all nuts, bolts and screws are well
tightened.
2. Before mowing place the grass catcher in its
position.
3. Before mowing make sure that the blade and
the blade fixing screw are securely fastened.
When cutting edges require resharpening, this
must be done evenly on both sides so as to pre-
vent any imbalance. If the blade is damaged, it
must be replace.
4. When mowing always wear a long trousers
and strong footwear.
5. Do not run the engine in an enclosed and/or
poorly ventilated area, where gas of the engine
contains carbon monoxide, which are danger-
ous for your health.
6. Work only when there is sufficient light.
7. Do not use the lawn mower when it is raining
or when the grass is wet.
8. Particular precautions must be taken while
mowing on slopes or downing stretches. Mow
across the face of slopes, never down or up.
9. Turn off the engine if you must leave the lawn
mower unattended, displace the lawn mower or
incline it.
10. Never lift the rear of the mower while start-
ing the engine and never place your hands and
feet underneath the deck or into the rear dis-
charge chute while the engine is running.
11. Never change in any way the rated speed of
the engine.
12. On the self-propelled mowers, disconnect
the self-propelled system before starting the
engine.
13. Never lift or carry the mower while the en-
gine is running.
14. Stop the engine and remove the spark plug
cover in these cases:
- Stop the engine and remove the spark plug
cover in these cases:
- Before any operation under the deck or the
grass rear discharge chute.
- Before any maintenance, repairing or checking
operations.
- Before carrying, lifting or removing the mower.
- If you leave the mower unattended or chang-
ing the cutting height.
- To remove and emptying the grass catcher.
- After hitting a foreign object, stop the engine
and check thoroughly the mower in order to see
if it is damage.
SAFETY PRECAUTIONS
a) Always use the lawn mower with the grass
catcher or/ and the deflector in position.
b) Stop the engine before emptying the grass
catcher or before you change the cutting height.
c)While the engine is running, never introduce
your hands or feet under the lawn mower or
under the grass ejection area.
d) Before mowing, remove all foreign objects
from the lawn, which maybe thrown by the
machine.
e) Keep children and other people and domestic
animals at a safe distance when the lawn mower
is in use.
f) Never lift the mower while starting the en-
gine.
FEATURES
KNOW YOUR TOOL
Before attempting to use this product, become
familiar with all of its operating features and
safety requirements.
Your drill press has been designed for only one
purpose, mow grass, any other intended use is
strictly forbidden.

9
1. ENGINE CONTROL BAR
2. SUPERIOR HANDLE
3. INFERIOR HANDLE
4. ENGINE
5. CARTER
6. WHEEL
7. RECOIL STARTER
8. ADJUST HANDLE
TECHNICAL DATA
CODE PP520A
DISPLACEMENT 141 cc
CUTTING DIAMETER 20"(510 mm)
WHEEL DIAMETER 7" / 7"
TANK CAPACITY 1,3 L
HEIGHT CONTROL 3 LEVELS
POWER 2,5 kW
SPEED 2 800 r/min
WEIGHT 23 kg (50,7 lb)
CODE PP620A
DISPLACEMENT 161 cc
CUTTING DIAMETER 20"(510 mm)
WHEEL DIAMETER 7" / 11"
TANK CAPACITY 1,3 L
HEIGHT CONTROL 5 LEVELS
POWER 3,0 kW
SPEED 2 800 r/min
WEIGHT 27 kg (59,5 lb)
ASSEMBLY INSTRUCTIONS
ASSEMBLY
NOTE: This unit is shipped without gasoline or
oil in the engine. Fill up with gasoline and oil as
instructed in the accompanying engine manual
BEFORE operating your mower.
ASSEMBLING THE HANDLE
1. Fasten the lower handle to
The device by using two blots and
two small knobs on each side.
2. Unfold the upper handle and fix it to lower
handle
By using the big knobs and the blots on each
side
NOTE: Make sure the rope guide is on the right
handle, when you stand behind the mower.
ADJUSTMENT
SETTING THE CUTTING HEIGHT
WARNING!:
Adjust the cutting height only
When the engine is switch off the spark plug
Boot has been pulled.
The cutting height is centrally adjusted with
Cutting height adjusting handle. Different
cutting Heights can be selected.
Pull the adjusting handle out and select the
Desired cutting height. The handle snaps
Into the desired position.
From position 1 to position 7 . The cutting
height Range from 25mm to 75 mm
OPERATION INSTRUCTIONS
GAS AND OIL FILL-UP
Refer to the separate engine owner’s manual
for additional engine information.
1. Add oil provided before starting unit for the
first time out of the box.
2. Service the engine with gasoline as instructed
in the separate engine owner’s manual.
WARNING: Use extreme care when handling
gasoline. Gasoline is extremely flammable and
the vapors are explosive. Never fuel the machine
indoors or while the engine is hot or running.
Extinguish cigarettes, cigars, pipes and other
sources of ignition.
Before using the machine you must read the
engine instruction book.
Engine delivered without oil: add 0.6 liter of oil
before starting the engine.
ENGINE STARTING:
Once the machine has been set up properly,
start the engine as follow:
7
1
6
4
3
2
5
8

10
ENGLISH•User's Manual
a)Put the lever on the START position
b)Take the flame out and maintain it against
the superior handle, pull on the recoil starter
handle until you can feel resistance and then
pull harshly.
c) Put the lever on RUN position
WARNING: Blade is in action as soon as
engine started. While the machine is working
maintain the security handle (3) in working posi-
tion. The engine will stop as soon as you release
the engine control bar.
THE REGULATION METHOD OF THROTTLE
CONTROL CABLE:
The regulation method of throttle control cable
On the brake stand of flameout there are switch
of flameout, if the cable is elongates, make
throttle control against the superior handle
rocker of brake can’t touch the switch of flame-
out spark plug do not create spark engine can’t
run. This time you need regulate the cable.
The method is as follows
METHOD 1
1 Dismantle throttle control and Dismantle the
top of cable then use spanner Loosen the nut of
regulate the screw.
2 Revolve the regulate the screw to make the
plastics set lengthen then will avoid the length
of cable that has lengthen out.
3 After regulation fix the cable into the throttle
control , Simple method to put the throttle con-
trol into superior handle easy :
Put right end of the throttle control into the
superior handle first, then put the other end of
throttle control into the superior handle.
4 Tension the throttle control to against the
superior handle ,this time , the angle of rocker
of brake to cover is 90° or the distance of brake
stand to rocker of brake is 1- 2 mm otherwise if
it is no distance the cable will break off.
5 Use spanner screw down the nut after regula-
tion.
6 Contrarily Repeat the method above ,as far as
the spark plug create spark.
METHOD 2
Remove the dipstick and dismantle the end of
cable use tool to make a larger angle depend on
pull the support of cable.
2 IN 1 FUNCTION
MULCHING AND SIDE DISCHARGE
WHAT IS MULCHING ?
When mulching, the grass is cut in one working
step, then finely chopped and returned
to the grass Strip as natural fertilizer.
HINTS FOR MULCH- MOWING
- Regular cut-back by max. 2 cm from 6 cm to 4
cm grass height
- Use a sharp cutting knife
- Do not mow wet grass
- Set max. motor speed
- Only move at walking pace
- Regularly clean mulching wedge,housing inner
Side and mowing blade.
STARTING OPERATION
Retrofitting for mulching mower
NOTE: Only with a stopped motor and stand-
still Cutter!
- Push the mulching wedge into the discharge
channel. Lock the mulching wedge with hous-
ing–the nose on the bottom side of mulching
wedge grip must snap into the opening on the
housing.
-Lower the discharge flap again.
Resetting for side-discharge mowing
NOTE: Only when motor and cutter are at
Standstill!
- Lift the discharge flap and remove the grass
catch box
- Mount the mulching wedge(see mulch Mow-
ing).
- Lift rear flap for side discharge.
- Mount the discharge channel for side discharge
on the support pin of the rear flap.
- Lower the rear flap–the rear flap lies on the
Discharge channel.
MAINTENANCE AND STORAGE
GENERAL RECOMMENDATIONS
• Always observe safety rules when perform-
ing any maintenance.
• The warranty on this lawn mower does not
cover items that have been subjected to oper-
ator abuse or negligence. To receive full value
from warranty, operator must maintain the
lawn mower as instructed here.
• Changing of engine-governed speed will
void engine warranty.
• All adjustments should be checked at least
once each season.
• Periodically check all fasteners and make
sure these are tight.
WARNING: Always stop engine, disconnect
spark plug, and ground against engine before

11
ENGLISH•User's Manual
performing any type of maintenance on your
machine.
WARNING: Before performing any mainte-
nance or cleaning work, switch off the engine
and wait until the blade has come to a stop.
- Make sure that all nuts, bolts and screws are
kept well tightened to keep the lawn mower in
a safe operating condition.
- Never store the lawn mower with a tank with
gasoline in an enclosed area where gasoline
fumes could reach a strong heat source or a
flame. Allow the engine to cool down before
you store your lawn mower in any storage place.
- In order to reduce any risk of fire, clean the
lawn mower and in particularly the engine, the
muffler, the fuel tank. Suppress all grass traces
or leaves or excess of grease.
- Check frequently the condition of the deflec-
tor and the grass catcher, replace them if the are
damage.
- In case of drain oil of the tank before winter,
do this operation outside.
- Wear thick gloves for the mounting and the
sharpening of the blade. Be sure that the blade
is always well balance.
MAINTENANC
WARNING: stop the engine and unplug the
spark plug before any repairing or maintenance
operations.
Stop the engine and unplug the spark plug be-
fore any repairing or maintenance operations.
- For four strokes engine read carefully the
maintenance engine manual. Check regularly
the oil level and add some oil or replace it if
necessary.
- Frequently check the lawn mower and ensure
that all grass deposits are removed from be-
neath the deck.
- Lubricate regularly the wheel axle and the
bearings with grease.
- Check often the blade, in order to obtain a
clean work the blade should always be sharp
and well balance.
- At regularly intervals check the tightening of
all bolts and screws. Wear off or badly tighten-
ing nuts and bolts can involve some important
damages to the engine or the frame.
- If the blade hits violently an obstacle, stop the
lawn mower and bring it to agreed service sta-
tion.
THE BLADE: the blade is made of pressed steel,
in order to obtain a clean work sharpen the
blade frequently, around every 25 hours of
work. Be sure that the blade is always well bal-
ance, introduce a small iron axle( 2 or 3 mm)
in the central hole of the blade, it should stay
horizontal .If the blade does not stay horizontal
balance it by taking off some metal on the side,
which is down.
YOU MUST ONLY USE THE MANUFACTURER
BALDE IT SHOULD BE REFERENCED AND WEAR
THE MANUFACTURER BRAND.
To remove the blade, unscrew the screw, check
the blade support and change all spare parts if
they are worn out or damage.
When reassembling the blade, make sure that
the cutting edges face in the direction of the en-
gine rotation. The blade screw must be torque
to 3.7 K· gm (37 Nm) with a dynamometric tool.
ONLY USE ORIGINAL SPARE PARTS. SPARE PART
OF BAD QUALITY CAN INVOLVE IMPORTANT
DAMAGES TO YOUR LAWN MOWER AND BE
PREJUDICIAL FOR YOUR SECURITY.
WARRANTY CONDITIONS
The manufacturer warrants the product 12
months from the date of purchasing, from
all fabrication faults. The lawn mowers that
are used in a professional or locative way are
warranted 3 months. The warranty cannot be
claimed in case of normal wear.
The manufacturer will replace at his expense the
spare parts, which would be classified as defec-
tive by him or an agreed station service. In any
case the manufacturer will not accept the reim-
bursement of the machine (partially or totally)
and/or damages and interest direct or indirect.
The warranty does not cover:
- An insuffisant maintenance.
- An abnormal use or damage due to shocks.
- The mounting, adjustment and preparation of
the machine.
- The spare parts with normal wear, security
spare parts (belt, blade, blade support, bearings,
cables, deflectors, spark plug, air filter etc…)
- Freight and packing cost.
The manufacturer will refuse any responsibility
if the machine was not used for the purpose
it was made or if the operator did not use the
machine as describe in the operations and main-
tenance rules in the owner manual.
Read carefully the instruction manual before
any use of the lawn mower.
For all spare parts order you must specify the
reference of the mower the construction year,
the serial number of the mower and of the en-
gine.

12
Manual de usuario • User’s manual
Notas / Notes

13
Notas / Notes

14
PP520A
PP620A
Urrea Herramientas Profesionales S.A. de C.V.
Warranties this product for a period of 2 years in its
parts, components and manual labour against any
manufacture defect from the purchasing date.
Purchase date: ____/____/____
Product:____________________
Brand:______________________
Model:______________________
______________________________
Distributor seal and signature
Sold and Imported by:
Urrea Herramientas Profesionales S.A. de C.V.
km 11,5 Carretera A El Castillo, El Salto, Jalis-
co, México. C. P. 45680, Tel. (33) 3208 7900, RFC
UHP900402Q29
Terms:
In order to make warranty effective you must pres-
ent the product along with the warranty properly
fillled and signed to an authorized distributor or
service center.
Urrea Herramientas Profesionales S.A. de C.V.
will cover the transportation cost related to the
warranty.
This warranty is not applicable in the follow-
ing cases:
· When the product has not been used according to
normal conditions or natural wear of its parts.
· When the product has not been used according
with this user’s manual instructions.
· When the product has been fixed or modified by
unauthorized or unqualified person.
Urrea Herramientas Profesionales S.A. de C.V.
garantiza este producto por el termino de 2 años
en sus piezas, componentes y mano de obra contra
cualquier defecto de fabricación a partir de la fecha
de entrega.
Fecha de venta: ____/____/____
Producto: ___________________
Marca: ______________________
Modelo: ____________________
______________________________
Sello y firma de distribuidor
Comercializado e Importado por:
Urrea Herramientas Profesionales S.A. de C.V.
km 11,5 Carretera A El Castillo, El Salto, Jalis-
co, México. C. P. 45680, Tel. (33) 3208 7900, RFC
UHP900402Q29
Condiciones:
Para hacer efectiva la garantía deberá presentar
el producto junto con la póliza de garantía debi-
damente firmada y sellada por el establecimiento
donde la adquirió, en cualquiera de los centros de
servicio autorizados.
Los gastos de transportación que se deriven del
cumplimiento de la garantía serán cubiertos por:
Urrea Herramientas Profesionales S.A. de C.V.
Esta garantía no será valida en los siguientes
casos:
· Cuando el producto haya sido utilizado en condi-
ciones distintas a las normales o al desgaste natural
de sus partes.
· Cuando el producto no haya sido operado de
acuerdo al instructivo de uso que lo acompaña.
· Cuando el producto haya sido alterado o reparado
por personas no autorizadas.
ESPAÑOL
PÓLIZA DE GARANTÍA
ENGLISH
WARRANT POLICY

15
PP520A
PP620A
Urrea Herramientas Profesionales S.A. de C.V.
Warranties this product for a period of 1 year in its
parts, components and manual labour against any
manufacture defect from the purchasing date.
Purchase date: ____/____/____
Product:____________________
Brand:______________________
Model:______________________
______________________________
Distributor seal and signature
Sold and Imported by:
Urrea Herramientas Profesionales S.A. de C.V.
km 11,5 Carretera A El Castillo, El Salto, Jalis-
co, México. C. P. 45680, Tel. (33) 3208 7900, RFC
UHP900402Q29
Terms:
In order to make warranty effective you must pres-
ent the product along with the warranty properly
fillled and signed to an authorized distributor or
service center.
Urrea Herramientas Profesionales S.A. de C.V.
will cover the transportation cost related to the
warranty.
This warranty is not applicable in the follow-
ing cases:
· When the product has not been used according to
normal conditions or natural wear of its parts.
· When the product has not been used according
with this user’s manual instructions.
· When the product has been fixed or modified by
unauthorized or unqualified person.
Urrea Herramientas Profesionales S.A. de C.V.
garantiza este producto por el termino de 1 año
en sus piezas, componentes y mano de obra contra
cualquier defecto de fabricación a partir de la fecha
de entrega.
Fecha de venta: ____/____/____
Producto: ___________________
Marca: ______________________
Modelo: ____________________
______________________________
Sello y firma de distribuidor
Comercializado e Importado por:
Urrea Herramientas Profesionales S.A. de C.V.
km 11,5 Carretera A El Castillo, El Salto, Jalis-
co, México. C. P. 45680, Tel. (33) 3208 7900, RFC
UHP900402Q29
Condiciones:
Para hacer efectiva la garantía deberá presentar
el producto junto con la póliza de garantía debi-
damente firmada y sellada por el establecimiento
donde la adquirió, en cualquiera de los centros de
servicio autorizados.
Los gastos de transportación que se deriven del
cumplimiento de la garantía serán cubiertos por:
Urrea Herramientas Profesionales S.A. de C.V.
Esta garantía no será valida en los siguientes
casos:
· Cuando el producto haya sido utilizado en condi-
ciones distintas a las normales o al desgaste natural
de sus partes.
· Cuando el producto no haya sido operado de
acuerdo al instructivo de uso que lo acompaña.
· Cuando el producto haya sido alterado o reparado
por personas no autorizadas.
ESPAÑOL
PÓLIZA DE GARANTÍA
ENGLISH
WARRANT POLICY

Importante: Los periodos de mantenimiento indicados sirven como referencia. Las labores de mantenimiento se realizarán más
frecuentemente si fuera necesario dependiendo de las condiciones y frecuencia de uso.
Important: The indicated maintenance periods serve as reference. The maintenance work will be performed more frequently if necessary depending on the
conditions and frequency of use.
Importante: El no cumplir con los tiempos de mantenimiento ocasionará que se invalide la garantía.
Important: Failure to comply with this maintenance plan will invalidate the entire warranty.
Nombre de usuario /
User's name:
Fecha de compra /
Purchase date:
Lugar de compra /
Place of purchase:
La instalación del equipo debe de realizarse con-
forme al manual de usuario por un especialista.
The installation must be done by one specialist as the user
manual indicate.
¿Quién
realiza la
tarea?
Responsible for
maintenance.
NOTA: Para llevar un mejor control,
es necesario que usted como usuario,
llene estos datos al momento de
compra.
NOTE: To get a better control, is necessary you
fill this chart with your personal data at the
purchasing.
Revisar filtro de aire / Check the air filter
Revisar cubierta de descarga y tapas/ Inspection the side discharge chute
Limpiar cubierta de descarga y tapa/ Clean the side discharge chute
Revisar el nivel de aceite/ check the oil level
Limpieza general (no usar solventes) / General clean up (do not use solvents)
Limpiar filtro de aire con aire comprimido/ Clean the Air Filter with air pressure
Cambio de aceite/ Oil change
Remplazo de filtro de aire/ Replace air filter engine
Remplazo de bujía / Change the spark plug
Limpieza del carburador / Clean the carburetor
Limpieza de motor/ Clean the engine
Limpieza de tanque de combustible/ Clean the gas tank
Revisión de apriete de uniones/ Join tightening review
Cambio de los baleros del motor (de ser necesario)/ Change engine bearings
Revisar sistema de arranque de retractil / Check belt condition
Revisión de la banda / Check belt condition
Cambiar banda / Replace motor belt
Revisar volante / Inspection of flywheel
Tipo de mantenimiento / Type of Maintenance
Cada 200 horas
o 3 meses / Every 3
months 200 hours
Primeras 8 horas de
uso / First 8 hours
working
Cada 8 horas o
diariamente / Daily
or every 8 hours
Cada 600 horas
o 6 meses / Every 6
months 600 hours
Usuario /User
Centro de
servicio
autorizado /
Authorized
service center.
Datos de usuario y compra /
User and purchase data.
S1P1 S2
Línea de corte / Cutting line
Ciclos de
Trabajo /
Working Cycle
1 tanque de gasolina por 30 minutos de descanso /
1 Gasoline tank per 30 minutes of rest
PP520A-PP620A PP520A-PP620A
Máximo 8 hrs diarias/
8 hr per day

Urrea Herramientas profesionales S.A. de C.V. garantiza es-
tos productos por el termino de 1 año en sus piezas compo-
nentes y mano de obra contra cualquier defecto de fabrica-
ción en el motor a partir de la fecha de compra siempre y
cuando se cumpla con el plan de mantenimiento y servicios
aquí contenidos.
IMPORTANTE: Los componentes de desgaste natural
como filtros, bujías, carbones, retráctil y mantenimiento no
estarán cubiertos como garantía.
• Consulta los precios de mantenimiento en tu centro de
servicio autorizado Urrea.
Urrea Herramientas profesionales S.A. de C.V.
warranties this product for a period of 1 year in parts and handwork
against manufacture defect in the engine head since the purchasing date,
provided that the maintenance plan described here is complied with.
IMPORTANT: The components of natural wear as air filters, spark
plug, carbon brush, recoil and maintenance service are not including as
a warranty.
• Check the maintenance prices in your local Service Center.
Garantía/ Warranty
Tarjeta de Servicios/ Service Card
Modelo /Model:
#CSA
Orden de trabajo/ Work order
Firma de CSA y Fecha de servicio/
Signature of ACS and Date of Service
Tipo de
mantenimiento/
Maintenance
Número de serie /Serial number:
Línea de corte / Cutting line
IMPORTANTE/
IMPORTANT
• El servicio se debe realizar cada 200 horas o 3 meses de uso
(lo que ocurra primero). Verifique el tipo de servicio como se
indica en la tabla de mantenimiento periódico (en la parte
posterior) en uno de los centros de servicio autorizado Urrea
para mantener valida la garantía.
· This maintenance must be done each 200 hour of service or 3 months
(whichever comes first). Verify the type of service in the chart behind in one
of the Urrea Service Center to keep valid the warranty.
This manual suits for next models
1
Table of contents
Languages:
Other Surtek Lawn Mower manuals