swamp SDM16i User manual

Product Manual
SDM16i
16 Input Digital Mixing Console
A mixer for the modern age, the SDM16i includes software that connects via Wi-Fi or Ethernet and can
be controlled by any device on any web browser with no app to download and up to 10 simultaneous
users. Intuitive mixing software with Parametric EQ, Compression, Noise Gate, 2 FX channels. Change
the way you mix today.
Digital Wifi Mixer
1

SDM16i Product Manual
Overview:
1. Inputs 1 to 2 - Combo XLR / ¼” TS Jack - Hi-Z (¼”), Balanced (XLR)
The first channels have Hi-Z ¼” inputs designed for connecting guitars directly with a guitar
lead. Ideal for electric-acoustic guitars and bass. The XLR input can also be used instead, for
extra microphone channels.
1A. Inputs 3 to 16 - Combo XLR / ¼” TRS Jack - Balanced
The remaining channels from 3 to 16 all feature a Line Level ¼” TRS jack inputs designed for
connecting any line level signal such as outputs from keyboards, electronic drum machines,
DJ mixers, CD players etc. Again, the
2. AUX Outputs - Auxiliary XLR Outputs
The 4 individual balanced XLR line level AUX outputs allow for separate mixes to be created
2

SDM16i Product Manual
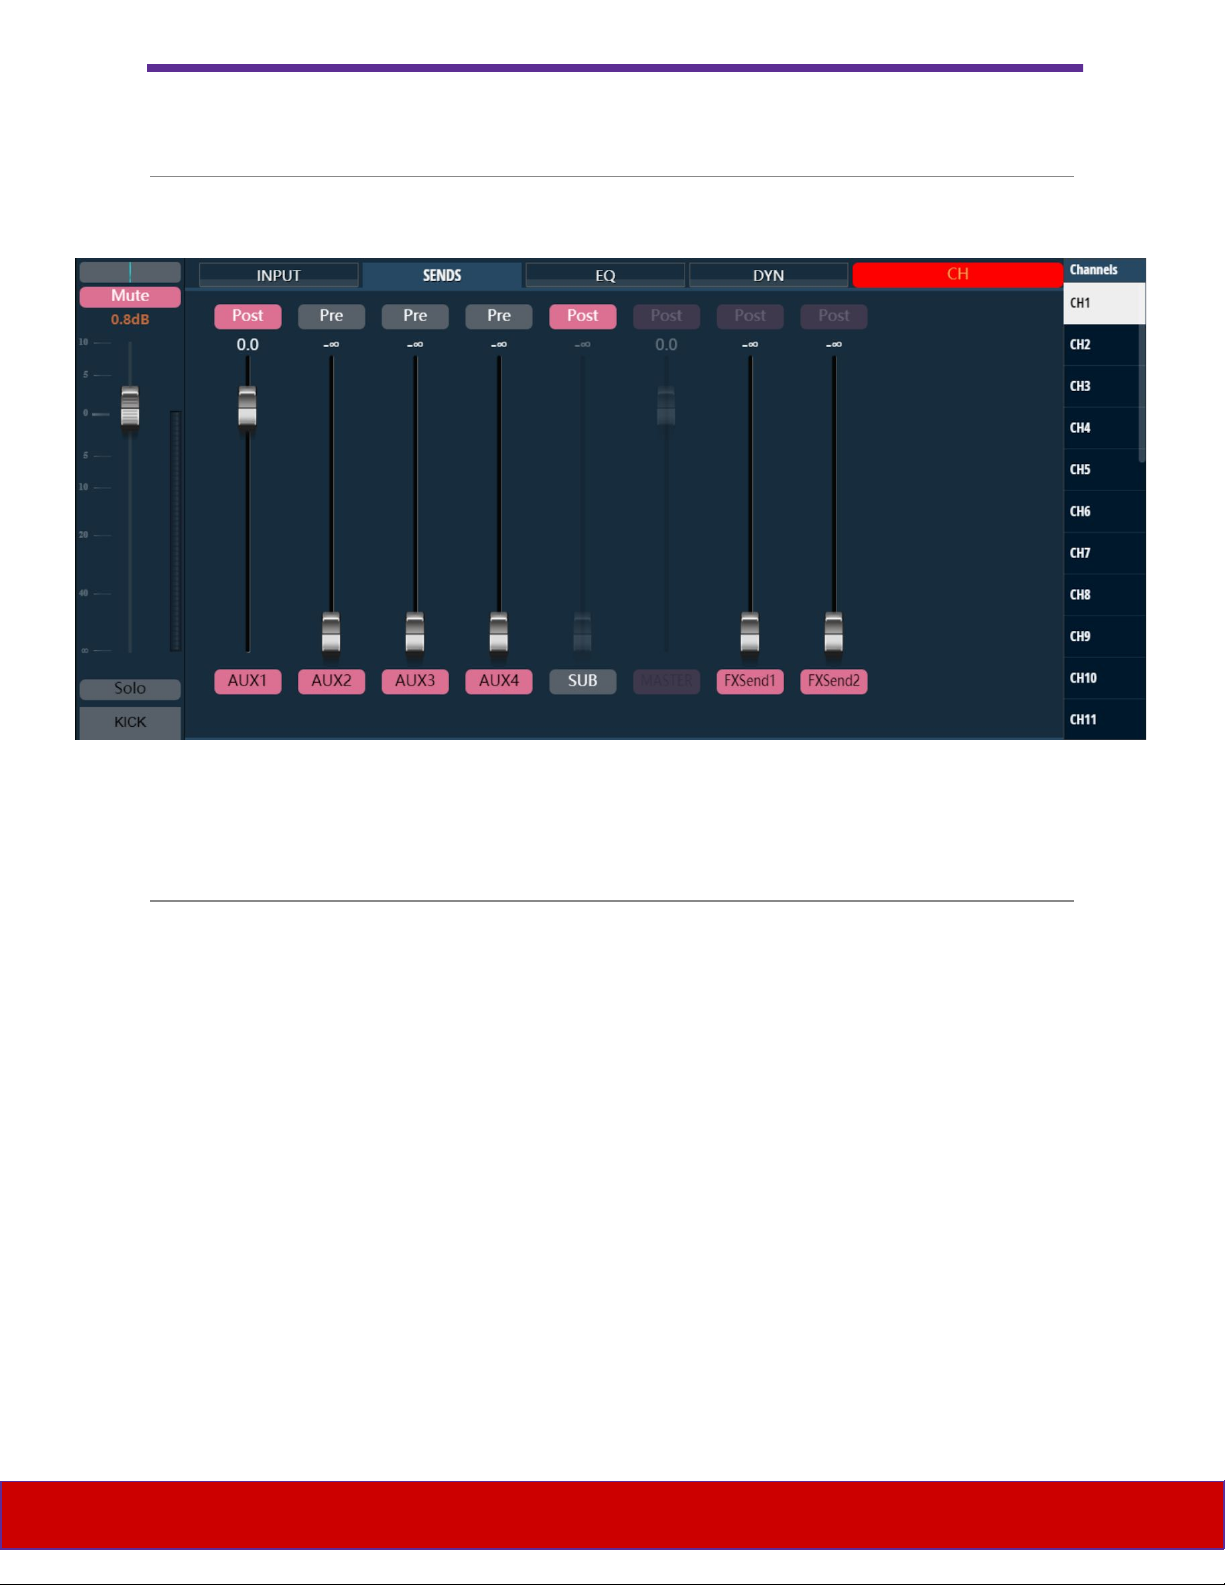
and often sent to foldback speakers, and used to send separate mix and crossover EQ setting
to subwoofers. Select Pre or Post fader and apply parametric EQ and compression/limiting for
each AUX channel.
3. Main Outputs - XLR and ¼” TRS
Featuring balanced line level XLR and TRS output connection options, both outputting the
main left and right channel signal. Connect these to your FOH (front of house), full range
speakers. Use parametric EQ to tweak the final output to suit the room, and add hard
compression as a form of a limiter to squash peaking signals.
4. Main Output Volume Control
Set the main output to the unity setting at 1 o’clock, or tweak to suit your speaker system or
venue. Also maintains a hands-on option to control the main output if required.
5. Headphone Amplifier and Volume Control
Connect any headphones into the headphone amplifier ¼” TRS output to monitor the main
output, or change settings to monitor Solo mode selected channels and even FX wet signals so
you can get than reverb setting perfect. Utilising Solo functionality, the headphone channel
can also be used as an additional AUX output, but be mindful to setup the headphone output
as to not overload a line level input (i.e. usually a 2 o’clock setting is enough).
6. LED Meter Strip
Clearly lit LED lights flash to indicate signal level for the main output. With LED 11 frequency
levels going up to +10dB. Will display the same as the main output within the software.
7. Wireless and Wired Connectivity
Flick between using the in-built W-Fi hotspot or use an Ethernet cable to connect to an
external router, existing network or seperate hotspot device. The plug and play ability of the
Wi-Fi hotspot, with reliable range of 20m is great for on stage performers and small venues.
Larger venues and live mixing engineers should consider connecting to existing networks or
network extenders with a wider Wi-Fi range. A device connected to a router via ethernet also
gives a completely wired connection that eliminates any potential for any software dropouts.
8. USB Port for Playback and Stereo Recording
A USB stick or flash drive can be connected to either playback music into the individual player
channel of the mixer, or record the main left and right signal from the mixer. Also very useful
when mixing yourself as a performer, as you can for example record a take of verse and then
move into the audience area and playback the recording to hear the mix and even make
EQ/compression adjustments in the player channel to tweak the sound live, which you can
then replicate on the appropriate channels.
9. SPDIF Digital Audio Input and Output
Interface with any digital device that has SPDIF input/outputs. The SPDIF input has its only
channel within the mixer software, again with EQ, compressor setting options. The SPDIF
3

SDM16i Product Manual
output is of the main left/right channels.
10. Antenna
A fixed antenna that can we raised when in being used in Wi-Fi mode or collapsed and locked
in when not in use.
11. 48V Phantom Power LED
Indicates that 48V phantom power has been selected for at least one of the channels. A clear
icon also displays on each channel in the software when phantom power is selected.
Hookup Example:
1. Wired or Wireless - Ethernet Connection via Router
Connect an ethernet/network cable to your router to enable control of mixer from any device
4

SDM16i Product Manual
connected to the router’s Wi-Fi, including both wired and wireless hotspot connections. The
SDM16i software runs on HTML5 is accessible through any modern browser. User maintains
access to the internet connection of the router.
2. Wireless Wi-Fi Hotspot Connection
Switching to WiFi mode turns on the inbuilt Wi-Fi router hotspot inside the unit, enabling any
Wi-Fi enabled device to connect to the mixer wirelessly, without the need for an external
router.
3. Hi-Z Instrument Inputs
Channels 1 and 2 feature Hi-Z / high impedance inputs on the ¼” jacks, acting like an in-built
DI box, allowing direct connection of guitars and instruments with hi-z pickups. Suited for
connecting acoustic/electric and bass guitars, though just like for DI’s be mindful to turn your
instrument volume down from 10, to ensure you are not overloading the input, especially for
active bass guitars.
4. Electric Guitar with Amplifier Mic
While the electric guitar could be plugged in directly to the Hi-Z inputs on channels 1/2, a
better way to capture the sound of your sound for mixing through the PA, is to mic up the
guitar amp to capture the full sound of your rig. Using an instrument mic like the iSK DM-57 is
a great option.
5. Keyboard via DI Box or Direct ¼” Connection
The combo jacks of channels 3 to 16 feature ¼” TRS line level inputs, suitable for connecting
most keyboards via their ¼” jack outputs. However, due to a keyboard’s connection to 240V
wall power, ground hums can arise especially if the mixer and keyboard are connected to
different power circuits. By using a passive DI box such as the SWAMP DB-1, a transformer is
adding to the signal removing ground loops while also converting the signal to balanced, mic
level for input into the mixer using XLR cables.
6. DJ Mixer - ¼” Line Level Inputs
The line level outputs of DJ mixing desks, either RCA, ¼” or XLR, can be connected directly into
the balanced ¼” TRS inputs (sitting in the middle of each combo XLR/Jack connector). Any
device outputting a line level signal can be connected in this way. Utilise our wide range of ¼”
TRS to RCA/XLR/Jack linking and patch cables. Pan the channels left and right respectively, to
get true stereo sound.
7. Mic Up Drum Kits
With 16 channels, each with a mic preamp, there is no excuse not to mic up the drum kit.
In-built dynamics and EQ on each channel allows for detailed mixing and you can save the
scene once setup, so consider a full mic setup. Each channel as 48V phantom power for
overhead condensers.
8. Headphone Monitoring
With a physical volume control, use to monitor your signals before sending them through the
5

SDM16i Product Manual
main outputs. Using the solo functionality allows for monitors of individual channels, or
groups of selected channels. Can also be used as additional output if required, though turn
down output volume to 3 o’clock if connecting to line inputs on speakers.
9. Smartphone / Laptop Audio Playback
Plug in any smartphone, tablet, laptop or any device with a 3.5mm headphone output. Using a
3.5mm TRS to dual ¼” cable a user can connect to 2 channels and by panning each left and
right in the software a true stereo input is created.
10. Foldback Monitors and FOH Speakers
Connect your FOH (Front of House) speakers to the Main left and right outputs. Balanced XLR
and ¼” TRS outputs are given, wired in parallel, allowing using to the connector of preference.
The extra output enables the main signal to be sent to additional speakers or devices. Each of
the 4 AUX balanced XLR outputs carry signals that can have uniquely mixed signals sent to
foldback monitors or in-ear systems. Use balanced inputs on your speaker where possible for
a balanced signal connection to avoid noise picked up along the cable for mixer to speaker.
11. Microphones
Vocal microphones can be connected to any channel from 1 to 16, dynamic and condenser
microphones are supported with 48V phantom power on each channel.
Control Software:
Utilising HTML5 technology, any device with a modern web browser can use the SDM16i control
software. That means and smartphones, tablet, laptop or desktop, whether they are Windows, MAC or
Linux, all simultaneously with up to 10 users at a time.
Requiring no app to download or install, the software is reliable, highly stable due with no app that
can crash. If you close the browser manually or it happened to close unexpectedly, the mixer will
continue to operate with its prior settings to the interface page being closed.
Access to mixer control page is through a simple URL that is first loaded through a fixed IP Address,
and be latter recalled in your browser by typing any part of ‘WIFI-MIX’ into the URL bar, or simply save
a bookmark link.
Main - Channel Overview
TBA - IPAD / IPHONE size selection
6

SDM16i Product Manual
1. Select Display Format Style
iPad display format is designed for larger screens, and has a ‘split screen’ setup where faders are always
viewable on the bottom half of the screen. iPhone format is for smaller screens, where there is no split
screen format and user needs to toggle between the display for ‘editing’ and the main display for
controlling multiple faders.
2. Touch CH1-8 to view the channel strips for channels 1 to 8
This view shows the larger display size suited to desktops, tablets and iPads. Allowing a ‘split screen’
where the bottom half shows faders top half available for other features and channel control options.
Ideal if fast access to faders is required.
7

SDM16i Product Manual
3. Touch CH9-16 to view the channel strips for channels 9 to 16
On each channel strip (1 to 16) the user has the ability to touch on each of these action buttons; Gain,
Phantom Power, Polarity, Channel Linking, Noise Gate, Compressor, Sends, Panning (Left / Right), Mute,
Solo, and Fader.
The user can also touch anywhere on the channel strip to select the channel, before proceeding to the
edit page which displays larger buttons and colour coding options.
8

SDM16i Product Manual
4. Touch BLUE ARROW button to expand or collapse the channel faders
To allow more precise fader control, toggle the expand/collapse button.
Phone Display Format:
5. Phone Display Version - Touch CH1-8 to view the channel strips for channels 1 to 8
Similar to the larger screen display option but without the ‘split screen’ ability and layout is better
9

SDM16i Product Manual
suited to smaller touch screen devices. Options are down the right-hand side and click on the channel
name/number to enter edit mode.
Phone Display Format:
6. Phone Display Version - Touch CH on top bar to view channels selector on side-bar
Ideal when add settings to multiple channels allowing a simple way to quickly jump through channels
while maintaining the same view.
10

SDM16i Product Manual
Channel Strips Options
7. Touch EDIT on the top menu to enter edit mode
The channel currently selected channel is displayed at the top-right of page, touch on the fader section
to change channel. Adjust the gain with the fader and select other options including colour coding for
the channel strip. Move easily to adjust Sends, EQ and Dynamics though the buttons below the channel
number.
11

SDM16i Product Manual
Phone Display Format:
8. Touch SENDS to adjust the channel volume sent to AUX and FX sends
Control the volume of each channel, sent to each of the 4 AUX outputs and 2 FX processors. On/Off
control to mute the output, and Pre/Post button for the AUX channels to choose whether the main
channel fader affects the output. Also select to add the signal to the SUB (internal group) channel.
12

SDM16i Product Manual
example iphone format image:
9. Touch EQ to adjust the Parametric EQ settings for each channel
Use one of the factory preset settings, or modify each of the 4 parametric EQ points and HPF and LPF to
your own desire. Once your done, you can save your ideal setting and recall for future use. To change
the Q value, currently a touch screen must be used. Use 2 fingers and move inwards to outwards to
adjust.
13

SDM16i Product Manual
example iphone format image:
10. Touch DYN to adjust the Dynamics settings for each channel
Use one of the factory preset settings, or modify the Noise Gate and Compression to suit your
instrument or venue. Simple and effective noise gate controlled by a single fader. Signal blends in
smoothly once volume exceeds the date dB. The compressor has threshold and ratio settings are
changed by touching/clicking and dragging the 2 points on the display. Attack and release settings are
14

SDM16i Product Manual
then adjusted with faders, and a final gain fader usually to provide ‘make up gain’ for heavily
compressed signals.
11. Touch OUT to adjust the Output channel options
Touch on any of the faders to select the output channel (MASTER selected above). EQ and Dynamics can
be added to the MASTER, AUX and FX outputs. (Note, HPF and LPF settings not available in EQ settings
for outputs)
15

SDM16i Product Manual
12. Touch METER to view the signal levels
Touching METER will display the signal levels for every channel in the top half of the display section.
Channel faders displayed at the button, correspond the channel strip selection from top menu (i.e. OUT
is selected, so output faders displayed).
16

SDM16i Product Manual
13. Touch AUX1 to change the Fader displayed on right-hand side-bar
The 8 buttons displayed on the right allow the user to easily change the output fader that is displayed
on the very right of the channel strip.
14. Touch PLY-FXR to adjust the USB Media Player, SPDIF and FX channel options
All the controls possible on channels 1-16, are also available for the USB media player, SPDIF input and
FX processor returns.
17

SDM16i Product Manual
15. Touch FX to adjust the Effects settings
Select any channel, then touch on the FX button from the top menu to load the effects processor
options for that channel (MASTER channel selected above). Select whether to use the FX1 or FX2 effects
engine and bus. Then touch on EFFECTS button on the right side menu to load the 3 FX options; Reverb,
Delay and Chorus.
18

SDM16i Product Manual
16. Touch PRESETS to select factory Preset Effects
Similar to EQ and Dynamics, a factory preset options can be selected modified and saved as User
setting, for later recall. Above screenshot shows a range of the factory Reverb settings.
19

SDM16i Product Manual
17. Touch PRESETS to select factory Preset Effects
Above screenshot shows a range of the factory Delay settings. Note that using the Solo mode for FX, you
can monitor the ‘wet signal’ (effected signal only) in headphones to get the ideal delay sound.
18. Touch SCENES to save or select previously saved scenes
Scenes allow the user to save settings from all across all the mixer for later recall. This allows bands
create their ideal mix and then to save a scene for recall when playing with the same setup and/of
venue. Likewise, venue using the SDM16i as an in house mixer can save scenes for different types of
acts, to give some consistency to sound and prevent musicians from playing too loudly of harshly.
20
Table of contents
Other swamp Music Mixer manuals