161
Safety Information
3
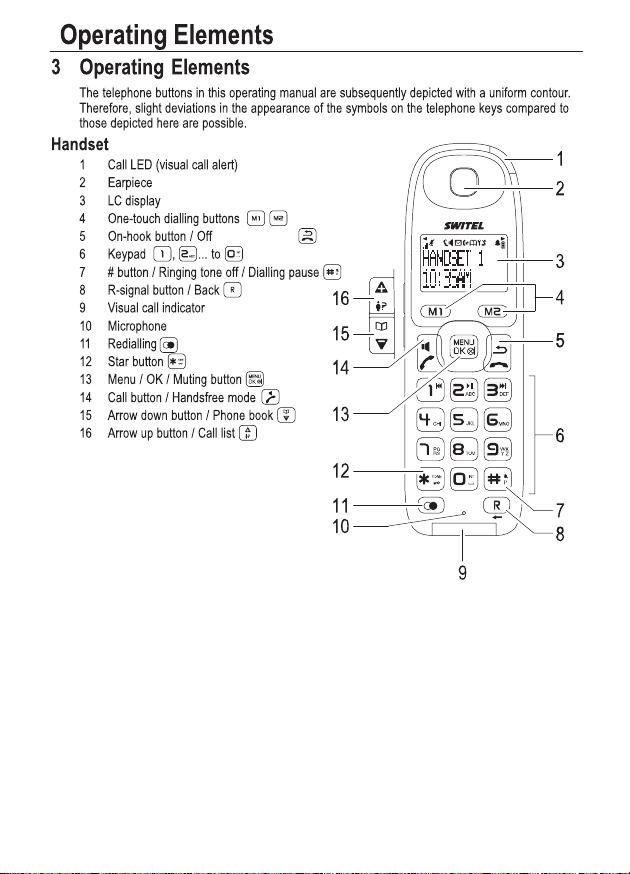
1 Safety Information
Please read this operating instruction manual thoroughly.
Intended use
The telephone set, comprised of handset(s) and base station, is suitable for telephoning within a
public telephone network system. Any other use is considered unintended use. Unauthorised
modification or reconstruction is not permitted. Under no circumstances open the device or com-
plete any repair work yourself.
Power failure
The telephone cannot be used to make calls in the event of a power failure. Always keep a wired
telephone which operates without an external power supply available in case of emergency situ-
ations.
Installation location
The installation location is a decisive factor to ensure trouble−free operation.
Prevent excessive exposure to smoke, dust, vibration, chemicals, moisture, heat and direct sun-
light. Do not use the telephone in potentially explosive areas.
Do not place the telephone (base station) in the direct vicinity of other electronic devices such as
TV sets, microwave ovens, refrigerators etc., because they can mutually affect each other. Do not
place the telephone (base station) near another phone. Ensure that no large metallic objects, such
as a refrigerator or a mirror, are located between the base station and handset. Walls, too, can im-
pair the connection between the base station and handset.
Position the telephone (base station) near a suitable power socket and telephone line socket. Pay
attention that the cable cannot be tripped over!
Attention: The cables must not be extended!
Place the telephone (base station) on a level, non−slip surface. Normally, the device footpads do
not leave any marks on the surface where it is located. However, due to the diverse types of paints
and surfaces which come into question, it cannot be fully ruled out that the footpads will leave
marks on the surface on which it is located.
The higher the base station is located (even inside a building), the further its range.
Power adapter plug
Attention: Only use the power adapter plug supplied because other adapter plugs
could damage the telephone. Ensure access to the power adapter plug is not obstruc-
ted by furniture or such.