SX BLUE GPS SX PAD User manual

- SXPad –
User Guide

Table of Contents
Chapter 1 –Introduction
Foreword
Inventory
Safety and maintenance
Item list
Characteristics
Quick Start
Rebooting the system
Turning off your PDA
Chapter 2 –Operation
Instrument and software
Front view
Below view
View of the backside
Button of the display
Parameters of the buttons
Calibration and use of the touchscreen
Chapter 3 –Managing battery life
Battery charge level
Managing battery life and standby mode
Recharging the battery
When to replace a battery
Important notes concerning heat
Chapter 4 –Establishing Connections
Establishing connections
USB connection
Wireless connection
Annex A –Declarations
Declarations
European notice
Safety Instructions
Disposal of the battery
Warning
Regulatory information / Notice of Non-responsibility

Table of Figures
Fig-1. Initial start-up of SXPad
Fig-2. Window confirmation of power shut-off
Fig-3. Front view of the SXPad
Fig-4. Bottom view of the SXPad
Fig-5. Back side of the SXPad
Fig-6. Icons to follow in order to configure the buttons
Fig-7. Window of buttons
Fig-8. Icons to follow in order to calibrate the screen
Fig-9. Calibration of the touchscreen
Fig-10. Battery charge levels
Fig-11. Window for managing Standby mode

Chapter 1 –Introduction
Foreword
Congratulations for purchasing this SX Pad Tablet PC. This PDA is a complete portable device with
fully integrated wireless connectivity. With this instrument, you will be able to organize and access
to your important personal and professional information in the field in the in your pocket or in the
palm of your hand .
This manual contains all of the information necessary that you will need to configure and start using
your SX Pad Tablet PC. It describes all of the main functions of the Tablet PC in a simple but detailed
way.
Inventory
This PDA was created to offer you many years of productivity and to enjoy using it. Use this section
to keep the details of your purchase for future reference. These pieces of information will be
necessary if you need to send your Tablet PC for repair under warranty. Do not do not forget to
update this section as you add options to your Tablet PC.
Purchase date:
Location of Purchase:
Name of Reseller:
Address of Reseller:
Phone number of Reseller:
Website and email address:
Contact Person:
Model number:
Serial number:

Safety and maintenance
You can use your SX Pad Tablet PC in many different environments. However, to guarantee a long
time use and optimal performances, please take the following safety tips in consideration at all
times:
•Respect all of the warnings and instructions detailed in this guide as well as those that are dis
played on the SX Pad Tablet PC.
•When you are using the SX Pad Tablet PC for the first time, we recommend that you read
carefully the section entitled (Establishing Connection) of this manual and initialize the
battery for optimal battery performance.
•Unplug the SX Pad Tablet PC from the wall socket before cleaning the instrument. Use only a
moist cloth for wiping your SX Pad Tablet PC clean. Never use cleaning sprays, solvents or
any other types of detergents.
•Keep the SX Pad Tablet PC away from heat sources or from areas that are very humid or
dusty.
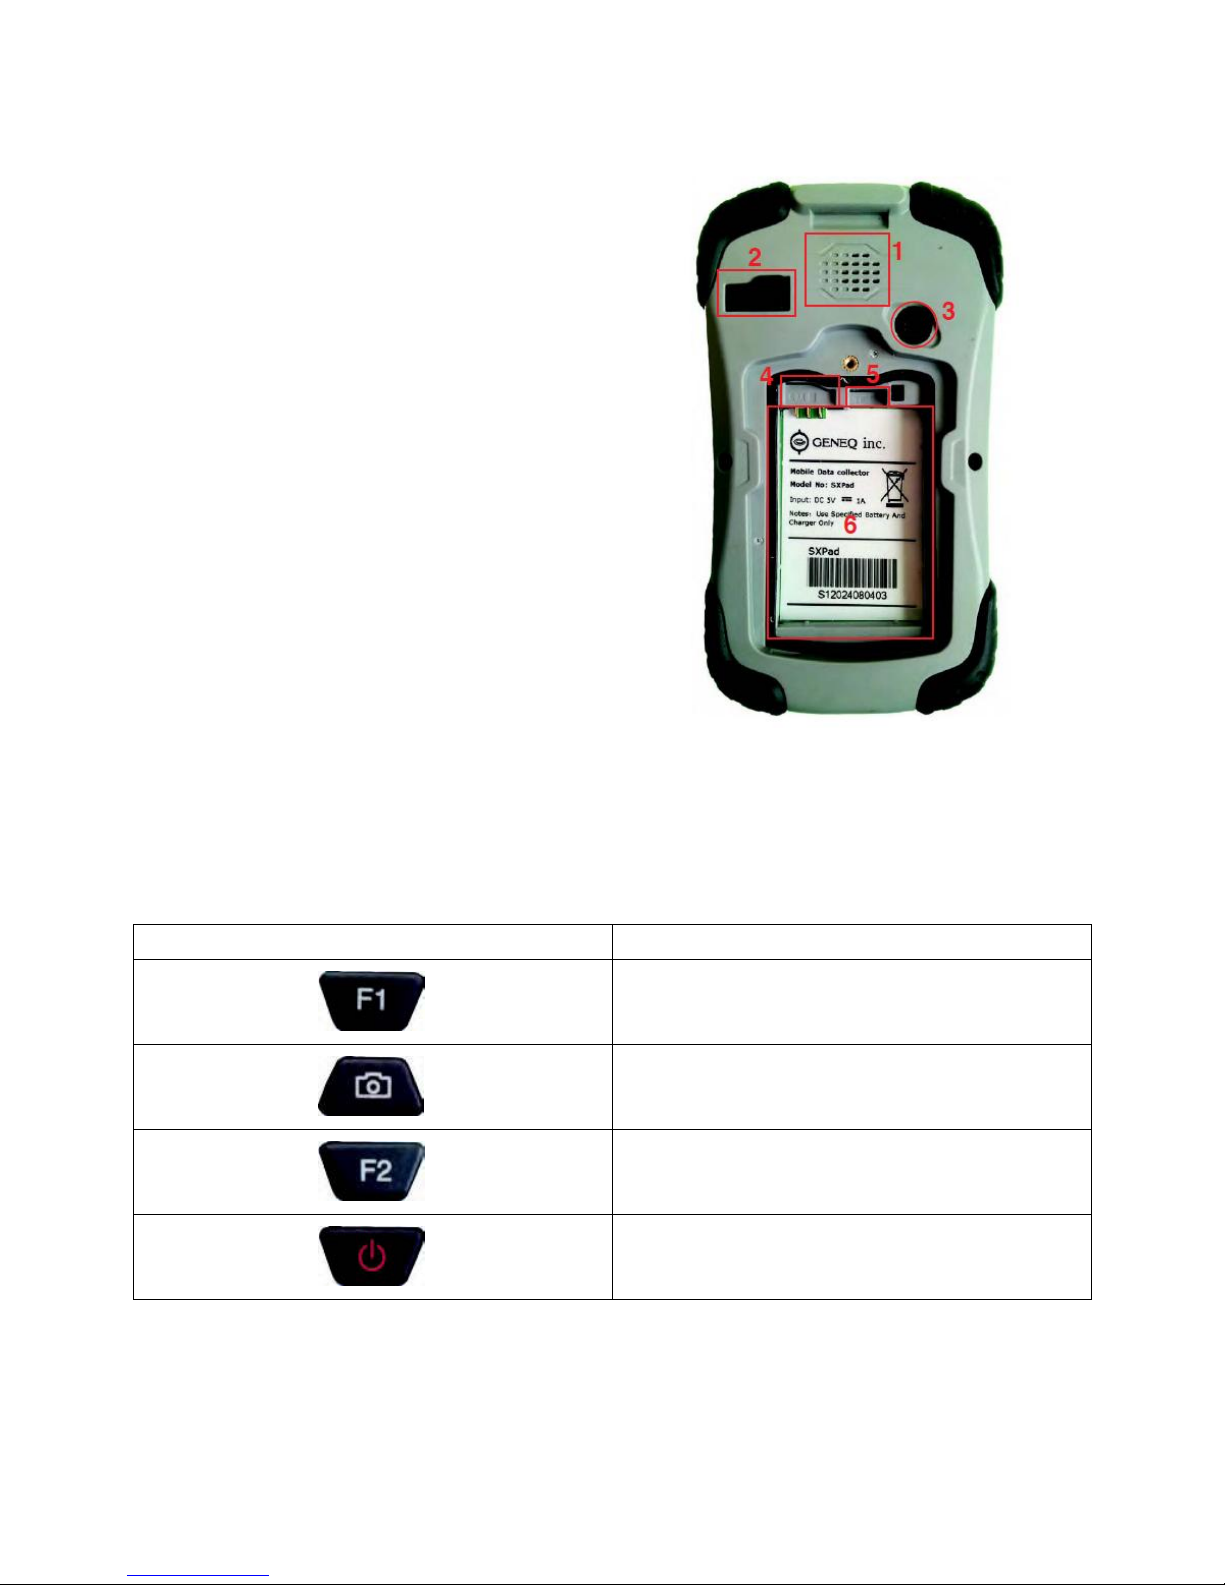
•A sticker, underneath the Tablet PC, contains all of the information concerning the electrical
requirements for this unit. These characteristics need to be respected at all time and under
all conditions. If you are unsure of the electrical characteristics of your area, please consult
your reseller or electrical distribution company.
•Do not walk on or rest nothing on the power cord of the unit.
•If you are using the SX Pad Tablet PC with an electrical extension power cord, make sure that
the total electrical intensity for all of the products that are plugged into the electrical
extension power cord does not exceed the maximum electrical intensity of the electrical
extension power cord or wall socket.
•Never insert any foreign objects into any of the ports or plugs of the Tablet PC. Dangerous
voltage exists within this unit. It is powerful enough to cause electrical shock, start an
electrical fire and/or damage the unit.
Item list
Please verify the content of the package when you open it for the first time. If your package is
missing one or more elements or damaged, please notify your reseller immediately. The content of
your package should contain the following:
Standard
• A functional PDA
• A battery (in its own box)
• A USB to mini USB transfer cable
• A handle with stylus pen
• A wall socket to USB connector (with a worldwide adaptor)

Options
The following elements are usually options but some resellers can have included them in the
standard packages. Certain elements cannot be included in some countries or certain resellers have
decided to not offer some of them.
•Clear screen protector ......................................... GESXPAD101
•Cigarette lighter power supply ............................ GESXPAD109
•Car window mount .............................................. GESXPAD110
•USB to RS232 Serial cable .................................... GESXPAD111
•4GB or 8GB micro SDHC memory card ................ GESXPAD113
•Pole mounting clamp........................................... GESXPAD114
•Soft carrying case................................................. GESXPAD115
•
Warning: When you purchase one of the accessories listed above, buy only the accessories that are
recommended for your PDA. The accessories above are proprietary items. Your reseller can order
those recommended accessories. If you are using accessories that are not recommended for your
PDA, they could cause a malfunction of your PDA or emit and receive electromagnetic radiations
above the regional limits. If the accessories are proprietary items, for example any USB adaptors,
Bluetooth receivers, make sure that those accessories can function with the PDA before purchasing
them. Your Reseller can also help you choose brands and reliable models.
Characteristics
With this PDA, you will carry with a large amount of technology with you such as the following
characteristics:
•3.7” TFT color Touchscreen, VGA 480x640, readable in full sunlight;
•GEOHT processor, 624MHz;
•512 MB of RAM;
•256 MB of memory (expandable by inserting a memory card);
•OS Windows mobile 6.5;
•Li-ion battery 3000mAH;
•5.0 Megapixel Camera with autofocus;
•Fall and vibration MIL STD 810 G, IP65;
•Operating temperatures (-20º to +60ºC; storage temperatures -30º to +70ºC);
•Weight: 275g;
•Dimensions: 97 x 160 x 30mm;
•Internal GPS chip type SiRF Star III (2-5m of precision);
•Integrated 3G modem, Wi-Fi and Bluetooth technology;

Quick Start
Opening your SXPad for the very first time
1
2
3
4
Fig-1. Initial Start-up of the SXPad
1. Unscrew the back panel of the SXPad, insert battery into the PDA and close back panel.
2. Press for a few seconds the power button to start the PDA. You will then see the start-up
screen.
3. Windows Mobile will ask you to configure it at the initial use (You will need to calibrate
the touchscreen, choose potential WIFI networks, etc.)
4. Once the initial configuration has been completed, you will be taken to the home menu of the
Windows Mobile software
Remark: The battery cannot be fully charged on its first use.
Please ensure to complete a first discharge/recharge cycle (i.e. make sure
to deplete the battery completely of its charge and recharge it fully on its first use).
Rebooting the System
Windows Mobile 6.5 is already pre-configured on your PDA and has already all of its drivers. If you
decide to restart Windows Mobile, it is possible to restore to the factory settings of your system
(this is possible because of a restore hidden partition) by pressing the “F1” + “F2” buttons at the
same time when booting up your instrument.
Warning: The restoration of the system will reinitialize the system to its factory default
configuration and will lead to the complete loss of your data in the internal data of your PDA.

Turning off your PDA
Like classic computers, the PDA has components that have low power consumption that allows
them to be in stand-by mode for many hours without having to shut-down your PDA. However,
during extended periods of non-use, we recommend that you turn off your instrument.
To turn-off completely you instrument, press for a few seconds the button marked “power”. You
will then see the following message appear:
Fig-2. Window confirmation of power shut-off
Press on “Yes”, the instrument will be shut-off after you hear a beep.
Stand-by Mode
In order to simply put your PDA in stand-by mode (i.e. turn off screen et put in processes on pause),
simply press once and quickly the button marked “power”.
To start back where you left off, simply press the button marked “power”.

Chapter 2 –Operation
Instrument and software
This chapter will talk about the different components and controls of your PDA, including the
instrument, software, and audio and video components.
Operation
Before using your PDA, please read carefully this chapter in order to familiarize yourself with the
main components of your system.
Front View
1. Microphone
2. Touchscreen display
3. Button “F1”
4. Button “Camera”
5. Button “F2”
6. Button “Power”
Fig-3. Front view of the SXPad
Bottom View
1. USB port
Fig-4. Bottom view of the SXPad

Back View of the SXPad
1. Speaker
2. SMA for external GPS antenna
3. Camera
4. SIM card slot
5. MicroSD card slot
6. Location of the battery
Fig-5. Back side of the SXPad
Buttons on the Front of the SXPad
4 buttons is located on the front of the SXPad, their default functioning are as follows:
Button
Function
Button “F1”
Start Menu
Button “Camera”
Taking a picture
Button “F2”
OK/Close
“Power” Button
Press to turn-on/turn-off PDA or on stand-by
mode

Configuring the Buttons
It is possible for you to configure the buttons mentioned in the previous page with other
parameters. In order to accomplish this, go to Windows ->Settings ->Personal ->Buttons.
Fig-6. Icons to follow in order to configure the buttons
You will then arrive at the following window:
Fig-7. Window of buttons
Click on the column “Button” of part 1 to select the button that you want to modify, then choose
the action that you want this button to accomplish in the drag-down list in part 2
Calibration and Use of the Touchscreen
The touchscreen is a thin membrane on top of the LCD screen that responds to mechanical pressure
on the surface of the screen. If you notice that the tip of the stiletto pen at the point of contact on
the screen does not correspond to the cursor, you can recalibrate the screen.

Use of the Touchscreen
The surface of the Touchscreen being sensitive to pressure, it is possible to use your thumb or
stiletto pen to make it function.
To double-Click using the stiletto pen, tap twice in a row very quick on the screen.
To right-click with the stiletto pen, press the screen for about two seconds. You will then see a circle
of points appear. When it becomes full, the menu will appear. You can then let go of the pressure to
press on the item that you want to select in the menu.
Calibrating the Touchscreen
When the tip of the stiletto pen repeatedly is not aligned with the cursor, it is a good idea to
recalibrate the touchscreen. In order to perform this task, go to Windows -> Settings -> System ->
Screen.
Fig-8. Icons to follow in order to calibrate the screen
Under the tab “General”, press on the button “Align Screen”. You will then see the following
window:
Fig-9. Calibration of the Touch Screen
To calibrate the touchscreen properly, aim the stiletto pen at the centre of the crosshair on the
screen at each of its location. Once the 5 points of calibration are performed, the procedure is
finished.

Chapter 3 - Managing battery life
Battery Charge Level
You can check the battery charge level by consulting the battery charge indicator level of Windows
located at top of the notification area. It is also possible to see the battery charge level by going to
Windows -> Settings -> System -> Power. You will see at that point a bar showing the battery charge
levels left.
Fig-10. Battery charge level
Managing Battery Life and Standby Mode
In order to save the battery, you can put your PDA in standby mode (turn off screen and put
processing on standby) by pressing the “Power” button once and quickly.
To come back to where you left off, press again on the “Power” button.
To minimize the loss of energy, the PDA will automatically put itself on standby mode to limit the
power consumption of the screen. It is possible to manage those parameters by default and to
manager power consumption strategies by using Windows®. To be able to perform those tasks,
please go to Windows -> Settings -> System -> Power. Under the “Advanced” tab, you can choose to
either use or not the automatic standby mode and when the standby mode should be activated
when the power source is using the battery or is using an external source of power.
Fig-11. Window for managing Standby mode

Recharging the Battery
When you will plug the wall adapter to recharge your battery in a wall electrical outlet, the charging
of the internal battery will be start automatically. During the recharging period of the battery, the
battery icon will be replaced by a wall plug to signal that the battery is being recharged.
The connection via a USB port on a computer allows you to recharge as well the internal battery of
your PDA. At the end of the charging period, you will see the icon as a battery to signal that the bat-
tery is fully charged.
If the battery is complete empty, you will need to wait some time before being able to turn on your
PDA. An icon of a battery with a red exclamation mark in its centre will appear to signal that your
battery has no more charge.
When to Replace a Battery
The capacity of storage of the battery diminishes over time after using it. We recommend that you
replace the battery only once the length of time with which you can operate the PDA with a full
charge decreases significantly.
Replacement of the battery
1. Unscrew the back panel,
2. Take out the battery by lifting slightly and sliding the battery from top to bottom,
3. Align the connectors of the new battery and then slide the battery from bottom to top,
4. Screw back the back panel.
Warning: Before you use the PDA, please ensure that the back panel is well screwed and tight
as if it is not well screwed back on, the battery could move during and will cause
the PDA to shut-off and thus any data not saved will be lost.
Important Notes Concerning Heat
The processor of the PDA has been specifically designed for low energy consumption and to
produce little heat. However, if you will use it in a warm environment, the temperature can
increase. If the temperature of the PDA keeps on increasing, the processor speed will decrease. This
situation could probably cause a loss of performance of the PDA.
Warning: The Lithium-Ion type batteries must never, under any circumstances, be left exposed to
extreme heat or open flames. If the batteries are left in an overheating mode for any prolonged
length of time, this could cause a dramatic loss of battery life. Avoid situation like leaving the PDA
on a hearing radiator or exposed to direct sunlight for any prolonged length of time

Chapter 4 –Establishing Connections
Establishing Connections
Your PDA has various connectors and wireless connections capabilities. This chapter will show you
how to manage the various ways of connecting your PDA to the various connections possibilities.
USB Connection
Wireless Connection
• Wi-Fi
• Bluetooth
• Mobile network

Annex A –Declarations
Declaration
Declaration from the Federal Communications Commission
This equipment has gone through testing and has been found to conform to the limit imposed to
digital peripherals class B under section 15 of the FCC rules.
These limits have been created to give reasonable protection against harmful interferences in
residential installations. This instrument generates, use, and can emit radiofrequency energy, and if
is it not installed or used as per the instructions supplied, can produce interferences, which can
affect radio communication. However, no guaranty is given that it will not cause interference to an
installation. If this equipment produces harmful interferences during the reception of radio or
television waves, which you can easily observe by shutting off and turning on the equipment, we
suggest that you take one or more of the following preventive measures:
1. Reorient or move the receiving antenna.
2. Move the equipment away from the receiving antenna.
3. Plug the equipment in a wall socket other than the one on which the receiving antenna is
plugged into.
4. Consult with the distributor or a certified radio/Television technician for assistance.
You will need to use armored connection cables and wall jack with this PDA to guarantee that this
equipment conforms to the radiofrequency energy emissions standards. Any modifications or
change without the manufacturer’s authorization of this equipment will void the permission to use
this instrument.
Warning : Any modifications without the explicit permission to do so by the
manufacturer of this product will void the permission to use this instrument.
Warning concerning the exposure to radiation. This equipment respects the exposure limits to
radiations defined by the FCC pour an uncontrolled environment. This equipment should not be used
located near or used with another type of antenna or emitter.

Declaration on the Exposure to Radiation
This equipment respects the exposure limits to radiations defined by the FCC pour an uncontrolled
environment. The users must follow the instruction guide to be in compliance with radiation expo-
sures. To stay in compliance with the radiation exposure set and defined by the FCC, the user has to
follow all of the instructions in this manual.
According to the norm FCC 15.407(a), the instrument is set to work with the range of frequency be-
tween 5,15 and 525 GHz under all normal working conditions.
The normal use of this instrument is limited only to indoor use.
The availability of certain specific channels and/or range of operational frequencies depend on final
countries of use and the firmware will be programmed in the factory, which will correspond to the
country of destination. The settings for the firmware are not accessible by the user.
Declaration of Compliance
This instrument complies with section 15 of the FCC rules. Its functioning falls under the two
following conditions:
•This equipment must not cause harmful interferences
•This equipment must accept any interference received, including those that might trigger a
malfunction
Declaration of Compliance for the EU
For the following equipment: Module 802.11a/b/g/n WLAN integrated to the tablet
This equipment has been declared in compliance with the directives of the Council of Member
States concerning the electromagnetic compatibility.(2004/105/EC), the directive for lower tension
(2006/95/ EC) and to the procedures for the European Council directives (1999/5/EC).
The equipment passed the tests. The tests were done according to the European standards:
• EN 300 328 V.1.4.1 (2003-04)
• EN 301 489-1 V.1.3.1 (2001-09) / EN 301 489-17 V.1.1.1 (2000-09)
• EN 301 893 V.1.2.2 (2003-06)
• EN 50371 : 2002
• EN 60950 : 2000
Regulatory Declarations: (R&TTE/WLAN IEEE 802.11b & 802.11g). The European norms demand a
power of transmission radius maximum of 100mW EIRP and range of frequencies from 2,400-
2,4835 GHz; in France, this equipment must also be restrained to a range of frequencies from
2,4465-2,4835 GHz and an use indoors.

Safety Instructions
To prevent any risk of fires, use only a telephone cable nº26 AWG or bigger.
Important Safety Instructions
When you are using your equipment, the basic safety precautions have to be followed, which are
listed below, to prevent any fire hazards, electrocution or personal harm.
Never use the equipment close to source of water, for example close to bathtub, a sink, washer, in a
humid garage or a pool.
Avoid using this equipment during an electrical storm. The risk of electrocution because of lightning
is very real.
Never use this equipment to notify about a gas leak.
Only use the batteries and power cords indicated in this manual. Never throw the batteries in fire.
They could explode. Consult the local agencies to obtain more information in order to dispose of
used batteries.
Disposal of the Battery
This product uses Li-Ion batteries. These batteries have to be disposed of appropriately. Please get
in contact with your local environmental agency for more information about recycling and disposal
in your region.
Warning
Warning about the Power Adapter:
This tablet was designed to be used with a power adapter having the following model number: Nº
FSP065-RAB
Warning: Before plugging into your tablet any other models of power adapter, please refer to your
reseller so that the reseller may guide you in the choice of an adapter or propose to you a
compatible power adapter. A power adapter not compatible may cause a fire even an explosion of
the batteries.
Warning about the Battery:
There is a risk of explosion if the battery is not well installed into the tablet. Use only a battery of
the same type or equivalent recommended by the manufacturer. Follow the previous instructions
concerning the disposal of the battery.

Regulatory Information/Notice of Non-responsibility
The installation and use of this equipment on a local wireless network needs to be done in accor-
dance with the instructions that is included in the user’s guide that comes with this product. Any
modifications (including antennas) performed on this product without the explicit written
authorization from the manufacturer can result in the loss of permission to use this equipment.
The manufacturer cannot be held responsible for radio or television interference if any
unauthorized modifications are made to the product or because of the substitution of cables, or
modifications not specified by the manufacturer. It is the responsibility of the user to remedy any
interference created by an unauthorized modification, substitutions or attachment of the unit.
Neither the manufacturer, nor the authorized resellers or distributors assume any responsibility for
any damage or violation of governmental rules and regulations resulting of the non-respect of these
directives.
Important Remarks
The declaration of the FCC on the exposure to radiation: this equipment respects the exposure
limits to radiations defined by the FCC for a non-controlled environment. This equipment and its
antenna should not be located or used with another antenna or another emitter.
Requirements Concerning Radiofrequency Interferences
This equipment is limited to an indoor use when we consider that its functioning is in the range of
frequencies from 5,15 to 5,25 GHz. According to the FCC standards FCC 15.407(e), this product has
to be used indoors in the range of frequencies from 5,15 to 5,25 GHz in order to reduce the
possibilities of harmful interferences with the portable satellites systems.
The high powered radars are primary users of the range of frequencies between 5,25 to 5,35 GHz
and between 5,65 to 5,85 GHz. These radar stations can cause interferences and/or damages of this
equipment.
SAR Exposure
This equipment has been tested for its compliance to exposure limits to defined radiation by the
FCC in standard flat configurations.
Have a look at the report for the SAR test that has been uploaded on the FCC website.

WLAN
“In order to minimize radio interferences of licensed services, this equipment have to be used only
indoors and kept far from windows whenever possible. The equipment (or the transmission
antenna) located outdoors has be in the possession of a license.
Remark: Please note that the manufacturer has to guarantee that there is no Ad-Hoc capacity in the
range of frequencies 5250-5350 and 5470-5725 MHz.
For LPD
The use of the equipment is subject to the following two conditions: (1) This equipment should not
cause any harmful interference and (2) this equipment has to withstand any interference received,
as well as interference causing a malfunction
Detachable Antenna
In order to minimize the potential radio interferences for other users, the type of antenna and its
gain have to be chosen so that the equivalent isotropically radiated power (EIRP) is superior to
which is necessary for normal communication.
Table of contents